


|
An incredibly subjective situation. Everyone very clearly has quite subjective opinions about it. I would never come close to accurately describing exactly what happened, nor my rationale. Should never have even mentioned it. Just please believe that I'm a perfectly level-headed, objectively thinking, non-confrontational believer in non-violence capable of making sound decisions on my own. You are all entirely entitled to believe whatever it is you want to about it, and probably already do believe about it. I have no right to ever object to something like that. Just please let's not talk about it any more for the sake of the potential detriment of the thread. For which I take full responsibility.
|
 #
?
Jan 10, 2011 07:37
#
?
Jan 10, 2011 07:37
|
|


|

|
| # ? May 25, 2024 11:55 |
|
|
The Scientist posted:An incredibly subjective situation. Everyone very clearly has quite subjective opinions about it. Yeah. Don't do that poo poo. You are lucky you weren't caught. Let's move on.
|
|
#
?
Jan 10, 2011 09:05
|
|

|
So there I was, enjoying a cigarette in the parking lot of some highway rest stop. I was tired from a long day of driving, so I was just taking it easy, enjoying the sights. I spot this weird dude making sparks over on the other side of the parking lot. I have no idea what he's doing, but it looks mighty suspicious. Running a grinder and filing poo poo, I think he might have been a terrorist making an IED to take out NASA or something. So I try to keep my eye on this character, trying to be all subtle about it because he keeps glancing over his shoulder at me. Real unabomberish. Well, gently caress, I guess I wasn't as subtle as I hoped, because he came over to talk to me. I don't remember exactly what he said, or what I said, adrenaline will do that to you, but I think he propositioned me for some gay sex. After I refused, this crazed bastard pulled a knife and threatened me. I waited for a few minutes so I could call the police and then I took off. Craziest day I've had on this trip so far. Never going to Florida again.
|
|
#
?
Jan 10, 2011 18:47
|
|


|
I learned a valuable lesson the other day. Just because a cutter is stamped .250 doesn't mean it isn't actually .210 and will gently caress up all your layout because you made an assumption in your measurements and now you've blown tolerance by .015. Millin' ain't easy. 
|
|
#
?
Jan 11, 2011 19:28
|
|

|
If the cutter is undersized, can't you just cut it again? Or is it too late for that? Regardless, that sucks.
|
|
#
?
Jan 11, 2011 20:18
|
|
|
I was/am making a fly cutter in a horizontal mill. First step was to cut a notch in the top* for a flat length for set screws. I used a height gauge to set this by touching on the end mill, which put my notch .040 too high on the part. I then used the notch to measure down for a horizontal slot, which wound up being .020 too high, with only .005 tolerance. *part laying on its side, angled at 20 degrees to the cutter This was a cascade of errors. First, not measuring the end mill. Second, not measuring the notch. Third, not cross checking the slot height against the top of the part before cutting. I blame it on being the first week back from winter break, lack of sleep, and it being my first time on the horizontal mill. Everything went so great until I pulled it out of the vise and measured everything.  Should look something like this when it's done. 
|
|
#
?
Jan 11, 2011 22:45
|
|
|
RE: anvil construction- What's the best/easiest/cheapest way to harden the work surface? Right now I'm leaning towards (not that it's based off of anything) a 1-1.5 inch plate of 4140 (with pritchel/hardy-holes cut, if I can manage it), welded to the biggest mass of steel I can scrounge up. I see a lot of people recommending using hardfacing instead and then grinding it flat afterwards, and that would probably be cheaper in the end, but that sounds a lot less durable. Or should I just not care and let it work-harden? I'd imagine I'd have to be pretty careful to not ding the poo poo out of it for a while, but energy return seems to be the biggest factor in anvil design so it intuitively seems like it'd work. Ambrose Burnside fucked around with this message at 16:53 on Jan 12, 2011 |
|
#
?
Jan 12, 2011 16:14
|
|

|
Hard facing welding rod works, but you have to heat up the anvil body a lot in order for it to take the weld and not have the face crack like bad pavement. If you're working with a homogeneous tool steel anvil, you have to heat the whole thing to heat treat it, which for most chunks of steel of around 100 pounds or more takes an awfully big fire, not to mention a crane or some kind of overhead arm to lift it safely. If you're working with an improvised/found anvil, I wouldn't bother hardening it with heat. If it's solid enough, it'll be fine for basic weekend hobby type work. Let me make some more suggestions for the anvil though. Railroad car axle is pretty ideal, get a short length that you can flip up and down. Hammer on the flat face, flip it on its side for doing rounding things, and it's hard as gently caress. Any square bar that is 4x4 or bigger would make a fine anvil too, but you'll want something round to compliment it. I would recommend against a bit of plate for actual forge work. It works really well for Jovial because he's doing sheet metal. If you're putting real force behind your strikes into plate, even 1.5" plate, it will bend and deform eventually. Most important point: You need mass under your hammer to rebound the energy into the work piece. 1.5" might be good for forming, but you will be working a lot harder to get anywhere.
|
|
#
?
Jan 12, 2011 17:49
|
|
|
Is this going to be "the" anvil for your rest of your life, or do you plan to buy a regular one at some point. The answer to this question will dictate how much effort you should put into that project. Personally, I wouldn't worry about it and I'd just start beating red hot metal.
|
|
#
?
Jan 12, 2011 17:50
|
|

|
In other news, this may be the first step towards neat glass anvils. Not really. But it's the first thought that came to mind. It's a cool idea. (yes, I know that the type of glass being produced is not really what you want in an anvil)
|
|
#
?
Jan 12, 2011 18:47
|
|

|
Good, maybe those loving assholes who buy perfectly good antique anvils just so they can stick them in a planter as a "feature" on their lawns will use these glass ones in the future. Total waste of good iron. Ugh.
|
|
#
?
Jan 12, 2011 18:59
|
|
|
quote:"The initial samples of the new metallic glass were microalloys of palladium with phosphorous, silicon and germanium that yielded glass rods approximately one millimeter in diameter. Adding silver to the mix enabled the Cal Tech researchers to expand the thickness of the glass rods to six millimeters. The size of the metallic glass is limited by the need to rapidly cool or �quench� the liquid metals for the final amorphous structure." I don't think they'll be making anvils out of this stuff any time soon. Also it wouldn't be transparent, any more than glass-hard steel. But it's some pretty neat materials science, anyway!
|
|
#
?
Jan 12, 2011 20:07
|
|

|
Yeah probably not. Metallic glass sounds really cool, anyway. Still, I wish people wouldn't buy usable things specifically to let them waste away.
|
|
#
?
Jan 12, 2011 22:24
|
|
|
Slung Blade posted:I would recommend against a bit of plate for actual forge work. It works really well for Jovial because he's doing sheet metal. If you're putting real force behind your strikes into plate, even 1.5" plate, it will bend and deform eventually. I figured as much, which is why I'd want it backed by a lot more mild steel. Obviously a whole anvil made of tool steel would be awesome, but that poo poo is expensive. The 1.5" was kinda arbitrary, but plate seems to max out at 2" anyways so it doesn't make much of a difference. I don't have any solid plans yet, but if I find a really nice lump of scrap steel to use, I figure it'd be worth taking the time to extend its' life a bit. quote:Is this going to be "the" anvil for your rest of your life, or do you plan to buy a regular one at some point. The answer to this question will dictate how much effort you should put into that project. I'm probably gonna take a basic course in February or March with these dudes: http://thak.ca/ It's more expensive than other equivalent courses in the area, but it makes a point of having you make your own basic tooling (tongs, chisels, rake/poker, etc) to take home, which is pretty neat. Most other places offer a single take-home tool, but this way I'll be set.
|
|
#
?
Jan 12, 2011 22:41
|
|
|
Yeah don't buy an anvil until you know that you'll enjoy it or not. Take the course, decide after that. However, having something solid to bash things on is a handy thing to have around the house. So if you find a good improvised bit of scrap or something, don't hesitate to grab it.
|
|
#
?
Jan 13, 2011 07:55
|
|
|
Finished flycutter. Carefully photographed to hide the uglier surfaces. Next project, a bunch of parts for an english wheel the autobody class is making. Facemilling good, deburring bad. 
|
|
#
?
Jan 13, 2011 21:44
|
|
|
So did you restart from scratch when you made that, or did you rework the hosed one from before? It looks really good from what I can see. Please excuse my ignorance, but what exactly is a flycutter and what's it used for?
|
|
#
?
Jan 14, 2011 17:16
|
|
|
I reworked it. I had to take some off the length to erase the middle slot, and went for a wider slot than originally planned. It will work just fine, I just blew the tolerance on the blueprint. I'm an obsessive polisher, so my parts always tend to come out shiny, even if they're wrong. A flycutter is a single point cutting tool for face milling. It gives a nicer surface finish than an end mill and is far cheaper than a face mill, but is a lot slower. Face milling 1" mild steel on a WW2 surplus machine.  Next week we're putting that in the lathe. 
|
|
#
?
Jan 14, 2011 18:15
|
|
|
I wish I had ww2 surplus machine tools That's really neat, what do you do your polishing with? Drawfile->emery paper->tripoli?
|
|
#
?
Jan 14, 2011 19:04
|
|
|
That mill certainly shows its age, but it's still a good machine. The instructor constantly points out that they paid more for that 6" face mill and inserts, than the mill itself. A finishing pass at high speed, low rate, then emery paper. That will get aluminum to a near mirror finish. Stainless, like that fly cutter, takes some wire wheeling to get completely smooth. I haven't found a way to get mild steel really shiny, but light pressure on the wire wheel gives a really nice matte finish.
|
|
#
?
Jan 14, 2011 21:40
|
|
|
Has Tripoli compound and a polishing wheel replaced leather stropping? Going to my first local blacksmith guild meet-up tomorrow. I find the description "It's open forge so just bring a piece to work on" incredibly enticing. Anybody got any tips on where to find cheap iron? I can get mild steel from any hardware store, in pretty small sizes, buts its pretty expensive. I'd invite AnomolousBoners but I think he still thinks I'm a psycho.
|
|
#
?
Jan 15, 2011 02:57
|
|
|
Made some progress on my welding cart. I didn't make it to Harbor Freight to get casters, but I got all the tool hangers put on. You can't really see it, but the grinder-holding plate is sticking out on a little L-shaped piece made from scraps of the tubing. You can see how I intend to power it; a small C-clamp or two will hold the outlet strip on.  Clamps! 
|
|
#
?
Jan 15, 2011 03:45
|
|
 Bad Angus! Bad!
|
Did you do all that with FCAW? You've come a long way in a short time, man. It look awesome.
|
|
#
?
Jan 15, 2011 03:47
|
|
|
The Scientist posted:Did you do all that with FCAW? quote:You've come a long way in a short time, man. It look awesome. Edit: Also, I really need a miter saw. You see all those 45-ish-degree angles on things? Those are all scraps from the original pieces for the top and bottom. Turns out I can't actually cut a 45-degree angle freehand with an angle grinder. Chillbro Baggins fucked around with this message at 04:39 on Jan 15, 2011 |
|
#
?
Jan 15, 2011 04:13
|
|
|
Delivery McGee posted:
Mark it with a triangle, notch it with a wide chisel on all four sides. Cut freehand with metal to spare and file down to notches. Or get a cheapass mitre box and use a hacksaw.
|
|
#
?
Jan 15, 2011 04:56
|
|
|
I really like your cart. I think that a cart with a nice top on it is more useful than most rolling tool chests. While a full sized chest is nice for organization, it doesn't offer a very good working surface. That's what a cart like that is great for. I think I am going to pick up an old desk and turn it into a work bench.
|
|
#
?
Jan 15, 2011 04:58
|
|
|
Slung Blade posted:Mark it with a triangle, notch it with a wide chisel on all four sides. Cut freehand with metal to spare and file down to notches. duck hunt posted:I think that a cart with a nice top on it is more useful than most rolling tool chests. While a full sized chest is nice for organization, it doesn't offer a very good working surface. That's what a cart like that is great for. quote:I think I am going to pick up an old desk and turn it into a work bench. Where does one go to buy metal? It's way overpriced (or more than I'm willing to pay, anyway) at the hardware store, and my dad only has so much random old poo poo around his shop. Do I just go to the local welding shop, tell them I'm dabbling in welding, and see who they recommend? I'm kind of afraid to go to the local welding shop, since I'm just half-assing it as a hobby. Too bad my sister divorced her professional-structural-steel-welder husband right before I got into welding. Also, my brother can't seem to do anything with his little FCAW machine (or, as you may recall, the lovely 110v stick buzzbox he gave me to start my welding hobby, both of which I've been moderately successful with), and he worked for said ex-brother-in-law for a summer and learned to weld! Are the low-amperage hobby machines that much harder to use when you're used to the big pro generator-powered ones, or is my brother just stupid? Chillbro Baggins fucked around with this message at 06:18 on Jan 15, 2011 |
|
#
?
Jan 15, 2011 06:06
|
|
|
A couple months back I posted asking about buying a cheapo mig welder to fabricate my own exhaust (with no prior experience), and was kindly told those were a bad idea. I appreciate that because I then started looking for a cheap TIG welder and found a brand new harbor freight TIG welder for $100. So far: $100 HF 91811 TIG welder $20 HF regulator $40 HF auto darkening helmet $160 80 ft^3 argon tank from the local welding supply place $10 for thoriated tungsten $10 for E70S-2 rod I originally had a $300 budget, which I only blew by $40 so I'm pretty happy. In the picture there's a pair of header flanges I made on my 150lb HF mini mill. They're 3/8" mild steel, and they took forever to make on my tiny mill. Also pictured are 90 degree mandrel bent 16 gauge mild steel tubing I cut down the center with a dremel.  Click here for the full 2048x1536 image. I decided to try welding in a piece of sheet metal to fill in the gap after practicing for half an hour. And came up with this: 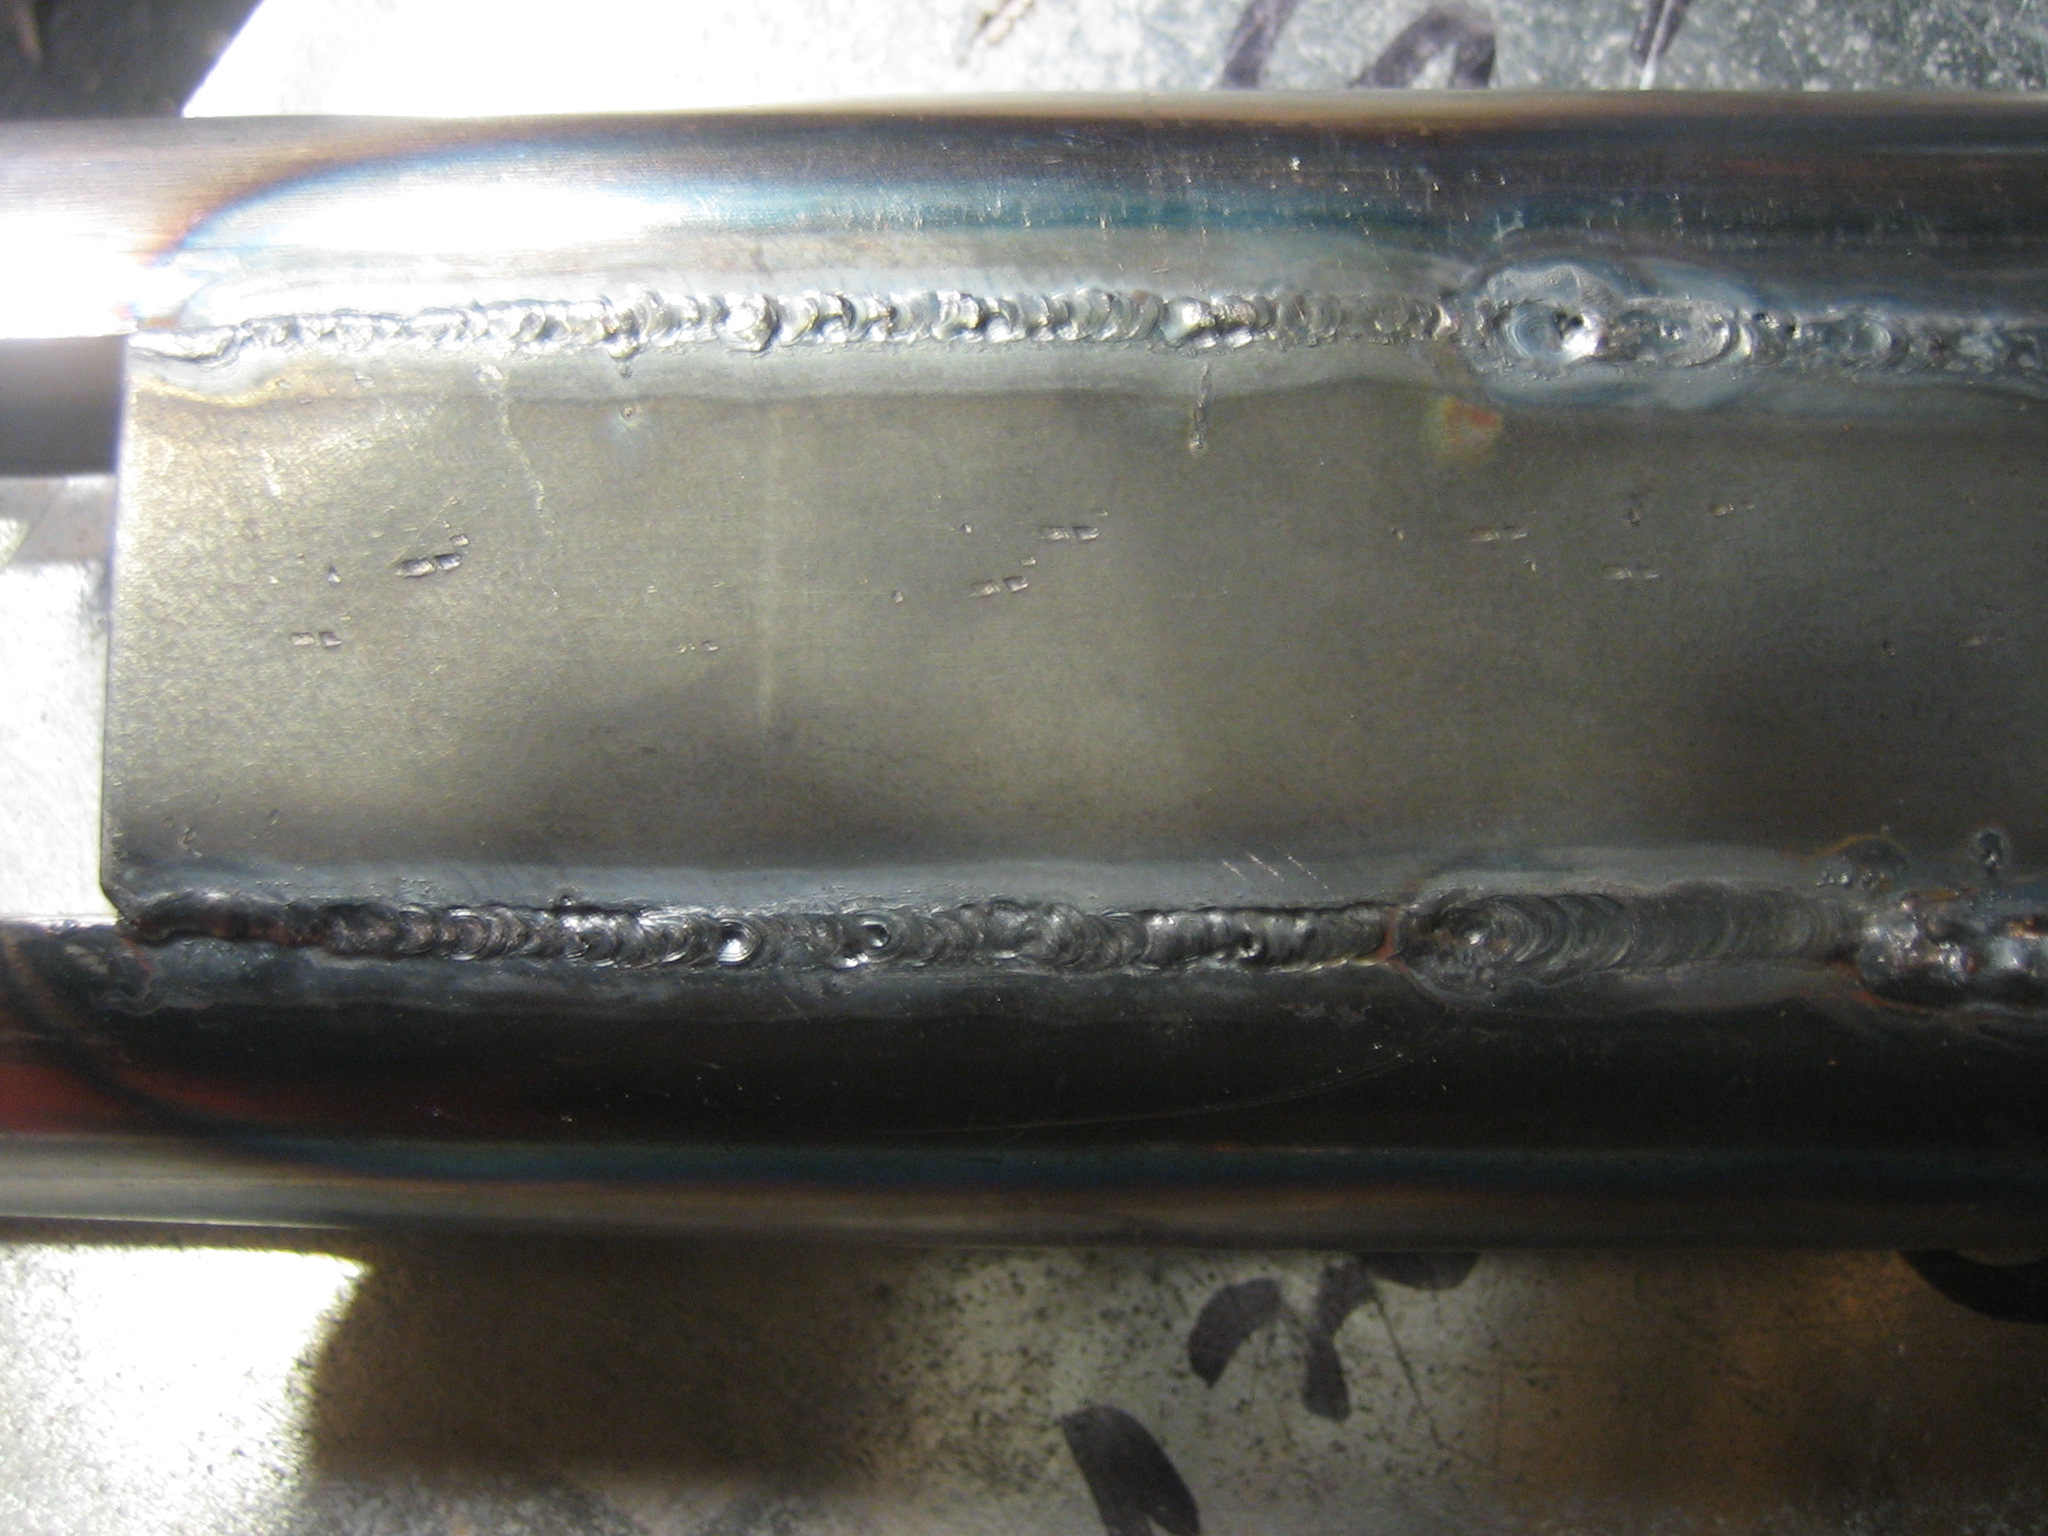 Click here for the full 2048x1536 image. Today I tried welding the other side. It went a bit better and took a third as long. This was after I discovered what mill scale was and got some proper thoriated tungsten rods.  Click here for the full 2048x1536 image. Only blew through once (I was able to fill it in), which I was pretty happy with. The welds certainly aren't pretty but I think they'll work. I'm going to grind them down a bit so they looks a bit better. Questions: -Can anyone recommend a good way to prevent cratering when I stop welding? I know I should feather off the amperage but the HF welder has no foot pedal. I've just been adding a small amount of filler, flicking the torch so the arc stops, and then holding the nozzle over the weld for a couple seconds to keep some argon on the weld. -I need to weld mild steel to a stainless flex pipe and catalytic converter. The catalytic converter steel is pretty strongly magnetic and the flex pipe is weakly magnetic so I guessed they're 400 series stainless. I read that I should use 309L filler, but there isn't any at the local welding supply placed. One guy told me I should just use the E70S2 rod I have. Would that work?
|
|
#
?
Jan 15, 2011 06:33
|
|
|
Delivery McGee posted:Made some progress on my welding cart. I didn't make it to Harbor Freight to get casters, but I got all the tool hangers put on. I REALLY like you cart! One thing I would recommend is if you have the money, get some Bessey speed clamps. BESSEY CLAMPS ARE THE BEST CLAMPS IN THE WORLD. I love a good clamp: http://tinyurl.com/4omjpnb
|
|
#
?
Jan 15, 2011 06:39
|
|
|
ASSTASTIC posted:One thing I would recommend is if you have the money, get some Bessey speed clamps. I have done the entire project (except the hammer loop) with those two 3" C-clamps and bits of scrap tubing (and my non-gun hand for things I couldn't figure out how to get a clamp on). It's been ... interesting. It would've been easy if I'd had three hands -- holding a bit of tubing across the corner, a square in the corner, and tightening two clamps without letting anything slip out of place gets difficult, especially when one of the pieces to be welded needs to be bent into position and held while doing all the clamping. Gonna get more clamps (a couple of Vise-Grip style and some more Cs, at least) when I go to HF for casters. Actually, HF has a knockoff of the Bessey clamp. Still pretty expensive, though. In retrospect, I should've made a space for a third angle grinder so as to avoid having to switch discs -- one with a grinding wheel, one cutoff, one wire brush would be ideal, I think. Only thing left to do besides the wheels is to put some pegs on the front to drape the cables on and a bit of sheetmetal and appropriate bracing to make a shelf on bottom. Edit: and some sort of spike to hang the spare grinding wheels on would be good, I think, rather than having to dig them out of the drawer. My overall goal is "rolling metalwork toolbox" more than "welder cart." Edit again: and now I want to add some bits of tube sticking up from the top bar over the drawers against the non-door side of the welder to hold my chisels. Chillbro Baggins fucked around with this message at 07:37 on Jan 15, 2011 |
|
#
?
Jan 15, 2011 07:32
|
|
|
I have a feeling that you're gonna find that those two C clamps holding the power strip on are exactly what you need to use at some point. Is there any way to figure out how to mount the strip without taking up 2 of your clamps?
|
|
#
?
Jan 15, 2011 07:50
|
|
|
The Scientist posted:Is there any way to figure out how to mount the strip without taking up 2 of your clamps?  , but your post made me remember I have a roll of this stuff, which would be perfect. , but your post made me remember I have a roll of this stuff, which would be perfect. Also, I kind of want to get a two-outlet splitter to go below that, so I can plug my three-covered-outlets strip and the welder in without using up one slot of the former for the latter (that third grinder thing again, or maybe I'll get a corded drill.) Edit: Yes, my only drill is cordless. I have a Ryobi One+ set that is actually fairly decent as long as you run two batteries and swap them between charger and tools. All the straight cuts, including chopping the ladder rack into pieces that would fit in my car, were done with the Ryobi cordless recip saw. It's a beast with a fresh battery. Chillbro Baggins fucked around with this message at 08:09 on Jan 15, 2011 |
|
#
?
Jan 15, 2011 07:57
|
|
|
Delivery McGee posted:
That is a pretty big piece of metal, maybe too big. Honestly you can pound all you want and heat it up but a 1/4 or 3/8 piece and it will stay straight. I used to have a long table with a 3/8 top on it stayed nice and straight. If you go too heavy that thing will get very heavy quickly. Kind of a pain in the rear end to roll around.
|
|
#
?
Jan 15, 2011 11:49
|
|
|
dyne posted:Questions: dyne posted:-I need to weld mild steel to a stainless flex pipe and catalytic converter. The catalytic converter steel is pretty strongly magnetic and the flex pipe is weakly magnetic so I guessed they're 400 series stainless. I read that I should use 309L filler, but there isn't any at the local welding supply placed. One guy told me I should just use the E70S2 rod I have. Would that work? AbsentMindedWelder fucked around with this message at 12:23 on Jan 15, 2011 |
|
#
?
Jan 15, 2011 12:21
|
|
|
Delivery McGee posted:Edit: Yes, my only drill is cordless. I have a Ryobi One+ set that is actually fairly decent as long as you run two batteries and swap them between charger and tools. All the straight cuts, including chopping the ladder rack into pieces that would fit in my car, were done with the Ryobi cordless recip saw. It's a beast with a fresh battery. drat, jealous.  AbsentMindedWelder posted:Typically, you'd just start backing off the current with your footpedal. Can't give you any other advice since I've never TIG'd without a footpedal. What kind of port does the foot pedal controller plug into? Is it like a 1/4" jack like what you see on guitar and keyboard pedals? Cause you could get that at radioshack. Or if its different but not TOO weird, you could make one from parts at radioshack. Welders have the weirdest ports.
|
|
#
?
Jan 15, 2011 16:11
|
|
|
AbsentMindedWelder posted:Typically, you'd just start backing off the current with your footpedal. Can't give you any other advice since I've never TIG'd without a footpedal. The Scientist posted:What kind of port does the foot pedal controller plug into? Is it like a 1/4" jack like what you see on guitar and keyboard pedals? Cause you could get that at radioshack. Or if its different but not TOO weird, you could make one from parts at radioshack. Being the high quality of Chinese equipment that it is, the HF tig welder does not even have a port for a pedal. There is just a potentiometer that controls the current. People have cobbled together a pedal by removing the potentiometer and sticking it in a pedal, though.
|
|
#
?
Jan 15, 2011 17:16
|
|
|
A couple of you guys have asked where to get cheap iron. In my area (Bay Area, CA) there are numerous steel supply places; you go and look around and somewhere they have a scraps bin. Since steel rod comes in 21 foot lengths and plate comes in 8' by 4' pieces, "scrap" can actually translate to some pretty big chunks of metal. My favorite place is Alco Metal and Iron, which has three locations and is opening a fourth soon (I've only been to the one in San Leandro though). They also recycle metals so you can get scrap alloys too, sometimes. Of course you can also just go ahead and buy non-scrap amounts. I've bought full 21' rods of flat bar, round, square, and hex; in order to get it home I had to cut it in half, of course, and some places will charge on a per-cut basis but it's usually just a dollar or two to get them cut. Or if you have a battery operated tool you can do it yourself in the parking lot. The other place to go, particularly to get carbon steel, is an automotive junkyard. Buy springs. Coil or leaf springs are made of spring steel which is usually something like 1070 or 1080 or somewhere in that range. It it excellent stock for blade making. And if you find a piece that's really rusty and lovely looking, you won't pay much for it.
|
|
#
?
Jan 15, 2011 21:05
|
|
|
dyne posted:Bah, that's what I figured. Can you guys recommend any online sources? I probably need like 2 1/16" 309 rods. Bah, you don't need a pedal. here ya go. It's spendy stuff, but its one of those things that is worth the investment to have around because when you need it, and you have it, you feel like a boss.
|
|
#
?
Jan 15, 2011 21:44
|
|
|
duck hunt posted:Bah, you don't need a pedal. I'm interested in the technique myself.
|
|
#
?
Jan 15, 2011 23:44
|
|
|

|
| # ? May 25, 2024 11:55 |
|
|
When you are finishing a weld without a pedal or a down slope timer, sometimes you end up with craters or "fish eyes." If you don't have a pedal I'll explain what I do. At the end of the weld, I will oscillate the torch in a small circle. This helps heat the puddle if you need it. Most of the time, then end of the weld has accumulated quite a bit of heat. The problem with cratering is that the end of the weld cools too quickly, so take your time terminating your weld. The other thing that you can do is increase your arc length (reasonably as to not extend the arc so far that the shielding becomes deficient). You can tilt your torch to the side just a bit. Like if you are welding and progressing with a 15 degree torch angle, try turning the torch past 30 degrees at the end of the weld. The elongation of the arc will raise the voltage and spread the heat out more. The key is to prevent the end of the weld from cooling too rapidly. I hope that this helps.
|
|
#
?
Jan 16, 2011 01:42
|
|