

|
Sole.Sushi posted:I don't know if he just went way heavy on the edge highlights to showcase the idea, but that looks like rear end to me. If they were thinner/lighter/not so blatant, after the mud wash it'd probably look pretty sweet. Kinda, yeah, and he goes way too high with the bleached bone in the back. There's no reason why the uppermost corners of that bag should be getting such highlight, tucked under the arm as they are.
|
 #
?
Mar 5, 2011 09:10
#
?
Mar 5, 2011 09:10
|
|


|

|
| # ? Jun 8, 2024 11:50 |
|
|
I'm a big fan of using Boostrap Leather and Kommando Khaki to make shades and giving the whole thing a Tamiya Smoke coating to give it that tanned, leathery look. Alternately, why the hell are Space Marines using leather? gently caress that noise and go the route of synthetic fiber blend!  Never done that before, but I think I'd do it this way: Basecoat Black/Chardon Granite (1:1), drybrush Black/Chardon Granite (1:3), edge highlight pure Chardon Granite, wash Badab Black. I may do this the next time I paint scouts to add some variety to their leather stuff. Never done that before, but I think I'd do it this way: Basecoat Black/Chardon Granite (1:1), drybrush Black/Chardon Granite (1:3), edge highlight pure Chardon Granite, wash Badab Black. I may do this the next time I paint scouts to add some variety to their leather stuff.
|
|
#
?
Mar 5, 2011 09:25
|
|

|
I think the leather color is just a nice warm complimentary color to the bold colors of the marines' armor. Space Wolves definitely use brown leather, though. Because they're cool like that. 
|
|
#
?
Mar 5, 2011 17:06
|
|

|
Sole.Sushi posted:I don't know if he just went way heavy on the edge highlights to showcase the idea, but that looks like rear end to me. If they were thinner/lighter/not so blatant, after the mud wash it'd probably look pretty sweet. Eh, I liked it, and it looks like a pretty quick way to paint the bags.
|
|
#
?
Mar 5, 2011 17:26
|
|

|
Bootstrap Leather, Devlan Mud wash, Khaki highlight. There you go. You just got some knowledge dumped on you.
|
|
#
?
Mar 5, 2011 17:34
|
|
|
Yeah, brown leather is a nice armour contrast colour. Scorched brown, snakebite leather highlight, devlan mud wash here.
|
|
#
?
Mar 5, 2011 17:54
|
|

|
Hell Diver posted:I think the leather color is just a nice warm complimentary color to the bold colors of the marines' armor. Space Wolves definitely use
|
|
#
?
Mar 5, 2011 22:02
|
|
|
AnUninvitedGuest posted:Haters gonna hate.
|
|
#
?
Mar 5, 2011 22:10
|
|
|
Okay, so I tried using the guide from BoLS on painting white for my state troops and well...it did not go well. It's way to complicated for my level. Does anyone have an effective way to paint white in maybe 3 or 4 steps? I would really appreciate it.
|
|
#
?
Mar 5, 2011 22:22
|
|

|
A full day of pulling off old bases and starting to re-do. I have sand, gravel, static grass, and detailing bits. Someone please give me the idiot's guide to basing miniatures.
|
|
#
?
Mar 5, 2011 22:30
|
|
|
tokyosexwale posted:Okay, so I tried using the guide from BoLS on painting white for my state troops and well...it did not go well. It's way to complicated for my level. Does anyone have an effective way to paint white in maybe 3 or 4 steps? I would really appreciate it. There's really no easy way to do it. There are two types of white: Warm and cold. - Warm is done by starting with a Graveyard Earth (or Khemri Brown) basecoat. Paint bleach bone directly overtop of the Graveyard until it only shows in the recesses, then finally step up and paint the majority of the raised areas in Skull White. Alternately, try painting the area Kommando Khaki, wash with Graveyard Earth or Devlan Mud in the recesses, highlight bleached bone, and then highlight white. - I generally do cold white quickly by painting an area Space Wolves Grey. From there I painted a wash of extremely thinned Shadow Grey into the recesses and folds of the clothing. I then touch back up with Space Wolves Grey and then finally highlight to Skull White. Warm white is best done for parchments or as a compliment to other warm tones like yellows or reds. Cold is best used to compliment blues or blacks.
|
|
#
?
Mar 5, 2011 22:44
|
|
|
tokyosexwale posted:Okay, so I tried using the guide from BoLS on painting white for my state troops and well...it did not go well. It's way to complicated for my level. Does anyone have an effective way to paint white in maybe 3 or 4 steps? I would really appreciate it. I just basecoat (over black, even) with Vallejo Game Color's Stonewall Grey. One or two coats will do the job. Then apply highlights with thinned skull white and you're done. Results in tabletop-quality dudes. Start with a grey primer coat and your job is even easier.
|
|
#
?
Mar 5, 2011 22:52
|
|
|
Beerdeer posted:A full day of pulling off old bases and starting to re-do. I have sand, gravel, static grass, and detailing bits. Someone please give me the idiot's guide to basing miniatures. 1. Stick mini on his base 2. Use PVA glue and use an old brush to spread it around, covering the surface of the base 3. Dip the base (held by the model) in basing grit of some kind, that you have conveniently in a butter tub or whatever 4. Remove base, shake off excess gravel 5. Spray prime the mini with the basing and all. Spray paint should help seal the basing grit and keep it from falling off. Also, question for you guys - how do you recommend sealing your figures? I have some metal Guardsmen (like a platoon's worth now) and I don't want any paint getting chipped. Just wanna know what stuff I need and where I can get it.
|
|
#
?
Mar 5, 2011 23:58
|
|

|
tokyosexwale posted:Okay, so I tried using the guide from BoLS on painting white for my state troops and well...it did not go well. It's way to complicated for my level. Does anyone have an effective way to paint white in maybe 3 or 4 steps? I would really appreciate it. Fix's method is to use white ink--not sure how he does it, but I believe it's some kind of gray foundation coat followed by layers of slightly thinned white ink until coverage is awesome. Daler-Rowney puts out the FW inks available at many art supply stores, and at https://www.dickblick.com which usually has some kind of deal going on. Beerdeer posted:A full day of pulling off old bases and starting to re-do. I have sand, gravel, static grass, and detailing bits. Someone please give me the idiot's guide to basing miniatures. SRM gave his input, but he just kind of covered the gravel part. 1) Do what SRM said--I find it also helps to put a layer of thinned PVA glue over the gravel and let it dry to help seal it to the base before doing any undercoating. 2) Mix the sand with gravel to create a blend for more interesting base topography. 3) Static grass goes on usually after you've finished (and sealed) your model. Simply place a dab of PVA glue, pinch some static grass and press it to the glue for a second. Turn the model upside-down and tap the bottom repeatedly, but not hard: this will knock loose the excess and cause the grass to stand upright. 4) Detailing bits, depending on what they are and how you want to use them, can be worked into the gravel, placed under it and sticking out, placed on top, really whatever. Just think how you want to use it, and you should find out how to use it instinctively. SRM posted:Also, question for you guys - how do you recommend sealing your figures? I have some metal Guardsmen (like a platoon's worth now) and I don't want any paint getting chipped. Just wanna know what stuff I need and where I can get it. Testor's brand gloss and matte varnishes (Glosscote and Dullcote); a bit expensive for the amount you get, but still cheaper than GW and more awesome than a blowjob. Sole.Sushi fucked around with this message at 00:12 on Mar 6, 2011 |
|
#
?
Mar 6, 2011 00:01
|
|
|
Sole.Sushi posted:Testor's brand gloss and matte varnishes (Glosscote and Dullcote); a bit expensive for the amount you get, but still cheaper than GW and more awesome than a blowjob.  I am using the wrong products here. I am using the wrong products here.
|
|
#
?
Mar 6, 2011 00:08
|
|

|
!amicable posted:
Well, I'm sure there are other sealants that are good too.  I just know that these won't fog up on you, even under imperfect conditions, which is a far cry from a lot of sealants that I've used. EDIT: For SRM's benefit because I forgot to explain, you want to do one coat of gloss varnish for that nice, durable candy shell followed by two layers of matte varnish to bring the tone back down to neutral. VVVVV Hehe. "Finishing." 
Sole.Sushi fucked around with this message at 00:15 on Mar 6, 2011 |
|
#
?
Mar 6, 2011 00:11
|
|
|
"Hey, honey? Sole.Sushi recommended a new product for us to try for our special couples painting time. I hear it's great for finishing."
|
|
#
?
Mar 6, 2011 00:13
|
|


|
Sole.Sushi posted:EDIT: For SRM's benefit because I forgot to explain, you want to do one coat of gloss varnish for that nice, durable candy shell followed by two layers of matte varnish to bring the tone back down to neutral. Bitchin! I'll look into finding some. Why do you need to use gloss coat first though? Shouldn't matte be durable enough? Also, I put together this tutorial on making shotguns. Never say I never gave you folks anything: I've been wanting to field shotguns on my vets for some time, and I saw that Space Marine scout shotguns are going for up to 15 bucks on Warstore. To boot, they've got hands attached and the arms wouldn't work for my Catachans. I tried to think of a way to make shotguns that was easy to replicate with bits I don't mind chopping up. I searched through my bits box and dug up the following: - 1 lasgun - 1 Chimera lasgun (I don't put these on my tanks since they look silly. If you think the same you should have plenty!) 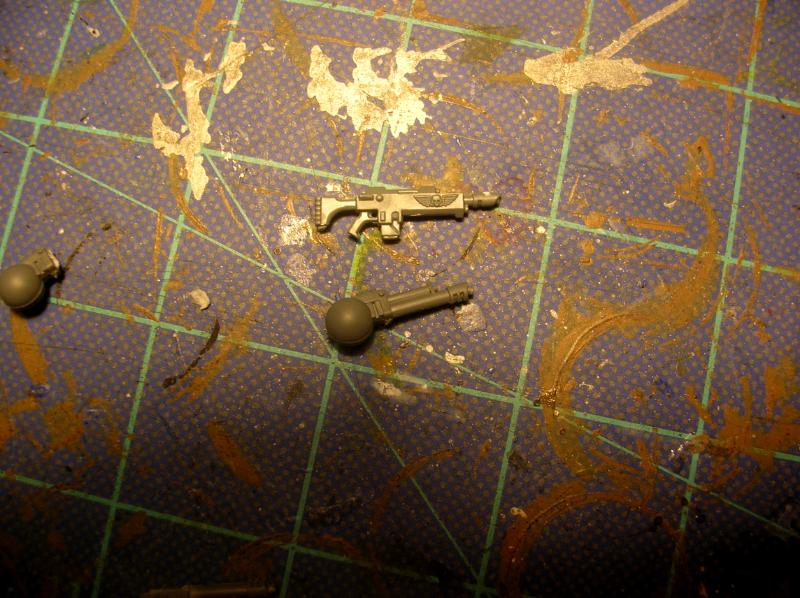 For this conversion I used one pair of clippers, one sharp knife, and some superglue. Step 1: Using your clippers, cut the front of the gun off. I just cut down to the lip of the magazine loader. Using a knife, smooth it out and cut off the stock and sight rail.  Step 2: Using your sharp knife, cut the Chimera lasguns off at the divide between tube and box: 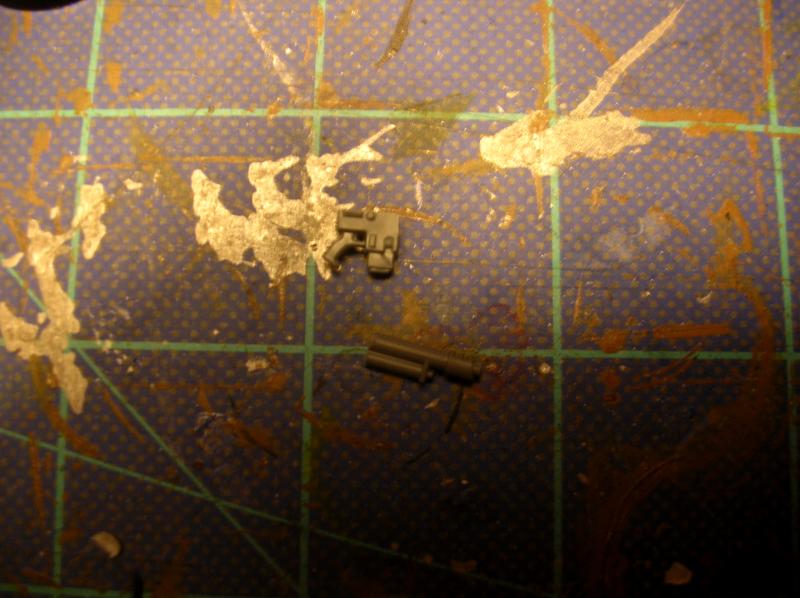 Step 3: Glue em together! 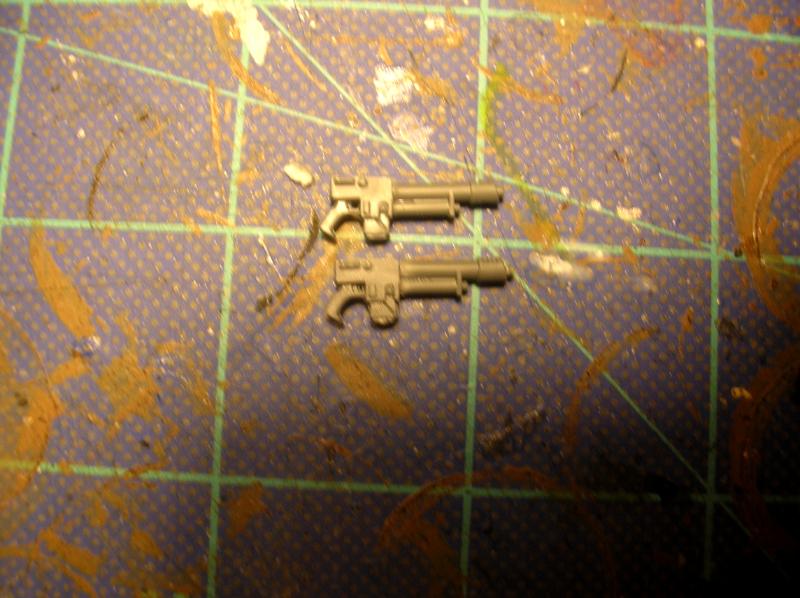 I wouldn't worry about drilling the barrels, since they're very thin. I'll probably just paint a black dot there. These come out to be slightly shorter than your average lasgun. Hope you enjoyed the tutorial!
|
|
#
?
Mar 6, 2011 00:54
|
|
|
Doubleposting because I feel like crossposting: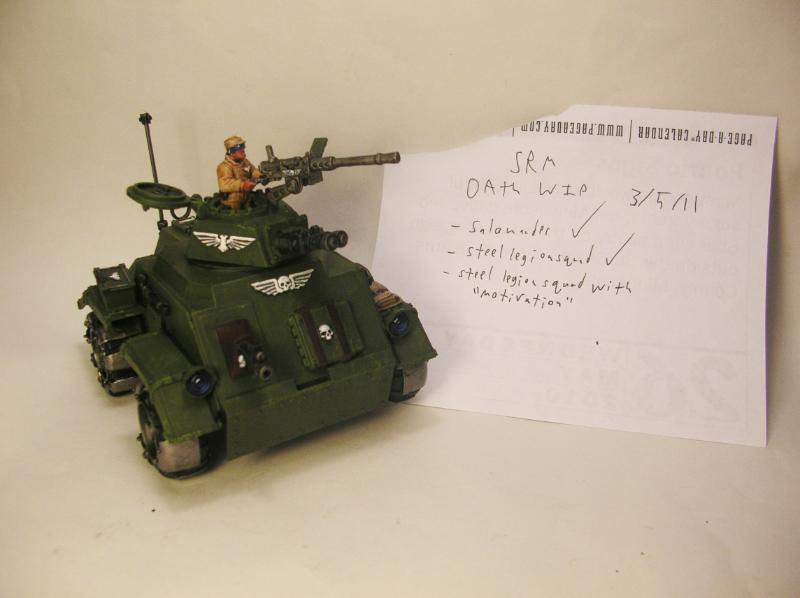 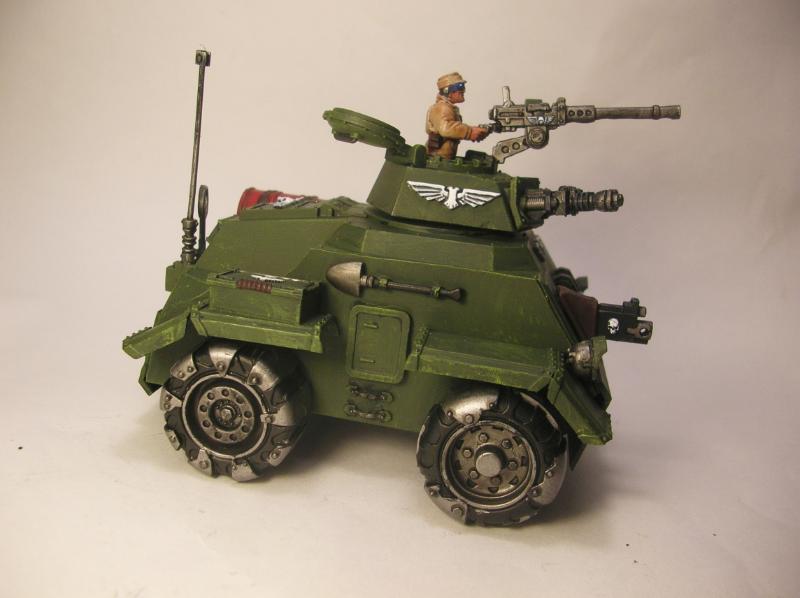 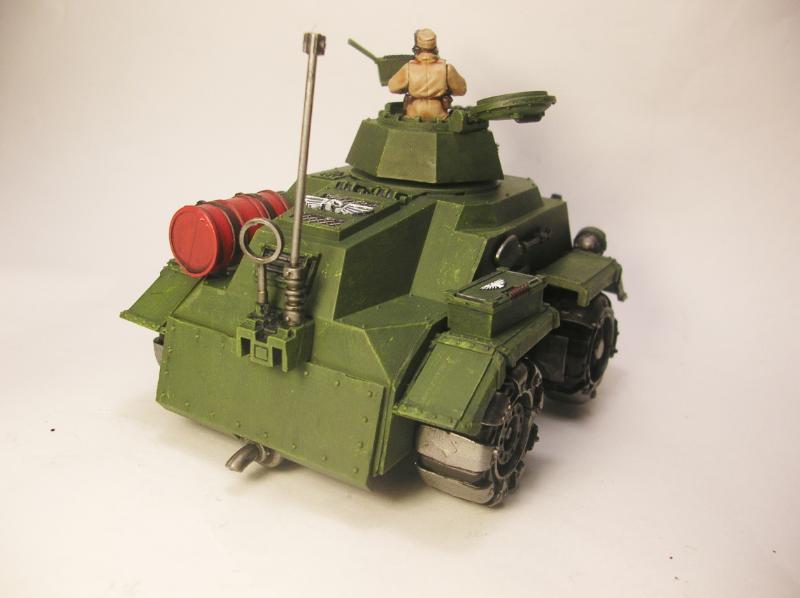 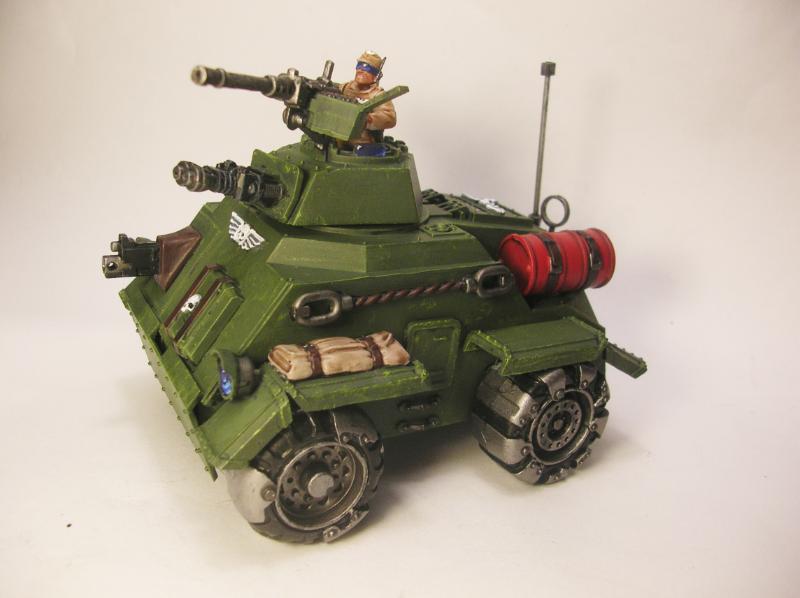  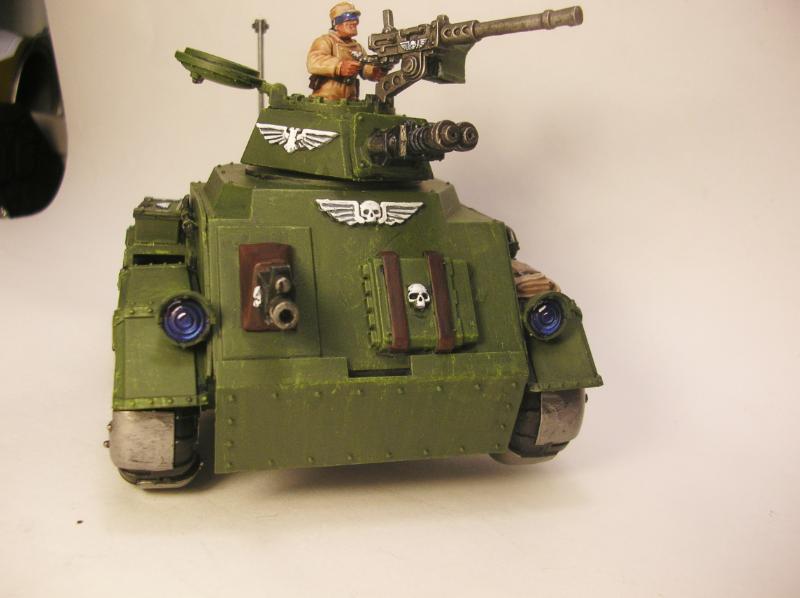
|
|
#
?
Mar 6, 2011 02:05
|
|
|
You better get some dirt washes in those crevices, soldier. That thing looks like it's never seen a day of combat. Look at pictures of MRAPs or something online. I get weathering ideas every time I watch a convoy roll past me, and that may be the nerdiest loving thought in the entire warzone. Hell Diver fucked around with this message at 02:12 on Mar 6, 2011 |
|
#
?
Mar 6, 2011 02:09
|
|
|
SRM posted:Bitchin! I'll look into finding some. Why do you need to use gloss coat first though? Shouldn't matte be durable enough? For metal models, sadly no: gloss literally does act like a candy shell, preventing the paint from chipping, where as matte varnish simply acts like a wax coat. To put it another way: One Goon said he did the 1-Gloss:2-Matte combo with metal models and transported them in a box, all banging together and never had paint chip.
|
|
#
?
Mar 6, 2011 02:12
|
|
|
Sole.Sushi posted:For metal models, sadly no: gloss literally does act like a candy shell, preventing the paint from chipping, where as matte varnish simply acts like a wax coat. To put it another way: One Goon said he did the 1-Gloss:2-Matte combo with metal models and transported them in a box, all banging together and never had paint chip. Also, when the matte wears away you can see shiny bits of your models--that tells you that it's time to re-matte coat without it messing up the paint job.
|
|
#
?
Mar 6, 2011 02:16
|
|

|
Hell Diver posted:You better get some dirt washes in those crevices, soldier. That thing looks like it's never seen a day of combat. On it! Expect some pictures once the washes dry. Sole.Sushi posted:For metal models, sadly no: gloss literally does act like a candy shell, preventing the paint from chipping, where as matte varnish simply acts like a wax coat. To put it another way: One Goon said he did the 1-Gloss:2-Matte combo with metal models and transported them in a box, all banging together and never had paint chip. Duly noted; I'll see about grabbing some soon! About how much are you typically able to coat with one can each of gloss and dull? EDIT: This a good start for some basic weathering? A Graveyard Earth drybrush and some Devlan Mud in the right places seem to go a long way: 
SRM fucked around with this message at 02:47 on Mar 6, 2011 |
|
#
?
Mar 6, 2011 02:29
|
|
|
SRM posted:EDIT: This a good start for some basic weathering? A Graveyard Earth drybrush and some Devlan Mud in the right places seem to go a long way: Another little trick you can do is paint little nicks with black (or charadon granite or something) on the edges of the tank, basically anywhere where the paint would easily chip, and then thinly repaint the (Camo green it looks like) high light under the nicks. For added depth, painting a little bit of boltgun in the middle of the black. But yeah, a little dirty drybrushing where mud would get kicked up. Wash the wheels, and basically run Devlan mud in every creak where plates meet, because that's where dirt will collect and be hard to get out.
|
|
#
?
Mar 6, 2011 02:53
|
|
|
Thanks for the advice, Hell Diver! It'll be nice to have my IG vehicles not look like they're fresh out of the factory.
|
|
#
?
Mar 6, 2011 02:57
|
|
|
SRM posted:Thanks for the advice, Hell Diver! It'll be nice to have my IG vehicles not look like they're fresh out of the factory. No prob. I used to have an Armored Company, so I got pretty good at weathering Catachan Green tanks.   Here're few pics of my most recent razorback to kind of give you an idea of some of the ways you can do the scraping and scoring. I actually tried multiple techniques on this one because I'm trying to settle on what I like the best, but it at least gives you an idea. It looks a lot better on darker colors, I think, but it's really something that you have to apply to multiple areas before you really get a feeling for the effect.
|
|
#
?
Mar 6, 2011 03:01
|
|
|
God drat that is a beautiful tank. I really love your stuff Hell Diver, its very much the same style of painting I aspire to. What do I do when chipping black paint?
|
|
#
?
Mar 6, 2011 03:07
|
|
|
Miles O'Brian posted:God drat that is a beautiful tank. I really love your stuff Hell Diver, its very much the same style of painting I aspire to. What do I do when chipping black paint? Just paint the nicks in Boltgun and then underline them with your highlight color (I prefer shadow grey for black). I've got a Catachan pic somewhere that has a "blued" rifle with chipping on it. It looks a lot like my M-16. E: Here you go.    
Hell Diver fucked around with this message at 03:14 on Mar 6, 2011 |
|
#
?
Mar 6, 2011 03:11
|
|
|
Hell Diver posted:Just paint the nicks in Boltgun and then underline them with your highlight color (I prefer shadow grey for black). What does "blued" mean?
|
|
#
?
Mar 6, 2011 03:17
|
|
|
Sole.Sushi posted:Fix's method is to use white ink--not sure how he does it, but I believe it's some kind of gray foundation coat followed by layers of slightly thinned white ink until coverage is awesome. Daler-Rowney puts out the FW inks available at many art supply stores, and at https://www.dickblick.com which usually has some kind of deal going on. FW ink is pretty pimp, but can be chalky if painted over larger areas. On smaller spaces it can go on over black in two or three coats and be a bright as gently caress white. I'd really recommend mixing it in some matte medium, though (I'd really recommend that for any of the FW inks, as they tend to be a bit glossy). Not too much for the white, though, as it really cuts the pigment on that stuff. quote:Testor's brand gloss and matte varnishes (Glosscote and Dullcote); a bit expensive for the amount you get, but still cheaper than GW and more awesome than a blowjob. Fuckin' BANG! I love, love, love this stuff as a paint-on sealer. It gets you high as a kite when drooling it over a hundred guardsmen, but you can really slime it on and it will dry down great (pro-painters practice a little more control to keep it from building too heavy in the crevices. Done right, it's a satin-to-dull finish, though you can get a bit of shine in areas where you haven't been careful. Easily fixed by a blast of matte spray like dullcote, and this stuff is basically armor. I'm shocked (shocked, I tells ya!) how little chipping has happened on my wraithguard and banshees. After a whole lot of handling your finger oils will make it a bit shinier, but another blast of matte will take care of that.
|
|
#
?
Mar 6, 2011 03:19
|
|
|
!amicable posted:What does "blued" mean? It's when a weapon's metals are all sealed black like an M-16 or pretty much any modern assault rifle.
|
|
#
?
Mar 6, 2011 03:21
|
|
|
tokyosexwale posted:Okay, so I tried using the guide from BoLS on painting white for my state troops and well...it did not go well. It's way to complicated for my level. Does anyone have an effective way to paint white in maybe 3 or 4 steps? I would really appreciate it. Try this, Epic Duck Studio's quick and dirty Tau Fire Warrior video (the model's main colour is white). http://epicduckstudios.com/2011/02/quick-n-dirty-tau-fire-warrior/ Indolent Bastard fucked around with this message at 04:38 on Mar 6, 2011 |
|
#
?
Mar 6, 2011 04:33
|
|

|
Still need to build a lightbox, so these photos are going to be lovely as all get out and go. Additionally, I kind of powered through these guys because they are generic marines. First up, a group shot: The heavy hitters, and close-up on an experiment on painting flames that I'll likely do on my next set of tac marines:  Here's the back of the missile launcher and multi-melta dudes:  And here's a shot of a pretty servo-skull:  And now a modeling thread exclusive, a shot of my Chaplain converted from a Legion of the Damned Sargent:  He's a counts-as Chaplain Cassius, hence the combi-flamer.
|
|
#
?
Mar 6, 2011 05:26
|
|
|
Sole.Sushi posted:Salamanders Very nice. I love the way you painted your flames. I like them a lot better than mine. The metallic look is very different and I like it. E: Also your cassius is dope. I like that combi-flamer. I've made one out of the same combi-plasma but it looks weird cause I don't have the bottle on the bottom. E2: ...or am I wrong in it being the captain's combi-plasma? The bottle is integrated seamlessly if it is. NecronSchmecron fucked around with this message at 05:45 on Mar 6, 2011 |
|
#
?
Mar 6, 2011 05:40
|
|

|
That chaplain is pretty cool. And those bases. 
|
|
#
?
Mar 6, 2011 05:46
|
|

|
Love those bases. 
|
|
#
?
Mar 6, 2011 05:49
|
|
|
slamders in snow, what teh gently caress man <--- edit this is literally me irl, on seeing dem mariens
|
|
#
?
Mar 6, 2011 05:54
|
|
|
Fyrbrand posted:slamders in snow, what teh gently caress man They're visiting the Space Wolves to show them how to have an animal themed chapter without having a guy named Urodela Salamandarius riding a giant salamander while hitting people with salamander-shaped hammers.
|
|
#
?
Mar 6, 2011 06:11
|
|
|
Aranan posted:They're visiting the Space Wolves to show them how to have an animal themed chapter without having a guy named Urodela Salamandarius riding a giant salamander while hitting people with salamander-shaped hammers. If they weren't black dudes Salamanders would probably be popular enough to have their own codex and then Vulkan would be a guy with two hammers riding a salamander. With wings. Also there would be salamandernaughts and salafists and boltermanders and salatalons and their trade make physic power would be Scales of the World Salamander.
|
|
#
?
Mar 6, 2011 06:31
|
|
|

|
| # ? Jun 8, 2024 11:50 |
|
|
NecronSchmecron posted:Very nice. I love the way you painted your flames. I like them a lot better than mine. The metallic look is very different and I like it. The flames are painted hot-rod style--I can go into detail if you want. E-E2: Combi-Flamer was indeed made out of a combi-plasma and parts of a flamer: the tank and the flame guard cowling. I carved a niche in bottom of the combi-plas and slid the bottle there, while the cowling had a channel carved into it from the top down, adding a second, smaller barrel under the bolter barrel for the flamer fuel to eject. Fyrbrand posted:edit this is literally me irl, on seeing dem mariens Is that a good thing? 
|
|
#
?
Mar 6, 2011 06:56
|
|