


|
Uhm, looks more like a lighting issue than anything else, with the light coming from behind your character's head.
|
 #
?
Apr 1, 2011 10:25
#
?
Apr 1, 2011 10:25
|
|


|

|
| # ? May 30, 2024 21:10 |
|
|
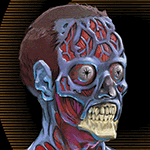
SVU Fan posted:Can anybody shed some light on SSS shaders for skin in either Mental Ray or Vray? I've googled it really extensively and watched a ton of videos, but for some reason my outcome is never the same. I THINK I've narrowed it down to being either the UVs or the texture map that are messing up. The character was made in Zbrush and I'm importing it into Maya to render. I've double checked the normals to make sure they're facing the right way and everything, so not sure what the deal is. Here; this might be useful. https://vimeo.com/6815004 I think you've got the shader halfway there, but the lighting is where you have to fix. This tutorial covers it pretty well. The reason you have the big black spot is because the light is coming around though the thin sides as it should, and being blocked by the thick middle, as it should. But there's no light infront to provide color. From looking at the pictures; you've got an alright grasp on textures and modelling, and now you should really try to refine and learn how to light a scene really well. Lighting can make a scene look flat or photorealistic.
|
|
#
?
Apr 1, 2011 10:42
|
|


|
Also my instructor recommended putting your diffuse into your epidermal as a test to see how that works.
|
|
|
#
?
Apr 1, 2011 15:29
|
|
|
Back with the unwrapping here. I noticed the seam at the front on the right arm and fixed it in the meantime. Here's some shots and the map:   Helpful comments will be appreciated on sight. I guess I'm moving on to the hi-poly now. Any special tips and tricks? How should I, if at all, approach the re-topologizing afterwards? Am I looking to reduce my polygon count or is it negligible?
|
|
#
?
Apr 1, 2011 23:09
|
|
|
If your goal is to have it completely backlit and have it scatter right through his core/face, play around with the radius sizes and weight for your back scatter component. The mental ray sss is actually pretty comprehensive, I wish the vray sss had a bit more control like that. Otherwise it definately looks like a lighting issue, the actual sss itself looks pretty nice on account of you keeping a proper scale. Once you start doing things like sss and final gather/gi, I tend to work in a linear workflow, you get far better results. http://3dlight.blogspot.com/ and http://www.djx.com.au/blog/ are two guys who have some pretty good stuff on achieving a linear workflow in mental ray
|
|
#
?
Apr 2, 2011 00:24
|
|

|
Okay, fixing the lighting definitely took care of all the black splotches, thanks a lot guys! The reason I quickly assumed it was my texture map that was causing the problem is that the beige color of the tentacle underside is not showing up in the render at all. I plugged the two different uv unwraps into the diffuse color and neither of them change the output, which means they're not being counted at all right?
|
|
#
?
Apr 2, 2011 02:24
|
|

|
I've been really concerned with how long I spend on modelling stuff lately so I tried doing a 'speed run' on this one. Kind of a refinery style thing with lots of repeated geometry. I'm pretty happy, it only took 3-4 hours to go from nothing to this level so I'm getting a lot better at not dawdling on the details.
|
|
#
?
Apr 2, 2011 16:26
|
|

|
I've got a pretty simple fountain model I've been working on recently, but I've realised that I cannot UV unwrap worth poo poo. Are there any really good resources for learning how to do it properly? I'm trying to get used to doing stuff with the Unreal engine importing with Specular maps, Displacement and Normal maps and all that good stuff, but my texturing looks horrible, I end up with a lot of stretching and stuff all over the model.  Ideally, a decent resource that covers starting from scratch all the way up to the Unreal engine would be awesome, but really anything that you guys recommend that covers UV mapping would be a big help.
|
|
#
?
Apr 2, 2011 16:34
|
|


|
SVU Fan posted:Okay, fixing the lighting definitely took care of all the black splotches, thanks a lot guys! The reason I quickly assumed it was my texture map that was causing the problem is that the beige color of the tentacle underside is not showing up in the render at all. I plugged the two different uv unwraps into the diffuse color and neither of them change the output, which means they're not being counted at all right? Do you have your diffuse map plugged into any of the epidermal/subdermal/back components? Could just be whatever colour you have in there showing through more than your overall diffuse. Best thing to do is just do some testing. Assign a surface shader or something to check your UVs are good. Then go through your sss shader piece by piece by changing the weighting (ie. Overall 0.0, epidermal 1.0, subdermal 0.0, back scatter 0.0) to see how it's all effecting your render.
|
|
#
?
Apr 3, 2011 00:28
|
|
|
I ran the texture through an HSV remapper node and plugged two different versions of that into the backscatter and front scatter slots. I tried just plugging the texture map directly into the color slots of regular Lambert and Blinn shaders too and it's not displaying on the model properly still. Did the two different texture maps I posted look like there's something wrong with them? I tried doing it for a simple eye texture and the same thing happened, the whole back half of the eyeball was black. It sounds like it might just be my Zbrush texture export causing problems when it's being taken into Maya Also, Moist von Lipwig posted:That looks really good man, very clean. The detail on the walkway's floor is awesome.
|
|
#
?
Apr 3, 2011 00:46
|
|
Surprise T Rex posted:I've got a pretty simple fountain model I've been working on recently, but I've realised that I cannot UV unwrap worth poo poo. Are there any really good resources for learning how to do it properly? Eat3D and 3dmotive. I even believe eat3d has a fountain making tutorial.
|
|
|
#
?
Apr 3, 2011 03:06
|
|
|
Friday I started baking. Saturday night the program crashed with 67% complete. It was a good thing because I started a new hi-poly with some improvements and less sub division levels. Though I realized I really suck at hi poly sculpting I intend to make up for the difference with some sly editing with the NVidia normals map filter plugin. We'll see how that goes. Here he is now with the normal map:  Not pictured- some ray miss screw ups that need to be addressed. I'll re-bake tomorrow.
|
|
#
?
Apr 4, 2011 00:07
|
|
|
Anybody in here have any Boujou/Matchmover experience? I'm tracking a sequence that is top down. It's a camera essentially dollying down a wall while looking at a dresser right below it. A character briefly bumps into the table and wiggles it for about 10 frames. The tracking tracks this awesomely except it registers the drat dresser bump as a camera move (even though the entirety of the rest of the scene doesn't bump). I can't seem to get to get MM to ignore just a few frames of the track. It's either one piece of the sequence or the whole thing. Any other options or ideas?
|
|
#
?
Apr 6, 2011 03:08
|
|

|
BonoMan posted:Anybody in here have any Boujou/Matchmover experience? Boujou has a roto mask feature which lets you exclude certain areas of the frame. You should add a mask around the dresser for the duration of its wiggling movement. Hopefully it's not so large in frame that you can't get matchmove data from the surrounding area. If that doesn't work, try Syntheyes -- I've seen that program get some really nice matchmoves from stuff that would make Boujou throw up its arms and admit defeat. And somehow it costs 1/20th as much 
|
|
#
?
Apr 6, 2011 03:22
|
|
|
schmuckfeatures posted:Boujou has a roto mask feature which lets you exclude certain areas of the frame. You should add a mask around the dresser for the duration of its wiggling movement. Hopefully it's not so large in frame that you can't get matchmove data from the surrounding area. Doh. Contours in MM. That's what I was missing. Thanks! edit: Goddamn it's nice to see Maya/MM 2011 continues the great tradition of nothing having anything being obvious. Why label it contour? Why not call it what it is? Mask? or Roto Mask? And the help files loving blow.
|
|
#
?
Apr 6, 2011 03:49
|
|
|
I'm getting kind of sick of UV mapping (or doing anything else) in 3DS Max. Is there a best program for that I should learn?
|
|
#
?
Apr 7, 2011 00:30
|
|
|
Haledjian posted:I'm getting kind of sick of UV mapping (or doing anything else) in 3DS Max. Is there a best program for that I should learn? I like Maya. A lot of people use Headus UVLayout for UV mapping (at least as a first step before massaging them).
|
|
#
?
Apr 7, 2011 00:45
|
|


|
Haledjian posted:I'm getting kind of sick of UV mapping (or doing anything else) in 3DS Max. Is there a best program for that I should learn? 3d Coat solved all of my UV mapping problems, and turned texturing into a real joy. It's really awesome for creating textures from scratch -- it's got multiple layers and blending modes like Photoshop, but lets you paint directly onto your model.
|
|
#
?
Apr 7, 2011 05:00
|
|
|
Haledjian posted:I'm getting kind of sick of UV mapping (or doing anything else) in 3DS Max. Is there a best program for that I should learn? You could try looking into roadkill for max, it's a free plugin as far as I know. A few guys in the office use it all the time I think it uses that algorithm that blender users keep banging on about.
|
|
#
?
Apr 7, 2011 06:14
|
|

|
Cross-posted from the ZBrush thread: Maya/ZBrush sculpt done for a commission. I wasn't able to put in as much detail as I would have liked due to time constraints, but I'm really pleased with how it turned out, especially considering it's my first real ZBrush sculpt. The client was happy with it as well, and it's going to be one of the chapter illustrations for Eos Press's new Nobilis book.  This is also the first time I've gotten paid for my 3D work. I feel like I'm all grown up or something. 
|
|
#
?
Apr 7, 2011 10:36
|
|


|
Blep
Snooty fucked around with this message at 20:41 on May 10, 2017 |
|
#
?
Apr 7, 2011 18:21
|
|
|
Nice dude, is that a realtime grab or rendered? Cause those hair alphas look nice.
|
|
|
#
?
Apr 7, 2011 18:55
|
|
|
I just grabbed a quick render with Max's default shader and a skylight without shadows on. I've done the textures in a ridiculously high resolution though (4096x) so that might have something to do with it. But thanks!
|
|
#
?
Apr 7, 2011 18:57
|
|
|
So I'm finally getting to do a tad bit of 3D work again and god I'm rusty. I have a quick Maya/Mental Ray rendering questing. I have some text integrated into a scene and I'm rendering a reflection pass. I put a plane under the text to catch reflections and everything is fine EXCEPT that the plane catches a lot of reflection overall so there's a slight sheen on the entire thing. Is there a way to basically say "I want the text to reflect but don't show anything else! not even ambient reflection!" edit: nm Use Background fixed it, but I SWEAR I tried that earlier and it didn't work . There goes my mind.
BonoMan fucked around with this message at 21:13 on Apr 7, 2011 |
|
#
?
Apr 7, 2011 21:07
|
|
|
I love coming into work to grab a render which was running for 8 hours over night and due to be out at 12pm (in 2 hours) only to find 2 of the DR nodes decided it'd be really useful if they dropped all the maps about half way through. And my parents wonder why I smoke.
|
|
#
?
Apr 8, 2011 10:10
|
|

|
cubicle gangster posted:I love coming into work to grab a render which was running for 8 hours over night and due to be out at 12pm (in 2 hours) only to find 2 of the DR nodes decided it'd be really useful if they dropped all the maps about half way through. Nothing better than seeing a portion of your model as a formless, black mass What's the best way to put a sticker on something? Say I have a glass bottle I want to put a label around. I learned this is in class but can't remember it now, sadly.
|
|
#
?
Apr 8, 2011 10:14
|
|
|
Duplicate the geometry, cut the sticker into it/delete the rest, shell by .1mm with select inner faces on (Whichever one pushes it out/selects the original faces), grow, delete. The boss got in and it turns out it wasn't that important the render got done today, so i've sent it off again and we're going to shut up shop early today and go for a few pints at lunchtime. From great mood to panic to even better mood in 2 hours.
|
|
#
?
Apr 8, 2011 12:05
|
|
|
cubicle gangster posted:Duplicate the geometry, cut the sticker into it/delete the rest, shell by .1mm with select inner faces on (Whichever one pushes it out/selects the original faces), grow, delete. Thanks! I knew it was something like that but I couldn't remember what order it went in. Also, lunchtime pints are the BEST pints.
|
|
#
?
Apr 8, 2011 13:03
|
|
|
So I'm working on a personal project. I hand sketched some (terrible) orthos today and I'm getting cracking on it now. Here's the first reference that I didn't do:  My lousy orthos of it: 
ArchNacho fucked around with this message at 04:17 on Apr 10, 2011 |
|
#
?
Apr 9, 2011 04:59
|
|

|
Watchlar posted:Personal project I've had in the works for a while: Loving most of this, but that rear end costume design is horrible. Visually it makes it look like her actual crack is cavernously wide. Slim it down to a string, or widen it to a full swimsuit width. The texture painting is great though, and dig the pose. Also don't render on black. Ever. Also try to do a few helmet-hair breaking planes. Just one or two that break the smooth dome of her hair geometry. I normally put 2-3 "tufts" right at the part at the top of the head, then at least one that breaks the front on silhouette, one for 3/4, and one for side profile. The middle where it's texture looks great, and the ends where it's alpha'ed look great, it's just that ultra sharp helmet silhouette that lets it down.
|
|
#
?
Apr 9, 2011 14:23
|
|


|
ArchNacho posted:So I'm working on a personal project. I hand sketched some (terrible) orthos today and I'm getting cracking on it now. That is incredible stuff. I'd want to see the film this is featured in; I don't care what it's about. So keep working on it. Can anyone please assist me with rigging a dolphin in 3D StudioMax? I've tried looking for rigging tutorials for sharks or fish, but can't seem to find any. And rigging tutorials for bipeds just don't translate well; I'm a modeler/texturer, not a rigger. I thought a dolphin would have a fairly simple rig, but it's proving a real bitch. I'd really appreciate any help.
|
|
#
?
Apr 9, 2011 15:35
|
|

|
poopinmymouth posted:Loving most of this, but that rear end costume design is horrible. Visually it makes it look like her actual crack is cavernously wide. Slim it down to a string, or widen it to a full swimsuit width. Oh my god it's Poop. You're my idol, I've read your tutorials so much  Fangirlism aside, thanks for the feedback, this is exactly what I needed. I'm still tweaking it so these are all getting adressed! I'm probably just completely overhauling the leotard since the more I look at it the more I see flaws in it. And thanks for the hair tip, I was desperately trying to figure out what to do with it.
|
|
#
?
Apr 9, 2011 16:18
|
|
|
Well... I'm gonna keep pushing the diffuse texture some more. Here's what I got so far: Maybe I'll start on the props for a bit...
|
|
#
?
Apr 9, 2011 22:17
|
|
|
If i ever work somewhere else that doesn't have this feature, I'm adding a SMS text function to any render/simulation wrangling software UI I come across. "What got a a few minutes per frame sim?" Send me a text when its done? Yes please! ")
|
|
#
?
Apr 10, 2011 12:16
|
|


|
Hellbeard posted:Well... I'm gonna keep pushing the diffuse texture some more. Here's what I got so far:
|
|
#
?
Apr 11, 2011 17:46
|
|
|
Haledjian posted:Are you gonna leave his face that color? He looks kinda dead. Could it be my lighting? What's the best lighting setup for testing out my diffuse texturing on the fly?
|
|
#
?
Apr 11, 2011 20:59
|
|
|
A question about particles. I have about 1,000 or so particles I'm attempting to batch render. The results are unimpressive, it's just a cloud of white dots I plan to bring over to After Effects. No lights, no background, no forces, just Maya Hardware. So why in the world is it taking -hours- to render a frame? Everything goes well for about ten frames, then it just comes to a stand still. I am doing absolutely nothing special and this is just maddening. EDIT: Is there any way to 'freeze' existing particles and just render those? That would be ideal, I don't need them to actually move, just move the camera around them. FidgetWidget fucked around with this message at 21:51 on Apr 11, 2011 |
|
#
?
Apr 11, 2011 21:34
|
|
|
Hellbeard posted:Now I won't. For Max, I've found best to slap on a white skylight with shadows turned off. Renders instantly and exposes all your problems.
|
|
#
?
Apr 11, 2011 21:39
|
|
|
Could always just use default renderer, no lights at all and put the diffuse self-illumination all the way up to 100%.
|
|
#
?
Apr 11, 2011 22:07
|
|
|

|
| # ? May 30, 2024 21:10 |
|
|
This is a project I've started working on. I'm still working on the shader. Trying to get the all the maps to balance properly etc. at the moment and still doing some work on the sculpt. It's Zbrush, Max, Vray with displacement and normal maps from ZB. A fair bit of work to go on it but it's good fun so far. Lighting's pretty flat at the moment while I figure out the shader, also I might have used an overly sharp antialising filter which I had to soften out in post, kinda looks weird. 
EoinCannon fucked around with this message at 11:45 on Apr 12, 2011 |
|
#
?
Apr 12, 2011 11:39
|
|