

|
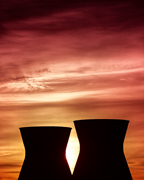
Tyorik posted:So I've been tinkering around with this image trying to rescue it and I got it to an almost acceptable place, but then I ran into this problem with the sky: It seems to be quite yellow. Try running a blue/cyan filter and see what you come up with. 
|
 #
?
Apr 25, 2011 19:37
#
?
Apr 25, 2011 19:37
|
|


|

|
| # ? May 30, 2024 10:39 |
|
|
Any suggestions on how to crop (or process further!) this?  I'm especially unsure how to handle the bottom blacks as well as the sky, if i should just kill it or not. Also, how important is using standard crop aspect ratios? I've barely printed anything, and most of my stuff is digital only.
|
|
#
?
Apr 26, 2011 01:56
|
|

|
Greybone posted:How important is using standard crop aspect ratios? I've barely printed anything, and most of my stuff is digital only. 2:1 crop to get rid of the sky. It's weighted a bit low, but you could take a bit more off the top to even that out.  3:1 crop-rotated. I kind of wish there was a bit more to work with, but it works. The rotation adds vertical lines to the picture so it doesn't feel off level, though it sort of loses some abstraction. Again the sky is gone moving the brightest area to a place that roughly falls into one of the thirds. Plus I like 3:1 ratios.  Crop ratios don't matter much when printing. If your file doesn't match the ratio of the paper they (a good lab) will ask whether you want it cropped or full. To avoid this I will always use the canvas tool in photoshop to make sure it matches the paper ratio and will print exactly how I want it. Since a lot of my photos are wide I will generally stick two or more together in photoshop and have them printed on a single sheet (eg: two 1:3 photos fit on a 2:3 print).
|
|
#
?
Apr 26, 2011 02:40
|
|
|
Greybone posted:I'm especially unsure how to handle the bottom blacks as well as the sky, if i should just kill it or not. I like the black at the bottom of the frame too. You could do something like this instead of cropping: 
|
|
#
?
Apr 26, 2011 02:54
|
|

|
Ak Gara posted:It seems to be quite yellow. Try running a blue/cyan filter and see what you come up with. I don't so much mind the heavy yellow, but the sky in the background is just a matte gray-blue. There's nothing to see and your eyes follow the sunset into... nothing. Any ideas on how I fix that? Tyorik fucked around with this message at 13:48 on Apr 26, 2011 |
|
#
?
Apr 26, 2011 13:26
|
|

|
Is "Clarity" just an unsharp mask?
|
|
#
?
Apr 26, 2011 13:44
|
|


|
Tyorik posted:I don't so much mind the heavy yellow, but the sky in the background is just a matte gray-blue. There's nothing to see and your eyes follow the sunset into... nothing. Any ideas on how I fix that? When stuck, fake it! 
|
|
#
?
Apr 26, 2011 13:57
|
|
|
A5H posted:Is "Clarity" just an unsharp mask?
|
|
#
?
Apr 26, 2011 14:02
|
|
|
Crop it out?
|
|
#
?
Apr 26, 2011 14:54
|
|
|
Photo Mechanic is on sale for $60 for another 3 days, anyone use it? I've been looking for something to speed up my workflow culling/selecting photos to process. My typical workflow is to drag everything on to the computer, open JPG's in Preview (don't have the fastest Macbook in the world) and flip through them with the folder open, marking the ones I want to try processing with OS X's color labels. There's a lot of back and forth and while it works it's less than ideal, thinking that a dedicated program with hotkeys and everything would be a good idea.
|
|
#
?
Apr 29, 2011 04:12
|
|
|
Pompous Rhombus posted:Photo Mechanic is on sale for $60 for another 3 days, anyone use it? I've been looking for something to speed up my workflow culling/selecting photos to process. My typical workflow is to drag everything on to the computer, open JPG's in Preview (don't have the fastest Macbook in the world) and flip through them with the folder open, marking the ones I want to try processing with OS X's color labels. There's a lot of back and forth and while it works it's less than ideal, thinking that a dedicated program with hotkeys and everything would be a good idea. I gave it a try, and it's a billion times faster than using Lightroom to cull images (If you import and render a 1:1 preview of every image and have a Sandy Bridge i7 with 8+gb of ram, then LR probably flies anyway) It basically lets you do all the meta tagging, ratings, and deletings very quickly. You can check out Zack Arias using PM to cull his images in this video to give you an idea of how it works. http://www.zarias.com/workflow-photo-mechanic-to-lightroom-to-photoshop-to-delivery/ e: Compared to what you're doing now, if you make any money from photography, it's worth buying it.
|
|
#
?
May 1, 2011 01:15
|
|

|
Shmoogy posted:I gave it a try, and it's a billion times faster than using Lightroom to cull images (If you import and render a 1:1 preview of every image and have a Sandy Bridge i7 with 8+gb of ram, then LR probably flies anyway) I do every now and then, but I went ahead and bought it (with 2 hours left on the clock, drat their pressure!) after doing a quick try-out with the trial version. Is it possible to re-map the keys? I'd prefer to use stars rather than colors for deciding what to weed out, I see that there's a conversion option, but it seems like a needless extra step. Doing the ctrl+number for the starring was giving my hand cramps after just a short while.
|
|
#
?
May 1, 2011 02:05
|
|
|
Pompous Rhombus posted:I do every now and then, but I went ahead and bought it (with 2 hours left on the clock, drat their pressure!) after doing a quick try-out with the trial version. Is it possible to re-map the keys? I'd prefer to use stars rather than colors for deciding what to weed out, I see that there's a conversion option, but it seems like a needless extra step. Doing the ctrl+number for the starring was giving my hand cramps after just a short while. I tried looking around and didn't see anywhere to change it, nor any methods answered in various forums. I never really ran into cramps while holding down cmd/ctrl. If you're using your macbook, maybe you can try playing around with something like this method: http://simonwillison.net/2004/Jun/8/remappingShortcuts/
|
|
#
?
May 1, 2011 02:20
|
|
|
What's hilarious is that importing poo poo in LR doesn't take noticeably longer than it does in his video. SSDeez yo.
evil_bunnY fucked around with this message at 15:10 on May 1, 2011 |
|
#
?
May 1, 2011 12:27
|
|

|
Is there a way to make Aperture put a grid overlay on your pictures? Specifically something that divides the picture into 9 square things.
|
|
#
?
May 3, 2011 03:14
|
|

|
Peven Stan posted:Is there a way to make Aperture put a grid overlay on your pictures? Specifically something that divides the picture into 9 square things. AFAIK the only way to do it is to hold down command while using the crop tool.
|
|
#
?
May 3, 2011 05:49
|
|

|
EDIT: Oops, Aperture, not Lightroom.
|
|
#
?
May 3, 2011 14:08
|
|
|
Me and a friend are looking at getting a Spyder 3 to sort out our colour calibration. We can't see any reason to get the Elite above the Pro except for that it mentions the elite has software brightness correction. Is that something we need to get the right brightness in our digital files and in our prints? Thanks.
|
|
#
?
May 5, 2011 11:41
|
|

|
Here I'm trying to salvage shots taken in the dimmest of red light. Am I on the right track? I was surprised at how much detail was revealed through manual white balance. I probably made a mistake by reducing the blacks at first, but again I was surprised by the detail it revealed.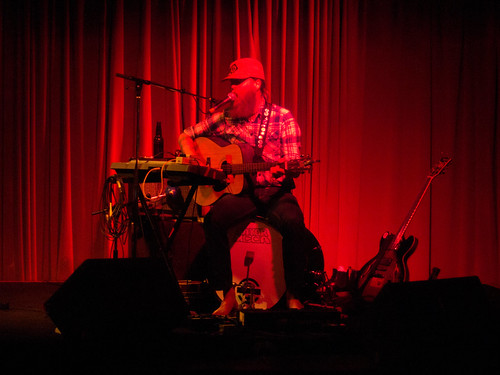 Processing: Import into Lightroom 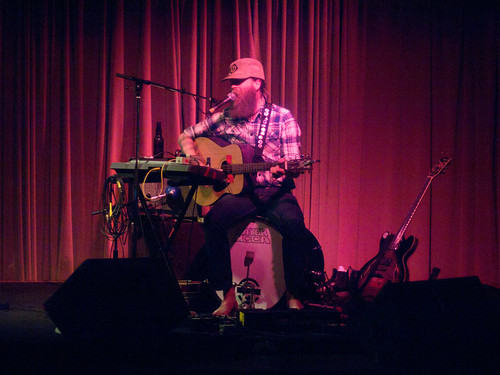 Processing: White balance  Processing: Exposure 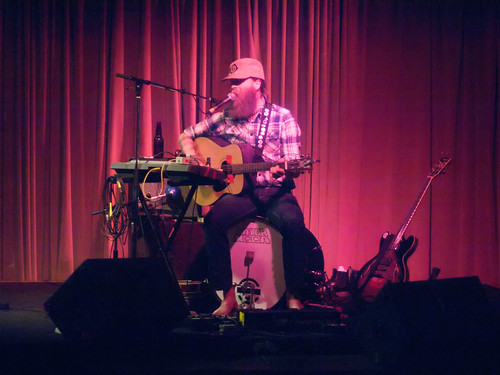 Processing: Dfine 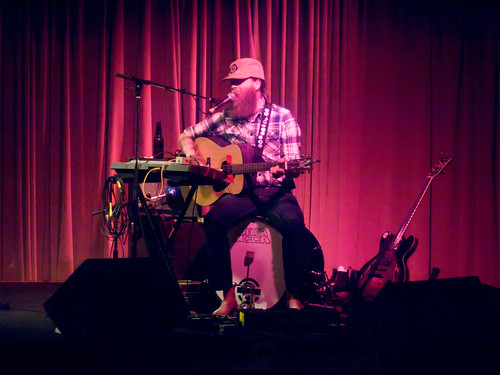 Processing: Blacks & clarity Nik Software's Dfine was fantastic for noise-reduction. I normally allow it to run in automatic, but I used a control point to preserve Mayor McCA's beard. He's a bit pink, but I think that's fair because of the red lighting. If I balance for his skin, the other colours become garish. I suppose I could use Viveza possibly but I'm not sure if it's worth it. Certainly not on every photo, but maybe one or two. edit: Used Viveza to get rid of the ugly colours on the left, but I don't even know what to do for the one-man band. 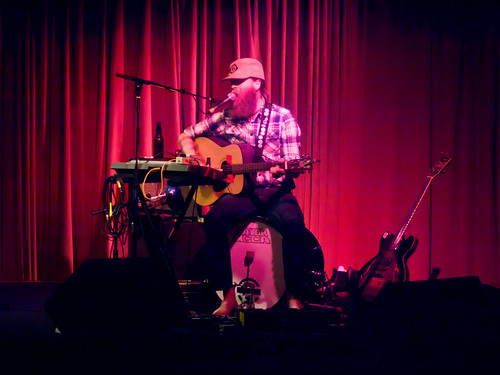 Processing: Viveza Magical programme though. teethgrinder fucked around with this message at 04:27 on May 6, 2011 |
|
#
?
May 6, 2011 03:55
|
|
|
I've had this photo sitting on my hard drive for a few months and now I'm finally trying to fix it.  It's a stitch I took at Chichen Itza. When i took it, I thought I shot enough sky but obviously I'm missing a couple big patches on the left and right sides. Also, the could on the upper left center next to the black area didn't stitch right. What would be the best way to fix this? I'm guessing that I should drop a whole new sky in, but I don't have any on tap. Is there a free place to get skies or should I just try to shoot my own? Is there a good way to fix it with what's already there?
|
|
#
?
May 8, 2011 03:29
|
|
|
There seems to be a fair amount of separation between the clouds and sky, so it would probably not be a nightmare to get rid of the uppermost clouds on either side and just try to blend a blue up there somewhere. It seems like it would be more of a pain to mask out the one small clump of trees to add a whole new sky.
|
|
#
?
May 8, 2011 03:42
|
|


|
Martytoof posted:There seems to be a fair amount of separation between the clouds and sky, so it would probably not be a nightmare to get rid of the uppermost clouds on either side and just try to blend a blue up there somewhere. It seems like it would be more of a pain to mask out the one small clump of trees to add a whole new sky. How would I do the blending? With a gradient?
|
|
#
?
May 8, 2011 03:47
|
|
|
Unfortunately I don't remember the name of any of the tools since I'm no photoshop pro -- I'd eyedropper the extremity colours at a few points, put down blobs of colour then try to use the ...... healing brush ..? tool to try to blend everything together in small increments. I mean this might be HORRIBLE advice. I'm just saying what I'd try doing first. It might actually be a lot easier to substitute an alternate sky ")
|
|
#
?
May 8, 2011 03:52
|
|
|
I've done exactly that before, for what it's worth. Usually, I try to work with what I have first -- in this case, the clouds. Use the clone tool/smudge/healing brush to try to finish off the clouds neatly, and then do the sky behind them. Rather than doing color blobs like Martytoof suggested, I usually take out big chunks of existing sky in the right band and then paste them in/smudge a bit, then try the healing brush. Photoshop usually does a good job of fixing it all up given a bit of initial help.
|
|
#
?
May 8, 2011 04:03
|
|

|
teethgrinder posted:Here I'm trying to salvage shots taken in the dimmest of red light. Am I on the right track? I was surprised at how much detail was revealed through manual white balance. I probably made a mistake by reducing the blacks at first, but again I was surprised by the detail it revealed. It's definitely an improvement, but seems pretty heavy on magenta after tweaking.
|
|
#
?
May 8, 2011 04:11
|
|
|
This is what I finished with:  Honestly, all I could think to do to fix it was create second copy with different white balance and then composite the two together. It's not really worth the effort. The problem with doing it more automatically is that the colours on him are in the highlights of the curtains behind him.
|
|
#
?
May 8, 2011 04:19
|
|
|
Haggins posted:I've had this photo sitting on my hard drive for a few months and now I'm finally trying to fix it. This seems like the kind of image Content Aware Fill was built for   You can see some variance in the sky, but it looks like it'd be easy to tone down in the full version of the image.
|
|
#
?
May 8, 2011 05:33
|
|


|
That's a good job Kazy. When I tried content aware fill it just kept trying to put in bits of the pyramid in the sky 
|
|
#
?
May 8, 2011 05:42
|
|
|
How does this look? http://cl.ly/103m2w1Y3T0s1D260F2s I used content aware file then went to down on the healing brush.
|
|
#
?
May 8, 2011 16:36
|
|
|
It's a good attempt. I'd say it would probably fool your average person if they didn't examine it too closely. You can still make out the contrast between a slight and dark blue in the top left area. I might run over the entire upper left area with some kind of overlay blue gradient layer at a low opacity just to make it uniform, I dunno. Overall a good job though.
|
|
#
?
May 8, 2011 17:52
|
|
|
I would just use the clone tool, should be pretty easy. I always shoot clouds/skies for dropping into images. Always useful to have a folder of them for stuff like this.
|
|
#
?
May 8, 2011 20:53
|
|

|
Thanks for the help. It's not perfect, but it passed the girlfriend test when I had her take a look at it. http://flic.kr/p/9FKmj2 brad industry posted:I always shoot clouds/skies for dropping into images. Always useful to have a folder of them for stuff like this. Good idea.
|
|
#
?
May 8, 2011 22:55
|
|
|
I think you should carry the right top cloud out over the edge. The other side looks pretty good though. Well done haggins.
|
|
#
?
May 8, 2011 22:57
|
|
|
Yeah I mean it won't pass a forensic investigation, but if I saw that on Flickr and didn't know that you had edited it I probably wouldn't question it at that resolution. Great job
|
|
#
?
May 8, 2011 23:14
|
|
|
Thanks, glad you guys like it.A5H posted:I think you should carry the right top cloud out over the edge. The other side looks pretty good though. Well done haggins. Good idea. The right side if the cloud still doesn't sit right with me and I was having a hard time getting the edges to look good. Sounds like an easy way to fix that problem.
|
|
#
?
May 9, 2011 03:06
|
|
|
After making some adjustments to a picture I try and drag and drop it from Lightroom into my mail, however, the adjustments I made did not carry over. Is there a way to save those adjustments so they show up in the emailed version??
|
|
#
?
May 9, 2011 06:23
|
|
|
You have to export the photo (ctr-shift-e) for LR to make a new version of your photo with the edits permanently applied. It will keep your original untouched photo where you imported it. It will ask you where you want to save your new export. I generally keep a folder on my desktop where I save exports intended for facebook or flickr. After I upload them I erase them because I don't need them. The original is saved and the edits are saved as a .txt file so I can re-export them whenever I want.
|
|
#
?
May 9, 2011 06:28
|
|
|
You don't like using the built in Facebook & Flickr management? I do wish the official Flickr plug-in would allow you read "captions" for titling on Facebook instead of just titles or file-names.
|
|
#
?
May 9, 2011 12:09
|
|
|
Also matching your tags to mentions would be pretty great. It'd also ideally import your friends list as tags.
|
|
#
?
May 9, 2011 13:03
|
|
|

|
| # ? May 30, 2024 10:39 |
|
|
teethgrinder posted:You don't like using the built in Facebook & Flickr management?
|
|
#
?
May 9, 2011 13:11
|
|