


|
Hillridge posted:I'm moving into an industrial space whose only plumbing is this:
|
 #
?
Apr 29, 2011 16:07
#
?
Apr 29, 2011 16:07
|
|


|

|
| # ? May 26, 2024 13:11 |
|
|
Here's the outside, could I bring it out the wood part above the door, then point it straight up? (Landlord is fixing those death steps before we move in)
|
|
#
?
Apr 29, 2011 16:21
|
|

|
Hillridge posted:Here's the outside, could I bring it out the wood part above the door, then point it straight up?
|
|
#
?
Apr 29, 2011 18:23
|
|
|
Hillridge posted:Here's the outside, could I bring it out the wood part above the door, then point it straight up? That vent needs to be 10 feet from that window . You have the chance to smell the vent. The minimum it needs to be above the roof is 12 inches. Unless you are in a higher snow elevation. All the fixtures require a vent. The toilet requires a 2 inch vent, the shower and lav only require 1 1/4 unless you wet vent them. You can penetrate that will but it will look slightly retarded i'd rather say penetrate the roof and install a flashing to seal it. Toilet require 3 inch line minimum for the drain. I believe you have a 3 inch line there.
|
|
#
?
Apr 29, 2011 19:31
|
|

|
Rd Rash 1000cc posted:If he doesn't know, the thermal couple is what connects to the gas valve and goes into the burner. With the heat of the Pilot light, it creates enough electrical current to keep the gas valve open. The thermal couple comes in a coil, if you over bend it then bend it back it fucks it up and you will ruin it. So uncoil it till you get the right 90� + or- angle to fit the water heater. Another sign to tell a gas valve is bad is if the water heater doesnt keep temp. It will short fire itself. So when running the tub on hot all the way. You will get 120+ F water for like 5-10 minutes. But it will drop drastically down. This means the R factor is not being met by the gas valve. So it basicly thinks the water is hot enough but the entire tank is not up to temp. At that point you replace the water heater or gas valve if you can actually find one. Thanks! It doesn't seem to have trouble keeping temperature, it just doesn't want to stay lit. It went out last night, the handyman lit it this morning, and three hours later it was out again. Managed to produce enough hot water for a long, much needed shower and washing most of the dishes (except the kitchen sink doesn't want to drain now..) though. I think my roommate and I are just going to learn to relight the drat thing ourselves and bug the landlord when he comes back from vacation. I mentioned what you said to the handyman and he just stood there, like I was talking moon language. Then I witnessed him use a rolled-up paper towel to actually light the drat thing because he didn't have long matches or anything of the sort. Plus, he lives about an hour away so it's not like he can just drop by whenever.
|
|
#
?
Apr 29, 2011 20:55
|
|


|
You can replace the thermal couple yourself. Seriously its so easy. All you have to do is unscrew it from the gas valve, get some needle knows pliers and pull it out by the burner. Install the new one, and thread it back in and you are good. Re light and you are done. My first one took like 15 minutes and that was mainly because I wanted to make sure I didnt have to remove the burner to replace it. Which usually you dont, they are just pinned in there. I imagine home depot would sell an 18" or 24" thermal couple. You can remove the old one and straighten it to measure the length of it. And to light most water heaters its simple. Turn the gas valve to pilot. Press the handle down so it opens the gas valve. Put flame to the end of the thermal couple and hold down the gas valve for 30 secs until the pilot light stays lit. Once it stays lit, turn the gas nob to on. Then turn the temp dial up to B or around the middle of the dial so it will cook it to 120F. edit: Here is a video on youtube how to replace it. http://www.youtube.com/watch?v=v0aBPsNg6vo Turd Herder fucked around with this message at 21:16 on Apr 29, 2011 |
|
#
?
Apr 29, 2011 21:09
|
|
|
Rd Rash 1000cc posted:And to light most water heaters its simple. Turn the gas valve to pilot. Press the handle down so it opens the gas valve. Put flame to the end of the thermal couple and hold down the gas valve for 30 secs until the pilot light stays lit. Once it stays lit, turn the gas nob to on. Then turn the temp dial up to B or around the middle of the dial so it will cook it to 120F. I'll discuss this with my roommate when he gets home. And thanks for the tips on lighting it. The water heater has full instructions for that printed on the side, but it doesn't include "plan b" for when one of the steps doesn't work.
|
|
#
?
Apr 29, 2011 21:13
|
|
|
Ya no problem, oh and it looks like the video I posted above actually shows how to light the pilot too.
|
|
#
?
Apr 29, 2011 21:17
|
|
|
Rd Rash 1000cc posted:Ya no problem, oh and it looks like the video I posted above actually shows how to light the pilot too. Well.. after watching the video I feel kind of dumb, now that I realized which part the thermocoupler is.. And you say bending it excessively is bad? Do you perhaps have any suggestions for getting around this design flaw? My thermocoupler looks like an unbent coathanger.   It's actually worse in person. I just can't get very good pictures of it.
|
|
#
?
Apr 30, 2011 00:26
|
|
|
Mizufusion posted:Well.. after watching the video I feel kind of dumb, now that I realized which part the thermocoupler is.. And you say bending it excessively is bad? Do you perhaps have any suggestions for getting around this design flaw? My thermocoupler looks like an unbent coathanger. What I meant is if you bent the thermal couple in a 90 then bend it back straight it can mess it up. So basically you bend it slowly and try not to tweak it to much. Does that make sense?
|
|
#
?
Apr 30, 2011 00:37
|
|
|
Rd Rash 1000cc posted:What I meant is if you bent the thermal couple in a 90 then bend it back straight it can mess it up. So basically you bend it slowly and try not to tweak it to much. Does that make sense? Ah, okay. There is a spot on mine where it looks like someone did just that, but it's impossible to photograph.
|
|
#
?
Apr 30, 2011 00:48
|
|
|
Mizufusion posted:Ah, okay. There is a spot on mine where it looks like someone did just that, but it's impossible to photograph. When I install one I slowly roll it out , and keep inserting it till I get close to the angle so then I can finally bend it in place to get it to light.
|
|
#
?
Apr 30, 2011 01:38
|
|
|
Rd Rash 1000cc posted:That vent needs to be 10 feet from that window . You have the chance to smell the vent. The minimum it needs to be above the roof is 12 inches. Unless you are in a higher snow elevation. All the fixtures require a vent. The toilet requires a 2 inch vent, the shower and lav only require 1 1/4 unless you wet vent them. I'm pretty sure the windows aren't able to be opened, does that change anything? We're in NH, so getting 2+ feet of snow on the roof isn't uncommon. I'll see how far up my pipe is on my house. I don't care if it looks dumb because that's the back of the building by the emergency exit and going through there would be easier than the roof. I guess the final call is up to the landlord though. Also, see how the door has been put in where a window used to be? We're now planning on taking out the boarded up window 3 spots to the left of it and moving the door over there. The current door is junk and needs to be replaced anyway, so we'll just board up that opening.
|
|
#
?
Apr 30, 2011 02:46
|
|
|
Hillridge posted:I'm pretty sure the windows aren't able to be opened, does that change anything? We're in NH, so getting 2+ feet of snow on the roof isn't uncommon. I'll see how far up my pipe is on my house. If the windows aren't able to open and are solid then it doesn't matter how close the vent is. If you get 2 feet of snow regularly I'd suggest at least having a vent that is above that. And if you want to put it out a wall its up to you but it will lower the property Value aesthetically. Since someone is more likely to question it when they see a vent run out the side of the building then up. Turd Herder fucked around with this message at 10:24 on Apr 30, 2011 |
|
#
?
Apr 30, 2011 10:16
|
|
|
Not sure if this applies to this thread, since it's our heating unit, but I know nothing about this thing except that we're getting two significant drips from it and wasting hot water, and I'd really like to learn more about it, so we can do things on our own. One of the drips is from the pipe right over the yellow bucket, another from an overhead pipe real close to the unit. Are these indicative of larger problems, or just something that takes an easy fix? We've noticed the drips are getting worse, at least from the one overhead. 
|
|
#
?
Apr 30, 2011 18:23
|
|
|
unprofessional posted:Not sure if this applies to this thread, since it's our heating unit, but I know nothing about this thing except that we're getting two significant drips from it and wasting hot water, and I'd really like to learn more about it, so we can do things on our own. One of the drips is from the pipe right over the yellow bucket, another from an overhead pipe real close to the unit. Are these indicative of larger problems, or just something that takes an easy fix? We've noticed the drips are getting worse, at least from the one overhead. I've worked on a couple boilers so I can help you. The line leaking into the bucket is your T/p valve. You can replace it yourself but I dont even know if home depot would sell the right ones. And it would require you to turn off the boiler, take the cover off, turn off the expansion tank (or let the pressure out of the bladder on it) Unscrew the old t/p and install a new one very quickly so you don't loose much water. And for the leaking boiler drain. If the leak is coming out of the drain itself you can just throw a hose bib cap in it. Home depot carries something similar to it. http://www.amazon.com/Hose-cap-3-4-female/dp/B003LNYQX0/ref=sr_1_cc_1?ie=UTF8&qid=1304187630&sr=1-1-catcorr If its leaking from the stem of that valve you just have to tighten the packing on it. This is a common problem in a boiler drains that are installed upside down like that. It would be nice to replace but you'd have to solder in a new one since they didn't make it an iron pipe boiler drain.
|
|
#
?
Apr 30, 2011 19:23
|
|
|
Rd Rash 1000cc posted:The boiler drains for the washing machine are standard. You can get new ones to replace them. They are 1/2 Iron Pipe Size by 1/2 hose adapter. (dont get the 1/4 turn boilder drains, they usually end up leaking.) Thanks for the help. The reason that I wanted to go with pex is I figured it would be easier for a newb like me to work with. Also, for whatever reason, I thought that because galvanized is kind of the older technology, stores might not stock it anymore. I have a new plan now, since Lowe's will cut and thread the pipes for me. Correct me if I'm wrong, but this seems like the easiest method. All I need to before making the connections is to tape and dope the threads, right?
|
|
#
?
May 1, 2011 22:21
|
|

|
rhombus posted:Thanks for the help. The reason that I wanted to go with pex is I figured it would be easier for a newb like me to work with. Also, for whatever reason, I thought that because galvanized is kind of the older technology, stores might not stock it anymore. Pex is simple it just needs to be supported. And yes you will have to put a couple wraps of teflon tape on then brush a thin layer of dope on it. Just put the tape and dope on male threads. Galvy is still being used and it will work if you want to go that around. And if you remove all of the stuff you want to replace you then you have all your cut lengths if you measure the pipes. Also make sure you can shut off the water completely and drain it down. So you know if you have to do this partially live with it dripping slightly.
|
|
#
?
May 2, 2011 00:14
|
|
|
I just installed a kitchen faucet. I'm not a plumber but I think the last guy who owned this house goofed. I was having a really hard time getting the nuts off the threads for the old faucet housing in the sink (not the hoses). Wife was holding the top parts with a wrench while I tried twisting the nuts from below and they would not come off. I even got a wrench that flips at 90 degree angle and it was actually starting to strip. I thought they might have corroded so I had to drill them off. Then I tried to remove the housing for the water wand, which is a plastic nut with wings on it that I assume is only supposed to be finger tight on the plastic housing. It would not twist and the wings were breaking. I drilled this as well and then had to used a screwdriver to pry the parts of the nut off the threads. That's when I reallized that there was something that looked like plumber's putty all over the bottom of the sink and all in the threads of all the housing attachments. I didn't think you would need plumber's putty for housing (again not the hoses) especially for the threading considering it makes it impossible to remove. Am I right that silicon should instead be used on the top of the sink to seal if needed?
|
|
#
?
May 2, 2011 05:30
|
|

|
londerwost posted:I just installed a kitchen faucet. I'm not a plumber but I think the last guy who owned this house goofed. I was having a really hard time getting the nuts off the threads for the old faucet housing in the sink (not the hoses). Wife was holding the top parts with a wrench while I tried twisting the nuts from below and they would not come off. I even got a wrench that flips at 90 degree angle and it was actually starting to strip. I thought they might have corroded so I had to drill them off. Then I tried to remove the housing for the water wand, which is a plastic nut with wings on it that I assume is only supposed to be finger tight on the plastic housing. It would not twist and the wings were breaking. I drilled this as well and then had to used a screwdriver to pry the parts of the nut off the threads. That's when I reallized that there was something that looked like plumber's putty all over the bottom of the sink and all in the threads of all the housing attachments. I don't even silicone around the faucet where it attaches to the sink because they usually come with a plastic gasket to seal it.
|
|
#
?
May 2, 2011 06:18
|
|
|
I have to move some pipes so my new vanity will fit. Blue is the cold water line. Red is the hot water line. The black line is just an empty pipe soldered to the outside of the hot and cold pipes. I imagine this is to provide support. I have to move my hot water and my drain to the left of the Green dotted line. It looks like someone had attached the hot water to the toilet line, and this was capped off and a new route was made to the toilet from the cold. This section of drywall came off very easily as it was poorly taped and spackled. There is another bathroom on the opposite wall. The water pipes come down from the ceiling, then split off at a T, and exit through the walls. What is the easiest way to move the hot pipe on this side of the wall without disturbing the other side? It looks like with the drain, I'll just have to cut it off before the Wye fitting. Then replace the Wye and the elbow out the other side with a straight section and a 3-Way Sweep 90 Tee going out both sides of the walls. Does this sound correct? 
|
|
#
?
May 15, 2011 16:09
|
|

|
FogHelmut posted:I have to move some pipes so my new vanity will fit. For the drain, you technically aren't suppose to run 2 fixtures off one dirty arm like that. But even if you cut in another wye on its side it will work. Don't cut a Tee in unless you plan on making it vertical.
|
|
#
?
May 15, 2011 19:14
|
|
|
Rd Rash 1000cc posted:If you just 90 the hot line over and shoot it over about 4 inches from center of drain so its in about the right spot. Then run the cold line 4 inches off center to the other end of the sink so hot and cold are on the proper sides. (hot is usually on left side, while cold is usually on the right.) I'm doing this much, so I might as well just do it all. I'm going to chop off the copper above the T joint. Transition this to CPVC with a SharkBite connector, and put in new valves and connections, then transition back to copper to the toilet from the CPVC. The drain pipe is going to give me the biggest headache. I won't do the T connection. The pipe in the wall is ABS. Is it better to do a rubber connector to PVC? I only ask because the PVC parts seem to be more available than ABS. Otherwise, I'll just search for some ABS.
|
|
#
?
May 15, 2011 20:25
|
|
|
FogHelmut posted:I'm doing this much, so I might as well just do it all. I'm going to chop off the copper above the T joint. Transition this to CPVC with a SharkBite connector, and put in new valves and connections, then transition back to copper to the toilet from the CPVC. I'd use pex instead of CPVC. Cpvc can cause issue in 10 years or so. Also when using shark bite Sand each piece of pipe and then put some vegetable oil on it. (any potable oil will work.) I put my finger in the oil then put it on the pipe in a thin layer, then put rub it into the O ring of the shark bite fitting. Most cases you don't have to do this but once you get one fitting that fucks you over for a half an hour because you didn't do it. Then you will sand and lube every shark bite fitting you use. You can use a No hub to transfer from abs to pvc. It'd suggest it over the transition fittings they have.
|
|
#
?
May 15, 2011 22:45
|
|
|
Rd Rash 1000cc posted:I'd use pex instead of CPVC. Cpvc can cause issue in 10 years or so. Also when using shark bite Sand each piece of pipe and then put some vegetable oil on it. (any potable oil will work.) I put my finger in the oil then put it on the pipe in a thin layer, then put rub it into the O ring of the shark bite fitting. Thanks for all the advice. I had already bought the CPVC though. What can go wrong in 10 years? I was able to find all of the ABS pieces at Lowes. Home Depot only had stuff for larger drains. 
|
|
#
?
May 16, 2011 01:42
|
|
|
FogHelmut posted:Thanks for all the advice. I had already bought the CPVC though. What can go wrong in 10 years? They usually leak at the joints over time. Thats just my experience I have encountered in apartment complexes that were built in 95.
|
|
#
?
May 16, 2011 04:25
|
|
|
Alright, Goon Plumbers- I need help! We recently discovered why all our clothes are shrinking- our washing machine only puts out hot water. We live in an old-school duplex, and the washer and dryer are in a storage room along side of the house, connected to the garage/covered parking thing. Not sure if that's relevant at all. Probably not. Sorry for the image quality, kinda had to lean over the machine with my phone. If I feel the hose connections, the one circled in red is clearly warm, and the one in blue is cold, but I'm not sure if it's cold because of the water or cold because it's metal. But, you can feel the water flowing through them while the washer is filling. Both are connected to the back of the washer, and both are turned on all the way. Whether it's set on cold, tap, hot, whatever, it always starts cool-ish (probably just the lukewarm water in the pipes) then turns piping hot within 30 seconds. We did check all the settings to see if the hoses were flipped (hot meant cold, cold meant hot) but that wasn't the case. The washer is a little over a year old- the combo was a moving-in present from my folks- so I doubt they're broken. It's a simple turn-dial GE high efficiency model, if that makes any difference. If we don't plan on doing any Hot washing at all, can I just turn off the knob that the hot water comes from? Or would that mess something up? Fair warning, I'm not very much of a handyman. My dad knows hardware and such, but nothing about plumbing, so I can't turn to him. I guess I could ask the landlord, but it's not his washer, so it's not his problem. Any ideas? TShields fucked around with this message at 18:40 on May 18, 2011 |
|
#
?
May 18, 2011 18:37
|
|

|
TShields posted:Alright, Goon Plumbers- I need help! We recently discovered why all our clothes are shrinking- our washing machine only puts out hot water. We live in an old-school duplex, and the washer and dryer are in a storage room along side of the house, connected to the garage/covered parking thing. Not sure if that's relevant at all. Probably not. Turn off both boiler drains and disconnect both hoses. run them into a bucket and see if they are really hot and cold. They both could be hot due to a crossed line. I don't know a ton about washing machines but I doubt its the issue. Once you make sure you have hot and cold lines just make sure you hook them up properly and go from there.
|
|
#
?
May 18, 2011 22:26
|
|
|
We recently replaced an old toilet in our bathroom. The old one was set up for 12" from the wall to the bolts, but our house only has about 11 - 11 1/2". On top of that it was filled up with scale and couldn't flush worth a drat. We replaced it with an American Standard Cadet 3, compact. This one fits much better and flushes like a champ. This model toilet gets a thumbs up from this guy.
|
|
#
?
May 19, 2011 04:37
|
|

 It's burgin' time!

|
I heart bacon posted:We recently replaced an old toilet in our bathroom. The old one was set up for 12" from the wall to the bolts, but our house only has about 11 - 11 1/2". On top of that it was filled up with scale and couldn't flush worth a drat. We replaced it with an American Standard Cadet 3, compact. This one fits much better and flushes like a champ. This model toilet gets a thumbs up from this guy. I recently installed an American Standard Cadet 3 in my one bathroom. I'm really impressed with it's flushing ability considering the cost. I will be installing another one in my other bathroom. Speaking of, should I be concerned about the angle of this flange? There is going to be tile on the floor. Should the wax ring(s) take care of it? 
|
|
#
?
May 19, 2011 14:31
|
|
|
FogHelmut posted:Speaking of, should I be concerned about the angle of this flange? There is going to be tile on the floor. Should the wax ring(s) take care of it? The wax ring will not fix that if there is going to be tile.
|
|
#
?
May 19, 2011 16:36
|
|

|
Rd Rash 1000cc posted:Turn off both boiler drains and disconnect both hoses. run them into a bucket and see if they are really hot and cold. They both could be hot due to a crossed line. I don't know a ton about washing machines but I doubt its the issue. Once you make sure you have hot and cold lines just make sure you hook them up properly and go from there. So yeah.. I fixed it. Solution was too dumb for me to even say. Thanks for the reply, though.
|
|
#
?
May 19, 2011 20:11
|
|
|
Neutrino posted:The wax ring will not fix that if there is going to be tile. Why not? There was already a toilet on there before.
|
|
#
?
May 19, 2011 20:23
|
|
|
Was there the same thickness tile there before? Also just because there was a toilet doesn't mean it worked well. For a wax seal to work well it needs to be compressed well. Unfortunately with an angled flange all the compression will happen on one side and not the other lower spot. It will "work" but your bathroom will smell like a sewer.
|
|
#
?
May 19, 2011 21:16
|
|
|
You can get toilet flange extensions for when you put the tile in. Wax plus an extension should be fine. Edit: both sides will compress/spread as long as the wax goes high enough all the way around, one will just compress more.
|
|
#
?
May 19, 2011 21:16
|
|

|
jackyl posted:You can get toilet flange extensions for when you put the tile in. Wax plus an extension should be fine. I agree with jackyl, just use a with a horn attached. And I agree, the cadet 3 is an awesome toilet. I am running two right now and I havent clogged them no matter how hard i try.
|
|
#
?
May 20, 2011 04:17
|
|
|
I'm trying to plan out the plumbing for the bathroom I mention a page or so back. Here's what I have so far, do you think it will be ok, or am I doing something stupid? Behold my amazing MS paint plumbing schematic: 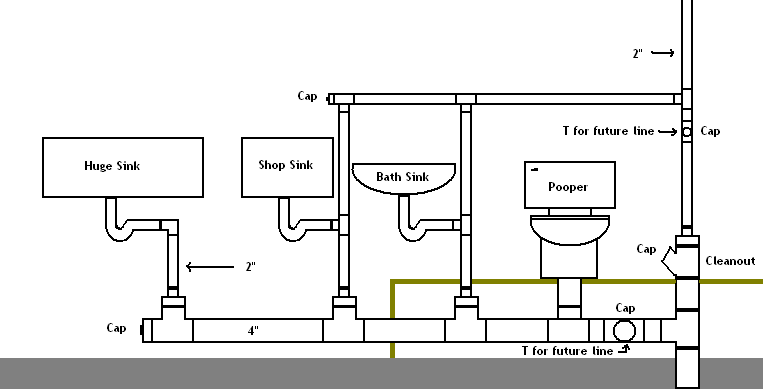 The 4" pipe running across the whole bottom will be sloped toward the drain at a rate of 1" every 4' The bathroom itself is up on a structure we've dubbed the "poop deck". It's basically a platform we built 2' above the cement so we have enough space for the plumbing. The shop sink is one of those deep white plastic sinks, and the huge sink is this gigantic metal thing like you'd find in a cafeteria. Both of those will be outside the bathroom and not on the poop deck. We may eventually add a kitchen next to the bathroom, so I drew in T's on the drain and vent that will be capped until we need them.
|
|
#
?
May 20, 2011 15:41
|
|
|
Hillridge posted:I'm trying to plan out the plumbing for the bathroom I mention a page or so back. Here's what I have so far, do you think it will be ok, or am I doing something stupid? The shopsink (laundry sink ) and bath sink ( lav) are correct, the rest arent. The toilet needs a 2" vent, and the huge sink needs a vent. You can not use a T on its back to vent either. You can wet vent the toilet and use the Vent for that to drain the lav. The huge sink will most likely require a 1.5" vent. To properily vent the toilet you can use a low heel 90, or roll a wye with a 45 in it and point to a near wall. You are correct on running a 1/4 inch per foot of grade. Though with 4" UPC code states you can run it at 1/8th but it lowers the fixture units you can run on it. (though what you are running only requires a 3") Turd Herder fucked around with this message at 03:25 on May 21, 2011 |
|
#
?
May 21, 2011 03:22
|
|
|
Rd Rash 1000cc posted:The shopsink (laundry sink ) and bath sink ( lav) are correct, the rest arent. The toilet needs a 2" vent, and the huge sink needs a vent. You can not use a T on its back to vent either. You can wet vent the toilet and use the Vent for that to drain the lav. The huge sink will most likely require a 1.5" vent. Is the bath sink not wet venting the toilet as I have it drawn because it is upstream of it, or is there some other reason? Do you have an example of what it should look like? Why can't I use a T on the huge sink like I have on the other two?
|
|
#
?
May 23, 2011 15:21
|
|
|

|
| # ? May 26, 2024 13:11 |
|
|
Hillridge posted:Thanks for the response, I now have a few more questions. Here is an isometric drawing My paint skills arent as good as yours but i hope its clear. The dotted lines are the vents. I tried to show fittings with lines, I have tee's and 90's for the vents. Tee's are used for the horizontal drains coming up from the main. And then use a wye with a 45 in it in the horizontal to make come off the main vertically. The toilet is vented one of many ways possible. I used a 3x2 low heel. its a 3 inch 90 with a 2 inch outlet on the top. The 2 inch vent from the toilet is being used as a wet vent for the lav thats near the toilet. I should have explained the tee's more. But you cant use a tee horizontally unless its for venting. 
Turd Herder fucked around with this message at 17:51 on May 23, 2011 |
|
#
?
May 23, 2011 17:49
|
|