


|
In a few weeks I'm going to start building a living room furniture set. Couch, Loveseat, Chair and possibly an ottoman. They'll be fully upholstered but I wonder if that is something you guys would like to see here or in a thread of it's own?
|
 #
?
May 17, 2011 23:55
#
?
May 17, 2011 23:55
|
|


|

|
| # ? May 22, 2024 18:58 |
|
|
Definitely. At the very least, shamelessly plug your thread here if you make one! ") If you're doing a full set, though, with upholstery and everything, I bet a thread would be worthwhile.
|
|
#
?
May 18, 2011 00:31
|
|


|
Bad Munki posted:Definitely. At the very least, shamelessly plug your thread here if you make one! Yeah, going to do the whole nine yards as soon as I have time for it, right now I have a set I'm simply reupholstering. I thought about making a thread for just this project, but then I figured I could cover it all at once on the next project.
|
|
#
?
May 18, 2011 01:05
|
|
|
I guess I can crosspost this here because, well, it's woodworking. ") Bad Munki posted:Aeolian Harp Mark II is going to be about a bajillion times nicer than Aeolian Harp Mark I:
|
|
#
?
May 18, 2011 01:28
|
|


|
How bad of an idea is it to rig up a drill press as a vertical lathe? I'd only really be using it for tool handles and other reasonably-small doodads.
|
|
#
?
May 18, 2011 01:34
|
|

|
It will work somewhat, but the bearings in a drill press aren't made for that sort of side load and it can damage it over time.
|
|
#
?
May 18, 2011 02:26
|
|

|
Ambrose Burnside posted:How bad of an idea is it to rig up a drill press as a vertical lathe? I'd only really be using it for tool handles and other reasonably-small doodads. Like was mentioned before, don't do that! You don't want to try this then find out you need to buy a lathe anyways, plus a new drill-press. You can build your own lathe with a few scraps of wood, a table saw, a lathe. . . oh! Sorry. Honestly, before my father picked up a 2nd hand lathe I created a jig that allowed me to make rudimentary "lathe-esq" shapes on the router table. It was a jig that held the work piece over the router and allowed the work to spin. I had a brake made that allowed me to control the amount it spun (usually a mm at a time). The depth of the cuts were controlled by the router's depth adjuster and the whole assembly slid back and forth over the bit. I'd post a ms paint of the setup, but I don't think I could translate it well so that it made any sense. Also I'd say it wasn't the best idea since allowing the piece to slip would result in the bit binding or the piece being thrown across the room. Check out craig's list for one in your area. Once you get a lathe, you'll wonder how you lived without it.
|
|
#
?
May 18, 2011 04:18
|
|

|
Blistex posted:Check out craig's list for one in your area. Once you get a lathe, you'll wonder how you lived without it. I'm just hesitant because I'm not a woodworker- the only woodworking I'll be doing is handles and grips, period. It seems kinda silly to buy a tool for just that one task, especially when I won't be using it all that frequently.
|
|
#
?
May 18, 2011 19:55
|
|
|
I have no personal experience - but have you tried something like this? http://www.amazon.com/Grizzly-H2669-Hobby-Lathe/dp/B0000DD399/ref=sr_1_3?ie=UTF8&qid=1305745680&sr=8-3 (electric drill not included)
|
|
#
?
May 18, 2011 20:09
|
|
|
Bad Munki posted:I guess I can crosspost this here because, well, it's woodworking. Wow, very impressive! Is that from another thread here? I'm reminded of Rev. Dr. Moses P. Lester's Amateur Piano Repair thread. I could have sworn that went to the goldmine, but it appears not. Probably needs archives to read, but it was totally interesting.
|
|
#
?
May 18, 2011 20:34
|
|


|
That link is treason, Johnny!
|
|
#
?
May 18, 2011 20:47
|
|

|
Ambrose Burnside posted:I'm just hesitant because I'm not a woodworker- the only woodworking I'll be doing is handles and grips, period. It seems kinda silly to buy a tool for just that one task, especially when I won't be using it all that frequently. "One of us! One of Us! Gooble gobble, gooble gobble!"
|
|
#
?
May 18, 2011 20:49
|
|
|
stubblyhead posted:Wow, very impressive! Is that from another thread here? Yeah, the Post Your Projects Megathread. Someone showed us aeolian harps over there, and I'm enchanted with the idea. Made a crude one out of PVC and fishing line; it worked so now I'm trying to make a nicer one. I'm curious about the piano thread, but you actually linked to the reply form for this thread, quoting me.
|
|
#
?
May 18, 2011 20:49
|
|
|
rt4 posted:That link is treason, Johnny! Son of a... how did I do that? http://forums.somethingawful.com/showthread.php?threadid=3261478 It's really really impressive, dude fixes up this old piano without having the slightest idea how to do anything, just figuring it out as he goes along. He even replaces the pegboard, which is a very large and very major portion of the internal workings. stubblyhead fucked around with this message at 21:41 on May 18, 2011 |
|
#
?
May 18, 2011 21:39
|
|
|
I saw this video linked over at woodnet, I thought it was pretty neat: http://www.youtube.com/watch?v=q3utt2Y5aH0
|
|
#
?
May 19, 2011 15:28
|
|
|
That was pretty neat. I have a small rosette, like so:  I need to cut the hole for it. The rosette is sold as 1 1/2" diameter, which seems accurate enough to the actual item (allowing a little over 1/64" for glue). My question is, how best to cut the hole? It's going into 1/8" oak, maybe even a little thinner than that if I decide to run it through the planer a couple more times. Is a hole saw my best bet here? I'm wary of a spade bit because, at least in my experience, they tend to be a bit messy, and on a thin (carefully chosen) piece of wood like this, I really don't want to gently caress it up. Is there some other bit I should consider? Of course I'll be doing this on a drill press, so that can be part of the consideration.
|
|
#
?
May 19, 2011 20:03
|
|
|
Forstner bit or a router template.
|
|
#
?
May 19, 2011 20:12
|
|

|
Is one or the other "better?" I don't have a circle template for the router, assuming you're talking about one where you'd lay it over the workpiece and put a bushing on the router to trace it correctly. Otherwise, if you're talking about a circle guide, as in a pinned arm that replaces the plate on the router, I do have that, but it seems overkill for such a small thing.
|
|
#
?
May 19, 2011 20:18
|
|
|
Yeah, I was more referring to the template that goes over the work piece, not the Jasper type things a lot of people use for speaker building. I guess that might work...Router would definitely be a cleaner cut, but a good forstner bit usually leaves a clean entry, some tearout on the sides of the interior of the hole sometimes if it's dull.
|
|
#
?
May 19, 2011 20:36
|
|
|
Hmm. I imagine I'd have to make the template myself, which kind of presents a chicken vs. egg problem. I guess I could buy a forstner bit to cut the template to make the hole...  I'll just give the forstner bit a try on some scrap I have. Since I'll have to go buy one, it ought to be good and sharp. e: worked like a charm and the rosette is currently drying in place. I wasn't sure how best to clamp it, so I put the 1/8" plank between two books (with some plastic wrap over, of course) and then set a couple 25lb. iron plates on it. That ought to be well enough. Bad Munki fucked around with this message at 22:31 on May 19, 2011 |
|
#
?
May 19, 2011 20:39
|
|
|
I've decided to get into woodworking and find the idea of using hand tools particularly appealing. I also need some bookshelves so I can move my books out of my parents house. See where I'm going here? My questions are: How do you make dado's with hand tools? Also, how should I join the sides and top so the shelf is actually sturdy?
|
|
#
?
May 19, 2011 21:58
|
|
|
captkirk posted:My questions are: How do you make dado's with hand tools? Also, how should I join the sides and top so the shelf is actually sturdy? A couple of favorites: Tage Frid Teaches Woodworking is a 3 volume set that is a class by a master woodworker. Also, The Complete Woodworker's Companion by Roger Holmes. The latter will get you up and running quicker but the former is a treasure trove of information. http://www.amazon.com/Tage-Frid-Teaches-Woodworking/dp/1561588261/ref=sr_1_3?s=books&ie=UTF8&qid=1305851466&sr=1-3 http://www.amazon.com/Complete-Woodworkers-Companion-Roger-Holmes/dp/0823008665/ref=cm_cr_dp_orig_subj I would also recommend looking around for woodworking classes, either at stores that specialize in woodworking or some community colleges have evening classes for adults, often held at local high schools. You can also take private woodworking lessons although those tend to be spendy.
|
|
#
?
May 20, 2011 01:45
|
|

|
Stupid, stupid, stupid. Damnitall. So I got that rosette set in place. Looked great, I was really happy. So what did I do? Well, for some insane loving reason, I decided to take the power sander to it. I still don't know why the hell I did that. As I did it, I thought, "Huh, I should be using a sanding block for this part." And that was about the time the rosette completely shattered. I was all amped up to finish this thing, too, and I would have, but now I have no rosette because I didn't think to order any backups. Also meant I had to drill the fragments of the old one out of the soundhole, but that at least went as planned. So now I have to wait for the new rosette to come in, as that is literally preventing me from making any further progress on this thing. What the hell was I thinking.
|
|
#
?
May 20, 2011 03:48
|
|
|
Just finished my chairs and gave them a coat of Spar Varnish - this poo poo is amazing for outdoor furniture. Look at this Cedar - LOOK AT IT. 
|
|
#
?
May 20, 2011 14:10
|
|
|
That is looking sweet! I have some heavy duty cedar lawn chairs on my deck that the previous owners left behind. They're grey and I was debating if I should sand and stain them, or just keep them grey. Now I think I'm leaning towards the stain.
|
|
#
?
May 20, 2011 17:23
|
|
|
Hello Woodworking thread! Quick finishing question. I'm going to be building a frame for a mirror this weekend and I'm wondering. Should I finish the individual pieces before putting them together, or once they've all been glued and set around the mirror? I'm worried about finish getting in the grove where the mirror will be housed. Any advise is appreciated.
|
|
#
?
May 20, 2011 17:46
|
|

|
jvick posted:Hello Woodworking thread! Quick finishing question. I'm going to be building a frame for a mirror this weekend and I'm wondering. Should I finish the individual pieces before putting them together, or once they've all been glued and set around the mirror? I'm worried about finish getting in the grove where the mirror will be housed. One would normally finish at the end - but for a simple project, you could finish before glue-up. Clamping pressure might mar the finish though  Also, make sure you don't get finish on any areas you are going to apply glue to.
|
|
#
?
May 20, 2011 20:13
|
|
|
Thanks for the tip. I plan to make little pieces around the corners with some cloths to protect the finish. Hopefully it works!
|
|
#
?
May 20, 2011 21:19
|
|
|
A rabbet on the back for the mirror would have been a non-issue but if it's sliding into a groove then you can either tape the mirror or pre-finish. I would pre-finish.
|
|
#
?
May 20, 2011 22:50
|
|
|
wormil posted:A rabbet on the back for the mirror would have been a non-issue but if it's sliding into a groove then you can either tape the mirror or pre-finish. I would pre-finish. I think I may go this route now that I've seen the actual router bit that I'll be using. It's a lot deeper than I anticipated. I think this way the frame will actually be stronger overall once a backing has been put on.
|
|
#
?
May 21, 2011 16:54
|
|
|
Tired of making heavy, expensive things, I made a box! It is walnut and maple with an aromatic cedar bottom. Used Tung oil instead of our standard water based finish for no good reason. It needs another coat to get the inside corners, but it turned out pretty good. It would have hinges on it but the brass screws stripped when I looked at them wrong. My camera flash is broken so excuse the sidewalk.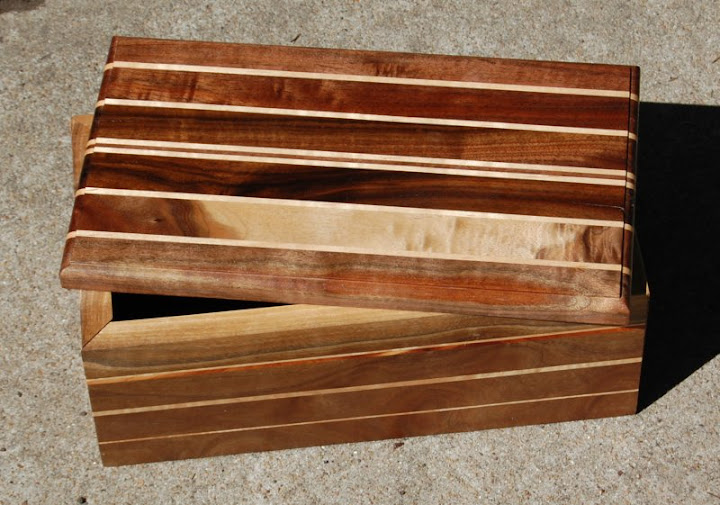 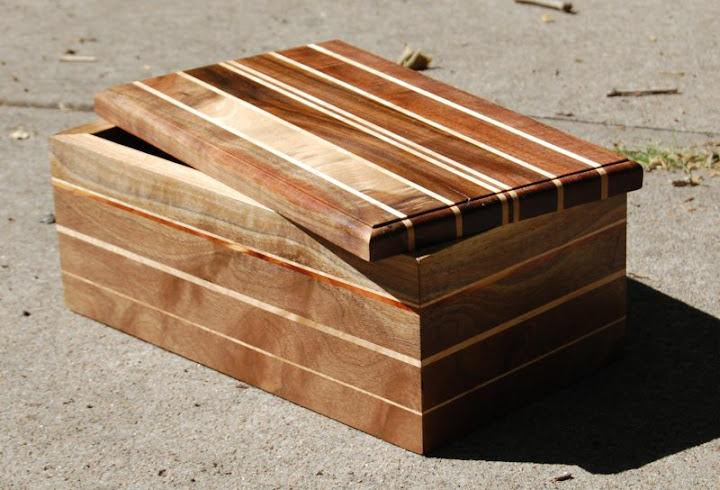 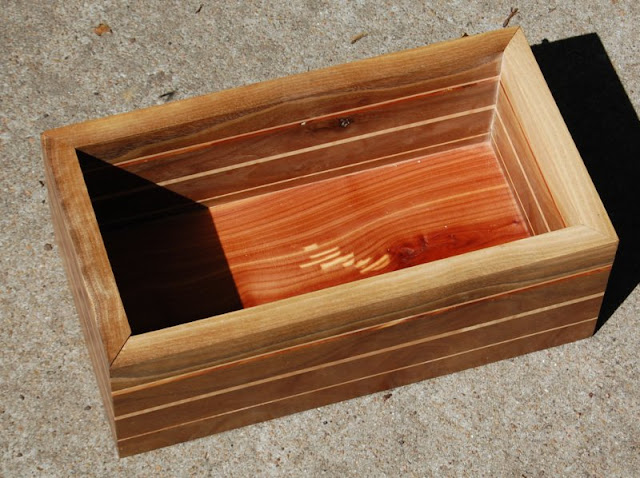 Also, we had power tool races at school and kicked serious butt. This is a panel saw with wheels. It drives itself from the actual blade of the saw. The front blades are just cool looking wheels. It is also a bad idea. 
|
|
#
?
May 21, 2011 22:41
|
|

|
I just got a new toy.  Some assembly required, but it was free.
|
|
#
?
May 22, 2011 19:56
|
|


|
SO I have to probably be one of the world's worst finishers. I put the first coat of finish on my mirror frame annnnnnddddd, it's uneven. I'm wondering if you guys have any suggestions, is there an easy way to fix this, can I sand part of it down? Will a second coat even things out? My problem is that I have a second frame to do and I don't want them to be all mis-matched. too thick:  Juuuuust right: 
|
|
#
?
May 23, 2011 01:39
|
|
|
jvick posted:SO I have to probably be one of the world's worst finishers. I put the first coat of finish on my mirror frame annnnnnddddd, it's uneven. I'm wondering if you guys have any suggestions, is there an easy way to fix this, can I sand part of it down? Will a second coat even things out? My problem is that I have a second frame to do and I don't want them to be all mis-matched. What kind of finish? Looks to me like you might letting it try too much before wiping it back. You could try a pre-conditioner to even out the pores (if its blotching because it's open pored wood)....You could try sanding it back but you might have issues with the profile in the frame losing it's crispness. MarshallX fucked around with this message at 16:34 on May 23, 2011 |
|
#
?
May 23, 2011 16:32
|
|
|
MarshallX posted:What kind of finish? Looks to me like you might letting it try too much before wiping it back. I used a Minwax Stain & Poly in one. I tried it on a test piece and when I wiped that with a rag, it pretty much took all the stain off. I thought about using a rag damped with a bit of mineral spirits to even it out. For the second frame I'll probably thin the finish just a tad with the mineral spirits before applying.
|
|
#
?
May 23, 2011 17:59
|
|
|
dur posted:I just got a new toy. Nice. It is a later, lighter weight model, but if you set it up properly it should provide you with tons of utility.
|
|
#
?
May 23, 2011 18:31
|
|

|
GEMorris posted:Nice. It is a later, lighter weight model, but if you set it up properly it should provide you with tons of utility. I posted the one I picked up over in the Tools thread, a '63 Craftsman. It's going to need a lot of TLC. I was reading through the manual and was surprised to see that you can rotate the saw blade to rip boards fed through from the side. Would that work well enough that I could put off getting a table saw for a while?
|
|
#
?
May 23, 2011 21:19
|
|

|
I've got a rocking chair made out of ash and stained "walnut." I put that in quotes because it doesn't look like walnut at all. I'd like to put a nice cherry stain on it, but I've never stained anything before. Would it be a lot of work? Are the fumes particularly bad? I'd be doing it outside, but I'm also six months pregnant and my husband freaks out over things like that.
|
|
#
?
May 24, 2011 00:51
|
|
|
Cpt.Wacky posted:I posted the one I picked up over in the Tools thread, a '63 Craftsman. It's going to need a lot of TLC. *sigh* When I find time to finish my RAS restoring project that is.
|
|
#
?
May 24, 2011 09:35
|
|
|

|
| # ? May 22, 2024 18:58 |
|
|
Brennanite posted:I've got a rocking chair made out of ash and stained "walnut." I put that in quotes because it doesn't look like walnut at all. I'd like to put a nice cherry stain on it, but I've never stained anything before. Would it be a lot of work? Are the fumes particularly bad? I'd be doing it outside, but I'm also six months pregnant and my husband freaks out over things like that. Has this already been stripped? If not, then you will have to remove the old finish. If/when that is done, you might want to go to Home Depot and check out the stain samples they have. They're in little packages like Ketchup packets you get with take-out. Pick a few that you're interested in and then test them on the underside of the chair. Staining is easy. It's when you get into custom mixes and thinning that it becomes tricky.
|
|
#
?
May 24, 2011 17:26
|
|