

|
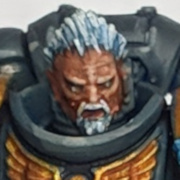
Bhyo posted:These guys have been on my brain for the past month so I dropped everything to get the first one painted. The models really were lovely and I enjoyed having to convert arms from my proper marine kits to work with the halberds. This looks pretty awesome. All metalic armors can be tough, but the detailing and contrasts on this really make it work. You have a whole squad, right? Looking forward to seeing that.
|
 #
?
Aug 15, 2011 16:11
#
?
Aug 15, 2011 16:11
|
|


|

|
| # ? Jun 8, 2024 08:08 |
|
|
Ashcans posted:This looks pretty awesome. All metalic armors can be tough, but the detailing and contrasts on this really make it work. You have a whole squad, right? Looking forward to seeing that. 3 more to do yes, but I'll probably finish some other stuff before I move onto the next one.
|
|
#
?
Aug 15, 2011 16:34
|
|

|
stabbington posted:The best thing to do when you see someone painting better stuff than you is pick their brains for tips (which is half the purpose of this thread) and get them to show you how they do various things, if they have the time. Nothing teaches you a technique or method better than seeing it first-hand and being able to ask questions about it. I try and post a 50/50 split between begging for compliments and offering advice, usually to the point where I end up doing some stage by stage post and learning something myself. It's been said a million times before but the best way we learn is through critique and picking other peoples brains. I'm no PV by a long shot but I'm improving and mainly through listening to other people and not being afraid to ask questions. If you saw my earlier post about teaching a class of 30 kids it probably explains why I end up posting lots of  with step by step stuff, it's not me being patronising it's just in my programming with step by step stuff, it's not me being patronising it's just in my programming 
|
|
#
?
Aug 15, 2011 17:52
|
|
|
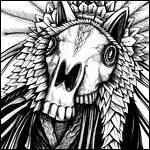
On that note, richyp, on that last image you uploaded of the troll(?) dude, how did you get those tones so smooth on the muscles, I can't seem to quite get my highlighting to look the same, it ends up looking blocky and blotchy.
|
|
#
?
Aug 15, 2011 18:46
|
|

|
Flipswitch posted:On that note, richyp, on that last image you uploaded of the troll(?) dude, how did you get those tones so smooth on the muscles, I can't seem to quite get my highlighting to look the same, it ends up looking blocky and blotchy. My trick to make my highlights look smoother is to stand farther away.
|
|
#
?
Aug 15, 2011 18:48
|
|

|
Cycloptic progress. More purple pants highlights and cleaning up the bone highlights next. And I have to figure out something to make the turqoise pop a little more. Maybe. I think it's the first couple things I've painted in 10 years. Well at least that. The sandy gritty paste crap was super helpful for basing, but impossible to get out of my underwear. The tiles are plasticard. The bannerpoles are bullshit, and one broke because it was pinned too far on one side, and weakened. But everybody who plays warmahordes already knows that. Oh and I did a brown dip. All things considered, I think I'd rather slather with a wash and a fluffy brush. But it's ok as long as the model fits in the jar.
|
|
#
?
Aug 15, 2011 18:55
|
|

|
Flipswitch posted:On that note, richyp, on that last image you uploaded of the troll(?) dude, how did you get those tones so smooth on the muscles, I can't seem to quite get my highlighting to look the same, it ends up looking blocky and blotchy. It was my first proper attempt at blending rather than layering. What I did was paint the whole body blue then wash it with Asurmen Blue. After it dried I repainted everything but the crevices in the original blue (think it was vmc blue grey). This was the hard bit, but its more obvious on the flesh->blue parts on the arms but the technique was the same: Paint a line of the original colour where you want the blend to end, then on the other side paint your lighter shade, while they're both still wet pull the lighter paint into the original blue and keep dragging the brush in one direction until it looks like a gradient. On the muscles I did a circle of the blue where the gradient would end, then painted the lighter blue in the middle, dragging the brush from the middle to the edge of the "circle" repeatedly until it looked smooth. On the flesh color->blue you can see where I painted the flesh then around the edge I used the original blue doing the same approach as above dragging from the middle to the edge into the blue going around clockwise over and over again. If you're fast you can do it before the paint dries, if not use some medium or retarder in the blue to slow down the drying time.
|
|
#
?
Aug 15, 2011 19:16
|
|
|
richyp posted:If you saw my earlier post about teaching a class of 30 kids it probably explains why I end up posting lots of Flipswitch posted:On that note, richyp, on that last image you uploaded of the troll(?) dude, how did you get those tones so smooth on the muscles, I can't seem to quite get my highlighting to look the same, it ends up looking blocky and blotchy. See what I mean.... I knocked up a quick example with some pictures on a base to show you what I meant above. (This would normally be done over the base colour not on a white base, so assume the original colour is the same as the right hand colour in these pictures) Step 1) Paint the original colour on the outer edge of where the highlights will end, and paint the highest level of highlight you want to achieve to the opposite side, leave a smallish gap between the two colours. Do this quickly so the paint for both colours remain wet for the following steps, or as above mix in some form of drying retarder.  Step 2) Quickly wipe your brush clean, and pull the highlight colour into your base colour, working from top to bottom/left to right, or in a circular motion in the case of the troll muscles. repeat this to get a three tone gradient like this:  Step 3) As you did in the previous step, work the edges of the middle shade into the left colour, and the right colour, always working the paint in the same direction. The gradient should be much smoother now (in this case you can see almost four distinctive shades):  Step 4) Feather the edges of each shade using the same approach again, always dragging the brush in the same direction to avoid swirls of colour, and it should look like this:  It's tricky to pull off so try it on some plastic/crap model a few times until you're comfortable doing it, but when you do get it, its much much faster than layering with 3-4 colours as you only actually used two and both at the same time. Try it with two completely different colours when practicing as it makes it easier to see the blend, something like red and blue should work and you should end up with a gradient from red through purple to blue.
|
|
#
?
Aug 15, 2011 19:59
|
|
|
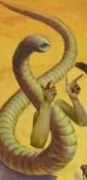
Got the painting bug real bad today. Finished this Hellion thats been sat on my desk for 2 weeks.  
|
|
#
?
Aug 15, 2011 20:18
|
|
|
Cheers for that guide Richyp, step by step 'for dummies' are the best kind of guide. Edit: That is a sexyman, Bhyo.
|
|
#
?
Aug 15, 2011 20:41
|
|

|
richyp posted:See what I mean.... That owns, thanks. Random q: as a Real Artist Guy, do you ever look at hams' writings on painting figures and  at how wrong they are? at how wrong they are?
|
|
#
?
Aug 15, 2011 21:09
|
|


|
uncle jimbo posted:That owns, thanks. Not an artist, just a primary/middle school teacher who never grew up ")
|
|
#
?
Aug 15, 2011 21:23
|
|
|
Pints are on me next time you come over the Cardiff way richyp, that step-by-step is really informative and helpful. Thanks mate. 
|
|
#
?
Aug 15, 2011 21:28
|
|
|
Yeah, when I get to painting my Skorne I'll definitely try it out, Skorne (and Warmachine in general) should be good for blending with all those big chunky miniatures with huge armour plates.
|
|
#
?
Aug 15, 2011 21:59
|
|

|
richyp posted:Not an artist, just a primary/middle school teacher who never grew up Thanks for that guide. Very useful. Still, seems like it is fairly impossible to pull off on a tiny little Space Marine.
|
|
#
?
Aug 15, 2011 22:48
|
|

|
So tomorrow I'm going to be finishing off my second batch of orks. Was wondering if there was anything people thought I could improve or fix either next time I paint or when I finish them tomorrow.     I uhh... You know, I think I forgot something important on a couple of the models. I can't work out what though! Also starting trying to make my own bases  I've washed them since, and although they look great it takes loads of wash to do. Can peeps recommend what inks to get to make my own washes equivalent to the GW colours (Most notably Devlan Mud) or any that would make awesome colour washes in their own right?
|
|
#
?
Aug 15, 2011 22:52
|
|

|
Lethemonster posted:So tomorrow I'm going to be finishing off my second batch of orks. Was wondering if there was anything people thought I could improve or fix either next time I paint or when I finish them tomorrow. I have Daler-Rownet FW acrylic artist inks in a couple colors, and Liquitex artist inks in a few others. Both work great and are about 4 dollars for a pretty big bottle. To put that in perspective 10 drops of ink will make about as much wash as a GW wash bottle, so it'll last you a long time. This was mentioned a few pages back but these: http://www.awesomepaintjob.com/index.cfm/resources.recipes are great wash recipes.
|
|
#
?
Aug 15, 2011 23:49
|
|
|
Lethemonster posted:So tomorrow I'm going to be finishing off my second batch of orks. Was wondering if there was anything people thought I could improve or fix either next time I paint or when I finish them tomorrow. Hit the teeth with a sepia wash,orks shouldn't have pearly whites. Otherwise they are ace.
|
|
#
?
Aug 16, 2011 02:02
|
|

|
Crossposting more Infinity: 
|
|
#
?
Aug 16, 2011 05:27
|
|
|
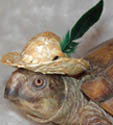
Churned out another character for my Dark Elves army this evening. Here is a Dreadlord on foot:   The shield could use a little work, and I'm not sure I like copper as the weapons color but I'm pretty happy for one nights work. Turtle Dad 420 fucked around with this message at 07:46 on Aug 16, 2011 |
|
#
?
Aug 16, 2011 06:51
|
|
|
Turtle Dad 420 posted:Churned out another character for my Dark Elves army this evening. Here is a Dreadlord on foot: It looks great! But like you said, the shield could perhaps do with a bit more detail. Maybe just add some scratches or something, giving it a more worn and torn look.
|
|
#
?
Aug 16, 2011 12:44
|
|
|
Flipswitch posted:Pints are on me next time you come over the Cardiff way richyp, that step-by-step is really informative and helpful. Thanks mate. Might take you up on that offer if I'm ever down that way. Quick question, I've just finished painting the brown on this horse (ignore the rest of the model for the moment, it's just base coated) and I'm not sure what colour to do the fur. I was thinking black highlighted with dark blue to pull in some of the blue from the armour trim (it'll be darker than it is now). Anyone have any better ideas, all I can think of are lighter/yellowy or darker browns or black? The only problem with darker brown is that there's a lot of brown already on the model with the horse, bow and quiver. 
|
|
#
?
Aug 16, 2011 13:33
|
|
|
Babby's first Infinity model and test scheme for my Alpha Flight themed Aleph force:  The Asura is just so drat tiny. Comments and criticisms appreciated. She hasn't been sealed yet and I can see some areas that need touching up.
|
|
#
?
Aug 16, 2011 14:18
|
|
|
Did you paint that with one hand?
|
|
#
?
Aug 16, 2011 15:59
|
|
|
sassassin posted:Did you paint that with one hand? I'm typing this reply with one hand!
|
|
#
?
Aug 16, 2011 16:01
|
|

|
I am looking to base all of my undead units soon (majority of which are Mantic miniatures), but have the entire army painted as if they were only illuminated by moonlight. What kinds of base effects should I be going for? How will this affect things such as grass and rock colours? I know it will affect miniatures as I will paint the parts where light isn't reaching as darker shadows, but I am not sure about how I will do the bases. Any help?
|
|
#
?
Aug 16, 2011 16:25
|
|

|
The Dark Project posted:Any help? I'd paint your base in simple shades of dark blue. Basecoat black, heavy drybrush Necron Abyss, then maybe a light drybrush of Ultramarines blue or similar. Might want to avoid grass unless you want to soak them in some watered down paint or ink.
|
|
#
?
Aug 16, 2011 16:48
|
|


|
Flipswitch posted:Pints are on me next time you come over the Cardiff way richyp, that step-by-step is really informative and helpful. Thanks mate. Cardiff you say? You ever venture into the GW there or are you a firestorm games person?
|
|
#
?
Aug 16, 2011 18:39
|
|


|
Gravitas Shortfall posted:I'd paint your base in simple shades of dark blue. Basecoat black, heavy drybrush Necron Abyss, then maybe a light drybrush of Ultramarines blue or similar. Might want to avoid grass unless you want to soak them in some watered down paint or ink. This is a good way to do it, you can also add shades of purple if you think that only blue will be boring. Example:  Combine deep shadows and sourced highlights from above on any stuff on the bases like rocks to make it glowy.
|
|
#
?
Aug 16, 2011 18:43
|
|
|
Progressing slowly with my last two Space Marines. However, I am too afraid to try highlighting on them.richyp posted:Might take you up on that offer if I'm ever down that way. Even in its current state. That looks amazing. How long have you been painting?
|
|
#
?
Aug 16, 2011 23:56
|
|
|
Torabi posted:Progressing slowly with my last two Space Marines. However, I am too afraid to try highlighting on them. I know the feeling. Just jump in and try it while you're still working on cheap-rear end models like starter set marines. The fear will only get worse when you are talking about models that are either expensive or that you lovingly built yourself. And you can always strip them if you don't like how they come out.
|
|
#
?
Aug 17, 2011 00:10
|
|
|
Dominion posted:I know the feeling. Just jump in and try it while you're still working on cheap-rear end models like starter set marines. The fear will only get worse when you are talking about models that are either expensive or that you lovingly built yourself. Well, I better get started on it. Mix the blue color with a bit of skull white and apply it to places. Sounds fairly simple but I guess we'll see what happens. Should I wait with apply highlights until everything else is done? Such as the gold trim on the shoulders etc. Stupid question but, what do you mean by stripping them?
|
|
#
?
Aug 17, 2011 00:43
|
|
|
Skarsnik posted:Cardiff you say? You ever venture into the GW there or are you a firestorm games person? Both mate, I only ever stop in GW just to chat with some of the staff as they're a friendly bunch and I wouldn't mind playing some games there in the future. I do head into Firestorm a fair bit though and play some Infinity and 40k there in the mornings. Am looking to start going in on the evening nights though. edit: Saying that though, me and my mate are heading into the GW as he's interested in starting Warhammer Fantasy so I'll be about there for a little while. Flipswitch fucked around with this message at 00:50 on Aug 17, 2011 |
|
#
?
Aug 17, 2011 00:43
|
|
|
Torabi posted:Well, I better get started on it. Mix the blue color with a bit of skull white and apply it to places. Sounds fairly simple but I guess we'll see what happens. If possible you should try to use a lighter shade of blue to mix highlights with instead of white. You can do them at whatever point you like but if you're worried about making hard-to-fix mistakes you can wait until all the colours are blocked in. Stripping means throwing the models into a bowl of something that will strip the paint off them.
|
|
#
?
Aug 17, 2011 01:14
|
|
|
Yeah don't use white, at least skull white. Has a tendency to make things into a bright pastel color. Use a lighter shade of blue or at least an off-white like bleached bone.
|
|
#
?
Aug 17, 2011 01:28
|
|

|
By chance, I have a blue discovery. Vallejo Ultramarine is like half a shade lighter than GW. Easy shading, yay!
|
|
#
?
Aug 17, 2011 01:32
|
|
|
The Dark Project posted:I am looking to base all of my undead units soon (majority of which are Mantic miniatures), but have the entire army painted as if they were only illuminated by moonlight. I uploaded some relevant pics I had floating around here. I wish they were mine / that I remembered where I got them, but they're basically examples of what you're looking for.
|
|
#
?
Aug 17, 2011 01:52
|
|

|
OK, I've read Beer4TheBeerGod's airbrush post, and I've just purchased my first airbrush. There's plenty of info out there on paint, but I'm not sure what kind of primer I should be running through it. I mean, brand, product name, etc. Do I need to be looking for airbrush-specific primer? If so, does it have to be thinned? Acrylic paints on plastic, usually (and sometimes metal or resin). And I usually prefer gray primer, for what it's worth.
|
|
#
?
Aug 17, 2011 02:10
|
|

|
Lincoln posted:OK, I've read Beer4TheBeerGod's airbrush post, and I've just purchased my first airbrush. There's plenty of info out there on paint, but I'm not sure what kind of primer I should be running through it. I mean, brand, product name, etc. Do I need to be looking for airbrush-specific primer? If so, does it have to be thinned? Keep it simple: http://www.acrylicosvallejo.com/gb/primers-gb.html Ready mixed, good quality, wide availability.
|
|
#
?
Aug 17, 2011 02:42
|
|
|
|
| # ? Jun 8, 2024 08:08 |
|
|
Lincoln posted:OK, I've read Beer4TheBeerGod's airbrush post, and I've just purchased my first airbrush. There's plenty of info out there on paint, but I'm not sure what kind of primer I should be running through it. I mean, brand, product name, etc. Do I need to be looking for airbrush-specific primer? If so, does it have to be thinned? I just started using Vallejo's gray airbrush primer, and I've been super happy with the results. Just use it straight out of the bottle, no thinning required, and it makes a super smooth coat.
|
|
#
?
Aug 17, 2011 02:48
|
|