


|
PAnick posted:Of course! Lowpoly Torso bust
|
 #
?
Apr 15, 2012 03:38
#
?
Apr 15, 2012 03:38
|
|


|

|
| # ? May 31, 2024 18:31 |
|
|
So I sculpted something with dynamesh and I want to make a super lowpoly version of it. I don't know what the best way to go around this is. I remember there's a word for the tools/workflow to go from highpoly to lowpoly but I can not remember it at all. Any help? Workflow tips? Tools? Tutorials? If I can I only want to use zbrush but I do have C4D by my side if need be.
|
|
#
?
Apr 17, 2012 10:26
|
|

|
The process is called retopology ZBrush has tools for this but they're a bit clunky imo There are native tools and (better) plugins for max and maya and 3dcoat that do a better job as well as standalone stuff like topogun which is quite decent and easy to use
|
|
#
?
Apr 17, 2012 11:49
|
|

|
EoinCannon posted:The process is called retopology Aha that's the word, thank youuu. Also ugh I guess I can reinstall max and try to get it right. Any suggestions of tutorials or plugins that you mentioned? I might try topogun though.
|
|
#
?
Apr 17, 2012 11:54
|
|
|
In this Gnomon tutorial Ian Joyner uses Polyboost for retoping a zbrush sculpt. It's a few years old, these tools are rolled into max since 2010 under the graphite toolbar http://www.thegnomonworkshop.com/store/product/153/Character-Modeling-for-Production Wrapit is a very good plugin for max, I use it at home and it's my preferred method http://matt-clark.co.uk/wrapit/ There's lots of topology theory and practical guides and examples out there that should give you all the tools you need to retop stuff quickly and properly
|
|
#
?
Apr 18, 2012 00:09
|
|
|
3d coat is supposed to be the easiest / fastest way to do it until Zbrush releases its new retopo tool. The current zbrush retopo method is kind of slow IMO. Topogun works pretty drat well too. Thanks for the links guys. The Mike Monteiro one was really good. PAnick: Although it has been said before. Really impressive work!!
|
|
#
?
Apr 18, 2012 08:56
|
|


|
Thanks! Yeah I usually post my stuff at zbrushcentral but that forum moves so fast so usually my thread is on page 7 in a couple of minutes. You kinda have to pimp your own thread continously with small updates or comments if you want to be seen, but I'm too lazy for that. ") Jewel: Had some retopology discussion on the last page aswell with tips and links and tutorials.
|
|
#
?
Apr 18, 2012 10:00
|
|

|
So I am working in Maya 2012, and I am attempting to create a character with a ponytail and fringe. To create the ponytail, I have used the method in this tutorial here: http://www.mikefudge.com/tutorials/MayaHair.html The problem so far has been that whenever I run the simulation, the hair flies away from the head. I have pictures below to illustrate the issue. I have not yet created the ponytail or fringe, but I intend to create the ponytail on a seperate piece of geometry which will be constained to the head joint. The fringe will be paintFX. The second issue is that the hair does not appear to move with the lofted NURBS surface, so even if I do get the hair to behave the way I want, it's not very worthwhile if I can't get it to move with the character. The first picture is the hair at rest and the second is the hair when the simulation is run for a second or two. http://i.imgur.com/wfrhM.png?2 http://i.imgur.com/lJ31n.png?1
|
|
#
?
Apr 19, 2012 15:14
|
|
|
 Done doodling this guy. Will probably never do hardsurface in zbrush again. Takes way too long, never get perfect straight lines or perfect circles. Back to ugly monsters and demons. Played around with it a little in photoshop and made myself a wallpaper:  Warning I have a huge monitor.
|
|
#
?
Apr 19, 2012 22:49
|
|
|
PAnick posted:
If you aren't afraid to use a ton of subtools, the clip brushes and shadowbox give pretty decent results for something done fast. Sometimes a hi-rez mesh in max is always better but for some things Zbrush can do nice hard surface stuff.
|
|
#
?
Apr 21, 2012 08:17
|
|
|
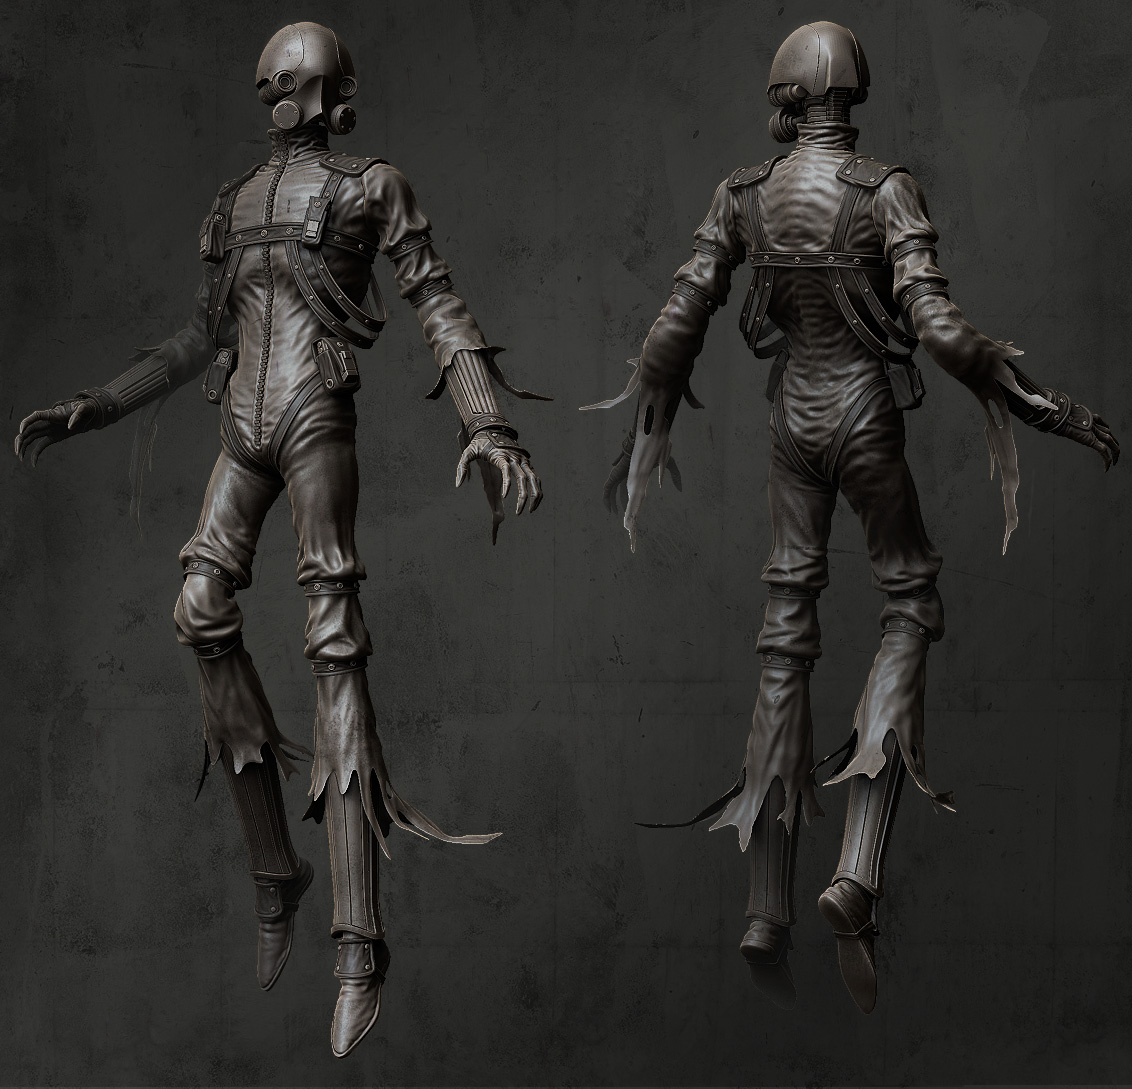
Oh yeah definitely! You are right, it's just that I'm so spoiled with being able to just sit with one mesh and one brush and go from a sphere to a finished model. Sure I have tried doing a mech thing with all those tools you mentioned but I'd rather just switch to Modo and build it there. Also since I'm doing lowpoly game models all day I'm "lowpoly-damaged"  So doing a box form in zbrush out of millions of polygons just screams WRONG and WASTEFUL in my brain when I could just do it in 0,5 sec and with 6 polygons in Modo. So doing a box form in zbrush out of millions of polygons just screams WRONG and WASTEFUL in my brain when I could just do it in 0,5 sec and with 6 polygons in Modo.And yeah it depends of course very much what kind of model you are doing. Like this type of "organic" exo-armor or cybernetic thing works very well in zbrush.
|
|
#
?
Apr 21, 2012 18:38
|
|
|
PAnick posted:Oh yeah definitely! You are right, it's just that I'm so spoiled with being able to just sit with one mesh and one brush and go from a sphere to a finished model. Sure I have tried doing a mech thing with all those tools you mentioned but I'd rather just switch to Modo and build it there. Yeah, you're totally right on that one, depends on the stuff you gotta do, i'm into a lot of lowpoly stuff right now at work too so it's just unreasonable for me to whip out zbrush and start doing stuff in it. How is Modo in comparison to max? Also, do you happen to live in Montreal?
|
|
#
?
Apr 21, 2012 22:51
|
|
|
Cool stuff PAnick. Here is a new speedish sculpt from me:  Anybody know the easiest way to get a cluster of objects to duplicate and rotate/translate randomly within the chest? I tried using the pain geometry tool in Maya but I was having a hellof a time trying to get them to stay within the chest geometry and to not intersect each other.
|
|
#
?
Apr 22, 2012 03:09
|
|

|
Odddzy posted:How is Modo in comparison to max? Also, do you happen to live in Montreal? Modo is the best 3d graphic software I have used ever (I'm trying to be subtle here hehe). I went from Lightwave -> 3Dsmax -> Maya -> Modo. The speed of the tools, poly creation and unwrapping is unmatched. This is for making a highpoly and lowpoly mesh for games. I have to switch to Maya for rigging and skinning. Everyone I know who has tried Modo can't let it go. Ok I'm gonna stop pimping now. Going back to max would probably lower my productivity by 75%.When I worked for Ubisoft I spent some time in Montreal. Man I miss that city, great place, lovely people. Used to jog up Mont-Royal every day after work. Sweden is freezing and wet. Damnit. So no sorry, I'm not in Montreal.
|
|
#
?
Apr 23, 2012 20:40
|
|
|
Pretty sure this guy got a job at Blizzard, or something. https://www.youtube.com/watch?v=6BMtWFkF3EM content: SVU Fan posted:Anybody know the easiest way to get a cluster of objects to duplicate and rotate/translate randomly within the chest? I tried using the pain geometry tool in Maya but I was having a hellof a time trying to get them to stay within the chest geometry and to not intersect each other. I assume you're trying to get a bunch of gems or coins and goodies in the treasure chest? I have pretty limited experience with the pain(t) geometry tool so I'm not sure if maybe you'll just get the right results by tweaking a brush setting, but if there's no luck there, then you might just have to do something like...duplicate like 10 of them by hand, combine all into a mesh, duplicate the combined mesh a few times and move each duplicate around so they look more random (rotate and shift each one) and then separate them all. Then all you'd actually have to do is fix the handful of objects that are colliding; hopefully not too many. This is a pretty low-tech solution, and I wouldn't be surprised if somebody here knew a better answer, but it's worked for me and still takes less time than duplicating them one by one. It doesn't take too much to fool the brain into seeing randomness if you tweak a few small parts of a larger pattern. Another option, maybe, is to duplicate a bunch of them and then run a dynamics solution and have them all fall inside the chest (you can have an invisible plane just under the lip of the chest so that you don't need an entire chest worth of objects), and then just let them fall and collide and they'll look nice and random. Not sure if this is a viable solution - also not my area of expertise - but it sort of popped in my head
|
|
#
?
Apr 24, 2012 03:43
|
|

|
I have showed that video to all of my artist friends, they all love it.
|
|
#
?
Apr 24, 2012 04:10
|
|

|
Fffffffuck Panick, I was all proud of my sculpt and then I saw the robot head you made. That is so fantastic. Really intricate. I had a week off of work, so I started trying to learn ZBrush. I specifically want to use it for hard surface robots and vehicles. This is the first thing I've made that I am starting to like.   I can't figure out how to get Imgur to show a small thumb nail and link to the full size image, I hope these aren't too big. EDIT: And an alternate I decided not to go ahead with... 
bring back old gbs fucked around with this message at 05:24 on Apr 24, 2012 |
|
#
?
Apr 24, 2012 04:54
|
|

|
PAnick posted:Modo is the best 3d graphic software I have used ever (I'm trying to be subtle here hehe). I went from Lightwave -> 3Dsmax -> Maya -> Modo. I've used all of those and for modeling I can't beat Modo. With a few small lingering bugaboos (text modeling, for instance) all the tools work and work quickly and very well. If I had to go back to Lightwave modeler, or Max for any type of modeling I'd probably have a stroke. The only part I don't take full advantage of is the materials and rendering. (Not upgraded to 601 yet) It's second nature for me to use Lightwave's surfaces etc. that I've not taken the time to learn Modo's. Just had to throw my enthusiastic reccomendation in. Carry on.
|
|
#
?
Apr 24, 2012 17:19
|
|
|
Can I get some opinions on Vray? A big consideration is that I work at a production house with a small VFX department (there are 2 of us) and I'm trying to set up a render farm, either with local machines or with EC2 instances, and from what I've read Vray comes with 8 render node licenses with each purchase of Vray for Maya, whereas if you're using mental ray you need to buy one MR standalone for each render machine (lol).
|
|
#
?
Apr 24, 2012 19:47
|
|

|
For the max version there are unlimited render licenses for vray. I'm not going to go looking through the maya help, but I cant imagine why it'd be any different.
|
|
#
?
Apr 24, 2012 21:17
|
|

|
CaptainCrunch: They FINALLY fixed text modeling in 601! Modo has some pretty good materials and rendering by now but I don't use it too much since I'm doing game art mostly. ACanofPepsi: Hey that's an awesome start! Just keep adding details and it will turn out great. People on other sites kept asking me about my process so instead of replying to them all I drew a picture:  My first try in writing up a tutorial-ish thing so if you see anything weird or out of place or not explained properly please let me know.
|
|
#
?
Apr 25, 2012 00:25
|
|
|
PAnick posted:
Thanks for the kind words, and the big writeup. Everything's explained nicely, I had a detail question though: How do you get such sharp cuts in between your panels/hydraulic tube things? I would have assumed it was a bunch of sub tools. Is it lots of masking + HPolish? That's how I am doing it but it would be a nightmare on something as complex as yours which is why I thought it was different pieces. I've attached a pic with some areas circled that I thought would be very hard for me to do. I know some stamps are used for little bits but I mean specifically all the panels that seem to be at 90 degree angles with sharp as heck corners, how do you do those? 
|
|
#
?
Apr 25, 2012 00:46
|
|
|
SVU Fan posted:Cool stuff PAnick. Cant you use a physics sim to just get a pile of whatever it is you want? Any extras would just fall out.
|
|
#
?
Apr 25, 2012 03:37
|
|


|
ACanofPepsi posted:Thanks for the kind words, and the big writeup. Everything's explained nicely, I had a detail question though: How do you get such sharp cuts in between your panels/hydraulic tube things? I would have assumed it was a bunch of sub tools. Is it lots of masking + HPolish? That's how I am doing it but it would be a nightmare on something as complex as yours which is why I thought it was different pieces. You can get amazingly sharp edges and corners using Zbrush's newish Clip brushes. The basic workflow for hardsurface that I've been shown is just extracting the shapes from your basemesh, adding grouploops for more topology where you need it, then using trim dynamic to get the basic angles and planes, then use the clip brushes for the really sharp parts.
|
|
#
?
Apr 25, 2012 04:25
|
|
|
What are some of the better model catalogs out there? We have a "national" project ramping up with a few cg elements, yet everyone's booked so we need to outsource as much as possible. edit: Turbosquid. Duh. How the hell did I forget that? I've been outta the game way too long  . .
|
|
#
?
Apr 25, 2012 15:24
|
|

|
SVU Fan posted:You can get amazingly sharp edges and corners using Zbrush's newish Clip brushes. The basic workflow for hardsurface that I've been shown is just extracting the shapes from your basemesh, adding grouploops for more topology where you need it, then using trim dynamic to get the basic angles and planes, then use the clip brushes for the really sharp parts. This is the method being taught to me right now by a Gnomon DVD I bought. Make a "muddy" mesh, and retopologize new sections piece by piece adding creases to the hard edges. It really does work quickly and looks great. I don't know how I'll pose anything with a million subtools, but I'm still in the stage where I'm learning my brushes/interface and getting comfortable with a tablet. Posing/Rendering isn't even remotely a priority for me right now. It looks like Panick did that amazing mech bust with a single blob of clay, not multiple parts, which I am very curious about.
|
|
#
?
Apr 25, 2012 18:48
|
|
|
Masking is VERY useful for producing sharp edged detail as well.
|
|
#
?
Apr 25, 2012 22:27
|
|
|
ACanofPepsi posted:This is the method being taught to me right now by a Gnomon DVD I bought. Make a "muddy" mesh, and retopologize new sections piece by piece adding creases to the hard edges. It really does work quickly and looks great. I don't know how I'll pose anything with a million subtools, but I'm still in the stage where I'm learning my brushes/interface and getting comfortable with a tablet. Posing/Rendering isn't even remotely a priority for me right now. Long post incoming: I can't speak specifically for PAnick so I guess we'll have to see what he says, but there are a ton of different ways to do this in the newer versions of ZB4r3. Subtools are the cleanest way to go IMO, and allows for infinite more versatility. If you wanted to keep it all one mesh though for quicker sculpting I guess, you can use dynamesh to add on cylindrical blobs where you want them, then you can use a bias mask to mask off specific edges, then go through the same process of build up form/use trim dynamic or flatten/dam standard or pinch for tight edges or creasing/etc. If anybody is interested, I have some specific hard surface brushes that take some of the ZB brushes and modifies them directly for hard surface stuff. Also, tried to do a clay render of this guy. I can't get DOF to work properly in mental ray no matter how many times I measure my distance.  I tried adding bokeh with a texture for some chromatic aberration too, but it keeps coming out like this   any ideas?
|
|
#
?
Apr 26, 2012 07:57
|
|
|
So I kinda finished my first big assignment, but it turns out I've got an extra week for it. Question 1: what would you guys change? Question 2: how the hell do I go about getting "volumetric" grass in there? 3ds Max 2012 SP2 x64 just hangs indefinitely whenever I add hair to anything on this scene, including a low-poly growth proxy. I'm at a loss
|
|
#
?
Apr 26, 2012 17:56
|
|

|
If you're using VRay, those VRayProxies are pretty handy for that. http://www.peterguthrie.net/blog/2009/04/vray-grass-tutorial-part-2/ That tutorial worked nicely for me. --edit: Pudding et al...  --edit2: vvv Awwww. You should change that! 
Combat Pretzel fucked around with this message at 18:18 on Apr 26, 2012 |
|
#
?
Apr 26, 2012 18:12
|
|

|
Combat Pretzel posted:If you're using VRay, those VRayProxies are pretty handy for that. I'm using mental ray, sadly
|
|
#
?
Apr 26, 2012 18:13
|
|
|
That's less about the proxy system and more about the scatter plugin, proxying blades of grass is kind of pointless. and mental ray has a proxy system anyway, doesnt it? Your landscaping looks lumpy and blobby and kinda rubbish compared to the rest of it, which is really really good. There's very little definition - geometry or texture wise, and the lumps don't really make much sense. the path is just a darker bit of the grass too, you could model something really nice in and displace it through or drop it to the mesh. I'd cover those stalks in the rhs foreground up with leaves too, they drag the eye a bit. also seems like the landscaping drops away massively under the camera, making it seem like we're floating super high. you could pull it up and do a really nice detailed foreground with the camera seeming at tripod height rather than dip it out and try and hide it all away in the shade. edit: that might be a bit harsh about your landscaping, but everything is really is very good - that just stands out a bit. cubicle gangster fucked around with this message at 20:38 on Apr 26, 2012 |
|
#
?
Apr 26, 2012 19:03
|
|
|
PAnick posted:CaptainCrunch: They FINALLY fixed text modeling in 601! Modo has some pretty good materials and rendering by now but I don't use it too much since I'm doing game art mostly. Seriously? Ok, time to have a serious talk with the boss man about the upgrade. Thanks for the heads up!
|
|
#
?
Apr 26, 2012 20:31
|
|
|
I love scatter plugins. Parametric cars!  Total setup took around an hour, now it's drag & drop. I just need to proxy up a shitload more cars. Super easy to change the density, they follow the spline direction & I can use a scatter texture to randomise the colours (when I bother to set it up). Follows terrain height, too. I'll do a little writeup if anyone wants to know more - bearing in mind it only works with multiscatter though, forest pro is out. cubicle gangster fucked around with this message at 22:59 on Apr 26, 2012 |
|
#
?
Apr 26, 2012 21:44
|
|
|
Only semi-related to this thread: Is conceptart.org broken for any of you guys? I've tried viewing it for the past few months and every artist gallery returns a PHP error. People have asked about it on the forum and got no answer. I thought it was because I kept opening it on my iPhone but it's broken on my desktop machine as well. Is anybody from here connected over there? What's the deal?
|
|
#
?
Apr 26, 2012 23:33
|
|
|
Haha ok let me first say that the robot was more or less an accident. It started just as a quick doodle I did while eating on my lunch at work. The next day I just wanted to try out stuff and started experimenting, see how far you could go with a single mesh. Then the next day I added a subdivision...added details...then just one more...and yeah. I'm trying to say that my way is not very optimal, just maybe a little faster. If you look at a close up it all kinda falls apart:  Uneven lines, wobbly flats, poly density all over the place. But from a distance it works. (and baking to a lowpoly game model works as well because those small problems wont stick on a normalmap) SVU Fan said exactly what I was gonna say more or less. Pinch, Flatten, DamStandard (great for quickly popping in and out those random details and panels and stuff). But what really made it possible was TrimDynamic and TrimAdaptive. Hard to explain but try them out. Perfect brushes for hardsurface sculpting. btw SVU Fan I'll gladly try out those brushes!
|
|
#
?
Apr 27, 2012 00:29
|
|
|
There are also a bunch of brushes (and some matcaps) provided by the author of this thread at Zbrush central for polishing and edging, but you have to pick through the thread to find the download links. I could put them in my dropbox but not sure if that's against the rules? I don't know if they're updated/compatible with release 4, or made obsolete by the brushes in 4, but they were certainly useful in the past.
|
|
#
?
Apr 27, 2012 01:54
|
|

|
ACanofPepsi posted:Only semi-related to this thread: Is conceptart.org broken for any of you guys? I've tried viewing it for the past few months and every artist gallery returns a PHP error. People have asked about it on the forum and got no answer. The front page is completely broken. The login still works though and I am still getting emails from them as of a few days ago. Working on my first monster for a movie. Really exciting. Haven't done much character animation in 3d studio max for ages. Switching back to Max from Maya is going to be a pain. Does anyone know of any really good Max tuts for renderpasses and compositing? I usually use Maya but I didn't have a choice here. TIA. PAnick: Thanks for the tutorial! Listerine: I would be very interested. Another favorite Zbrush trick I like for hard edges is to use group loops. Mask out a circle (or any shape) and then ctrl + alt click to harden the edge. After that convert masking to polygroup. Then add group loops to tighten up the edge. From there isolate the polygroup which was the original mask and inflate or deflate. Hpolish / smooth the edge slightly and you have a nice hard edge extrusion. sigma 6 fucked around with this message at 21:19 on Apr 27, 2012 |
|
#
?
Apr 27, 2012 21:15
|
|
|
cubicle gangster posted:That's less about the proxy system and more about the scatter plugin, proxying blades of grass is kind of pointless. and mental ray has a proxy system anyway, doesnt it?
|
|
#
?
Apr 28, 2012 00:13
|
|
|

|
| # ? May 31, 2024 18:31 |
|
|
MaxOfS2D posted:So I kinda finished my first big assignment, but it turns out I've got an extra week for it. The hard straight lines on the farmhouse really stand out against the organic scenery and soft lighting. Find a way to make it less 'hard geometry' and more a built structure by breaking up the harsh lines with unevenness.
|
|
#
?
Apr 28, 2012 01:50
|
|