


|
Only if there are inhalants involved 
|
 #
?
Apr 28, 2012 06:22
#
?
Apr 28, 2012 06:22
|
|


|

|
| # ? May 9, 2024 11:51 |
|
|
I'm at a standstill with my Black Pearl model. Well, I've been at a standstill for months, partly because of work but mostly cause I'm afraid to paint this thing. What I've done so far is assemble and paint the launch and the cannons and started to assemble the body of the ship. I like how the cannons and launch came out but I painted them by layering GW washes on the grey primer and that's not feasible for the rest of the ship. Also after looking at some screenshots from At World's End, I don't think it'll really make the colors match anyway. Here's some shots of what I've done and a couple of the reference screenshots I found. Any advice would be really welcome cause I am a Bad Painter.        
|
|
#
?
Apr 28, 2012 17:11
|
|

|
I looked for some good pictorial techniques for this, but I can't seem to find one that covers this exact case. First of all, you need to make it look like old, blackened wood. Second, you need to distress the wood. This one covers actual wood distressing, but ignore the base material, you need to see the technique the guy uses to make the uneven wear patterns. http://shortlinemodelers.com/weathering/chipping-paint-wooden-models For your case, the wood is very dark brown, verging on black. Where it becomes worn, it turns a lighter brown of the unaged wood beneath the surface varnish. But it's not just straight pine colored underneath. It's old and soaked through with age. So it's still somewhat gray. I would recommend doing a base coat of this un-aged wood color with striations in laquer. Make it look like wood. use the above hairspray technique to paint your blackened, aged wood over the younger laquer. Remove sections of this to reveal the undercoat where you would see damage. Remember your scale when distressing the paintjob. 1/72 means that if you were really looking at it (1/1 scale, far enough away it is the same size as your model in your hand), it would be way off in the distance. You don't need to scratches, but you would be able to see gouges or where the ship has sideswiped other boats.
|
|
#
?
Apr 28, 2012 23:01
|
|

|
Vaporware posted:I looked for some good pictorial techniques for this, but I can't seem to find one that covers this exact case. So you're saying I should do a base coat of a grayish wood color, then a dark brown/black coat while using the hairspray method to show the wear through? Can you clarify the bolded part?
|
|
#
?
Apr 29, 2012 05:15
|
|
|
Yeah, that's what I'd try first. Just do the first layer in lacquer so if the overcoat doesn't look great, you can wipe the topcoat of dark black/brown off without having to redo the undercoat. For that, I believe you have to use Testors Lacquer (TS- for plastics), since Mr. Color tends to craze when you try and remove the topcoat. The Striations I'm talking about is the old "fake wood grain" methodology people have been using since MDF and other smooth boards have become easier to source than hardwood. http://www.ehow.com/video_4994309_make-faux-wood-grain-finish.html Lay down your most "wood color" first, like a burnt umber or dark red tan. Drag in one direction to make stripes. Let it set overnight/ use a heat lamp to set it. Do another layer, more gray, Do another layer, more gray. Do a final layer, then add some detailing of knots. Emphasize some of the planks more than others to indicate repairs/newer boards mixed with older ones. Wash with a Dark brown (devlan mud, imo) to make the wood look more weathered on the surface than in the cracks. Just using less than your best brushwork or a cheaper brush can make the striping easier. For the topcoat, I'd give the hairspray technique a go first. After that, some washing and perhaps a soot drybrush. That's how I'd approach it.
|
|
#
?
Apr 29, 2012 21:03
|
|
|
Epi Lepi, what's the dimensions on the small rowboat from that kit? The reason I ask is I need to make up a small boat to be used by Charon (aka the Ferryman) who takes souls across the river Styx. Unfortunately, I have no idea how to do this, and I don't know what the right keyword is to search for it on ebay. I have never made one out of wood, so I am thinking it might be a little beyond my skill at this point. However, I am interested in learning. I did find this tutorial on how to make a small boat, but I have no idea what wood to use to do it. I am thinking balsa will just crack under the strain of bending. If anyone can help me out with a boat which would be suitable, and fit on a 100mm x 50mm base, I would be most appreciative!
|
|
#
?
Apr 30, 2012 22:09
|
|

|
The Dark Project posted:Epi Lepi, what's the dimensions on the small rowboat from that kit? The Launch from the Black Pearl kit is too small for what you're looking for, it's 1/72 scale. Quick google actually got me this page: http://www.model-dockyard.com/acatalog/Amati_Boats___Boathooks.html One of these might do the trick but I don't really know anything about them. If not try googling 1/64 scale longboats, whaleboats, lifeboats, launches, etc, I think that's the scale that will work best for you.
|
|
#
?
Apr 30, 2012 22:23
|
|
|
I have vague memories of the Warhammer General's Compendium book having advice for building boats out of Balsa wood by making a form in the shape you want and soaking the wood so it is pliable then tacking it to the form with shirt pins and letting it dry.
|
|
#
?
Apr 30, 2012 22:47
|
|

|
Yeah it's what the translated google page is suggesting as well. Perhaps it's time to get out of my comfort zone and give it a go. If I end up throwing it against the wall I can always go with a pre-made or cast ship. I think I might go to my local hobby shop for a bit of advice as well. They're pretty good when they aren't grumpy old buzzards.
|
|
#
?
Apr 30, 2012 22:50
|
|
|
Just finished my Sea Harrier the other day and it turned out to be quite a neat little kit for like 8 months worth of work. I need to build faster...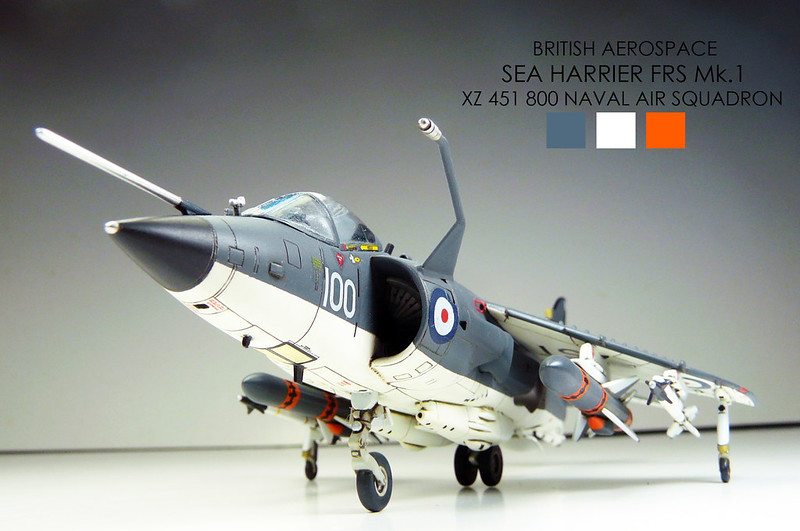  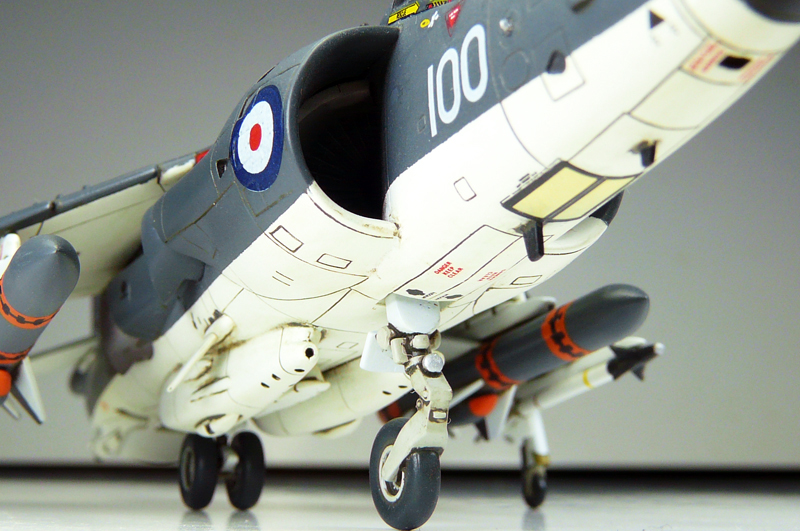  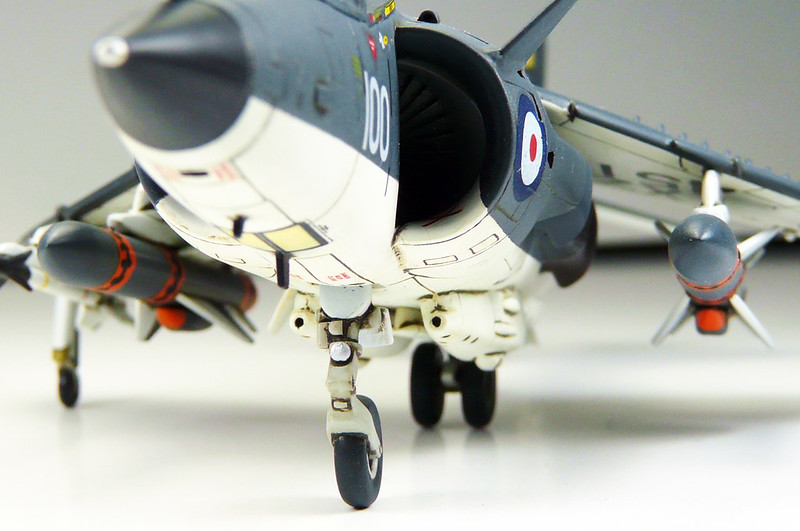  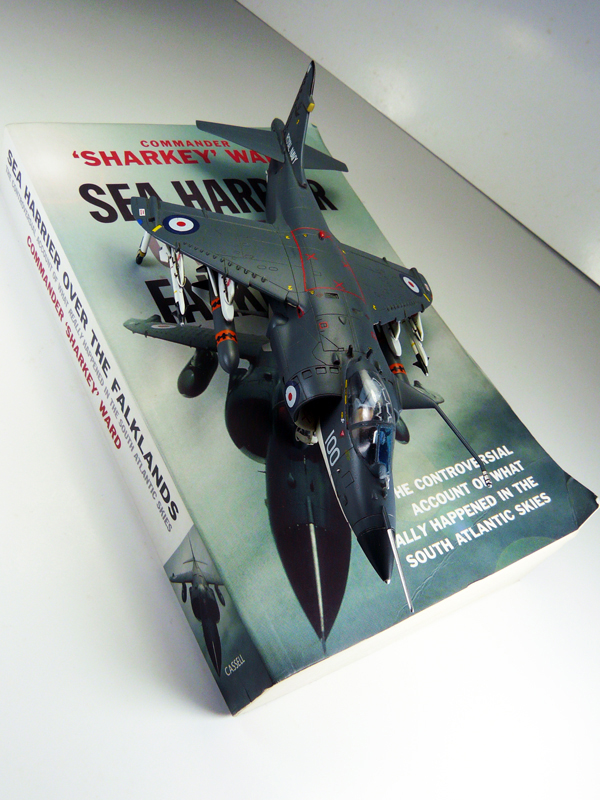
|
|
#
?
May 1, 2012 09:15
|
|
|
Morgenthau posted:Just finished my Sea Harrier the other day and it turned out to be quite a neat little kit for like 8 months worth of work. I need to build faster... That looks very nice! I like the striking color scheme. Is that a 1:72 kit? I know what you mean about building faster. I've been working on a 1:48 P51 Mustang for almost 6 months and I haven't even gotten to the landing gear, drop tanks, canopy, or propeller yet 
|
|
#
?
May 1, 2012 11:33
|
|


|
Morgenthau posted:Just finished my Sea Harrier the other day and it turned out to be quite a neat little kit for like 8 months worth of work. I need to build faster... This is so sexy its untrue. Do you have any WIP shots?
|
|
#
?
May 2, 2012 21:25
|
|

|
I've finished the Viper this weekend.     And drat you Morgenthau I just picked up one of these because of you: 
big_g fucked around with this message at 22:13 on May 7, 2012 |
|
#
?
May 7, 2012 22:07
|
|
|
Yup it's the Hasegawa 1/72 kit. Usually the biggest hurdle in building for me is the cockpit which I can spend months doing. Next it's the wings which will take another few weeks...  big_g posted:This is so sexy its untrue. big_g posted:I've finished the Viper this weekend. Wow that's sex. Nice weathering, plus the detail on the pilot is fantastic! big_g posted:
That said, Have fun with the intakes!
|
|
#
?
May 8, 2012 17:02
|
|
|
I made another thing; 1:32nd Airfix Ford Escort Mk1. This is a terrible kit that must date from the 60s or so. Still, I had fun with it.   
|
|
#
?
May 8, 2012 19:19
|
|

|
The best thing about old-rear end cheapo kits is that you can do crazy experiments with them without being afraid to mess up something nice.
|
|
#
?
May 8, 2012 19:28
|
|
|
Brilliant! Didn't notice the skeleton there.
|
|
#
?
May 9, 2012 10:44
|
|
|
Unkempt posted:I made another thing; 1:32nd Airfix Ford Escort Mk1. This is a terrible kit that must date from the 60s or so. Still, I had fun with it. Good job, but one thing I would have changed would have been the windows, as you fogged them up, I would have sanded them thinner or swapped for some thin sheet plastic (like the stuff that blister packs are made from). As with the break, the front windshield looks way too thick (sorry for super picky). The rust job is fantastic, did you use pigments?
|
|
#
?
May 10, 2012 01:00
|
|

|
Wibbleman posted:Good job, but one thing I would have changed would have been the windows, as you fogged them up, I would have sanded them thinner or swapped for some thin sheet plastic (like the stuff that blister packs are made from). As with the break, the front windshield looks way too thick (sorry for super picky). The rust job is fantastic, did you use pigments? Yeah, the windows are way too thick but I only really noticed that once I'd actually broken the front one. How would you use the thin plastic? Just bend it into shape or mould it? I guess I could have used the original windscreen as a mould but hey, too late now. I'll chalk that one up as a learning experience. To be honest, I didn't mean to fog them up that badly either.  The rust is all acrylic paint; I spray it all Aluminium to start with, then paint red-brown (Tamiya XF-64, I am addicted to it) in the rusty bits, then blob on some PVA glue and then spray the top coat. When that's dry, peel off the glue to leave a big rusty patch, then finish off with some brighter orange and maybe some more diluted red-brown as a wash.
|
|
#
?
May 10, 2012 09:18
|
|
|
How do Tamiya paints compare in thickness to GW and Vallejo? Am I going to need to dilute the gently caress out of them or can I paint straight from the pot?
|
|
#
?
May 10, 2012 14:21
|
|
|
Arquinsiel posted:How do Tamiya paints compare in thickness to GW and Vallejo? Am I going to need to dilute the gently caress out of them or can I paint straight from the pot?
|
|
#
?
May 10, 2012 15:21
|
|

|
Speaking of Vallejo paints, has anyone had success pouring other brands of paint into the empty vallejo bottles you can get online? I'd just switch to Vallejo, but I have about 9000 jars of ModelMaster paint I'd rather not waste.
|
|
#
?
May 10, 2012 15:52
|
|

|
Bolkovr posted:Speaking of Vallejo paints, has anyone had success pouring other brands of paint into the empty vallejo bottles you can get online? I'd just switch to Vallejo, but I have about 9000 jars of ModelMaster paint I'd rather not waste. I ordered a bunch of these a while ago. I can pour some enamel in one if you'd like, I guess the plastic will go soft if it can't stand the paint. I only have Humbrol enamel though.
|
|
#
?
May 10, 2012 20:05
|
|

|
Unkempt posted:Yeah, the windows are way too thick but I only really noticed that once I'd actually broken the front one. How would you use the thin plastic? Just bend it into shape or mould it? I guess I could have used the original windscreen as a mould but hey, too late now. I'll chalk that one up as a learning experience. To be honest, I didn't mean to fog them up that badly either.
|
|
#
?
May 11, 2012 14:11
|
|

|
Bolkovr posted:Speaking of Vallejo paints, has anyone had success pouring other brands of paint into the empty vallejo bottles you can get online? I'd just switch to Vallejo, but I have about 9000 jars of ModelMaster paint I'd rather not waste. I've transferred all my citadel acrylics into vallejo bottles. Works quite well.
|
|
#
?
May 12, 2012 00:30
|
|

|
Lots of armor and aircraft in this thread, but I'm posting this anyway. Finishing up a 1/24 scale garage I've been working on. I've got a few more little things to add (tires on the rack, more stuff on the shelf, Spec Miata racecar), but I wanted to get it off of my bench and into the cabinet. Just about everything in here aside from the obvious kit stuff is scratch built.  
|
|
#
?
May 15, 2012 17:52
|
|

|
Unkempt posted:Yeah, the windows are way too thick but I only really noticed that once I'd actually broken the front one. How would you use the thin plastic? Just bend it into shape or mould it? I guess I could have used the original windscreen as a mould but hey, too late now. I'll chalk that one up as a learning experience. To be honest, I didn't mean to fog them up that badly either. The fogging is not really a problem, and makes your life a lot easier with what you can do to thin the windows. As per the thin plastic, it's flexible enough that you can just cut it to shape and then press it to where it's going and the glue once set will be able to hold it. But you can heat form it as well (with a heat gun or hairdryer on hot, but you need to be very careful to get the right shape, so built a form to do this).
|
|
#
?
May 15, 2012 21:35
|
|
|
What glue do you use for clear plastic? I find regular craft glue works fine, and doesn't make as much of a mess if it smears. Let it dry and if you're careful you can peel it off like Liquid Mask, without consequence.
|
|
#
?
May 16, 2012 02:07
|
|


|
Boomer The Cannon posted:What glue do you use for clear plastic? I find regular craft glue works fine, and doesn't make as much of a mess if it smears. Let it dry and if you're careful you can peel it off like Liquid Mask, without consequence. I use craft glue for aircraft canopies as well. An added bonus is that its transparent when dried.
|
|
#
?
May 16, 2012 06:57
|
|
|
Boomer The Cannon posted:What glue do you use for clear plastic? I find regular craft glue works fine, and doesn't make as much of a mess if it smears. Let it dry and if you're careful you can peel it off like Liquid Mask, without consequence. I use revell contacta pro and as long as I am frugal with it, it doesn't frost up. But the Tamiya ultra thin works also works pretty well. White glue/PVA would also work, but can form really weak bonds in high humidity.
|
|
#
?
May 16, 2012 07:32
|
|
|
Where's a good place to order airbrush parts from? I've managed to destroy my nozzle tip, and need a new needle besides.
|
|
#
?
May 17, 2012 03:18
|
|

|
Live drat you! Picked up a revell 1/72 stug iv a few days ago and painted that thing up, went for a eastern front style, painted it in grey, then ontop of that their summer camo, then a wash of white, these two picks are a few days old as i've put on the side armour, ill get some non-camera phone photos when i get home in a couple of hours.   I'm not that great 
|
|
#
?
May 24, 2012 12:14
|
|

|
Pictures as promised     
|
|
#
?
May 29, 2012 17:29
|
|
|
I think it looks a lot better with the skirt armour on. Next you should have a StuH in the same scale that dispenses cigarettes though the barrel.
|
|
#
?
May 29, 2012 20:32
|
|
|
What can be used to remove an acrylic paint layer but not the enamel paint underneath or vice versa? The plan is to paint a layer of gold with a layer of black on top and then rub away the raised areas with something to reveal the gold, but leaving the black in the recessed areas.
|
|
#
?
May 31, 2012 15:45
|
|

|
I had luck with rubbing alcohol, but I don't think you will be able to remove paint with any kind of accuracy.
|
|
#
?
May 31, 2012 17:04
|
|
|
 It's going to be something like this and I've had success with the technique for panel lining on bare plastic. I know rubbing alcohol cleans up acrylic, I'll see how it interacts with enamel.
|
|
#
?
May 31, 2012 18:37
|
|
|
Sounds like something I'd mask. Alternatively just wash the black in with multiple thin layers.
|
|
#
?
May 31, 2012 18:50
|
|
|
Has anyone here tried melting down sprues to make bases?
|
|
#
?
Jun 4, 2012 03:11
|
|
|

|
| # ? May 9, 2024 11:51 |
|
|
You could try windex to break down the acrylic, as it won't have effect on the enamel. but acrylic over enamel is tough. I usually always use enamel or oils over acrylic and never vice-versa as I sometimes get odd effects to the acrylic. mr hobbies thinner would work really well at breaking down the acrylic but its a solvent so no idea what will happen with the enamel. I know it doesn't mix with lacquers though.
|
|
#
?
Jun 4, 2012 10:51
|
|