
|
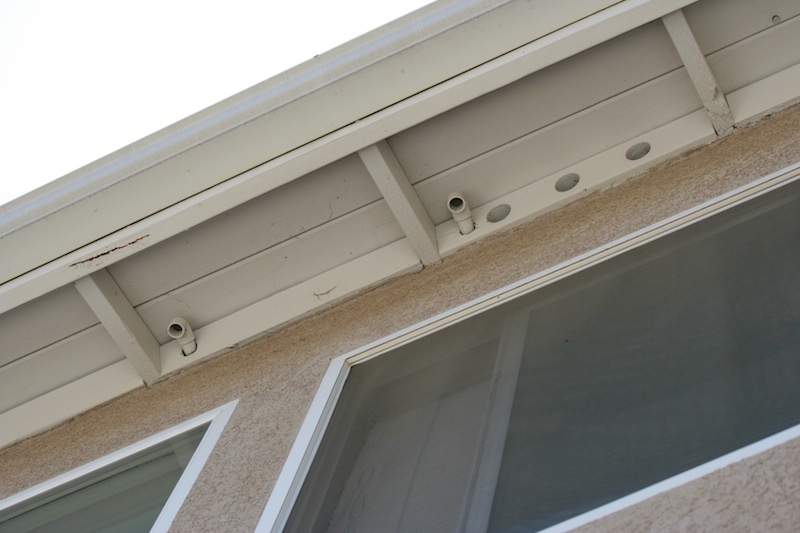
OK, so I have a siding repair question. We have some water-damaged siding, water-damaged to the point of putting a couple of small holes in the masonite siding. It's very obvious that I need new siding; one look at my finances currently shows that this will not be feasible for awhile, nor do I have the tools or confidence in cutting these weird shapes to replace it myself. Can anyone offer a solution to buy me some time until I can afford to get the siding pulled off and replaced? The two options I was thinking of were using expanding foam in the holes, then slathering some sealant over it (I'm not overly fond of this idea, as I'm afraid the foam will destroy more wood as it expands) or filling in as much of the holes/cracks as I can with silicone caulk and then slathering sealant over the affected spot. Or maybe I'm just pipe-dreaming and neither or these are feasible; this is why I'm asking for advice. If either of these ideas are crazy (and even I think the first one is) or if anyone has a better one, please please let me know. Photo:
|
 #
?
May 15, 2012 23:36
#
?
May 15, 2012 23:36
|
|


|

|
| # ? May 11, 2024 09:25 |
|
|
You need to fix the roof leak first...is that a porch roof? Water is getting under the flashing between the roof & the siding...you have damage in the soffit (underneath the roof) You may want to consider reporting that as a homeowner's insurance claim. Depending on your insurance co, hey may shoot it down as wear & tear, but if the damage looks fairly recent, they should cover it as water damage. In the short run, I would unload a tube of silicone caulk in it rather than expanding foam. The foam is a bitch to work with once it's cured. Caulk until just below the face, and then top it with a paintable caulk & touch it up. It may hold for a couple of years
|
|
#
?
May 16, 2012 00:44
|
|


|
kid sinister posted:Nemesis, could you post some pictures please? Also, soldering/desoldering are easier than you think. There are tons of tutorials on Youtube. This is the worst of the damage. There is some fabric cord inside the wire, and the light blue is the foil type stuff around the inner insulated conductors.  This is the opened plug. I stripped that last screw and broke the cover off... (this is when I thought I was replacing the plug for sure. I can put it back on and seal it safely).   Here's the warning tag on the cord ")  Let me know if the pics are not working... trying to hotlink from my skydrive and I'm not sure if it will work for anyone else. `Nemesis fucked around with this message at 02:36 on May 16, 2012 |
|
#
?
May 16, 2012 02:31
|
|

|
PainterofCrap posted:You need to fix the roof leak first...is that a porch roof? Water is getting under the flashing between the roof & the siding...you have damage in the soffit (underneath the roof) It's where the garage roof joins the front wall of the house. Visually most of that roof looks fine, flashing intact, unrusted, and in good shape...until maybe about 3 or 4 inches from the edge, where there doesn't appear to be any flashing, at least not to my untrained eye. Before doing anything with the wall, I guess I'm going to have to get up there and caulk the dickens out of the exposed part. Thanks for the rest of your advice as well! Since it rained yesterday and will again tonight, I'm going to wait until we have a couple of sunshiney days in a row.
|
|
#
?
May 16, 2012 02:59
|
|
|
`Nemesis posted:What does that writing pressed into the cord jacket say?
|
|
#
?
May 16, 2012 04:18
|
|
|
kid sinister posted:What does that writing pressed into the cord jacket say? E316671 (backwards r) JLL301 3x0.824mm (superscript 2) 18AWG VW-1 Shielded 105c 300v elegrp LM LF ZL200620134167.8 US751806382
|
|
#
?
May 16, 2012 06:29
|
|
|
Just tape that bitch up.
|
|
#
?
May 16, 2012 07:50
|
|


|
Rev. Bleech_ posted:It's where the garage roof joins the front wall of the house. Visually most of that roof looks fine, flashing intact, unrusted, and in good shape...until maybe about 3 or 4 inches from the edge, where there doesn't appear to be any flashing, at least not to my untrained eye. Before doing anything with the wall, I guess I'm going to have to get up there and caulk the dickens out of the exposed part. Would not be a bad idea to install a rainwater deflector to keep water away from the corner.
|
|
#
?
May 16, 2012 11:30
|
|


|
E: wrong thread
|
|
#
?
May 16, 2012 15:31
|
|


|
edit: wrong thread
nesbit37 fucked around with this message at 20:30 on May 16, 2012 |
|
#
?
May 16, 2012 19:41
|
|
|
I am trying to dig 3 feet down into hardpan and clay to set about 15 fence posts. After breaking my back for six hours I have finished one hole, so I am looking to rent an auger for the rest. In most places where I need to dig it goes 1/4 inch dirt --> 2 inches landscaping rocks --> 6 inches dirt --> 2 more inches rocks ---> hardpan and clay from hell, interspersed with rocks up to the size of a cantaloupe. Will a standard 2 man auger be up to this task, and if so what should I know about operating this piece of machinery? I am not above paying a professional to do this project if it is really necessary, but if I can save a couple grand I'd like to do so. ixo fucked around with this message at 22:21 on May 16, 2012 |
|
#
?
May 16, 2012 21:51
|
|

|
FCKGW posted:I recently bought a house and started using the central A/C this weekend. It seems the A/C drain line comes out of my attic as shown by these 2 pvc pipes: I'm assuming you only have one central air conditioning system and the furnace/evaporator coil are in the attic. Do both of the lines produce condensation? If so you have a problem with drainage. One of those drain pipes is supposed to be a secondary, overflow line which is intentionally over a door or window so it gives you an indication of a problem with the primary drain. The other is the primary drain, which is supposed to terminate just above ground level. The contractor didn't finish the job (providing there was a licensed contractor). You should route the primary drain to the dirt, maintaining a minimum 1/8" per foot slope on horizontal sections. Don't drain onto concrete or into your rain gutter. A/C condensation will eventually slime up either.
|
|
#
?
May 16, 2012 23:14
|
|

|
`Nemesis posted:E316671 (backwards r) JLL301 3x0.824mm (superscript 2) 18AWG VW-1 Shielded 105c 300v elegrp LM LF ZL200620134167.8 US751806382 That's shielded 18AWG cable. You can easily get that online. You might be able to find a shielded power cord from a desktop PC (note: not all PC power cables are shielded), cut the ends off and steal the cable from that. Just replace the cable all the way from the air conditioner to the plug, soldering at the plug for all 3 wires AND the shielding. kid sinister fucked around with this message at 01:00 on May 17, 2012 |
|
#
?
May 17, 2012 00:58
|
|
|
Cross-posted from the general craft thread (initially thought that was the best place to tender this question, now I'm second guessing), I've got a woodworking project with a crafty twist. I'm making a custom magnetic knife rack for my kitchen. I got a cheap (but sufficiently strong) 18" generic magnetic rack, and I'm going to fit it in a custom oak frame with a nice routed edge that matches our kitchen cabinets. The problem is that the knife rack is actually eight magnets set end-to-end in a metal frame (rather than a single long magnetic bar), and I don't want the individual magnets to show. What would be the best material to put over the face of the magnets, to hide them without weakening the magnetic pull? Initially I tested some thin pieces of metal from my local hardware store, but that seemed to weaken the magnets and also I'd worry about scratching the knives. I'm now leaning towards some sort of simple, peel-and-stick solution. Is there some sort of paper-thin peel-and-stick plastic (ideally in black or white) that would work for this? Anyone have other recommendations?
|
|
#
?
May 17, 2012 16:13
|
|

|
ixo posted:I am trying to dig 3 feet down into hardpan and clay to set about 15 fence posts. After breaking my back for six hours I have finished one hole, so I am looking to rent an auger for the rest. In most places where I need to dig it goes 1/4 inch dirt --> 2 inches landscaping rocks --> 6 inches dirt --> 2 more inches rocks ---> hardpan and clay from hell, interspersed with rocks up to the size of a cantaloupe. Will a standard 2 man auger be up to this task, and if so what should I know about operating this piece of machinery? If you know there are rocks down there guaranteed, don't DIY it unless you want to spend forever digging those out yourself when the auger snaps back at you and jams for each rock. But if you get a guy to do it for you, they should have an idea ahead of time what they're getting into or theyre liable to just up and quit when they realize how many rocks are down there.
|
|
#
?
May 17, 2012 16:38
|
|
|
ADHDan posted:Initially I tested some thin pieces of metal from my local hardware store, but that seemed to weaken the magnets and also I'd worry about scratching the knives. What metal types did you try? It sounds like some aluminum flashing for roofs and gutters would be perfect for this: non-magnetic, thin enough to easily bend around the magnets, comes in long rolls so you could easily cover your bar with one piece, and aluminum is softer than steel so it would be easier on your knife edges and finishes. You might want to also pick up some tin snips to cut it to size.
|
|
#
?
May 17, 2012 16:40
|
|
|
kid sinister posted:What metal types did you try? It sounds like some aluminum flashing for roofs and gutters would be perfect for this: non-magnetic, thin enough to easily bend around the magnets, comes in long rolls so you could easily cover your bar with one piece, and aluminum is softer than steel so it would be easier on your knife edges and finishes. You might want to also pick up some tin snips to cut it to size. That's not a bad idea. I'd been trying magnetic metals (mostly thin pieces of steel, I think). I do have heavy-duty snips, and a full set of rasps for smoothing edges. I was leaning towards something plasticky, but I'm willing to explore all options. Thanks!
|
|
#
?
May 17, 2012 16:47
|
|
|
Another option is to fill the areas around the magnets and paint it with a thin layer of enamel. The more material between the knives and the magnets, the weaker the attraction; it doesn't matter what the material is.
|
|
#
?
May 17, 2012 19:17
|
|
|
ixo posted:Will a standard 2 man auger be up to this task, and if so what should I know about operating this piece of machinery? A two-man auger will either break your ribs or break the machine when it hits a sizable rock. All the rotational force has to go somewhere when the auger blade comes to a quick stop by hitting a large rock. You could look into how expensive it would be to rent a small Bobcat with an auger. PainterofCrap posted:In the short run, I would unload a tube of silicone caulk in it rather than expanding foam. The foam is a bitch to work with once it's cured. Caulk until just below the face, and then top it with a paintable caulk & touch it up. It may hold for a couple of years It has always been my experience that acrylic(paintable) caulk will not stick to silicone caulk. He may be able to adhere the acrylic to the sides of the hole with the silicone behind.
|
|
#
?
May 18, 2012 00:08
|
|
|
What is the best way to bring a low voltage wire outside into my house? I setup an 10m band antenna and I need to get a big fat cable into the house. I could very well want to expand this in the future, so I want to overdo it. Right now I'm using a cracked window, which is obviously terrible. I would like to mount an outdoor junction box, run the cable through a rubber gasket, through to the other side. What sort of considerations should I take into account with this being an exterior wall? I know there is a vapor barrier, do I need to somehow seal this up if I punch a hole in it?
|
|
#
?
May 18, 2012 07:24
|
|

|
NotHet posted:What is the best way to bring a low voltage wire outside into my house? These work pretty well: http://www.mfjenterprises.com/Product.php?productid=MFJ-4611 http://www.mfjenterprises.com/Product.php?productid=MFJ-4612 http://www.mfjenterprises.com/Product.php?productid=MFJ-4614 I think they come in sets of two, so you can use one on the outside and one on the inside.
|
|
#
?
May 18, 2012 14:28
|
|

|
Got a strange little situation. I live in condo and had removed a coat closet shortly after moving in. The phone line came in through the floor to a service jack that was inside the closet. The line then continued up into the ceiling, which I assume went to the phone jacks in the living room and the bedroom. Naturally, I said "I have a cell phone and I'll never need a land line for anything", so I diked the wire right at the floor. I also had to replace some of the subfloor. Now I am looking at getting DSL because it's a lot cheaper than comcast and I want to reconnect my phone line. Any thoughts on how I can do that. I thought about cutting a decent size hole in the sub-floor, maybe with a 4" hole saw. That'll let me get in there and hopefully splice in a new phone line, but I have no idea how to get it into a new spot. I don't know which way the beams run, but either way, how can I get a wire into the wall and up to a jack, all from a small holes 6-8 feet away??
|
|
#
?
May 18, 2012 17:44
|
|

|
Splizwarf posted:Another option is to fill the areas around the magnets and paint it with a thin layer of enamel. The more material between the knives and the magnets, the weaker the attraction; it doesn't matter what the material is. Yeah, that was my main concern with any material. At this point I think I have my solution: a strip of very thin electrical tape, with some superglue to keep it from peeling off with use. On first test, the tape doesn't seem to interfere with the magnetic pull, and it looks nice enough for my purposes. Thanks!
|
|
#
?
May 18, 2012 18:01
|
|
|
ADHDan posted:Yeah, that was my main concern with any material. At this point I think I have my solution: a strip of very thin electrical tape, with some superglue to keep it from peeling off with use. On first test, the tape doesn't seem to interfere with the magnetic pull, and it looks nice enough for my purposes. You could also try either a wood veneer, the thinner the better or I know in the uk you can get peel & stock plastic film that mimics most wood patterns.
|
|
#
?
May 18, 2012 18:37
|
|
|
Ugh https://docs.google.com/spreadsheet/ccc?key=0Armllw2QWqdpdGU4MFQ3bXF5dk1PdEVKSGp1UV9fQkE We need to recover our front yard with various stone/mulch (mulch is dirt in that chart). Did I do my math wrong? Please some one tell me I did my math wrong.
|
|
#
?
May 18, 2012 18:56
|
|
 Associate Christ
|
Dunno about your math, but if you can get ahold of a pickup truck and buy the dirt etc loose instead of bagged you will save a ton. Around here (Virginia) it was about 1/4 the cost to buy it loose for topsoil and mulch.
|
|
#
?
May 18, 2012 20:08
|
|
|
Your math does look a bit shaky. How much of a depth are you wanting? http://www.vanputte.com/mulch/index.shtml - try this link and just click on any type of mulch and it will bring a calculator up on the right side. You are showing 108 total sqft, were the calculator shows 2880 sqft. Select your depth and click 'Figure it' again and it will then tell you how many cubic yards you need.
|
|
#
?
May 18, 2012 23:50
|
|

|
I just ripped the siding and sheathing off an exterior wall and the insulation was vintage 70s R-11 fiberglass. I'd really like to up the R value to R-15, but they're 24 inch 2x4 studs and all I've been able to find so far is unfaced rock wool in the right R value and dimensions. Anybody have advice for insulating an exterior wall from outside? I'm in Oregon, so fairly low humidity and high levels of precipitation. I'm planning to wrap the sheathing in two layers of 15lb felt. Is it ok to use unfaced in this situation?
|
|
#
?
May 19, 2012 02:28
|
|

|
Starker44 posted:Your math does look a bit shaky. ... You are showing 108 total sqft, were the calculator shows 2880 sqft. Not Kaluza-Klein, but the 48 & 60 are marked as sq ft, not linear feet. Looks like he wants 2". His math looks correct but the mulch calculator is rounding up slightly, which is probably good because you always need a little more than you estimate.
|
|
#
?
May 19, 2012 04:01
|
|

|
Another caulking question- the old caulking on our bedroom window is starting to peel off. This has allowed moisture from outside to seep in. What kind of caulking is best to replace it with? I have a 100% silicone tube, but I also have one that's a mix of acrylic + silicone. I'm not sure which one would be best to use:
|
|
#
?
May 19, 2012 23:16
|
|

|
melon cat posted:Another caulking question- the old caulking on our bedroom window is starting to peel off. This has allowed moisture from outside to seep in. What kind of caulking is best to replace it with? I have a 100% silicone tube, but I also have one that's a mix of acrylic + silicone. I'm not sure which one would be best to use: How old are those tubes you have? Caulk doesn't stay ready-to-use forever. Are you sure that isn't a stick-in vinyl trimpiece?
|
|
#
?
May 19, 2012 23:57
|
|
|
kid sinister posted:How old are those tubes you have? Caulk doesn't stay ready-to-use forever. quote:Are you sure that isn't a stick-in vinyl trimpiece?
|
|
#
?
May 20, 2012 00:30
|
|
|
melon cat posted:The 100% silicone tube is a week old, unopened. The acrylic/silicone mix tube is older- over a year old, unopened. :/ That is the most uniform application of caulk I have ever seen!
|
|
#
?
May 20, 2012 01:52
|
|
|
melon cat posted:It might be. Any easy way to determine if it is? how about a picture of the left side?
|
|
#
?
May 20, 2012 05:45
|
|
|
LumpyGumby posted:I couldn't find a NERF thread (Thinking about making one) but I figured this question is small enough to go here. I've also heard of people using vinyl dye instead of paint on NERF stuff as well, as it can change the color without messing with the texture or having any chance of flaking. It doesn't do faux finishes, but you can change the color easily enough.
|
|
#
?
May 20, 2012 14:20
|
|
|
kid sinister posted:how about a picture of the left side? melon cat fucked around with this message at 19:29 on May 20, 2012 |
|
#
?
May 20, 2012 19:24
|
|
|
Yes.
|
|
#
?
May 20, 2012 21:00
|
|
|
I'm planning to make a bit of counter space to go on either side of a grill and I was planning on making the tops out of poured concrete. Does anyone have experience making concrete counter tops? Or any resources for coming up with colors/ patterns that emulate other materials? Or a way of crating a Chisel Edge or natural edge?
|
|
#
?
May 20, 2012 21:49
|
|
|
Brice posted:I'm planning to make a bit of counter space to go on either side of a grill and I was planning on making the tops out of poured concrete.
|
|
#
?
May 20, 2012 22:06
|
|
|

|
| # ? May 11, 2024 09:25 |
|
|
melon cat posted:Eh? Do you mean a side of the window where the caulk's not peeling off? I'm not trying to be a smart-rear end, or anything. I'm just not 100% clear on what kinda of photo would be helpful! Sorry, I meant of the left side of that caulk piece, the side currently hidden by your picture. How about another picture of the edge of the frame itself where the frame meets the window? It's possible that it's some type of kerf-mounted moulding.
|
|
#
?
May 20, 2012 23:52
|
|