

|
Evil Vin posted:The goons over in the board game thread sent me over here to be a stupid newbie. I recently bought a board game (Chaos in the Old World) and I've seen the amazing pictures of peoples painted copies and that inspired me to start much smaller and work my way up. Either do what PV and others said, and just use cheap acrylics... Or if you want to go into miniatures, you could get the following GW paints: Daemonette hide, naggaroth night, agrax eathshade, death world forest, ratskin flesh, khorne red, ceramite white, abbadon black, mournfang brown caledor sky, leadbelcher and screaming bronze. Almost certainly go for the acrylics, but those paints (with some mixing)should give you everything you need to paint them up. Oh, and a hobby knife to trim those mold lines of death. Wazzu fucked around with this message at 02:01 on May 24, 2012 |
 #
?
May 24, 2012 01:59
#
?
May 24, 2012 01:59
|
|


|

|
| # ? Jun 3, 2024 15:46 |
|
|
Wazzu posted:Either do what PV and others said, and just use cheap acrylics... Thanks for the advice. Just out of curiosity are the GW paints really that fantastic? I'm looking into pricing the things from GW and it looks like I'd be dropping near $50 on the paints. (Compared to like probably like $10 in buying multiple packs of the cheap stuff)
|
|
#
?
May 24, 2012 04:33
|
|


|
Evil Vin posted:Thanks for the advice. Just out of curiosity are the GW paints really that fantastic? I'm looking into pricing the things from GW and it looks like I'd be dropping near $50 on the paints. (Compared to like probably like $10 in buying multiple packs of the cheap stuff) It's not so much that GW paints are great, it's that purpose made hobby paints are better than craft paint. Which brand of hobby paint you get, GW or Reaper or Vallejo or P3, is mainly personal preference.
|
|
#
?
May 24, 2012 04:41
|
|

|
Dominion posted:It's not so much that GW paints are great, it's that purpose made hobby paints are better than craft paint. Which brand of hobby paint you get, GW or Reaper or Vallejo or P3, is mainly personal preference. However the new GW paints are pretty goddamn great. Mephiston Red 
|
|
#
?
May 24, 2012 04:58
|
|

|
SRM posted:However the new GW paints are pretty goddamn great. Mephiston Red Eh, the P3 paints thin better. The new line of layer paints is terrible. (Though I also like Mephiston Red.)
|
|
#
?
May 24, 2012 07:55
|
|

|
Evil Vin posted:Thanks for the advice. Just out of curiosity are the GW paints really that fantastic? I'm looking into pricing the things from GW and it looks like I'd be dropping near $50 on the paints. (Compared to like probably like $10 in buying multiple packs of the cheap stuff) If you plan never to paint again it's not worth getting miniatures hobby grade paints; regardless of how easy GW ones are to get. The only thing I would recommend truly is agrax earthshade, as a wash to put over everything to make it look better. Flipswitch posted:The base layers are quite nice I think but the layer ones are inconsistent and all over the place. Thus I only suggested bases! Wazzu fucked around with this message at 10:52 on May 24, 2012 |
|
#
?
May 24, 2012 09:03
|
|
|
The base layers are quite nice I think but the layer ones are inconsistent and all over the place.
|
|
#
?
May 24, 2012 10:33
|
|


|
Flipswitch posted:The base layers are quite nice I think but the layer ones are inconsistent and all over the place. I'm glad I'm not the only one having this experience. This warjack I painted is the last model I'll be using them on.
|
|
#
?
May 24, 2012 14:48
|
|
|
Much like the previous range they all have their idiosyncrasies. The only one I cant stand is white scar, thats just bad.
|
|
#
?
May 24, 2012 15:00
|
|

|
serious gaylord posted:Much like the previous range they all have their idiosyncrasies. The only one I cant stand is white scar, thats just bad. White Scar is.. okay? It's weirdly gritty though.
|
|
#
?
May 24, 2012 15:35
|
|


|
Started work on my boat for Charon the Ferryman. It will proxy as a Black Coach in my night-time swamp themed Vampire Count army. Instead of ferrying a soul to the underworld, he is bringing one back. Bought a big piece of balsa wood in a long block. Cut it in half, and then trimmed off a big part that wasn't going to be used (maximum width I wanted was 50mm due to the width of the base).  Drew a boat shaped pattern on it, and then got to work with a scalpel. I really wish I had a scroll saw for this kind of thing, as it would make it so much easier. I will have to look to see if I can buy one locally for cheap. Seems a lot of people get rid of them quite often, so I should be in luck. Once I had hacked it down to a reasonable size, and with the beginnings of a rounded shape, I then took a dremel to it with a sanding head. After that was done, I hand sanded it to get it as symmetrical and even as I could.  I then used PVA wood glue to stick it to an offcut of pine. Again wish I had a jigsaw or scroll saw handy as I really would prefer if it was smaller. I have asked a friend to bring his jigsaw to a mates place tomorrow, so hopefully we can do it there.  I then banded my initial plasticard strip across the exact middle. Remember kids, when you are making stuff like this, give yourself more than you need, as it's good to have it go into the holes on each side with some extra length in there. The main problem I had was the drill bit I was using was far too small, so I had to drill twice. This has caused unintentional grooves into the blank itself. I don't think it will cause too much of a problem though. I then put the ribs all the way along the length of the boat. It doesn't look even at the moment, but as soon as I can get some thumbtacks to pin them to the exact width, it will go well. Then begins the process of adding the plasticard strips in the right order to build the boat. Hopefully I will have it cut out by then, as I can then use rubber bands to help keep it stuck down to the blank while the plastic glue goes off and it becomes more solid.  This is pretty exciting. The most I have done with in this hobby is throw together a few buildings or terrain, or the odd slight conversion. Feels good to be branching out and going for something more exotic. More photo's to come as I progress! Edit: Apologies for the photo's. Still not worked out the macro function on my camera. Hoping the photo's to come will be better.
|
|
#
?
May 24, 2012 16:13
|
|

|
Supposed to lay the keel first. 
|
|
#
?
May 24, 2012 16:49
|
|


|
Following through on the instructions given at this link the keel is done last. In any case, it's a moot point for me, as the boat will likely be suspended off the base by a 'spirit wave' of ghosts and other ethereal beings, so the chance of seeing a keel is highly unlikely.
|
|
#
?
May 24, 2012 16:56
|
|
|
I was genuinely surprised when the block of wood became a smooth ship shape, I was expecting at least 2-3 photos/days of awkward cutting before approaching that! It looks great, but aren't the bars supposed to be on the inside?
|
|
#
?
May 24, 2012 17:03
|
|

|
That's a mold he's building the boat on. They will be on the inside.
|
|
#
?
May 24, 2012 17:08
|
|


|
Edit: Beaten by Fix and with less words. What you're looking at is the blank form which you build the boat around. Following the guide, you build the ribs, top most outside planks, central strut, and then finish the rest of the hull from the center outwards. Once you've done this, added an outside strip along the center, and a keel, and the glue has dried properly, you cut it off from the blank and gently remove it. With luck, it should hold it's shape. I am hoping this goes well as since I am using plasticard, the plastic glue isn't likely to get it to stick to the balsa in case I mess up and mis-apply it. Once you've removed it and it is sticking together, you add a few more details, some interior modifications, and you should be good to go. I will be going for another step which involves making a strut front and back (not sure how else to describe this) to hang a lantern off. See the pic below to see what I mean.  As for the block becoming smooth, it took some time and a lot of sanding. This is my first trial run, so if I botch it, I don't mind going back and making another. I have enough balsa so I can make several boat blanks if necessary.
|
|
#
?
May 24, 2012 17:14
|
|
|
That is gonna be the sweetest loving thing when it's done. can't wait.
|
|
#
?
May 24, 2012 18:39
|
|

|
I need some advice about painting tiny plastic dolls and this seems like the place to ask. Sorry about the poor picture quality all I have is a cell phone camera. I haven't done any modeling since I was obsessed with airplane models as a kid. This is a whole different world than hosing medium sized airplanes with a cheap Testor's airbrush but with Summer here I've got some much appreciated free time to try something new.      The surface of the paint isn't very smooth. I hosed up the primer, I think maybe it was too humid? and the surface was pretty rough so I dropped the 8 of the 10 man Tac Squad I primed into simple green and cobbled together two replacements out of a friends bit-box and just went ahead and painted these two for practice.
|
|
#
?
May 24, 2012 18:59
|
|


|
Those look really good, too bad about the primer. I too started out as a model airplane (and a whole lot of different army models) and classic cars builder and painter. It was sweet noticing that certain skills where still there after quite some years.
|
|
#
?
May 24, 2012 20:05
|
|

|
I've been busy making a portfolio website and setting up a blog for posting random things. Here is the update on 15mm Arik. Added canteen, posed arms, basic structure fixing and connected the binocular slice I had made beforehand. The front slice,by the way, is much too big so on the next session I'll just make the lenses on the sculpt itself.    
|
|
#
?
May 24, 2012 23:26
|
|

|
Crossposting from the oath thread. Here is my completed Banewolf of the 113th Vali Mechanized.      It seems like I got a warped upper hull piece sadly, which explains why no amount of rubber banding, and glue could hold the drat thing flush with the lower hull.
|
|
#
?
May 24, 2012 23:32
|
|


|
Double posting from Traditional Games forum, since I'm an idiot...meant to reply to this. Hoping I can get some brutal truth feedback from some people here. So, I finally decided to paint my skaven, after 12 long years.... I've been playing around with color schemes and techniques, and have a couple of test figs for perusal. All 4 were primed white. Please ignore mold lines. I'm just testing colors right now. The two that are on the sprue side by side were washed with Army Painter Strong Tone Ink before painting, the two that are top/bottom were washed with Army Painter Dark Tone Ink. I did base coats and then washed the skin/fur areas with Army Painter Soft Tone Ink. Then all 4 were washed with Army Painter Strong Tone Ink. The two that are side by side got the Strong Tone Ink, all over, including the skin/fur areas. The other two just got the Strong Tone Ink on robes/armor, keeping it off of the skin/fur. Personally, I prefer the lighter blue color, so I don't really need suggestions on that. What I need help with is speed. It took me like 4 hours for each model...Any suggestions for speeding that up? Also, should I throw some highlights on? Thanks!  
|
|
#
?
May 24, 2012 23:47
|
|

|
They look pretty good (I got blue skaven too) but it took you 16 hours to paint them? 
|
|
#
?
May 25, 2012 02:09
|
|

|
Anyone have good airbrush cleaning tips? I'm sort of obsessed with keeping it pristine.
|
|
#
?
May 25, 2012 02:26
|
|
|
Did more work on my loading bay terrain board:    
|
|
#
?
May 25, 2012 02:27
|
|

|
Nice.
|
|
#
?
May 25, 2012 02:50
|
|


|
Nebalebadingdong posted:They look pretty good (I got blue skaven too) but it took you 16 hours to paint them? Well, prolly closer to 12....but yeah. That's a big reason of why I don't paint...I've tried painting a few models before, 5 or so years and it was just so tedious. I dont know whether its my technique or what, but it just takes me forever to paint. Any suggestions?
|
|
#
?
May 25, 2012 03:07
|
|
|
Manifest posted:Anyone have good airbrush cleaning tips? I'm sort of obsessed with keeping it pristine. Non-ammonia Windex and a lot of hot water works pretty well.
|
|
#
?
May 25, 2012 03:22
|
|

|
Z the IVth posted:Did more work on my loading bay terrain board: Wanna play Timesplitters on dat board
|
|
#
?
May 25, 2012 03:23
|
|
|
Manifest posted:Anyone have good airbrush cleaning tips? I'm sort of obsessed with keeping it pristine. I would recommend against water. Lacquer thinner works fantastically for me.
|
|
#
?
May 25, 2012 03:33
|
|
|
Z the IVth posted:Did more work on my loading bay terrain board: Are the printouts your design?
|
|
#
?
May 25, 2012 03:38
|
|

|
Red Shoe posted:I would recommend against water. Lacquer thinner works fantastically for me. Yeah, I have a small bottle of distilled water for thinning, but I've been running tamiya acrylic thinner and rubbing alcohol through it after every cup/color change. How often do you take yours apart and clean the individual components? I can see where paint looks like it dries on the bottom side of the rocker.
|
|
#
?
May 25, 2012 03:42
|
|
|
So I finished my lascannon teams! You may notice the kind of hasty white on the gunshields. I'm going to be doing a "whitewash" technique similar to the one that Russians used in World War II. Basically, they would take brooms, rollers, anything they could - and hastily paint tanks white over their existing green paint coats. This meant the paint would wear off before too long, and it looked very rough. Thankfully, it's not hard to do either, especially with the new GW dry white. I also had fun using my basing mixture on the wheels of the guns to show they'd been wheeled through some snow.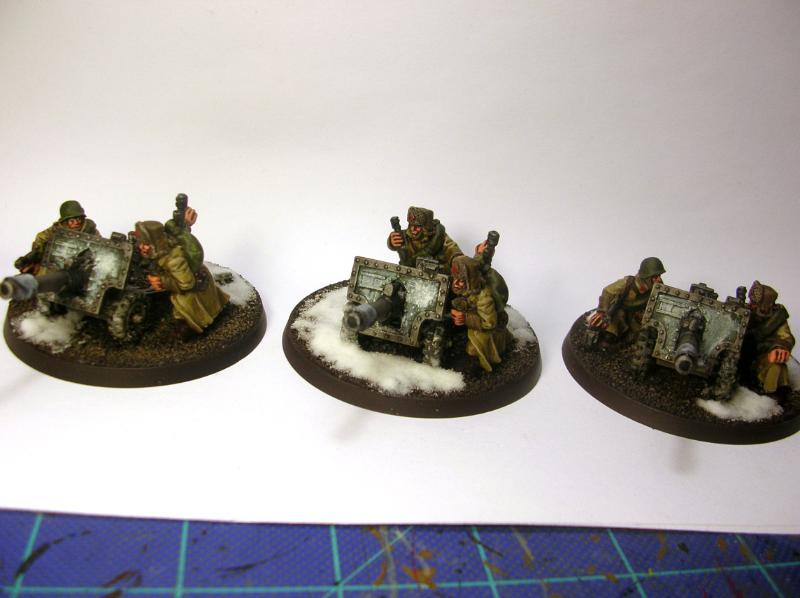 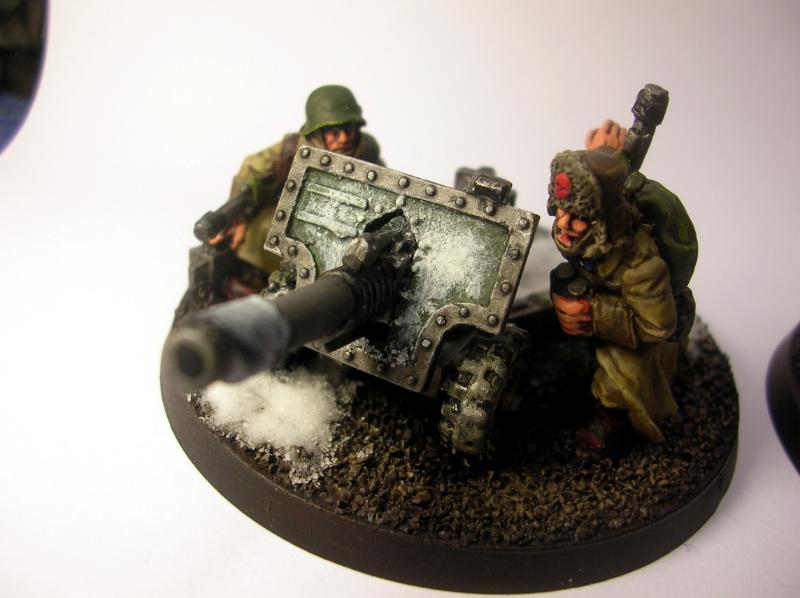 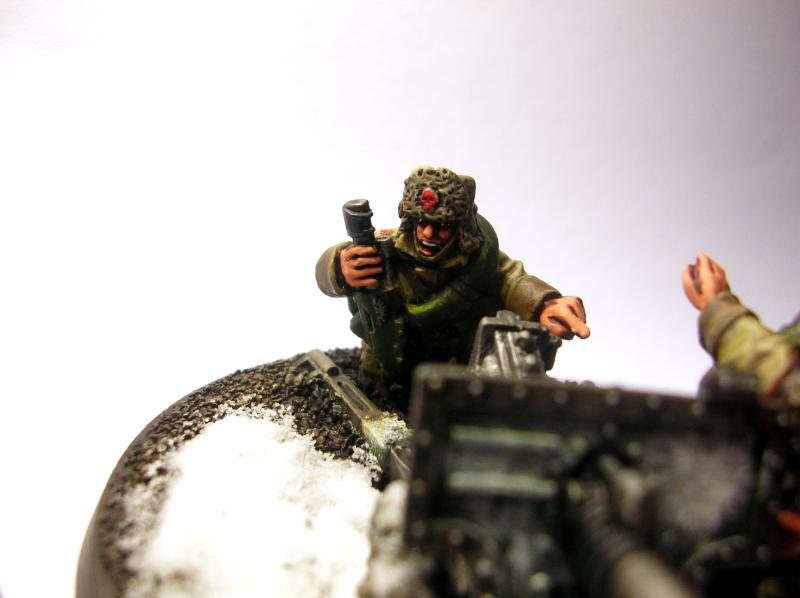 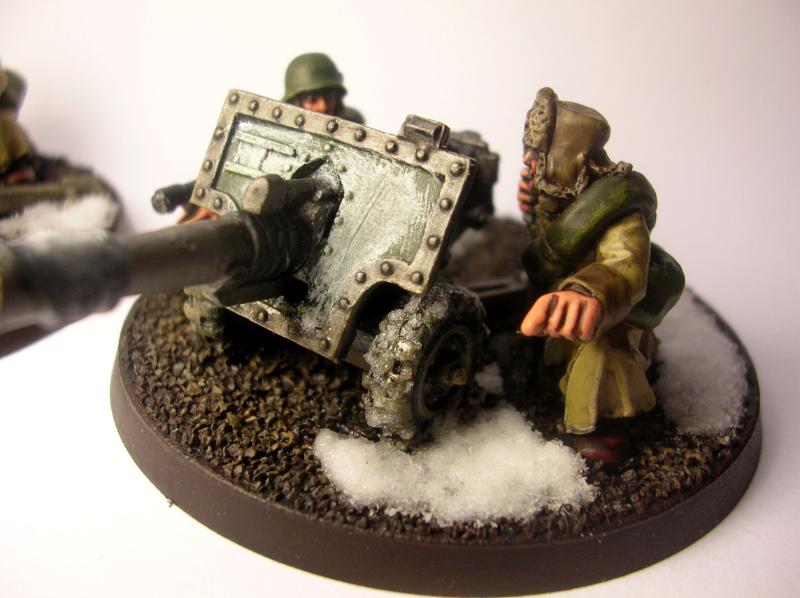 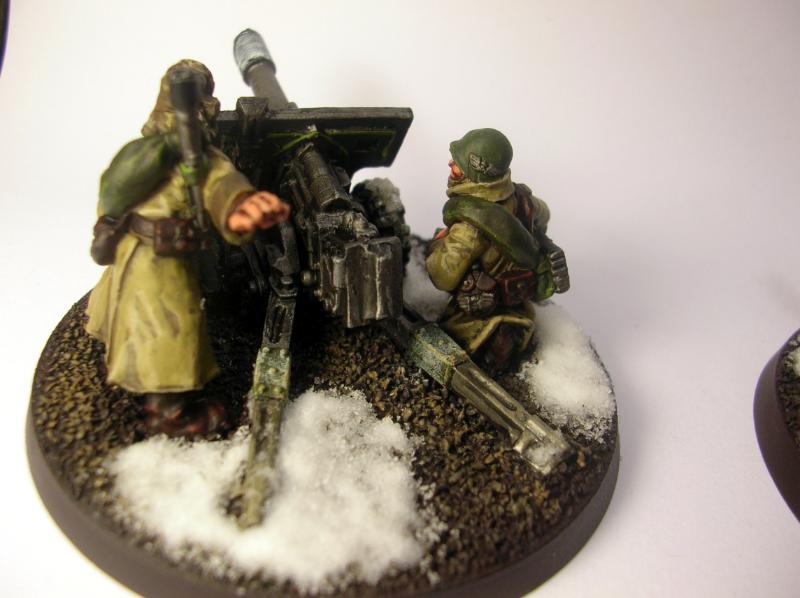 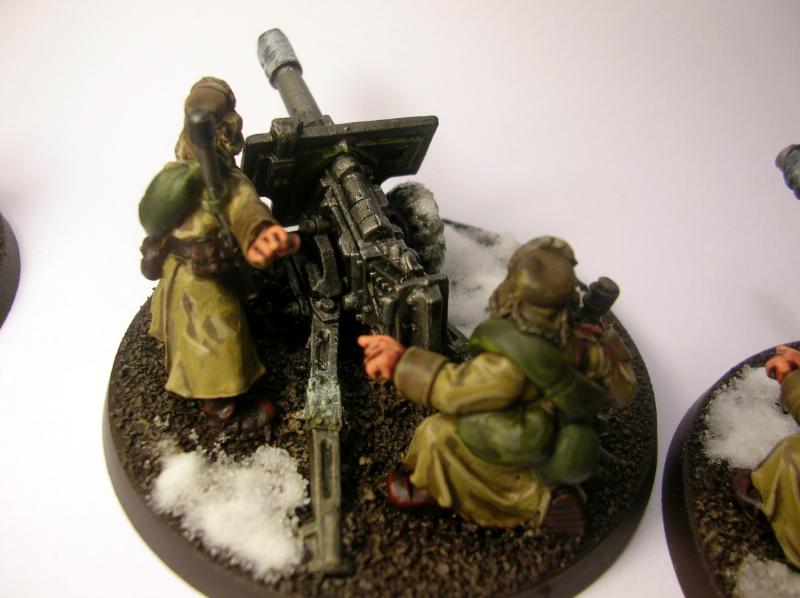  And here are some shots of everything I've painted in May - 22 infantry models and 6 guns - that's more than a model a day! 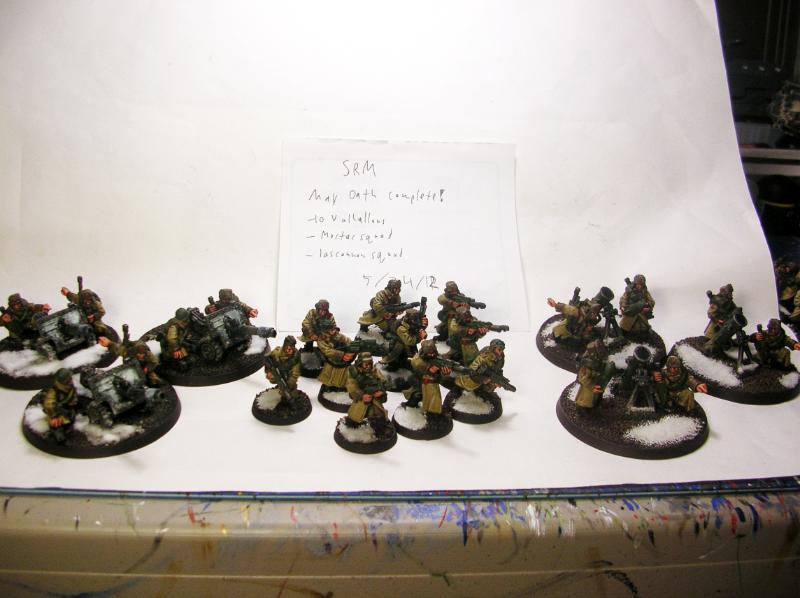 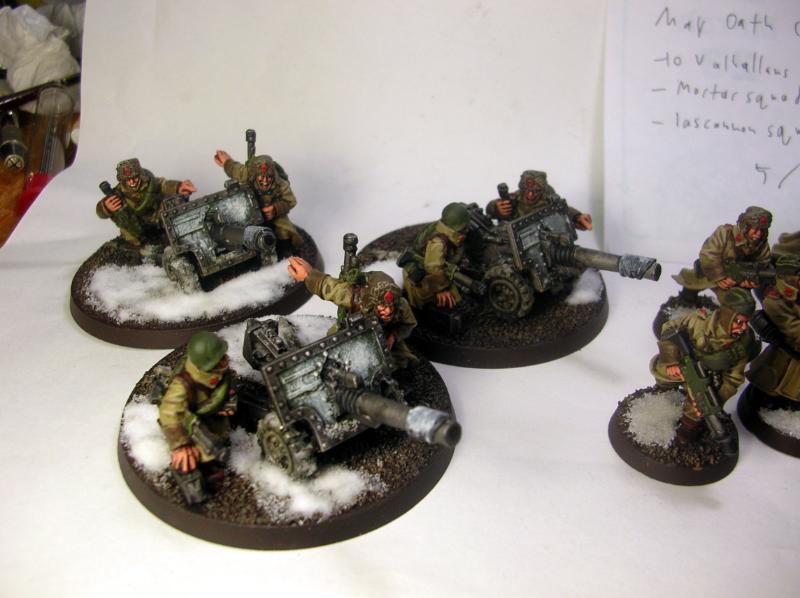  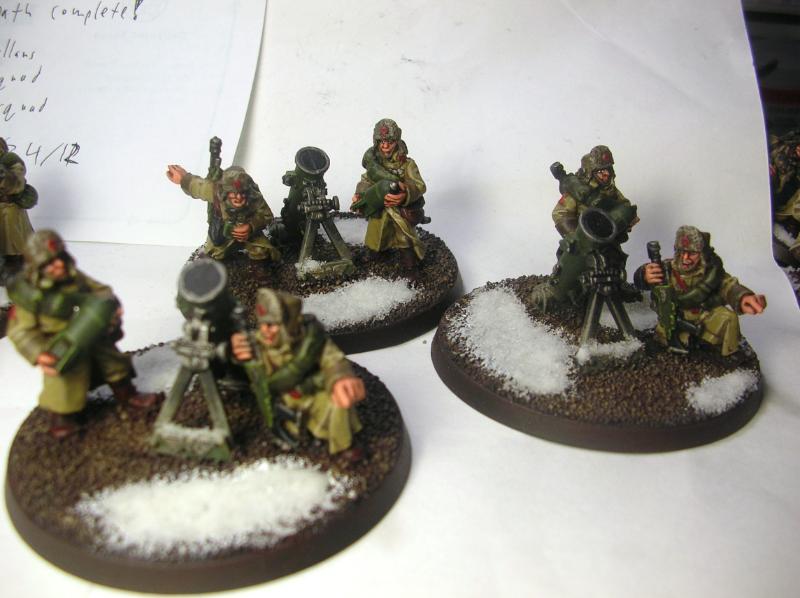
|
|
#
?
May 25, 2012 04:27
|
|
|
Manifest posted:Yeah, I have a small bottle of distilled water for thinning, but I've been running tamiya acrylic thinner and rubbing alcohol through it after every cup/color change. I soak the components of the nozzle after every use and run a cleaner through the main body. I don't do a full cleaning unless I am noticing buildup or a change in performance.
|
|
#
?
May 25, 2012 04:58
|
|
|
I made some trees.    I have no idea what I'm going to do with them, but I just sorta got on a roll and now I have them. Pretty simple, too. The whole lot of them took about 20 minutes.
|
|
#
?
May 25, 2012 07:29
|
|
|
Red Shoe posted:I soak the components of the nozzle after every use and run a cleaner through the main body. I don't do a full cleaning unless I am noticing buildup or a change in performance. What do you soak in? Thinner? Simple green?
|
|
#
?
May 25, 2012 07:35
|
|
|
Fix posted:I made some trees. As a Wood Elf player, I heartily approve of more trees on the table. They look pretty good-- what did you use for the trunk/branches?
|
|
#
?
May 25, 2012 07:37
|
|


|
Those might be the best miniature trees I've ever seen, any chance of a tutorial? How durable are they?
|
|
#
?
May 25, 2012 07:40
|
|
|
Tadhg posted:As a Wood Elf player, I heartily approve of more trees on the table. They look pretty good-- what did you use for the trunk/branches? This weed I found in a field. It's already quite dried though slightly spongy and flexible and has these little flower bud tips that make for good surface area to hold the flock. Plus there's a ton of it out there and it just takes a little spray glue. I'll snag some more next week and take some photos, see if anyone knows what it's called. These sat in the trunk of my car for better than a week, and were still flexible enough that after flocking them I could grab them by the trunk and shake excess off pretty vigorously and have no problems. Fix fucked around with this message at 07:43 on May 25, 2012 |
|
#
?
May 25, 2012 07:40
|
|
|

|
| # ? Jun 3, 2024 15:46 |
|
|
I need to put together a terminator with storm shield and thunder hammer - being temporarily miffed at the cost of the bits I decided to see what would happen if I made my own out of the bits I had available and some modeling clay.  The clay didn't enjoy being baked too much, so there is some weird bubbly texture to it, and being clay I'm guessing it's not the most ideal material to be working with. I've never done any of this stuff before, so could you folks give me a recommendation - is green stuff going to be rigid enough for a storm shield, or should I be looking at one of the other types of putty?
|
|
#
?
May 25, 2012 08:30
|
|
