|
1st AD posted:Yeah, the processed photo generally looks all right to me but that posterization is terrible. Ugh, it wasn't that bad in Lightroom, but it's still there. Back to the drawing board.
|
 #
?
Feb 12, 2013 12:12
#
?
Feb 12, 2013 12:12
|
|


|

|
| # ? Jun 5, 2024 22:26 |
|
|
It might be how you exported it. Did you export as a full resolution jpeg?
|
|
#
?
Feb 12, 2013 12:59
|
|
|
I thought I did; I'll go check my settings. The posterization effect is still there in Lightroom though, it's just less. I'll go through the actual preset settings (like I probably should anyway) the person who created it might have the "art" slider set too far or something.
|
|
#
?
Feb 12, 2013 14:13
|
|
|
Arrrgh, my tax return is in and I'm tempted to go buy some software. Is Nik still updating their stuff now that they've been bought out by Google? If not, what's the alternative, especially for B&W? An Aperture plug-in would be ideal for me.
|
|
#
?
Feb 13, 2013 03:49
|
|
|
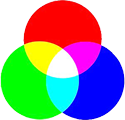
Can anybody point me toward a trusted primer or tutorial on color correction in Lightroom? For that matter - is there any free software that does a decent job of monitor color calibration? I feel clueless with regards to correction and also either colorblind or untrained (not sure which) when it comes to knowing what needs color correcting. Edit: I scored a 41 on the test. Am I hosed? voodoorootbeer fucked around with this message at 10:32 on Feb 15, 2013 |
|
#
?
Feb 15, 2013 10:21
|
|

|
voodoorootbeer posted:Can anybody point me toward a trusted primer or tutorial on color correction in Lightroom? For that matter - is there any free software that does a decent job of monitor color calibration? I feel clueless with regards to correction and also either colorblind or untrained (not sure which) when it comes to knowing what needs color correcting. Even people with excellent colour vision do a crap job at calibrating by eye. If you want any kind of results, you need a hardware calibrator. You might be able to borrow one from a friend/school/workplace, as it�s not something you�ll need all the time. I scored a four, two adjacent transpositions in yellow‐green. 
Platystemon fucked around with this message at 11:23 on Feb 15, 2013 |
|
#
?
Feb 15, 2013 11:18
|
|

|
Platystemon posted:Even people with excellent colour vision do a crap job at calibrating by eye. If you want any kind of results, you need a hardware calibrator. You might be able to borrow one from a friend/school/workplace, as it�s not something you�ll need all the time. Neat test. I got 6 with some switching in the blue/green areas.
|
|
#
?
Feb 15, 2013 17:00
|
|


|
That's a really cool test, got a 4 with the switching in the blue/green areas as well.
|
|
#
?
Feb 15, 2013 18:05
|
|
|
well I did not expect to get a 0.
|
|
#
?
Feb 15, 2013 18:14
|
|

|
I remember taking this test a year or so ago, and got 1 or 2. I took it again just now - 10. My eyes are getting worse I guess 
|
|
#
?
Feb 15, 2013 18:16
|
|


|
That's funny,I assumed I would do terrible at this.
|
|
#
?
Feb 15, 2013 20:56
|
|

|
voodoorootbeer posted:Can anybody point me toward a trusted primer or tutorial on color correction in Lightroom? For that matter - is there any free software that does a decent job of monitor color calibration? I feel clueless with regards to correction and also either colorblind or untrained (not sure which) when it comes to knowing what needs color correcting. 41?? poo poo son.
|
|
#
?
Feb 17, 2013 01:28
|
|

|
CarrotFlowers posted:41?? poo poo son. Looks like it's time to become awesome at b&w 
|
|
#
?
Feb 17, 2013 06:20
|
|
|
voodoorootbeer posted:Looks like it's time to become awesome at b&w 32 Glad I got a Spyder4 for Christmas! *Edit: At least I have a reason for being so lovely! gently caress! That just totally taxed my brain. Going to lay down and hopefully not puke.
|
|
#
?
Feb 17, 2013 20:39
|
|
|
So I just went on a winter hike in the woods. Lots of trees with some clearings with frozen over streams and fallen trees. The weather was somewhat cloudy but the sun was still able to get through the clouds here and there. I took most of the pictures slightly underexposed. Any tips on post processing snow covered areas in the woods with sunlight? Also just a general question. What is the difference between the meter in the camera and EV exposure compensation? I'm always hearing people talk about +2EV etc. and I don't know what that means. I just adjust the settings to make sure that the light meter in the camera shows about -1/3. I guess I don't know much about light metering and when and how to use it properly.
|
|
#
?
Feb 17, 2013 21:37
|
|
|
Exposure comp means you tell the camera to shoot at a setting that is off from the internal meter. Camera meters are pretty dumb. So let's say you're shooting snow, the meter wants to underexpose (because he has chronic depression and wants everything to be gray). You dial in +1 stop of exp comp, the camera shoots at meter+1stop. Snow looks white. You win the prize.
|
|
#
?
Feb 17, 2013 21:41
|
|

|
Same goes for hockey I've discovered. For the same reasons, obviously. I'm just surprised when major newspapers here print yellow hockey photos.
|
|
#
?
Feb 17, 2013 22:13
|
|
|
Exposure comp comes in handy when shooting animals with black fur. But in the opposite direction from the whole snow thing.
|
|
#
?
Feb 18, 2013 00:40
|
|
|
I rarely use exposure compensation. I usually switch to manual if the meter is getting confused. Manual mode is bad if I start shooting in the shade and forget to adjust, but exposure compensation is bad if I shoot something with less of the meter‐confusing element.
|
|
#
?
Feb 18, 2013 06:49
|
|
|
Sometimes it's quicker to just turn one dial though than switch from Av/Tv to manual. At least on my cameras, switching to manual defaults the settings to what I last had them on in manual so when I switch from aperture or shutter priority I have to gently caress with aperture and shutter instead of just clicking a dial up 2 stops and then back 2 stops when I'm out of that weird lighting.
|
|
#
?
Feb 18, 2013 07:20
|
|
|
Lightroom 4 and some movie editing software is the shellshocker on Newegg right now for $90. Gonna have to jump on that.
|
|
#
?
Feb 18, 2013 19:54
|
|

|
evil_bunnY posted:Exposure comp means you tell the camera to shoot at a setting that is off from the internal meter. Camera meters are pretty dumb. So let's say you're shooting snow, the meter wants to underexpose (because he has chronic depression and wants everything to be gray). You dial in +1 stop of exp comp, the camera shoots at meter+1stop. Snow looks white. You win the prize. Thanks. I shot on manual and I had the exposure meter at about -1/3 to -2/3. The snow pictures with sunlight look alright... Would putting the exposure bar to +1 in lightroom solve any issues? VV Awesome. Thanks again! GoldenNugget fucked around with this message at 22:17 on Feb 18, 2013 |
|
#
?
Feb 18, 2013 20:29
|
|
|
Push it in lightroom until either the snow looks good or your shadows have too much noise. At base ISO you can give it a couple of stops before it gets too bad.
|
|
#
?
Feb 18, 2013 22:05
|
|
|
Online ColorIQ Challenge posted:You have perfect color vision! gently caress YES I DO
|
|
#
?
Feb 18, 2013 22:14
|
|
|
I'm having a problem that I've never, ever encountered in Photoshop before and I'm hoping maybe someone here can help me figure out what the heck.  Going through to edit some shots I took in studio yesterday, of a blown glass ball ornament. Seems simple enough, and in ACR the images look well enough. But, the moment I go out of ACR and into Photoshop with them, the area of the ball becomes a complete black / pixelated digital mess of wtf-ery.  911 Help by eachus, on FlickrIf I save the image, even after it looking like that, it looks "normal" as a jpg in Bridge or when uploaded to the web, but the moment I take it back into Photoshop it wigs out again like crazy.  ??? by eachus, on Flickr Literally every shot I took with this ball is exactly the same, gelled, not gelled, backlit.. everything loads up with that crazy pixelation in Photoshop. What gives? At this point, I've even tried uninstalling Photoshop and reinstalling, and that didn't help the issue. And it's only with these shots, everything else looks just fine. :/ edit: Actually, I think I'm just a loving idiot and figured it out by fixing the histogram. -headdesk- That Damn Satyr fucked around with this message at 20:19 on Feb 20, 2013 |
|
#
?
Feb 20, 2013 20:16
|
|
|
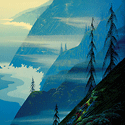
I took my new zoom lens out to test today because I had some free time after work before sundown, and while I wasn't expecting to get anything great (it was more getting familiar with the lens) I found a shot I actually kind of like. The problem is, today was totally overcast, so the sky and forest are a fairly similar tint of grey. I have Aperture and I'm trying to figure out how to make the blues pop from the skyline, the trees below look more like their natural green color, and the red rocks in the foreground to be a touch more vibrant. I tried using the saturation brush for the skyline and that worked OK, but it's turning the trees aqua and I don't know how to make it bring out the greens. Is this a possibility or do I need to look to a different program (Lighroom perhaps)?
|
|
#
?
Feb 22, 2013 01:59
|
|

|
Yeah LR has color-specific saturation.
|
|
#
?
Feb 22, 2013 02:01
|
|
|
Viveza works with Aperture too and I believe has a 30 day trial. It would be great for what you're trying to do.
|
|
#
?
Feb 22, 2013 02:06
|
|
|
If it were LR I'd try to reduce the luminance of the blues and possibly increase the green saturation. Never used Aperture though so I don't know if those sliders exist.
|
|
#
?
Feb 22, 2013 02:37
|
|
|
Aperture does do color-specific luminance/saturation using the Color brick. Select one of the colors (doesn't matter which) and use the eyedropper tool to select the hue you want to alter:  Then use the sliders to do what you need to do. By the way, the actual slider for the hue only goes from -60 to +60, but if you drag the actual number to the right you can go all the way through -180 to 180.  While I didn't need it for this photo the Range slider determines how much of the color wheel the adjustment will affect (like say, all colors from -15� to +15� of the hue you chose). If you need further refinement you can use the brush to paint the effect in/out, and you can also add more than one Color brick if you need it. I'm glad someone else is using Aperture ") I haven't used LR but from what I understand Aperture is... mostly feature compatible. I haven't used LR but from what I understand Aperture is... mostly feature compatible.
|
|
#
?
Feb 22, 2013 04:11
|
|
|
Eegah posted:A bunch of good information! This is super helpful, thank you! Unfortunately I don't think it's going to help my current picture all that much since the hue for the sky and the treeline is entirely too similar, but I played around with the functionality a bit and it's definitely useful. That's what I get for going out on the greyest afternoon I've seen since I moved here, but it was the first chance I've had to play with the new lens so I figured it was worth the tossaway photos. I'm definitely going to spend more time this weekend, hopefully with some actual daylight, back where I took these and see if I can't get some better shots.
|
|
#
?
Feb 22, 2013 04:55
|
|
|
Check out the Viveza trial. It lets you make colour adjustments like that by region very intuitively.
|
|
#
?
Feb 22, 2013 06:13
|
|
|
I asked earlier but I'm a bit skittish on Nik software since they got bought by Google. Has there been anything on them doing any updates? I know their stuff works with Aperture 3 but who knows when/if an Aperture 4 will come out because it's ~Apple~ and they don't tell poo poo to no one.
|
|
#
?
Feb 22, 2013 06:33
|
|
|
This thread hasn't had any tutorials lately, which is a shame. At the same time, I've had a few requests to put together a tutorial of my own. So I guess I'll be the one to get the ball rolling again. This is the finished product...  Sumatran Tiger by William T Hornaday, on Flickr And I'd like to preface this by saying that I really have no idea what I'm doing most of the time. I have no formal or informal training on any of this and have just figured things out by trial and error. I can almost guarantee there are easier, quicker, and better ways of doing all of this, but I don't know what they are; so feel free to give feedback on that. And this is probably going to be longer and more boring than I intended. So, here's what the photo looked like straight out of the camera. Canon 7D: 1/400 sec at f/4.0, ISO 200, 200 mm. Despite the fact that the light was boring and flat, I like shooting on overcast days because colors look better and it gives me a lot more freedom to adjust things to where I want. It's tougher to play around with images that already have a lot of contrast and very bright/dark areas.  Cropped it down in Lightroom.  And did some basic adjustments in Lightroom to get the overall look closer to what I wanted. A little bit of an exposure boost, slight vignette, and made the grass less yellow.  Brought it over into Photoshop as a smart object (made a few more tweaks in Camera RAW) and added a high pass layer (1 pixel radius) with 'overlay' blending mode to sharpen it just a smidge. On some photos, I'll have a second and more drastic high pass (~2 pixel radius) and mask that in to areas that really need attention or I want especially sharp (e.g., eyes, other facial features, edges of fur, etc.)  Darkened the background some with a brightness layer. This way seems to kill a lot of contrast, but I was going to make it all shadowy in the end and things tend to get to get less contrasty in low light.  Used a curves layer to apply contrast in order to bring out a lot of the color, texture, contours, and edges in the tiger. This is usually the first step I take in Photoshop. I make a curve where the darks end up being a little too dark and the lights a little too light, and then just gradually paint in the areas that I want the aforementioned characteristics come out  Used a curves layer in 'multiply' blending mode to burn the grass and create some stronger and more directional light than was actually there. Typically when burning this way, I'll also throw in a subsequent vibrance layer of about -20 to control the color in the affected areas. Like contrast, color tends to die a bit as light decreases.  Used another curves layer in 'multiply' blending mode to do the same stuff for the tiger. Again, didn't use a vibrance layer here either because I took care of the color correction later on.  Grass was still too bright, so darkened it some more with another brightness/contrast layer.  And darkened it some more. I don't know why I couldn't have just done this on the previous layer.  Used a curves layer in 'screen' blending mode to roughly dodge areas that I wanted to be facing the 'light.' And added a little color warmth to make it more sunlight-y. Sometimes when warming up dodged areas, I'll also slightly cool down the shadowed areas.  Used another curves layer in 'screen' blending mode to dodge the finer areas that I really wanted to pop with light. Also helps create a little bit more contrast to define edges and fur/body contours.  Used a vibrance layer to dull the grass. Again with the low-light, low-color thing.  Used a vibrance layer and a subsequent color balance layer to dull the tiger a bit and control the strength of the orange. I tend to err on the side of caution when it comes to color, and rather it be too dull than too garish.  Used a vibrance layer to give a little color boost to the brighter areas, particularly around the face.  The front leg still felt a little oversaturated, so dropped that back down a bit with another vibrance layer.  And lastly used a curves layer to add a little contrast to the eyes and make them a hair brighter.  And here's a fancy little GIF of everything I just said.  Feel free to critique the hell out of my processing technique.
|
|
#
?
Mar 3, 2013 03:14
|
|
|
I think it's rad as hell and I'm going to try and work some screen layer stuff in my workflow now. I do a lot of dodge/burn with softlight layers. If you want critique you could probably stop much earlier than you do and still get 99% of the final result but tweaking has no finish point so as long as you don't go to insane it's fine
|
|
#
?
Mar 3, 2013 03:37
|
|
|
Insanely helpful. Thanks so much for putting that together!
|
|
#
?
Mar 3, 2013 04:24
|
|

|
I do minimal stuff with photoshop and generally hack my way through lightroom so this is really great - can't wait to play with some of that. Thanks for the tutorial!
|
|
#
?
Mar 3, 2013 08:18
|
|
|
Thank you for taking the time to write that up. What kind of brush size/hardness/opacity do you typically use when masking? Do you have a tablet or do you use a mouse?
|
|
#
?
Mar 4, 2013 02:37
|
|
|
Brush size pretty much depends on the level of detail I'm trying to work with. I don't think I've ever used a brush hardness of anything other than 0%. Opacity stays at 100%, with pressure determining opacity. Flow typically stays at 50%, but I'll sometimes drop it to 20% when working with very large areas and/or when I want to build it up very gradually. I've got a Intuos3 with the pen pressure sensitivity set to about 2/3 to firm. And I pretty much exclusively use the pen in Photoshop.
|
|
#
?
Mar 4, 2013 04:56
|
|
|

|
| # ? Jun 5, 2024 22:26 |
|
|
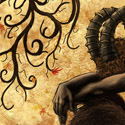
Thought I'd do a walkthrough of how I worked on this image. This does not include the spotting/dust removal, I do that right after cropping and the first curves layer.  Dilmaghani Rugs, Scarsdale NY by JaundiceDave, on Flickr When scanning, I don't really care that much about color casts, even if they're pretty bad. I'm just aiming for a flat scan with no clipping and as much detail as possible. Luckily through my school i've got access to some really nice scanners, so that's cool i guess. Here's the image straight out of the scanner.  First thing I do is apply a curves later, setting the black and white points individually for red, green, and blue. This gets the contrast I'd like and sets the stage for the rest of my editing. This step is really 80% of the processing, but the other 20% take 80% of the time.  Next thing I did was to use a masked brightness/contrast layer to bring down the brightness and increase the contrast of the central windows.  This wasn't quite enough, so i added another adjustment layer and darkened/increased the contrast a little more using a large soft brush at a low opacity.  Next thing to do was to select a green color range, since the greens were a little intense, and desaturate them using a hue/saturation layer. Hue/saturation layers are lifesavers for color correction, they save a ton of time and effort. I don't know what I'd do without em.  After this, I simply desaturated the areas of the image that were still problematically colored and would be really annoying to correct for otherwise.  This looked strange, so I went through and using a hue/saturation layer set to colorize mode with a light orange color and a low opacity brush, I painted the areas over with a dull orange that was similar to the light already there.  And finally, I felt like the rug in the center was too garishly colored, so I added another hue/saturation layer and went over it with a low opacity brush till it looked how I wanted. That's it. 
|
|
#
?
Mar 5, 2013 22:34
|
|