


|
So, Slung Blade, how much did you pay for that? I prepped the anvil for welding today. I had to chisel off another section on the middle of the face, though it was not nearly as thick as the section on the heel. I was following a long crack along the side of the anvil and said gently caress it and got the chisel. No pics of it but its nothing special. Tomorrow I will go over all the surfaces with a sandblaster before welding. I also ran some 7018 practice beads on heavy plate just because I hadn't done any substantial welding in months, and they turned out really well aside from a few slight travel speed fuckups. Super loving excited to weld that big heavy bitch tomorrow.
|
 #
?
Mar 30, 2013 03:13
#
?
Mar 30, 2013 03:13
|
|


|

|
| # ? May 25, 2024 00:36 |
|
|
iForge posted:So, Slung Blade, how much did you pay for that? Honestly? I can't remember. 250-350 Canadian maybe? It wasn't a screamin deal or anything, but it was acceptable for what it is and where I am. Considering how few there are in my part of the world, it's as rare as a black astronaut. I've thought about buying a big, new one, but the shipping alone...  Good luck with your anvil weld man, that thing looked pretty rough with the broken top plate 
|
|
#
?
Mar 30, 2013 03:31
|
|


|
Slung Blade posted:Honestly? I can't remember. 250-350 Canadian maybe? Thanks! The section that I removed today was not nearly as rusty underneath as the section on the heel, and I believe that crack was my doing. There was a time that, because I wanted to work too fast, I would use a 10 pound sledge 1-handed to beat the metal into submission faster, and I think that may have contributed to this crack. I am confident that all the bad metal is removed now and after welding, grinding, more welding, more grinding, and a trip to the machine shop, this anvil will have a new lease on life. My camera battery is on charge right now, so I will have a full battery and empty memory card for lots of pics tomorrow. I picked up a 450 degree temp stick today (because they didn't have 400) so I will know that the pre-heat is high enough before welding.
|
|
#
?
Mar 30, 2013 03:43
|
|
|
AbsentMindedWelder posted:This morning I rigged up an apparatus to press on the bull gear. After I get home from work this evening I will give the spindle a final cleaning, lubing, followed by assembly and installation into the headstock. I won't go to bed until it's finished! When I went to press on the gear with my "apparatus" I could only get it on half way. Thus, I did have to go bed without it "finished". No big deal, this morning I went over a buddie's shop who has a hydralic press... problem solved:  Then the pulley cone was slid on, nothing special to see there. After that it was time to unwrap that duct tape that was on the spindle for 3 years. It left quite a bit of residue, but it cleaned up with denatured alcohol no problem.  After that the bearing was installed and the spindle was set in the headstock with the aid of an assistant. New lubrication felts were installed. If you would like more details about the bearings and this procedure in detail, check out the original South Bend documentation: http://www.wswells.com/data/howto/SBL_form_2002.pdf  After that, it was time to clean up the shims, install the bearing caps, the expander screws, the new oilers, and the plugs. Brand new spindle oil was added to the reservoirs. The spindle turns by hand just fine. Tomorrow I will measure the bearing clearance, then turn my attention to the counter-shaft, motor, and flat belt. When the spindle is spinning and the back gear is installed, I'll clean up the pulley cone. ") You'll note some paint is missing from the headstock... I used some brake cleaner to blast out any dirt inside the oil ports before assembly... it took the fresh paint clean off! Some even dripped down on the pedestal. No big deal, it'll be easy enough to feather the edges and touch it up. 
AbsentMindedWelder fucked around with this message at 07:55 on Mar 30, 2013 |
|
#
?
Mar 30, 2013 07:53
|
|

|
That's looking awesome AMW. Shame about the paint getting stripped, but yeah, minor detail.
|
|
#
?
Mar 30, 2013 07:55
|
|
|
Been a productive day so far, but no where near finished. It's time for a break however, and an update. Here I've prepared to lift the counter shaft assembly in place using a floor jack. The big heavy pin sticking to the right is it what it pivots on.  After that the handle and spring that raises and lowers the counter shaft to tension the flat felt was installed. After that the motor plate and hardware was installed. New MC cable was wired on the motor and it was then bolted to the mounting plate. Pressed on the pulley to the motor and installed the V belts. Still to do this evening is measure the bearing clearance, temporarily wire up the VFD and test the motor, followed by gluing up the flat belt. 
|
|
#
?
Mar 30, 2013 23:21
|
|
|
Here I am measuring the bearing clearance on the left bearing. I used a piece of pipe to "lift up with 75 lbs of force" as South Bend recommends. This bearing came in right at one .001" , right in spec. The right bearing is measured in the same manner. This one came in at .0015", just .0005" above spec, but I'm OK with that. The spindle is good to go!  After that I hooked up the Variable Frequency Drive (a Hitachi X200). The motor is a 1 HP Baldor 3 phase. It spun up just fine. Sounds like the bearings need a drop of oil or something, I'll have to figure out exactly how I'm supposed to lubricate it. Now I'm going to start working on figuring out exactly how long I'm supposed to make the flat belt so I can get that cut and glued up. Once that's good (and all the under drive parts are properly lubed) it's time to put the spindle under power! 
|
|
#
?
Mar 31, 2013 01:39
|
|
|
Super tired from working on the anvil all day but I made a lot of progress. I started to lose daylight so I quit and will finish welding it sometime this week. The pre-heat is seriously needed for the 9018 rods to burn properly. We did a few test beads on non-preheated inch thick plate and they turned out like poo poo, but once I got on the hot anvil they looked 100x better. It took about 30 minutes for the whole anvil to get up to 450ish degrees for me to start welding on it. The steel face was losing heat way faster than the wrought iron body so I had to heat it back up several times. I resorted to just heating the area where I would be welding rather than heating the whole thing. As it cooled, the wrought body would be at 400 while the face would be around 250. Pain in my rear end. I know my welds aren't the nicest looking but they are solid and I took my time and ground out anywhere that had a hint of slag inclusion before continuing. All the welds are getting ground flat so who cares what they look like or what direction they are going. The pallet is there because the neighbor's kids were jumping on their trampoline and while they are a good 60 feet away, I wanted to put up a wall anyway. Pre-heat setup.  Propane burner closeup:  Action Shot:  Progress:  Localized pre-heat on the heel:  Localized pre-heat on part of the face:  Padding the sunken face:  Adding metal after grinding the heel:  Another action shot: 
|
|
#
?
Mar 31, 2013 02:29
|
|
|
In that first pic you can clearly see a shadow of iForge drinking a cup of tea.
|
|
#
?
Mar 31, 2013 02:45
|
|
|
Is that a Reil burner you used for the pre-heat? How's she do ya? Once I get some non-vital-food-and-school money I want to wrangle up some Kaowool and wide steel pipe and make a proper propane forge, and I was leaning towards a Reil-pattern burner or two (just the one if I rig it up with a welding tip in the perpendicular pipe nipple like Ron recommends instead of just a drilled hole) but don't have any actual experience with burners so it's just "this is what a lot of people seem to be happy with".
|
|
#
?
Mar 31, 2013 03:53
|
|

|
Ambrose Burnside posted:Is that a Reil burner you used for the pre-heat? How's she do ya? Once I get some non-vital-food-and-school money I want to wrangle up some Kaowool and wide steel pipe and make a proper propane forge, and I was leaning towards a Reil-pattern burner or two (just the one if I rig it up with a welding tip in the perpendicular pipe nipple like Ron recommends instead of just a drilled hole) but don't have any actual experience with burners so it's just "this is what a lot of people seem to be happy with". It is indeed a Reil burner. That one is absent minded welder's and it has a brass flare on it (you need to use a flare to keep the flame going when it is outside of a forge or firebox.) I'm not sure what size drill he used on his, but I think mine uses a #87 drill bit for the hole. I use a modified Reil burner in my Freon-tank forge. Also that reminds me, we should really change out that galvanized burner tube for a black iron one.... edit: didn't answer your main question... It works really well. I have built 3 or 4 and have been happy with all of them. it can take a little fiddling to get it running right in a forge but once you do you'll be really happy with it. iForge fucked around with this message at 04:25 on Mar 31, 2013 |
|
#
?
Mar 31, 2013 04:18
|
|
|
Hey all. I think I may have been bitten by a horrible bug.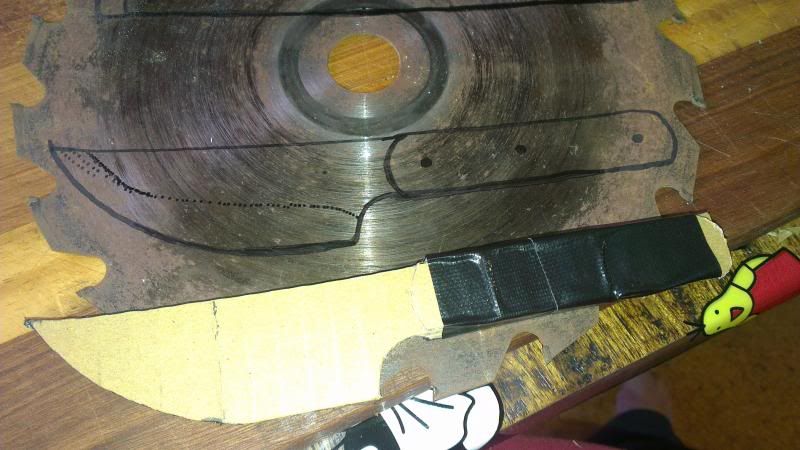 Is there a cure? 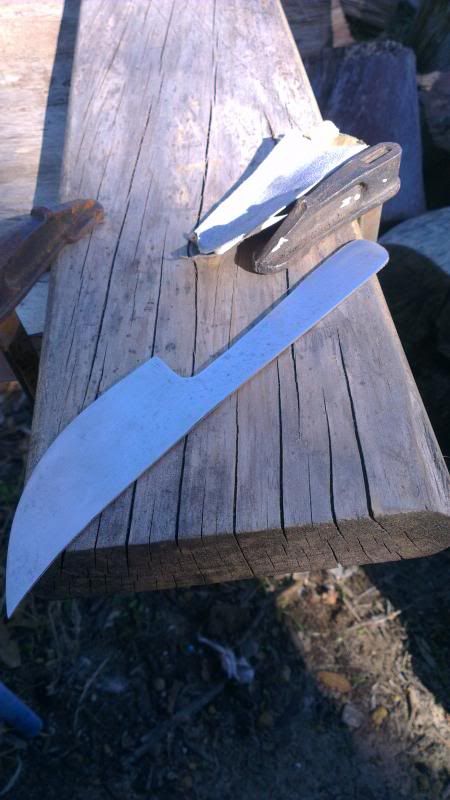 It's a work in progress, but I'm hoping to make a skinner with wooden handles. 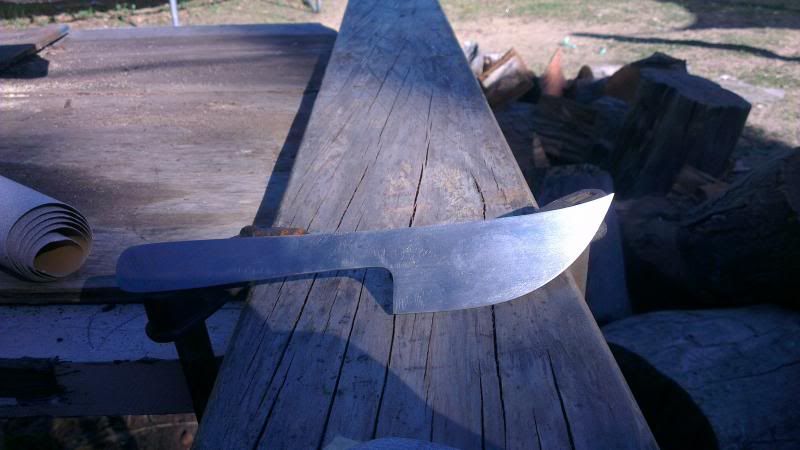 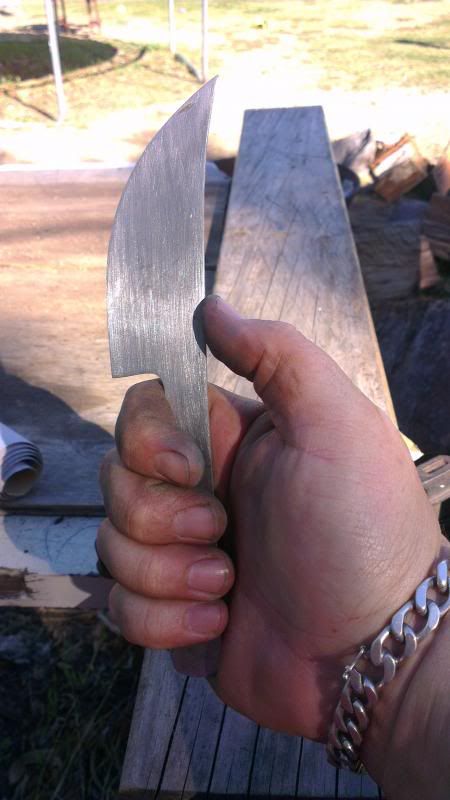 Apologies for the phone pics, but that's all I had on me. Edited to update links, cause I hosed up. LeeJam fucked around with this message at 00:17 on Apr 1, 2013 |
|
#
?
Mar 31, 2013 12:47
|
|
|
Ambrose Burnside posted:Is that a Reil burner you used for the pre-heat? AbsentMindedWelder fucked around with this message at 14:09 on Mar 31, 2013 |
|
#
?
Mar 31, 2013 14:06
|
|
|
LeeJam posted:Is there a cure? Nope, you're doomed. Nice work on that blade-blade. Do you have the last image still? It's not loading for me.
|
|
#
?
Mar 31, 2013 15:29
|
|
|
iForge posted:It is indeed a Reil burner. That one is absent minded welder's and it has a brass flare on it (you need to use a flare to keep the flame going when it is outside of a forge or firebox.) I'm not sure what size drill he used on his, but I think mine uses a #87 drill bit for the hole. I use a modified Reil burner in my Freon-tank forge. There's no risk of melting with a brass flare? I'd probably go that way if I stumble on the right-sized tubing offcut, just because doing the flare would become a much smaller pain in my rear end.
|
|
#
?
Mar 31, 2013 16:42
|
|
|
Ambrose Burnside posted:There's no risk of melting with a brass flare? Nope, the heat is in front of the flame, not behind it.
|
|
#
?
Mar 31, 2013 17:10
|
|
|
LeeJam posted:Hey all. I think I may have been bitten by a horrible bug. Just wanted to point out your images are all broken. If you re-upload them to Imgur they should work.
|
|
#
?
Mar 31, 2013 18:03
|
|

|
AbsentMindedWelder posted:Nope, the heat is in front of the flame, not behind it. Haha oh yeah  For whatever reason I was visualizing the flame starting at the end of the straight pipe nipple segment and passing along the inner walls of the flare instead of, you know, starting at where the pipe actually, effectively ends, at the end of the flared section
|
|
#
?
Mar 31, 2013 19:03
|
|
|
I measured my old belt today and it came in at 61.75". I prepared the new serpentine belt with a bench grinder, which worked well. It is messy however, and unless you use an old wheel you'll want to take a wheel dresser to it afterwards. I ground down each side until the threads were visible, and then feathered each the ends. I put in 8" of overlap. The belt prep wen't well, too bad I had an abismal failure when it came to glue it. The adhesive I used is pictured below. This was just a disaster, first I felt like the activator pen was not giving me good coverage. Then when I was using a paper towel to spread the glue around I got some on my finger... which proceeded to feel like my skin was on fire. After dealing with that I carefully pressed the two halves together. Parts of it bonded parts of it did not. It was pretty clear that this failed so I moved the belt tension lever which promptly broke the joint. The belt is still usable, but I will have to go pick up a different adhesive tommorow when the stores open. I'm considering the idea of looking into how I go about lacing up the old belt (leather/plastic combo) in the interests of getting a spindle test done. 
|
|
#
?
Mar 31, 2013 22:16
|
|
|
Here's the manual for Alligator lacing so if you end up up going that way you just need to buy the laces.
|
|
#
?
Apr 1, 2013 01:20
|
|

|
AbsentMindedWelder posted:I had an abismal failure when it came to glue it. The adhesive I used is pictured below. Rubber is not plastic. You can't glue it with plastic glue, unless the glue specifically says it bonds rubber. I think you instead need some kind of vulcanizing rubber glue.
|
|
#
?
Apr 1, 2013 02:16
|
|

|
Welded up my stupidly tall table. Plopped the old girl on top, and put all the fittings back together. I drilled and re-tapped the handle's bolt hole, had to go with 3/8ths because that's all I have on hand, despite this thing being totally metric. That was a hard thing to do as a Canadian, realizing you have no metric threaded fittings  I lubed the poo poo out of everything with a heavyweight gear oil and ran it through a bunch of cycles to clear out anything I may have left in the working faces. (the ice cream pail lid is to catch all the drips of oil)  It's getting kinda small in here...  So yeah, probably going to weld some feet onto those legs, and maybe some triangular torsion support gusset dealies, but I need to make some tooling and try this thing out and see what's what. First though, I need to buy some bolts long enough to go through the plate and the press's feet...
|
|
#
?
Apr 1, 2013 02:22
|
|
|
Leperflesh posted:Rubber is not plastic. You can't glue it with plastic glue, unless the glue specifically says it bonds rubber. I think you instead need some kind of vulcanizing rubber glue. I'm not gluing rubber, I'm gluing the cords in the belt (which I believe to be some type of nylon). The rubber was ground away until the cords on either side show. People have done this serpentine belt "mod" have used glues meant for plastics as the rubber ones don't work. I have some leftover serpentine belt. I will try different adhesives and see what works out well. Since I was kind of dead in the water, I decided to try something. I took the old flat belt down to the drill press and drilled a series of 1/16" holes. I then used copper wire to make up a very amateurish lacing job and soldered it shut.  Booyah! It actually worked! I ran the spindle for an hour with absolutely no problem. The right bearing was happy at 100 F and the left bearing seemed to like 86 F. I'm very very pleased. Next up is to clean and install the back gear, then turn my attention to the carriage.  
|
|
#
?
Apr 1, 2013 02:42
|
|
|
AbsentMindedWelder posted:I measured my old belt today and it came in at 61.75". goons.txt No but seriously your lathe is quite awesome. We have an old South Bend in the shop here and it's a peach. Despite decades of use by untrained students, all you need to do is feed it some ATF every so often and it just keeps on trucking away.
|
|
#
?
Apr 1, 2013 05:24
|
|


|
^^^ Thanks! Speaking of lubrication now might be a good time to post what I'm using here. I don't know that I'd use ATF but something is better then nothing, for sure. Here is some original SB documentation on lubrication for 10-16" lathes: http://www.wswells.com/data/general/1967_10-16_Lube_Chart_S6503R.pdf http://home.roadrunner.com/~rcbattelle/lathelubrication.html has more lubrication info. His site also happens to detail a 13" lathe like mine very well and has been a great resource. To sum it all up: I'm running Mobil Velocite 10 in my spindle bearings. The spindle pulley cone and back gear will get Teflon grease. The apron and gearbox are filled up with Mobil DTE Heavy Medium. The ways and lead screw get Mobil Vactra #4. Everything else, thurst bearings, open gears, various shafts and pivot points etc will see Mobil Vactra #2. 
AbsentMindedWelder fucked around with this message at 14:01 on Apr 1, 2013 |
|
#
?
Apr 1, 2013 13:53
|
|
|
I don't think anybody here has mentioned having much experience with this kinda stuff, but: do you think I could grind a standard trailer ball hitch, 2 inches I'm pretty sure, down flat enough to make a decent mushroom stake for doing copper hollowware vessels on? I've wanted to try raising forever but you can't just up and do it without the right raising stake for the task. e: Also, what's the right way to do something like this? My thought is- make a brass-sheet cut-out template of the profile I want it to have and use that to guide the grinding-down process.
|
|
#
?
Apr 2, 2013 03:56
|
|
|
Ambrose Burnside posted:I don't think anybody here has mentioned having much experience with this kinda stuff, but: do you think I could grind a standard trailer ball hitch, 2 inches I'm pretty sure, down flat enough to make a decent mushroom stake for doing copper hollowware vessels on? I've wanted to try raising forever but you can't just up and do it without the right raising stake for the task. I made one out of a pipe cap and it works nicely. Just weld a pipe or bar inside it for the stem and grind it to profile. Much less work than a hitch ball. 
|
|
#
?
Apr 2, 2013 04:51
|
|
|
I've been meaning to post in this thread for quite some time now (Started reading it the day it was created), but now I actually have a reason to. I finally got around to building my make-shift forge this last weekend, after having the components sit in my basement for a good two years. Where is a place you guys would recommend to buy tongs? Right now I'm just using a big pair of channel locks, and they just aren't as long or as useful as I would like.
|
|
#
?
Apr 2, 2013 05:47
|
|
|
Actually, you can make tongs without tongs: http://www.anvilfire.com/iForge/tutor.php?lesson=jd_tongs/demo
|
|
#
?
Apr 2, 2013 06:17
|
|


|
Stupid little question, but I don't know anything about metal or jars or paint or this planet. I really like using Aldi's Casa Mamita salsa jars around the house  Is there some really easy and inexpensive way to, like, strip the lids of the paint/branding? I'm thinking, like, bleach for metal. I think. I don't know. Something chemical since I'm not buying a belt sander, but also I don't want to kill myself. My desire to pursue this pet project roughly equates to about $15 and a single trip to Lowe's, and only because I eat so much salsa that I've gotten three of these jars in the past month.
|
|
#
?
Apr 2, 2013 07:18
|
|

|
Aircraft remover is the best chemical for taking paint off of things. It's basically 95% jellied dichloromethane with a little bit of methanol and caustic base thrown in for good measure. It will bubble off the paint like Xenomorph blood eating through the hull of a spacecraft. It will also burn your skin so wear gloves, and it's highly toxic so don't do this to anything you intend to eat out of later. If you can find a place that supplies pure dichloromethane (also called methylene chloride), you can use that as well, but aircraft remover is easier to find. Failing that, most chemical paint strippers you can find at Lowe's will have the same general compounds in them. Avoid the ones with sissy names like "low toxicity" or "environmentally friendly" if you want the good stuff  That said, now that I've tried soda-blasting I don't think I'm ever going to try stripping paint any other way again. That poo poo is magic, and it's cheap and completely non-toxic to boot. Can't beat that combination. e: hah, the first google result for "aircraft remover" is a youtube video of somethingawful's own Boomerjinks demonstrating it on one of his movie car replicas. Sagebrush fucked around with this message at 07:35 on Apr 2, 2013 |
|
#
?
Apr 2, 2013 07:32
|
|
|
I really want a John Neeman Kitchen Knife now
|
|
#
?
Apr 2, 2013 11:56
|
|

|
MrDude, try some "CitriStrip". It's relatively pleasant to work with and it does a great job at paint removal. Sagebrush, I'll have to look into this soda-blasting thing. Got more stuff done yesterday and this morning. Dropped off the pedestal covers and door, a couple of the headstock covers, and the item that holds the start/stop button to the local powder coater who does a nice job at blasting. I'll get them later in the week and will paint them ASAP. Installed the back gear:  Touched up the paint the brake cleaner took off. I'll give it another coat in those areas after it dries:  Painted one of the back gear gaurds grey. When this dries enough so I can reposition it I'll go over the inside where white is showing. I also got the under-drive tension handle cleaned up. Before I paint it, I want to try and remove the handle so I can get a fresh shiny brass plating on it.  Put a first coat on access cover to the bull gear pin. I'm using the white color as the first coat since I have a bit of it and want to avoid mixing up more battleship grey.  I took the saddle apart this morning. I took most off the paint very quickly with a wire wheel on an angle grinder. I stayed away from the ways and important surfaces. I'll give this thing some citristrip to get in those couple areas and remove the little residue on it. You can see the cross feed waiting patiently for my attention in the background. (Gotta love Kroil Oil for that stuck hardware!)  I got some new epoxy to try and did a test on a piece of leftover belt. This was much easier to work with. I didn't have a crappy activator pen that was half dried out and was able to skip the whole skin feeling like it's on fire thing. This is just a basic two part epoxy that you mix up on some cardboard and have about 5 minutes to work with. 
|
|
#
?
Apr 2, 2013 15:19
|
|
|
Pretty sure that's still not going to work the way you hope. Anything "plastic" is generally going to cure as a hard material, which of course won't work in a belt, since it needs to constantly flex.
|
|
#
?
Apr 2, 2013 16:14
|
|


|
Ferremit posted:I really want a John Neeman Kitchen Knife now Their butchers axe is one of the most beautiful things I've ever seen. 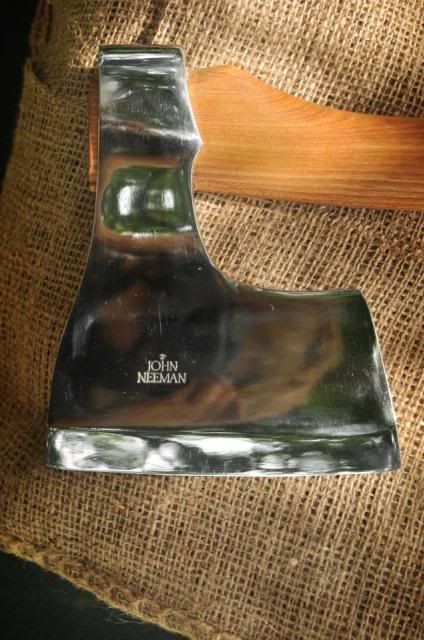
tonedef131 fucked around with this message at 21:05 on Apr 2, 2013 |
|
#
?
Apr 2, 2013 16:21
|
|

|
Bad Munki posted:Pretty sure that's still not going to work the way you hope. Anything "plastic" is generally going to cure as a hard material, which of course won't work in a belt, since it needs to constantly flex. Yeah, was gonna say, that's not going to work very well under load. Just get some of the alligator belt-zipper things that were posted up the page; they're designed for this purpose. VVVVV then just sew it together with strong thread, or lace it with a narrow leather strip. Sagebrush fucked around with this message at 23:42 on Apr 2, 2013 |
|
#
?
Apr 2, 2013 21:58
|
|
|
I do not wish to use lacing or alligator clips as I'm not interested in hearing click, click, click constantly as the metal hits the pulley cones. I might be able to get away with some stainless steel wire in the grooves so it doesn't touch metal, but that's only my last resort. I did not make up the idea of gluing a serpentine belt. This has been done by countless people on the internet, and they have typically used Loctite adhesives designed for general purpose plastics to do this. Adhesives designed to vulcanize rubber will not work as there is not enough rubber showing to make it work well. Remember the idea is to really bond the synthetic threads in the belt together. The packaging on the adhesive I just tried specifies plastics AND rubber on the packaging, so we will see what the results are when the test belt cures. If someone wants to suggest an adhesive that is NOT designed exclusively for rubber, please do.
|
|
#
?
Apr 2, 2013 22:37
|
|
|
I glued together my leather blower belt with rubber cement, then sewed through the glued portion. I know rubber cement can glue many other things besides rubber, despite its name. If you can't get your serpentine belt to work, you can buy leather at practically any length and width at wholesale prices from M Steffan's Sons Leather. Just call the lady up and tell her what you need, she was super helpful with my strange request when I needed to make a blower belt. I believe they do ship anywhere no problem.
|
|
#
?
Apr 2, 2013 23:06
|
|
|
iForge posted:I made one out of a pipe cap and it works nicely. Just weld a pipe or bar inside it for the stem and grind it to profile. Much less work than a hitch ball. That's an amazing idea, thanks. I'm not intending to do armouring or anything serious over it so it won't matter that it isn't solid tempered steel.
|
|
#
?
Apr 2, 2013 23:11
|
|
|

|
| # ? May 25, 2024 00:36 |
|
|
AbsentMindedWelder posted:If someone wants to suggest an adhesive that is NOT designed exclusively for rubber, please do. Not an adhesive, but what about something like kevlar thread, or another fiber lacing?
|
|
#
?
Apr 2, 2013 23:39
|
|
