

|
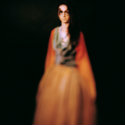
rear end is my canvas posted:If you are trying to duplicate the skin (though it is most likely a make-up effect), you can try stacking a selective color layer and and tug and pull the red and yellows. Stack an additional selective color layer and do the same but set this one to a luminosity blend. Cheers, I'll have a play with that. I think it's probs a mix of makeup and post but It's a nice exercise to see how far I can get just with post.
|
 #
?
Jun 30, 2013 08:04
#
?
Jun 30, 2013 08:04
|
|

|

|
| # ? May 16, 2024 09:17 |
|
|
m4mbo posted:Cheers, I'll have a play with that. Scott Kelby's book Professional Portrait Retouching Techniques for Photographers using Photoshop runs through something that looks fairly similar for desaturating and blending the skin tones. Though I've never gone for that look, the book is really handy if you do a lot of portrait work.
|
|
#
?
Jun 30, 2013 21:32
|
|

|
CarrotFlowers posted:Scott Kelby's book Professional Portrait Retouching Techniques for Photographers using Photoshop runs through something that looks fairly similar for desaturating and blending the skin tones. Though I've never gone for that look, the book is really handy if you do a lot of portrait work. Thanks for the tip, I'll check it out! Portraits are mostly what I'm interested in for my personal work.
|
|
#
?
Jul 2, 2013 19:26
|
|
|
Time to buckle up and get Lightroom 5 - my beta just expired. I'm glad they didn't decide to make it cloud only.
|
|
#
?
Jul 2, 2013 19:48
|
|

|
rio posted:Time to buckle up and get Lightroom 5 - my beta just expired. I'm glad they didn't decide to make it cloud only. They made it windows 7+ only 
|
|
#
?
Jul 2, 2013 20:20
|
|

|
I don't think you're going to get much sympathy these days.
|
|
#
?
Jul 2, 2013 20:25
|
|
|
It's the kick in the rear end I needed to finally install the copy of windows 7 I bought like 5 months ago but still.
|
|
#
?
Jul 2, 2013 20:41
|
|
|
Dren posted:They made it windows 7+ only Windows 7 is a great OS. Upgrade if you can. Windows 8 though, my good God. Is Lightroom 5 going to be part of their Creative Suite?
|
|
#
?
Jul 2, 2013 20:44
|
|


|
I would argue even 8 isn't that bad if you just think of the Metro stuff as a glorified start menu. It's basically the same as 7 in all the ways that count.
|
|
#
?
Jul 2, 2013 20:53
|
|
|
doctor 7 posted:Windows 7 is a great OS. Upgrade if you can. Windows 8 though, my good God. I think it's in the suite, but you can get it standalone straight up.
|
|
#
?
Jul 2, 2013 20:59
|
|

|
doctor 7 posted:Windows 7 is a great OS. Upgrade if you can. Windows 8 though, my good God. If you think win8 is bad then you're probably one of those stupid people who bitched about vista nonstop too. Sorry that you're terrible with computers, yospos bitch
|
|
#
?
Jul 2, 2013 21:03
|
|


|
Mr. Despair posted:If you think win8 is bad then you're probably one of those stupid people who bitched about vista nonstop too. Is that really the deal with win8? I bought win7 because I've used it at work where it has been completely rock solid and never a problem in any way plus I'd heard rage about win8. I've been using Vista at home for years though and never thought it deserved the crap it got. Also, I am gonna need some LR5 tutorials/books. I have been an ignorant Lightroom owner for like 3 years now (I had LR3). Do people have further recommendations for books/online materials past the ones in the OP?
|
|
#
?
Jul 2, 2013 21:19
|
|
|
Windows 8 is a pretty great operating system.. it's basically Windows 7 that's even more stable. The complaints universally revolve around Microsoft's decision to mess with the start menu and design aesthetic, which apparently made every single nerd on the planet furious. Curiously, the loudest complaints came from the type of people who habitually type "M$" and think they're being clever. Microsoft tried to unify the interfaces on all the hardware they support by switching to a touchscreen friendly design. I personally really like it, but I'm in the minority. Windows 8.1 is in the works that apparently restores the start menu so we'll see if that placates the masses.
|
|
#
?
Jul 2, 2013 21:29
|
|

|
Edit: never mind, this isn't a Windows thread
doctor 7 fucked around with this message at 21:37 on Jul 2, 2013 |
|
#
?
Jul 2, 2013 21:32
|
|
|
Posted this in the general thread, but I guess really it's a post-processing question. Any thoughts?Bob Mundon posted:Reading up on multiple exposure techniques, I'm finding out my T3i isn't fancy enough for Canon to deem it worthy to include that feature. But I know you can do something similar in Photoshop, can you also in Lightroom? If so, anyone have a good guide or explanation on how to combine exposures?
|
|
#
?
Jul 9, 2013 01:56
|
|
|
No, because Lightroom doesn't do layers is basically the short answer to that. You could try GIMP if you don't want to use photoshop.
|
|
#
?
Jul 9, 2013 10:55
|
|
|
XTimmy posted:No, because Lightroom doesn't do layers is basically the short answer to that. You could try GIMP if you There, fixed it for you.
|
|
#
?
Jul 9, 2013 16:43
|
|
|
GIMP's not that bad, but it's a learning curve from Photoshop. I've used it for a long time now, ever since I "went legit". I'd argue some of it is MORE intuitive, and it has some superior scripting features. Its major deficiencies are lack of CMYK support, and it's pretty terrible with font stuff. But for RGB image manipulation it's pretty solid.
|
|
#
?
Jul 9, 2013 17:09
|
|
|
teethgrinder posted:GIMP's not that bad.
|
|
#
?
Jul 10, 2013 04:57
|
|

|
Even without multiple layer manipulation like in Photoshop, is there really nothing out there that just combines them when it's something that's handled in camera on some models? It couldn't be that crazy if it's something that can be automatic (granted, might be terrible in camera, haven't tried it).
|
|
#
?
Jul 10, 2013 05:24
|
|
|
Gimp is fine in some areas, and pretty sucky in other areas. Unfortunately, if you want to HDR your catsphotos, the sucky areas are the ones that will frustrate the hell out of you. It doesn't have proper raw support, smart objects, built in HDR blending, 16b adjustment layers (this may have changed, it's been coming 'soon' for a long time) or a usable healing brush/content aware fill. All those things will make life easier. But more importantly, there are three main ways of doing 'manual' HDR in PS - doing the whole thing manually with masking (for masochists/perfectionists/guys who get paid a bunch), using blend-if to combine and blend layers, or using apply image to build luminosity masks. Gimp lacks the latter two. Bob Mundon posted:Even without multiple layer manipulation like in Photoshop, is there really nothing out there that just combines them when it's something that's handled in camera on some models? It couldn't be that crazy if it's something that can be automatic (granted, might be terrible in camera, haven't tried it). If you just want to autocombine exposures, any of the HDR packages will do it. Photomatix is a popular one that can produce anything from subtle to Ratcliffetarded. But it's like a hundred bucks, and no one should pay a hundred bucks to HDR stuff. A free alternative is Picturenaut, which I only used once but it seemed okay. Since you have Lightroom, LR/Enfuse does a great job imho (though it can be a bit sucky with ghosting). It produces nicely blended photos with the full DR of the scene and none of the silly clown vomit. And it's practically free. http://www.photographers-toolbox.com/products/lrenfuse.php For people who don't have LR, it's essentially just 'Enfuse for dummies', so you can go find Enfuse and use that for free. http://fusion.ns-point.com/ Along the 'free' line, there is also FDRTools and LuminanceHDR. Both of which are free/opensource products - and, as expected, have free/opensource interfaces. BrosephofArimathea fucked around with this message at 08:13 on Jul 10, 2013 |
|
#
?
Jul 10, 2013 08:01
|
|

|
I think he means multiple exposures as in this Perhaps without the Depth by TimFPictures, on Flickr Rather than the usual radioactive garbage.
|
|
#
?
Jul 10, 2013 09:30
|
|
|
Well actually going for capturing a lit city at night, but also having the mountains in the background and moon, with everything having a correct exposure. Haven't tried the shot normally yet, but considering the neon awfulness that is Reno, I doubt it'll expose everything correctly.
|
|
#
?
Jul 10, 2013 18:52
|
|
|
Ah, that's exposure blending or HDR, multiple exposures generally refers to exposing the same piece of 'film' multiple times to achieve a composite in camera. Evidently I can't read and skipped over thre entire description of what you wanted.
|
|
#
?
Jul 11, 2013 01:30
|
|
|
Sorry for the incorrect wording then, any options in Lightroom or otherwise for that?
|
|
#
?
Jul 11, 2013 15:04
|
|
|
Bob Mundon posted:Sorry for the incorrect wording then, any options in Lightroom or otherwise for that? Lightroom doesn't do HDR natively but you can use the previously mentioned LREnfuse plugin to integrate enfuse, an HDR tool, with Lightroom. If you're shooting raw and you have enough dynamic range in your sensor you probably don't even need to do exposure stacking/HDR. You can probably get what you're after by dicking with the sliders in lightroom. Try both methods see what you like.
|
|
#
?
Jul 11, 2013 15:23
|
|
|
Looking at Silvia Gravs work recently. I get how she gets the tones, it's hard black and white with the edges clipped. But stuff like the light breath is confusing me in how she got such a natural looking way. The textures in particular interest me. Maybe she's just better at pre-composing an image than me but holy poo poo. 
|
|
#
?
Jul 12, 2013 06:43
|
|
|
I have a photoshop question. A while back I took some photos of the harbor in St. Thomas at sunset. Set the camera up to just keep shooting and then I kicked back and relaxed. A plane took off during one of the shots and left a pretty cool light trail across my photo. Unfortunately, the light trail was split across two exposures. I'd like to join them back together. I've already layered the two images and comped the two existing trails but there's a small gap between the shots that needs to be filled in. I feel like this should be pretty easy to do but I don't know a good way to do it. Here's a shot of the overall image: 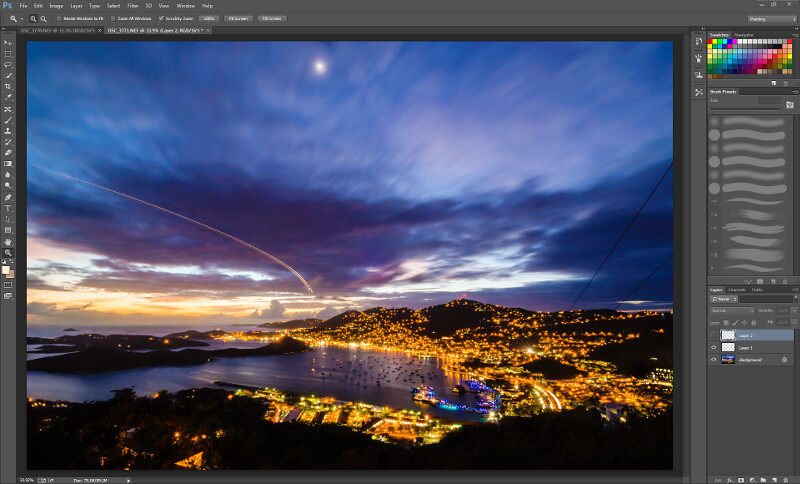 Here it is zoomed to the problem area: 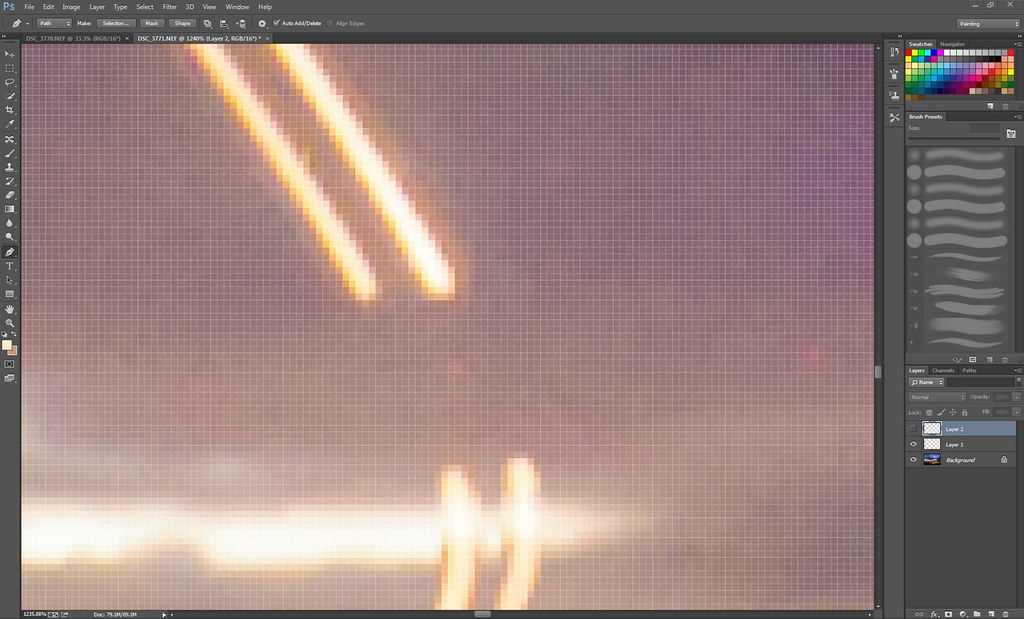 I kind of set the sliders to eye-bleed in lightroom so sorry about that.
|
|
#
?
Jul 12, 2013 19:37
|
|
|
Take a copy of the trails long enough to cover the gap onto a new layer, then go Edit > Transform > Warp, and use the control handles to shape the new layer into the gap... Finish up with some 1600% touching up of the adjoining ends.
|
|
#
?
Jul 12, 2013 23:27
|
|


|
I've got CS5, although mostly all I do is dink around with sliders (or use my tablet to spot/clone out dust, hairs, etc on film scans). It probably would have made more sense to switch LR or Aperture, but my car got 15 rods to the hogshead and that's the way I liked it, so to speak. I dipped in to LR2 or 3 a few years ago for a small project, but just used the free trial and that was the end of it. Really not keen on the library/organization stuff at all, prefer handling that in the operating system. Still, I was looking at picking up VCSO, and they've got a pretty fragmented product line. I can see the writing on the wall as far as continuing to use CS5 as my main image editing program, given how unimpressed I am by Adobe's new plan to make Photoshop subscription-based. How does spotting/cloning work in LR or Aperture? Do they even have it? Or would I need to export to TIFF (or whatever) and open them in my old copy of CS5 to do that stuff? Actually have a license of LR3 that I can upgrade to 5 for $79. I did some quick research on Aperture and I guess LR5 seems like the way to go. Dren posted:Here's a shot of the overall image: I like this shot!
|
|
#
?
Jul 15, 2013 14:38
|
|
|
Pompous Rhombus posted:Really not keen on the library/organization stuff at all, prefer handling that in the operating system. Once upon a time I thought like this, and then I gave up and let LR do its thing. It's one of the best decisions I've made with regards to archiving my pictures. The only maintenance I have to do now is tag my photos so I can find them later, based on subject.
|
|
#
?
Jul 15, 2013 15:04
|
|
|
LR5 has a smart heal brush which is really awesome and even has a special mode for getting rid of dust spots (press 'a' with the heal brush selected). Plus, all LR edits are nondestructive. I suppose Photoshop's heal brush is better but it's better because of the overall environment of PS and the power all of that stuff gives to the heal brush. Like, you can stroke a path with the heal brush in PS so that you can heal in a straight line. And it's easier to apply multiple heals to a single spot. Here is the LR5 healing brush video: https://www.youtube.com/watch?v=IMBvM0eCKtw Lightroom's clone tool is good too. I've used Lightroom for a few years now and I recently grabbed the 30 day trial of CC Photoshop and spent a little time learning how it does things. It seems to me that for the editing that LR can do, and it can do quite a lot, LR is a better piece of software than PS. edit: Oh, and thanks for liking the shot. I'm almost finished with it. Cleaned up the power lines, got rid of a bunch of noise that you can't see in that version, and am almost happy with the connected plane trails.
|
|
#
?
Jul 15, 2013 15:22
|
|
|
Lightroom is a very powerful image correction/library software, but Photoshop is still miles ahead in terms of functionality. Just the simple addition of layers and masks in all their various forms puts photoshop ahead in what it can do. Besides, the two are not in direct competition and are designed to be used together, it's just that most day to day photography for many people doesn't require anything Photoshop has to offer. EDIT: Yup, which is why you do your event photos in lightroom but your portraits in Photoshop. XTimmy fucked around with this message at 23:40 on Jul 15, 2013 |
|
#
?
Jul 15, 2013 23:25
|
|
|
I watched some of the tutorials for Photoshop CC's Camera Raw stuff. Virtually all of the Lightroom goodies are in Camera Raw and can be applied to an image in Photoshop as an adjustment layer. Which is far more powerful than what Lightroom can do with those same tools.
|
|
#
?
Jul 15, 2013 23:34
|
|
|
So this is totally cheesy & overdone, but it's the kind of look I need to go for for a project: Kind of that "club poster" type look. I'm mostly curious about the lighting effect, anyone have any ideas on how I can get something like that? Is it just a few layers of different levels of painted glow, with some particles overlayed to give it texture? I've never really done anything like this. Sorry if this is the wrong thread.
|
|
#
?
Jul 18, 2013 16:15
|
|

|
Haha.
|
|
#
?
Jul 18, 2013 16:34
|
|
|
triplexpac posted:So this is totally cheesy & overdone, but it's the kind of look I need to go for for a project: As terrible as that image is it probably took over a hundred layers of lens flare, illustrations and adjustment layers to achieve the final look. If you step into this project thinking that its just some quick textures and glow you'll find yourself very frustrated. There is a ton of masking and transforming involved just for the glow aspects, prepare for a lot of hours if you want something as polished as that image.
|
|
#
?
Jul 20, 2013 22:03
|
|

|
Any tips on setting up a Lightroom develop preset so that it generates the raw image to be more like the JPEG preview? To me, about 95% of the time it looks way better initially, then it generates the raw and it is significantly worse. Is there anything I should look for when setting up with a T3i, or will I just have to play with it until it's right.
|
|
#
?
Jul 21, 2013 04:02
|
|
|
Develop -> Camera Calibration -> Profile. I don't know whether you can have LR automatically apply the profile (preset) used on your pictures, but the ones provided are really close to those in the camera.
|
|
#
?
Jul 22, 2013 17:03
|
|

|

|
| # ? May 16, 2024 09:17 |
|
|
evil_bunnY posted:Develop -> Camera Calibration -> Profile. this should honestly be in the OP at this point, or a new OP.
|
|
#
?
Jul 22, 2013 18:28
|
|