

|
I went to buy some Pledge with Future Shine because the Menards website showed me this: But the store only had this:  They checked the in store bottle against the website and the product code was the same, but is it the same?
|
 #
?
Jan 17, 2014 05:48
#
?
Jan 17, 2014 05:48
|
|


|

|
| # ? Jun 8, 2024 09:28 |
|
|
My impression is that Pledge changes the label all the goddamn time. My bottle doesn't look exactly like either of those two.
|
|
#
?
Jan 17, 2014 05:52
|
|

|
w00tmonger posted:is there a "best" place to get custom bases? Or should I just go with some secret weapon ones? Fenris Games
|
|
#
?
Jan 17, 2014 05:56
|
|

|
I used to wash steel with black, but it has a problem clashing with bright power armor, and Devlan Mud gives a rusty appearance that's way too worn for my purposes. It turns out that cutting black wash with DM helps a lot, the result is indistinguishable from black wash at first glance but goes much better with other colors. I used Army Painter 3 parts Dark Tone to 1 part Strong Tone, but it should work with GW washes as well. Sorry if it's old news to everyone.NTRabbit posted:Looks pretty cool under blacklight though Seconding this idea. Paper banners printed & glued on are as oldschool as can be.
|
|
#
?
Jan 17, 2014 06:09
|
|


|
BuffaloChicken posted:
dude you used to be able to buy those as stickers in blister packs too. I bet someone has a few spare ultramarine back banners around, they're just stickers, I had them for undead and for orcs & goblins.
|
|
#
?
Jan 17, 2014 06:35
|
|

|
Indolent Bastard posted:I went to buy some Pledge with Future Shine because the Menards website showed me this: Pledge FloorCare Multi-Surface Finish is the correct and also the same stuff. Have fun gloss varnishing everything and making washes and using it as paint thinner and making glazes. It's really handy for tons of different applications. Pacheeco fucked around with this message at 06:49 on Jan 17, 2014 |
|
#
?
Jan 17, 2014 06:45
|
|
|
Pacheeco posted:Pledge FloorCare Multi-Surface Finish is the correct and also the same stuff. Thanks. (Choose a name and label and stick with it SC Johnson  ) )E: My wife was horrified to learn that a "floor polish" was in fact high gloss enamel paint (after a fashion).
|
|
#
?
Jan 17, 2014 06:47
|
|
|
Indolent Bastard posted:Thanks. They're not that much worse than spray Dullcote in that regard. My count is 3 or 4 labels for what's essentially the exact same product.
|
|
#
?
Jan 17, 2014 06:48
|
|
|
BuffaloChicken posted:Still loving your old-school UM as always, SRM, even if I'll never be a fan of Goblin Green (or square) bases despite all my other retro leanings. I think having the crazy old schemes on 'modern' realistic bases really brings them to earth just enough to look like they belong in the modern game without sacrificing the retro paintjobs on the models themselves. Thanks man! I figure if I'm going to go old school with these guys, I better go balls deep. I actually play with a guy pretty regularly who does the Goblin Green bases and old school models, and once we have time/enough Ultramarines we'll do a 2nd ed style battle report. Your Ultras look boss though; there's a guy in the Independent Characters hobby challenge who's doing something similar with his Ultras, and they look so 3rd edition in the best way. The banner is the same size as it was in the Ultramarines codex. I'm thinking I'll print out some double-sided vector art that I make from the Ultramarines codex. It'll be cleaner and simpler, and the aforementioned old school dude has access to a wicked nice printer.
|
|
#
?
Jan 17, 2014 07:16
|
|


|
What's good for degreasing lovely FFG boardgame minis?
Pierzak fucked around with this message at 07:49 on Jan 17, 2014 |
|
#
?
Jan 17, 2014 07:20
|
|
|
Tide and a toothbrush
|
|
#
?
Jan 17, 2014 08:19
|
|


|
Indolent Bastard posted:That's why you need a note book and not a scrap of paper. I'm incredibly unorganised, I've had several notebooks in the past and they just dissappear over time ") I've just learned to deal with it I've just learned to deal with it  Pacheeco posted:Vallejo Surface Primer? It's fantastic primer. I switch between rattle can primer and VSP depending on the model. If I have to prime 20 models or prime white I'll just rattle can it because it's faster. White Surface Primer is a little thin so it becomes a chore doing multiple passes over tons of models. But if I'm priming a small batch or really high detail miniature I'll use VSP. Yea that's the one, I'm thinking for cost reasons alone really - maybe I'll keep a spray can handy just in case.
|
|
#
?
Jan 17, 2014 10:42
|
|


|
I've spent like 2 hours trimming lovely little triangular tabs off this Farsight model and I feel like I've gotten nowhere. I never want to buy another Finecast model again.
|
|
#
?
Jan 17, 2014 12:57
|
|

|
w00tmonger posted:is there a "best" place to get custom bases? Or should I just go with some secret weapon ones? These ones are my favourites. http://www.fantascape.co.uk/
|
|
#
?
Jan 17, 2014 13:16
|
|
|
Have any of you had trouble using an airbrush for the initial base coat on bones? I just tried to more or less prime a load of bones last night but a lot of the paint just beads up on them. I have had a little problem with them doing this when brushing the first coat on but nothing this bad. Is a washing in order or something else with the minis?
|
|
#
?
Jan 17, 2014 14:00
|
|
|
There are 3 prominent (stickied?) threads on the Reaper forums you want to read. In short, the beading effect is a property of the Bones' material, some primers work, some don't (there's a list in one of those threads), adjusting the primer consistency/spraying distance so the primer doesn't have time to bead and spraying in thinner layers might help.
|
|
#
?
Jan 17, 2014 14:10
|
|
|
Thanks, I didn't find those threads you mentioned but I did find some others on airbrushing bones. It seems they don't like it when you thin with water, and people have had better luck with airbrush medium. I'll try that and see. Hopefully will only need to mix paints that way for the base coats.
|
|
#
?
Jan 17, 2014 15:29
|
|
|
It's only for the first layer, yeah. Once you have a layer down the rest aren't actually touching the bones so it's fine.
|
|
#
?
Jan 17, 2014 15:48
|
|

|
I have decision to make. Which colour scheme would you guys say works better?  Orrrrr...  ?
|
|
#
?
Jan 17, 2014 20:16
|
|


|
The latter, though if you made the blue darker on the top one it would probably work too.
|
|
#
?
Jan 17, 2014 20:28
|
|
|
The second one looks much more effective but drat if that doesn't look like a gnarly ballsac in pink.
|
|
#
?
Jan 17, 2014 20:32
|
|


|
VogeGandire posted:I have decision to make. Man, if someone makes an iridescent paint, the second one would look awesome in it.
|
|
#
?
Jan 17, 2014 20:38
|
|
|
ijyt posted:Man, if someone makes an iridescent paint, the second one would look awesome in it. They do. Vallejo makes Metal Medium which is colorless metallic paint so you can make whatever color you want, and several (non-hobby) companies make what I would call oil-slick or beetle-shell paint, where you get that purple-green-black shimmer depending on what angle you look at it.
|
|
#
?
Jan 17, 2014 20:40
|
|
|
VogeGandire posted:I have decision to make. Is this an actual thing or did you spend 10 minutes in MSPaint using an eyedropper and paint bucket? I'd really like one of these to test color schemes on for fantasy stuff.
|
|
#
?
Jan 17, 2014 20:43
|
|


|
VogeGandire posted:I have decision to make. In the first image, my eye is drawn to the body. In the second image, my eye is drawn to the armor plates/claws. The plates/claws are the interesting/defining bits of Tyranids, so having my eye drawn to them first seems better. Although the lighter pink of the vents on the gun sort of make you forget that it is carrying a gun when you look at it. The reaction is "Oh wow, armor plates, head spike, big sweepy scythe things", then you see the body, then you sort of think to yourself "oh, its looks like it has some sort little of gun too".
|
|
#
?
Jan 17, 2014 22:09
|
|

|
Solution: paint the gun safety orange.
|
|
#
?
Jan 17, 2014 22:19
|
|


|
VogeGandire posted:I have decision to make. I like the second better but I'd make the claws/hooves the same color as the gun and lighten the skin a tad although a dry brush of a lighter tone would probably help a lot. The first one, trying to get that skin color, would probably be a nightmare. And also probably not look so great. Vallejo makes fluorescent magenta paint but it's kind of a pain to get working right but it would work great on the 2nd scheme dry brushing it over the purple. They also make a fluoro electric blue. Business Gorillas posted:Is this an actual thing or did you spend 10 minutes in MSPaint using an eyedropper and paint bucket? I'd really like one of these to test color schemes on for fantasy stuff. It's a real website for Tyranid schemes. I've seen others for Tau, Eldar and Space Marines but I've never seen one for WHFB. Pacheeco fucked around with this message at 22:44 on Jan 17, 2014 |
|
#
?
Jan 17, 2014 22:34
|
|
|
The Lightbodge, or, how to make a lightbox in 3 easy steps �and about 15 million difficult ones. With that obvious joke out of the way, on to the meat of the project. My current light box setup sucks.  And it produces poor results.  As you can see from this illustrative, but poorly illuminated, example. It�s constructed (if that�s the right word) like most, from a hollowed-out cardboard box and some tissue paper. It�s too shallow, and the lights are way, way, WAY too dim. So for a while, I�ve been wanting to replace it. I�ve recently got into hobbyist woodworking, and I thought hey, why not build one? Turns out, it�s actually pretty straightforward, though I lack the tools and expertise to do a really *good* job. I based it around these raw materials:  3* Screwfix dirt cheap white circular ceiling light fittings with frosted glass covers. �8.99 each. Simple, easy to install, and no need for any separate covers � I�d initially planned to mount lights outside the box and cover holes in the outside with frosted perspex, but that would have been kind of expensive. A 3-gang dimmer switch. A goon suggested that individually switchable and dimmable lights would make a pretty kicking lightbox � I doubt I�ll actually wind up using the facility much, but we�ll see. At �16.49, the most expensive component, and probably the least necessary. Some cable, and a plug. Not the ideal cable for the project; I�d probably have been better off cannibalising a cheapo extension cord, but this does the job. About a tenner from Screwfix, probably way better than I need, but no harm in overbuilding. 12mm Plywood. I got a full sheet of decent quality ply at BuildBase for �20, a 1/3 discount due to some slight discolouration and damage I didn�t care about. Again, possibly a bit overengineered, I could have got away with thinner, but it�ll do. Again, no harm in overbuilding. Paint. I used Vinyl Silk emulsion. I had it knocking around from painting cupboards. A sheet of white card. �2.99 from Ryman�s. A2 size, I think it�s intended as backing board for picture frames. Nuts, bolts and screws of various sorts. About a fiver for the lot, but I only used a little from each packet. Some odds and ends of cutoffs from other projects � more on that story later. Duct tape, naturally. Total cost of about �70, but in that I got a bunch of bits and pieces spare to use in later projects, in particular the plywood. I initially planned, as you can just about see from the image above, an elegant, perfectly cut finger jointed box. I set out to do this with� a jigsaw. It was unsuccessful. I managed to make a box, but it was not elegant, and the joints were way too gappy to even consider gluing it up properly, so for the first time of many on this project, I said to myself �gently caress it, BOOODGE!�. So I put spare offcut blocks in the corners and screwed the thing into those. It holds together reasonably well, but I wouldn�t trust it with much actual weight. I may, at some point, pull it apart and put it back together with some gapfilling adhesive of some kind (PU construction glue probably), but for now, it�ll do.  Then, I drilled the holes to fit the light fittings, and added the switching gear , again, with a fairly huge bodge, of screwing it onto some wooden rails screwed on to the back from the inside. I painted the inside with 4 coats of vinyl silk emulsion, the first (and second, third and fourth, because I had a tonne of spare paint) one being thinned down 4 parts paint to 1 with water. It took a bit of covering due to the dark plywood.  I added the sheet of card. Handily, at this point one of my bodges came good, because the blocks I added to screw the whole thing together, conveniently allows me to slot the card in behind them without needing to tape or glue it down. Useful. I added the light fittings. These are bolted on, to save me adding yet more thickness to the outside, or using tiny screws which risked not holding.  I wired the whole thing up. Most worrying part, as I am no electrician.  Finally, add bulbs, covers, and switch it all on with distinct trepidation. And after trying it out� It didn�t burn down my house, and it all switched on, which is gratifying. I must have been loving channeling GCSE physics.  How do the photos look?    Better, as you can see. Not having to use the flash means I can control the white balance better. But it still needs some brightening. It�s improved very slightly by adding two of the desk lamps from the original setup in front of the box (righthand end). Slightly more pop on the brights this way. But the real trick to this is that I worked out that what I need is a new camera on which I can control the exposure time and f stop without switching to night scene mode which doesn�t play well with the macro setting. That would really help. Next time I might post about minis...
|
|
#
?
Jan 17, 2014 22:50
|
|

|
http://www.amazon.co.uk/Konig-Porta...Photo+light+box In case anyone wants a lazier way of doing it.
|
|
#
?
Jan 17, 2014 23:02
|
|

|
serious gaylord posted:http://www.amazon.co.uk/Konig-Porta...Photo+light+box Yeah got one of those and it works pretty drat well. Heck the lights themselves are now on my work table as extra lights to support the weak energy-saving bulb I got in the main lamp.
|
|
#
?
Jan 17, 2014 23:14
|
|

|
Pssssh, DIY that poo poo bro (yeah, I probably spent way too much on this, but it was enjoyable).
|
|
#
?
Jan 17, 2014 23:39
|
|
|
thespaceinvader posted:Pssssh, DIY that poo poo bro (yeah, I probably spent way too much on this, but it was enjoyable). I kinda wanted to DIY as well but I had a helluva time to find some decent lights where I live so I just went with buying one instead. The box works but its only drawback is that you can't really use it for large models like Valkyries and such if you wanna avoid seeing gaps and such. But for anything smaller than that it's great.
|
|
#
?
Jan 17, 2014 23:48
|
|
|
Mm, if I were to be building again I'd probably use different (brighter) lights I think, and hopefully be able to actually do the box joints properly, but otherwise I'm pretty satisfied. I still might wee whether it's plausible to replace the current bulbs with brighter CFLs though.
|
|
#
?
Jan 18, 2014 00:48
|
|
|
I think I know where my next treeman and forest dragon is coming from: http://www.creaturecaster.com/pages/kickstarter
|
|
#
?
Jan 18, 2014 01:33
|
|

|
Holy poo poo those not-Chaos Daemons.
|
|
#
?
Jan 18, 2014 01:41
|
|
|
I just use something like this. It's really cheap, easy, and breaks down fast for moving. Bunch of foam core and some shop lamps. And there's plenty of room for big items and full squads. Hell I could get my whole 40k army in it if I tried. 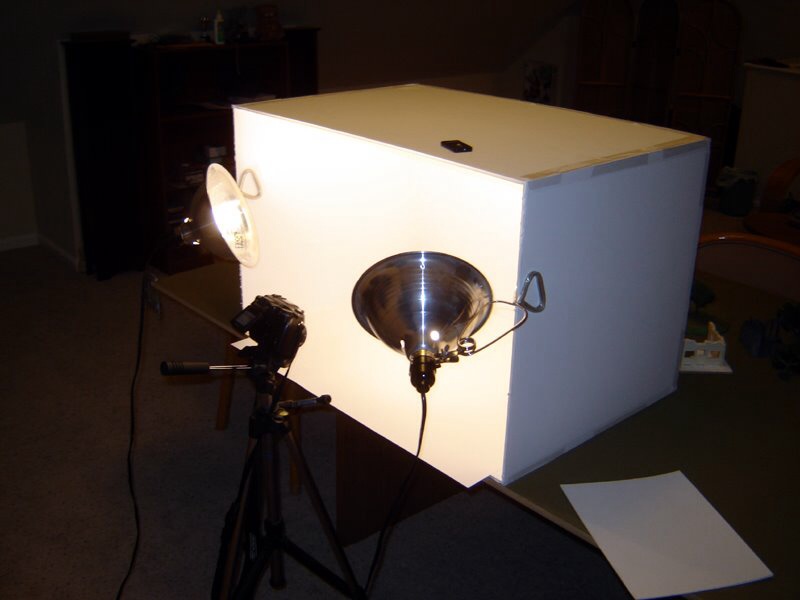
|
|
#
?
Jan 18, 2014 01:46
|
|


|
I am happy to see he offers a I also hope these will be a bit more in scale with normal GW minatures. His ultraforge stuff was neat but really big. edit: 5" - 6.5" tall, that is ok I guess. Just really gets annoying having new LoSight issues and modeling for (dis)advantage problems. WhiteOutMouse fucked around with this message at 01:57 on Jan 18, 2014 |
|
#
?
Jan 18, 2014 01:49
|
|

 will blow your mind.
|
The sex doll face is really creeping me out. So well done I guess?
|
|
#
?
Jan 18, 2014 01:53
|
|

|
I wonder how long it'll be before the C&D's start flowing in this time.
|
|
#
?
Jan 18, 2014 02:00
|
|


|

|
| # ? Jun 8, 2024 09:28 |
|
|
Not a viking posted:I think I know where my next treeman and forest dragon is coming from: This might be the first Kickstarter I back if they can beat out Forge World prices. Those renders look amazing and I've been eyeballing a GUO/Ku'gath and Keeper of Secrets for a while now. Hopefully the actual product looks as good as they do.
|
|
#
?
Jan 18, 2014 02:01
|
|