

|
Rapey Joe Stalin posted:You want what is called a 'pin vice'. And the attendant drill bits in a diameter that matches or is slightly narrower than your paper-clip. Hm, okay, fortunately I already have both of those for pinning and magnetizing.
|
 #
?
Mar 19, 2014 01:06
#
?
Mar 19, 2014 01:06
|
|


|

|
| # ? Jun 1, 2024 18:13 |
|
|
Apollodorus posted:How do I attach model heads to paper clips? Or pins, for that matter? Just jam them into the plastic? Or use a drill? Pin vice/jewelers drill to drill out small holes. Or you can use a very small regular drill bit and a power drill on larger pieces. Just drill a decent depth hole and super glue your pin in. When it's time to take it out you can just pull it out or cut it flush. For very small things like heads and arms I use my pin vice and toothpicks. The pin vice makes a very small hole and toothpicks are tapered and wood so you can get an incredibly tight fit in drill holes that can't be very deep or wide in circumference. Pacheeco fucked around with this message at 01:16 on Mar 19, 2014 |
|
#
?
Mar 19, 2014 01:10
|
|

|
Under 15 posted:Yeah, drink and paint. There are a lot of things I can't do very well when I drink, but painting isn't one of them - I don't think you could really tell the difference between my sober painting and four beers in, except that it was a lot slower. IIRC, one of the issues of White Dwarf I read when I was a youngin' suggested drinking a glass of wine to calm your shaky painting hand.
|
|
#
?
Mar 19, 2014 01:17
|
|
|
Dr. Lenin posted:IIRC, one of the issues of White Dwarf I read when I was a youngin' suggested drinking a glass of wine to calm your shaky painting hand. That is gold, requesting a grognard with digital archive access or a giant moldy stack of old White Dwarf issues to post this, please. 
|
|
#
?
Mar 19, 2014 04:48
|
|
|
Finished three more models for my Cygnar army. I'm particularly happy with how Archduke Runewood (the guy in the middle) turned out!
|
|
#
?
Mar 19, 2014 08:25
|
|

|
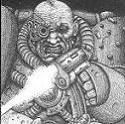
Harbinger of Despair WIP. Looking for suggestions or adjustment I can make before I finish up. Specifically, how can I make the orbs more glow-y? They look a bit chalky. Also, I guess I didn't clean the figure as well as I thought I had and missed a few spots with the primer.  I was going for a marble-ish pattern on the purple parts, and I like how that came out. I think a black wash on the silver and sepia wash on the gold will cover up some of the mistakes that I made. Thinking about edge highlighting the shoulder pads gold.
|
|
#
?
Mar 19, 2014 09:57
|
|
|
PyroDwarf posted:Harbinger of Despair WIP. Looking for suggestions or adjustment I can make before I finish up. Specifically, how can I make the orbs more glow-y? They look a bit chalky. Also, I guess I didn't clean the figure as well as I thought I had and missed a few spots with the primer. What I did was take moot green and water it down a lot (like a wash almost) then added a tiny bit of the 'ardcoat to it. Then I put that over the glowy bits that I painted previously. Gave it a shiny texture that didn't look just like gloss varnish of paint. Alternatively you could use a glaze over it if you just want to buy one of those. But that's really to deal with the texture of the parts, you can also make glow effects by layering green to yellow then blending it with a wash or glaze to blend the colors together. Which gold did you use on this guy by the way?
|
|
#
?
Mar 19, 2014 19:50
|
|

|
Crain posted:
It's Vallejo liquid gold. The silver parts are liquid silver.
|
|
#
?
Mar 19, 2014 20:51
|
|
|
I'll share how I do the necron orb-bits; Paint it a bone colour, then hit it with a really thinned dark green. Dark Angels green if you're using the old GW paints, Caliban Green for the new. The bone is going to shine through a bit, which is what gives the effect. Make some swirly patterns with the brush, or anything really so that the green isn't consistent. Then hit it with a coat of gloss varnish. Sorry, but this is the best image I have at hand. Click for big.  I stole the method from someone here, but I can't remember who. 
|
|
#
?
Mar 20, 2014 02:06
|
|

|
What's the best water effects product out there? I wanna make some SWAHMPS.
|
|
#
?
Mar 20, 2014 03:19
|
|


|
ghetto wormhole posted:What's the best water effects product out there? I wanna make some SWAHMPS. I've used the Secret Weapon swamp flocking kit, and I've had no complaints with it. The water does shrink a little and you might want to apply it in several layers, but if you're like me and looking for something simple to try and you don't have a big flock collection (yet) I'd recommend it. The water dropper bottle is sold separately as well, and one of my local gaming stores has it next to the Secret Weapon pigments.
|
|
#
?
Mar 20, 2014 03:48
|
|


|
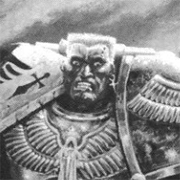
Hey guys can you see the face in this dude's bolter?
|
|
#
?
Mar 20, 2014 04:24
|
|


|
I do not, but I do think it looks great man. Good job.
|
|
#
?
Mar 20, 2014 04:30
|
|

|
It looks like leatherface's mask  Also, is there a guide somewhere that covers painting blue ghosts or the like? I'm trying to paint these Titan Forge goblin ghosts like the ones they have on the box. I'm guessing start with a deep blue basecoat over black primer, add some blue ink and highlight to white, but can anyone suggest a blue colour that would match the one they use in the picture?
|
|
#
?
Mar 20, 2014 04:45
|
|
|
Weirdo posted:It looks like leatherface's mask One way I can think of involves priming/basing it white, then using blue paint thinned down into a glaze and giving successive coats. Starting with light tones and then working down to darker tones, hitting the deeper recesses more and focusing less on the larger spots. Eventually, you'd highlight raised area with white again. GW's old Ice Blue with a drop or two of Regal Blue in later layers would work perfectly; for the new range, Lothern Blue is as close to Ice Blue as you'll get. Reaper Sky Blue is a close color to Lothern Blue. Another is just priming white and then using blue washes (like the GW ones) over the whole thing a couple times, then highlight white. Maybe do edging with black wash for definition. Washes are a little darker and create sharper definitions, whereas glazing is more subtle and controllable. Both are valid for their own reasons, and I'd say experiment on a test figure before starting on the goblin ghosts.
|
|
#
?
Mar 20, 2014 05:47
|
|

|
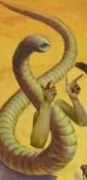
Groetgaffel posted:I'll share how I do the necron orb-bits; You forgot to model the banana peels, dude.
|
|
#
?
Mar 20, 2014 06:18
|
|
|
PyroDwarf posted:Harbinger of Despair WIP. Looking for suggestions or adjustment I can make before I finish up. Specifically, how can I make the orbs more glow-y? They look a bit chalky. Also, I guess I didn't clean the figure as well as I thought I had and missed a few spots with the primer. With my crons I start with a base coat of Warpstone Glow. Hit with a wash of Nuln Oil. Then a second hit of Warpstone while leaving the edges of the orbs dark. Then I'll water down some Scorpion Green and hit that orb in a smaller area in the center. Once that's fully dry I'll give it another smaller hit of Scorpion. Then I'll usually mix in some Sunburst Yellow with the Scorpion Green and pop on a tiny bit of that to finish off. Really gives orbs a good glow effect in contrast to my boring metal and gold scheme. I'd post a pic but I'm on my mobile. AndyElusive fucked around with this message at 06:36 on Mar 20, 2014 |
|
#
?
Mar 20, 2014 06:34
|
|

|
Big Willy Style posted:You forgot to model the banana peels, dude.
|
|
#
?
Mar 20, 2014 07:38
|
|
|
Slimnoid posted:One way I can think of involves priming/basing it white, then using blue paint thinned down into a glaze and giving successive coats. Starting with light tones and then working down to darker tones, hitting the deeper recesses more and focusing less on the larger spots. Eventually, you'd highlight raised area with white again. GW's old Ice Blue with a drop or two of Regal Blue in later layers would work perfectly; for the new range, Lothern Blue is as close to Ice Blue as you'll get. Reaper Sky Blue is a close color to Lothern Blue. Thanks for the advice, I'll give them both a shot!
|
|
#
?
Mar 20, 2014 09:06
|
|
|
Finished the second platoon for my Flames of War Canadian list:  The progress so far. Not bad for 6 weeks of work (although the Sherman tanks, Universal Carriers and Typhoon are all loaners):   
|
|
#
?
Mar 20, 2014 11:54
|
|

|
Pilgrimski posted:http://www.graffiticreator.net/ Anyone willing to have a go and make me some graffiti? The ones I like the most get a spot on my containers! 
|
|
#
?
Mar 20, 2014 14:04
|
|
|
Lord Humongus posted:Hey guys can you see the face in this dude's bolter? This is gross. I love it.
|
|
#
?
Mar 20, 2014 14:06
|
|

|
Pilgrimski posted:Anyone willing to have a go and make me some graffiti? The ones I like the most get a spot on my containers! Where'd you get these containers?
|
|
#
?
Mar 20, 2014 14:45
|
|


|
The three big ones in the top left I made myself - master model - mould - cast from resin. The rest are from here: http://www.lasercutcard.co.za/
|
|
#
?
Mar 20, 2014 14:49
|
|
|
Deviant posted:Where'd you get these containers? It looks to me like majority are these from Lasercutcard but the big ones I can't really recognize from anywhere. efb
|
|
#
?
Mar 20, 2014 14:51
|
|

|
What would be the best way to go about removing paint from just one portion of a model? I accidentally painted the head of a model the wrong color but I don't want to layer more paint on over the incorrect layers.
|
|
#
?
Mar 20, 2014 16:31
|
|

|
PantsOptional posted:What would be the best way to go about removing paint from just one portion of a model? I accidentally painted the head of a model the wrong color but I don't want to layer more paint on over the incorrect layers. You could spot apply mineral spirits/paint thinner on the head but it's going to be a mess and it won't get all the paint out of the crevices and you'll end up getting paint remover on parts you don't want it on, causing you even more headaches. Unless your model is reaching "Thin Your Paints" levels of paint thickness, just paint over it. Or if you used super glue, remove the head from the model (if that's possible).
|
|
#
?
Mar 20, 2014 17:23
|
|
|
PantsOptional posted:What would be the best way to go about removing paint from just one portion of a model? I accidentally painted the head of a model the wrong color but I don't want to layer more paint on over the incorrect layers. Your paints should be thin enough that you can paint over the incorrect color without losing detail. Barring that, there is no "Spot paint removal" process that I know of (unless you're using enamels, then you can use thinner very carefully, but it would still be a pain in the rear end.)
|
|
#
?
Mar 20, 2014 17:26
|
|
|
On metal you could probably scrape the paint off with a plastic tool that wouldn't damage the metal. I've done that when I've horribly hosed up a small area before.
|
|
#
?
Mar 20, 2014 23:44
|
|

|
You could try rigging it up upside down in a cup of Simple Green or whatever you use so just the head's soaking, then scrub it carefully. I've done that before with crap like sword arms or whatever extremity that I wasn't happy with.
|
|
#
?
Mar 20, 2014 23:53
|
|

|
If I have an all metal mini, is there anything more powerful (or faster) than Simple Green I can/should use?
|
|
#
?
Mar 21, 2014 00:15
|
|

|
I used acetone. It worked p good.
|
|
#
?
Mar 21, 2014 00:20
|
|
|
DirtyRobot posted:If I have an all metal mini, is there anything more powerful (or faster) than Simple Green I can/should use? BTW, both are highly toxic, so very good ventilation (preferably outside), rubber gloves AND tweezers/something else to hold models because nitro eats through gloves. VVV: The full name is nitrocellulose solvent I think (generic), and mine doesn't react with hot water in any way except slowly collecting on the surface in little oil-like pools. Pierzak fucked around with this message at 00:57 on Mar 21, 2014 |
|
#
?
Mar 21, 2014 00:26
|
|
|
Pierzak posted:Nitro solvent is extremely fast and effective but doesn't eat through CA glue, acetone is slower but does. I usually give mine a general scrub in nitro and a night in the acetone jar. and if 'nitro solvent' is the same poo poo as the brand name product 'nitromors' - do not get it anywhere near hot water, the fumes will make your eyes bleed, your pores vomit and it will give cancer to the next 5 generations of your family. Nasty poo poo but it does the job pretty drat well.
|
|
#
?
Mar 21, 2014 00:46
|
|


|
Ended up just painting over it since my layers were pretty thin, it worked out alright. I was a little antsy about going from a purple layer to white to red but everything worked out in the end.
|
|
#
?
Mar 21, 2014 02:28
|
|
|
March oath crosspostJerryLee posted:
|
|
#
?
Mar 21, 2014 04:30
|
|


|
DirtyRobot posted:If I have an all metal mini, is there anything more powerful (or faster) than Simple Green I can/should use? Regular paint stripper is fine - the stuff that is like a gel works great. It comes in a quart can under various names, and you can get it at Home Depot or Lowes. Also, if you want to deal with something slightly less toxic, get Super Clean from Advanced Auto Parts or Walmart. It's like gold for stripping models, and I don't understand how people keep missing the posts about it. The title of this thread needs to be changed to ...(Shut up and use Simple Green or Super Clean, for God's sake)
|
|
#
?
Mar 21, 2014 13:46
|
|
|
A fair point to make regarding Simple Green: do not, like me, assume that the Simple Green that you find in the cleaning products aisle is what you want. Go back to the automotive section where they keep the
|
|
#
?
Mar 21, 2014 14:16
|
|
|
Any advice for shading/highlighting pink horrors? I basecoated with Liquitex Magenta 6 spray, which is VERY similar to old tentacle pink.
|
|
#
?
Mar 21, 2014 15:12
|
|
|

|
| # ? Jun 1, 2024 18:13 |
|
|
Thanks guys.PantsOptional posted:A fair point to make regarding Simple Green: do not, like me, assume that the Simple Green that you find in the cleaning products aisle is what you want. Go back to the automotive section where they keep the
|
|
#
?
Mar 21, 2014 15:27
|
|