


|
jvick posted:Walnut & Maple cutting board I'm finishing up as a thank you gift for some friends. Have you made and used a style like this before? The reason I ask is expansion and contraction are likely going to break it apart as the two pieces at the end which are running perpendicular to the rest of the pieces are not going to allow for movement, depending on the way they are fastened to the rest of the piece. This is why you usually see cutting board made of pieces of wood all running the same way.
|
 #
?
May 13, 2014 16:03
#
?
May 13, 2014 16:03
|
|


|

|
| # ? Jun 5, 2024 22:57 |
|
|
Blistex posted:Have you made and used a style like this before? The reason I ask is expansion and contraction are likely going to break it apart as the two pieces at the end which are running perpendicular to the rest of the pieces are not going to allow for movement, depending on the way they are fastened to the rest of the piece. This is why you usually see cutting board made of pieces of wood all running the same way. No, and I originally had them all running the same way. At the end, I was using a hand plane to smooth out one of the joints, and it jumped cutting out some large chunks. I cut that end off and it cut into the biscuits, so instead of scrapping the whole thing, I added the end pieces. They are all connected with biscuits. It will probably break apart in the first 6 months.
|
|
#
?
May 13, 2014 16:16
|
|

|
Walked posted:Thoughts? Avoid curves until I can swallow a bandsaw? Seems really, really limiting. Argh. I know power tools are super cool and all that, but how about a coping saw and a spokeshave?
|
|
#
?
May 13, 2014 18:59
|
|

|
Walked posted:Alright, so I've been at this for some time now and it's awesome. Working with the basic tools is the way to go here. Mark the curve onto the wood, cut it roughly with a hand saw - big curves can be done with a ripsaw, small with a coping saw or similar - and then you're looking at planes, spokeshaves, and a lot of sanding. Slow, but it'll work.
|
|
#
?
May 13, 2014 22:28
|
|
|
I started making a stereo stand for my amp and record player. Doesn't look like too much now, but I'm pretty happy with my progress seeing as I started on Sunday from a pile of rough cut cherry. All handcut mortise and tenon joints. I'm going to add vertical bars on the sides, a shelf 2/3 up and doors below the shelves. I'm also going to try breadboard edges for the top. 
|
|
#
?
May 14, 2014 01:47
|
|
|
Speaking of stereos and what not. Very nice by the way. Has anyone built their own speakers? My fianc� and I are moving in a couple months into a house with a large open room and I've thought about making some custom speakers.
|
|
#
?
May 14, 2014 04:28
|
|
|
jvick posted:Speaking of stereos and what not. Very nice by the way. Has anyone built their own speakers? My fiancé and I are moving in a couple months into a house with a large open room and I've thought about making some custom speakers. I built a 3.1 setup maybe 4-5 years ago and they're still going strong and sounding great . There was a pretty active thread on it for a while, which is where I got all my info. I'll see if I can find it later, but partsexpress.com is your friend.
|
|
#
?
May 14, 2014 12:35
|
|

|
kaiger posted:I built a 3.1 setup maybe 4-5 years ago and they're still going strong and sounding great . There was a pretty active thread on it for a while, which is where I got all my info. I'll see if I can find it later, but partsexpress.com is your friend. Did you build the speaker boxes yourself, or just piece it together? My hope is to make the boxes myself out of hardwood, and just drop in components. The toughest part I think will be getting proper dimensions. I'll just leave this here: Nomad Desktop CNC Mill 
|
|
#
?
May 14, 2014 15:11
|
|
|
jvick posted:Did you build the speaker boxes yourself, or just piece it together? My hope is to make the boxes myself out of hardwood, and just drop in components.  I don't know how much of a difference it makes, but MDF/Particle Board is preferred as they offer a solid and consistent structure for your speakers as opposed to hardwood which has varying densities which might affect sound. I don't know how much of a difference it makes, but MDF/Particle Board is preferred as they offer a solid and consistent structure for your speakers as opposed to hardwood which has varying densities which might affect sound.
|
|
#
?
May 14, 2014 18:29
|
|
|
jvick posted:Did you build the speaker boxes yourself, or just piece it together? My hope is to make the boxes myself out of hardwood, and just drop in components. The toughest part I think will be getting proper dimensions. I looked for the thread and found a mention of it in 2008, but apparently it wasn't popular enough for the archives. Regardless, the speakers I built are these: http://www.rjbaudio.com/Microbe%20SE/microbe%20SE.html I'm not sure by "drop-in components" you meant a prefab crossover or build your own like the Microbes, but the crossovers were pretty simple to build if you have basic soldering skills and supplies. I used 3/4" Birch ply for the boxes. Blistex is right that MDF is very good for that purpose, but I wanted to stain them and didn't want to deal with veneers.
|
|
#
?
May 14, 2014 21:24
|
|
|
jvick posted:Speaking of stereos and what not. Very nice by the way. Has anyone built their own speakers? My fianc� and I are moving in a couple months into a house with a large open room and I've thought about making some custom speakers. Thanks, I've built my own speakers. Parts express was too expensive to ship to Canada so I bought some cheap drivers from qcomponents. I punched all the parameters in to several online calculators to get volume dimensions and crossover values and went to town. I built them out of solid oak with dovetail corners. I used MDF for the front and back and sealed everything with caulking. The sound is alright, they sound crappy at low volumes but once you crank them they sound pretty good. They don't really compare to any of my commercial speakers, but the considering my commercial ones were at least 5 times the cost, it's not so bad. Here's a pic with my kitty: 
|
|
#
?
May 15, 2014 00:51
|
|
|
Walked posted:
This is your best option. Most professional curve work is done this way. Make a template of the piece(s) you'd like to fabricate out of MDF using a jog saw, a trammel jig for your router and hand tools. Once you're happy with the shape, attach it to your work piece and draw the pattern on to it. Cut the piece to within around 2mm of the line, then use the router and template to finalize your shape. A trammel jig is super easy to make, and an ellipse jig can be made quite easily as well if you need more complex curves. In the end, detailed full size layouts are essential for any curved work and can help you solve all sorts of problems before you even touch your materials. In the end it depends entirely on what type of curves your doing and what you plan to do with them. I have a great set of curved layout instructions that I can share with the thread, and I will post them when I get a chance.
|
|
#
?
May 15, 2014 04:30
|
|

|
Skinny Bins posted:I have a great set of curved layout instructions that I can share with the thread, and I will post them when I get a chance. That would be great, thanks! I've tried to do curves from time to time on my bandsaw, and it's all too easy to screw them up by cutting too close. By the time the curve's back to the right shape, you've shrunk the piece by 25%...
|
|
#
?
May 15, 2014 04:37
|
|

|
Speaking of bandsaws, thoughts on this? http://toledo.craigslist.org/tls/4469471388.html Model 113-243310, looks to be from the mid-80s? As much as I want to get a nicer one, I just can't put out the money for it right now. For $100 (or less if I can haggle it down), I figure it'd be a decent stopgap until I can get something better. I don't really plan on doing any serious resawing.
|
|
#
?
May 15, 2014 17:32
|
|
|
bimmian posted:Speaking of bandsaws, thoughts on this? http://toledo.craigslist.org/tls/4469471388.html I have that saw, with a different table. Really not a bad saw especially for $100. When it is tuned up and all of the bearings and blocks aligned it works great.
|
|
#
?
May 15, 2014 17:43
|
|

|
I've looked at a couple of those bandsaws and they all shook like young Elvis but I bet with a tune and balancing you could stop that.
|
|
#
?
May 15, 2014 18:29
|
|

|
Well I offered $75 and they accepted, so I guess I'm buying it.
|
|
#
?
May 15, 2014 19:56
|
|
|
Any wood carvers in here? This is my first carving attempt:  I did it with a Dremel, the engraving attachments, and the little sanding drum attachments. I haven't carved anything before, but I had a rotary tool so I thought that would be a convenient place to start. It is my mum's Chinese family name (F�ng), and this is a practice run on pine for a pendant I will be making her. The final product will probably be done on a reddish wood, like mahogany or Queensland maple (  ). ).A quick question for any carvers: I am after the really straight-walled, clean cut look (as opposed to gouges/cuts still visible, rustic). What is the best way to get all the little bits in between nice and smooth? I haven't really tried sanding yet (need to get my hands on some fine grit stuff) but is hand sanding the way to go to get everything really clean looking?
|
|
#
?
May 16, 2014 08:54
|
|
|
What grit are you looking for? I had to go to an automotive paint place to get 1000 or higher. Wasn't the greatest quality either. I usually get all mine from https://www.thesandpaperman.com.au but don't know if he stocks that. Email him and ask, he is usually pretty helpful. You could get the dremel router attachment. That would get things close to smooth.
|
|
#
?
May 16, 2014 09:45
|
|


|
I'm pretty sure I got 2000 grit once at a car parts place like Autozone.
|
|
#
?
May 16, 2014 15:54
|
|
|
Amazon has a decent selection of 1000/2000 grit as well.
|
|
#
?
May 16, 2014 16:02
|
|
|
Chroisman posted:Any wood carvers in here? In order to get a really smooth finish, you need to do a couple things. First, when carving, use sharp tools. This reduces tearing and saves you time when sanding. When you start sanding, start with a lower grit (80-100) until the tool marks are gone. If you try to sand at a higher grit before you've gotten rid of any major imperfections, you'll end up sanding for a very long time (and probably won't be successful in the end.) once the tool marks are gone, move up through the grits (preferably without skipping) until you get to your desired finish. Final grit size is determined mostly by how the wood is going to be finished. If you're going to paint it, 120-150 is fine. If you're going to clear coat it, 150-180 is good. When finish is applied to wood, the moisture raises the grain, making it seem rough. This is one of the reasons it's important not to go to a super fine grit before the finish is applied. That, and the fact that many finishes will not adhere well to wood that's been sanded too smooth. Once the first coat of finish is applied and dry, knock down the raised grain with some 220-440 grit(sand very lightly at this point.) Continue applying coats and sanding in between. The more coats you put on, the stronger your finish will be, and the more you'll be able to polish it. If you want to move to higher grits after a couple of coats that's fine (no pun intended,) otherwise use a buffing pad. Just remember that in general, 90% of sanding is done at a lower grit (80) and the other 10% is spread out over the finer grits.
|
|
#
?
May 16, 2014 16:46
|
|
|
McMaster-Carr has a bunch of sandpaper in a lot of configurations (sheets, belts, etc): http://www.mcmaster.com/#sanding-sheets/=rzwixg You can use those really really high grits on wood but once you consider finish I haven't seen any real difference above 440 or so. I use 1000, 1200 and 2000 (with a bit of oil) to keep my planes and chisels nice and sharp (and then hone with a leather strop). It works well. If I'm doing a lot of chiseling I'll keep a nice flat steel plate with a sheet of 2000 wrapped around it on hand, and periodically hone the chisel on that.
|
|
#
?
May 17, 2014 02:18
|
|


|
What do you guys think of buying used table saw blades, you can buy them in lots on ebay here and there, is it a waste of time and money or can genuine savings be made?
|
|
#
?
May 17, 2014 08:45
|
|

|
Going to go and check this out tomorrow. http://cleveland.craigslist.org/tls/4466492516.html I've been looking around for a used table saw (really wanted to find a ~20 year old Unisaw or something similar), and $700 is more than I want to spend, but that looks like an awesome deal. Can't tell exactly what model it is. e: On an unrelated note, finished that bridge I posted about a month or so ago.   
Hypnolobster fucked around with this message at 04:48 on May 18, 2014 |
|
#
?
May 17, 2014 15:15
|
|


|
His Divine Shadow posted:What do you guys think of buying used table saw blades, you can buy them in lots on ebay here and there, is it a waste of time and money or can genuine savings be made? Nothing wrong with a used blade. Unless there's something wrong with that used blade. If the teeth are all intact and not worn down, a used blade is perfectly ok, especially if you get it sharpened.
|
|
#
?
May 18, 2014 06:59
|
|
|
Skinny Bins posted:Nothing wrong with a used blade. Unless there's something wrong with that used blade. Also check if it's flat. Years ago I had a table saw blade that was dished somehow and it would bind and throw the wood when you went to use it. It didn't look like there was anything wrong with it, until I held it to a square and seen that it was curved.
|
|
#
?
May 18, 2014 15:52
|
|
|
Neighbor got too old and went to a home, his son is helping clean the place up so it can be rented. Aside from a sweet 1HP electric motor I got out of it, I also spotted some boards up in the rafters. All cherry, some with a live edge. The picture is deceiving: the longest one is about 6.5 feet.
|
|
#
?
May 19, 2014 00:16
|
|


|
I got a bunch of 2x3 for cheapsies from lowes and made this lil sitting bench.  It's nice because when you sit on it, it's rock solid. Since you're always applying equal and opposite force from the tool to the bench with your butt, it's super stable and doesn't wobble a bit. The vise is simply a couple 18" bits of 1/2" threaded rod fitted into a channel in the bench that I routed out before glue-up that thread into a nut that I likewise chiseled out a little recess for and epoxied in place. Then the jaws are just left-over chunks of 2x3 with 1/2" holes drilled in them. They're not really attached to either end, but the piece by the handles tends to stay with the handles, and having them drift around hasn't really been a problem yet. If it becomes an issue, I'll replace the washers with a steel bar that goes all the way across and sink some screws into it. On the drill press I drilled a 1/4" hole across the faces of two nuts, threaded them on and used them as a guide to drill a 1/4" hole in the threaded rod. The handles are just 1/4" bolts fitted through the holes. At first I didn't have any handles on them and the threads really chewed up my hands trying to open & close the vise. Also the vise bolts were stupidly tight and very difficult to move, I guess the channel I routed out wasn't deep enough, or it warped during glue-up or some drat think I dont know. After slathering some paste wax onto the vise bolts and adding a couple handles so the threads didn't chew up my fingers and running the bolts in & out a couple times, the vise was Just Fine and works great.  Right now, the handles are free to rotate around the crossbolt things. I'd like to fix that. Also they need knobs at the end because the ends are a little sharp. Also I'd really like to have something in there that spun freely, maybe a larger chunk of Al tubing that fits around the one I have now? At some point I'll add a likewise homemade leg vise along the right side leg. If I had to do anything different, I'd have placed the legs closer to the edges of the bench, and I'd have pre-waxed the bolts when I put them in before glue-up. Maybe made it a couple inches taller. Overall, took a weekend & a half and about $25 worth of materials. I'm pretty happy with it. rotor fucked around with this message at 05:59 on May 19, 2014 |
|
#
?
May 19, 2014 05:57
|
|

|
I am thinking of making this jig so I can edge joint on a table saw, I am wondering if there's a reason to just raise the blade to 2" as the instructions say? I would like to make the jig so it works with the blade at maximum depth of cut (80mm or 3" and some weirdo fraction), that way I could face joint boards up to 6" wide as well using this jig. I don't see any problems doing it this way but I am new to this so perhaps I am overlooking something. Instructions: http://download.plansnow.com/plansnow-tablesaw-jointing.pdf
|
|
#
?
May 19, 2014 11:35
|
|
|
His Divine Shadow posted:I am thinking of making this jig so I can edge joint on a table saw, I am wondering if there's a reason to just raise the blade to 2" as the instructions say? I would like to make the jig so it works with the blade at maximum depth of cut (80mm or 3" and some weirdo fraction), that way I could face joint boards up to 6" wide as well using this jig. I don't see any problems doing it this way but I am new to this so perhaps I am overlooking something. I have a jig like this but I've never been successful jointing with it at all. I found it too difficult to apply constant side pressure into the fence while feeding the stock. Ended with tons of deep saw marks and a not very straight edge.
|
|
#
?
May 19, 2014 13:08
|
|
|
Hypnolobster posted:Going to go and check this out tomorrow. the footbridge looks great
|
|
#
?
May 19, 2014 15:17
|
|

|
mds2 posted:I have a jig like this but I've never been successful jointing with it at all. I found it too difficult to apply constant side pressure into the fence while feeding the stock. Ended with tons of deep saw marks and a not very straight edge. Hmm, I assume you checked your sawblades and used a suitable one for the purpose, and the saw to make sure there was no wobble in the arbor? Also perhaps featherboards would work?
|
|
#
?
May 19, 2014 15:35
|
|
|
His Divine Shadow posted:Hmm, I assume you checked your sawblades and used a suitable one for the purpose, and the saw to make sure there was no wobble in the arbor? Also perhaps featherboards would work? LOL, uh yeah. Good luck though, Id like to hear if you have better results. I was trying to joint some big pieces of 8/4 ash and it was just a humongous pain in the rear end with this method.
|
|
#
?
May 19, 2014 16:22
|
|
|
Sorry didn't mean to offend it was just the things I've read about online while checking up the opinions on jigs like this. I really hope I can get it to work because I don't wanna buy a jointer or planer just yet. Preferably not in many years.
|
|
#
?
May 19, 2014 16:50
|
|
|
His Divine Shadow posted:Sorry didn't mean to offend it was just the things I've read about online while checking up the opinions on jigs like this. I really hope I can get it to work because I don't wanna buy a jointer or planer just yet. Preferably not in many years. No worries, I am not offended at all. I'm all about sleds over here.
|
|
#
?
May 19, 2014 17:05
|
|
|
A jig like that can be a complete pain in the rear end to make correctly and use. It's a lot, lot, lot easier to use a 12mm piece of MDF as a carrier sled registered either to the fence or to the miter slot and double-sided tape or clamp the piece you want the initial jointed edge on. I have a shop-made version of this jig that works really well for establishing a reference edge. It's kind of brainless and it can do up to 8/4 stock. http://www.rockler.com/taper-straight-line-jig Edit: this all assumes you have at least 1 face reference surfaced.
|
|
#
?
May 19, 2014 17:42
|
|
|
First coat: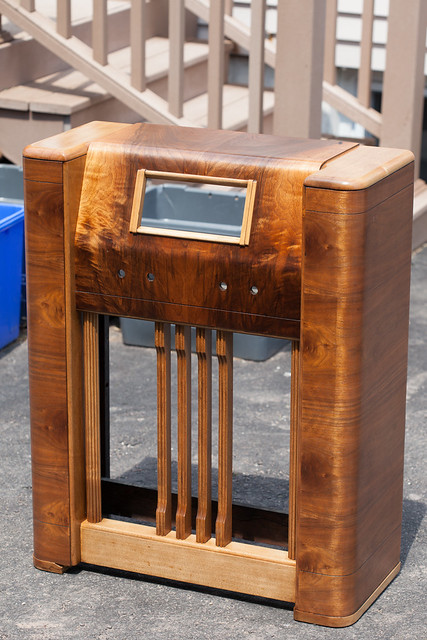 2014-81 by Tom Rintjema, on Flickr
|
|
#
?
May 19, 2014 18:46
|
|
|
You going to install a Sonos inside that thing, or something?
|
|
#
?
May 20, 2014 03:44
|
|
|

|
| # ? Jun 5, 2024 22:57 |
|
|
Tim Thomas posted:A jig like that can be a complete pain in the rear end to make correctly and use. It's a lot, lot, lot easier to use a 12mm piece of MDF as a carrier sled registered either to the fence or to the miter slot and double-sided tape or clamp the piece you want the initial jointed edge on. I liked that style though because it would allow me to plane the faces of boards, I could cut and joint and face plane my own 2x4 or even 2x6s all with one tool. It's a really attractive prospect. My first project is to make a smaller cross cutting sled I think. Matthias Wandel has a nice model, as does this guy on youtube called Savvas pappava, I might combine both their ideas into one. Also got some blade questions, I'm wondering if I should go with an all purpose blade or if I should get specialized blades? I was thinking maybe either one of these could be a useful blade for many years to come: http://www.rockler.com/10-x-40t-forrest-woodworker-ii-thin-kerf-general-purpose-blade http://www.rockler.com/10-x-40t-atb-forrest-woodworker-ii-general-purpose-blade Seems to be very well thought of, one is a thin kerf, the other is a regular kerf but otherwise the same brand and style of blade. Not sure which would be better, I got a contractor style saw but it has a proper 3HP engine so it's not underpowered. I am thinking about the thin kerf blade though since I'll likely get a standard kerf all purpose blade with the saw. Edit: Bah looks like I get no blade at all. So I need one anyway. His Divine Shadow fucked around with this message at 10:46 on May 20, 2014 |
|
#
?
May 20, 2014 08:53
|
|