


|
Two of these aren't really macro but they're focus stacked so I guess this is the place. Not sure why kiwano melons are so expensive but they look pretty cool.  
|
 #
?
Jun 1, 2014 18:05
#
?
Jun 1, 2014 18:05
|
|


|

|
| # ? May 12, 2024 15:17 |
|
|
Pretty sure that is actually an alien egg and you should douse it in fuel and burn it until it's ashes.
|
|
#
?
Jun 3, 2014 03:23
|
|

|
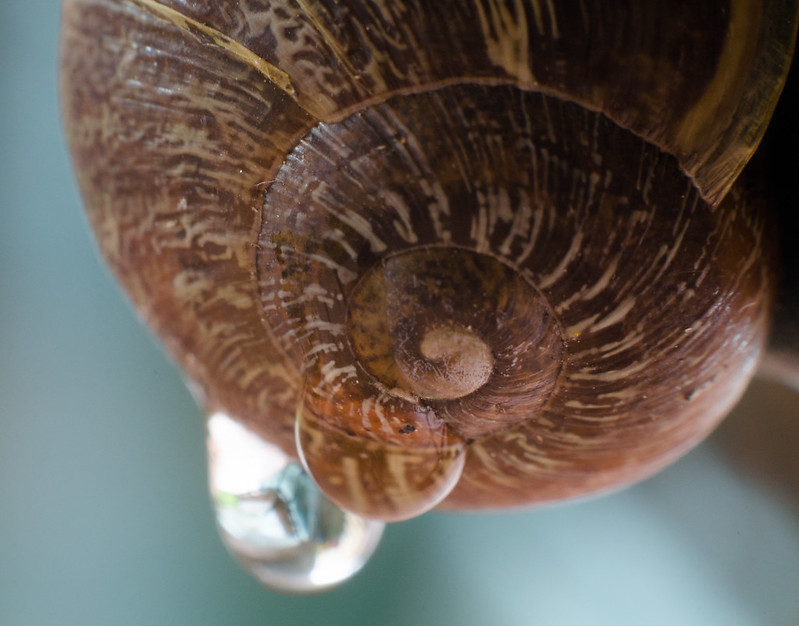
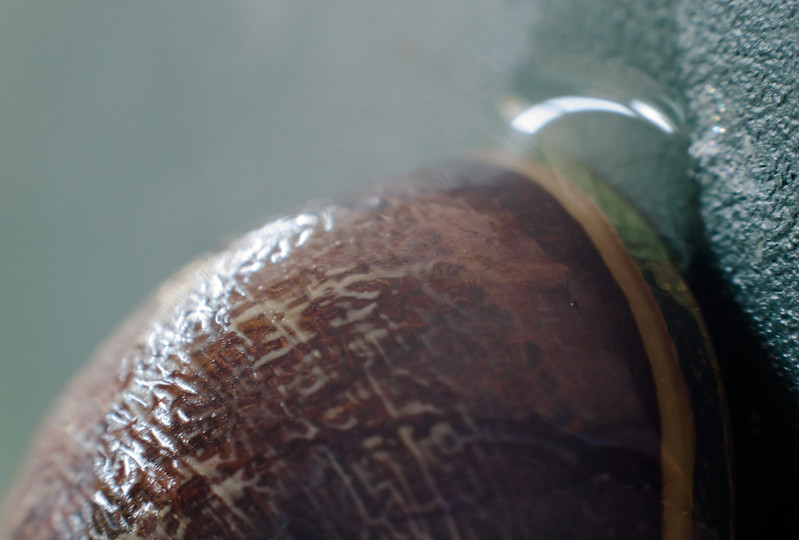
Graniteman posted:The main options are Zerene Stacker and Helicon Focus. I think Zerene has the better reputation but I've never used Helicon. ZS does have a lightroom plugin but I've also never used that. There's a free trial so you can give it a shot. Tricerapowerbottom posted:Zerene can also control a Stackshot, which is huge depending on how much do you this stuff. Thank you both very much for the info. I've been fiddling with Zerene and was hoping for some advice to improve my results. PMax gets me an awful blurry mess around specular highlights and DMap gets me lots of tiny smudgy bits in the same areas. I can get decent results if I spend a LOT of time retouching in the better bits on the DMap output but was hoping there were some settings I could change to get a better result with less retouching required. Here is one overall image and a couple close ups from it to show what I'm getting with DMap.   
|
|
#
?
Jun 7, 2014 10:48
|
|
|
Lon Lon Rabbit posted:I've been fiddling with Zerene and was hoping for some advice to improve my results. I've definitely run into that issue as well. I don't know of any settings in ZS that would reduce those blurred specular highlights. I have two maybe semi-helpful comments: People who are really into high magnification focus stacking shots spend a ton of time and energy on light diffusers and lighting modifiers in order to get the subject to look just right. Strong highlights are generally avoided where possible. No different than non-micro photographers really. But if you have the ability to control the lighting on your subject to minimize those highlights that would be my first recommendation. Secondly, since you are new to ZS you may not be using the "stack selected" retouching workflow to the fullest. I know I wasn't until I read the tutorial here. The short version is, the tool is designed so that if you want to pull in detail from several frames at once you should select all of those source frame, then stack them, then retouch using the sub-stack as the source. It makes retouching larger stacks much much easier.
|
|
#
?
Jun 7, 2014 16:20
|
|
|
hi SpiderFriend by nick.kneer, on Flickr SpiderFriend by nick.kneer, on FlickrHI 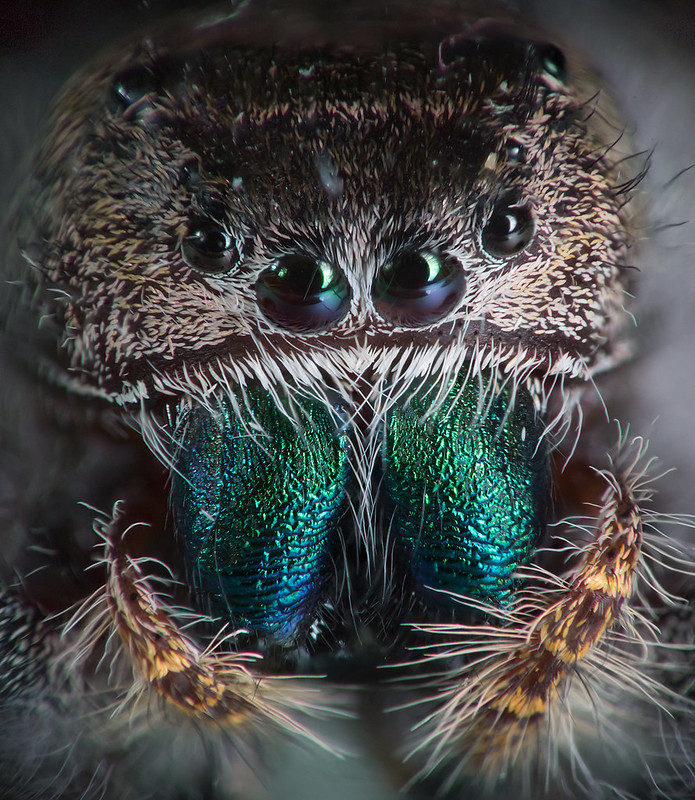 SpiderCloseup by nick.kneer, on Flickr SpiderCloseup by nick.kneer, on Flickr
|
|
#
?
Jun 8, 2014 15:43
|
|
|
dakana posted:Amazing pictures Nice! Does video stuff count? Azorubine and tartrazine precipitating out of a solution of sodium citrate Aspirin Boom
|
|
#
?
Jun 10, 2014 10:53
|
|

|
While on a vacation with the wife and kid, I leaned up against a tree during a break and noticed a caterpillar. DSCF3250_2 by Kelly_Davis, on Flickr And another. And another.  DSCF3261 by Kelly_Davis, on Flickr And then I looked up.  DSCF3256 by Kelly_Davis, on Flickr This is my favorite photo I've taken so far this year.  DSCF3273 by Kelly_Davis, on Flickr
|
|
#
?
Jun 13, 2014 06:47
|
|


|
Have some Elder Sign fruit.
|
|
#
?
Jun 17, 2014 14:06
|
|
|
Last night I stacked a Megachile bee, with "okay" results: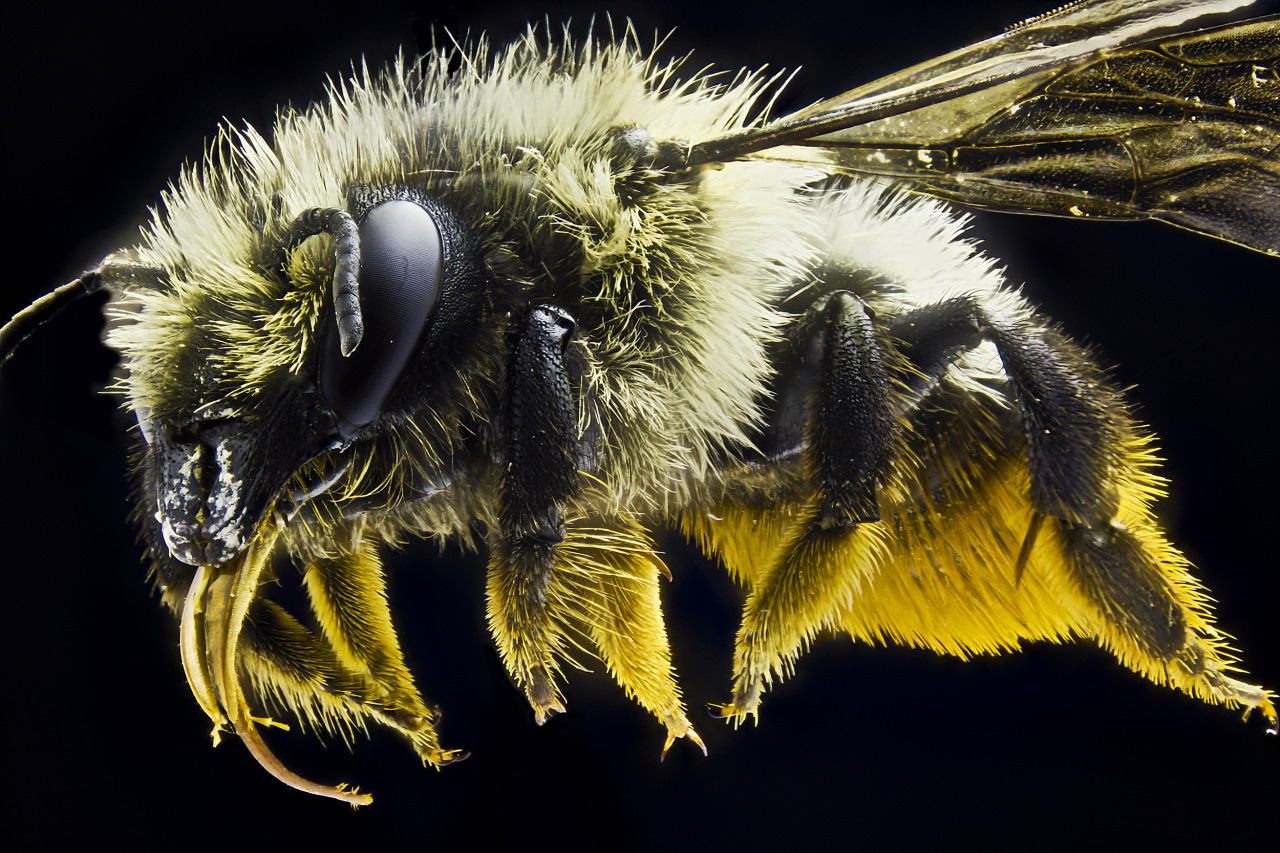 I am trying to emulate a particular set of photos from a USGS worker that are posted on flickr: https://www.flickr.com/photos/usgsbiml/sets/72157630468783226/.  Centris decolorata, F, Side, Puerto Rico_2013-07-04-12.37.24 ZS PMax by Sam Droege, on Flickr Centris decolorata, F, Side, Puerto Rico_2013-07-04-12.37.24 ZS PMax by Sam Droege, on Flickr amegilla, m, side, india_2014-06-18-16.30.41 ZS PMax by Sam Droege, on Flickr amegilla, m, side, india_2014-06-18-16.30.41 ZS PMax by Sam Droege, on FlickrThe worker posts that the pertinent pieces of equipment they are using are: Camera: Canon EOS 5D MarkII Macro Lens: Canon Manual 60 mm 1-5X (MP-E65/2.8) Macro Flash: Canon Twin Lite MT24EX Setup: specimen placed inside of a styrofoam cooler, black cardboard background, and the lights are placed near the base of the specimen, facing away from each other. The areas left open by the hole made for the lens is covered in white typewriter paper to encourage bounce. Whereas I am using a Canon T2i, a El-Nikkor 50mm f/2.8 reversed on bellows, and a desk lamp over a styrofoam cup diffuser that the specimen is set in (and a Yongnou 560 III that I don't know enough about to use effectively yet, have not used it for macro stacking yet). In mine, I used a CFL bulb in a desk lamp, set directly above the styrofoam cup with the pinned specimen inside. The background is a small piece of ultra-black flocking used for the insides of telescopes. I realize that there are going to be considerable technical differences between the equipment I have available right now and the stuff the USGS worker is using, but I'm disheartened by the differences between the photographs... When I am using my setup, I use the Canon Utility software in Manual, with the aperture set to approximately the enlarging lens' current aperture (usually between the 4 and the 5.6 markers), and adjust the exposure time to give a slightly to-the-left histogram. This particular stack was 59 images altogether, cranked by hand. I don't really think I need a Stackshot (as the worker is using) at this point, but it would be nice. After taking the photos, I use Bridge to resize and save as jpgs, (not getting the Embedded Profile Mismatch prompt I normally get when I open a CR2 in PS, which might have something to do with it). I stack in Zerene Stacker, usually using the DMap output and retouching from there. Beyond that, I am using the mini-Bridge function in PS CS5 to open the resulting jpg as RAW, adjusting the brightness, contrast, and blacks. Then I usually go into the file with PS itself and use the healing tool to remove bits of dirt, and finally go over the whole thing with the unsharp mask function to enhance detail. As you can see, the lighter parts of the bee are over-exposed, and while the detail looks okay, it's not as good as the photographs done by the USGS guy. I also get serious halos in my DMap results, usually around the claws or wings (highly reflective surfaces, compared to the hairy or dark colored parts of the insect). You can see some of my hamfisted PS'ing in my photo, right under the bee's left antennae. In this case, I was able to convincingly PS the pin out of the picture, but I know that if the positioning had been different, there would be more of that. Are the differences between my Megachile example shown here simply a matter of learning how to use my flash and working on learning how to light the subject better, getting better equipment in general, taking more time with my post processing, or a combination of all three?
|
|
#
?
Jun 19, 2014 19:12
|
|


|
Tricerapowerbottom posted:Are the differences between my Megachile example shown here simply a matter of learning how to use my flash and working on learning how to light the subject better, getting better equipment in general, taking more time with my post processing, or a combination of all three? Definitely the largest difference is in the lighting. The MT24EX is a macro ring flash, which means it's on the lens' axis. They've got more substantial bouncing of light going on, which helps reduce contrast and shadowing. Your light is coming primarily from above, and while it's a nice size, simply due to its positioning it ends up putting too much light on the top of the bee and not enough on the bottom. This is what creates a large amount of contrast between the top and the bottom, and you're left to either sacrifice the highlights, sacrifice the darks, or compromise. You could try getting some more desk lamps and getting lights on-axis to the bee, or 2 at 45 degree angles in front of the bee, etc. That's your biggest difference, for sure. Also in your workflow you're not taking advantage of RAW in any way by resizing and saving as JPG before editing. The point of RAW is that it contains more information for adjusting exposure, contrast, white balance, saturation, color, etc; saving it as JPG discards all of that information. I'd suggest editing one of the RAWs to how you'd like it, then syncing the edit settings to all of the other RAWs in the stack, and then resizing and saving as JPGs before the stack.
|
|
#
?
Jun 19, 2014 21:24
|
|
|
dakana posted:Definitely the largest difference is in the lighting. The MT24EX is a macro ring flash, which means it's on the lens' axis. They've got more substantial bouncing of light going on, which helps reduce contrast and shadowing. Your light is coming primarily from above, and while it's a nice size, simply due to its positioning it ends up putting too much light on the top of the bee and not enough on the bottom. This is what creates a large amount of contrast between the top and the bottom, and you're left to either sacrifice the highlights, sacrifice the darks, or compromise. You could try getting some more desk lamps and getting lights on-axis to the bee, or 2 at 45 degree angles in front of the bee, etc. That's your biggest difference, for sure. Thanks, appreciate the response. On the second point, I forgot to mention that I do apply a by-case preset from one of the photos to the bunch in Bridge before I start the resizing. I usually end up doing it again using the open as RAW function afterwards, though.
|
|
#
?
Jun 19, 2014 21:38
|
|
|
The MT24EX is not a ring flash  To get that pro look, direct light with puny diffusers* won't cut it. Either diffuse that poo poo properly* or do what the pro does: use indirect light. You'll need a couple flashes for that, desk lamps aren't practical or powerful enough. *  Awesome paper towel diffuser, bro!  ...oh Also, mods please rename this thread to "Necro Necro Necro!"
|
|
#
?
Jun 19, 2014 22:34
|
|

|
Right, the MT24EX is a couple little flashes that are on a ring mount that can be removed: The USGS worker has them on either side of the block that the specimen is mounted on, facing in opposite directions. The inside of the styrofoam box provides the diffusion. I will work on it with my own YN to see if I can get something going that will work better than what I'm getting now. I imagine just shooting at a quicker shutter speed will improve things a little, and a truly spread out light will make things look more even in the end. edit: anyone aware of a comparable Chinese Amazon-y pair of lights? Or just get another YN and slave it? Tricerapowerbottom fucked around with this message at 22:49 on Jun 19, 2014 |
|
#
?
Jun 19, 2014 22:47
|
|
|
A second YN is fine, you don't need a twin flash for studio work.
|
|
#
?
Jun 19, 2014 23:04
|
|
|
Tricerapowerbottom posted:Are the differences between my Megachile example shown here simply a matter of learning how to use my flash and working on learning how to light the subject better, getting better equipment in general, taking more time with my post processing, or a combination of all three? I shoot stuff like this a lot. 1) your lighting is not even enough. The biggest challenge for good portrait photography (bugs or people) is getting the light just right. That's where I spend most of my time during setup. I use two flashes, but you can do a good job with one if you make a lot of effort to get even light on multiple sides. As I understand you, the bug is in a styrofoam cup. That's a good start. Try shooting across the side of the cup and position a small mirror on the other side to act like a reflector that bounces light back into the "shadow side" of the cup. Get more light around your subject and that will make a huge difference. 2) try to properly expose (not to the left). As long as you aren't blowing out your images or falling to complete black you are fine. 3) I use Zerene Stacker. the DMAP algorithm sucks for hairy subjects. Use PMAX. You can also get fancy and stack both way, then composite in photoshop to use the hairy bits from the PMAX image and the smooth bits from DMAP. That's what the most "serious" people do, but I don't and I think my images turn out pretty well. Definitely do not just use DMAP. 4) I don't think it helps much to process RAW files first. My post processing workflow: shoot the deep stack in jpeg. It really doesn't make a difference for focus stacking like this. Even the author of Zerene says that in his detailed testing it doesn't matter. That said, shoot in a locked white balance (not auto). Or shoot RAW and just deal with the slower workflow, but recognize you aren't really benefiting. Mass-crop the full image set if needed, and export them all to your working folder. Stack all in ZS using PMAX. Touch up stacking errors in ZS as needed. Export as a 16 bit tiff. The stacking algorithm is going to pull more detail and color into that resulting tiff by combining your 60 source jpgs. Open the resulting tiff in PS and apply camera raw as smart filter, then spot healing for dust trails. Finally sharpen using smart sharpen. It works really well for correcting diffraction limited blur, which is what you will have. You have the gear and software to do a great job, just practice! It's actually pretty tricky to get it all lined up to make good shots, but it's just the sum of a lot of small techniques you have to learn by practicing. The thing I've iterated on most though is trying different ways of lighting my subject.
|
|
#
?
Jun 20, 2014 01:31
|
|
|
Long story short, using the flash inside of a styrofoam box worked a hell of a lot better: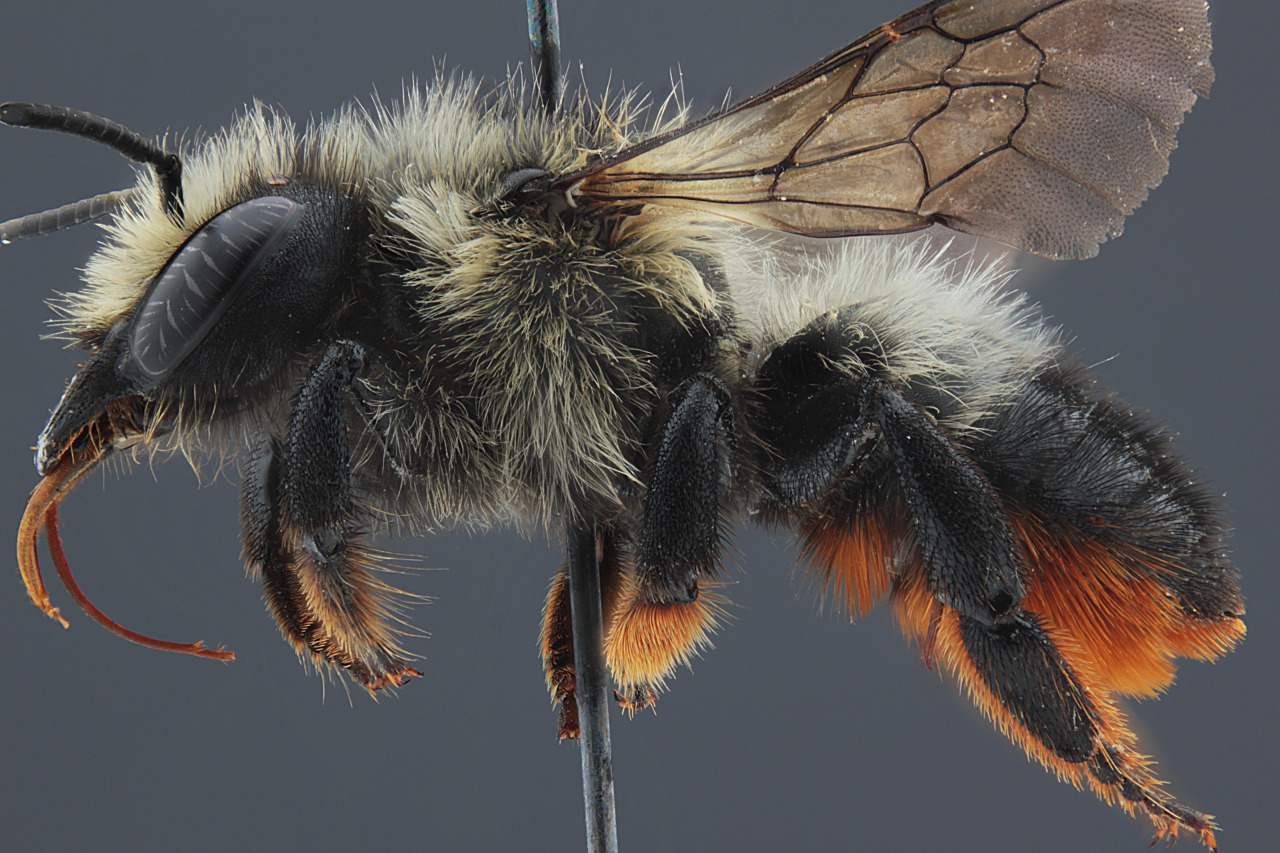 Still need to work on my idea of contrast, though. I see a big difference in what I remember in PS on my home computer and what I see at work. The FB uploading compression and color wonkery actually made this one look better than the unaltered file, which is what's posted above: 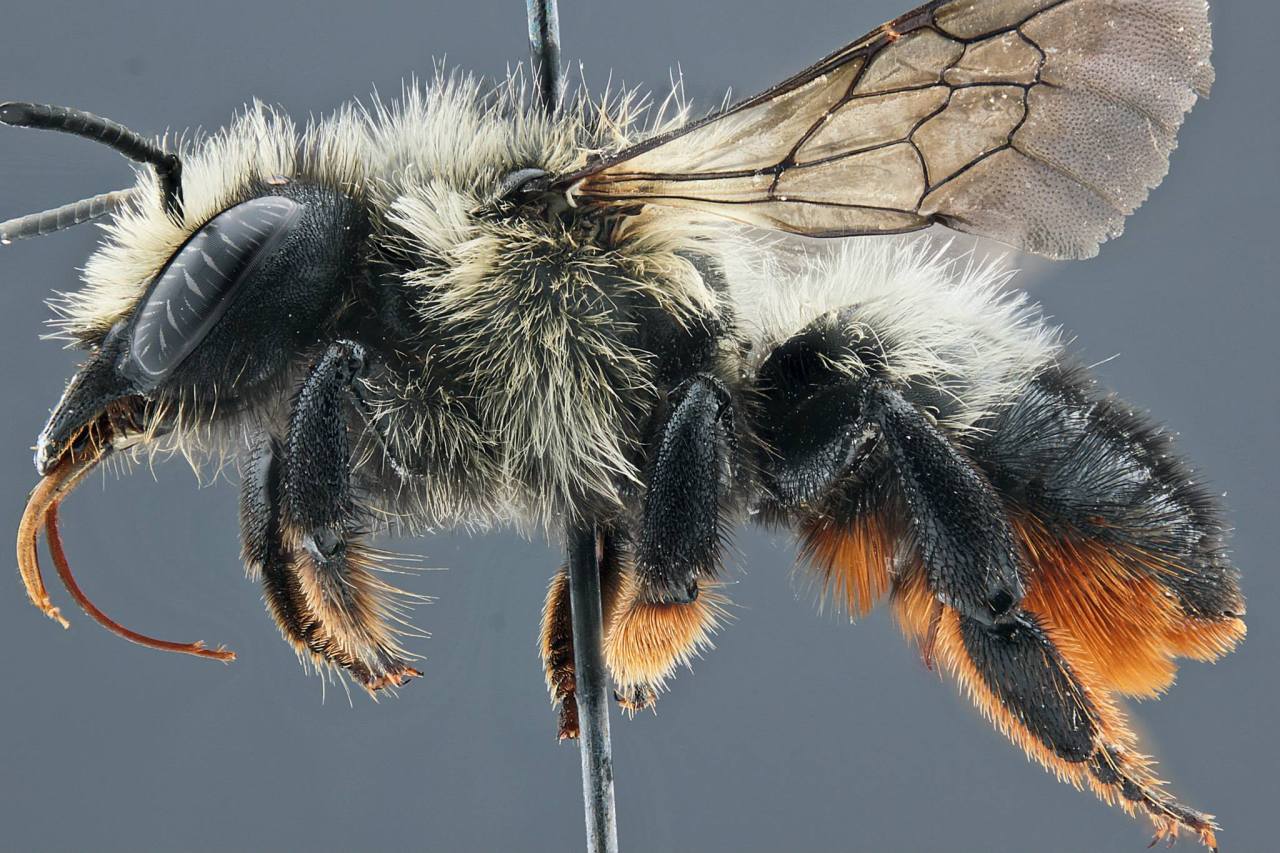
Tricerapowerbottom fucked around with this message at 22:21 on Jun 22, 2014 |
|
#
?
Jun 22, 2014 08:05
|
|
|
 P6280016.jpg by MrDespair, on Flickr P6280016.jpg by MrDespair, on Flickr P6280030.jpg by MrDespair, on Flickr P6280030.jpg by MrDespair, on Flickr P6280021.jpg by MrDespair, on Flickr P6280021.jpg by MrDespair, on FlickrThe oly 12-40 works pretty ok for macro (it helps when you have giant rear end moths and good sized spiders to work with though).
|
|
#
?
Jun 29, 2014 05:24
|
|


|
If you use a MT-24EX flash head, you probably have some crazy rigged up diffusers to make it look good for macro. I just saw this blog post about what looks like a really nice diffuser you can just buy from ebay.
|
|
#
?
Jun 29, 2014 20:01
|
|
|
Graniteman posted:If you use a MT-24EX flash head, you probably have some crazy rigged up diffusers to make it look good for macro. I just saw this blog post about what looks like a really nice diffuser you can just buy from ebay. Just saw that as well, think I'll buy it just for plastic shell that clips to those heads nicely and I can put more stuff in there if needed. Right now I'm using actually something similar except made from cardboard and couple Fong Puffer diffusers. Pics too:  IMG_9606 by ruut103, on Flickr  IMG_9634 by ruut103, on Flickr
|
|
#
?
Jun 29, 2014 20:19
|
|

|
 20140629 YellowFlower 2_ by MedievalMedic, on Flickr 20140629 YellowFlower 2_ by MedievalMedic, on Flickr
|
|
#
?
Jun 29, 2014 23:02
|
|

|
ah forget it posted:
|
|
#
?
Jun 29, 2014 23:09
|
|
|
Bob Socko posted:Jesus Christ, those jaws are the stuff of nightmares. I think it looks really cute. 
|
|
#
?
Jun 29, 2014 23:18
|
|
|
Bob Socko posted:Jesus Christ, those jaws are the stuff of nightmares. /  IMG_0345 by ruut103, on Flickr
|
|
#
?
Jun 30, 2014 19:04
|
|
|
    
|
|
#
?
Jul 1, 2014 15:34
|
|
|
I don't have a way to post the photos now, but I've been using the DCR-250 on my Canon 70-300 for cool west African bugs in a place I didn't want to take a setup worth more than per capita income, and WOW. For $60 the DCR is incredible, and I think it's well beyond 1x when zoomed to 300mm. If anyone is reading this for a budget entry to macro, definitely try the thing out.
|
|
#
?
Jul 3, 2014 11:03
|
|

|
Dragonfly: Dragon Fly by jdorseydesign, on Flickr Dragon Fly by jdorseydesign, on FlickrAnd a Cricket? Grasshopper? No idea.  Grasshopper? by jdorseydesign, on Flickr Grasshopper? by jdorseydesign, on Flickr
|
|
#
?
Jul 8, 2014 22:45
|
|
|
Fuji 35mm worked surprisingly well for flower macros DSCF3399.jpg by fuglsnef, on Flickr  DSCF3423.jpg by fuglsnef, on Flickr  DSCF3425.jpg by fuglsnef, on Flickr
|
|
#
?
Jul 13, 2014 17:01
|
|
|
I found out my favorite tea is kinda gross looking up close. Tea by t.humeston, on Flickr
|
|
#
?
Jul 23, 2014 02:42
|
|
|
Picked up a Canon FD 50mm f/3.5 macro + extension tube for cheaper than what I paid for the FD->XF adapter. Playing around in the garden:  DSCF1263.jpg by Brian.M.K, on Flickr Anyone know what this little guy is?  DSCF1283.jpg by Brian.M.K, on Flickr Rot fucked around with this message at 22:01 on Aug 1, 2014 |
|
#
?
Aug 1, 2014 21:58
|
|

|
I'm not an expert but that looks like a spider.
|
|
#
?
Aug 4, 2014 17:05
|
|
|
Crab spiders are cool. IMG_0998 by ruut103, on Flickr
|
|
#
?
Aug 4, 2014 18:36
|
|
|
|
|
#
?
Aug 17, 2014 09:19
|
|

|
A few macro shots I took recently. Tamron SP AF 90mm, Nikon SB-60 with RayFlash 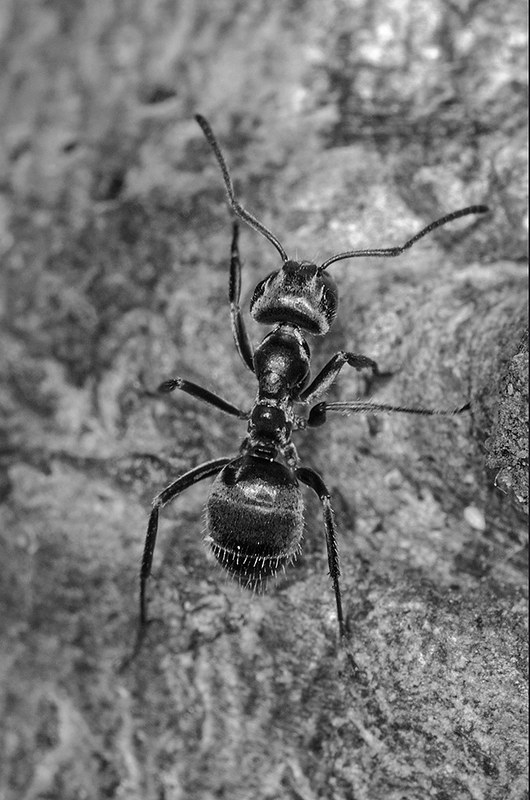 Nikon D7000, Tamron 90mm, full set of cheap Nikon F extension tubes and a RayFlash hanging off a SB-600.  Tamron 90mm, generic set of three extension tubes, Nikon SB60 flash + Rayflash, Cree cycle torch for side illumination (and a bit o' depth) The RayFlash has been pretty useful with macro lighting. The depth of field was so slight with the ant, if I focussed on the tree the ants were oof. Live view helped adjust focus (even though they were running around like headless chickens). spookygonk fucked around with this message at 20:15 on Aug 17, 2014 |
|
#
?
Aug 17, 2014 20:12
|
|


|
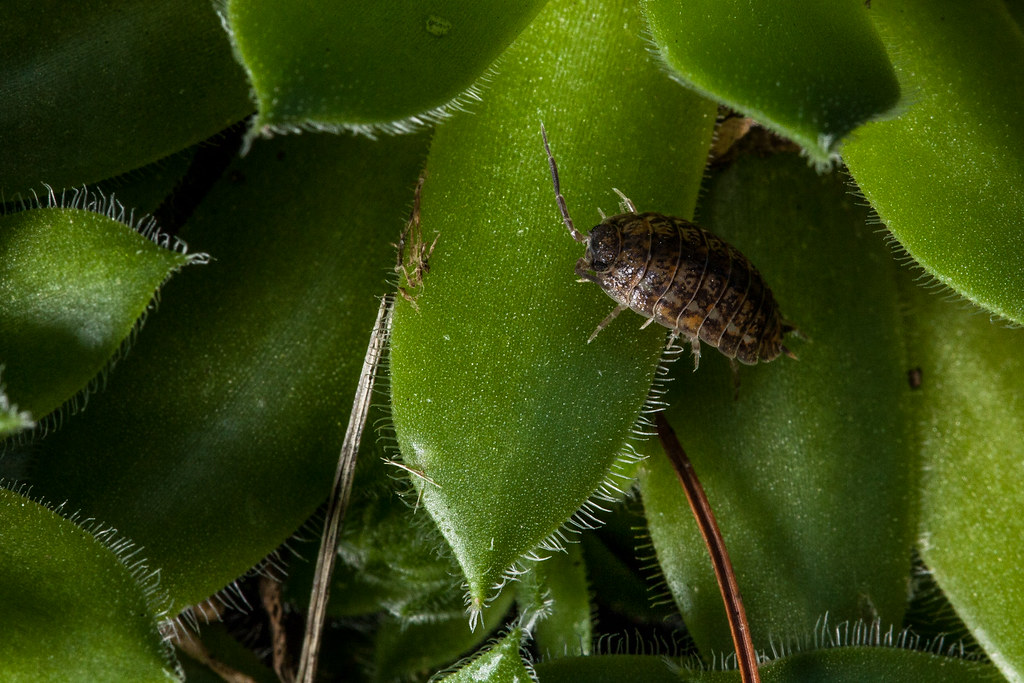 Pill Bug by cclunie, on Flickr Pill Bug by cclunie, on Flickr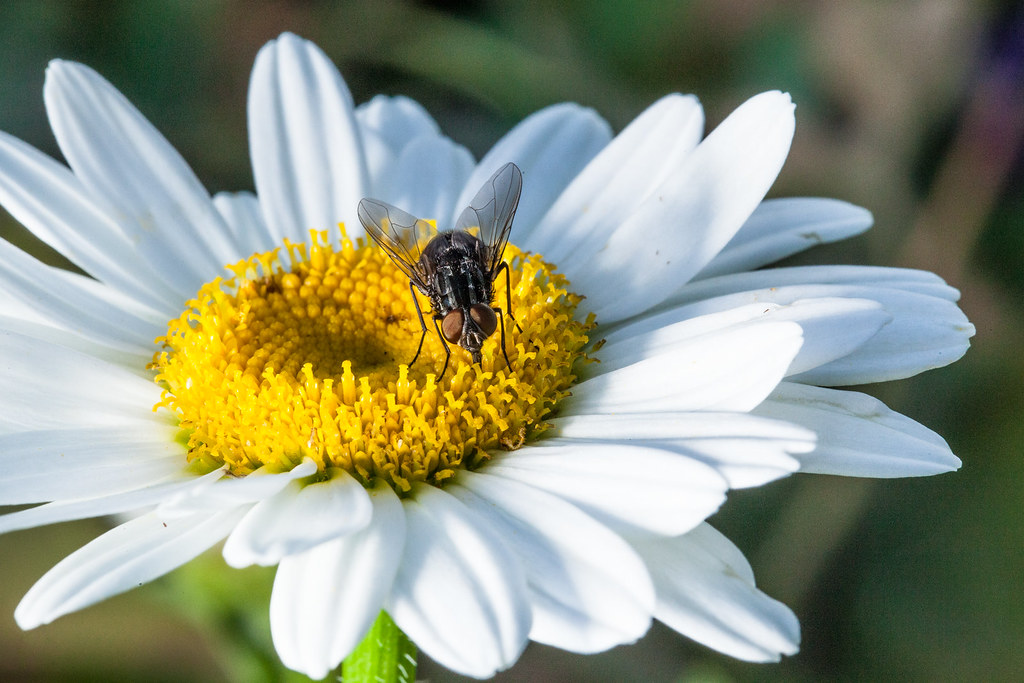 Fly on a Daisy by cclunie, on Flickr Fly on a Daisy by cclunie, on Flickr
|
|
#
?
Aug 17, 2014 21:16
|
|

|
Love this. Here are some small things in Ghana, all with a regular 70-300 and DCR-250. It worked really, really well for an instantly switchable bird/bugs lightweight setup.  Watermelon Spider by Icybacon, on Flickr  Bush Cricket by Icybacon, on Flickr  Tiny Gecko by Icybacon, on Flickr  Ghanaian True Bug by Icybacon, on Flickr
|
|
#
?
Aug 18, 2014 16:58
|
|
|
I've recently taken to taking photos of the various strains of medical marijuana that I procure in Washington. Right now I'm using a Canon 5D Mark III with 100mm 2.8L Macro paired to a YN560 external flash via radio triggers. I'm also focus stacking (which I love). My question is how do I get close, close, closer to the buds to really get all the fantastic detail? Right now I'm able fill the frame with a decent sized bud, but I'd also like to get in tighter for detail shots. Would extension tubes help? Close focus filter? Thanks in advance for any advice. Photos are on @northwestgreens on twitter if anyone wants to check em out.
|
|
#
?
Aug 27, 2014 21:10
|
|

|
mclifford82 posted:I've recently taken to taking photos of the various strains of medical marijuana that I procure in Washington. Right now I'm using a Canon 5D Mark III with 100mm 2.8L Macro paired to a YN560 external flash via radio triggers. I'm also focus stacking (which I love). I'd do extension tubes, since they don't degrade the image as much as a close focus filter, which is really just a magnifier. You can get spendy and buy ones that'll give you AF and AE, or you can be cheap and buy off-brand ones that don't have any electronics, so it'll be manual focus and manual aperture (set the aperture with the lens on the camera, hold down the DoF preview button, and remove the lens from the camera.)
|
|
#
?
Aug 27, 2014 21:25
|
|
|
May I ask, how often do you guys with dedicated macro kit actually get it out to use? I love taking macro shots, when the opportunity arises, but it's a pain in the rear end as I'm free-lensing my 50mm to do it. I'm seeing the third-gen Sigma 105 for �380 and I'm pretty tempted to pick it up (even though I desperately need a tripod first). I'm wondering whether the low amount of macro I do is linked to the trouble I have to go to, or whether it's just something that doesn't really come up that often.
|
|
#
?
Sep 1, 2014 23:52
|
|

|
You want something easier to take out an use, but you want to ditch your super simple setup and go with something that needs a tripod? gently caress that. Unless you're focus stacking just leave a flash on the camera and go to town.
|
|
#
?
Sep 2, 2014 02:09
|
|
|

|
| # ? May 12, 2024 15:17 |
|
|
Mr. Despair posted:You want something easier to take out an use, but you want to ditch your super simple setup and go with something that needs a tripod? gently caress that. Unless you're focus stacking just leave a flash on the camera and go to town. Oh no, sorry. The macro and tripod thing are unrelated. Money wise, I should purchase a decent tripod before another lens is what I meant. 
|
|
#
?
Sep 2, 2014 10:29
|
|