


|
Thanks for all the tips, I'll stick with oil. It'll save me money at the very least! I'll need to jump on a harder project next.
|
 #
?
Aug 26, 2014 21:07
#
?
Aug 26, 2014 21:07
|
|


|

|
| # ? Jun 6, 2024 05:44 |
|
|
Try to use a food safe oil that isn't mineral oil. I read on another forum that mineral oil can reduce the antibacterial properties of wood. I use this orange oil and it works really well and smells amazing http://www.gillystephenson.com/inc/sdetail/110/119
|
|
#
?
Aug 27, 2014 00:31
|
|


|
Frogmanv2 posted:Try to use a food safe oil that isn't mineral oil. I read on another forum that mineral oil can reduce the antibacterial properties of wood. First I've heard of this, what is the reasoning behind it? Why would it reduce it more than any other sort of oil?
|
|
#
?
Aug 27, 2014 00:40
|
|

|
ChaoticSeven posted:First I've heard of this, what is the reasoning behind it? Why would it reduce it more than any other sort of oil? I dont know. I was reading an old thread on http://www.woodworkforums.com that went on for ages and someone posted a link to what they said was a study that showed it, only it 404ed when I tried to read it. It's most likely not going to make a difference if you follow basic kitchen hygiene rules, but I err on the side of caution.
|
|
#
?
Aug 27, 2014 01:27
|
|
|
The only reason I can think of is they are afraid that oil might trap moisture but that would go for any oil and we all know that oil is a poor moisture barrier. Some fruit oils deter dogs and bugs but I don't see that applying to bacteria.
|
|
#
?
Aug 27, 2014 05:24
|
|

|
Did some more digging and found http://www2.gi.alaska.edu/ScienceForum/ASF11/1121B.html Bottom of the page states " The mysterious natural antibiotic effect of wood on food contaminating bacteria seems to work with old wood as well as new, and with every species of wood tested so far. The only thing they've found that does enhance bacteria growth is treating the wood with mineral oil. By sealing the wood, oiling makes it more like plastic. As far as bacteria are concerned, that's a good thing." And names of researchers are given, so it's possible to track down what they did, but that doesn't really pass the sniff test, because oiling the block isn't sealing it, though that depends on whether or not the oil is a drying or non drying type. I'm still going to stick to the oil that says food safe and smells great. You can do what you want.
|
|
#
?
Aug 27, 2014 06:21
|
|
|
I'm trying to find plans for a porch swing like this:  Can anyone point me in the right direction for something like this? If I can't figure out the joints myself w/ my limited skill/tools I might just commission someone to make it. It looks like that actual swing comes from this Ted's Woodworking Guide http://shedplanscourse.com/porch-swing-kits-woodworking-tools#.U_4ZIY1dWYd but I'm not about to pay for something like that for a single plan that may or may not work for me.
|
|
#
?
Aug 27, 2014 18:52
|
|

|
Oh hey it's that Ted! http://woodgears.ca/ted/
|
|
#
?
Aug 27, 2014 19:05
|
|

|
Haha, good to know. I was totally not aware of this... Not that I'm the type to shell out for something like this in the first place anyway, but it did seem a little off.
|
|
#
?
Aug 27, 2014 19:16
|
|
|
I've gotten plans from here before. Both free and purchased. http://www.woodworkersworkshop.com/resources/index.php?cat=102
|
|
#
?
Aug 27, 2014 19:19
|
|

|
MMD3 posted:I'm trying to find plans for a porch swing like this: Here is a similar swing, see if this is close enough: http://extremehowto.com/build-a-porch-swing/?page=all
|
|
#
?
Aug 27, 2014 20:43
|
|
|
Is it possible to make a jewelry box with only a table saw, dremel and other probably useless hand held power tools? I'll try making finger joints with just the table saw and I'm pretty sure I'll be able to with a simple jig, but I'm not sure how I'd go about making the bottom panel without a router short of just gluing the thing straight under the box which would look ugly
KingColliwog fucked around with this message at 03:40 on Aug 28, 2014 |
|
#
?
Aug 28, 2014 03:12
|
|
|
If you make it a mitered box you can run the cuts for the bottom panel all the way through. The miter will hide the cuts.
|
|
#
?
Aug 28, 2014 03:45
|
|
|
for some reason I had excluded miters from my plans. Thanks that's what I'll do for my first try at a box.
|
|
#
?
Aug 28, 2014 12:28
|
|
|
KingColliwog posted:Is it possible to make a jewelry box with only a table saw, dremel and other probably useless hand held power tools? I'll try making finger joints with just the table saw and I'm pretty sure I'll be able to with a simple jig, but I'm not sure how I'd go about making the bottom panel without a router short of just gluing the thing straight under the box which would look ugly Oh yeah! With "just a table saw" you can build almost anything. There are an almost infinite number of jigs that you can make for it. For you want to do check out Jay Bates on YouTube. He has a good box joint jig video. I built the same jig and am pretty happy with it. For the bottom you can just glue it straight to the bottom. You can rabbit for edges and have it inset a little. You'd want a dado blade to do this though. Or you can completely inset the bottom. Recently I've been insetting most of the bottoms on my boxes. You also find out how square your box is. This is where hand planes get very handy. Another thing you can do is make a groove all the way around the inside at the bottom and put a panel in. Easily done with the table saw. I really never use hand power tools for woodworking. Except for drills, and a jigsaw can be handy.
|
|
#
?
Aug 28, 2014 21:53
|
|
|
mds2 posted:Oh yeah! With "just a table saw" you can build almost anything. There are an almost infinite number of jigs that you can make for it. What he said. Or use your run of the mill blade at rabbet depth and use your miter gauge to make multiple cuts simulating the dado effect. Use your fence to set depth then move towards the edge with each pass. Pair away waste! Lazy mans rabbet!
|
|
#
?
Aug 29, 2014 12:32
|
|
|
Or cut in 2 passes at right angles.
|
|
#
?
Aug 29, 2014 21:58
|
|
|
Arrrrrrg. I hit a broken off screw while squaring up a recycled 2x4 on my table saw and chipped 6-7 teeth on my Irwin Marples blade. It's been a great general purpose blade and at $40 I'm not that upset. But I'm curious- what do you guys do with your damaged blades? Also, recommendations for a metal detector?
|
|
#
?
Aug 30, 2014 07:17
|
|
|
the spyder posted:Arrrrrrg. I hit a broken off screw while squaring up a recycled 2x4 on my table saw and chipped 6-7 teeth on my Irwin Marples blade. It's been a great general purpose blade and at $40 I'm not that upset. But I'm curious- what do you guys do with your damaged blades? Also, recommendations for a metal detector? And my used blades go on the pile with steel scrap, once it gets over 50kg I take it to the scrap yard and sell it.
|
|
#
?
Aug 30, 2014 12:38
|
|
|
If you feel crafty you can make a knife, riving knife, marking knife, lathe parting tool, scraper, or other stuff from old blades.
|
|
#
?
Aug 30, 2014 15:31
|
|
|
Picked up a lathe this morning at a garage sale for $50. I didn't realize until I got it home that there's actually two lathes. The big one is a Craftsman, the smaller one is rusty and no obvious make/model is visible. He threw in the set of Powerkraft tools for free. The bag of nuts was supposed to go with it but I can't see how unless there was another bag of bolts that got lost somewhere. I'm pretty new to lathes and turning. Can anyone recommend any good youtube channels for turning?
|
|
#
?
Aug 31, 2014 00:19
|
|

|
I'd guess the little one is a no name from before the fifties since it has oil ports. Captain Eddie is long winded but one of the best teachers. Mike Waldt just did a beginner series, I'd start there. A lot of the guys turn but don't explicitly teach.
|
|
#
?
Aug 31, 2014 00:40
|
|
|
I've been working on this sideboard for a couple months now. It's cherry with walnut accents. Finish was three drenching coats of 1/2 Watco Danish Oil + 1/2 Boiled Linseed Oil with two coats of Howard Citrus Shield paste wax on the wear surfaces. The doors are a table-sawn raised panel with a small beaded detail at the edge of the field. The pulls are a 1" cove with an inverse-coved pull. Trying to figure out what I'm going to do for the drawers, I've done the fronts with pulls the same as the doors and it looks good, but I still need to do the drawer boxes. I'd love to do dovetails but my dovetail jig won't cut consistently right now and I don't trust myself to hand-cut them. Don't want to do pocket screws, either. Was thinking table-sawn glue-locks to make the drawers unless I find religion and do a 5/16 box joint or something. Tim Thomas fucked around with this message at 20:54 on Aug 31, 2014 |
|
#
?
Aug 31, 2014 20:49
|
|
|
Finish a shelf that took some extra tools ( a router for the dados). Biggest project I've done and will be trimmed in to look built in eventually. 90 inches wide and plywood with a maple frame.
|
|
#
?
Sep 1, 2014 04:46
|
|


|
I consider this my actual first woodworking project. We needed a small shoe rack for the door in the laundry room and I figured I'd try building one. I just kinda winged the idea of the size and thought it out in my head. In retrospect I would do things differently and be more careful in others and definitely use more test pieces before cutting dados, which is doable but takes a while when you just have a rip blade. 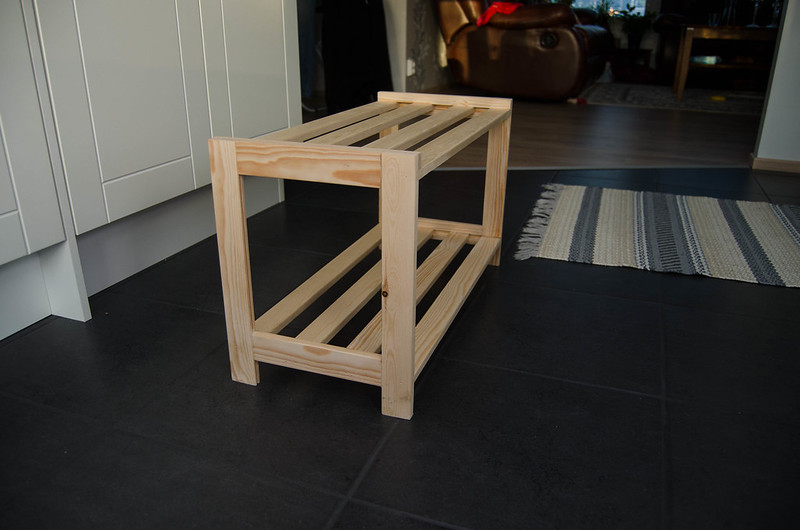 In place. I think I'd like to coat it with shellac still. 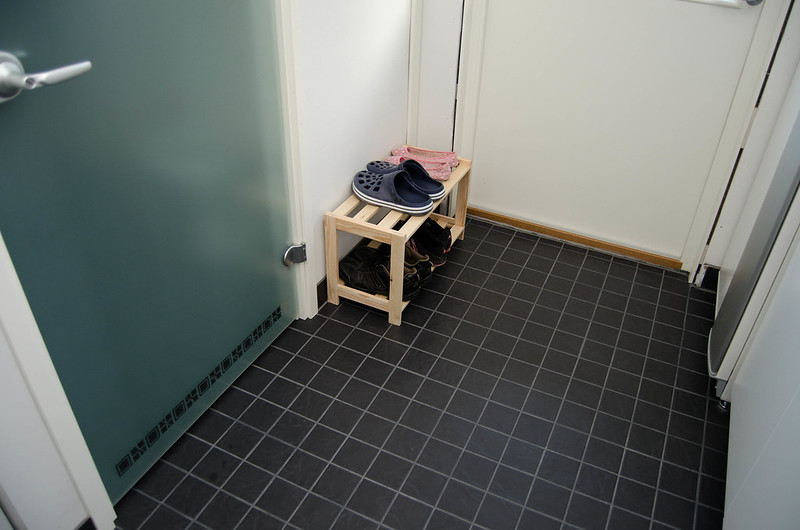
|
|
#
?
Sep 1, 2014 18:03
|
|
|
Looking good.
|
|
#
?
Sep 1, 2014 20:41
|
|

|
Does anyone have any recommendations for shops/brands for parallel clamps? I need to buy some wide clamps for making table tops but don't want to spend a million dollars.
|
|
#
?
Sep 1, 2014 23:07
|
|
|
Couldn't you just use some pipe clamps with wood blocks to distribute the pressure?
|
|
#
?
Sep 1, 2014 23:18
|
|

|
Sylink posted:Does anyone have any recommendations for shops/brands for parallel clamps? I need to buy some wide clamps for making table tops but don't want to spend a million dollars. If you have a Menards near you (big home center like Lowes but they are not nationwide), they put the Jorgenson CabinetMaster clamps on sale a few times a year. That's generally the most reliable cheap way to get parallel clamps. Last time they were $25-35 for 24-48" clamps. You used to be able to price match to HomeDepot but they carry Irwin clamps now. The Jorgensons are still made in the USA.
|
|
#
?
Sep 2, 2014 01:07
|
|


|
Home Depot still carries the Jorgensens. I prefer them to the Irwins, as they have a more coarse acme thread and seem to lock more tightly to the bar.
|
|
#
?
Sep 2, 2014 01:10
|
|
|
TooMuchAbstraction posted:Couldn't you just use some pipe clamps with wood blocks to distribute the pressure? Those would work,too. Really any good source of large clamps is great. Ill have to check home depot.
|
|
#
?
Sep 2, 2014 03:28
|
|
|
Sylink posted:Those would work,too. Really any good source of large clamps is great. Ill have to check home depot. Make your own. You need some straight wood, some threaded rod, some epoxy, a drill and a saw. I have and they work fine, plus you can make them as big as you want. I think I have posted a YouTube clip on how to do it earlier in the thread.
|
|
#
?
Sep 2, 2014 03:45
|
|
|
Bought one of these (cyclone separator) last night, I have a surplus vacuum cleaner I wanna turn into a shopvac: http://www.aliexpress.com/item/cyclone-turbocharged/1577956202.html Will be interesting to see how it turns out, could probably be upgraded to a proper dust collector later on with a proper bigass fan, whatever I can score 2nd hand really. But for now a shopvac would help alot. I wonder how effective would it be to hook up to my table saws dust collection port?
|
|
#
?
Sep 3, 2014 06:18
|
|
|
So you should wear eye protection even when not using power tools. Was just rubbing some sawdust onto some glue squeeze out and I bent down to get another handfull and somehow I got a bunch of sawdust into my eye. Not fun.
|
|
#
?
Sep 4, 2014 06:10
|
|
|
Finally decided to pick up a GRR-Ripper... worth every penny. The obvious safety advantages aside, it make working with smaller pieces so much easier. I can make cuts I wouldn't even have attempted before. Seriously go buy one.
|
|
#
?
Sep 4, 2014 21:40
|
|
|
bimmian posted:Finally decided to pick up a GRR-Ripper... worth every penny. The obvious safety advantages aside, it make working with smaller pieces so much easier. I can make cuts I wouldn't even have attempted before. I bought one because I'm a beginner and I don't want to gently caress myself up. But, as beginner I find myself cutting big stuff on the table saw and not really little stuff. Big as in 24"+ inch squares. Do I need 2 for this? Is that what you recommend? I was thinking about making a Jay Bates push-stick https://www.youtube.com/watch?v=W9oyt2gj0ek to go along with it.
|
|
#
?
Sep 5, 2014 01:49
|
|
|
2 are recommended for working with long stock yea, but I didn't want to drop that much $$$ right now. One and a normal push stick + featherboards still gives a lot of control, just need to reposition during the cut if it is that big. I'll probably pick another up whenever I see it go on sale. I was rather disappointed that my bandsaw doesn't have the balls to make bandsaw boxes, turns out a measly 1/2hp motor just doesn't cut it. I'm considering just finding a 1-1.5hp motor to replace it, is there any reason not to do that?
|
|
#
?
Sep 5, 2014 13:28
|
|
|
My bandsaw only has a 1/3 hp and I've made a couple boxes. Are you using a really hard wood or making really thick boxes?
|
|
#
?
Sep 5, 2014 17:01
|
|
|
I finished a major project a few months ago - built a set of fireplace-surround built ins (lower cabinets, upper bookshelves) as part of my family room remodel (I also drywalled the room and reframed the windows). The mantel is a hollow box with a removable face, and I ran power cords, AV cords and speaker wires from one of the base cabinets into the mantel (and speaker wire around the room behind the molding) so we can put a small TV above the fireplace with a 5.1 surround system with no visible wires. The bookshelves are all adjustable except for the bottom shelf, which I fixed permanently for structural rigidity. It took me about two months to finish, but that was working on it for only an hour or two 3-5 nights per week (after spending three straight days completing the major cabinetry). I did the bulk of the work in-room with a circular saw, router, and a crapton of dropclothes. The more intricate work (doors, trim) I did in the shop, which happens to be right next to this room. The cabinets are maple plywood from Home Depot and some alder plywood that was on sale at my local lumberyard, face frames are birch. I started out making the entire project from maple because I was going to clear-coat it, but then my wife decided she wanted it painted white so I switched to cheaper materials. I sprayed it with a latex base using the Harbor Freight airless sprayer - which is definitely one of the HF gems, up there with the dust collector. I learned one really nice trick for inset doors. In order to shave some VERY slight tapers to square the doors with the frames, I clamped a long extension onto my table saw fence and taped a washer to the corner of the door opposite the side to shave. The washer kicked out the door by about 1/32", so I could dial in for each door until it fit almost perfectly in the frame. The first image shows the before/after. This was my first major home improvement project, and considering I started woodworking less than three years ago I'm pretty pleased with my progress.      You can see my other projects on my LumberJocks profile: http://lumberjocks.com/ADHDan/projects. ADHDan fucked around with this message at 17:12 on Sep 5, 2014 |
|
#
?
Sep 5, 2014 17:02
|
|

|

|
| # ? Jun 6, 2024 05:44 |
|
|
wormil posted:My bandsaw only has a 1/3 hp and I've made a couple boxes. Are you using a really hard wood or making really thick boxes? Tried with ~3" of pine, so I didn't expect it to have an issue, but it just chokes. Perhaps there is something wrong with my current motor then, it has always seemed more underpowered than it should be.
|
|
#
?
Sep 5, 2014 17:37
|
|