


|
Bad Munki posted:You may still be able to save it by using the inside curve of each piece as the guide for a flush trim router bit on the next-inward piece. You may not end up with perfectly concentric circles, but a bunch of off-center circles may look cool in their own right. I think fixing it that way could prove to be a lot of work, as setting up to run the router over it may be tricky, but it could be worthwhile, you could end up with a real interesting piece. It will be hard to salvage, but using a router with templates is the best route to make the deadly accurate cuts you're going to need to make a glueline quality cut on a curve. As far as using to materials as they are, I can't think of a way of making it work without adding buffer materials between the existing curves to make up for the material that would be lost with a router cut. Maybe that's the way to do it?
|
 #
?
Oct 19, 2014 07:57
#
?
Oct 19, 2014 07:57
|
|


|

|
| # ? May 31, 2024 09:13 |
|
|
Note that the original plan would not have required perfect cut accuracy (which is good because I'm crap at following a line on my bandsaw anyway); it just would have required the cut to be the same on each of the boards. I was aiming to do something similar to this (not my work), except that instead of a "rectangular" checkerboard pattern, it would have been a radial pattern. I've done the rectangular one before with 2 colors, with no buffer material, and it worked fine. I just got too ambitious in upsizing the complexity, it seems.
|
|
#
?
Oct 19, 2014 16:02
|
|

|
drat. I'm replacing the panel on the left with solid "teak and holly" (maple in this case). It's a panel for the cabin floor of a sailboat. I did this all under the assumption that I could put the whole panel through the planer after it was glued up and guess what? It doesn't fit. The board thicknesses are uneven (teak thicker than maple), it's not totally flat and I need to thin the whole thing by a good 1/4" Any suggestions? My best idea at the moment is to cut down one of the maple strips (I'm not wasting teak) to get it in two peices, plane it, then redo the maple strip I cut in half (I'd have to re-route the groove in the teak on both sides). 
|
|
#
?
Oct 19, 2014 18:38
|
|

|
Build yourself a router thicknesser: https://www.youtube.com/watch?v=TpU5dZlW2pg
|
|
#
?
Oct 19, 2014 18:46
|
|

|
Finally done with this very needed project, putting a mobile base on my table saw. At something like 550-600lbs it's too heavy to move around just by dragging. Ever since I saw Matthias Wandels mobile base I thought that was one of the best implementations I've seen of this, way better than sticking castors on it permanently, much more solid for it to sit on its own feet when stationary.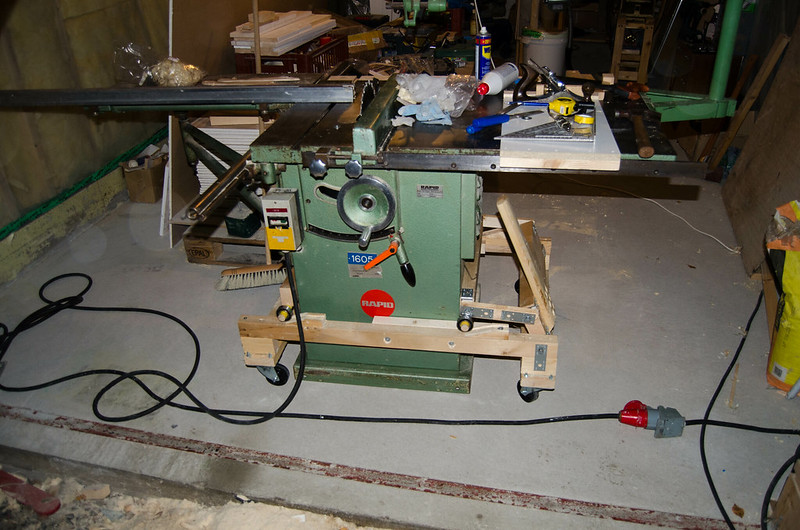 Unlike Wandel I didn't have any hardwood at all (unless I'd slaughter my wooden jointer, but that wouldn't be enough), so this is made 100% from spruce and pine leftovers. Used M8 bolts for all the turning parts. 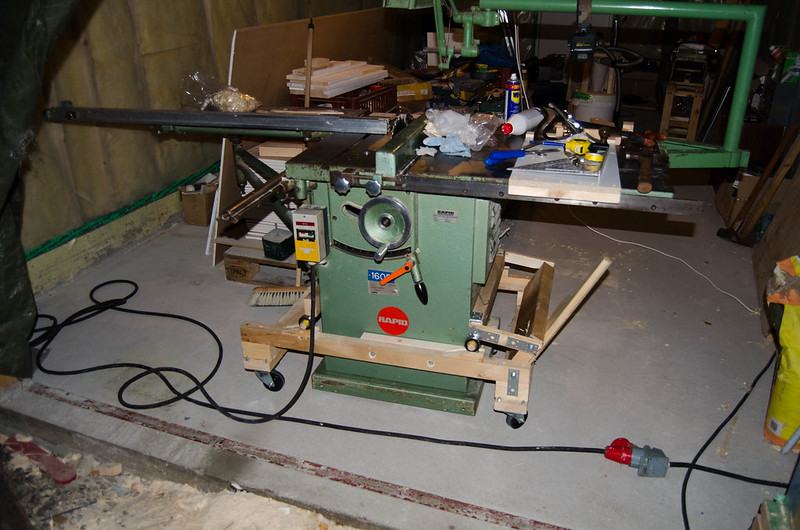 Lifted up. 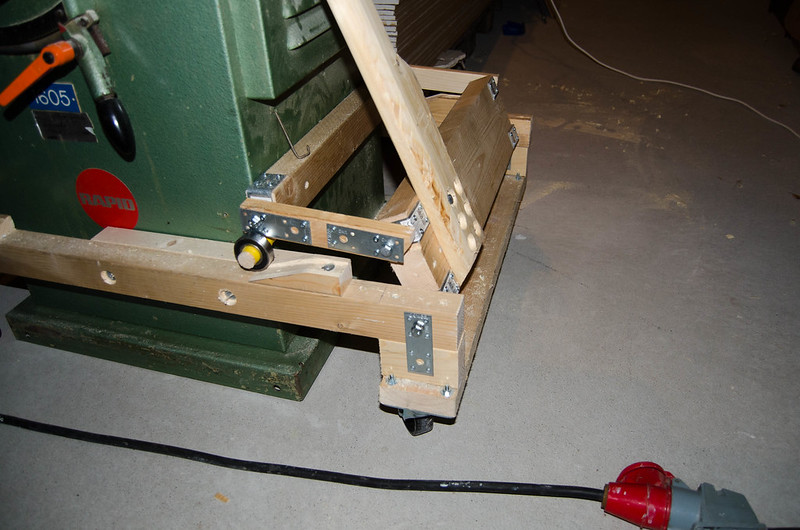 Now I made this base and used it, then after a few times I found everything was loose and sloppy, the stress of lifting the saw wore it out pretty fast, guess that's why Wandel used hardwood for his base, also his saw is probably 2/3rds the mass of mine. So what I did was I took the lifting assembly apart again, fitted angle and straight irons everywhere there'd be stress to reinforce the whole thing. Lots of metal there now and I think it'll stand up to the wear now. I'm really stoked I can move my saw around now, like placing it further from the door which is just a tarp, which one time ripped open and it rained on my saw and rusted it like heck. I'm just done taping every seam on the plastic that covers the walls, now I am nailing up the support boards (I can never remember the name in english) so I can start making ceiling and walls from the drywall pile also seen in the photos. Then I can mount the proper garage port. I am still so very happy about this saw, best money I ever spent, and no more than if I'd bought a new DW744XP saw locally, it doubles as my work table for handtool working since I don't have a normal workbench, or space to put one yet, get alot done with a shooting board though, wish I had a vise however: 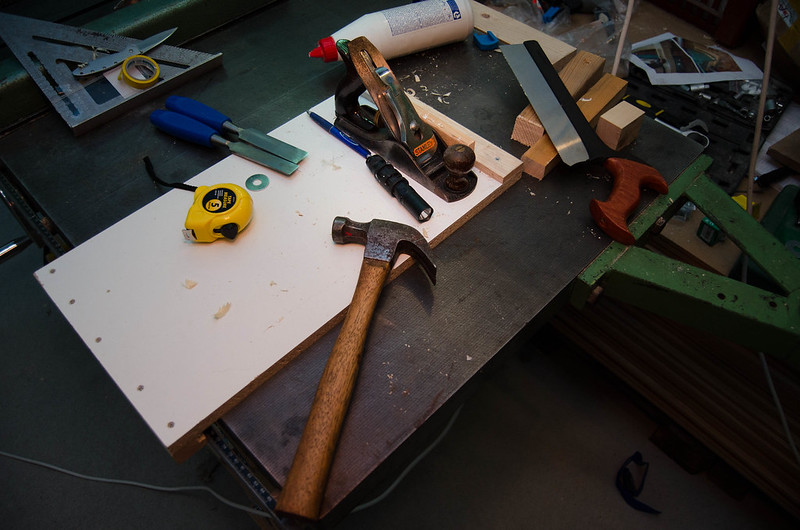
|
|
#
?
Oct 19, 2014 19:54
|
|

|
I would hand plane it flat then put a large bevel around the perimeter with a tablesaw, as if you were making a panel for a door. Doesn't look like it matches the other cabinetry anyway. Re: Fixing the bandsaw cuts. Make a template and use a router. The original plan wouldn't work anyway because the wrong sides are aligned for cutting. Unless I misunderstand the plan.
|
|
#
?
Oct 19, 2014 19:58
|
|

|
Any ideas on how the carcass is attached to the frame for this bookshelf?? 
|
|
#
?
Oct 19, 2014 20:44
|
|
|
If I had to guess, I'd say biscuited in at the top and bottom.
|
|
#
?
Oct 19, 2014 21:12
|
|

|
Commissioned shelf is coming along. I prefinished the shelves and interior and it seemed to work out ok. Here it is before finish sanding the outside.  I was rough milling some 8/4 cherry for another project that's about to start rolling. It's hands down the best rough lumber I've ever had. I didn't even mind planing down the ledges on the boards that are wider than my jointer, cherry is great fun to handplane.  
|
|
#
?
Oct 19, 2014 21:19
|
|

|
Meow Meow Meow posted:Any ideas on how the carcass is attached to the frame for this bookshelf?? Can't tell on my phone but drat that is beautiful.
|
|
#
?
Oct 19, 2014 22:31
|
|
|
Has anyone had any experience with Black Locust? Here is the expiation for the Virginia common tree guide. Virginia Common Tree Guide posted:Values and Uses: The wood is At the moment I am rough cutting it into a mallet for forced application of pressure on wedge shaped materials. And then I think I'll make some wedges out of it. However the course grain and extremely strong is getting to be a bitch. We are lousy with it on my parents land even though it's supposed to be more native to the mountain area. Note: also smells like rear end when burned for fuel.
|
|
#
?
Oct 20, 2014 02:55
|
|

|
ptier posted:Has anyone had any experience with Black Locust? Here is the expiation for the Virginia common tree guide. Do you have a black light?
|
|
#
?
Oct 20, 2014 02:56
|
|
|
Fiend posted:Do you have a black light? Whoa, just googled it, that's pretty cool.
|
|
#
?
Oct 20, 2014 03:01
|
|


|
ptier posted:Has anyone had any experience with Black Locust? Here is the expiation for the Virginia common tree guide. I have a ton of experience with it, but mostly in terms of running it through a bandsaw mill, building bridges and abutments out of it. I've made some rough finished benches out of it as well. Really doesn't like chisels and planes unless you're doing rough work. Mostly I'm doing timber framing type construction, the rest of the time it's logs and round notches or half laps. e: also somehow I didn't know about the black light thing. That's really cool. Hypnolobster fucked around with this message at 03:37 on Oct 20, 2014 |
|
#
?
Oct 20, 2014 03:31
|
|


|
Fiend posted:Do you have a black light? Cumaru faint to medium green streaks http://www.wood-database.com/wood-articles/fluorescence-a-secret-weapon-in-wood-identification/ Guess I know how to positively identify whether the wood I posted yesterday is Cumaru. Glue up on the urn went better than expected but I forgot to take pics. I started work on the top.   Will look like one of these when I'm done, undecided on legs or flat.  Also, I managed to knock my tablesaw out of alignment so it's basically unusable right now. So after this I get to realign the trunnions with the miter slot. What I think happened was this, I made an outfeed table for my saw but forget to check clearance on 45d cuts. Then tried to set my blade to 45. At first I just thought it was sawdust built up in the trunnions but apparently I actually nudged them out of alignment. Probably easier to remove the top (contractor saw) but I'm not looking forward to it.
|
|
#
?
Oct 20, 2014 04:16
|
|
|
TooMuchAbstraction posted:Turns out my planned project isn't going to work anyway: IMO the blade should NOT deflect that much. What is the re-saw height for the stack? Can you tighten the blade significantly?
|
|
#
?
Oct 20, 2014 04:53
|
|


|
Cobalt60 posted:IMO the blade should NOT deflect that much. What is the re-saw height for the stack? Can you tighten the blade significantly? The height was about 5". I had a bit more vertical clearance than I needed, and I suppose it's possible that the bearings were loose, neither of which would have helped. Honestly I rushed this -- if nothing else, I should have done a trial run on some scrap just to verify that the concept was sound.
|
|
#
?
Oct 20, 2014 15:49
|
|
|
A couple of weeks ago I made / installed window stools out of 3/4" poplar throughout my house. I followed that up by installing new retrofit windows which pretty much lock the stools in place (that will be important in a couple of lines). Someone who will not be named (my wife) accidentally damaged the front edge of one of the stools. It's bad enough to where wood filler/bondo isn't going to do the job. Because the new windows sit on top of the stool, i cant pry it up and make another one, so here was my jankey solution. I tacked a cleat to the top of the stool a quarter inch back from the edge. Took a trim router with a bearing / flush cut bit and took off that quarter inch from the front of the stool, removing the damaged material. Then I cut some 3/4 x 1/4" strips of poplar and glued one of the strips in place where I had removed the damaged material from. My question is, with that new glued on material only being 1/4" thick, can i still take my trim router w/ a round over bit and put a small radius on the top edge? I think i put a quarter inch round over on the original stool, I'd like to do the same here. Just not sure if that new piece will hold up to it or not.
|
|
#
?
Oct 20, 2014 16:46
|
|
|
If it's well and solidly glued on your should be fine. If there are any voids or loose bits you might not want to risk it. But if you have a hand plane you can approximate the same effect in this manner: http://woodgears.ca/shop-tricks/roundover.html
|
|
#
?
Oct 20, 2014 19:07
|
|
|
I'm thinking of putting pull out shelves in a pantry. The catch is that the interior of the pantry is almost 10" wider than the door that opens for it. In order to maximize space utilization, I'd like to have the shelf shaped like: The orange lines are where the drawer slides would attach. This would allow the drawer to be pulled halfway out (which is fine). The sides of the shelf would be 1x4, and the shelf itself would be 3/4" birch plywood. My concern is that the shelf would snap in half since the front is narrower than the back. Any ideas on how prevent it from snapping? I was thinking about putting a spline(s) (either wood or maybe angle iron) along the bottom (the dashed grey line). Thanks!
|
|
#
?
Oct 20, 2014 20:23
|
|

|
What are you going to be putting on it? The bigger concern for me than the shelf snapping would be the drawer slides breaking.
|
|
#
?
Oct 20, 2014 21:20
|
|
|
thespaceinvader posted:What are you going to be putting on it? General pantry stuff - cans, bags of flour, jars of spaghetti sauce, boxes of cereal, etc. I found drawer slides rated for 100 lbs, and that is what I was going to use. I'm sure that will be overkill and I won't come anywhere near that weight.
|
|
#
?
Oct 20, 2014 21:56
|
|
|
Leverage, man. You load the front end of that shelf, you're loading a big lever that's pulling down on the screws holding the drawer slides onto the walls of the cabinet. That's much more likely to be a weak point than the shelf material if you use plywood and put some reinforcement round the edges. E: what I meant of course was not the drawer slides breaking, but them pulling off the walls of the cabinet or the edge of the shelf. I'm probably exaggerating how much, though. Use a decent amount of screws and this should work fine. Reinforce underneath if you're concerned but I doubt it should be a problem if you use, say, half-inch ply for the shelf.
|
|
#
?
Oct 20, 2014 23:52
|
|
|
TooMuchAbstraction posted:The height was about 5". I had a bit more vertical clearance than I needed, and I suppose it's possible that the bearings were loose, neither of which would have helped. Honestly I rushed this -- if nothing else, I should have done a trial run on some scrap just to verify that the concept was sound. The concept was fine, I believe, and the guides bearing (those are the bearings you mean, right?) shouldn't play a HUGE role in blade deflection. I'm just saying, my saw can re-saw 12" hardwood into veneers, and I get tweaky when the top and bottom have a .01 inch variance. Even if your drift is really bad, there really should be no bow or belly in your cut, much less a massive inconsistency. Again, not trying to be like "your saw sucks," but I do wonder how much adjustment you might be able to make, whether blade tension or otherwise.
|
|
#
?
Oct 21, 2014 01:12
|
|
|
Finished up the shelf. Finish is Arm-R-Seal. Big fan of it and Seal-A-Cell. Expensive, and not sold locally though. Pain in the rear end. Still, haven't found anything with the exact look it gives.  
|
|
#
?
Oct 21, 2014 21:02
|
|
|
I can't tell how tall that is from your shots of the WW1 trench you work in, but it looks great. Can you see the dovetails on top while standing ?
|
|
#
?
Oct 22, 2014 11:22
|
|


|
Thanks. I can, but I'm pretty tall so I dunno about other people, really. It's around 55 inches tall, 10" deep and 34" wide.
|
|
#
?
Oct 23, 2014 02:14
|
|
|
I'm considering options for a tail vise for my workbench build. I know I definitely want the traditional scandinavian L-vise. I've seen many ways to build them, but I was wondering if you could use something like this, 2nd product on the page, large front vise: http://www.fine-tools.com/spindel.htm It's obviously meant for a different purpose but it seems to me like an easy way to build a durable L-vise, just make the cutout on the bench edge for the L-vise face as usual, then mount this under the bench to the side, then mount an L-shaped piece of wood on the moving part and you're set. L-vise without any complicated homemade systems. The design of the vise with its support arms look to me like ideal to cope with the off-center stress of an L-vise.
|
|
#
?
Oct 23, 2014 07:48
|
|
|
His Divine Shadow posted:I'm considering options for a tail vise for my workbench build. I know I definitely want the traditional scandinavian L-vise. I've seen many ways to build them, but I was wondering if you could use something like this, 2nd product on the page, large front vise: I guess that would work but it seems like the guide bars would get in the way. I think the single screw tail-vise setup is the most common for a reason.
|
|
#
?
Oct 23, 2014 17:08
|
|

|
Sylink posted:I can't tell how tall that is from your shots of the WW1 trench you work in, but it looks great. I must be having a simple-minded day, but I giggled like a loon at that comment. Chaotic, nice bookcase! The joints look pretty darn lovely.
|
|
#
?
Oct 23, 2014 18:18
|
|
|
ChaoticSeven posted:Finished up the shelf. Finish is Arm-R-Seal. Big fan of it and Seal-A-Cell. Expensive, and not sold locally though. Pain in the rear end. Still, haven't found anything with the exact look it gives. Both dovetails and finish are nice.
|
|
#
?
Oct 23, 2014 19:46
|
|

|
I've finally given up on my old Makita 12" Sliding Miter saw- it would need a new base if I ever wanted to get a accurate cut out of it. (Constantly slips out of adjustment due to abuse). I'm looking at two miter saws, either the $399 DeWalt DWS780 12" Slider from Home Depot (which I can get for $356 after using cardpool) or a $314 Makita LS1221 12" fixed mitre saw (Amazon Warehouse deals has one for $275). I like the idea of the Makita due to having a shallow work bench, but my contractor neighbour swears by the DeWalt. I used to be fairly anti-DeWalt, but I've been incredibly impressed with the last few tools I have bought from them. Opinions?
|
|
#
?
Oct 23, 2014 22:37
|
|
|
the spyder posted:I've finally given up on my old Makita 12" Sliding Miter saw- it would need a new base if I ever wanted to get a accurate cut out of it. (Constantly slips out of adjustment due to abuse). I'm looking at two miter saws, either the $399 DeWalt DWS780 12" Slider from Home Depot (which I can get for $356 after using cardpool) or a $314 Makita LS1221 12" fixed mitre saw (Amazon Warehouse deals has one for $275). I like the idea of the Makita due to having a shallow work bench, but my contractor neighbour swears by the DeWalt. I used to be fairly anti-DeWalt, but I've been incredibly impressed with the last few tools I have bought from them. Opinions? I may be a newbie but I get accurate cuts outta the HF double bevel slider. ymmv but it's half the cheeze.
|
|
#
?
Oct 23, 2014 22:44
|
|
|
ptier posted:Has anyone had any experience with Black Locust? Here is the expiation for the Virginia common tree guide. I love it. I turned a bunch of bowls from a super green log, and milled some of the excess into small pieces I throw into serving trays. It has such a unique color. 
|
|
#
?
Oct 24, 2014 01:03
|
|
|
Jeherrin posted:I must be having a simple-minded day, but I giggled like a loon at that comment. It's not just you. I didn't even notice the sandbags until I read that comment that scrolled back up.
|
|
#
?
Oct 24, 2014 05:37
|
|


|
I've decided I want to venture into this dark hobby. I mainly want to build stuff for around the house like tables and shelves. Currently the only power tool I own is a cordless drill. What basic saws should I invest in first?
|
|
#
?
Oct 24, 2014 05:47
|
|

|
Elston Gunn posted:I guess that would work but it seems like the guide bars would get in the way. I think the single screw tail-vise setup is the most common for a reason. I was thinking I'd mount it like a face-vise and just extend the L-portion to the side of the whole thing, that way the guide bars would come in handy as supports. But after giving it more though I'l do a conventional one. I am thinking I should build a workbench from my current sketchup plans to a tiny scale first and see how it actually works out before building the real thing. Guess it could be a nifty toys for the kids too.
|
|
#
?
Oct 24, 2014 06:07
|
|
|
I built a blanket chest and dresser for my son's schools auction this week. It's poplar and birch ply.  Initially I had planned just to build the blanket chest- but I ended up buying a bit too much wood and ended up making both. It's been fun, but there are some changes I would make if I make them again. the spyder fucked around with this message at 23:54 on Nov 2, 2014 |
|
#
?
Oct 24, 2014 07:44
|
|
|
Whale Cancer posted:I've decided I want to venture into this dark hobby. I mainly want to build stuff for around the house like tables and shelves. Currently the only power tool I own is a cordless drill. What basic saws should I invest in first? Decide on a first project, then work out what tools you will need for it.
|
|
#
?
Oct 24, 2014 08:23
|
|


|

|
| # ? May 31, 2024 09:13 |
|
|
the spyder posted:I've finally given up on my old Makita 12" Sliding Miter saw- it would need a new base if I ever wanted to get a accurate cut out of it. (Constantly slips out of adjustment due to abuse). I'm looking at two miter saws, either the $399 DeWalt DWS780 12" Slider from Home Depot (which I can get for $356 after using cardpool) or a $314 Makita LS1221 12" fixed mitre saw (Amazon Warehouse deals has one for $275). I like the idea of the Makita due to having a shallow work bench, but my contractor neighbour swears by the DeWalt. I used to be fairly anti-DeWalt, but I've been incredibly impressed with the last few tools I have bought from them. Opinions? I'm not a fan of DeWalt tools but I do own and use 2 of those DeWalt 12" saws daily, one in the shop and one out in the field with another 2 or 3 8.5" saws lying around. I can tell you that the thing holds up to heavy abuse and cuts accurately. The only complaint I have is that the saw that I use out in the field wouldn't lock into bevels very good after a couple of years and I had to take it apart and tighten up the block inside, but again this is after daily use of flipping the saw back and forth to various angles. The saw I've had in the shop hasn't had any issues at all since I bought it in 2006. My preference is the DeWalt for a compound miter saw and a Makita LS1040 for a 10" chop, I've had that setup for years now and don't really see it changing unless one of them takes a nosedive in quality. They also seem to be pretty popular with everyone else out here as well, about 90% of the finish guys I see out and about have a DeWalt set up if they are using a bigger saw.
|
|
#
?
Oct 24, 2014 10:17
|
|