


|
A good compromise is build a hybrid style bench that you can add vises or vise-less work holding devices to at some later date. The cost difference between a good woodworking bench and poor for woodworking bench is negligible.
|
 #
?
Dec 16, 2014 00:16
#
?
Dec 16, 2014 00:16
|
|


|

|
| # ? Jun 5, 2024 23:53 |
|
|
TooMuchAbstraction posted:Look at it this way: if you don't stick with the hobby, then small and disposable is good. If you do stick with it, you can disassemble the bench and find a new use for the materials used to construct it. Or use it as an assembly or drying table. Seriously you can never have too many work surfaces (or clamps).
|
|
#
?
Dec 16, 2014 00:17
|
|


|
SkunkDuster posted:edit: ^^^Didn't even realize we linked the same bench. I just did a google search on "cheap shop bench design" and that one looked good. I've actually made it and it's a nice sturdy utility bench. It's an afternoon project even with very little experience. You're always going to need a workbench like that. Mount your bench grinder on it. Put the benchtop drill press there. Sand rust off tools you're restoring. Make a mess on it and don't worry about it. That's what it's for. A sheet of 3/4 ply is perfect for the top. ACX is nice but CDX works too. Coat it in boiled linseed oil once or twice and you're good to go. If you're cheaper you can try to find a solid core door to cut down to size.
|
|
#
?
Dec 16, 2014 02:57
|
|

|
wormil posted:A good compromise is build a hybrid style bench that you can add vises or vise-less work holding devices to at some later date. The cost difference between a good woodworking bench and poor for woodworking bench is negligible. I plan to build a hybrid based on this picture. I like the idea of a good clamping side and an assembly side on the same bench since I have very limited space. I am still trying to decide what to make the flat work surface out of. Plywood would work, but I was also thinking something like MDF. Any thoughts? 
Atticus_1354 fucked around with this message at 04:32 on Dec 16, 2014 |
|
#
?
Dec 16, 2014 04:30
|
|

|
1/4" hardboard on a substrate of ply (torsion box construction below the ply, even better). the 1/4" is a sacrificial top, and hardboard is much denser than MDF. beat it up and replace as often as needed
|
|
#
?
Dec 16, 2014 05:03
|
|

|
Any thoughts on using melamine as a benchtop? My dad did it, but I've never worked with the stuff before.
|
|
#
?
Dec 16, 2014 05:06
|
|

|
My "clean" workbench is melamine, i.e. my inside workbench, the one I use for "finer" projects. It's nice, cleans up well. Can be a bit slippery. On 3/4" particle board, it's a nice and heavy block. But if it ever got damaged, it'd be rather spendy to replace. I wouldn't use it in any situation it might readily be damaged or abused.
|
|
#
?
Dec 16, 2014 05:13
|
|


|
Guitarchitect posted:1/4" hardboard on a substrate of ply (torsion box construction below the ply, even better). the 1/4" is a sacrificial top, and hardboard is much denser than MDF. beat it up and replace as often as needed I like that idea. But I was thinking about routering t-track in to the surface for clamping and finishing stuff so 1/4" top may be annoying to do.
|
|
#
?
Dec 16, 2014 05:47
|
|
|
I believe I've found the cause for my vibration in the bandsaw: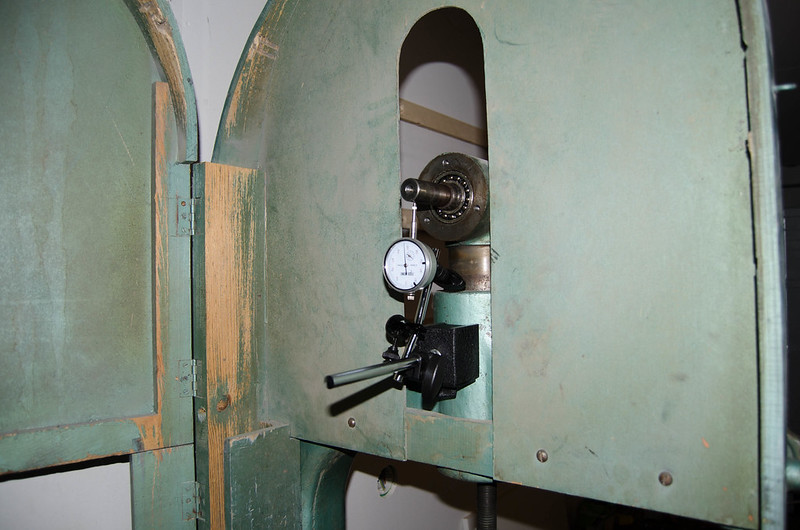 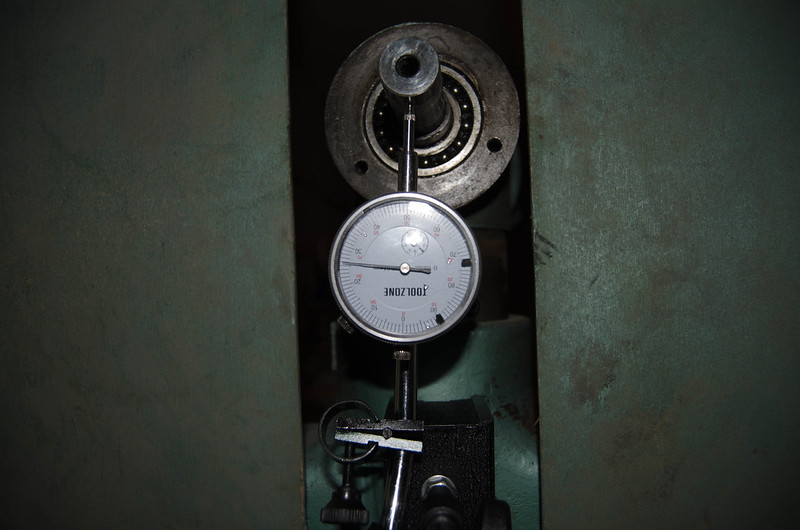  About .20mm runout which translates to 7 or 8 thousands in inches. Less the further in you go, which I was told is "great news" and means the shaft is bent. I dunno why this is great news, perhaps it's an easy fix.
|
|
#
?
Dec 16, 2014 07:22
|
|

|
Guitarchitect posted:1/4" hardboard on a substrate of ply (torsion box construction below the ply, even better). the 1/4" is a sacrificial top, and hardboard is much denser than MDF. beat it up and replace as often as needed I've just built a workbench for our studio (not for woodworking) with a 3/4" maple plywood top and I'm still undecided whether to finish it with polyurethane or stick a 1/4 hardboard on top. What the best way of securing the hardboard, if I don't want to use screws and want to keep the surface as flat as possible?.It'll be tricky to clamp.. (It's 28"x76")
|
|
#
?
Dec 16, 2014 08:12
|
|

|
ImplicitAssembler posted:I've just built a workbench for our studio (not for woodworking) with a 3/4" maple plywood top and I'm still undecided whether to finish it with polyurethane or stick a 1/4 hardboard on top. What the best way of securing the hardboard, if I don't want to use screws and want to keep the surface as flat as possible?.It'll be tricky to clamp.. (It's 28"x76") As long as the surface below it is flat, any kind of adhesive will do the trick - double sided tape would work, as would a light spray adhesive. the quicker option is countersunk brass screws (real brass, not brass plated) as the metal is soft enough not to damage tools the odd time you hit it. if you do go the double sided tape route, make sure there's a hole or two on the underside of the table so that you can shove a screwdriver into it to lift the surface when it's time to change it out.
|
|
#
?
Dec 16, 2014 13:35
|
|
|
Guitarchitect posted:1/4" hardboard on a substrate of ply (torsion box construction below the ply, even better). the 1/4" is a sacrificial top, and hardboard is much denser than MDF. beat it up and replace as often as needed My benchtop is 2 layers of 3/4" particle board with a piece of 1/4" hardboard on top. I went with hardboard for the exact reasons you mentioned and couldn't be happier with it. I tried double stick tape at first but it wouldnt hold over time. So I just drove a screw through it in each corner of the top. No problems for 2+years. Personally I would stay away from melamine because I'm just imagining it messing up one of my chisels.
|
|
#
?
Dec 16, 2014 15:12
|
|

|
His Divine Shadow posted:I dunno why this is great news, perhaps it's an easy fix. Alternate hypothesis: your grasp of sarcasm is lacking. e: Alternate alternate hypothesis: your grasp of sarcasm is flawless.
|
|
#
?
Dec 16, 2014 15:18
|
|
|
Melamine is great for an assembly table since glue doesn't stick and solvents don't hurt it.
|
|
#
?
Dec 16, 2014 18:01
|
|
|
wormil posted:Melamine is great for an assembly table since glue doesn't stick and solvents don't hurt it. Good point, I just realized that I do assembly on a old drafting table that has a melamine top. When the weather gets a bit warmer I'm planning to make the Paul Sellers table. His videos are pretty straight forward, so it shouldn't take more than 2 or 3 days to make. Not sure how cheap it will be though as I haven't totally priced it out. being made out of spruce 2x4's it should be on the cheaper end I'd assume.
|
|
#
?
Dec 16, 2014 18:53
|
|

|
mds2 posted:My benchtop is 2 layers of 3/4" particle board with a piece of 1/4" hardboard on top. I went with hardboard for the exact reasons you mentioned and couldn't be happier with it. I tried double stick tape at first but it wouldnt hold over time. So I just drove a screw through it in each corner of the top. No problems for 2+years. After sleeping on it the 1/4" hardboard really does sound like the best for my needs. Now to start drawing it out and pricing the materials for the work bench and router/miter saw table. Probably will be Feb before it even gets done. Until then I will keep using the workmate and my kitchen table.
|
|
#
?
Dec 16, 2014 19:07
|
|
|
His Divine Shadow posted:I believe I've found the cause for my vibration in the bandsaw: I'm not sure. I think the longer the shaft is, the easier it will be to straighten it out. Roll it on a granite slab or piece of flat float glass to check where it is bent. A nice flat table on one of your wood working tools might be okay, even. I would put it in a hydraulic press, support it on the ends, and press on the middle. Otherwise, is it a straight shaft with a separate collar for the bearings, or does the shaft have multiple diameters? If it's a straight diameter, you might get by with buying a length of pre-dimensioned stock shafting. It doesn't really look that way, but its worth asking. Also, is there any play in the bearings, can you move the shaft by hand?
|
|
#
?
Dec 16, 2014 19:48
|
|


|
Guitarchitect posted:As long as the surface below it is flat, any kind of adhesive will do the trick - double sided tape would work, as would a light spray adhesive. the quicker option is countersunk brass screws (real brass, not brass plated) as the metal is soft enough not to damage tools the odd time you hit it. if you do go the double sided tape route, make sure there's a hole or two on the underside of the table so that you can shove a screwdriver into it to lift the surface when it's time to change it out. Spray adhesive is a great idea. I got a couple of cans of re-mountable spray adhesive that would be perfect for this. Thanks!
|
|
#
?
Dec 16, 2014 21:47
|
|
|
Commodore_64 posted:I'm not sure. I think the longer the shaft is, the easier it will be to straighten it out. Roll it on a granite slab or piece of flat float glass to check where it is bent. A nice flat table on one of your wood working tools might be okay, even. I would put it in a hydraulic press, support it on the ends, and press on the middle. Otherwise, is it a straight shaft with a separate collar for the bearings, or does the shaft have multiple diameters? If it's a straight diameter, you might get by with buying a length of pre-dimensioned stock shafting. It doesn't really look that way, but its worth asking. Also, is there any play in the bearings, can you move the shaft by hand? No play, but the bearing on the wheel side is definitely funky and doesn't turn properly and it doesn't want tilt either, which it should do easily since it's a spherical double ball bearing. I got it further disassembled tonight:  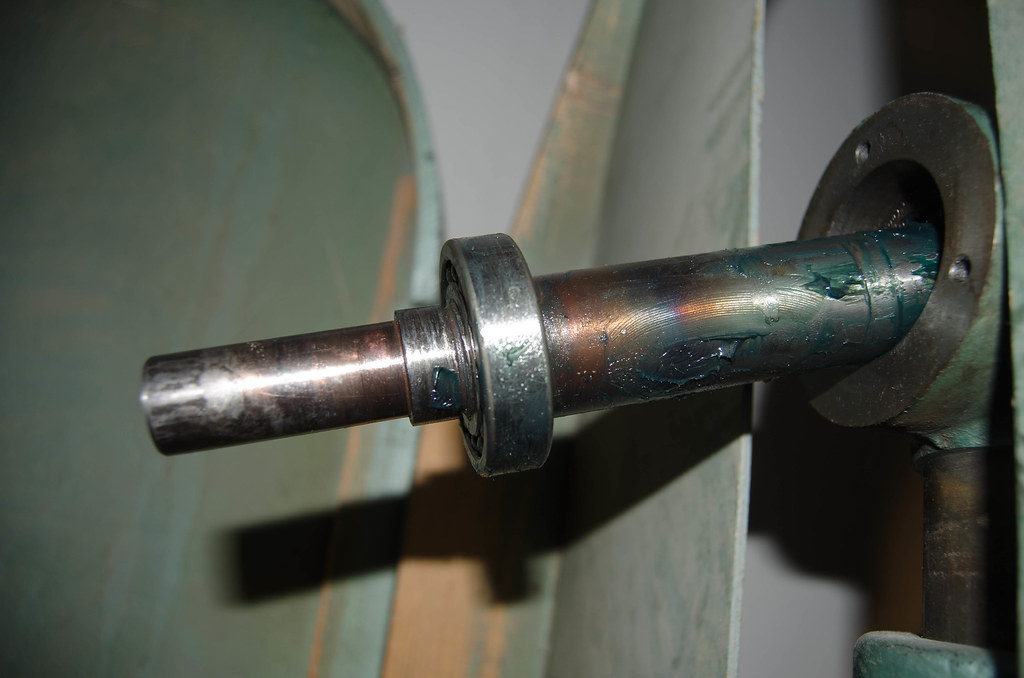 Might just be the funky bearing if I am lucky... now to get it off the shaft. My bearing puller is too big to get in on the collar side and pull the bearing off on that side, and I wasn't able to get it off on the wheel side either, afraid that the bearing would break into pieces so I stopped. I am not sure if the step up in diameter is actually a separate part, perhaps another lock ring like on the rear side, but if so, good luck getting that off since there's no where to grab it properly.
|
|
#
?
Dec 16, 2014 22:35
|
|
|
Nawww, it's almost certainly one piece. By spherical bearing do you mean a dual row spherical bearing? Seems kinda unusual.
|
|
#
?
Dec 17, 2014 05:12
|
|
|
Speaking of bandsaw bearings -- took mine apart and found something --unfamiliar. Apparently they are linear ball bearings although to me it looks like two ball bearings pressed into a sleeve. Linear ball bearings come in standard sizes. I measured mine at ID: 5/8", OD 1-3/16", Length 1-1/2"; but the standard size is 5/8 x 1-1/8 x 1-1/2. That's a 1/8" difference in OD. So if I ever need to replace the bearings, I guess I'll have to shim them?
|
|
#
?
Dec 17, 2014 05:46
|
|
|
Speaking of slippery non-stick melamine, behold the cutting board glue-up doodad.  I'm currently suffering my way through flattening a few endgrain cutting boards with a belt sander, and thought... if these were flatter this would be easier. I think if I did it again I'd reduce the surface area of the melamine, but as it stands currently I was able to glue up an edge grain serving board made out of scraps quite easily. I leave it clamped in the doodad for the 30 mins the bottle recommends, then pull it out, scrape off the squeeze-out with an abused card scraper, and clamp it again freestyle overnight. So far so good!
|
|
#
?
Dec 17, 2014 06:03
|
|
|
Commodore_64 posted:Nawww, it's almost certainly one piece. By spherical bearing do you mean a dual row spherical bearing? Seems kinda unusual. Yeah there's one on each side of the housing, and on the side opposite the wheel, there's a collar the other bearing goes into, the collar can be adjusted up and down via a screw and that way you get a wheel you can tilt, This is an old industrial saw so I think it differs a lot from most modern saws, also swedish made so that might add to it. Wormil, might they be a standard metric size?
|
|
#
?
Dec 17, 2014 08:20
|
|
|
Got one of the bearings off so now I was able to take the axle out, cleaned up the rear bearing which feels and looks good to my eyes: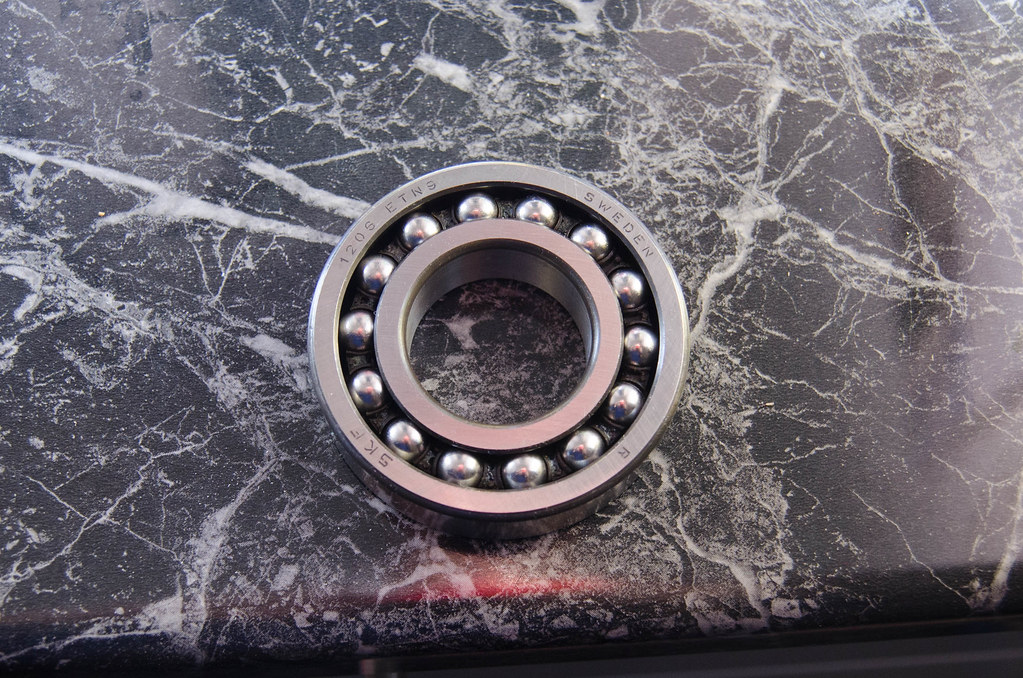 Quite the opposite of the other bearing which I still haven't gotten off, tried the puller again without much luck. Took some close up pictures of the shaft, not very pretty looking in places:   
|
|
#
?
Dec 17, 2014 14:36
|
|
|
You might need some heat to pull that one free.
|
|
#
?
Dec 17, 2014 16:31
|
|

|
Is the bluing on the shaft normal or did it get stupid hot while in operation at some point?
|
|
#
?
Dec 17, 2014 16:50
|
|

|
I don't know, hard to see how it could possibly get that hot even if the bearings where failing utterly. I am wondering if someone tried to flame straighten it, perhaps it was even done at the factory when it was made.
|
|
#
?
Dec 17, 2014 17:03
|
|
|
Also, once you pull a bearing like that using the outer race, you should really replace it anyway. So go nuts and cut that bastard off if you have to. I think your best bet would be to take the shaft to a machinist to get it straightened and sleeved.
|
|
#
?
Dec 17, 2014 17:28
|
|

|
His Divine Shadow posted:
The metric ones were even smaller. The bluing and bent shaft on yours are probably from someone using a torch to try and remove that bearing. I'd replace all those bearings with sealed versions.
|
|
#
?
Dec 17, 2014 17:40
|
|
|
wormil posted:The metric ones were even smaller. Also funny is how clean and fresh the grease was. Maybe they unloaded the thing after trying a quick fix and failing?
|
|
#
?
Dec 17, 2014 18:30
|
|
|
I didn't know the bearings of this type could be sealed even, I dunno if that is required here because they are inside a housing that is completely sealed to the outside. And yeah that bastard of a bearing there has not been working properly. I'd cut it off but I am afraid of damaging the shaft.
His Divine Shadow fucked around with this message at 19:11 on Dec 17, 2014 |
|
#
?
Dec 17, 2014 19:09
|
|
|
The shaft looks pretty buggered already anyway. You could probably force new bearing over that diameter, but it wouldn't be guaranteed to be straight. A machinist would turn down that diameter and press on a sleeve. On the other hand, if you're taking it in, leave the bearing on. That's a two-minute job on a press.
|
|
#
?
Dec 17, 2014 19:23
|
|
|
His Divine Shadow posted:I didn't know the bearings of this type could be sealed even, I dunno if that is required here because they are inside a housing that is completely sealed to the outside. And yeah that bastard of a bearing there has not been working properly. I'd cut it off but I am afraid of damaging the shaft. Is the front one a plain old deep groove ball bearing? That one can be found sealed, probably a 2RS for rubber shield would do. From SKF's site, it looks like the self aligning ball bearings like the one you removed only have seals in sizes starting with 22 or 23, which are like 5mm thicker than the one you have.
|
|
#
?
Dec 17, 2014 20:31
|
|
|
His Divine Shadow posted:I didn't know the bearings of this type could be sealed even, Maybe they can't. I'm not bearing smart once the topic strays from regular ball bearings. I hadn't even heard of linear ball bearings before taking my saw apart.
|
|
#
?
Dec 17, 2014 20:33
|
|
|
Commodore_64 posted:Is the front one a plain old deep groove ball bearing? That one can be found sealed, probably a 2RS for rubber shield would do. From SKF's site, it looks like the self aligning ball bearings like the one you removed only have seals in sizes starting with 22 or 23, which are like 5mm thicker than the one you have. They're both the same type as the one I pictured, two are needed or the shaft can't tilt. I got Jack of English Machines (youtube) helping me right now and he thinks the shaft is worth trying to fix, if it's not, he says it's cheaper to make a new one than sleeving this one. These should be the ones I need: http://www.ebay.ca/itm/1206-ETN9-SKF-/301192455646
|
|
#
?
Dec 17, 2014 21:38
|
|
|
It looks like I will be getting a 14" Rockwell band saw on extended loan. Will be a nice upgrade from my 9". Maybe I can finally cut out some bowl blanks.
|
|
#
?
Dec 18, 2014 21:52
|
|
|
Got the bearing off, had to cut it mostly off with a dremel, then I wedged a piece of metal in there and gave it a tap with a hammer and it split open and came off. Looks pretty buggered, not sure I can get a new bearing to seat straight against that ledge. and I wonder how that groove got worn into it. In other news, I bought a router, from Lidl!  Building a router table for it, got a scissor style car jack that I'll use as a router lift, simplest way really. 
|
|
#
?
Dec 19, 2014 16:55
|
|
|
I'm really curious how good/bad the Lidl router is.
|
|
#
?
Dec 19, 2014 18:48
|
|
|
It's a bit hard for me to say since it's the first time ever I have used a router. It doesn't feel bad to me, the bit set that came with it cut a nice roundover using that bit, it had 10 bits come with it and they look ok to my eyes too. I've had parkside stuff before and it's usually been fine given it's cost.
|
|
#
?
Dec 19, 2014 18:53
|
|
|

|
| # ? Jun 5, 2024 23:53 |
|
|
That shaft is buggered. The coloring really tells the story best though. I doubt that was done at a factory- mainly due to the damage. Do you have a piece of glass or granite you can roll it against? I'm curious if it's actually bent. You could pretty easily sleeve that and TIG weld it on/turn it down. (Well, when I say easy, what I mean is, if you have a machinist buddy close by.)
|
|
#
?
Dec 19, 2014 18:59
|
|