


|
mds2 posted:I made something similar last weekend. I have lovely lighting in my shop so I'm always needing better task lighting. I made this boom arm out of scrap plywood and a rare earth magnet to hold the cheap harbor freight light. I've since mounted my shop vac hose to it which I've been wanting to get up out of the way for a long time. Nice. Harbor Freight clamps, too! Is that a 60's era Craftsman table saw? If so, do you have any sort of blade guard and/or riving knife for it? I have a similar TS and my brother threw away all the safety features long before he gave it to me. I've been looking for aftermarket replacements but haven't had any luck yet.
|
 #
?
Dec 31, 2014 18:34
#
?
Dec 31, 2014 18:34
|
|


|

|
| # ? Jun 3, 2024 19:51 |
|
|
dobbymoodge posted:Nice. Harbor Freight clamps, too! Its the old Craftsman 113.???, but this one was made in the 80's I believe. I bought it from a friend after his dad passed away. It is the cast iron wings one. I dont have any of the safety features for it. I think most people took them off as soon as they got the saws and then lost them. You might look at a Micro-Jig Splitter for an easy safety upgrade to the saw. HF is less than a mile down the road from my house and I LOVE those 6" clamps. I really think they are the best clamps for the money and I grab a couple every time I go in. At $2.99 each they cant be beat. I also grab a free tape measure every time I go there.
|
|
#
?
Dec 31, 2014 18:44
|
|

|
This may make it seem like I've been living under a rock, butmds2 posted:I also grab a free tape measure every time I go there.
|
|
#
?
Dec 31, 2014 18:46
|
|


|
Bad Munki posted:This may make it seem like I've been living under a rock, but Every, or at least most, HF ads have a coupon on the front for a free tape measure, and I never go there without a coupon. mds2 fucked around with this message at 19:05 on Dec 31, 2014 |
|
#
?
Dec 31, 2014 19:00
|
|
|
Yeah. Or that light. I got that free last time I was there. I keep the coupons in the car and pull some free thing out before I go in. No purchase necessary usually.
|
|
#
?
Dec 31, 2014 22:54
|
|


|
CUTTING BOARD CHAT: Since you guys are talking cutting boards, I'll just link to my earlier post about the thingie I made for glueing them up. I haven't used it for an endgrain glueup yet but the edge grain one turned out swell! In this application, even with the slots, glue will stick. You have a LOT of glue lines and, collectively, they hold on pretty good. It's relatively easy to pry off though. I got a used V-Drum sander which I'm looking forward to trying cutting boards out on. I would never dream of putting end grain through my planer - even if you can make it safe, it'll dull your blades in no time at all.
|
|
#
?
Jan 1, 2015 00:50
|
|

|
Obligatory babby's first project pic: Once I got the lumber for the gaming table in the basement, it became clear that I didn't have enough work surfaces for something that large, and I needed a table that is the same height as the table saw. I can use it for an infeed/outfeed/assembly table. So I threw together (in like 6 hours - I measured everything 100 times, I swear and did a lot of head scratching as to what to do next) this table. It came out pretty good, and there's only a couple little niggles that nobody else would probably notice (or care about for a shop table). I built it around a chunk of leftover kitchen countertop that's like 2 inches thick and should be fairly non-stick. I swear 90% of starting out is building OTHER things that help you do projects. But it's fun! 
|
|
#
?
Jan 1, 2015 02:57
|
|
|
Doctor Zero posted:... That never quite goes away. See: endless fields of jigs Bench looks good though, that'll be a nice flat surface. How thick is the skirting? To make clamping easier, you may want to think of adding a lip (or just back it with another piece or 2) inside deep enough to accommodate a normal clamp.
|
|
#
?
Jan 1, 2015 05:59
|
|
|
Guitarchitect posted:CUTTING BOARD CHAT: That's a good idea, I'm gonna make one of those for my next cutting board.
|
|
#
?
Jan 1, 2015 06:00
|
|
|
I restored the brace that we used to tap maple trees when I was a kid. It was my grandfathers and as near as I can figure its about 100 years old. Its a Miller's Falls No. 732 10". The full gallery is here: http://imgur.com/a/MORyy
|
|
#
?
Jan 2, 2015 22:04
|
|

|
Noticing that some posters in here also frequent /r/woodworking, judging by a few project images as of late!  It's a nice reference for cool stuff/ideas. It's a nice reference for cool stuff/ideas.If you don't mind my asking, what did you use to clean up the metal and wood? It looks amazing!
|
|
#
?
Jan 3, 2015 02:46
|
|

|
Had an unexpectedly eventful exchange this morning!  Saw a Craigslist ad last night showing a garage sale about 45 minutes away (starting this morning). The picture of the garage had some planes near the edge of one photo, so I went to check it out. Saw a Craigslist ad last night showing a garage sale about 45 minutes away (starting this morning). The picture of the garage had some planes near the edge of one photo, so I went to check it out.Came out of it with a set of four Marples chisels, two whetstones (one was coarser than what I already have and another was much finer), a #4 plane (can't remember the make off the top of my head), and a #5 Jack Plane (Millers Falls). All of this stuff is pretty old but is in immaculate condition. Guy was selling each item for $10, so I snapped it up. Was expecting to replace my crappy #4, but came out of it with a chisel upgrade (heard good things about Marples), extra whetstones (you never know), and a nice Jack Plane upgrade. All-in-all, a good haul Looking forward to trying this stuff out.That said, I'm leaning toward not even bothering with sharpening the #4 plane's blade. Heard nothing but good stuff about Veritas blades, and I'm tempted to drop $40-50 to get their best one. The alloy sharpens easily and holds the edge incredibly well. Since it's going to be my workhorse, I'll likely treat the girl right. Geop fucked around with this message at 19:34 on Jan 3, 2015 |
|
#
?
Jan 3, 2015 19:30
|
|
|
Geop posted:Had an unexpectedly eventful exchange this morning! Post pics. My Miller Falls #9 is one of my favorites. I don't think blade upgrades are worth it, at least not from what Paul Sellers says about them. Consider making a scrub plane out of one of your older planes if you don't have one already. They are wonderful for hogging off lots of wood quickly and easily.
|
|
#
?
Jan 4, 2015 01:29
|
|

|
yeah I did the peter sellers sharpening thing (sandpaper instead of diamond plates tho) and my cheapass #4 cuts great. would deffo not pay $40 for a blade.
|
|
#
?
Jan 4, 2015 06:01
|
|

|
I'm building a desk using 3 beech butcher block countertops from IKEA. What's a good way to finish these that will be resilient and low maintenance? The instructions call for oiling, but it sounds like with that method I'd have to take everything off and re-oil it every few months, which is a hassle I'd like to avoid. I figure I have a few more options than are normally mentioned for these pieces since I'm not using them for food prep. Clear polyurethane satin is one non-oiling method I've seen recommended a few times. Also, I kind of want to darken the wood significantly to better fit the room the desk will be in, but it sounds like it's tough to get a good result with beech. I'm leaning toward skipping the stain at this point, but if I were to do it, what would be a good technique? I've seen some recommend a pre-stain conditioner, oil based stain, then something else on top of that (polyurethane, waterlox). Others recommend using dye or gel instead with this wood. This will be my first time doing anything like this, so the simpler I can keep this, the better.
|
|
#
?
Jan 5, 2015 03:48
|
|
|
Splinter posted:Words I finish all the desktops I put together with a few coats of wipe on poly. I let the wood soak up as much as possible with the first coat then wipe off any excess with a clean rag. After the second coat I lightly sand between each coat with 220 grit sandpaper. Usually do 4 coats then finish it off with some Johnson's paste wax. Gives me pretty good results. All of my tops have been veneered plywood with hardwood edging though so your results may vary.
|
|
#
?
Jan 5, 2015 05:56
|
|

|
Geop posted:Noticing that some posters in here also frequent /r/woodworking, judging by a few project images as of late! I don't mind at all. Sorry I'm late to replying however. Here was my process: 1. Scrubbed with krud cutter and paper towels to remove gunk. This failed miserably due to the condition of the brace. 2. Soaked the pieces in krud cutter for a few hours and brushed with wire brush. This worked better, but still wasn't terribly effective 3. Soaked the pieces in CLR and brushed with wire brush. This worked well. I repeated this process 3 or 4 times on the parts I could disassemble. 4. Used CLR full strength and scrubbed the sweep with Scotch Brite pads. Tons of elbow grease involved, but this got rid of a ton of the rust. 5. Dried everything out 6. I sanded the sweep and the handles. I started at 80 grit, then 220 to remove the rest of what I could of the rust. There was a ton of pitting that I can't get rid of, but that's OK. I don't need 'like new'. 7. I did several coats of Danish Oil on the sweep handle and the knob. I didn't touch the metal during this process. After 6 coats of the oil, I did 3 coats of paste wax. 8. I clamped the brace to a bench (I dont have a vice, and my 'bench' is a kitchen counter that lives in my basement). I cut strips of sandpaper (starting at 400 grit) about 1/2" wide and 6" long. Using a 'shoeshine' motion, I sanded the sweep. 9. Repeat step 8 with 1000 grit 10. I applied a few drops of 3-in-1 oil to the metal and using the same process from step 8, I wet sanded with 2000 grit until I got things nice and shiny. 11. I oiled all the mechanisms and then did a very light coat of wax over the whole piece. Then I buffed everything out with a terry cloth.
|
|
#
?
Jan 5, 2015 13:53
|
|
|
mds2 posted:Its the old Craftsman 113.???, but this one was made in the 80's I believe. I bought it from a friend after his dad passed away. It is the cast iron wings one. I dont have any of the safety features for it. I think most people took them off as soon as they got the saws and then lost them. You might look at a Micro-Jig Splitter for an easy safety upgrade to the saw. Yeah, mine is a 113.242820, which is AFAICT identical to 113.24280; cast-iron wings on mine. Do you have any problems with the blade angle shifting when raising/lowering? I keep getting non-square cuts after painstakingly setting the angle at full height, and so the other day I tested setting the angle then lowering the blade, and it definitely changes the angle. I don't see any damage to the height adjustment screw, so I'm at a loss to what could cause this. I also have my dad's old 103.21041 - King-Seeley build, not as pretty as the one in these pictures: http://vintagemachinery.org/photoindex/detail.aspx?id=16708 I know the King-Seeley stuff is supposed to be worse than the Emerson-built units, but I'm on the verge of cleaning this one up to see if it's a better performer. I think the wings from the 113 should work on it...
|
|
#
?
Jan 5, 2015 18:07
|
|
|
I have that 80's craftsman and have always found it kind of a pain in the rear end to get real accurate cuts. I'm trying to decide if I want to save up for a fence upgrade or a new saw. It would be so nice to use something with a fence that didn't rack a little bit ever time you clamped it down. I always spend ages measuring from the miter slot at the front and the back making sure things are actually aligned correctly.
|
|
#
?
Jan 5, 2015 18:25
|
|

|
swampface posted:I have that 80's craftsman and have always found it kind of a pain in the rear end to get real accurate cuts. I'm trying to decide if I want to save up for a fence upgrade or a new saw. It would be so nice to use something with a fence that didn't rack a little bit ever time you clamped it down. I always spend ages measuring from the miter slot at the front and the back making sure things are actually aligned correctly. Rock on, wobble-blade triple-checking buddy. We should start a support group.  
|
|
#
?
Jan 5, 2015 21:09
|
|
|
swampface posted:I have that 80's craftsman and have always found it kind of a pain in the rear end to get real accurate cuts. I'm trying to decide if I want to save up for a fence upgrade or a new saw. It would be so nice to use something with a fence that didn't rack a little bit ever time you clamped it down. I always spend ages measuring from the miter slot at the front and the back making sure things are actually aligned correctly. We have one of these in our barn. The best thing I ever did for it was buy a cheap harbor freight accu-link belt for it. Before the saw just vibrated everywhere, now it's quiet and smooth running. I put a cheap $40 Irwin Marples blade on it and it's my go to rip saw for rough lumber. I do have to agree- I HATE the fence on it. I have seen people retrofit nice fences, but honestly at $200-300 for a nice fence, I can find a used Delta Unisaw for $400 if I keep my eye out that's much better built.
|
|
#
?
Jan 5, 2015 21:27
|
|
|
dobbymoodge posted:Yeah, mine is a 113.242820, which is AFAICT identical to 113.24280; cast-iron wings on mine. Do you have any problems with the blade angle shifting when raising/lowering? I keep getting non-square cuts after painstakingly setting the angle at full height, and so the other day I tested setting the angle then lowering the blade, and it definitely changes the angle. I don't see any damage to the height adjustment screw, so I'm at a loss to what could cause this. I've had the saw about 3 1/2 years and never had any problems with mine changing the blade angle or being out of alignment in any way. I imagine I am just really lucky though. I do agree that the fence is a piece of poo poo, but it works for me. As mentioned above you can get a really good fence for $200-300, but I'd just buy a new saw if I ever thought about putting that much money into this one. I took my saw completely apart a couple years ago and thoroughly cleaned everything. That helped a ton.
|
|
#
?
Jan 5, 2015 21:42
|
|
|
In my house, I have two rooms that used to be one room. It was spatially divided similar to this But at some point in the past that space was framed and drywalled to make two rooms. Since the rest of my walls are lath and plaster, I want to take advantage of the stud and drywall there to make some bookshelves. The shelves will be supported partially by ledger strips attached to the studs, giving support on the back edge for the entire length of each shelf. This is what I have so far, conceptually:  I want to have uprights on the ends and in the middle with grooves cut to support the shelves, but I don't know what I would attach the uprights to and how. Ideas?
|
|
#
?
Jan 6, 2015 02:03
|
|


|
the spyder posted:We have one of these in our barn. The best thing I ever did for it was buy a cheap harbor freight accu-link belt for it. Before the saw just vibrated everywhere, now it's quiet and smooth running. I put a cheap $40 Irwin Marples blade on it and it's my go to rip saw for rough lumber. I do have to agree- I HATE the fence on it. I have seen people retrofit nice fences, but honestly at $200-300 for a nice fence, I can find a used Delta Unisaw for $400 if I keep my eye out that's much better built. The fence is pretty crappy, but there is some tuning that can be done on it. I hold a big speed square against the far end while I clamp down the handle and that helps a bit. As for my blade alignment woes, I wonder if this could help? http://in-lineindustries.com/products/contractor-saw-pals/ Anyone have experience with the PALS stuff?
|
|
#
?
Jan 6, 2015 18:05
|
|
|
Woodworker folks, I come to you from metal land with a request for feedback on something I am making. I need a gift box to hold a steel rose, but I couldn't find something with the right dimensions (long and narrow like a wine bottle) so instead I've settled on picking up some thin(ish) Basswood sheets and gluing them together into a box. Should I add any reinforcement on the joints beside glue, such as micro-tacks? I was planning to clad the exterior of the corners in copper sheet to add some contrast to the wood, would that be sufficient support? Since the wood is quite thin hinges will be out of the question, so for the lid I was thinking of adding two small rectangles inside on either end that will prevent it from sliding off and add a bit of tension? Finally, not sure if I should varnish the exterior or leave it raw, as I understand Basswood is quite prone to dents and scratches? Any advice would be much appreciated, I haven't worked with wood in about eleven years.
|
|
#
?
Jan 6, 2015 21:00
|
|

|
Silly question, would a wine bottle box work?
|
|
#
?
Jan 6, 2015 21:52
|
|


|
Can't find anything locally that isn't too wide or heavily branded.
|
|
#
?
Jan 6, 2015 22:03
|
|
|
Basswood isn't as soft as balsa but it's still pretty soft. I use it for models and prototypes but I don't think it would be good untreated for a nice box if you wanted it to last. I don't even know how it would take a finish TBQH. Maybe go to a hobby/train/crafts store and get a small piece to experiment on? It does have the advantage of being pretty inexpensive and light.
|
|
#
?
Jan 7, 2015 04:40
|
|
|
Doctor Zero posted:Basswood isn't as soft as balsa but it's still pretty soft. I use it for models and prototypes but I don't think it would be good untreated for a nice box if you wanted it to last. I don't even know how it would take a finish TBQH. Maybe go to a hobby/train/crafts store and get a small piece to experiment on? It does have the advantage of being pretty inexpensive and light. Don't people make guitars out of it? It must be OK at taking some kind of finish... Here's a quick video from a few weeks ago on how to make a wine box: http://youtu.be/-QXnu_mUcPc Jimmy Diresta also has some recent videos where he makes wine and bourbon boxes I think too. Squibbles fucked around with this message at 05:35 on Jan 7, 2015 |
|
#
?
Jan 7, 2015 05:29
|
|

|
Rime posted:Can't find anything locally that isn't too wide or heavily branded. I only checked Amazon but if the shape isn't right I understand it'll look awkward.
|
|
#
?
Jan 7, 2015 07:11
|
|
|
I picked up some 1/4" thick Basswood sheets from my local art supplier, and it seems like it's got exactly the properties I'm looking for. (research indicates water based poly will protect it from damage without altering the blonde coloration). I'll post the finished product assuming it doesn't look horrible. ")
|
|
#
?
Jan 7, 2015 07:15
|
|
|
Built a workbench this last week and I am in the process of making drawers for it. I will make two more rows of drawers in the empty space there's left, got a better design too in mind for that. Also larger drawers that'll be on wheels on the floor itself, like the kind you'd have under the bed. I sorted though several crates of crap and got much better organization already with these drawers and bench to work on. Need some more french cleats around this bench though for hanging tools and stuff. There's just so much stuff to hang up and organize, I didn't know I owned this much crap...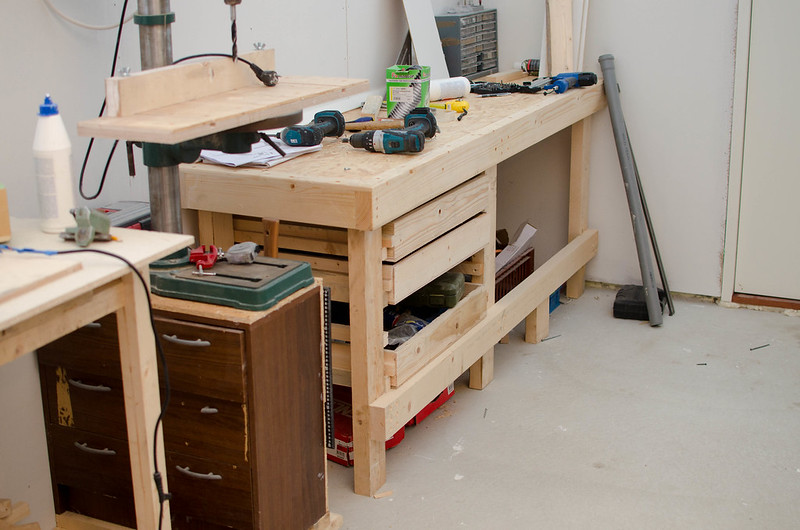 Oh and I want to put a leg vise through the leg thats nearest to the camera, and close up the side so dust won't get in there. Behind that grey plastic pipe I got a trapeze thread and nut (metric acme equivalent) for said purpose. Also built a mobile cabinet for my drill press from an old drawer, put a lumber frame in the bottom and some OSB on it to beef it up. Also used OSB on the top of the workbench, I think it looks sorta neat, I'd like to varnish it until it's smooth to the touch. 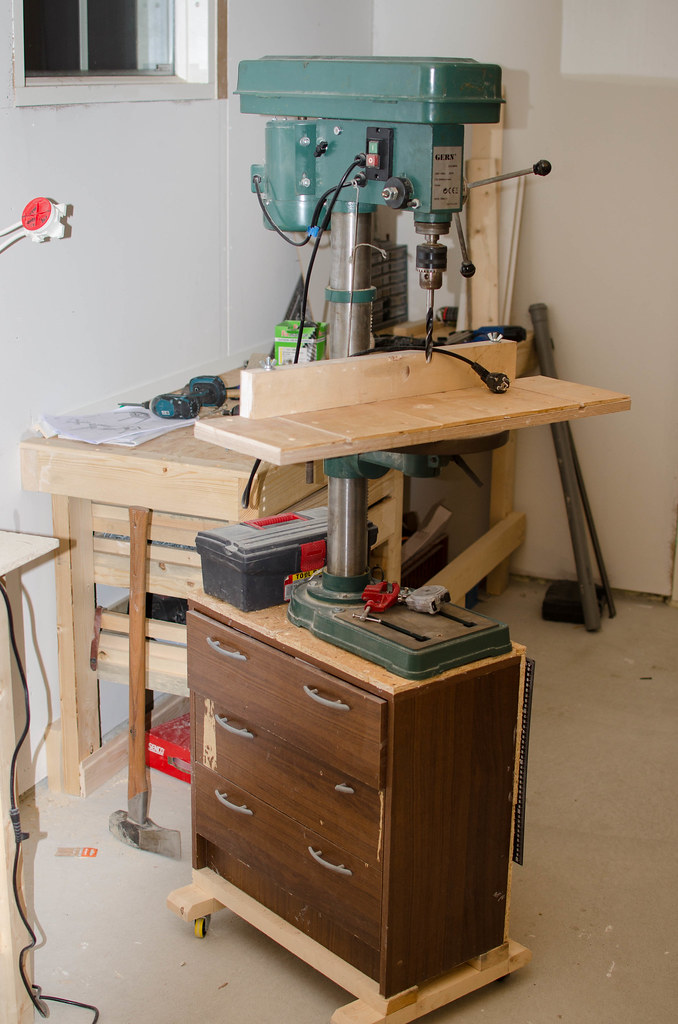
|
|
#
?
Jan 7, 2015 22:48
|
|

|
Finished the joinery on my nightstand. Still need to do a bit of planing to flush things up and clean up some edges, then on to scraping, sanding and finishing. Everything is solid cherry, including the back and the drawer bottom, I did so much resawing on my bandsaw, I really put it to work. I've got a few finish test pieces on the go, I'm leaning towards a few coats of garnet shellac, but I'll know for sure in a couple days.  
|
|
#
?
Jan 9, 2015 02:48
|
|
|
Meow Meow Meow posted:Finished the joinery on my nightstand. Still need to do a bit of planing to flush things up and clean up some edges, then on to scraping, sanding and finishing. Everything is solid cherry, including the back and the drawer bottom, I did so much resawing on my bandsaw, I really put it to work. I've got a few finish test pieces on the go, I'm leaning towards a few coats of garnet shellac, but I'll know for sure in a couple days. Really nice.
|
|
#
?
Jan 9, 2015 02:53
|
|

|
Dude, great job on that.
|
|
#
?
Jan 9, 2015 03:49
|
|
|
Meow Meow Meow posted:Finished the joinery on my nightstand. Still need to do a bit of planing to flush things up and clean up some edges, then on to scraping, sanding and finishing. Everything is solid cherry, including the back and the drawer bottom, I did so much resawing on my bandsaw, I really put it to work. I've got a few finish test pieces on the go, I'm leaning towards a few coats of garnet shellac, but I'll know for sure in a couple days. That's some great work.
|
|
#
?
Jan 9, 2015 17:50
|
|
|
I'm on a roll with the shop made tooling this week. And finally I got power hooked up in the shop, no more having to draw extension cords all around the floor! Built a new and improved fence for my 8" jointer/planer, this one is much more sturdy and adjustable:   I've actually been giving some thought to the jointer guard, if I should use the euro style or make a pork chop. The jointer is made for a euro style and I got an arm assembly, but parts missing and rusted shut in other ways. Would be simpler to make a pork chop. It might be more suitable for my way or working since the euro style is meant to be used with your hands and I have developed a habit of using push blocks... Then I made something that wasn't as hard as I thought it would be, I made a new fence for my sliding table, basically this means I can keep my tablesaw oriented this way which takes up less space and I have found it's more useful in this configuration, the old fence stuck out twice as long as the current one so I always had to take it on and off.  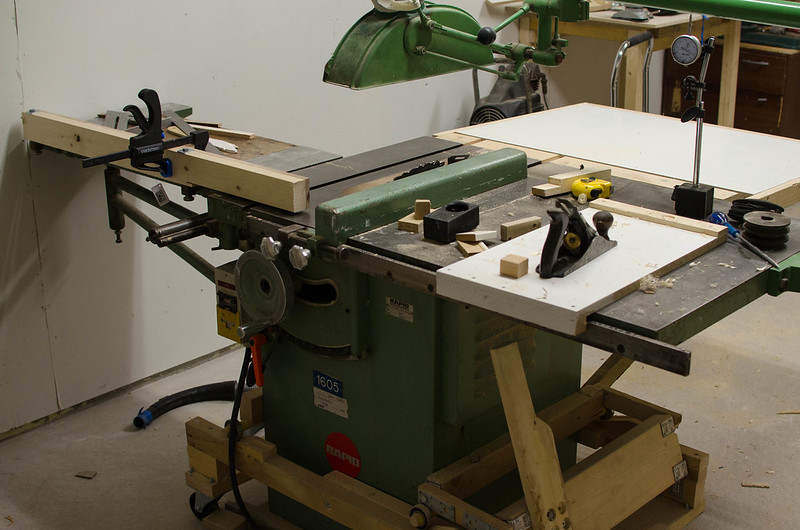  I wonder if I could make a screw advance stop block that would clamp onto this, an improvised wandel style box joint jig.
|
|
#
?
Jan 9, 2015 23:18
|
|
|
I envy your sliding table but that dust collector arm seems excessively long.
|
|
#
?
Jan 10, 2015 00:22
|
|
|
It's how it came from the factory some 40 years ago, the arm doesn't work as a DC though, it's too narrow. When I get a proper DC hooked up I will just have a pipe in the ceiling and drop down a flexible hose onto the guard. I am not sure I will keep using it, I don't use it most of the time infact. It's a bit big and clunky and I feel it just gets in the way of my push sticks and I can't see what's happening. I kind of want to make a narrower and leaner guard from lexan and wood like this: http://www.swedishwoodworking.com/articles/table-saw-blade-guard/
|
|
#
?
Jan 10, 2015 00:31
|
|
|

|
| # ? Jun 3, 2024 19:51 |
|
|
Quick wood finishing question: I just applied the first coat of wipe on clear poly on top of 2 coats of stain. The cloth I used to apply the poly darkened a bit during the process, like it picked up some color from the stain. Is that bad? Does that mean the stain wasn't given sufficient time to cure, or is that expected?
|
|
#
?
Jan 12, 2015 09:10
|
|