


|
If its that humid I'd just work on venting the workshop initially.
|
 #
?
Apr 22, 2015 13:59
#
?
Apr 22, 2015 13:59
|
|


|

|
| # ? Jun 4, 2024 20:15 |
|
|
I am building babby's first picture frame and it is actually going quite well. I would like it to continue going well , of course, and I would like the thing to last well into the future. I'm framing a reprint of an old map printed on italian paper 70 x 50 cm. The frame is made of some rather thick oak stock I had laying around (1.5" wide, 3/4" thick) with a 1/4" rabbet for mounting the transparent layer. What would you all recommend using for the transparent layer? I wanted to use lexan or something but the possibility that windex is used to clean it at some point down the road is pretty high so I would prefer glass. Would this be ridiculously heavy? The miters are being clamped for 24 hours at the moment and I am considering using either a half-lap or metallic miter fastening joints to reinforce the miters. Any opinions on that should I go with glass? And once I have the glass, map, and backer material mounted I was planning on using glazier's points to hold everything in place. Is there some optimal number of these to use to keep things safe and stable or some other preferred method? This is intended to be a gift for someone.
|
|
#
?
Apr 22, 2015 19:34
|
|

|
Kudaros posted:I am building babby's first picture frame and it is actually going quite well. I would like it to continue going well , of course, and I would like the thing to last well into the future. I'm framing a reprint of an old map printed on italian paper 70 x 50 cm. The frame is made of some rather thick oak stock I had laying around (1.5" wide, 3/4" thick) with a 1/4" rabbet for mounting the transparent layer. What would you all recommend using for the transparent layer? I wanted to use lexan or something but the possibility that windex is used to clean it at some point down the road is pretty high so I would prefer glass. Would this be ridiculously heavy? Given the size, I would definitely use plexiglass. Honestly though I use plexiglass for basically all of the framing I do now. It is much lighter, and it won't break like glass will under any number of situations. There are specific framing grade plexiglass options out there which are basically more optically clear than the stuff you would buy for windows. Edit: You want to use 1/8" thick plexi at least though at that size, anything thinner and it might not remain flat once you package the whole thing up.
|
|
#
?
Apr 22, 2015 19:50
|
|

|
Cakefool posted:If its that humid I'd just work on venting the workshop initially. Thanks for the tips. I'll see if the garage window can open, maybe I can put a fan there or something
|
|
#
?
Apr 23, 2015 01:04
|
|

|
Turned the knobs for the dresser yesterday. 
|
|
#
?
Apr 26, 2015 01:40
|
|

|
Been making sawdust and planer shavings, reusing old construction lumber and other scraps when building a couple of adirondack style chairs. Some of it requires a lot of resawing and planing. I really wish I had a dust collector now, the vacuum (blue and green thing) can't keep up with the saw and just sucks around where the hose lies. I think it would do OK with the planer but I need to build some hoods for it. Also this jointer/planer might be small and the vertical planing capacity is pitiful, but it does plane without any snipe whatsoever. I don't think I will be getting rid of this machine any time soon, small though it is. Maybe complement it with a lunch box planer. The biggest weakness is the aluminum top, it gets worn with time and spruce is quite hard on it, I know of one person here who built a reproduction small viking longboat using a jointer with cast aluminum and it wore a groove in its center. The fix was to machine it down and put on steel sheets as a new and more durable top. I plane a lot of spruce as well and I suspect I will have to do this someday myself. Unless there's some vintage cast iron deal I can't turn down. 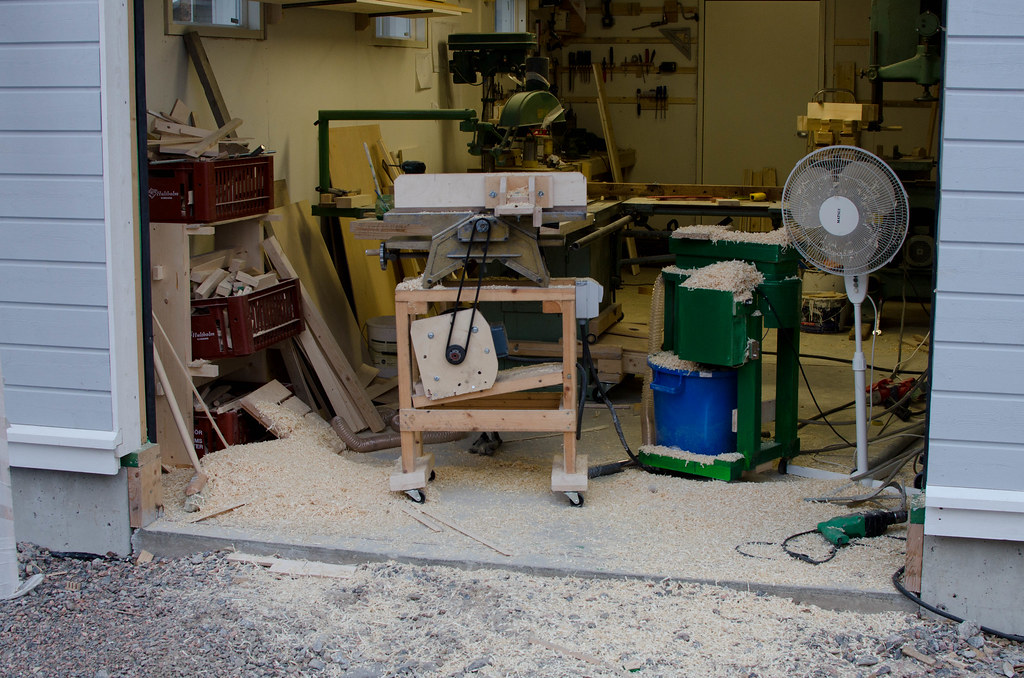 Most of the parts cut, enough for two chairs, was hoping to assemble outdoors today, but rain  
|
|
#
?
Apr 26, 2015 07:56
|
|

|
I wanted to do an Adirondack chair sometime. What did you use for plans? They sell full size paper plans and plans with pre-cut templates. Either one is tempting given the curves.
|
|
#
?
Apr 26, 2015 14:33
|
|

|
asdf32 posted:I wanted to do an Adirondack chair sometime. I built two folding Adirondack chairs using plans from Lee Valley several years ago. They're awesome and very comfortable. The only complaint I've heard is they're a little narrow , so I remedied that by taking a little bit off the inside of the arms of the chair. The next set I build I might make a little wider. I cut out the plans a little oversized, then then glued them to hardboard and used the bandsaw to cut to the lines. Since I was making two, I stacked up the boards, taping them together with double stick tape, and then cut out the parts. I bought a Rigid oscillating drum/belt sander to sand everything down. Since they fold, they're actually pretty easy to store for the worst part of the winter.
|
|
#
?
Apr 26, 2015 14:44
|
|


|
asdf32 posted:I wanted to do an Adirondack chair sometime. I got the plans from woodgears.ca, figured I'd get them when I bought the dust collector plans. I liked that they had less recline than a proper adirondack chair. EDIT: Also made a wooden grip for this bevel gauge, piece of birch with varnish on it, much nicer looking than the old aluminum grip it came with, the knob needs some varnish too:  He also has a free version, though I bought the improved plans while I was at it. I might be making several for my relatives from the sound of it too.... vvvv His Divine Shadow fucked around with this message at 16:40 on Apr 26, 2015 |
|
#
?
Apr 26, 2015 16:01
|
|
|
There are dozens of free Adirondack chair plans, I would check those before buying.
|
|
#
?
Apr 26, 2015 16:29
|
|

|
wormil posted:There are dozens of free Adirondack chair plans, I would check those before buying. Steve Ramsay has free ones, for instance http://woodworking.formeremortals.net/2014/07/build-an-adirondack-chair-limited-tools-project/
|
|
#
?
Apr 26, 2015 16:42
|
|

|
wormil posted:There are dozens of free Adirondack chair plans, I would check those before buying. Life sized printouts are probably worth $5-$10 I think.
|
|
#
?
Apr 26, 2015 21:39
|
|
|
I need a bigger garbage bin. This is just from this week.   One side is flat, the other has about 1/8" of twist remaining.
|
|
#
?
Apr 26, 2015 21:42
|
|

|
oxbrain posted:I need a bigger garbage bin. This is just from this week. You need a fire pit, it's very relaxing to sit beside on a cold night. Those also look like they might be the right size for a smoker, assuming they are food grade wood chips.
|
|
#
?
Apr 27, 2015 02:07
|
|
|
Crotch Fruit posted:You need a fire pit Wood chips from the shop make the absolute best fire starter, hands down. Just pile that poo poo on there and get a flame anywhere near it.
|
|
#
?
Apr 27, 2015 02:14
|
|


|
Bad Munki posted:Wood chips from the shop make the absolute best fire starter, hands down. Just pile that poo poo on there and get a flame anywhere near it. And this kind of thing is why you should have a fire extinguisher in your workshop.
|
|
#
?
Apr 27, 2015 02:54
|
|

|
Or at least a couple packs of hot dogs.
|
|
#
?
Apr 27, 2015 02:59
|
|
|
What times are these when we look to someone besides Norm for Adirondack plans. And they don't even cost money anymore. http://www.popularwoodworking.com/wp-content/uploads/August_05_Norms_Adirondack.pdf
|
|
#
?
Apr 27, 2015 06:55
|
|
|
I did find a buncha free designs and plans online, but I went with the ones I did because I liked the way they looked more than the traditional style of Norms chairs. And the plans are perhaps the most comprehensive ones I've seen, with 1:1 printouts, good guides, cut lists, video and even a sketchup 3d model. So I'm pretty satisfied with my choice, now if there's no rain today... I probably still won't get anything done as I started working on the bandsaw last night again.....
|
|
#
?
Apr 27, 2015 08:27
|
|
|
 Aaaand done, Did the finishing touches with an soldering iron and bit of blowtorch to the face. Tried to make it look like wormholes and hell, i like it.
|
|
#
?
Apr 27, 2015 14:27
|
|

|
My sister and I are doing a serving tray for my mom for Mother's day. She's finishing it, I'm building it. It's Red Oak with a birch base, just the standard home depot boards. I still have the final sanding and filling to do, but I'm fairly happy with the results. I initially was going to do dovetail joints, but my practice run with those didn't look great, and I don't have the time to gently caress around, as I'm trying to get this to my sister so she can stain it this weekend. She's planning on putting a doily (the lace napkin thing) in the tray and using resin to encase it. This is also the second time I've used my table saw since running my hand into the blade 3 years ago. Safety first! I've obviously got a lot to learn, but I'd really like to take this up as a more serious hobby. Ideally I'd like to do the checkerboard endgrain cutting boards that have been in this thread as christmas presents, which seems like it would be a good semi challenging starter project. AFewBricksShy fucked around with this message at 14:47 on Apr 27, 2015 |
|
#
?
Apr 27, 2015 14:40
|
|


|
His Divine Shadow posted:I did find a buncha free designs and plans online, but I went with the ones I did because I liked the way they looked more than the traditional style of Norms chairs. And the plans are perhaps the most comprehensive ones I've seen, with 1:1 printouts, good guides, cut lists, video and even a sketchup 3d model. I prefer traditional myself, lighter and simpler. Whats up with the bandsaw, still working on bearings?
|
|
#
?
Apr 27, 2015 16:34
|
|
|
wormil posted:Whats up with the bandsaw, still working on bearings? Nah it's a buncha "improvements" I am doing to it. I've added some additional enclosure under the table as it used to be open and spewed fine sawdust everywhere. Also a port for my shopvac. Going to add something to the door to cover up the gap, and close it up elsewhere as well.  Just held on with strong magnets. Also the lower guides are real primitive, not even a thrust bearing, and they sit really, really low. So I made a riser block from wood and mounted the guides on that. I did get it done today and I think it improved the blades tracking noticeably. Adding a thrust bearing will be a later project. That whole block of wood should be replaced and the grain oriented the other direction, and preferrably no pith, but it was an experiment to see how it would fare.  And since that worked I started on the chairs  with the time it took to get the bandsaw running, dinner and various "twinterruptions" I got the sides done today, definitely making a jig if I'll make more than these two chairs.  Started to cut dados in the back stringers, this is how I do it since my saw can't take a dado blade. And frankly I don't miss the ability to take a dado at all, never turned out be as useful as I thought, nibbling away with a flat topped rip blade works real well.  Produces a perfectly fine dado, 2cm deep exactly (checked with caliper): 
|
|
#
?
Apr 27, 2015 20:08
|
|
|
Even after 15+ years I never got around to buying a dado blade so you aren't missing much. Since I build one thing at a time and many of those things do not have dadoes or grooves, it was never a priority. And after building the box joint jig for a single blade, not sure I'll ever get around to buying a dado blade unless I decide to build some cabinets.
|
|
#
?
Apr 27, 2015 20:47
|
|
|
My grandpa : "bah, I never needed one of those dodo blades. And I supported a family of six with nothing but my table saw and router". Here he is in his 93rd birthday yesterday: https://instagram.com/p/18KqS5FSKc/
|
|
#
?
Apr 27, 2015 21:23
|
|

|
Beginner question: to do that dado do you just set up the fence so with the wood against the fence it cuts 2cm in, then move the piece down your guide by hand (rather than moving the fence I mean)?
|
|
#
?
Apr 28, 2015 07:11
|
|
|
I set up the fence so it's at the maximum width I want the dado (this was more than 2cm wide though, the depth of the dado was 2cm and I set that with a calipers depth gauge), then I just start hogging it out, going back and forth. For a dado in the middle of a piece I'd set up stops on both sides, if the piece was short enough. Otherwise I'd just have to be careful and follow the markings.
|
|
#
?
Apr 28, 2015 08:11
|
|
|
Okay thanks.
|
|
#
?
Apr 28, 2015 08:22
|
|
|
Cakefool posted:Beginner question: to do that dado do you just set up the fence so with the wood against the fence it cuts 2cm in, then move the piece down your guide by hand (rather than moving the fence I mean)? If the piece isn't too long, you can stand it up and cut it once with a tenon jig, then lay it down and remove the waste using the miter gauge. A lot quicker if you have several to do.
|
|
#
?
Apr 28, 2015 18:58
|
|
|
Squibbles posted:I just got a bunch of cheap tropical hardwood (Indonesian "Mahogany") but it seems to be rather wet from the guy storing it outside for an unknown amount of time. It was at least stacked with spaces between the boards spacers between the layers and I've stacked it that way in my garage now too. Doesn't look like any mahogany I've ever seen, but it's pretty looking. Hopefully you've stickered it with a neutral spacer so the lumber won't be stained or discolored by the spacers. I forget the rule for air drying, something like a year per inch thickness, but who knows how long it's already sat. e. also what bimmian said. With a humid climate, maybe the best air-drying you'll get is 12-15%? just guessing.
|
|
#
?
Apr 28, 2015 23:31
|
|


|
Mr. Mambold posted:Doesn't look like any mahogany I've ever seen, but it's pretty looking. Hopefully you've stickered it with a neutral spacer so the lumber won't be stained or discolored by the spacers. I forget the rule for air drying, something like a year per inch thickness, but who knows how long it's already sat. Yeah I googled Indonesian mahogany and it's usually just a euphemism for some kind of random tropical hard wood I think. I got a cheap moisture meter at Lee valley and it measured the outside of some of those boards at around 40%. That might just be the max it can show though. Oh and for spacers I'm using some generic plywood and some coated scraps from old IKEA shelves. When I get some time I'm going to cut the shelves narrower since they are about 6" wide right now and use more spacers in general since right now I only have two per layer. I'm reading a book about wood in general right now and just finished the section on drying so that's been helpful too. I was amused to see that book is the source of the 'yep it's wood' photo showing a guy inspecting a chunk of wood with an eye magnifier. http://knowyourmeme.com/memes/identifying-wood Pretty good book: http://www.amazon.com/Understanding...30266156&sr=1-2 Squibbles fucked around with this message at 01:10 on Apr 29, 2015 |
|
#
?
Apr 29, 2015 01:06
|
|
|
Made one chair now, I was going to buy outdoors wood oil with brown pigmentation to give it a slightly darker look, but I was thinking, I got BLO here, and I read it's a good oil for outdoor use, and I got stain, why not mix the oil and some stain and get a similar result? Anything obviously wrong with my reasoning?
|
|
#
?
Apr 29, 2015 11:12
|
|
|
His Divine Shadow posted:Made one chair now, I was going to buy outdoors wood oil with brown pigmentation to give it a slightly darker look, but I was thinking, I got BLO here, and I read it's a good oil for outdoor use, and I got stain, why not mix the oil and some stain and get a similar result? Anything obviously wrong with my reasoning? I've never tried such a thing, but curious how it turns out. Test on scrap first!
|
|
#
?
Apr 29, 2015 12:28
|
|
|
His Divine Shadow posted:Made one chair now, I was going to buy outdoors wood oil with brown pigmentation to give it a slightly darker look, but I was thinking, I got BLO here, and I read it's a good oil for outdoor use, and I got stain, why not mix the oil and some stain and get a similar result? Anything obviously wrong with my reasoning? I'd think you'll be good as long as the stain isn't water based.
|
|
#
?
Apr 29, 2015 13:41
|
|
|
Well with the alkyd based stain I got it didn't work at all, might as well have used pure BLO on the test pieces. Powdered stain might work, but I think I'll just go buy a can of outdoors oil with a brown tint.
|
|
#
?
Apr 29, 2015 19:28
|
|
|
Well, after 78 years of woodworking grandpa had his first table saw accident. His thumb is a bit shorter today. Stay safe everyone!
|
|
#
?
Apr 29, 2015 20:06
|
|
|
That sucks, was it really bad or relatively minor (well, as far as tablesaw cutting injuries go anyway)? 78 years, that's nuts. Finished up the dresser, aside from fitting the back. Turned the knobs from some quartersawn walnut I've been drying a couple years now. It was from the stock left on either side of the pith when you slab off a bowl blank. Came in handy. Bit of a relief to have this done.      
|
|
#
?
Apr 29, 2015 23:00
|
|
|
drat, nice job. That's gorgeous.
|
|
#
?
Apr 29, 2015 23:01
|
|


|
How much do you charge for something like that? Or is it a labour of love?
|
|
#
?
Apr 29, 2015 23:09
|
|
|

|
| # ? Jun 4, 2024 20:15 |
|
|
mds2 posted:Well, after 78 years of woodworking grandpa had his first table saw accident. His thumb is a bit shorter today. He can probably tell you stories of 60-70 years ago when power saws, especially circular saws were coming in vogue and fingers were flying left, right and off. Helluva note.
|
|
#
?
Apr 30, 2015 00:40
|
|