


|
Anyone know the name of that mold you can warm up, press stuff into, and then make green stuff casts? I seen posts about it a long way back and seem to remember it also being reusable and easy to make 2 part molds with it but can't find worth a drat.
|
 #
?
May 22, 2015 16:39
#
?
May 22, 2015 16:39
|
|

|

|
| # ? May 9, 2024 20:24 |
|
|
Instant Mold, loads of ebay sellers have it.
|
|
#
?
May 22, 2015 16:41
|
|

|
Oyumaru - http://www.metalclay.co.uk/oyumaru-instant-mold-moulding-compound/ (there's a bunch of versions, not sure which is the best for you)
|
|
#
?
May 22, 2015 16:41
|
|

|
There is another brand of this (warstore sells it or use to at least) but here is a similar product: http://shop.greenstuffworld.com/making-mold-material/blue-stuff-mold-4-bars
|
|
#
?
May 22, 2015 16:42
|
|
|
nesbit37 posted:There is another brand of this (warstore sells it or use to at least) but here is a similar product: That's really cool, I could imagine just using more of that same material cast pieces. Or greenstuff, I guess.
|
|
#
?
May 22, 2015 19:12
|
|
|
My locall shop only has GW primer so I am stopping by to ask the preferred primer of painters Here for plastics. I heard good things about rustoleum, anyone else have ideas? There aren't aNY other hobby shoppes round these parts.
|
|
#
?
May 23, 2015 04:03
|
|
|
Rustoleum has been my go to for years, especially the rust-colored primer for my Ork vehicles.
|
|
#
?
May 23, 2015 04:15
|
|

|
Rustoleum is fine but it sometimes goes on fairly thick in my experience so you have to be ginger with it. Krylon rules.
|
|
#
?
May 23, 2015 06:25
|
|

|
Doctor Borris posted:My locall shop only has GW primer so I am stopping by to ask the preferred primer of painters Here for plastics. I heard good things about rustoleum, anyone else have ideas? There aren't aNY other hobby shoppes round these parts. You're going to the wrong shop. Go to a DIY shop/home centre, not a hobby shop. Pick up spray primer there. It will be cheaper and better.
|
|
#
?
May 23, 2015 08:47
|
|

|
Dont ever buy spray primer from a diy shop. Thats the poo poo people spray on fence panels and you'll ruin models with that stuff. You just want a decent can of flat black/grey non alcoholic paint.
|
|
#
?
May 23, 2015 11:18
|
|

|
Works fine for me, that's where I got rust-oleum grey rattlecan primer from before I started painting bones and not needing it any more. Definitely better than GW.
|
|
#
?
May 23, 2015 11:40
|
|
|
Before I got an airbrush, I was using the Rustoleum "camo" paint, the stuff that dries dead flat and comes in various colors (black, khaki, olive drab, etc.), but since I got the airbrush I've been using Vallejo and AK Interactive primers (also want to try out some Ammo by Mig and Badger Stynylrez primers at some point too).
|
|
#
?
May 23, 2015 13:37
|
|

|
I firmly stand by Duplicolor sandable primer, it's something like six dollars a can and comes from the auto parts store. It goes on super smooth, and comes in at least white, black, grey, and red. (The grey is an excellent German panzer grey.) What you DON'T want is the self-etching or filler primers. Filler is what SG warned will destroy detail, and self-etching is for car use.
|
|
#
?
May 23, 2015 14:06
|
|


|
It's been a while!     I actually finished these guys like a week or two ago, just haven't had much time for manbarbies. Had a lot of fun painting them. I'm probably going to play these guys as a simple Sternguard squad with a couple of combi-weapons or the like. The '7' squad-marking is supposed to both look like a stylized scythe and be a honorary reference to the Death Guard Seventh Company, lead by Nathaniel Garro during the Heresy and ultimately destroyed on Isstvan.. or were they? The Death Guard weren't huge on bling, and I like the thought of one or two decorated veteran squads being all somber and practical as a homage to the original Legion.  Meanwhile, my current project is a third Tac squad. I just went through my loot box (minis donated by friends, etc) and if I could get my hands on some jump packs and devastator sergeant targeter backpacks I could have myself a full Battle Company, easy. Also. I'm increasingly tempted to get myself a whole bunch of blank 32mm bases and rebase them on those. Somebody either point me to cheapo 32mm plastic bases or talk me out of it, please! 
Drake_263 fucked around with this message at 17:58 on May 23, 2015 |
|
#
?
May 23, 2015 15:30
|
|
|
serious gaylord posted:Dont ever buy spray primer from a diy shop. Thats the poo poo people spray on fence panels and you'll ruin models with that stuff. You just want a decent can of flat black/grey non alcoholic paint. Halfords sprays are really good
|
|
#
?
May 23, 2015 16:17
|
|
|
Moola posted:Halfords sprays are really good Halfords grey acrylic is real good yeah. I use that or their black.
|
|
#
?
May 23, 2015 16:25
|
|
|
Homebase do Plasti-kote and Rust-oleum primers which are both good.
|
|
#
?
May 23, 2015 16:28
|
|
|
While we're talking primers, does anyone have any experience with brushing on Vallejo Game Color's White Primer (72.002)? I've experimented with thinning it down a bit, but generally it doesn't seem to stick to the plastic very well and tends to pool in recesses. I don't have this problem when brushing it on neat, but even then it seems to require 2-3 thin coats before I get a solid white. Alternatively, can anyone recommend another primer suitable for brushing on by hand?
|
|
#
?
May 23, 2015 22:39
|
|
|
I shoot that out of my airbrush, thinned about 3:1 (primer:windex), and it works pretty well.
|
|
#
?
May 23, 2015 23:26
|
|


|
I used their grey surface primer (73601) and brushed it on neat with no problems very reliable when I had no garden to spray in
|
|
#
?
May 23, 2015 23:27
|
|
|
Well, that's good. ") I just wanted to check I wasn't making some elementary mistake in how I was applying it. I just wanted to check I wasn't making some elementary mistake in how I was applying it.
|
|
#
?
May 23, 2015 23:31
|
|
|
If I'm not mistaken, isn't that particular "White Primer" just the name of a paint in the Game Colour range? Meaning it's a paint, not a primer. I think the one you need is Vallejo Surface Primer White Primer 73.600 (60mL) or 74.600 (200mL). I understand why they did this in the Model Colour range with Grey Primer, but not with this one in Game Colour. It's an easy mistake to make, but one they don't help with by adding to the confusion.
|
|
#
?
May 24, 2015 02:09
|
|

|
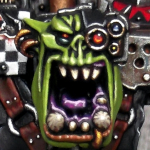
Got to playing around with my camera and grabbed some WIP shots of the new Tac squad for shits'n' giggles. So obviously I start by priming the dudes white, followed by Warboss Green on guns, belt buckles, grenades and shoulderpads. I try and not get the paint anywhere that's supposed to be white, but don't care about painting over future-metal areas - metal tends to work poorly on white primer so I don't mind darkening the area first.   I slap on a second layer of WB-green - the first one tends to be streaky and patchy - and then block out the rest of the decals. Leadbelcher for the non-casing parts on the guns, the insides of the power armor joints, ventilator grilles, those ribbed power cables and stuff like that. Balthasar Gold for the bronze areas - pauldron rims and blingbling. Mephiston Red for the red parts - eyes, bolter targeter lenses, purity seal wax, plasma coils, prominent rubber cabling like on the missile launcher, any gemstones. Bare skin is simple Cadian Fleshtone, and leather belt pouches and holsters get a simple coat of Mournfang Brown. After that's done I go through the white areas and clean up any mishits with White Scar.  Seraphim Sepia is some magical stuff and the whole mini gets a nice thorough wash with it. I try to make sure the entirety of the mini gets a thin layer of it, with extra love and care for vent grilles and other high-detail areas. I love how the whole mini goes from 'white with some detail colors' to 'holy poo poo he looks like a playable mini now'.    Shots of the rest of the squad, once they've had time to dry. If I was lazy I'd consider the dudes almost done at this point - at least the dudes at army Painter would consider them tabletop ready, replacing the Sepia wash with a Quickshade Light dip - but of course I consider them about halfway done, now. Next up I'm going to clean up the white sections a bit, then start highlighting the individual detail colors. All in all I quite enjoy painting these dudes, the scheme is simple but effective on the table and doesn't require that much effort for tabletop standard.
|
|
#
?
May 24, 2015 12:51
|
|
|
Danoss posted:If I'm not mistaken, isn't that particular "White Primer" just the name of a paint in the Game Colour range? Meaning it's a paint, not a primer. I think the one you need is Vallejo Surface Primer White Primer 73.600 (60mL) or 74.600 (200mL). aaaaaaaaaaaaaa  Well, thank you. I'll look into getting the proper primers. In more positive news, Cif multi-purpose cleaning spray strips vallejo and GW paints from plastic models in 20-30 minutes.
|
|
#
?
May 24, 2015 13:01
|
|
|
Is there a noticeable difference in terms of quality between armory spray can primer and the vallejo stuff through an airbrush? I have a poo poo ton of historical minis I'm going to primer soon and I've always used armory but if airbrushing on produces a better result I may go that route.
|
|
#
?
May 24, 2015 17:30
|
|
|
I think it's highly dependent on the quality of the spray paint you get. If you spray in the right conditions and heat the can in warm water so it has really good pressure you'll get a good result. I'm all about airbrushing so that's what I'd say to do, but they can be very situation dependent.
|
|
#
?
May 24, 2015 18:15
|
|
|
I think this is the first Eldar jetbike posted under the new models... I finished up the bike, glossed it, and took some shots. I'll add the usual roses once all three bikes are completed and then I'll matte coat it (twice) and do the base up. The shots are predictably glossy which obscures the fade somewhat in the pictures.  
|
|
#
?
May 24, 2015 18:24
|
|

|
God, it's been ages since I touched a brush. Decided the most sensible way to shake the rust off would be following a step-by-step, so I picked up a copy of Angel Giraldez's "A-Z painting for idiots" guidebook and tried my hand at painting the included Joan of Arc miniature:  Infinity minis are quite a shock scale-wise compared to the 40k ones I'm used to, but she was still fun as hell to paint. hosed up the placement of the Maltese cross and so had to go with a different design on the back of the tabard but, barring that mishap, I'm pretty pleased overall. As an aside, while browsing for alternative Joan schemes I stumbled upon Infinity.jpg (don't click this at work. Although if you're already browsing a miniature painting thread, it probably won't do appreciably more damage to your image).
|
|
#
?
May 24, 2015 21:23
|
|


|
Man, I picked a bad time posting after that! ---^ Looks fantastic. Still a work in progress, but I'm sold on The Wrath paint scheme. I still need to highlight but the bases are done. 
|
|
#
?
May 24, 2015 22:15
|
|
|
Finished my Punisher! I hope you like bullets, you heretic motherfuckers!     And here's the happy Russ family so far:  I still have three more Russes to build and paint: an Exterminator, a 2nd Demolisher, and a 2nd Eradicator. I sure am glad and I'm not tired of painting tanks! Next up: a Hydra! This looks fantastic! I'm super excited to see these guys in person at NOVA (if you're still coming).
|
|
#
?
May 25, 2015 01:52
|
|

|
Hot drat those tanks are marvelous. The color palette is really great.
|
|
#
?
May 25, 2015 02:26
|
|
|
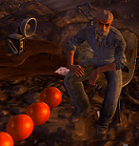
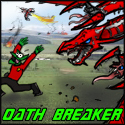
Oath thread crosspoast:     The sorceress's face and hand look so crappy because the auto-white-balance doesn't leave the dark skin shading showing very well in those spots and I'm not good enough to fix it. 
|
|
#
?
May 25, 2015 04:51
|
|

|
The Sex Cannon posted:
OneTrueBru posted:God, it's been ages since I touched a brush. Decided the most sensible way to shake the rust off would be following a step-by-step, so I picked up a copy of Angel Giraldez's "A-Z painting for idiots" guidebook and tried my hand at painting the included Joan of Arc miniature: overthefalls posted:Man, I picked a bad time posting after that! ---^ Looks fantastic.
|
|
#
?
May 25, 2015 16:36
|
|
|
The Sex Cannon posted:
Thanks man! Maybe we can have a large, fully painted goon battle of some sort up there (I'm still coming )
|
|
#
?
May 25, 2015 16:39
|
|
|
SRM posted:
Thanks! I appreciate it. I have not have had a lot of time to paint in the last 12 months and it's great to be inspired. The scheme is from the Khorne book, yeah. It's called The Wrath. I didn't want to go full red, and the bone helmets spoke to me. It's neat now, and I am seeing some awesome looks on terminators and mauler fiends.
|
|
#
?
May 25, 2015 18:30
|
|
|
JerryLee posted:Oath thread crosspoast: The lighting is too dark to see the depth of color and details, but I really dig the color choice you used for these guys. They look like an old painting and the weathering rocks
|
|
#
?
May 25, 2015 19:58
|
|
|
 Tabletop standard rank and file. Look pretty good from a couple of feet away. May paint up a couple more models and have a Word Bearer squad.
|
|
#
?
May 25, 2015 19:58
|
|
|
Thundercloud posted:
Honestly with just a bit of line highlighting here and there you can make them just a touch above tabletop standard.
|
|
#
?
May 25, 2015 20:22
|
|

|
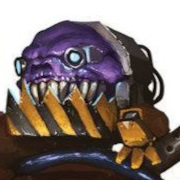
Annnd I'm done with the squad. Last time I'd left off with the basic colors blocked out, followed by a thorough thin wash of Seraphim Sepia. I like painting my minis one color at a time, moving from the most common and prominent color on the miniatures to the least. For these guys, it's white.  First order of business is drybrushing the white areas with Screaming Skull. THis is intended to 'smooth out' the color, cover up the places where the wash pooled overmuch, and gie the armor some definition. I try and not worry too much about the underside of the different shapes, leaving those areas slightly darker for shading. This is likely the messiest stage - naturally I do my best to not mess up the other colors too much, but little mistakes will simple be covered up in the later stages.  The next step is giving the white areas a second drybrush of Pallid Wych Flesh. PWF is a very light, slightly offwhite - I'd describe it as a sort of a porcelain color. It does a nice job of making the white armor pop without being quite as bright as pure white. This is done with a very light hand, aimed at the most prominent top surfaces on the mini - the tops of helmets, the upper surfaces of arms and backpacks, anything you'd imagine to be exposed directly to light from above. Also note that I'm trying to -not- hit the parchment bits on the purity seals at all - the difference will be subtle, but it should leave the parchment looking a little bit darker than the dirty-white armor. I could go with a thin fine highlight of white on the prominent corners in the armor, but I can't be arsed. Drybrushing tends to look the mini a little dusty and worn, but in this case it's a good thign - I'm basing these guys with a rust desert theme later, and this'll make them look like they've been in the field for a good long while. After white, the most prominent color in this color scheme is green.  First, I clean up the green areas with a thin layer of Warboss Green - the same base color I used before the wash. Again, this is intended to smooth out the areas, cover up any tidemarks from the wash - basically I target the top surfaces as a simple broad highlight. I aim to leave a little untouched rim around the pauldron rims - this'll leave a little thin line of natural shading around the edge of the rim, making the metal pop a little bit more. The next step is one of the most fiddly on the minis, but thankfully it's pretty easy - a two-step fine highlight with Moot Green. Basically I take a fine brush and do a careful thin line around the edges of the green areas - the corners on the weapons, along the edge of the shade I mentioned earlier. Once that's done, I go through the areas again, giving the topmost, most prominent sections of the line a second go, emphasizing the lines slightly. Normally I'd use a slightly brighter color, but Moot Green is a pretty color in and of itself - and the thing is that it's got such a poor coverage that a second thin line of it overlain with the first will brighten it enough ot get the effect through.  Left to right - plain green with the wash, cleaned up green, first line highlight, second line highlight.  A shot of a chunk of the squad, all with green highlights.   Color three is highlighting all the gunmetal parts - the worky bits and barrels on the guns, the ribbing in the armor joints, and the like. I just give those bits a careful drybrush of Ironbreaker - it's a relatively minor color and most parts with it are in hard-to-reach places anyhow. I'm the most interested in just adding a bit of definition into the more prominent areas like the guns.  Color four are the bronze areas - the pauldron rims, chest eagles, and random bling like skulls and honor markings. More expansive sections like chest eagles get a thin drybrush of Hashut Copper - the rest simply get a careful once-over with a narrow brush. I aim to clean out the bronze a little bit, covering up areas that got splatters from previous stages, and bring out the shine a little bit. This is the point where I note that normally, I would've likely used Hashut Copper as the base color on those parts rather than Balthasar Gold. However, the coverage on Hashut Copper is so abysmal that it's easier to block them out with BG and then just highlight a bit with Hashut. On the flipside, Hashut being so translucent makes it easy to build up the color in layers if that's your thing.  Finally, I highlight the bronze with a go with Sycorax Bronze. Again, chest eagles and other big prominent decals I drybrush - very light strokes moving downwards, trying to only hit the top surfaces on the areas I aim for - while things like pauldron rims I'll simply pick out with a narrow brush. I'm not aiming for total coverage - I simply draw little lines and spots of brighter shinier bronze on the most prominent and visible points on the metals, giving the impression of brighter reflections. It's not much of a difference, but does make the bronze sections look shinier. At this point we've gone through the primary colors on the miniatures - white, green, steel, bronze - and now we're down to decal colors. First off, flesh.  This squad has only one helmetless Marine - I tend to prefer helmeted Marines just because helmets make more sense, but your mileage may vary. Either way, at this point the exposed skin is simply Cadian FLeshtone with a thin layer of Seraphim Sepia shading it. It works, but it's thankfully easy to improve..  I simply do a quick an dirty two-stage highlight with Cadian Fleshtone. Thinned down, the paint is translucent enough that I can do a single thin highlight - essentially paint the big exposed area on the top of the head, and pick out things like the eyebrows, temples, and cheekbones - wait a bit for it to dry - and then do a second thin layer to slightly brighten the color on the top of the head for a brighter highlight. Up close the eyes are pretty nonexistent, but there's a quick little trick to empathize them - take a fine brush and daub just a little bit of green, blue or purple wash into the sockets. This will shade the eyes slightly and give them a more realistic look, especially if you white out the actual eyes (which I didn't do) - think of it as fancy eyeshadow for your manbarbie. Sidenote, I'm not really fond of helmetless Marines as a rule but I like this particular variation of helmetless head, with the rebreather - it reminds me of the Strogg from Quake 2 and 4. I'm just imagining this guy lumbering around the battlefield, yelling incomprehensively muffled warcries. "FORWARDS FOR THE EMPEROR!" "HRMNHDFHS FHDHRL DHRL DHRMHDDRHRL!"  Next up, I pick out the leather supply satchels and pistol holsters on the minis with the orioginal base color - Mournfang Brown. This is mostly to clean up any mishaps from the earlier bone/white drybrushes, and also functions as a simple line highlight for the leather areas.  This is then followed by a thin 'fine' highlight with Steel Legion Drab - highlightling the sharper edges on the leather areas and bringing out the shapes a little bit further.  The edges of the red wax purity seals are simply cleaned up and picked out by a careful thin line highlight of Mephiston Red. Meanwhile, I chose to paint the coils on my plasma weapons red-orange - it's a natural contrast color for the dull green, and lets me get away with using slightly fewer colors on the minis. There's nothing wrong with the usual blue plasma, but I don't want to use too many different colors on the minis or they'll end up a little bit christmas tree-y.    I simply drybrush the plasma coils with Wild Rider Red, Fire Dragon Bright and Yriel Yellow, each a more careful and lighter drybrush than the last - basically I'm aiming to only hit the very top and edges of the ribbed coils with the last drybrush. Make sure that your brush is very dry and move the brush along the length of the weapon - barrel to stock, stock to barrel - so you leave some of the previous colors untouched in the recesses of the ribbing. If you accidentally go overboard, you can try and salvage the effect by giving the ribbing a careful thin layer of Carroburg Crimson or Fuegan Orange wash, or the Bloodletter glaze. Drybrushing can be a little bit messy and after you're done, you might find the surfaces near the coils have little touches of red-orange-yellow. This is easy to pick out with green, metal and bronze, respectively, but you may want to leave the nearest surfaces with a little bit of the plasma colors to give the impression of glow from the coils on the surface of the gun. The second-to-last and most fiddly, in my opinion, phase are the eye and targeter lenses. I could just paint them red and leave it at that, but I like to put in just a little bit of extra effort.     The first image is the untouched eye - it's simply Mephiston Red with Seraphim Sepia darkening it. This makes a nice dark base color for a gem eye. Second image, I paint the 'front' of the eye - the half to two thirds of the length of the eye lense nearest to the helmet - with Evil Sunz Scarlet. Third image, I paint the front half to two thirds of the area I just painted - in other words, the most forwards quarter to one third of the eye - with Fire dragon Bright. This is the 'glow' of the eye. Last, I take my finest brush - if you have one of those needle-thin tiny Army Painter 'Insane Detail' brushes, this is what they were made for - and with the very tip, poke a teenytiny dot on the back of the eye. This is the reflection of the light hitting the lense. For the other red gems on the mini - the little targeter lenses on the bolters, secondary optics on some helmets, the scopes on the missile launcher - I do the same thing, except that instead of the 'forwards' part of the part of the lense, I pick a direction - lower right, typically - and use that corner as the 'forwards' direction. The reflection dot, of course, ends up on the opposite corner of the lense - top left corner. This gives the impression of light hitting the crystal on the top left corner, making a tiny bright primary reflection, while the opposite end of the crystal glows with refracted colored light. I find that three colors (the dark base, the two-thirds and one-third highlight, plus white for the reflection) are plenty enough for most gems, though particularly large lenses, screens and the like might benefit from a gradient of four or more colors. Either way, you'll want to go from as dark a color as possible for the base (say, Caliban Green with a green wash on top) to as bright a color as possible on the forwards corner (Moot Green, for green) in order to get a 'crystalline' appearance. After the rest of the mini is done, you may want to consider hitting the gems with a thin layer of 'Ardcoat or other clear glossy varnish to emphasize the glassy, reflective impression. (Also, for pete's sake, pick a single direction for the light and follow it for ALL the gems on the mini - it'll look weird with reflections coming from every direction. I tend to prefer top left for the direction of the light (and white reflection), with bottom right for the glowy parts on the gem.  Last up, squad markings. I didn't want to bother with transfers or excessive freehanding, so I went with a simple black XIV for the Chapter marking and an arrow with the squad number in it for the squad marking. I did them with a 0.3mm black marker bought from the local general store. You could use a thin brush, but I find that straight lines are easier to do with a marker. Also, I'm fully aware that they're crude,but for this particular army I'm aiming for an 'arms length' tabletop standard - that is, it looks good at about three to five feet of a distance. I'm not trying to win the Golden Demon, I'm trying to get a relatively good-looking army out in a relatively short time without wanting to blow my brains out.    Ready to kick rear end and take names. Except for the basing. Going to order in a bunch of 32mm bases for these guys first..
|
|
#
?
May 25, 2015 21:03
|
|
|

|
| # ? May 9, 2024 20:24 |
|
|
BULBASAUR posted:The lighting is too dark to see the depth of color and details, but I really dig the color choice you used for these guys. They look like an old painting and the weathering rocks Dang, thanks. Getting compliments from you on weathering is amazing. I know I don't have the greatest lighting setup, but on my screen it seems like I can see the colors and shading perfectly well except where they're actually in shadow, which is a minority of the scene--does it really look that dark to you?
|
|
#
?
May 25, 2015 21:41
|
|