


|
mds2 posted:I made a table. This is something that I have wanted to try for a couple years. When I was digging through my stack of walnut I came across two pieces of a branch that were book matched. Perfect. I built this table by ripping off one of the live edges of each walnut piece. I then made templates out of plywood. I used those templates to match everything up. I am very happy with how it turned out, though the table is a little small. 30"x17"x16". drat, that's impressive. Really nice job there
|
 #
?
Jul 8, 2015 21:12
#
?
Jul 8, 2015 21:12
|
|

|

|
| # ? May 31, 2024 19:16 |
|
|
Thank you everyone. Does anyone have any thoughts on the legs? I wanted a sleek modern feel. I think I am going to put this up for sale today too, so wish me luck.
|
|
#
?
Jul 8, 2015 21:17
|
|

|
Finished another round of magnetic bottle openers. 8 in the batch this time. I still have enough hardware to make another 2 once I finish planing the the rest of my boards. I wasn't sure if I liked cherry/walnut as much as maple/walnut but I think it's grown on me and I may prefer it now. It just makes the whole thing feel a bit warmer.     http://imgur.com/a/zue76
|
|
#
?
Jul 8, 2015 21:28
|
|

|
mds2 posted:Thank you everyone. Does anyone have any thoughts on the legs? I wanted a sleek modern feel. Sorry, I don't like the legs at all....but good luck!
|
|
#
?
Jul 8, 2015 21:38
|
|


|
mds2 posted:Thank you everyone. Does anyone have any thoughts on the legs? I wanted a sleek modern feel. I think the legs detract from all the hard work this has had put into it. I don't think it works with the semi-raw edge look and the thickness of the table top. Equate it to $100 shoes with a $1000 suit. This article says it all : http://www.homedit.com/hairpin-legs-can-look-great-on-anything/ There is a tendency to just throw hairpin legs onto anything and call it a day. Most of the stuff in that post looks loving awful from a design perspective. midge fucked around with this message at 21:54 on Jul 8, 2015 |
|
#
?
Jul 8, 2015 21:50
|
|

|
But that article says hairpin legs work with all sorts of stuff?
|
|
#
?
Jul 8, 2015 21:53
|
|

|
Indeed it does. Yet I'd say over 1/2 of them look unconsidered. After looking around, here are some ideas that could work but it's hard to tell without pulling it all into sketchup. It's diffficult to get an idea of how big it is with those angles of those pictures you posted. 1) http://www.ebay.com/itm/79-L-modern-desk-Dining-table-Exotic-solid-Acacia-wood-stainless-steel-legs-/261317269125 2) http://www.houzz.com/photos/156747/Structured-Green-Finn-Table-Dining-Room-modern-dining-tables 3) https://www.pinterest.com/pin/437834395000384251/ 4) https://www.modernlegs.com/products/flat-bar-bench-legs/ These all keep a modern feel to the table, while making it look like it's capable of holding itself up. The hairpin legs on that tabletop make me nervous; even though it's obviously within spec, it doesn't give off a good feeling. There's also something about how unbalanced the legs appear to be on the side with the little movement into the piece. midge fucked around with this message at 22:13 on Jul 8, 2015 |
|
#
?
Jul 8, 2015 22:09
|
|
|
Mr. Mambold posted:I think the Swiss company Inca (?) does a tabletop version of the multi-planer/jointer if they're even still in business- but that thing looks as big as a car. In short, no, I've never seen one like it. I have one of these that I got for free (!) that I have yet to get working, and I can confirm it's an over-under setup. Also, INCA almost certainly doesn't exist anymore, at least not as an equipment manufacturer. All I need are a couple of belts and to grind/sharpen the knives, and it's been more than a year since I got the thing. There must be some weird biological thing that leads men to get into woodworking as soon as they have kids and thus have no time to actually do any woodworking. e: no time or money dobbymoodge fucked around with this message at 22:20 on Jul 8, 2015 |
|
#
?
Jul 8, 2015 22:13
|
|

|
Yeah what the hell, you're right. Why is this happening to me?
|
|
#
?
Jul 8, 2015 22:31
|
|

|
His Divine Shadow posted:Yeah what the hell, you're right. Why is this happening to me? Your dad did the same thing, and so this is a Dad Thing to do, and as you are now a dad you must do it? 
|
|
#
?
Jul 8, 2015 23:03
|
|

|
I've worked a lot of handrails over the years, straight and curved, but I've never been asked to do a full enclosed circle like this. Took ~2 days to bend the rail and clean it up though I let it sit for just under a week before pulling the clamps off and it was installed today along with the nosing on the floor and another nosing on the ceiling below; the rail itself was 18 foot of maple and a pain in the rear end to bend. Wasn't sure how it would set up since the homeowner didn't want any newel posts as suggested, but it managed to set up surprisingly stiff:
Johnny Bravo fucked around with this message at 23:12 on Jul 8, 2015 |
|
#
?
Jul 8, 2015 23:05
|
|
|
Nice work, but that is an incredibly silly thing to do on the homeowners part. Like, do they expect any light from that fixture to land downstairs? Wtf is the point of a tiny hole in your floor? Is it like a hipster balcony thing? 
|
|
#
?
Jul 8, 2015 23:11
|
|


|
Yeah no idea; I had originally done the rail in their house back in 2007 when they were building it and that area was once an open overlook down into the den; it had about 24 feet of straight balcony with a slight radius in the middle. Then he decided he didn't like that and tore the balcony handrail out, framed in the floor and left the hole for his light. The room underneath is awfully cramped now but whatever floats his boat I guess. He also missed his radius/cut out by like an inch to an inch and a half at certain points. The nosing I put in is really close to a true circle based on the radius he gave me and the reveal varied from 1 1/8" to 3/4" to 1 5/8" along the entire rim, oh well.
|
|
#
?
Jul 8, 2015 23:16
|
|
|
I also like how the light isn't even centered on the hole. Anyhow, be sure to post again in 2023 when he has you frame in a window on the floor so he can get rid of any hint of a balcony but still keep the light fixture he insists on.  Adverse conditions aside, good job on it. I've tried bending maple before and it's a bitch, I can't imagine a full circle, especially one that was anywhere near true.
|
|
#
?
Jul 8, 2015 23:43
|
|
|
Johnny Bravo posted:I've worked a lot of handrails over the years, straight and curved, but I've never been asked to do a full enclosed circle like this. Took ~2 days to bend the rail and clean it up though I let it sit for just under a week before pulling the clamps off and it was installed today along with the nosing on the floor and another nosing on the ceiling below; the rail itself was 18 foot of maple and a pain in the rear end to bend. Wasn't sure how it would set up since the homeowner didn't want any newel posts as suggested, but it managed to set up surprisingly stiff: That is a seriously tight radius, and I gotta admit I've never seen a thing like that. How did you figure the lengths on the laminates, is there an app for that? Or did you sorta freehand it? (Last time I did any kind of bent rail there basically weren't P.C.s yet)
|
|
#
?
Jul 9, 2015 00:10
|
|
|
mds2 posted:Thank you everyone. Does anyone have any thoughts on the legs? I wanted a sleek modern feel. Good luck. I'm curious to know how it goes. As for the legs, I'm not fan of hairpin legs but I'm having a hard time picturing something else. Maybe a trestle?
|
|
#
?
Jul 9, 2015 03:03
|
|

|
I'm a big fan of this style of leg design (I would be, as I used it!)
|
|
#
?
Jul 10, 2015 00:13
|
|

|
Frogmanv2 posted:Lucky I'm in Australia then.
|
|
#
?
Jul 10, 2015 01:21
|
|

|
MrPete posted:Where in Australia? If you're near Newcastle/Sydney you could come use my table saw. Cheers for the offer but I'm in Wa. For shits and giggles, assuming you are in Newcastle, I'm 3900ish km away.
|
|
#
?
Jul 10, 2015 01:47
|
|


|
Bad Munki posted:I have some rectangles in 1/2" mdf. I need to put very consistent, shallow holes in the edges of these blocks, centered precisely halfway down the thickness. It needs to be pretty precise because I'm going to put magnets in the holes and have the blocks magnet on to each other while lying on a flat surface, like magnetic tiles. I need to make a TON of these holes, in a TON of these blocks. The blocks will be of varying sizes, but always a multiple of 2" on any particular side. So I need some jig that I can very quickly drill a 1/4" hole about 3/32" deep (flat bottom) in a highly repeatable fashion. Thoughts? I have a couple styles of dowel jigs, but either they won't work for that thin of a material, or they just don't hold tolerance like I need. So I'm thinking maybe take some plywood, route out a 1/2" dado, verrrrrry carefully place my hole in the center of the dado, and then put a bushing in it to keep the hole intact while I drill a million of these things. Right now, I think I only need to just do a single hole, say, 1/2" in from each corner, along each edge (so 8 holes per block, all the same distance from the corners.) A drill press with a depth stop and a forstner bit. It will work in the edge of MDF just fine. Bring those blocks up to Minnesota and I'll get it all set up for you and do the first couple. Then I'll watch you do the rest while I get drunk and share stories with you of people you've never met and don't give a poo poo about at all.
|
|
#
?
Jul 10, 2015 04:56
|
|


|
Actually, the router table worked fantastically well. Using a nice high-speed bit (tens of thousands of rpms) left very clean pips to insert the magnets into. Meant to post pics earlier, forgot. I had a little t-slot stop to make a firm backing for some 1/2" UHMW to use as a nice slippery guide, then it was just a matter of positioning the slide and the fence with the right offsets, which turned out to be pretty easy, since of course my tolerances weren't really as tight as I was telling myself. After that, it was just a matter of zip-zip-zip-zip, flip, repeat, done, for each piece, only took a few seconds. The 1/2" UHMW was eeeeeever so slightly thicker than the 1/2" MDF, which left just enough clearance under the clamp for things not to get caught up. I'd like to have done it with a zero clearance plate, but  and this worked fine. and this worked fine.  Also I'm not in Iowa anymore, sorry bud, I'm over in the rust-covered shithole that is Erie, PA.  Anyhow, I took my blocks and put the magnets in them and then glued my nerdy dungeon terrain bits on and now I have these manchild toys: https://www.youtube.com/watch?v=rYnpXs-MRWA I am quite satisfied with the product. ")
|
|
#
?
Jul 10, 2015 05:06
|
|
|
Bad Munki posted:
 Those are great, I assume on each face one magnet is N 1 is S?
|
|
#
?
Jul 10, 2015 08:01
|
|


|
Cakefool posted:
Yeah, it alternates N/S/N/S/N/S/N/S and is the same on every block so they can attach to each other in any orientation and tile up to fill a play field.
|
|
#
?
Jul 10, 2015 15:01
|
|
|
What are the wall sections made from? Did you mold them yourself? Very cool idea. Stuff like that always makes me want to create some modular D&D dungeons or a board game.
|
|
#
?
Jul 10, 2015 15:27
|
|

|
BUGS OF SPRING posted:What are the wall sections made from? Did you mold them yourself? Yes and no. They're cast from plaster, but not plain old hobby store plaster, it's actually I think a kind of dental plaster? I don't recall the specific brand, if it's merlin's magic, or what, but it's about 10 times stronger than regular plaster, so it's a lot more resistant to chipping and such. As for the creation, I started with some hirst art molds (http://hirstarts.com) and built up a wall section, and a floor section, glued them all up, filled in the gaps with greenstuff, joined a few stones across the parts to break up the lines and make it look like one piece, and then took that final master and some moldmax 30 RTV (http://www.smooth-on.com/Silicone-Rubber-an/c2_1113_1135/index.html) to make a two-part mold of the master. The whole process took a few days, but the end result is I can make duplicates of that corner piece in about 20 minutes each, and I'll be making more molds for different sections, so I can cast them in parallel. If I'm focused and on my game, I can probably churn out about one casting every five minutes sustained for a couple few hours, which includes overhead like cleanup/prep between each item. Anyhow, none of that's really woodworking, but there ya go. ")
|
|
#
?
Jul 10, 2015 20:26
|
|
|
John Heisz posted a video about bandsaw blade sharpening and I whipped up my own jig and sharpened one of my blade that had hit a screw once: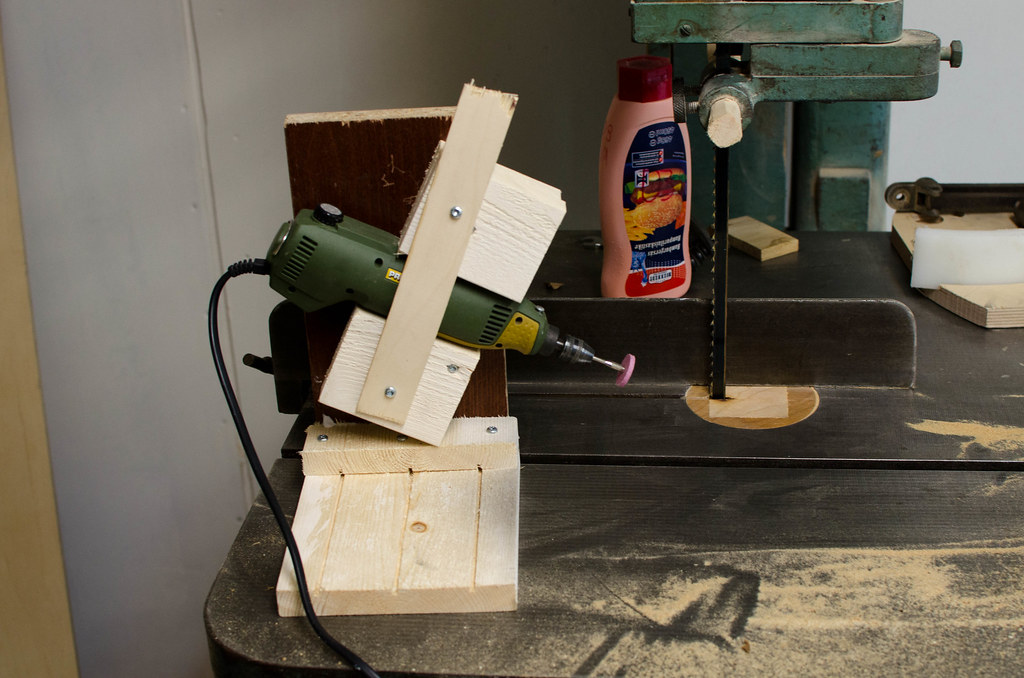 The difference is astounding, the blade was not this sharp new. Resawed these logs like butter, you can see how it was before on the two to the left 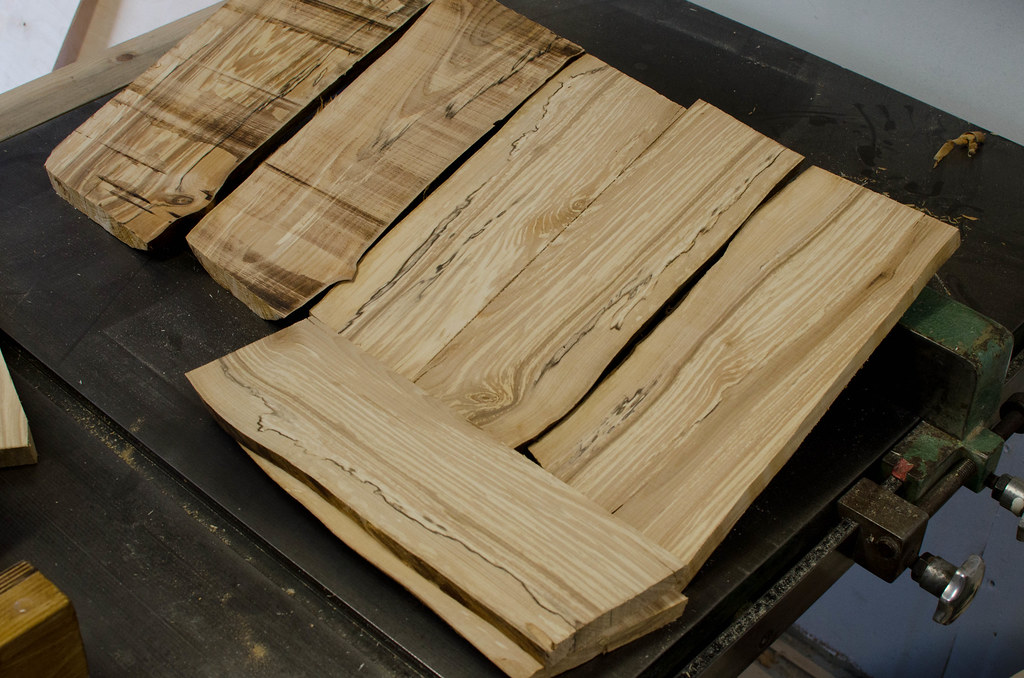 And then I resawed these from a log that been two trees grown together, thinking it'll make a nice door for a key cabinet: 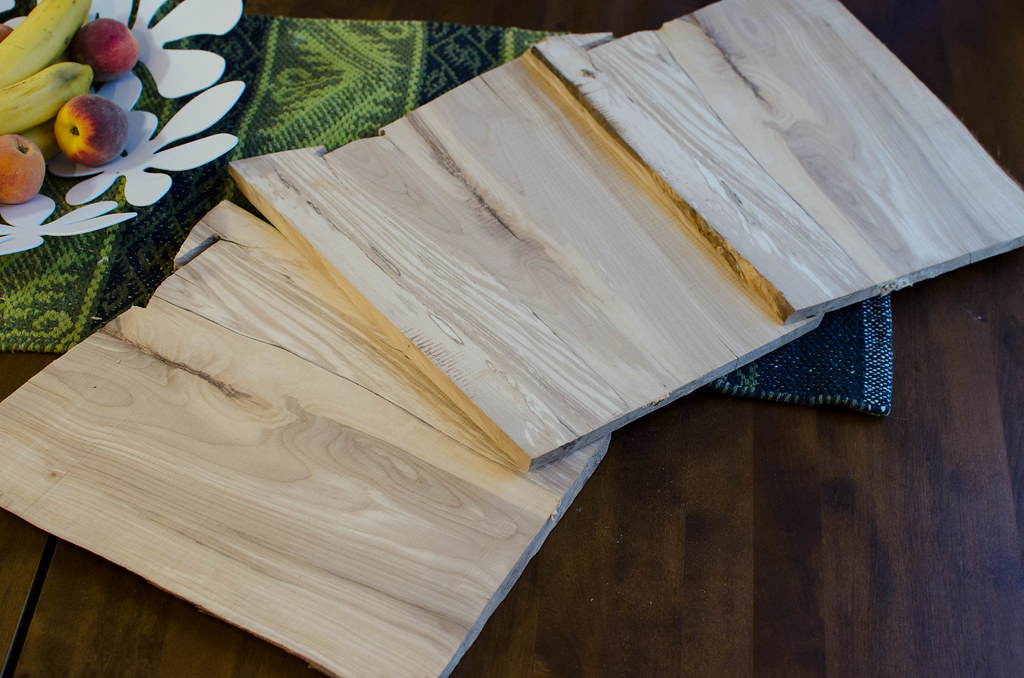 Real nice quality of cut: 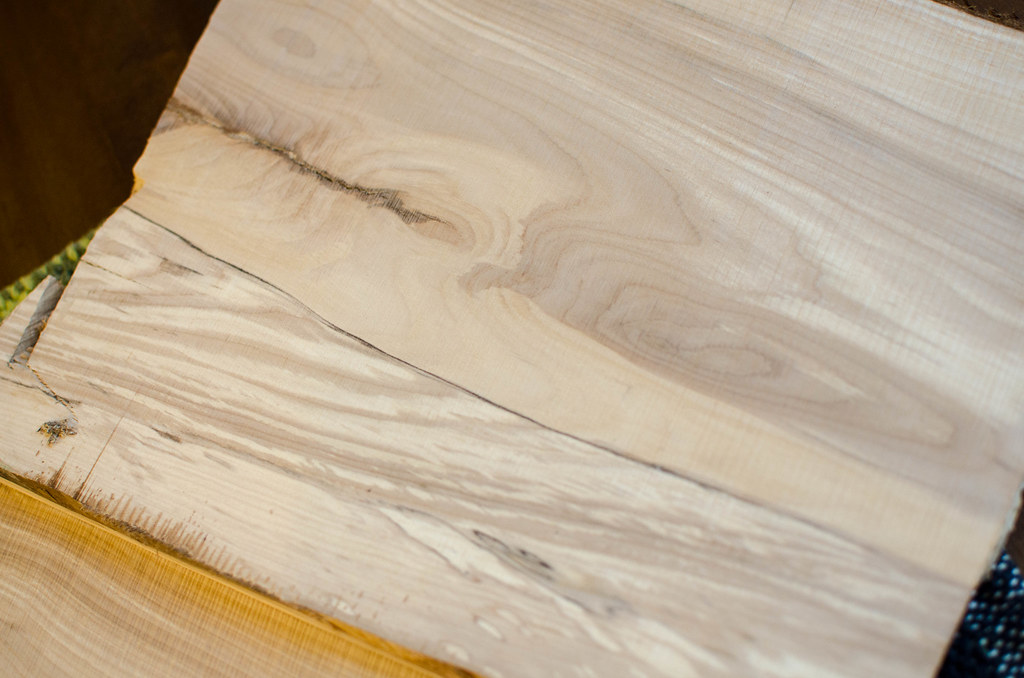
|
|
#
?
Jul 10, 2015 20:50
|
|
|
Bad Munki posted:Anyhow, none of that's really woodworking, but there ya go. Awesome info in any case, thanks!
|
|
#
?
Jul 10, 2015 21:33
|
|
|
Bad Munki posted:Nice work, but that is an incredibly silly thing to do on the homeowners part. Like, do they expect any light from that fixture to land downstairs? Wtf is the point of a tiny hole in your floor? Is it like a hipster balcony thing? Tall xmas trees, duh. On a related thought, I am growing sick of working with douglas fir every stinking day. We completed a timber bridge the other day with the largest beams at 16"x16"x50'. That was one heavy fitting job. Working underneath the one side while fitting, all I could think was "god, if this falls please have it kill me outright".
|
|
#
?
Jul 11, 2015 01:45
|
|

|
His Divine Shadow posted:John Heisz posted a video about bandsaw blade sharpening and I whipped up my own jig and sharpened one of my blade that had hit a screw once: Anything with it in action? Do you do one tooth at a time and manually work the blade or run the blade and lightly touch it to the blade?
|
|
#
?
Jul 11, 2015 04:18
|
|

|
JEEVES420 posted:Anything with it in action? Do you do one tooth at a time and manually work the blade or run the blade and lightly touch it to the blade? https://www.youtube.com/watch?v=GRFASuwGodE
|
|
#
?
Jul 11, 2015 06:21
|
|
|
Yeah sorry forgot the link, was late last night..
|
|
#
?
Jul 11, 2015 07:51
|
|
|
I'm on the verge of buying a veritas grinding jig instead of building my own, but before I do, I'd like to see what kind of homebrew grinding jigs/tool rests my goony brethren have come up with. I like the veritas style because it lets you set grind angle and blade projection, neither of which I trust myself to freehand (on my good iron, at least). I'm only concerned with chisels and plane irons so far, I don't have any turning chisels that require more esoteric jigs. So, how do y'all grind your tools? Go!
|
|
#
?
Jul 11, 2015 19:16
|
|
|
I use a simple bought jig to get the 30 degree bevel set, then I usually just freehand it on a diamond stone and then I strop on a piece of wood with some leather glued to it, the leather is impregnated with chromium oxide. If I feel I'm starting to get a messy bevel on the chisel, I "reset" the edge on the jig again. I wish I had a coarser stone for fast removal, but i am probably going to make a rotary wet grinder later instead and just go that way.
|
|
#
?
Jul 11, 2015 22:03
|
|
|
His Divine Shadow posted:I use a simple bought jig... What kind of jig?
|
|
#
?
Jul 11, 2015 23:38
|
|
|
I have a veritas jig because I honestly didn't think it was that expensive (I think I paid $30 for it?), and it's pretty goddamn foolproof. Would recommend.
|
|
#
?
Jul 12, 2015 01:15
|
|

|
A friend made me this for my birthday and I couldn't be happier.
|
|
#
?
Jul 12, 2015 02:45
|
|

|
dobbymoodge posted:What kind of jig? It's a cheap no-name blue colored jig, I literally cannot find a name on it so I cannot tell you what it is, I bought it from a finnish website. I think maybe the veritas you considered might be better quality since it's a Veritas.
|
|
#
?
Jul 12, 2015 08:40
|
|
|
Made this box yesterday start to finish including glue up and finishing. Record speed for a project for me.  http://imgur.com/a/csuRN It's made from some scrap pieces of cedar with 1/4" plywood for the bottom. I just used a wipe on mix of orange oil and bees wax to finish it due to the short timeline. Squibbles fucked around with this message at 00:01 on Jul 13, 2015 |
|
#
?
Jul 12, 2015 17:26
|
|
|
Here are some recent projects that I never got around to posting. My fence/gate and deck. I built the fence last summer, the gate and deck this Spring. All of it is white cedar.   Some cutting boards from cherry and maple I built for some wedding thank yous.  Here is a coffee table I started the other day, I did the breadboards this morning, still need to do a bit of fitting on them. I used a circular saw to do the shoulder cuts and it wasn't as straight as I was hoping. I cleaned up the cheeks with a chisel, it worked pretty good, but next time I'll spend some more time on the shoulder set up. I milled the legs, stretchers and apron this afternoon and did some mortise and tenons. Overall a pretty productive day.   Here's my favourite tool, so satisfying plowing some grooves for the breadboards. 
|
|
#
?
Jul 12, 2015 23:17
|
|
|

|
| # ? May 31, 2024 19:16 |
|
|
Still in the process of making these, first coat of polyurethane boat varnish on these. I wanted to try that for this application, the rowan wood isn't the hardest. The lighter piece is I believe birch, from an old plane that wasn't fixable. I think I'll put a knife on the lighter one, so I'll have a knife gauge and a marking gauge. I'd also like to inset some brass for looks and strenght. 
|
|
#
?
Jul 13, 2015 15:46
|
|