


|
Southern Heel posted:That looks perfect but being in the UK j can't find the exact same on Amazon.co.uk - can you see it or can I order direct or something? Feldherr charge the same postage through amazon as they do through their site; https://www.feldherr.net/ Pretty good, and I ended up keeping the full-size trays I ordered in the packing boxes as they're pretty robust and have useful handles.
|
 #
?
Jul 26, 2015 21:53
#
?
Jul 26, 2015 21:53
|
|

|

|
| # ? May 9, 2024 07:01 |
|
|
Southern Heel posted:That looks perfect but being in the UK j can't find the exact same on Amazon.co.uk - can you see it or can I order direct or something? I'm certain I'm overcomplicating things, but the 1/4 case comes with trays that fill the whole case. My idea was to split and reverse part of the foam so that taller models can go on one half of the case without sticking out of the foam.  e: The quarter case is basically half the height and half the width of a standard case, so it can only have a quarter of the foam of a standard case - two 1/2 width 1/4 height trays, or a single 1/2 width 1/2 height tray. ijyt fucked around with this message at 22:57 on Jul 26, 2015 |
|
#
?
Jul 26, 2015 22:53
|
|

|
Anyone here have experience painting ceramic? I got a little ceramic bank as a gift from China and it comes with some cheapo paints but I figure I can airbrush some designs on it.
|
|
#
?
Jul 27, 2015 00:10
|
|

|
Xposing from the Infinity thread. Colour test model from my new Haqqislam project, crappy lighting thrown in free of charge.   I also finished the Pirates (porcs).  
|
|
#
?
Jul 27, 2015 00:43
|
|

|
Griminn, a bird man from the first Mierce Kickstarter.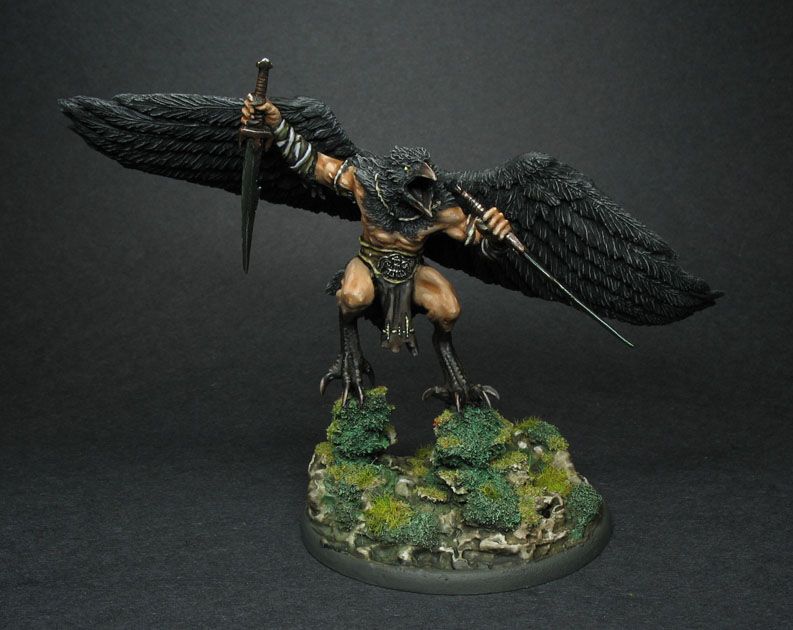 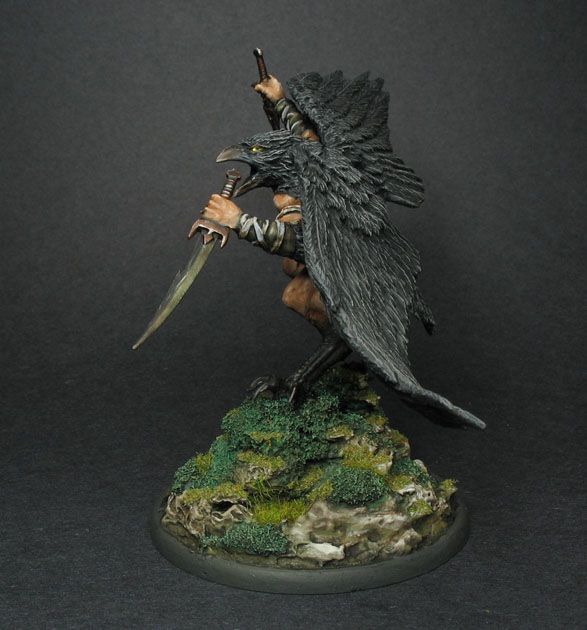 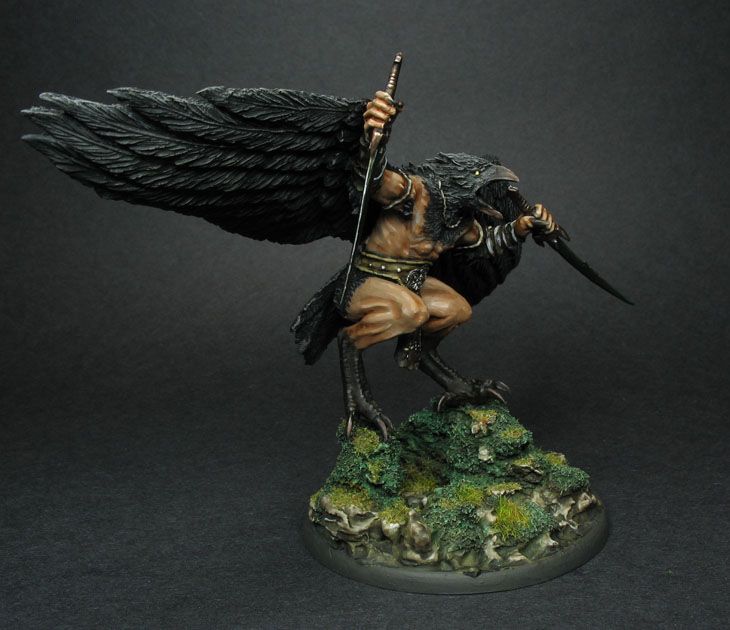 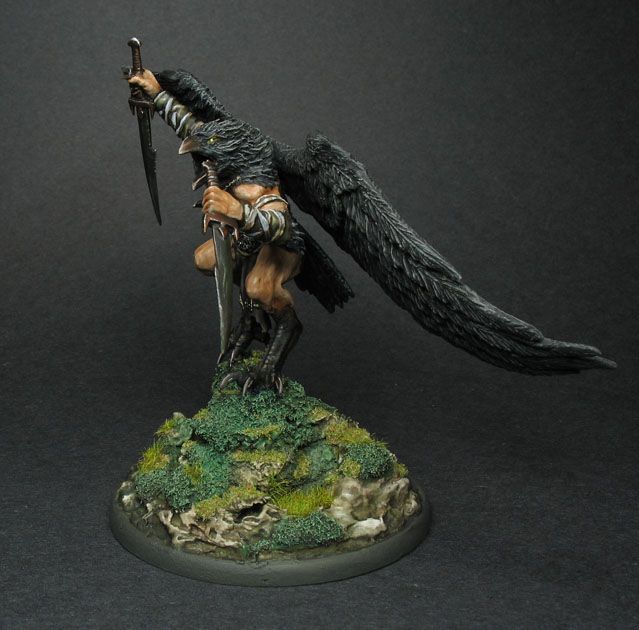 Next up is the Belech demon, also from Mierce.
|
|
#
?
Jul 27, 2015 00:59
|
|

|
Does anyone have any idea what kind of putty this guy is using to block off parts of the model while airbrushing in this video? https://www.youtube.com/watch?v=tm9f3mjkuhU edit: Found out it's just poster tack. Partial Octopus fucked around with this message at 02:38 on Jul 27, 2015 |
|
#
?
Jul 27, 2015 02:27
|
|


|
Been a long time since I've put anything together... minor conversion but due to the sculpt it took nearly 2 hours and I'm still not sure about it. The standard pose looks like this:  I wanted something more dynamic, I think it looks alright.
|
|
#
?
Jul 27, 2015 03:13
|
|
|
Questions from a stupid newbie: 1. For shading, I'm using heavily-watered down paint instead of an actual ink/wash and it's proving very frustrating. Would I be happier with the real deal? I try painting some on and sometimes nothing happens. I can't tell if it's because it's not dark enough, too watered down, or not enough on the brush. 2. I had an imperial guardsman with his lasgun held close to his chest. It was very difficult to paint the area between the gun and his body. In situations like this, am I supposed to paint the arms/weapon unattached and then stick them on after?
|
|
#
?
Jul 27, 2015 05:08
|
|
|
For the shading: It really depends on what your painting and the colors. I find washes work just fine most of the time, especially for metallic colors. When it comes to "is it good enough" that's your own personal judgement until you want to start getting internet cred and poo poo. As for painting armpits and chests: sometimes it's easier to paint that stuff while the model isn't fully assembled. It's up to personal choice: paint apart then glue on and risk superglue getting all over a mostly finished piece, or slapping that poo poo together and not worrying about a chest aquila that no one can see anyway?
|
|
#
?
Jul 27, 2015 05:14
|
|
|
Really watered down paint isn't going to achieve the same thing as a wash unfortunately. All that's going to happen is that the pigment will separate out and it gets all splotchy and gritty looking. To echo the mantra that tons of people who paint miniatures have said before, wash is talent in a pot. Next to a basic set of paints the best thing you can get is a pot of brown wash and a pot of black wash, so the obvious answer here is to just go ahead and buy a few of them instead of trying to recreate the effect with your paints. The first time you slather a flat looking base-coated miniature with some washes is like loving magic.
|
|
#
?
Jul 27, 2015 06:32
|
|

|
I Am The Scum posted:Questions from a stupid newbie: 1. If you want to keep using thinned paint rather than ready-made washes, you can always pin wash models instead. It's a much more time-consuming method unfortunately, and less fun. On the plus side, if you're careful, you don't need to worry about tidemarks or clean-up. A ratio of 1:4 paint:thinner should produce a reasonable result. If you're using plain water to thin, I'd suggest grabbing some matte medium or a bottle of airbrush thinner just to add a bit of adhesion to your wash. 2. I used to paint before assembly but after moving to metal models it's just way too much hassle. Unless you're going for a painting award just do the best you can with obscured sections. Squiggly Beast fucked around with this message at 10:53 on Jul 27, 2015 |
|
#
?
Jul 27, 2015 10:49
|
|


|
Buy the Army Painter Warpaints inks, glop them on, do a spot of cleanup after they've dried if needed, be amazed at how easy it was to get decent results. 
|
|
#
?
Jul 27, 2015 10:58
|
|

|
While we're on the subject of inks and washes, I've finally used up my last bit of Citadel Devlan Mud, which I found produced really great results on just about anything I tried it on. A quick search tells me it's been discontinued for a few years, can anyone recommend a good replacement?
|
|
#
?
Jul 27, 2015 11:16
|
|
|
Army Painter Quickshade Wash. Strong or Dark Tone (try both and see which you prefer, they're both good). GW's Agrax Earthshade is their own replacement.
|
|
#
?
Jul 27, 2015 12:24
|
|

|
What's the consensus on using Army Painter strong tone dip followed by dull coat? Stuff is like $35 a can so I'm wondering if just regular brown wash with dull coat will be as good.
|
|
#
?
Jul 27, 2015 14:59
|
|

|
It really depends what you're after. The quickshade dip is kinda like a combination wash and gloss varnish in one so it's reasonable for protecting the paintwork afterwards, with their washes they dry matt but there's no built in protection. If you do use the dip it's better to brush it on with an old brush, and make sure to leave it to dry for at least a week before applying any varnish as it can interact weirdly.
|
|
#
?
Jul 27, 2015 15:07
|
|
|
Preeeetty sure that army painter dip is just Minwax they charge an arm and a leg for. Go to Home Depot and spend $7 on a can of your choice and see what you get. That was the old Tyranid dipping technique
|
|
#
?
Jul 27, 2015 16:08
|
|

|
Partial Octopus posted:
You should have a fun time with that, painting greenish camo colors over black is rather easy and almost always looks great. Those models would make nice Mandrakes, too. Direwolf posted:Been a long time since I've put anything together... minor conversion but due to the sculpt it took nearly 2 hours and I'm still not sure about it. Looks great! Having the arms away from the chest allows more of the detail in the model to show and that fighting stance is very Khorne: all offense and no defense.
|
|
#
?
Jul 27, 2015 17:01
|
|

|
Direwolf posted:Been a long time since I've put anything together... minor conversion but due to the sculpt it took nearly 2 hours and I'm still not sure about it. The conversion looks weird to me because how is he going to swing that axe past those horns without popping his own head off...?
|
|
#
?
Jul 27, 2015 17:09
|
|

|
Does anyone have a good guide to using green stuff? I'm talking absolute, idiot-level, newbie stuff. I've got the Basius 2 pads coming (hopefully this week) and I've never really worked with GS so I'm really not sure how best to use it. I guess the real question is, do you mix it and let it sit for a bit before pressing into the mold (or applying to a model for gap filling since I've got some of that on my plate too) or is it best to start using it straightaway?
|
|
#
?
Jul 27, 2015 17:41
|
|


|
It starts curing right away, so leaving it for a little while will make it a little firmer and a little less sticky, but not much. Leaving it to cure for a long while will make it carvable/sandable, rather than mouldable which can be good for making weapons and such. For basing pads you're probably fine to coat them with some sort of release agent then just plop fresh GS down onto them.
|
|
#
?
Jul 27, 2015 19:38
|
|
|
Also, super pro tip: if you've got a bunch of greenstuff mixed and nothing to use it on, throw it in the freezer. It won't cure due to the cold, and if you take it out and let it get to room temp it'll be workable again. It won't be quite AS good as freshly-mixed GS, but it's better than wasting a bunch of it.
|
|
#
?
Jul 27, 2015 19:49
|
|

|
But seriously, if you decide to dip using wood stain or army painter remember to use some goddamn matte varnish afterwards. Go watch the Dr Faust video on army painter quickshade to get an extremely good example why.
|
|
#
?
Jul 27, 2015 20:31
|
|

|
thespaceinvader posted:It starts curing right away, so leaving it for a little while will make it a little firmer and a little less sticky, but not much. Leaving it to cure for a long while will make it carvable/sandable, rather than mouldable which can be good for making weapons and such. Excellent, this is exactly what I wanted to know. Does that mean that for gap filling it's best to mold it as much as you can while it's still fresh on the model?
|
|
#
?
Jul 27, 2015 20:47
|
|
|
Post 9-11 User posted:Looks great! Having the arms away from the chest allows more of the detail in the model to show and that fighting stance is very Khorne: all offense and no defense. thespaceinvader posted:The conversion looks weird to me because how is he going to swing that axe past those horns without popping his own head off...? Yeah that's my exact issue with it - the side horns are actually from a different option for the head as I didn't like the straight horns, and I already had to reposition them forward to accommodate for the arms, but if I chop off the top horns it looks too bull-like, visually I think the top horns are important. Maybe he's a magic demon from the Warp and the horns get insubstantial when he needs to make a swing? I actually ended up cutting off a fair amount of each arm to get them to fit in the right position and I had to segment the axe and reassemble it so the hands lined up, so I might have shortened them too much to make them fit? I think it'll be ok once I paint it.
|
|
#
?
Jul 27, 2015 20:55
|
|
|
rantmo posted:Excellent, this is exactly what I wanted to know. Does that mean that for gap filling it's best to mold it as much as you can while it's still fresh on the model? Definitely, and I also suggest using some silicone-tipped clay shapers to wedge the GS into the gap and work it to look like a seamless join. Those tools have saved my models (after I've dropped them) on multiple occasions. e: Protip, you'll probably use less greenstuff than you think you'll need when filling gaps. Also, CA glue plus greenstuff equals an excellent bond when pinning. Dr. Gargunza fucked around with this message at 23:07 on Jul 27, 2015 |
|
#
?
Jul 27, 2015 23:04
|
|


|
I've been pretty drat productive over the past week. Finished up Thyron from Warmachine, I really like the pants and base, I'm more middling on the armor. In hindsight, I should've spent a lot more time doing real dramatic blends on it, but by the time I figured that out, I was pretty committed to the decent but messy look I've got here. I may pick up another one to try to improve on in the future. The sword is another target for more dramatic blending, but I pretty much punted on it. If I do it over again, I'm leaving it detached so I can have maximum access to all its surfaces. The loincloth is just kind of sculpted ugly, and I'd probably replace it wholesale on a future version.  I also speedpainted a trio of Unidron Batroids for Infinity, rounding out my new Combined Army starter box force. Quick tabletop quality stuff here, but not bad for under 3 hours of work total, I'd say. Given more desire to spend effort on cheap line troops, I'd spend more time highlighting their weird tentacle heads and making the eyes really pop instead of their current "well, they're there, I think".  (full box shot)  Finally, I did some messing around with a weird blending technique that Ben Komets demonstrates in his Painting Buddha videos, and it's surprisingly easy to make work, assuming that you can get the paint consistencies correct, which takes some practice and probably a wet palette. Interested to see where I end up going on the rest of the mini. 
|
|
#
?
Jul 28, 2015 01:31
|
|

|
stabbington posted:Unidrons Umm... 3 hours!?  Mind posting your workflow? Also, that chestplate NMM looks amazing, I'll have to try it out.
|
|
#
?
Jul 28, 2015 01:54
|
|
|
Dr. Gargunza posted:Also, CA glue plus greenstuff equals an excellent bond when pinning. I've done a tiny bit of that (poorly) and have some more on my repair shelf, including having to rebuilt a wrist on a figure so the hand and staff can reattach (going to try and get someone to do that for me since I have less than no experience or skill at sculpting.)
|
|
#
?
Jul 28, 2015 03:01
|
|
|
I got my Scibor dwarves in the mail from Poland finally. Beautiful (if expensive) miniatures, lots of fun to paint so far. Any tips on beard and hair? Should I go lighter and more dramatic with highlights? 
Dirt Worshipper fucked around with this message at 03:12 on Jul 28, 2015 |
|
#
?
Jul 28, 2015 03:07
|
|

|
Unidron Workflow: Zenithal prime, white over black. Fleshy regions: two washes of VGA Sanguine Red, wash GW Carroburg Crimson, rough highlight with VGA Bloody Red. Metal stuff: base Scalecolor Black Metal, wash GW Nuln Oil, edge highlight Scalecolor Heavy Metal. Arm stripe: freehand a line of GW Mephiston Red, highlight with GW Bloodletter, then with VMA Flourescent Red. Eyes: Dot with white, glaze with Createx Flourescent Pink (only really successful on one, as I said, this was fast). Guns: Base black, paint upper surfaces a mix of VGC Turquoise and VGC Black, edge highlight white. Base: thin VGC Scurf Green goes under the middle of the model, thin P3 Arcane Blue in the light areas, allow to mix to form a nice natural gradient, drybrush VMC Ivory once it dries, rim black. In other words, the basic trick is that it's only a few simple colors, base/wash/highlight, and looks kinda meh up close.
|
|
#
?
Jul 28, 2015 03:12
|
|
|
Dirt Worshipper posted:I got my Scibor dwarves in the mail from Poland finally. Beautiful (if expensive) miniatures, lots of fun to paint so far. Any tips on beard and hair? Should I go lighter and more dramatic with highlights? There's a really nice subtle softness to these as is. What colours are you using? What's the technique? What minis are these?
|
|
#
?
Jul 28, 2015 07:23
|
|

|
Just got back into the hobby after being out for about half a decade i had some models from a couple of Fantasy Flight games (Mansions of Madness & Descent) that i wanted to paint up these are the first models i've ever felt looked competent on any level i need to work on my highlighting, be less messy with my washes, and figure out eyes.  
|
|
#
?
Jul 28, 2015 08:12
|
|

|
stabbington posted:Unidron Workflow: Zenithal prime, white over black. Fleshy regions: two washes of VGA Sanguine Red, wash GW Carroburg Crimson, rough highlight with VGA Bloody Red. Metal stuff: base Scalecolor Black Metal, wash GW Nuln Oil, edge highlight Scalecolor Heavy Metal. Arm stripe: freehand a line of GW Mephiston Red, highlight with GW Bloodletter, then with VMA Flourescent Red. Eyes: Dot with white, glaze with Createx Flourescent Pink (only really successful on one, as I said, this was fast). Guns: Base black, paint upper surfaces a mix of VGC Turquoise and VGC Black, edge highlight white. Base: thin VGC Scurf Green goes under the middle of the model, thin P3 Arcane Blue in the light areas, allow to mix to form a nice natural gradient, drybrush VMC Ivory once it dries, rim black. Motherfucker! And here I thought it was done by hand with a really good knowledge of light reflections.  Are the Black/Heavy Metal paints actually metallic, or just NMM shades called that? Hard to tell in the photos. Are the Black/Heavy Metal paints actually metallic, or just NMM shades called that? Hard to tell in the photos.
|
|
#
?
Jul 28, 2015 11:58
|
|
|
Monster w21 Faces posted:There's a really nice subtle softness to these as is. Thanks man, I'm just thinning my paints on a wet palette (GW and Vallejo). They are Scibor miniatures, the Dwarven line. http://sciborminiatures.com/en_,shop.php?art=1883#i/2013/big/ducal_guard_set_01.jpg
|
|
#
?
Jul 28, 2015 12:00
|
|
|
Would zenthal priming using spray cans and then touching up the highlights with white, followed by a glaze work? I've never really got into glazes at all but seems like a nice way to get vibrancy. I would be painting blues and greens onto PanO infinity models primarily. Would I just add my color to glaze medium or would it require separate Vallejo glazes?
|
|
#
?
Jul 28, 2015 12:09
|
|

|
Southern Heel posted:Would I just add my color to glaze medium or would it require separate Vallejo glazes?
|
|
#
?
Jul 28, 2015 12:59
|
|
|
I'm looking for 7 Warhammer Black Orc armored heads - plastic is fine. I got a bunch of orcs and goblins and a handful of the metal Black Orcs were missing their heads  If anyone could help me out, I'd appreciate it. I'm in the US for shipping purposes. If anyone could help me out, I'd appreciate it. I'm in the US for shipping purposes.Also, if anyone has an Azhag the Slaughterer models they're willing to let go for a reasonable price, I am interested.
|
|
#
?
Jul 28, 2015 13:16
|
|
|
Pierzak posted:The other way around. You add glaze medium to color, it gives the paint a slightly blurred effect so lazy technique looks miles better without blending Perfect and I can slop it over sprayed zenthal/etc.?
|
|
#
?
Jul 28, 2015 14:07
|
|
|
|
| # ? May 9, 2024 07:01 |
|
|
Southern Heel posted:Perfect and I can slop it over sprayed zenthal/etc.? You don't "slop" glaze-medium glaze like a wash, if that's what you're asking. It's for highlighting and thinning paint so it doesn't run like a wash. It's awesome for highlighting Infinity armor though.
|
|
#
?
Jul 28, 2015 14:19
|
|