


|
More WIP on Neran the Scary
|
 #
?
Sep 15, 2015 22:43
#
?
Sep 15, 2015 22:43
|
|


|

|
| # ? May 14, 2024 01:39 |
|
|
Pierzak posted:Always. I never mix new paint on top of a dried layer. It's not the tinting but the old paint may get rubbed off and get flakes into your current work. I used to use bottle caps, and just toss them when I was done.
|
|
#
?
Sep 15, 2015 22:50
|
|

|
Bavius posted:Awesome model, great job sir! Coins dull with handling - thin layers of matte yellow and then brown where extra worn will make them look older. Leave edges where they'd rub and be buffed up shiney. Tiny bits of black dirt will collect - overthin very dark or black paints so it starts to separate a bit and dab that into crevices to simulate the uneven collection of dirt. Make a few into old copper by adding thinned washes of a vibrant greeny blue as verdigris. Pigments as dust looks really good on coinage too if you have them.
|
|
#
?
Sep 15, 2015 23:11
|
|


|
OK, here's the skinny: WASHES: have a very thin, watery consistency. They are most commonly used for shading, where you want to achieve a smooth color transition that accentuates the texture of the model. The easiest way to get this is to start with ink, but you can also do it with paint and thinning medium or flow aid. You typically ALSO need to add some kind of agent to cut the surface tension (though a flow-aid helps in this regard). For example, when I am washing my Necrons, I use the following formula: 5 drops of water, 4 drops of Chestnut Ink, 1 drop of Future (tm) Floor wax. the wax cuts the surface tension nicely. The water is just there to reduce the pigment density in the ink, as ink is already pretty watery. FILTERS: have a very thin, watery consistency, but typically have a higher pigment density than a wash. They are used to change the tonal color of a surface without completely obscuring what's underneath it. They are commonly used to uniformly tint a surface but also have uses for smoothing out color transitions. For all of the glowy orbs of my Necrons, I use a progressive highlighting scheme going from dark red to deep red to bright red to orange to yellow to white (with each highlight covering a smaller area). Once all of that is done, I go back and hit it with a red filter. This tints everything red and smooths out the transitions, making the orb look like it glows from within. You can see an example on the prow of this Annihilation Barge:  And in smaller scale on the orbs on this Deathmark's back: 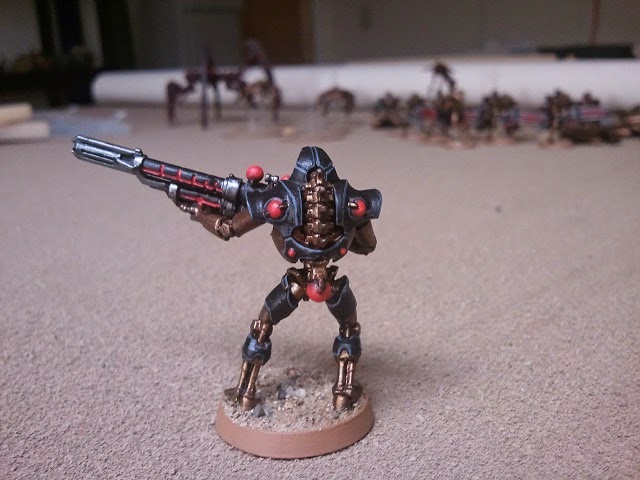 This filter is 1-drop of Evil Sunz scarlet, 2-drops of red ink, and 2 drops of water. Depending on the surface I'm using I might also add Future to cut the surface tension, but for most applications that's not necessary because I'm trying to get it to tint the raised part, not just the recesses. GLAZES: have a consistency that is like a nicely thinned paint (i.e. not straight out of the bottle), but have a lower pigment density. Being thicker than washes or filters, they are more apt to stay where you put them. the point of glazes is to allow the underlying color to show through, making for a smoother color transition. A good way to think of a glaze is as a semi-transparent highlight. It helps saturate your color up, but will take multiple coats to do it. Highlighting (i.e. the act of putting paint on progressively smaller and smaller sections of the miniature) with glazes will produce VERY smooth color transitions. On the black parts of the Annihilation Barge above, I have used a glaze of 2-parts black, 1-part dark red as an edge treatment prior to edge highlighting. You can see it if you look closely. It has the effect of creating a very subtle undertone of color transition from the black to the red, drawing the eye towards the highlighted edge. The paint I used for that glaze is lovely craft paint, which is great for glazes because the pigment density is so low - I actually didn't need to add any medium to enhance its translucency, just a touch of water to thin its consistency and make it flow off the brush smoothly. A filter is typically just a glaze with a very thin consistency. In terms of recipes, it's really hard to go with hard-and-fast rules like 1:4:2 or whatever. Some manufacturers produce thinner (consistency) or more translucent (pigment density) paints than others, and within any one manufacturer's range there will be variations from color to color. Finding yellow paint that has high pigment density is very difficult, for instance, so it almost always takes multiple coats of yellow to get an evenly colored surface (which is why I don't play Imperial Fists). And additionally, the word "thin" gets used in two contexts. When people say, "thin your paints!" they're almost always talking about consistency, i.e. helping the paint flow off the brush more smoothly and not leave brushmarks or paint-induced texture on the mini. But if I'm talking about paints with someone familiar with painting, I might say something like, "that Apple Barrel craft paint is crap for painting miniatures because it's too thin," meaning its pigment density to too low to cover well. This is super confusing for people new to the hobby. Mostly you just have to experiment. Grab a couple of minis you don't care about (preferably with a cloak or something that's good for practicing shading, highlighting, glazing, or filtering) and try some stuff out. Ilor fucked around with this message at 23:38 on Sep 15, 2015 |
|
#
?
Sep 15, 2015 23:33
|
|

|
Ilor posted:OK, here's the skinny: So, would paint, water and a few drops of dishwasher soap work too, if I don't have any floor wax? Would it be the same ratio as above? I think I mistakenly put far too little soap in mine. I also heard to never use tap water. Is this true, or an exaggeration?
|
|
#
?
Sep 16, 2015 00:11
|
|

|
I have never had problems using tap water, but here in SF the water quality is good. If you have a lot of minerals it's possible it could have some adverse effect.Avenging Dentist posted:I was pulling the wash recipe from here: "I made this wash with a flow release solution (20% flow release to purified water) and paint; 2:1 solution to paint." In searching, I've definitely seen a lot of wash recipes that use paint (and a lot that use ink too); is there really no way to get something wash-like using paint? https://www.youtube.com/watch?v=dEkMnP6p08I quote:Filters use oil paints, right? I'll just stick with acrylics and maybe inks for now. As LLor says, you can use Acrylics to achieve a filter effect. It's just easier with an oil due to how it behaves.
|
|
#
?
Sep 16, 2015 00:12
|
|


|
For many people, myself included, the only difference between a filter and a glaze is application. In my experience, these are the same people who don't use any mediums in their glazes. Just water. For competition quality blends it's sometimes a lot of water to a little paint, which is why I like reaper paints because they don't seperate under extraordinarily heavy dilution, or as Jessica Rich calls it: water with the memory of paint. The European's call it juicing. This is also why I don't paint to competition quality, because it's tedious as gently caress. Or at least why I haven't yet. None of the terms are really standardized within the hobby, a lot of blending terms get jumbled up to. Ratios and mediums and diluteness and flow and transparency are all things you kinda need to see what works best for you. There are a lot of paths to the same end.
|
|
#
?
Sep 16, 2015 00:25
|
|


|
BULBASAUR posted:I have never had problems using tap water, but here in SF the water quality is good. If you have a lot of minerals it's possible it could have some adverse effect. The water here is complete crap. I use distilled water for all my painting stuff, just to eliminate the variable of the terrible hard water. It's not like you use much, a gallon lasts forever even using it for cleaning brushes.
|
|
#
?
Sep 16, 2015 00:30
|
|


|
Ilor posted:OK, here's the skinny Thanks for all the details! My main goal is to actually start painting "well" now that I'm getting back into things. My old minis relied heavily on drybrushing and feathering highlights (I think that's the right word; I used relatively-thick paint, put it on a bit thick at the edge, and then "pulled" the paint back across to fade it into the previous color). I usually just basecoated with the darkest color I'd want on the mini and highlight up from there. The end result was probably above-average for tabletop, but I think that had a lot to do with the fact that I have a pretty steady hand. This time around, I want to do something more like basecoating with a mid-tone and then shading/highlighting as necessary. Washes seem like the way to go with shading, especially for highly-textured areas where the paint will easily flow into the crevices. I think I could treat highlighting similarly to how I used to, but use glazes instead to get smoother color transitions. I've been experimenting with stuff, but due in part to some really inaccurate advice from the internet, it did not go well. I guess I'll have to keep trying. A part of me wants to just paint like I used to, but my techniques were really inefficient and in some ways, counterproductive.
|
|
#
?
Sep 16, 2015 00:40
|
|


|
Foolster41 posted:So, would paint, water and a few drops of dishwasher soap work too, if I don't have any floor wax? Would it be the same ratio as above? I think I mistakenly put far too little soap in mine.
|
|
#
?
Sep 16, 2015 00:45
|
|
|
If you really want to step up your painting game I'd suggest getting 5-6 minis and painting each one with a lot of time and attention. Have a color theme in mind and try your best to execute on your vision. Then, when you're done, post it up here or compare it to other models that do your theme better. Look critically at what you painted and compare it to the painted minis which you think are better. Figure out the techniques they used and things you can improve. Then buy those tools/paint/materials and try them on your next mini, pushing yourself to get closer to what you want your models to look like. If you keep pushing and experimenting each time, by the time you've done it 6 times you'll be armed with an entirely new arsenal of painting skills. If you're satisfied with the results, then go and paint the rest of your stuff. If not, keep pushing and trying new things! It's basically what I did to learn to paint. I did about 12 minis and it took me about a year, but you can see how far I was able to come: http://www.powerfisted.com/?p=19 http://www.powerfisted.com/?p=22 You can do it much faster, of-course, and with less trial and error ")
BULBASAUR fucked around with this message at 01:30 on Sep 16, 2015 |
|
#
?
Sep 16, 2015 01:28
|
|
|
  I didn't like this model originally, but I am liking it now that I am painting it! Painting it as a kind of Afrika Korps color scheme. Edit: smoothed out some things 
dexefiend fucked around with this message at 01:41 on Sep 16, 2015 |
|
#
?
Sep 16, 2015 01:36
|
|

|
Ilor posted:It would work, but it would NOT be the same ratio as in my example. I started with ink, you're starting with paint. You'll need to thin the consistency of that paint down a lot to achieve the same effect. A thick wash might be 1 paint to 5 water, a thinner wash even more. And again, this depends on the consistency of the paint with which you're starting. Good to know, though I was mainly asking about the ratio of dishsoap. Would it be different than wax? So, would: 1 part paint (I used a plain old "craftsmart" paint for my base white and blacks because their cheaper), 5 part water and 1 part dish-soap?
|
|
#
?
Sep 16, 2015 01:58
|
|
|
Ilor posted:OK, here's the skinny: This is a really handy guide, thanks for sharing! Continuing the streak of Terminators I've been painting, it's a Terminator Command Squad! After building my Deathwing Knights, I found that the kit still had oodles of bits left over that I really wanted to use. After getting a few Terminator legs and Terminator backs (plus a kind donation back piece from Lingcodkilla) I was able to use those bits and put together a squad to escort around all the Deathwing characters I've been painting up. 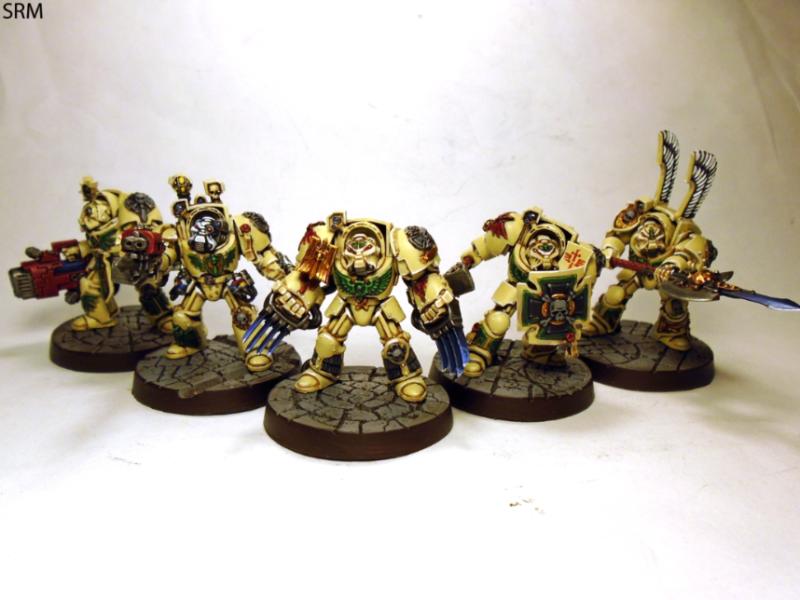  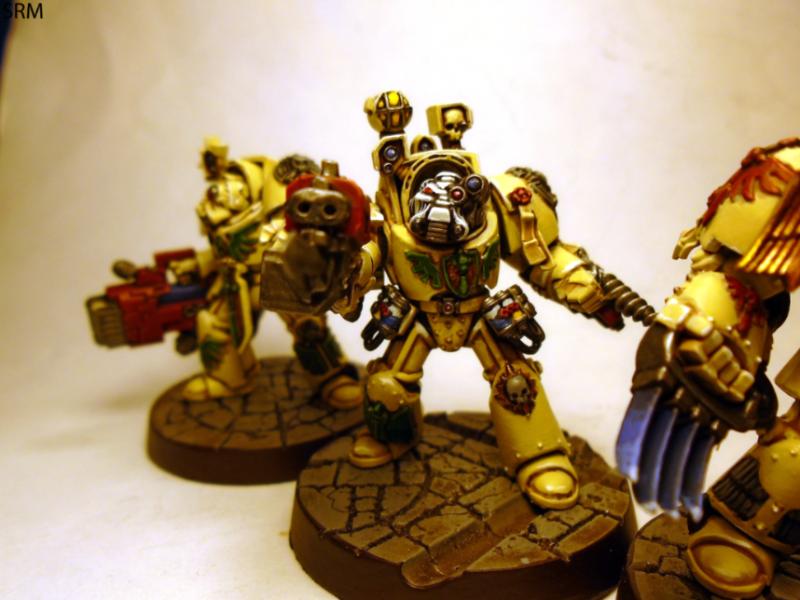   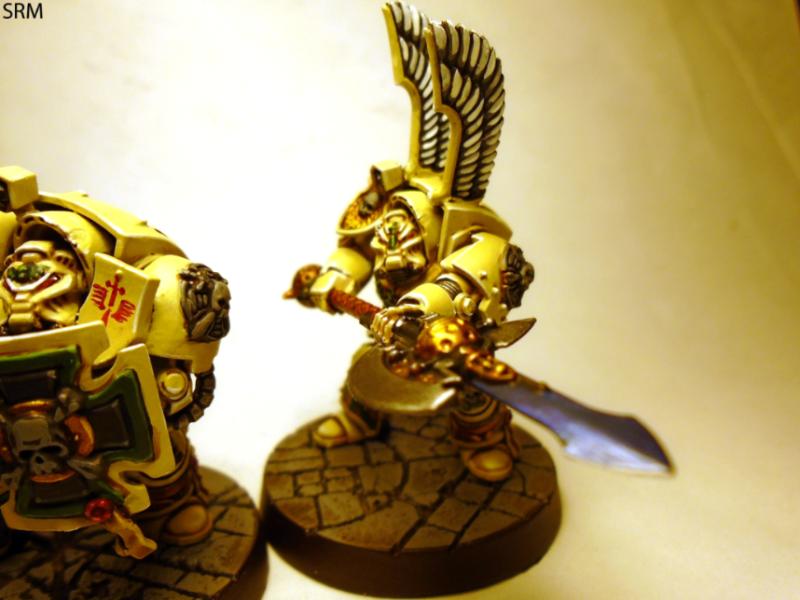 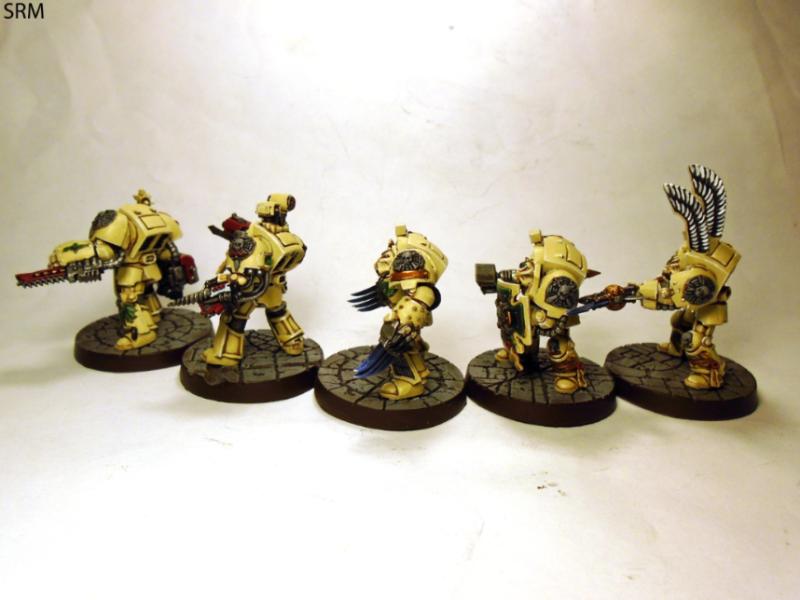   And with the OG they'll be protecting: 
|
|
#
?
Sep 16, 2015 02:25
|
|

|
Foolster41 posted:Good to know, though I was mainly asking about the ratio of dishsoap. Would it be different than wax? I think the idea behind using Future Floor Wax (which is not actually a wax) in washes is that it's a flow aid, and I'd guess that any surfactant (thing that breaks surface tension) would work to some degree. According to one article, dish soap works "in a pinch". Assuming all you need is a surfactant, something like Jet Dry might work better than soap, since I don't think it'll get as bubbly*; it's what I've used in the past for making "wet water" for casting Hirst Arts bricks, and what Hirst himself prefers. It's a bit hard to tell exactly what's in Future Floor Wax since companies aren't in the habit of revealing their secret recipes, but based on how people use it for modeling, it seems like it's an acrylic gloss medium with some flow aid to act as a self-leveler. People also use Future for coating surfaces for applying decals and restoring shine/transparency to clear plastic, both things that you might use gloss medium/varnish for instead (Liquitex at least treats gloss medium and varnish as the same product). * Note: this might just come down to how much you use, since apparently surfactants are commonly used to make stuff get all foamy (e.g. soap). On the other hand, I have a surfactant (for working with plaster) that explicitly calls itself a "debubbler". I might have to try that with some paint and see what happens! Avenging Dentist fucked around with this message at 02:43 on Sep 16, 2015 |
|
#
?
Sep 16, 2015 02:38
|
|
|
I'm not sure the mechanics, but adding gloss varnish to a mix of acrylic paint prevents tide marks. This is something you would use on larger models you were washing or using a filter on.
|
|
#
?
Sep 16, 2015 03:18
|
|
|
SRM posted:This is a really handy guide, thanks for sharing! Jesus christ, you make it hard to not get back into 40k. Thank god I can't paint for poo poo, or I'd be doomed.
|
|
#
?
Sep 16, 2015 04:11
|
|

|
Yes, the point of using Future in your wash is to reduce surface tension. Every fluid has different surface tension properties. The surface tension of water is actually pretty high. One of the things that surface tension does is dictate how sharply the surface of the fluid can bend. High tension = low bend, low tension = much bend. By itself, the relatively high surface tension of water tends cause it to "bead" on surfaces, as seen here: By adding surfactants with a lower surface tension to the wash, you are allowing the surface of the fluid to make sharper turns. Make no mistake, it's still beading, it's just doing it at a microscopic level. As the wash dries, it deposits some of its color in the place where it dried. The amount of deposited color depends on a variety of factors, but one of the things that affects it is the "verticality" of the bead's surface. If you have a wash made with straight water that makes large beads, you'll end up not with a gradually darkening effect as the recesses get deeper, but rather a "ring" effect, where the darkest part of the shading is actually around the edge of the recess, with the deepest part almost unchanged. This is almost exactly NOT WHAT YOU WANTED. The cool thing about surfactants is that they have an effect much stronger than their relative volume. I typically only use 1 drop of Future for every 10 or so drops of water/paint/ink, and I have yet to have any problems with that ratio.
|
|
#
?
Sep 16, 2015 04:11
|
|
|
As a side note, this is why oil washes are a thing; oil is a surfactant, and essentially acts as its own flow aid.
|
|
#
?
Sep 16, 2015 04:18
|
|
|
This is helpful, thanks! Things are going slightly less horribly now, although thinning my paints a lot more than I used to is basically forcing me to relearn painting from scratch. I'm sure I will have more stupid questions to ask in the near future!
|
|
#
?
Sep 16, 2015 07:57
|
|
|
dexefiend posted:
woah thats loving awesome. how did you make it look chipped/worn?
|
|
#
?
Sep 16, 2015 13:24
|
|

|
I'm looking to base a shitload of these: http://store.warlordgames.com/products/volleyfire-lights/ What would people recommend I use to base them? I don't have anything that fits them right now, so I'll have to buy or make something. The one time I've tried plasticard, I messed up cutting it into shape and haven't really tried it since. Is there a trick to getting it cut properly, and to measurements, or do I just have to keep trying until I get it right?
|
|
#
?
Sep 16, 2015 14:32
|
|

|
The Mantis posted:woah thats loving awesome. how did you make it look chipped/worn? Thanks man! I primed with Vallejo primer in Dunkelgelb (German Dark Yellow), airbrushed a mixture of Golden Yellow, Flat Yellow, and a beige to mute it a little bit.  Then sponge painted in the German Grey for the chipping.  Then I painted on raw umber, and streaked it with mineral spirits. In other words, I am a horrible plagiarist... I used this plan of attack: http://www.discountgamesinc.com/blog/the-hobby-corner-16/
|
|
#
?
Sep 16, 2015 14:53
|
|
|
drat it looks good.
|
|
#
?
Sep 16, 2015 14:57
|
|
|
Agreed - those chips in the paint look incredible.
|
|
#
?
Sep 16, 2015 15:16
|
|

|
Why is it filled with rocks, though? Is it supposed to be a coal hopper or what?
|
|
#
?
Sep 16, 2015 15:35
|
|
|
Pierzak posted:Why is it filled with rocks, though? Is it supposed to be a coal hopper or what? I had no idea what it's supposed to be! It is just this empty section with nothing in it. I filled it with rocks an I am going to paint it as a coal hopper.
|
|
#
?
Sep 16, 2015 15:52
|
|
|
dexefiend posted:I had no idea what it's supposed to be! It is just this empty section with nothing in it. I filled it with rocks an I am going to paint it as a coal hopper. I'd say paint the coal with a greenish hue to represent soulstone. Maybe with some glow effect too.
|
|
#
?
Sep 16, 2015 16:04
|
|

|
For people who use wet palettes, are they actually supposed to keep paint liquid overnight? Cuz I've never been able to achieve that with my wet palette, and I'm beginning to think a regular palette would be easier to use. The little dishes would help keep paint from spreading all over when I mix it. Maybe the whole "your paints are fine for weeks or more!" bit is more for people who paint, you know, paintings.
|
|
#
?
Sep 16, 2015 18:56
|
|
|
dexefiend posted:It is just this empty section with nothing in it. Ah, so Wyrd pushing the boundaries of "holy poo poo how do I reach there with my brush" again 
|
|
#
?
Sep 16, 2015 19:09
|
|
|
Avenging Dentist posted:For people who use wet palettes, are they actually supposed to keep paint liquid overnight? Cuz I've never been able to achieve that with my wet palette, and I'm beginning to think a regular palette would be easier to use. The little dishes would help keep paint from spreading all over when I mix it. Other than a few oddball paints that just seem intent to dry regardless mine works so long as I remember to add some water to it every day. And keep it covered, of course (CD jewel case). Otherwise it depends a little on humidity/temperature just how fast it needs topping up especially when in use.
|
|
#
?
Sep 16, 2015 19:15
|
|
|
Avenging Dentist posted:For people who use wet palettes, are they actually supposed to keep paint liquid overnight? Cuz I've never been able to achieve that with my wet palette, and I'm beginning to think a regular palette would be easier to use. The little dishes would help keep paint from spreading all over when I mix it.
|
|
#
?
Sep 16, 2015 19:19
|
|

|
Hm, maybe my sponge just isn't wet enough then. Do you dry out your sponge at all before putting it away? The instructions on mine (Masterson's) say "When you have finished your painting session, ... gently squeeze some of the water out of the sponge. ... If there is too much water in your sponge when you close the lid, the damp atmosphere inside the box will cause your paints to become diluted."
|
|
#
?
Sep 16, 2015 19:42
|
|
|
I have an artists grade wet palette, it'll keep paints liquid for literally months. It won't be usable, but it'll be liquid.
|
|
#
?
Sep 16, 2015 19:49
|
|
|
I'm no science-type dude, but if you squeeze too much moisture out of the sponge before sealing up the wet palette, wouldn't the sponge then absorb the moisture from the paint? Sort of like how if you toss a slice of bread in with cookies, the cookies will stay moist and the bread will dry out.
|
|
#
?
Sep 16, 2015 20:20
|
|

|
Avenging Dentist posted:For people who use wet palettes, are they actually supposed to keep paint liquid overnight? Cuz I've never been able to achieve that with my wet palette, and I'm beginning to think a regular palette would be easier to use. The little dishes would help keep paint from spreading all over when I mix it. If you use a Tupperware that seals it'll keep your paints fresh for a really long time. I've kept mine for weeks. Past that they begin to break up. The important part is to make sure your palette is a container that can be sealed.
|
|
#
?
Sep 16, 2015 20:43
|
|
|
X post from 40k threadLord Twisted posted:So I painted up some Firedrakes. Pretty happy with them, even though I'm not the worlds best painter!
|
|
#
?
Sep 16, 2015 21:34
|
|


|
Lord Twisted posted:X post from 40k thread Those are sweet! How'd you shape the lava channels in the bases?
|
|
#
?
Sep 16, 2015 21:37
|
|


|
Painting up a silver portion of a mini and I don't really want the dingy effect you sometimes get with a black ink - I want this to be a little brighter and shinier, like it was newer and more polished. Will inking it with blue instead make it look terrible? My thought is that it might lose some of the depth you get with a black ink, but I could very easily be wrong. (Maybe a mix of purple and blue might be a better idea?)
|
|
#
?
Sep 16, 2015 22:08
|
|
|

|
| # ? May 14, 2024 01:39 |
|
|
PantsOptional posted:Painting up a silver portion of a mini and I don't really want the dingy effect you sometimes get with a black ink - I want this to be a little brighter and shinier, like it was newer and more polished. Will inking it with blue instead make it look terrible? My thought is that it might lose some of the depth you get with a black ink, but I could very easily be wrong. (Maybe a mix of purple and blue might be a better idea?) Wash with black, repaint silver parts avoiding recesses, glaze with blue on the top half, repaint brightest parts silver again.
|
|
#
?
Sep 16, 2015 22:13
|
|
