


|
AlphaDog posted:I have that kit 3/4 of the way finished, I'm just waiting for them to send me a missing part. Ok, yeah, I wasn't really being fair to it. It doesn't appear to have any of crapttank's glaringly obvious design flaws nor anything as "are you making GBS threads me" dumb as the half-formed muzzle brake. The worst problem I've found so far is that the wings attach to the sprue with this big ungodly blob of plastic that engulfs the trailing 5mm or so of wing and will be a pain to fix. Also, I'd forgotten that it cost me like $12. v  v vAnd yes, this is High-Mock month.
|
 #
?
Nov 3, 2015 01:11
#
?
Nov 3, 2015 01:11
|
|


|

|
| # ? May 9, 2024 11:01 |
|
|
Hi Mock is in progress, I'll have pics when I get my camera back.
|
|
#
?
Nov 3, 2015 04:34
|
|


|
I was wondering, how many 'shelf queens' do you guys have? For me its; - Wespe SPG that I got tired of painting/weathering of - Tiger II that I am backdating to the first production model but still have to scratchbuild the exhausts - T-26 where I messed up some of the tracklinks and I don't really know how to fix them - 251/21 where I messed up the interior paintjob and messed up some things on the AAA guns - 251/7 where I lost some parts of the back doors, working on scratchbuilding those parts now - Stug III G that still needs the indy link tracks done, scratching the frame on the back and extra Pz.IV tracks so I can make it the 'Monte Cassino' Stug Maybe it's a nice idea to have a group effort to finish some shelf queens in December?
|
|
#
?
Nov 3, 2015 12:44
|
|


|
I've got a Revell 1/720 USS Intrepid in half-painted status because of the camo pattern, I just haven't felt like mixing up all the paints required for it yet. Previously I also had an almost-finished 1/72 P-47 due to losing one of the bombs, ended up just removing the other one and finishing it up(and even then screwing up part of the paintjob, but at least I can call it finished) Might go back to painting it after I'm done with my current build, or just not do the camo and paint it in a single color except for the deck.
|
|
#
?
Nov 3, 2015 13:02
|
|

|
Molentik posted:I was wondering, how many 'shelf queens' do you guys have? A man after my own heart I see... both in tastes and attention span... - Tamiya Nashorn, primed - just burned out on - Dragon King Tiger, base coated - also burned out on - Dragon Ferdinand, base coated, glossed, decaled - hosed up a decal in a pretty nasty way, immediately shelved - Dragon Panzer III J, based, glossed, decaled - pitched it this morning, unrecoverable - Eduard F6F Hellcat, 3/4 built - every time I think of putting the fiddly bits on the landing gear I get instantly turned off - Dragon 105mm field gun - kit sucks, fit is terrible, instructions are worse, plastic is brittle, will probably pitch
|
|
#
?
Nov 3, 2015 13:28
|
|
|
Where do I go to learn which particular model paints (preferably Vallejo) to use with a given camouflage pattern? Specifically, Waffen SS Autumn Plane Tree and Golden Oak Leaf. I mean, I can match colors but they tend to change during drying and gently caress mixing shades because I have a whole army to paint in that scheme.
|
|
#
?
Nov 3, 2015 14:09
|
|
|
I have a disturbingly large collection of 1/72 vehicles assembled fully but not painted.Pierzak posted:Where do I go to learn which particular model paints (preferably Vallejo) to use with a given camouflage pattern? Specifically, Waffen SS Autumn Plane Tree and Golden Oak Leaf.
|
|
#
?
Nov 3, 2015 14:32
|
|

|
Molentik posted:I was wondering, how many 'shelf queens' do you guys have? -A Tamiya stug III (the one with the interior) that I just need to get off my rear end and paint -An Academy king tiger where I painted the camo colors in the wrong order, meaning I have to mask off the entire tank rather than just laying silly putty where I want the different-color blobs to be before spraying the base color. Originally planned for it to have a joke "ambush plaid" pattern but the kit took enough work I can't bring myself to do that. -A trumpeter HMS Dreadnought that's waaaay fiddlier than I expected it to be. I can handle a zillion little boxes everywhere. I just can't be bothered to glue four tiny walls together. Every time I decide I'm gonna pull it back out I look at those stupid like plastic squares and just close the box. -A ginormous atomic cannon I got for a song before realizing it's a 1950s tooling. The fit is so bad I keep thinking I'm doing something wrong. Like, "this can't possibly be the way it's meant to go together." Pierzak posted:Where do I go to learn which particular model paints (preferably Vallejo) to use with a given camouflage pattern? Specifically, Waffen SS Autumn Plane Tree and Golden Oak Leaf. Does Vallejo's panzer aces line have what you need? Some of the colors are...well, if not wrong then not quite what the consensus seems to be, but they look good together and there's generally a case to be made for their accuracy. Blue Footed Booby fucked around with this message at 14:37 on Nov 3, 2015 |
|
#
?
Nov 3, 2015 14:34
|
|
|
Arquinsiel posted:I have a disturbingly large collection of 1/72 vehicles assembled fully but not painted. Too green. I meant something like the outer side of this. Sorry if I wasn't specific enough, I know little about historical camo.
|
|
#
?
Nov 3, 2015 14:38
|
|
|
Pierzak posted:Where do I go to learn which particular model paints (preferably Vallejo) to use with a given camouflage pattern? Specifically, Waffen SS Autumn Plane Tree and Golden Oak Leaf. You might want to buy this set, it has all the correct colours you need. http://www.acrylicosvallejo.com/en_US/panzer-aces-camouflage/family/16/46
|
|
#
?
Nov 3, 2015 14:40
|
|
|
Pierzak posted:Too green. I meant something like the outer side of this. Sorry if I wasn't specific enough, I know little about historical camo. I kept digging just because 'tisms, and TBH this is probably better as a general guide.
|
|
#
?
Nov 3, 2015 14:44
|
|
|
Oh and just a tip; when you are painting SS camo with all the little dots, it's WAAAAAAAAAAAAAAAAY easier to get them round and the same size when you use a (sharpened)toothpick instead of a brush.
|
|
#
?
Nov 3, 2015 14:46
|
|
|
I have a Revell Katyusha that turned out to be missing a lot of parts from the kit, so I might just salvage the launcher and slap it on a T-60 chassis. Also a Trumpeter Type 80 that is made from some kind of horrible non-gluable plastic and shatters to pieces whenever I as much as glance at it. Can't really finish either one.
|
|
#
?
Nov 3, 2015 14:58
|
|

|
I have a wooden canoe that I sanded through the resin into the wood, removing the stain in the process. I should finish that some day. I also have the craptank, which I've never gone back and added the decals to.
|
|
#
?
Nov 3, 2015 15:22
|
|


|
Arquinsiel posted:Ah, that's actually a reversible poncho. The colours are basically reversed so they can switch it up and mix and match to make it less obvious that who is where etc. Molentik posted:Oh and just a tip; when you are painting SS camo with all the little dots, it's WAAAAAAAAAAAAAAAAY easier to get them round and the same size when you use a (sharpened)toothpick instead of a brush. Pierzak fucked around with this message at 15:53 on Nov 3, 2015 |
|
#
?
Nov 3, 2015 15:47
|
|
|
I wonder what it was like being the guy in the SS who decides that this season's colours will be "Autumn Plane Tree" and "Golden Oak Leaf". (Hi mock nearing completion.)
|
|
#
?
Nov 3, 2015 16:03
|
|

|
Unkempt posted:I wonder what it was like being the guy in the SS who decides that this season's colours will be "Autumn Plane Tree" and "Golden Oak Leaf". I don't know, it's for Infinity  I hope it looks good but ahistorical enough that people don't give me poo poo for playing Nazis I hope it looks good but ahistorical enough that people don't give me poo poo for playing Nazis 
|
|
#
?
Nov 3, 2015 16:22
|
|
|
Unkempt posted:I wonder what it was like being the guy in the SS who decides that this season's colours will be "Autumn Plane Tree" and "Golden Oak Leaf". Joke about the SS uniforms being designed by Hugo Boss goes here. 
|
|
#
?
Nov 3, 2015 16:28
|
|
|
Molentik posted:Looks interesting! Are you going to glue the PE or soldering the bigger pieces for more strenght? I wouldn't be against soldering; I've got a good temperature controlled iron for my microelectronics work. I got the photoetch sheet when I saw the stock latticework booms:   Arquinsiel posted:But if you put them on the probe you can put teeny astronauts on it and claim it's a Bond movie or North Korean landing on the sun! The metalized sprue with the golden record includes a complementary Grey (Gold?) alien.
|
|
#
?
Nov 3, 2015 17:13
|
|

|
The day has come. I spent a lot of time messing with the anchors, but I simply couldn't find a position where they looked decent to me when lashed to the timberheads, so I chose to display them hanging from the catheads. I then spent far more time than I probably should have messing with the anchor buoys, and in the end was just unhappy with how they looked when properly attached to the anchors, so I decided to display the ship without them. I may make a couple of rope coils and place them on the empty timberheads where the buoys would be hung and belayed, but other than that, and some inspection and touch-up painting/matting, the Serenity is done. I need to re-do my lighting arrangement (which means rearranging the room I take these in) as I'm not real happy with the way these photo's turned out (from a lighting perspective), so I will probably do a full 'finished' photo-shoot sometime later this week. Image dump (bigger than usual - 1600x on the long side)... 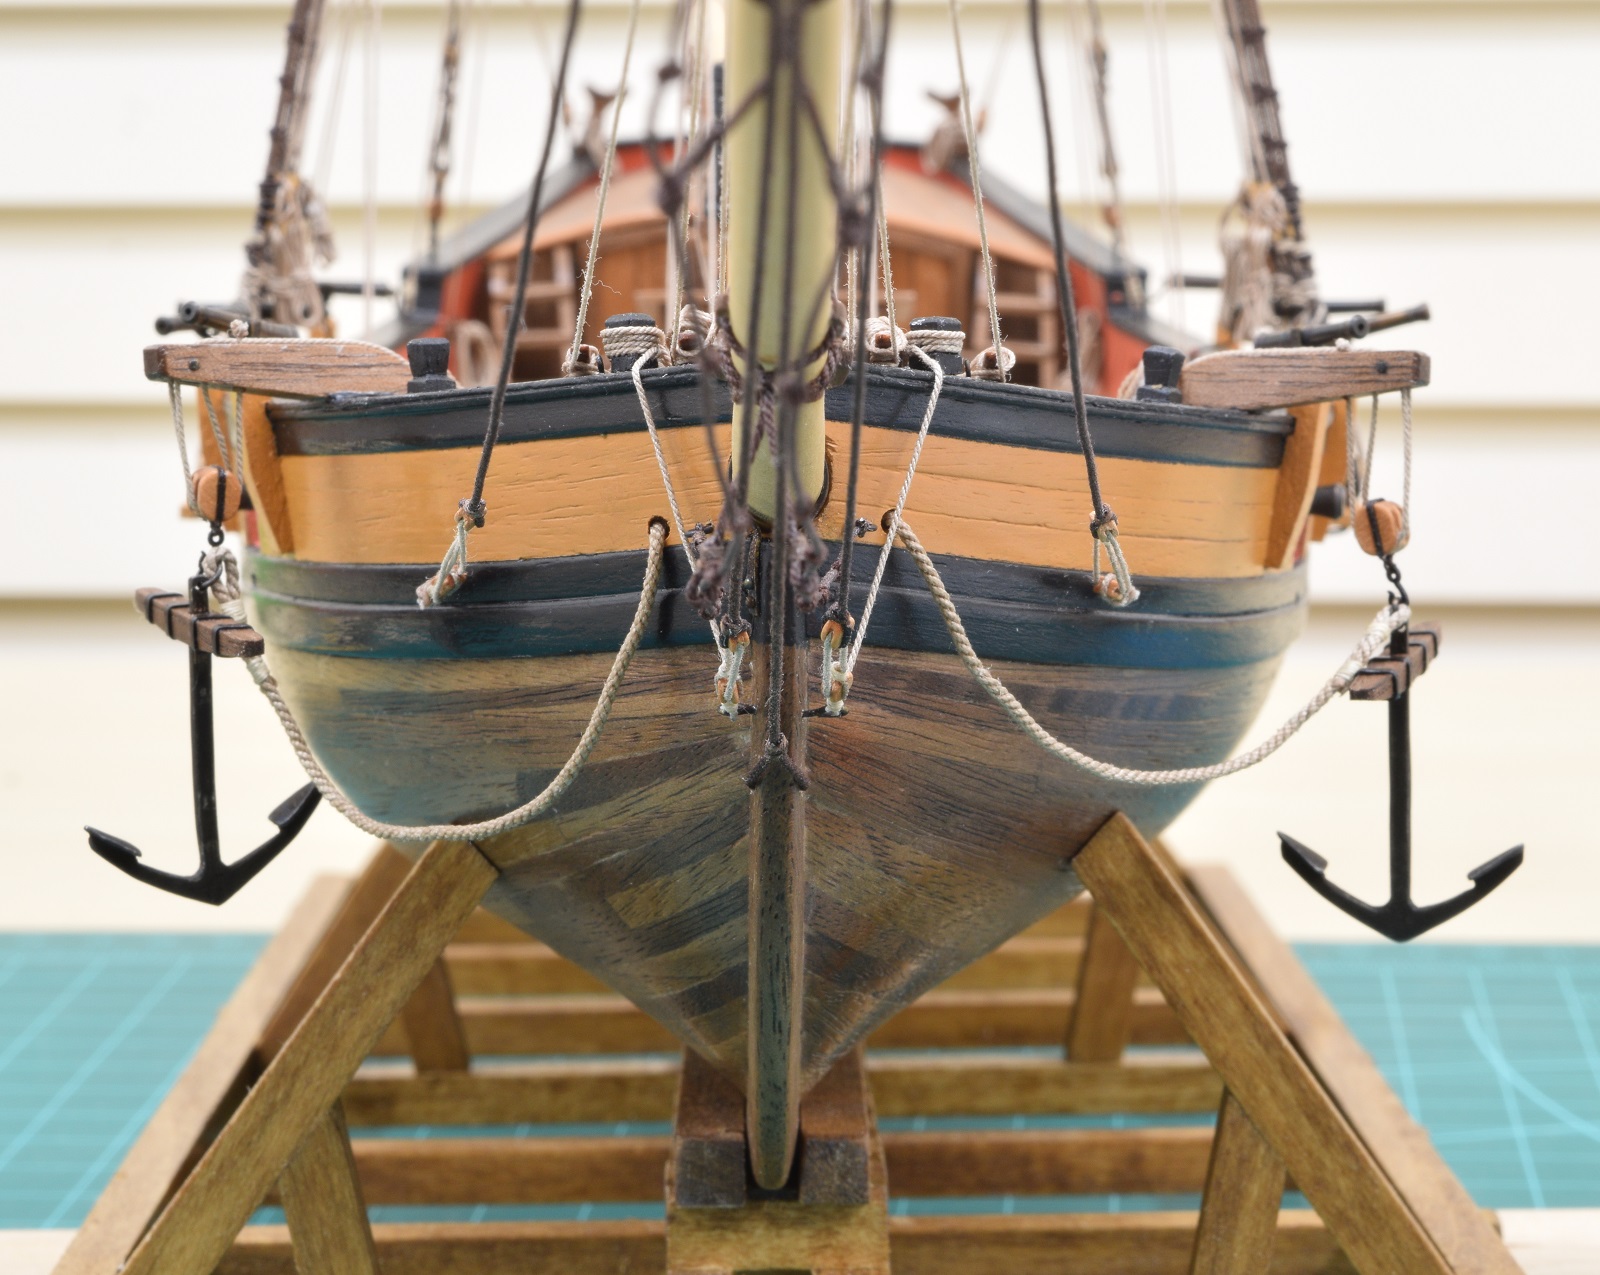 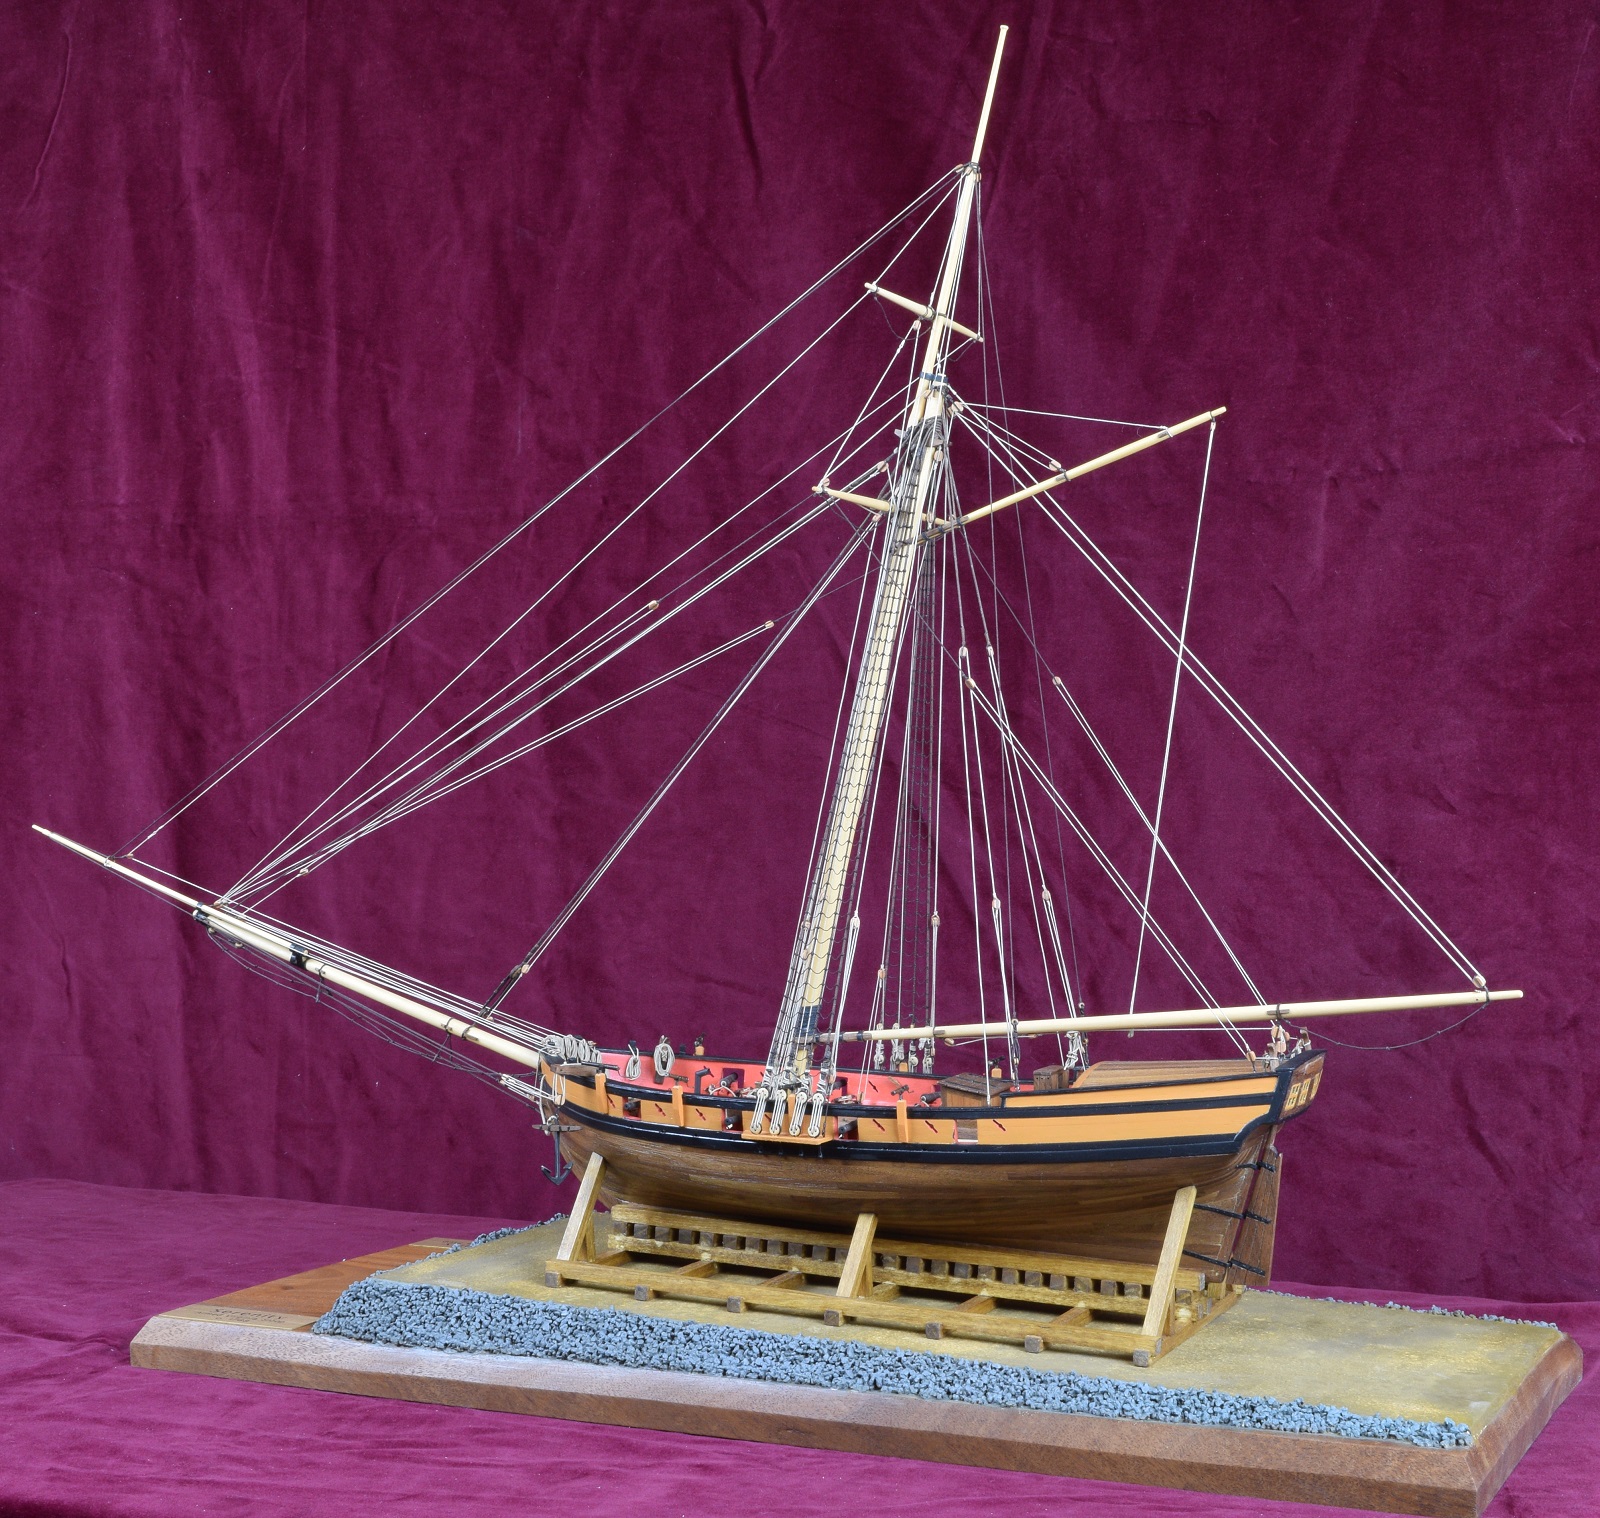 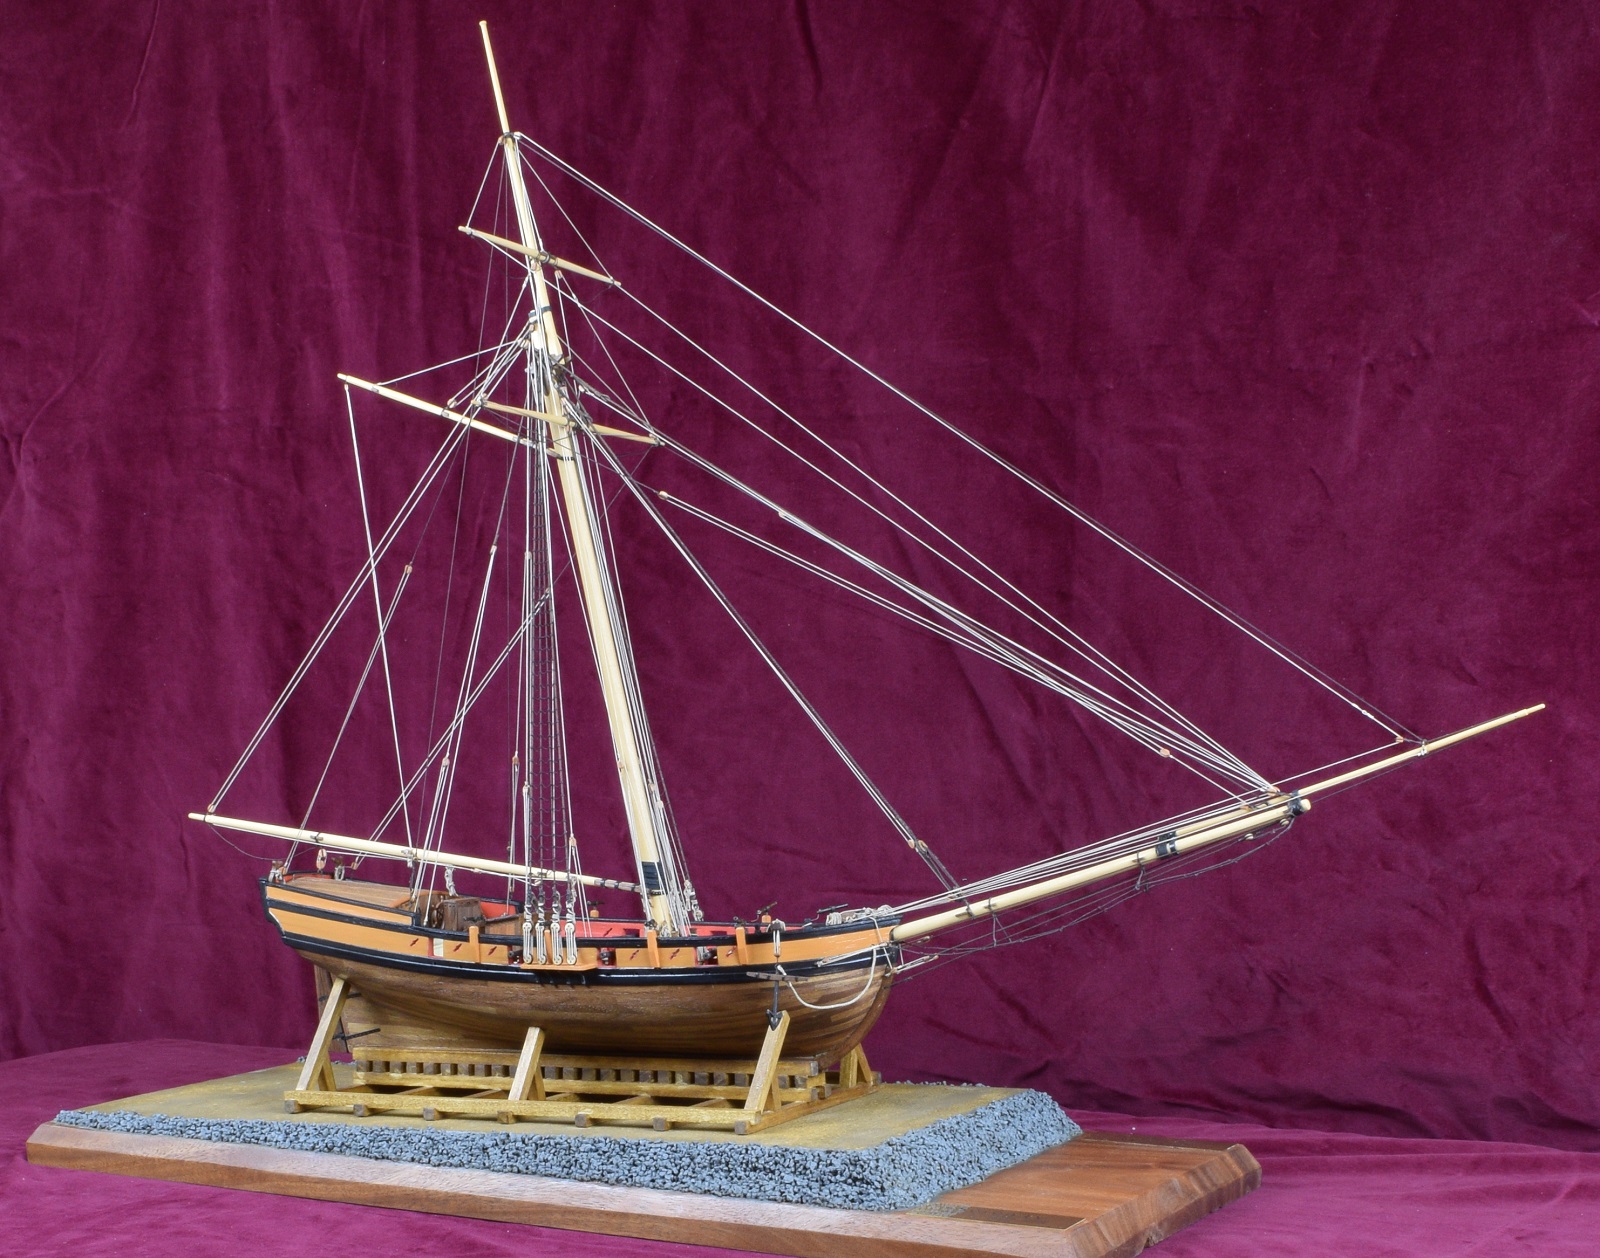 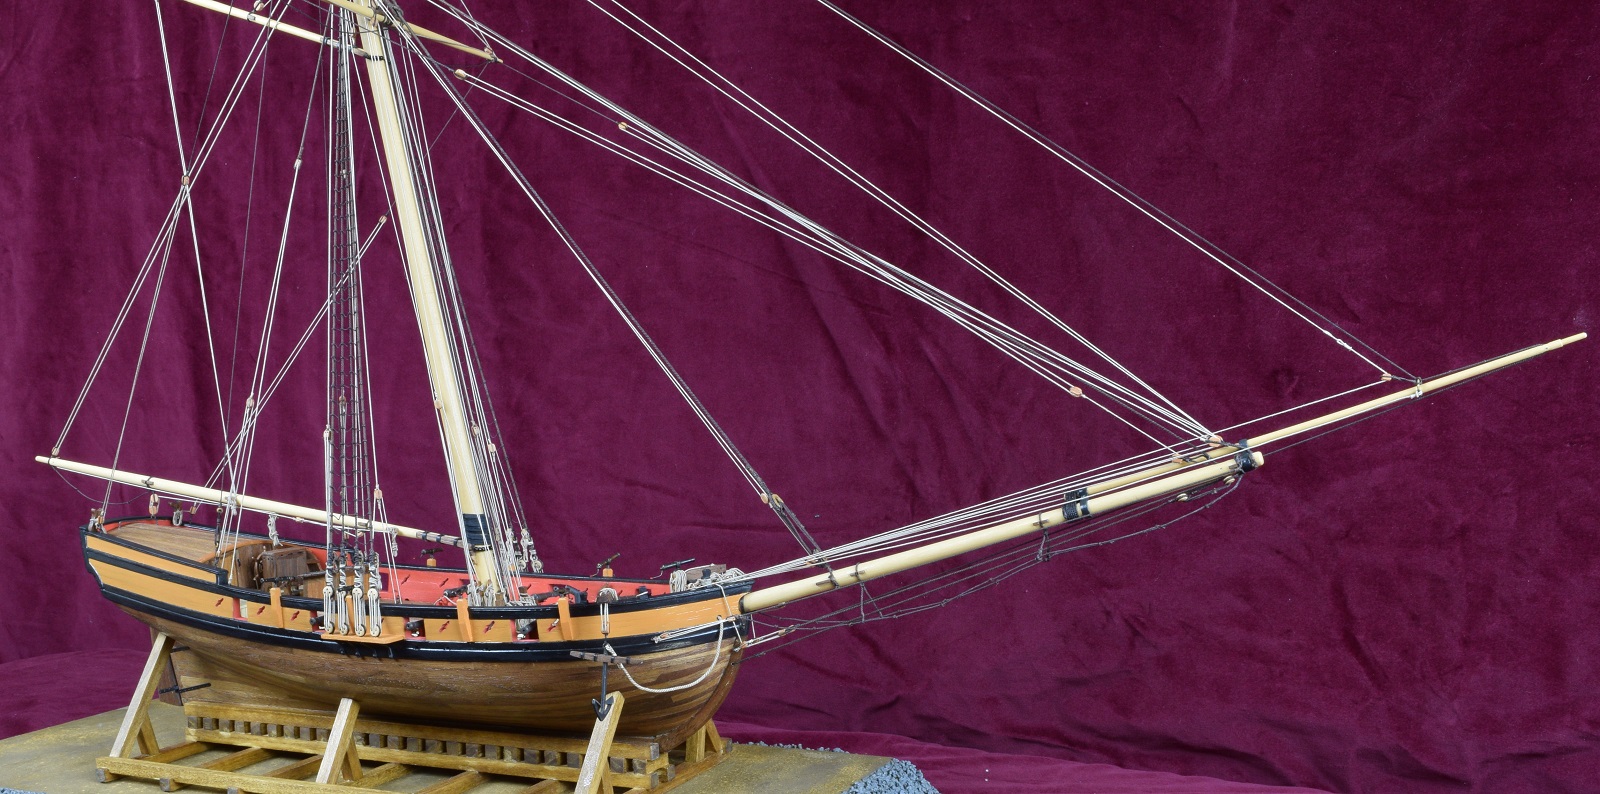 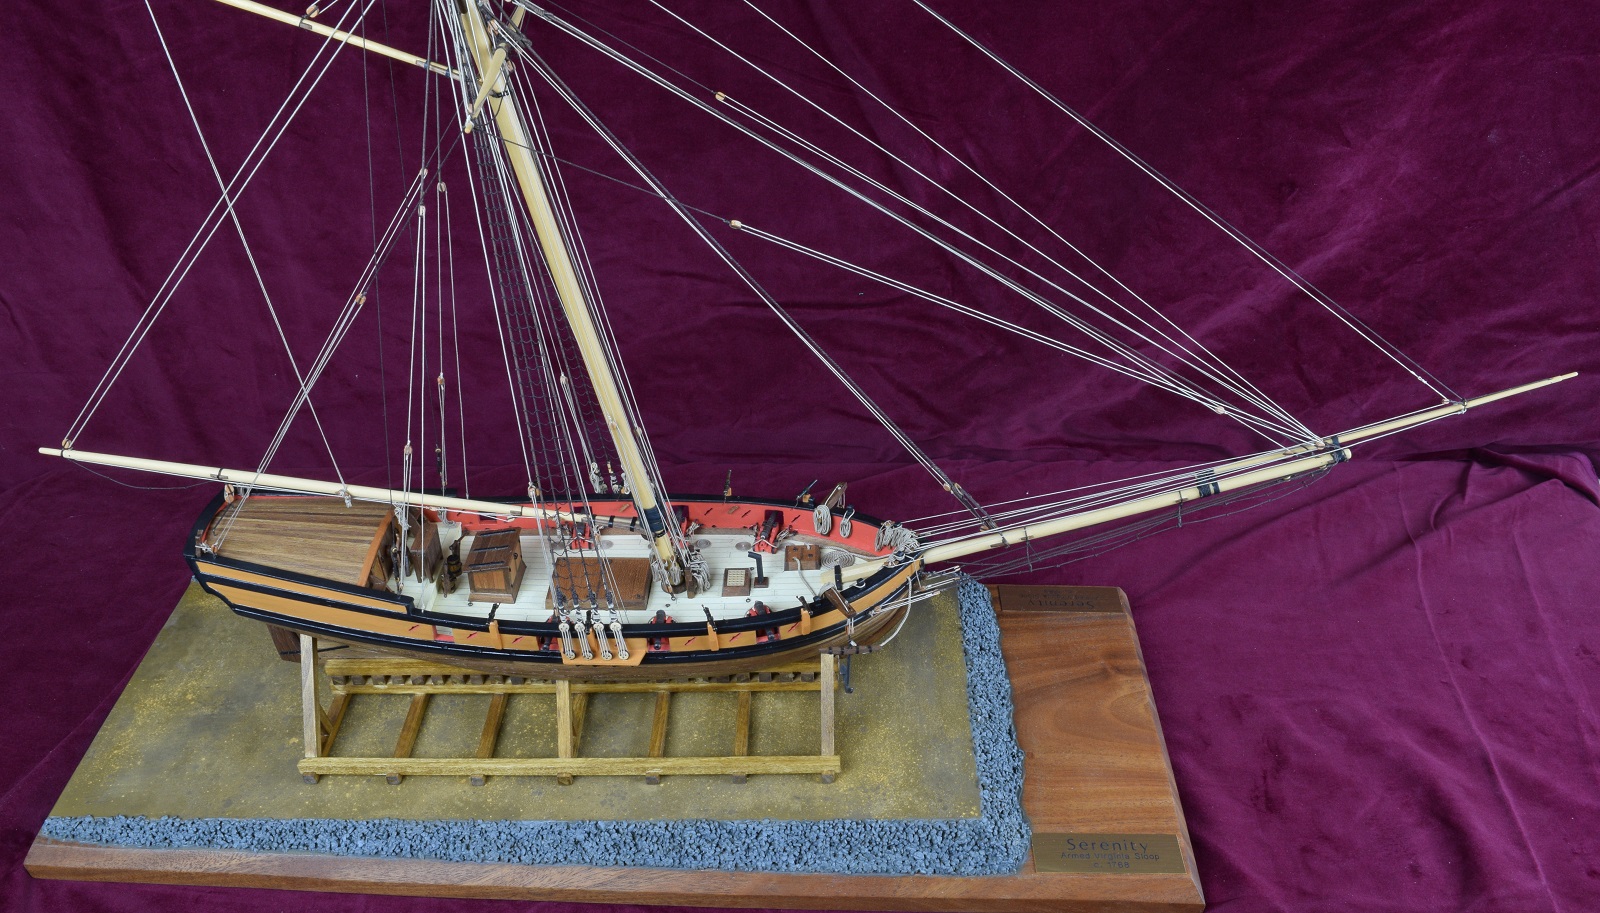 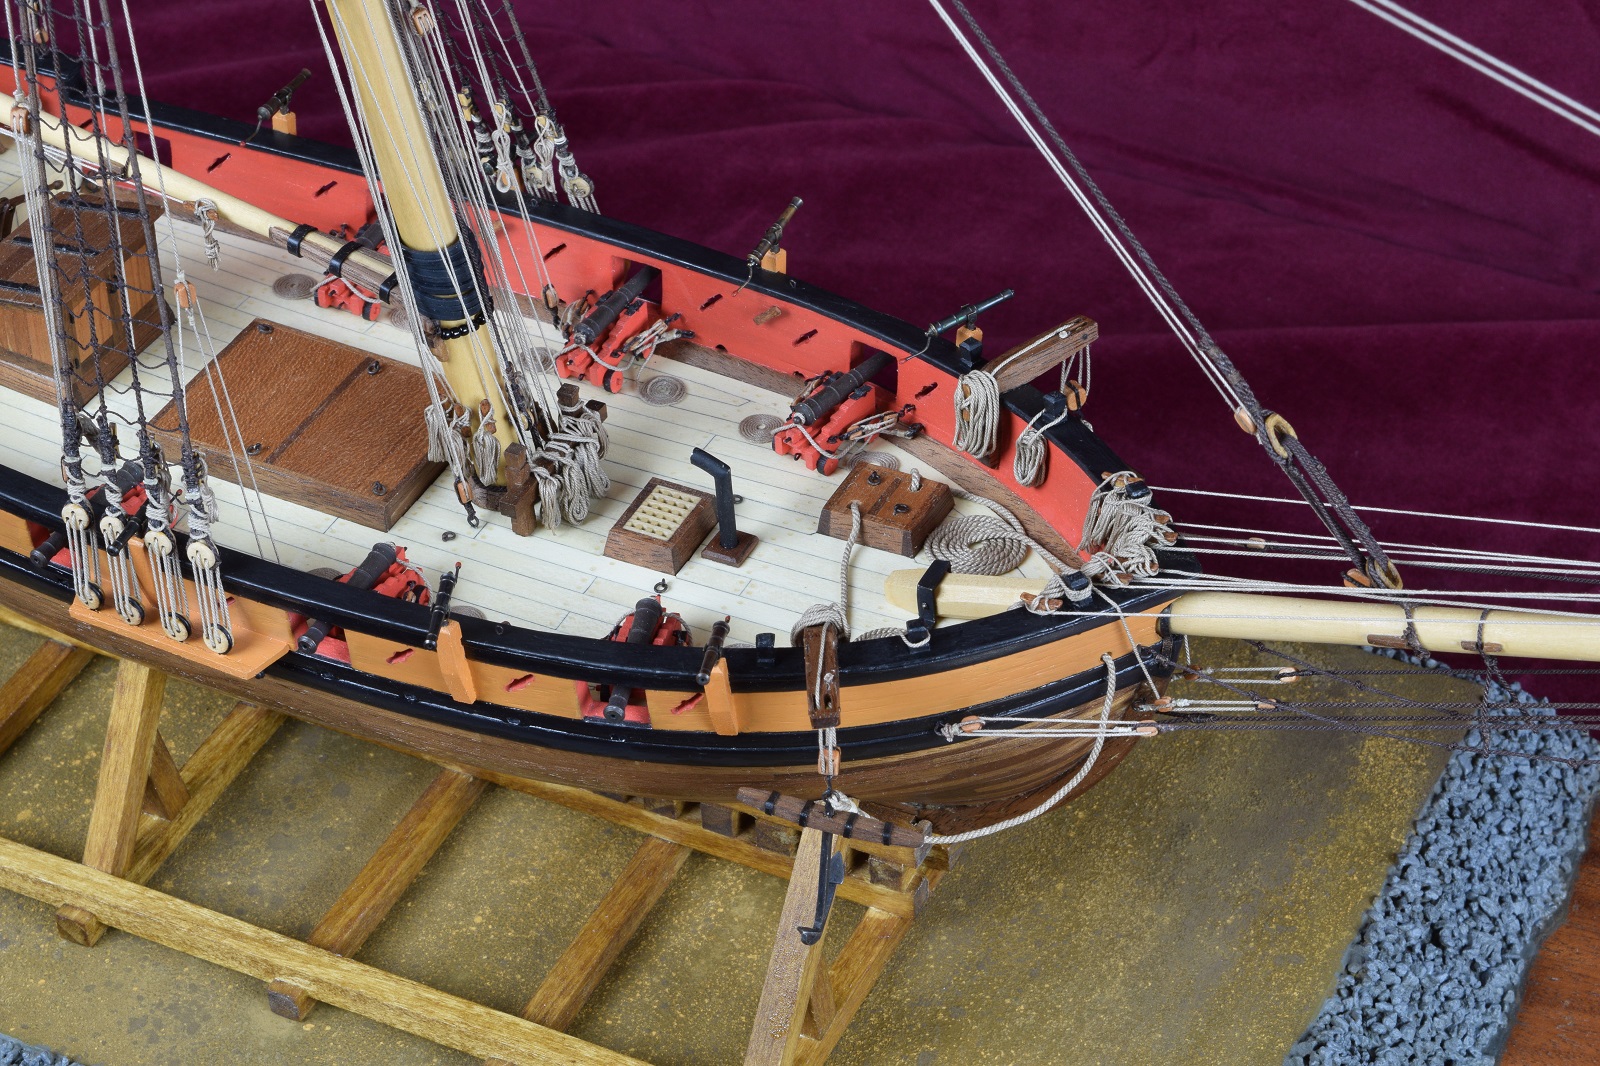 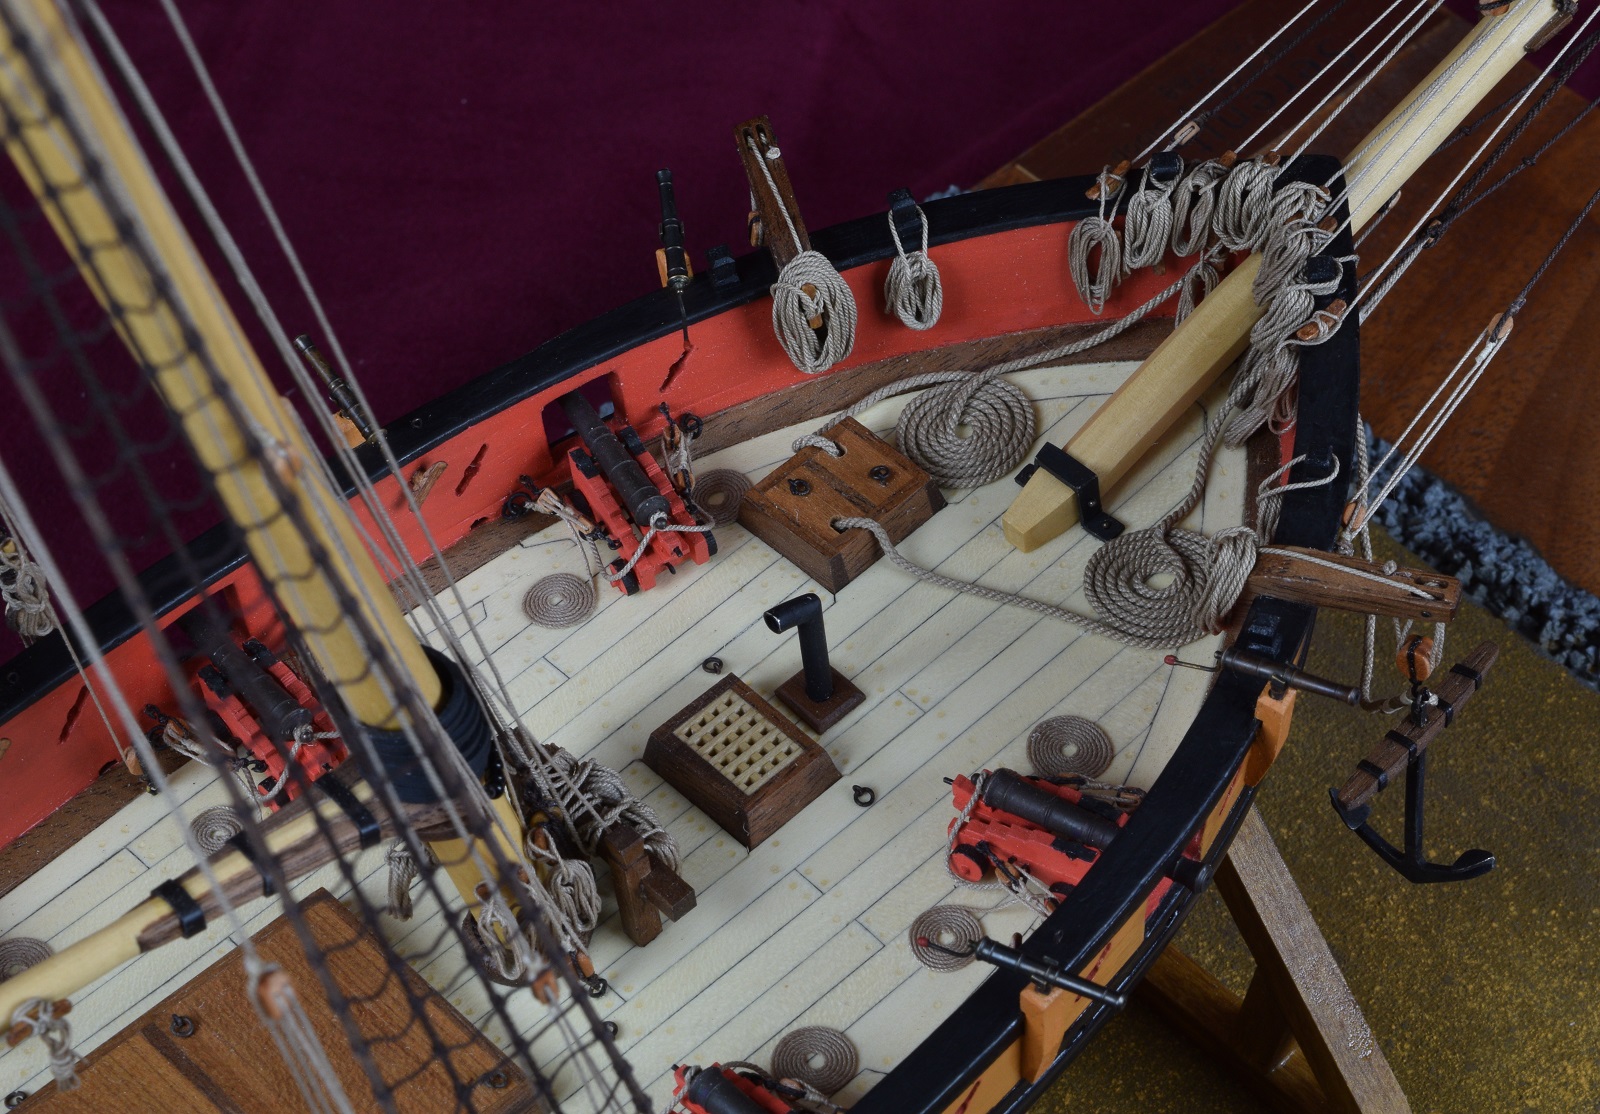 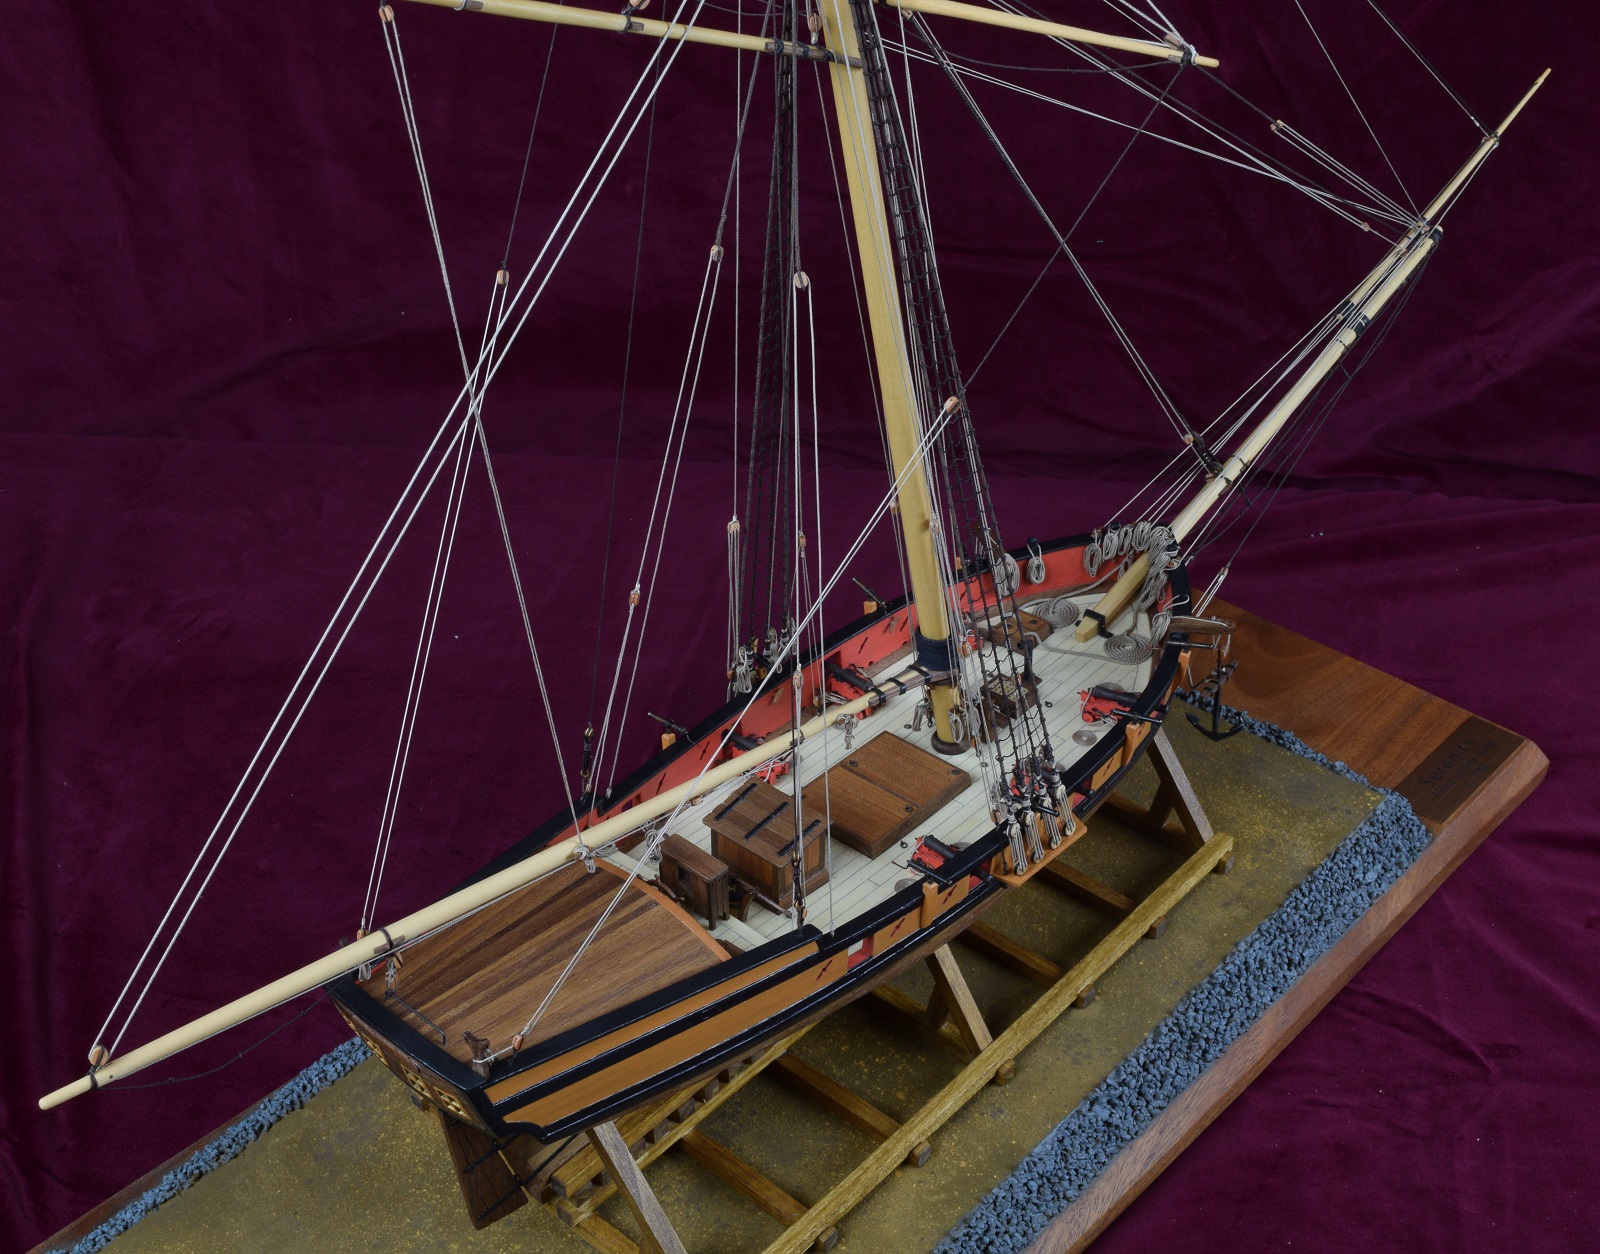 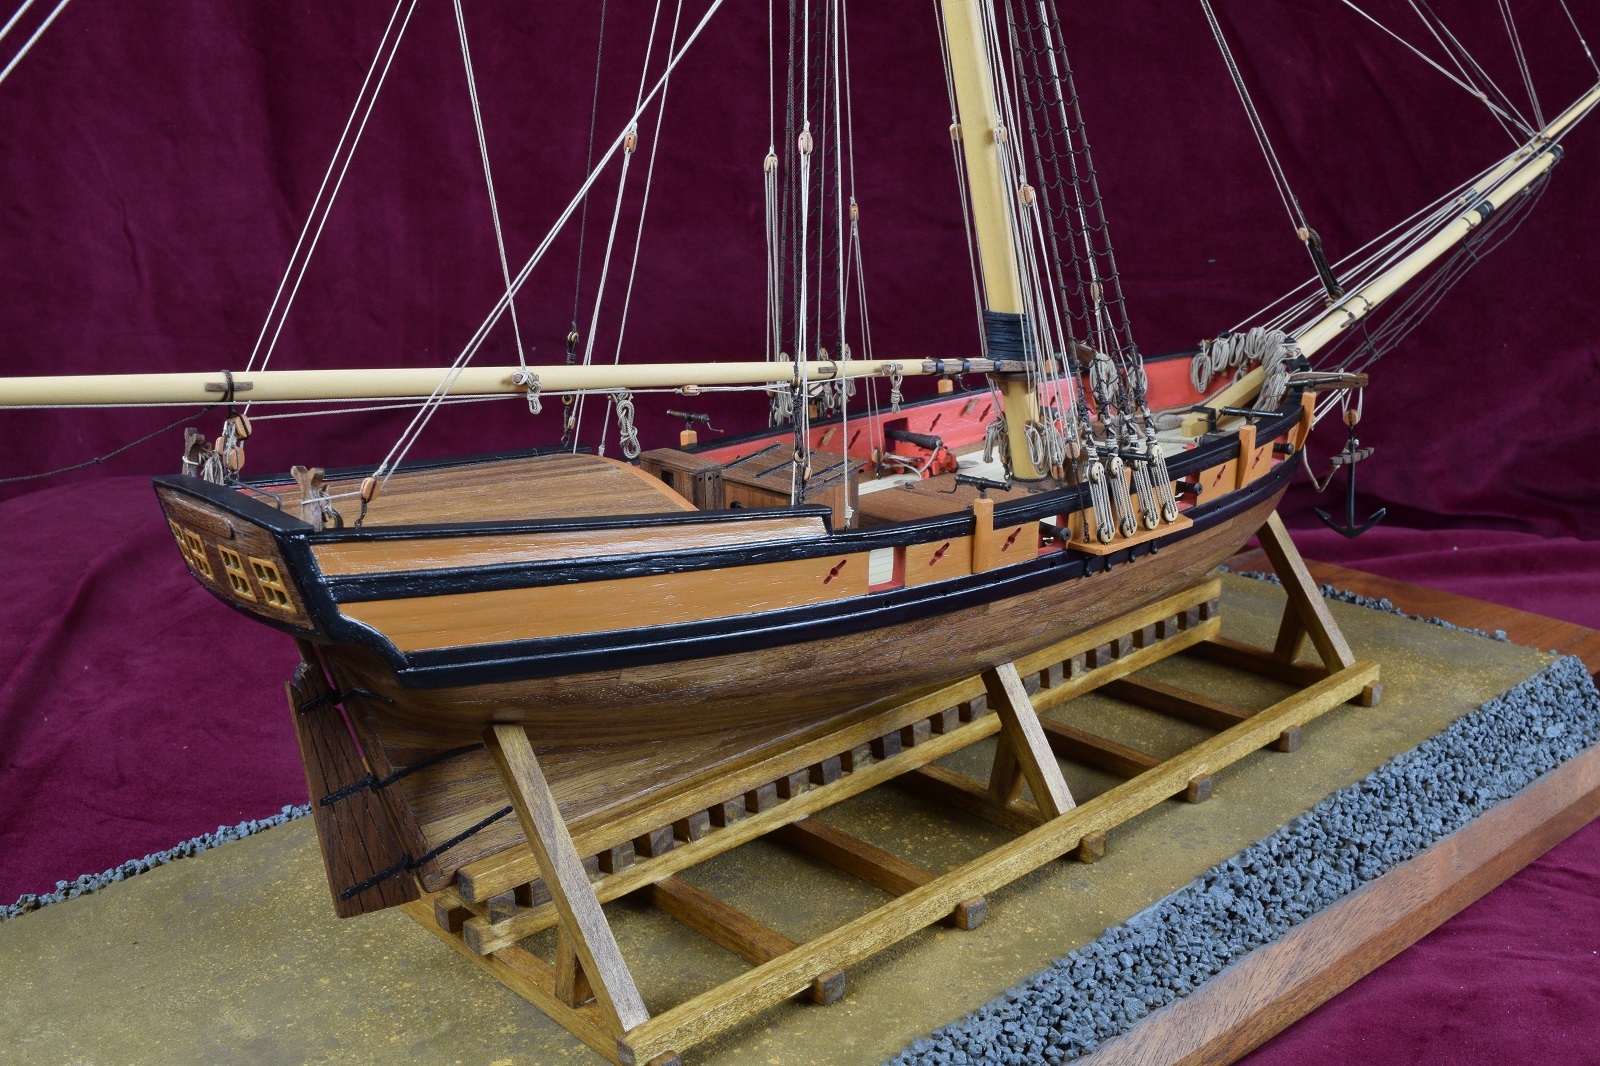 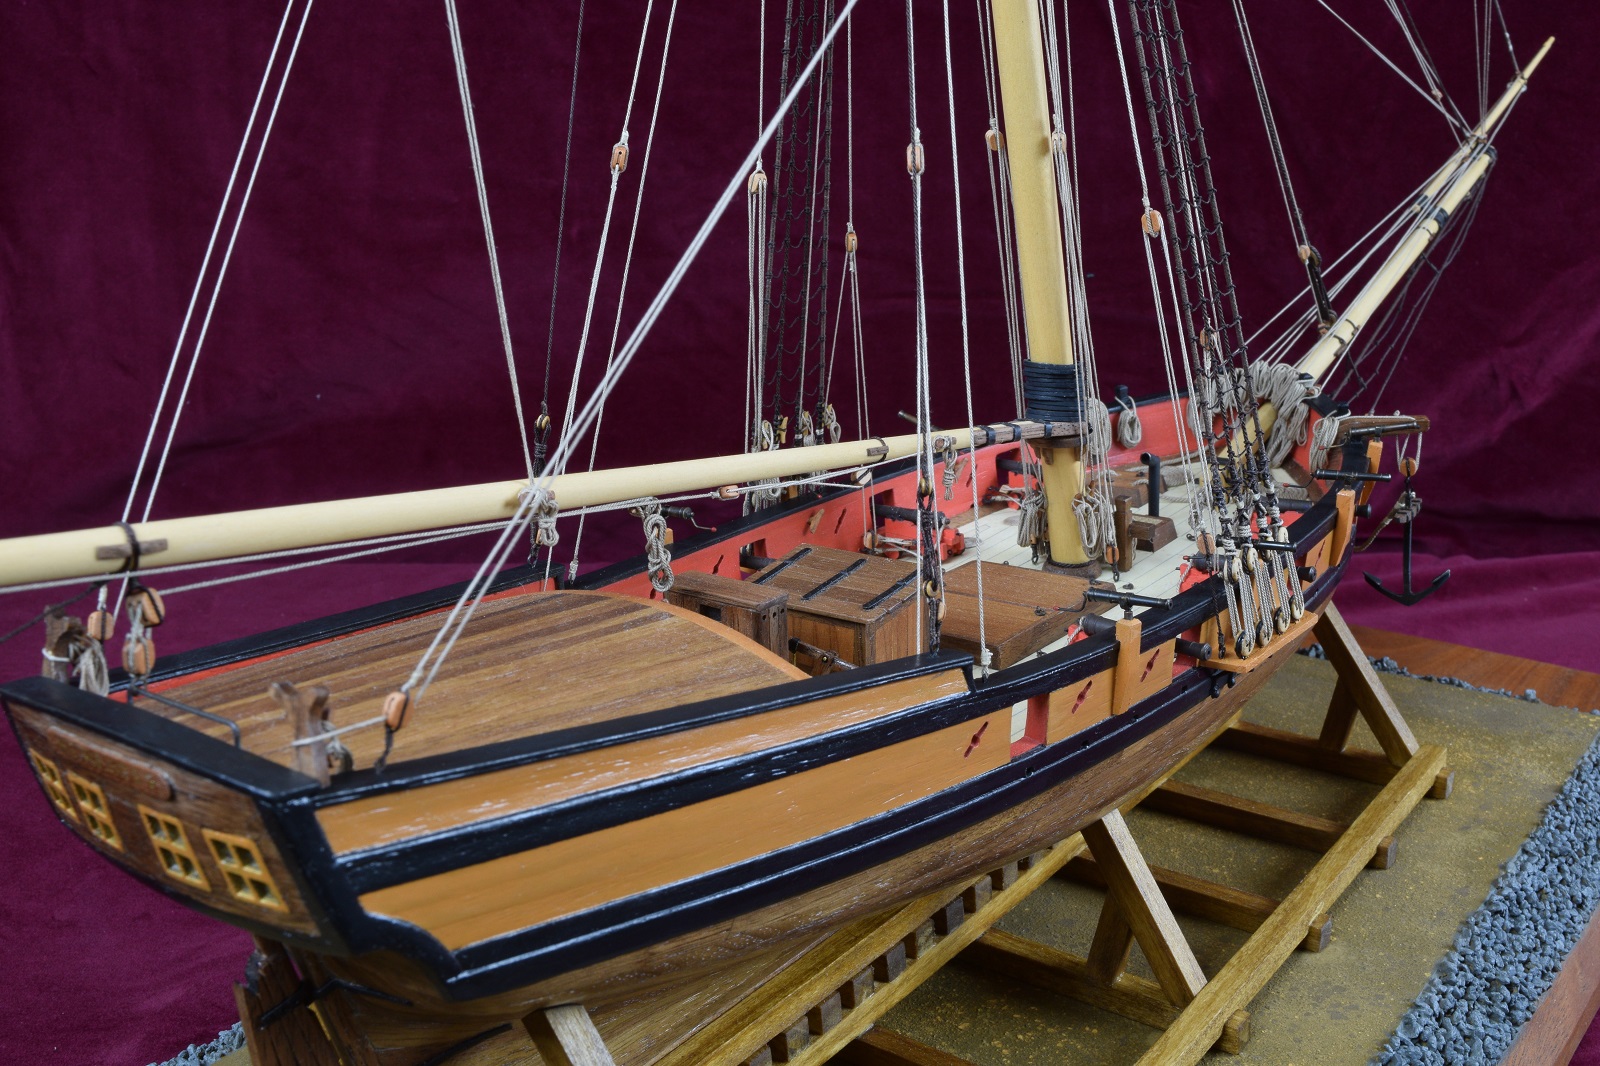  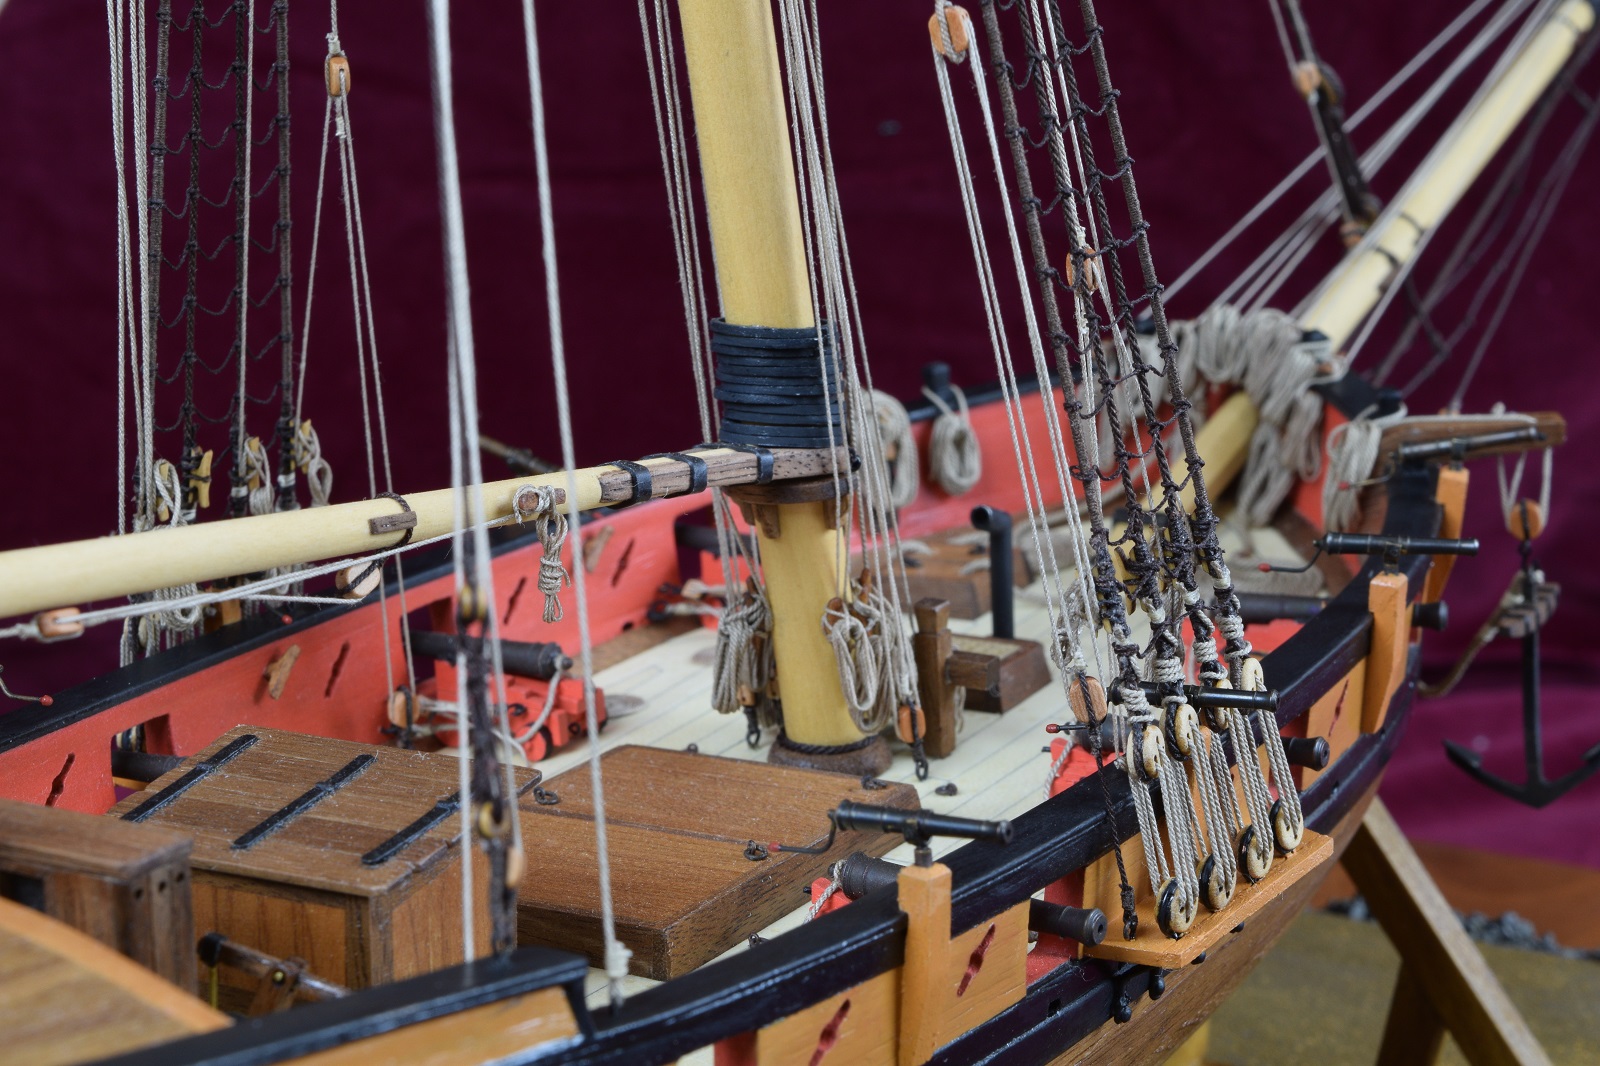
|
|
#
?
Nov 3, 2015 19:52
|
|
|
Blue Footed Booby posted:Joke about the SS uniforms being designed by Hugo Boss goes here.
|
|
#
?
Nov 3, 2015 20:01
|
|
|
A tip of the hat to you, Locator. It seems to have turned out fantastic!
|
|
#
?
Nov 3, 2015 20:08
|
|

|
I don't know which community has the worst aspergers patients, planes or tanks, but putting together this Dragon panzer IV has been an enlightenning experience.
|
|
#
?
Nov 4, 2015 03:53
|
|
|
Finished my Spitfire Mk.i and Bf109e. The spitfire had a much smaller decal sheet than suggested on the boxc and instructions - just the instrument panel, two wing rondels, tail markings, and large side ID markings/rondels. The box showed lots of small decals, but the sheet didn't have them. Oh well. I feel like I did a lot better at the panel lines this time, especially on the bottom of the spitfire, but I can't get a good image of those for whatever reason.   
|
|
#
?
Nov 4, 2015 04:07
|
|


|
Bloody beautiful Locator. That rigging looks fantastic. the anchors look good there, from the sailing I've done the only realistic spot for them is awkawardly lashed to something so it's not 100% in your way. What now? Nice planes too AlphaDog, what scale? I really like the colours on the 109. As for shelf queens, ugh. I've got a wingut wings albatross I haven't started, and 4 1/48 planes plus a 1/48 tank in stages from barely started to just-needs-mud. Plus the tirpitz, which is going well, but a game I kickstarted years ago just rocked up and there is a lot of work in that..
|
|
#
?
Nov 4, 2015 08:37
|
|

|
Sanguine posted:Nice planes too AlphaDog, what scale? I really like the colours on the 109. I'm doing 1/72 at the moment, mostly because there's lots of decent cheap kits available. I'd really like to do some bigger stuff, but I'm going to save it until my skills improve a bit more. The spitfire is the better looking model in person (it's not as dark looking), but the 109 photo'd better for some reason. Maybe one day I'll get a decent camera. What doesn't show up very well in either photo is the panel lining, which I feel went a whole lot better than my last attempts. I did enjoy masking and painting the splinter pattern on the 109. There was a small amount of leakage around the edge of the tape which I can't seem to avoid, but I suspect has a lot to do with how it's brushed on, so I'll read about that before next time. Also, I'm using primarily Vallejo Model Air paints and brushing them on. Depending on the paint, they seem to always be very thin and give poor/streaky coverage, or thick enough that they don't go on nicely. Does anyone have any good resources on preparing/thinning paints?
|
|
#
?
Nov 4, 2015 10:38
|
|
|
Wow, didn't even notice that was hand-painted before, good job! It's been said a million times before, I know, but if you're enjoying the hobby a cheap airbrush and compressor are a good investment. The only way I could ever get good coats hand-brushing was with many very light coats, and it's hard to get the paint consistency and surface wetability right. Plus it takes much longer for a coat to dry with hand-brushes. However I know some people get really good results using brushes only, so take the above with a pinch of salt.
|
|
#
?
Nov 4, 2015 12:05
|
|
|
AlphaDog posted:
The Model Air line is pre-thinned for airbrushing, thats why it doesnt cover as well handpainting.
|
|
#
?
Nov 4, 2015 12:18
|
|
|
The Locator posted:The day has come. I spent a lot of time messing with the anchors, but I simply couldn't find a position where they looked decent to me when lashed to the timberheads, so I chose to display them hanging from the catheads. I then spent far more time than I probably should have messing with the anchor buoys, and in the end was just unhappy with how they looked when properly attached to the anchors, so I decided to display the ship without them. I may make a couple of rope coils and place them on the empty timberheads where the buoys would be hung and belayed, but other than that, and some inspection and touch-up painting/matting, the Serenity is done. This is really excellent work. I'm in awe over the amount of detail you put into it. It was an absolute pleasure to watch the progress. But where are the sails? I don't understand how you put so much detail into something like that and leave the sails off. After all, what is a sailboat without the sails, but something that just floats in the water.
|
|
#
?
Nov 4, 2015 12:39
|
|

|
Sanguine posted:... from the sailing I've done the only realistic spot for them is awkawardly lashed to something so it's not 100% in your way. What now? Thanks, and yea, the way the anchors are stored is that they are pulled up against the rail and lashed to the timberhead that is ahead of the cathead. I have a rope-coil hung off that timberhead that would be used for the lashing. Unfortunately, the measurements just don't work out quite right on this model, and the anchor just won't snug up against the rail properly to be lashed correctly, so it just looked.. wrong I guess. As for what now.. first up is a big cleaning and re-organizing of the shop, since I never really did that after getting all the furniture done (it's a disorganized mess currently). After that, I think I'm going to do something fairly different, and build the "Picket Boat #1", a steam powered launch that sunk the CSS Albemarle using a spar torpedo in the Civil War in 1:24 scale. Saddamnit posted:But where are the sails? I don't understand how you put so much detail into something like that and leave the sails off. After all, what is a sailboat without the sails, but something that just floats in the water. They haven't been attached yet of course. ") The truth is that I just haven't figured out the sewing stuff (or some alternative methods) to properly make sails that look decent, and this is only my 2nd build. This kit is not designed to include sails, so I would have to create the patterns on my own and figure out how to make them work through trial and error, and I just don't have the interest in learning those skills at this time. Since the ship is displayed hauled out of the water (or not yet launched), it's reasonable to assume the sails would be removed for replacement or repair. Down the road I do intend to learn the 'sail' aspect, at least well enough to do furled sails, but I know that it would take me at least another several months to get them figured out and done on this ship, and since the plans don't cover the sails there would be a lot of guessing or 'faking' on my part, and honestly, I'm ready to be done with this ship and move on to something else, as I've been working on this for near 14 months now.
|
|
#
?
Nov 4, 2015 17:26
|
|
|
Saddamnit posted:But where are the sails? I don't understand how you put so much detail into something like that and leave the sails off. After all, what is a sailboat without the sails, but something that just floats in the water. Sails generally aren't part of ship models. There are certainly many models out there that do have them, but sail-less models outnumber models with sails by about 100 to 1. Usually this was because sails would hide much of the intricate rigging work. I like the look of mast with furled sails wrapped up tight against the booms though. Gives it a really cool look.
|
|
#
?
Nov 4, 2015 22:50
|
|

|
Amazing work Locator. She's an absolute beauty.
|
|
#
?
Nov 5, 2015 02:44
|
|


|
The Locator posted:The day has come. I spent a lot of time messing with the anchors, but I simply couldn't find a position where they looked decent to me when lashed to the timberheads, so I chose to display them hanging from the catheads. I then spent far more time than I probably should have messing with the anchor buoys, and in the end was just unhappy with how they looked when properly attached to the anchors, so I decided to display the ship without them. I may make a couple of rope coils and place them on the empty timberheads where the buoys would be hung and belayed, but other than that, and some inspection and touch-up painting/matting, the Serenity is done. Fantastic work man! That is one pretty ship.
|
|
#
?
Nov 5, 2015 04:38
|
|

|
There sure are a lot of little parts in this Hi-Mock kit.
|
|
#
?
Nov 5, 2015 14:00
|
|

|
Colonial Air Force posted:There sure are a lot of little parts in this Hi-Mock kit. Actually the Hi-Mock's parts are pretty big in-general compared to some. Especially the Real Grade kits, which are basically the 1/100-scale Master Grade kits scaled down to 1/144 scale (High-Grade and Real-Grade size) and stuffed with tiny detail pieces that can, and will, ping off into the ether if given the chance.
|
|
#
?
Nov 5, 2015 14:07
|
|

|
Colonial Air Force posted:There sure are a lot of little parts in this Hi-Mock kit. There's a lot of little parts in gunpla in general, but trust me that you've seen nothing until you've assembled a Real Grade Zaku II:  See the piping on the helmet/waist/legs? You put that together by manually threading individual rings onto a flexible pipe piece. At 1/144 scale (the same scale and size as your Hi-Mock kit). Oh, and those hands have individually articulated fingers.  The MG and PG kits do the same, but those are 1/100 and 1/60 respectively. Still, doing the piping on a MG Gouf gave me sore fingers and a headache for two days. It has absolutely nothing on The Locator's boat-building antics, but still.
Lemon-Lime fucked around with this message at 18:34 on Nov 5, 2015 |
|
#
?
Nov 5, 2015 14:12
|
|
|
Neddy Seagoon posted:... ping off into the ether if given the chance. Scale Modeling Thread; We are all scared of the Carpet Monsters!
|
|
#
?
Nov 5, 2015 15:49
|
|
|
Molentik posted:Scale Modeling Thread; We are all scared of the Carpet Monsters! This is why I paid a lot of money to rip the carpet out and put in hardwood flooring!
|
|
#
?
Nov 5, 2015 17:54
|
|
|
Molentik posted:Scale Modeling Thread; We are all scared of the Carpet Monsters! I have more problems with the cat deciding that I don't pay enough attention to her when I just started mixing up paint.
|
|
#
?
Nov 5, 2015 18:25
|
|

|

|
| # ? May 9, 2024 11:01 |
|
|
Molentik posted:Scale Modeling Thread; We are all scared of the Carpet Monsters! Tile floor, but with open stairs going down nearby. And since my PC desktop doubles at my workspace, my printer has also already tried to eat a small part once.
|
|
#
?
Nov 5, 2015 19:17
|
|