


|
Whoever suggested talcum powder as an additive to superglue (maybe Z the IVth?), thank you. I've been sifting a small bit of talcum powder on top of less-than-perfect joins just after gluing them together, and it seems to be producing a sturdier join.
|
 #
?
Dec 18, 2015 02:19
#
?
Dec 18, 2015 02:19
|
|


|

|
| # ? May 10, 2024 04:42 |
|
|
berzerkmonkey posted:SRM I'm loving your Orks too - what's your recipe for the green?
|
|
#
?
Dec 18, 2015 06:56
|
|

Avenging Dentist posted:Whoever suggested talcum powder as an additive to superglue (maybe Z the IVth?), thank you. I've been sifting a small bit of talcum powder on top of less-than-perfect joins just after gluing them together, and it seems to be producing a sturdier join. Let me get this straight: - you put a droplet of superglue on the miniature; - you disperse some talcum powder on it; - you attach the limb/head/wathever And that's it, right? What kind of superglue are you using? The classic fast drying one (about 10s)?
|
|
|
#
?
Dec 18, 2015 12:25
|
|

|
During a painting session over the summer, I decided to experiment with thinning my paints using acrylic flow release and nothing else, which basically gave me a tinted soap. Months later, the sections I thinned that way are still not completely dry; they're very glossy and a little tacky to the touch but the models have just been sitting on my shelf in hopes that chemistry would do me a solid and dry them out completely. I want to actually finish the models but I'd rather not strip them down and start fresh. I worry about just painting over the soap for fear of it sloughing off, I've considered putting some Pledge floor sealer or Dullcote on and finishing over that, but I have the same fear of it not taking. Any advice?
|
|
#
?
Dec 18, 2015 14:05
|
|


|
That Italian Guy posted:Let me get this straight: No, reverse it. Fill gap with talcum powder. Then drop thin superglue into it. The talcum powder helps give body to the glue. Alternatively mix thick/medium superglue wth talcum powder into paste and use that like putty. Dries faster and sturdier than any of the other paste-like fillers. The Japanese actually make a commercial product which is similar - tiny glass beads mixed with superglue.
|
|
#
?
Dec 18, 2015 14:25
|
|

|
Z the IVth posted:No, reverse it. Haven't done it myself, but I have heard/seen good things https://www.youtube.com/watch?v=5yY17r-hOlM
|
|
#
?
Dec 18, 2015 15:19
|
|

|
Indolent Bastard posted:Haven't done it myself, but I have heard/seen good things https://www.youtube.com/watch?v=5yY17r-hOlM I've been flogging the technique in this thread for ages but only Avenging Dentist seems to have given it a go. 
|
|
#
?
Dec 18, 2015 18:08
|
|
|
Z the IVth posted:I've been flogging the technique in this thread for ages but only Avenging Dentist seems to have given it a go. I'm going to give this a go in the January group build. Just need to acquire more guns... Anyone got any spares? e: Whoops, thought this was the scale modeling thread. Luminaflare fucked around with this message at 22:17 on Dec 18, 2015 |
|
#
?
Dec 18, 2015 18:23
|
|


|
Z the IVth posted:I've been flogging the technique in this thread for ages but only Avenging Dentist seems to have given it a go. I think I've also heard of people using baking soda for this?
|
|
#
?
Dec 18, 2015 21:05
|
|

|
That Italian Guy posted:Let me get this straight: I use Loctite Professional for 90% of my joins, and Loctite Gel Control for the remainder. Usually I just use the latter if the piece is extra-fiddly and I'm having a hard time lining them up quickly enough to keep the Loctite Pro from drying out. I do one of two things (note that all my joins are pinned): Version 1 (for pinholes that are loose-fitting)
Avenging Dentist fucked around with this message at 21:21 on Dec 18, 2015 |
|
#
?
Dec 18, 2015 21:14
|
|
|
rantmo posted:During a painting session over the summer, I decided to experiment with thinning my paints using acrylic flow release and nothing else, which basically gave me a tinted soap. Months later, the sections I thinned that way are still not completely dry; they're very glossy and a little tacky to the touch but the models have just been sitting on my shelf in hopes that chemistry would do me a solid and dry them out completely. I want to actually finish the models but I'd rather not strip them down and start fresh. I worry about just painting over the soap for fear of it sloughing off, I've considered putting some Pledge floor sealer or Dullcote on and finishing over that, but I have the same fear of it not taking. Any advice? Acrylic flow release is meant to be mixed in like a 1:100 ratio with paint/water. The instructions on the back of my Golden Flow Release say one ounce per gallon, which is 1:128. I typically add a tiny drop to a large amount of paint when I want it to get a little slicker and act more like a glaze or ink... I also usually add quite a bit of water at the same time. You used way way way too much and I don't think it's going to work out. You will probably have to strip that stuff out, or at least wash in water and repaint.
|
|
#
?
Dec 18, 2015 21:14
|
|

|
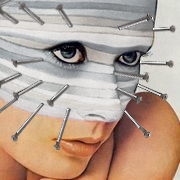
Two days ago I was cleaning minor mold lines on a resin model using an xacto chisel. It slipped and sliced the tip of my thumb nearly off. Blood squirting everywhere I ran into the kitchen to disinfect, apply pressure, and keep the bleeding to the sink. I broke out in a cold sweat and suddenly I had no idea what was going on because nothing made sense I was cold and alone. I was about to panic when I woke up on my tile floor, room spinning, blood everywhere. Later I learned I'd also given myself a minor concussion and hurt my left elbow. I've hobbied for over 10 years and I have never hurt myself before. BULBASAUR fucked around with this message at 00:29 on Dec 19, 2015 |
|
#
?
Dec 19, 2015 00:25
|
|


|
BULBASAUR posted:Two days ago I was cleaning minor mold lines on a resin model using an xacto chisel. It slipped and sliced the tip of my thumb nearly off. Blood squirting everywhere I ran into the kitchen to disinfect, apply pressure, and keep the bleeding to the sink. I broke out in a cold sweat and suddenly I had no idea what was going on because nothing made sense I was cold and alone. I was about to panic when I woke up on my tile floor, room spinning, blood everywhere. Later I learned I'd also given myself a minor concussion and hurt my left elbow. This kind of story is the true origin of "Blood for the Blood God."
|
|
#
?
Dec 19, 2015 00:31
|
|

|
Yikes. Well. We've all known, based on your work that you've been pushing yourself too hard. Nobody can apply pigments and weathering like that, month after month, without hobbying more recklessly and getting exhausted. Get some bed rest. Don't do any hobbies--try working overtime at your job or just digging trenches in the back yard if you need to let off steam. Give your body a chance to recover before you start any squads. Maybe consider limiting yourself to one vehicle or special character a year.
|
|
#
?
Dec 19, 2015 00:33
|
|

|
New WIP. This time survivors. Allister is almost done. Zachary needs some more red tones to the highlights, and Lucy is making some OK progress. Not totally happy with the skin tone.   
|
|
#
?
Dec 19, 2015 03:12
|
|

|
Wow, this is really good. Can you share your process? BULBASAUR posted:Two days ago I was cleaning minor mold lines on a resin model using an xacto chisel. It slipped and sliced the tip of my thumb nearly off. Blood squirting everywhere I ran into the kitchen to disinfect, apply pressure, and keep the bleeding to the sink. I broke out in a cold sweat and suddenly I had no idea what was going on because nothing made sense I was cold and alone. I was about to panic when I woke up on my tile floor, room spinning, blood everywhere. Later I learned I'd also given myself a minor concussion and hurt my left elbow. lol
|
|
#
?
Dec 19, 2015 03:32
|
|

|
Hixson posted:Wow, this is really good. Can you share your process? All the flesh tones are done using the Scale 75 Flesh Tones set and Unnatural Flesh tones set. Initially the model is primed, black to white, in a zenithal manner to achieve preshading, using an airbrush. Then Scale 75 Golden Skin is used as the base colour, with Pale Skin airbrushed on as a highlight. Basic Flesh is also used, spraying in a upward manner to give some shadow. With the base coating done, stronger shades are achieved using washes of Braineater Azure. This helps cool the flesh tones, and provide shadow. Highlights and glazes of the previous colours are used to help the blending, and to push the contrasts.
|
|
#
?
Dec 19, 2015 04:43
|
|
|
BULBASAUR posted:Two days ago I was cleaning minor mold lines on a resin model using an xacto chisel. It slipped and sliced the tip of my thumb nearly off. Blood squirting everywhere I ran into the kitchen to disinfect, apply pressure, and keep the bleeding to the sink. I broke out in a cold sweat and suddenly I had no idea what was going on because nothing made sense I was cold and alone. I was about to panic when I woke up on my tile floor, room spinning, blood everywhere. Later I learned I'd also given myself a minor concussion and hurt my left elbow. Three days had gone by. The blood... it wasn't yours.
|
|
#
?
Dec 19, 2015 06:06
|
|
|
The moral of the story is that if you must ham, ham responsibly
|
|
#
?
Dec 19, 2015 07:58
|
|
|
BULBASAUR posted:The moral of the story is that if you must ham, ham responsibly The moral of the story is keep the fleshy bits away from the pointy bits at all times. I mean, no ham ever does, but, you know, it bears repeating anyway.
|
|
#
?
Dec 19, 2015 09:22
|
|

|
BULBASAUR posted:Two days ago I was cleaning minor mold lines on a resin model using an xacto chisel. It slipped and sliced the tip of my thumb nearly off. Blood squirting everywhere I ran into the kitchen to disinfect, apply pressure, and keep the bleeding to the sink. I broke out in a cold sweat and suddenly I had no idea what was going on because nothing made sense I was cold and alone. I was about to panic when I woke up on my tile floor, room spinning, blood everywhere. Later I learned I'd also given myself a minor concussion and hurt my left elbow. This is loving hardcore. I started on the ruined Imperial industrial type base last night. It looks dark at the minute but I'm going to lighten the brown, add some pigments and some silfor tufts once the varnish has gone on. Only really that and the helmet to do now   
|
|
#
?
Dec 19, 2015 11:39
|
|

|
big_g posted:This is loving hardcore. I hope you don't mind me saying this, as your painting is awesome, but IMHO the base could do with a little tweaking. I think you need some 'in-between' sized bits of debris to blend the bigger pieces into the base. As it stands the ruins on top don't seem to have any weight and look like they've just been placed there. Its a little late to try the alternative, which would be to spread a little putty over the base and sinking the debris into that. BULBASAUR posted:The moral of the story is that if you must ham, ham responsibly To be quite honest it wasn't blood loss that did you in (you wouldn't have woken up if you had gone into shock). Vasovagal syncope to blood is an unfortunate thing to discover when all alone. Can happen to anyone, and sometimes its only in response to your own blood. Z the IVth fucked around with this message at 16:38 on Dec 19, 2015 |
|
#
?
Dec 19, 2015 16:30
|
|
|
I want to try zenethial priming on my next batch of guys, but I don't have an airbrush. Are there sufficiently high quality primer rattlecans available at a hardware store, or am I going to have to suck it up and buy the fancy modeling junk to avoid spraypaint grit?
|
|
#
?
Dec 19, 2015 17:32
|
|

|
grassy gnoll posted:I want to try zenethial priming on my next batch of guys, but I don't have an airbrush. Are there sufficiently high quality primer rattlecans available at a hardware store, or am I going to have to suck it up and buy the fancy modeling junk to avoid spraypaint grit? In the past I have done zenithal using Vallejo spray can primers. I don't trust the other brands.
|
|
#
?
Dec 19, 2015 17:57
|
|
|
Z the IVth posted:I hope you don't mind me saying this, as your painting is awesome, but IMHO the base could do with a little tweaking. Thanks for the comment. I know what you mean...the base never came together as I envisioned it. Part of the fun in modelling is fixing things though. Good advice with adding smaller pieces of rubble I'll probably try that tonight. I do think the extra colours of the pigments and tufts will help as well.
|
|
#
?
Dec 19, 2015 18:34
|
|
|
I painted some Cephalyx Warmachine mandollies. It's a new army for me, so I'm still figuring them out. The Agitator (yellow solo dude) looks so much better in person. I suck at the pictures.     Edit: the blue Trollblood monstrosity is a conversion using leftover parts from my main army. Here's the original studio version: 
|
|
#
?
Dec 19, 2015 19:53
|
|

|
uuuuuuurrrrraaaaaaaagggggg GGRRRRRRRRAHHHHHHHHHH  infinity croc man hacker
|
|
#
?
Dec 19, 2015 21:12
|
|


|
Finished some models and started some more.     More minis started.   
|
|
#
?
Dec 19, 2015 23:22
|
|
|
dr_ether posted:Finished some models and started some more. You have the nicest Phoenix and Watcher that I have seen, your technique and colour selection is impeccable. I just noticed though, that the join between the lion's mane and face looks very artificial. It was a good idea for them to design it that way to reduce seamlines, but it really jumps out when someone goes to town and does an amazing paintjob on it.
|
|
#
?
Dec 19, 2015 23:29
|
|
|
Z the IVth posted:To be quite honest it wasn't blood loss that did you in (you wouldn't have woken up if you had gone into shock). Vasovagal syncope to blood is an unfortunate thing to discover when all alone. Can happen to anyone, and sometimes its only in response to your own blood. Good call. Its genetic as my father and sister have it. I've never been triggered before so I figured I was safe until this happened. Lucky I only chop parts of my hand off once every 10 years so I have plenty of time before I see copious amounts of my own blood again. Miniatures Painting- A premier method for medical diagnosis
|
|
#
?
Dec 19, 2015 23:39
|
|
|
Be prepared Bulbasaur, your You know, for laughs.
|
|
#
?
Dec 19, 2015 23:46
|
|
 will blow your mind.
|
BULBASAUR posted:Good call. Its genetic as my father and sister have it. I've never been triggered before so I figured I was safe until this happened. Lucky I only chop parts of my hand off once every 10 years so I have plenty of time before I see copious amounts of my own blood again. I tried to split a sprue in half once, lengthwise, while drawing the knife towards the hand I was holding it with. Had to use quite a lot of superglue to repair that gash, since using a plaster and dressing would have meant stopping modelling. Once a ham, always a ham.
|
|
#
?
Dec 19, 2015 23:57
|
|
|
Having super glue immediately ready for when you cut yourself is oddly comforting.
|
|
#
?
Dec 20, 2015 00:14
|
|


|
Fyrbrand posted:I painted some Cephalyx Warmachine mandollies. It's a new army for me, so I'm still figuring them out. The Agitator (yellow solo dude) looks so much better in person. I suck at the pictures. Lovely stuff
|
|
#
?
Dec 20, 2015 01:17
|
|


|
So despite painting for years, I've never figured out how to actually blend. I usually just do a basecoat, wash it and highlight with thinned paint, but I've never been able to do a smooth transition from a darker to lighter color on power armor or what have you. Does anyone have an idiot's guide? Most of what I find on Google just doesn't seem to work.
|
|
#
?
Dec 20, 2015 03:41
|
|

|
Painting Buddha has been doing a video series on that very topic. You should watch that and give it a try.
|
|
#
?
Dec 20, 2015 08:53
|
|

|
Z the IVth posted:I tried to split a sprue in half once, lengthwise, while drawing the knife towards the hand I was holding it with. Had to use quite a lot of superglue to repair that gash, since using a plaster and dressing would have meant stopping modelling. This is because I never learned to have fine control while cutting away from myself, so I always cut with the edge towards my thumb, with everything from hams to peeling potatoes. BULBASAUR posted:Good call. Its genetic as my father and sister have it. I've never been triggered before so I figured I was safe until this happened. Lucky I only chop parts of my hand off once every 10 years so I have plenty of time before I see copious amounts of my own blood again.
|
|
#
?
Dec 20, 2015 11:11
|
|

|
In October when I got the itch to paint again I used a sculpting tool to open one of those old GW hexagon shaped paint jars, one from the terrible screw cap line not pop up lid type. I did not manage to open it but did push the sculpting tool through my palm. I spent the rest of October transferring my old paints into dropper bottles instead of painting.
|
|
#
?
Dec 20, 2015 12:19
|
|


|
Groetgaffel posted:Any time I do a significant amount of modelling, even if it's just cleaning stubborn mold lines, my thumb print area just end up a hardened criss-cross mess of scar tissue. I prefer superglue and gauze combined when glue alone won't work.
|
|
#
?
Dec 20, 2015 12:28
|
|


|

|
| # ? May 10, 2024 04:42 |
|
|
So I swung by the mancave to pick up the paints I'd forgotten and grabbed a whole shitlot of pictures while at it..                      
|
|
#
?
Dec 20, 2015 12:58
|
|