


|
Thanks everyone for the help after my question about taking photos of the trains in Japan. I'll make sure to remember the Train / Bird comparison haha. I was also able to purchase the Nikon 10-24 Wide Angle lens and excited to try it out while I am in Japan. I'm also bringing a tripod for my Nikon D7100 too so I hope to take a lot of great pictures. Does anyone have any tips or tricks on how I can make the best out of all the equipment I have. I'm planning on hanging out at a few train stations to take pictures / videos of the bullet trains passing by at high speeds. Should I mess with my settings if I'm using a tripod / night time pictures when taking pictures of the trains?
|
 #
?
Mar 21, 2016 21:42
#
?
Mar 21, 2016 21:42
|
|

|

|
| # ? Jun 7, 2024 01:08 |
|
|
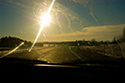
More trainchat! 1. Panning. Practice panning shots on cars / local trains / other fast-moving objects. The goal is to freeze the subject but have a motion-blurred background. Use a medium shutter speed, around 1/100-1/200, and follow the subject as it moves past you. Press the shutter button while continuing to move the camera, following the subject. Burst mode is your friend here. So is shutter priority, SV. Set your shutter speed, let the camera decide aperture / ISO.  Professors Depart 5 by Martin Brummell, on Flickr Professors Depart 5 by Martin Brummell, on Flickr2. Long exposures. I don't have a nightime long exposure of a train, but they have lights and stations (and other places) have streetlights that can create strong contrast in a long exposure, or appear as bright stars if they're in-frame. This is a dusk shot rather than full night-time, but I think you get the idea.  Traffic at sunset on College Drive 13s by Martin Brummell, on Flickr Traffic at sunset on College Drive 13s by Martin Brummell, on FlickrPut your camera in manual mode, and stick it on the tripod. Compose the shot (look through the viewfinder, focus, zoom, move around, whatever), and maybe take a few test shots with the ISO cranked up as high as it goes. The idea of the test shots is to check your composition, not take a good picture. Turn the ISO back down, stop down the aperture (f/11 is good place to start), and meter the scene. The camera will suggest a shutter speed - try it. This test shot is for exposure. At night, bright lights in-frame against a far-away, dark background can mess with the camera's light meter - your test shot might be just a set of bright lights against a completely black background. Adjust shutter speed and aperture until you get the exposure you want - as a starting point, a poorly-lit street scene at night needs 15-20 seconds at f/8 or f/11 and ISO 200. For cars on city streets (about 50km/h) 5 seconds will smear moving lights into bright bands but the car might still be visible, sometimes as a ghostly shadow. 10 seconds hides the cars but leaves bright bands all the way across the scene. 30 seconds is long enough to completely remove most moving objects. Muliti-minute photos create startrails as well as the moving bands of lights from vehicles. If your camera has an option for a 2- or 3-second delay, use it. In that mode, when you push the shutter button the mirror flips up, but the shutter doesn't open for that much time. This allows the vibration from the moving mirror to dissipate. Another technique, if you have a separate flash unit, is to set up your camera to take a completely dark long exposure. 5 seconds at f/16 and ISO 100 at night is going to be severly underexposed, for example. Push the button, wait a beat, then point the flash at the subject and push the test button. A flash burst is ridiculously short duration, often faster than 1/4000 second. But it's very, very bright (set your flash to maximum power, unless you're pointing it at a person who might be looking at the camera - that poo poo hurts). This one was set to expose the stars (f/4, 30s), but I popped my flash about half-way through to show the foreground trees.  SD 114 Bruny Part 5 Southern Skies 18 by Martin Brummell, on Flickr SD 114 Bruny Part 5 Southern Skies 18 by Martin Brummell, on FlickrI expect you could take a daytime long exposure this way that makes the train appear to be travelling at night. 3. Train accessories. Trains aren't the only interesting things at train stations. I'm betting other train-enthusiasts will be interested in distinctly Japanese / Bullettrain stuff you can see from the platform or the outside of the station.  035 Finely Tuned Facilities for Snow by Martin Brummell, on Flickr 035 Finely Tuned Facilities for Snow by Martin Brummell, on Flickr4. Train characteristics. They're long, they're fast, passenger trains are well-lit internally at night compared to the dark outdoors background. What is something that attracts you to trains? Can you fit that thing into a picture?  SD 120 Ice Crossing Riverhurst 38 by Martin Brummell, on Flickr SD 120 Ice Crossing Riverhurst 38 by Martin Brummell, on FlickrHorny Willet is here to remind you: train = 1/bird  Qu'Appelle River 2013 49 by Martin Brummell, on Flickr Qu'Appelle River 2013 49 by Martin Brummell, on Flickr
|
|
#
?
Mar 21, 2016 22:22
|
|

|
Here's a panned shot of a bullet train. It's not very good, but I didn't have any panning practice beforehand at all. Shinkansen by Hannah, on Flickr Shinkansen by Hannah, on Flickr
|
|
#
?
Mar 22, 2016 01:03
|
|

|
This showed up on my facebook this morning: http://www.adorama.com/alc/8894/article/shooting-motion-you-keep-shooting-bryan-peterson
|
|
#
?
Mar 22, 2016 15:10
|
|
|
God that guy is annoying
|
|
#
?
Mar 22, 2016 17:22
|
|


|
"Hi I'm a super energetic photographer convinced of his own technical expertise, so obviously that qualifies me to make a video where we can't even use a mic properly or wait for a this 30mph wind to die down." Also his picture was stupid.
|
|
#
?
Mar 22, 2016 22:39
|
|

|
I've not watched that particular vid, but I'll always give Peterson the benefit just because he's the author of the single most recommended book I've seen. His videos are usually fine but a bit brief.
|
|
#
?
Mar 22, 2016 22:56
|
|


|
Yeah, I don't know how to interpret that. His books are good stuff, but his photography doesn't really resonate with me.
|
|
#
?
Mar 23, 2016 02:55
|
|
|
EL BROMANCE posted:I've not watched that particular vid, but I'll always give Peterson the benefit just because he's the author of the single most recommended book I've seen. His videos are usually fine but a bit brief. He's technically competent and able to relay that competency effectively, but his photography is pretty meh
|
|
#
?
Mar 23, 2016 07:20
|
|

|
the composition of the train pic was terrible and a complete waste of a cool idea.
|
|
#
?
Mar 23, 2016 07:29
|
|
|
Can someone tell me what the hell is going on with flickr/yahoo? Petapixal article screaming about new changes being the death of everything was written by a guy who owns a rival site and I'm not sure I entirely trust him tbh. Also ordered a Panasonic Lumix DMC-TZ70 / ZS50 as a carry round, because it was 1/3 off amazon price and I like a lumix. Have I a made a huge mistake?
|
|
#
?
Mar 23, 2016 10:39
|
|


|
learnincurve posted:Can someone tell me what the hell is going on with flickr/yahoo? Petapixal article screaming about new changes being the death of everything was written by a guy who owns a rival site and I'm not sure I entirely trust him tbh. They removed a worthless feature for free users only, flickr is still pretty great.
|
|
#
?
Mar 23, 2016 13:15
|
|

|
RangerScum posted:They removed a worthless feature for free users only, flickr is still pretty great.
|
|
#
?
Mar 23, 2016 16:38
|
|

|
xzzy posted:Yeah, I don't know how to interpret that. His books are good stuff, but his photography doesn't really resonate with me. Oh completely agreed, he's very much a technical photographer in my opinion and all I took from the video is beginner inspiration for setting up that kind of shot. I completely agree with others that the actual photo isn't great and it's mainly due to the angle he used. They're just snippet vids to inspire and they work well enough for that.
|
|
#
?
Mar 23, 2016 17:58
|
|
|
ExecuDork posted:words Wow, thank you! That was a very helpful and detailed response. I really appreciate it! I'm going to try some of your suggestions later today. Hopefully I'll be able to practice my panning as well. HookShot posted:Here's a panned shot of a bullet train. It's not very good, but I didn't have any panning practice beforehand at all. That looks like Odawara station - am I right? See video below at 31 seconds. https://www.youtube.com/watch?v=1g_fy0hGMZU&t=31s Busy Bee fucked around with this message at 20:26 on Mar 23, 2016 |
|
#
?
Mar 23, 2016 19:53
|
|
|
8th-snype posted:God that guy is annoying MrBlandAverage posted:
|
|
#
?
Mar 25, 2016 02:15
|
|


|
Busy Bee posted:That looks like Odawara station - am I right? See video below at 31 seconds. Correct! Went there for a day trip and we had like a half hour to wait before our train back to Tokyo so got to see a bunch pass through the station.
|
|
#
?
Mar 25, 2016 02:31
|
|
|
Not sure where else to post this The Google NIK collection is now FREE
|
|
#
?
Mar 25, 2016 09:56
|
|
|
My mum found the bag of about 700 photos which we thought were long gone. These are photos from my childhood and a few are from when she was younger (60's, 70's and 80's). I've offered to scan them all but there is a problem... Engine oil has slowly dripped into the bag from somewhere and has gotten on to just over a quarter of the photographs. I've managed to gently wipe and mop up the excess oil with a paper towel from the badly affected photographs but there is still a sheen of oil that won't come off. If I scan them as they are now, it'll look like the photo was taken with a lens smeared in Vaseline  Does anyone know how to carefully remove the film of engine oil from the photographs?
|
|
#
?
Mar 25, 2016 11:15
|
|
|
Saffronica posted:My mum found the bag of about 700 photos which we thought were long gone. These are photos from my childhood and a few are from when she was younger (60's, 70's and 80's). I've offered to scan them all but there is a problem... http://www.fujifilm.com/support/photo_cleaning/ http://www.kodak.com/global/en/consumer/products/techInfo/cis145/cis145.shtml
|
|
#
?
Mar 25, 2016 12:03
|
|

|
spog posted:http://www.fujifilm.com/support/photo_cleaning/ The Kodak page mentions Isopropyl Alcohol to remove oil. I'll see if I can buy that. Thanks for the links, Spog.
|
|
#
?
Mar 25, 2016 12:35
|
|
|
Saffronica posted:The Kodak page mentions Isopropyl Alcohol to remove oil. I'll see if I can buy that. Thanks for the links, Spog. Prints are surprisingly resilient to cleaning- but obviously you'll be testing a single print first to test your process. Hope you are successful.
|
|
#
?
Mar 25, 2016 12:50
|
|
|
Ineptitude posted:Not sure where else to post this I downloaded and installed this. The raw sharpener looks pretty clean compared to the slider in ACR, to my eye. The color film simulation and black&white plugins seem to have a lot of lame presets but the underlying tools & settings look potentially powerful. Haven't tried any of it other plugins yet.
|
|
#
?
Mar 25, 2016 22:47
|
|

|
Does any of it work with lightroom because thats all i have.
|
|
#
?
Mar 26, 2016 00:35
|
|

|
A Saucy Bratwurst posted:Does any of it work with lightroom because thats all i have. Yes it does! I downloaded it too. The HDR program seems to be pretty useful, at least it has a ton more settings than the LR HDR function.
|
|
#
?
Mar 26, 2016 01:24
|
|

|
I'll give it a go The control points stuff in the HDR software looks really awesome. E: It annoys me that they use words like "punch" and "pop" in the vidoes. What does that even mean. underage at the vape shop fucked around with this message at 02:01 on Mar 26, 2016 |
|
#
?
Mar 26, 2016 01:48
|
|
|
How is the sharpening compared to the in-software lightroom feature? It would really take a lot for me to add discrete software to my editing stream beyond hopping into PS6 now and then, or using focus stacking software for macro shots etc.
|
|
#
?
Mar 26, 2016 08:57
|
|

|
As far as I can tell, the full suite of plugins only works for PS. It looks like only the HDR plugin works with Lightroom. I've only messed around with it for a minute, but the sharpening tool seems to be more powerful than the native LR or PS equivalent, giving more apparent sharpness with less artifacting. It still looks a little artificial to my eye, through. Maybe it isn't all that different from what you get when you really crank up the sharpening slider in LR. I don't often use LR/PS to add more than ~10% to default sharpening levels (especially because Flickr aggressively sharpens anything I upload.) I do remember trying to sharpen up photos taken with my 7D in LR, and having to crank it a little higher due to that camera's prodigious AA filter. I couldn't go too high, because the image would look over processed. Nik sharpener could be very helpful to me if it can create better looking highly sharpened results than LR. I'm going to test it out later today. SMERSH Mouth fucked around with this message at 21:04 on Mar 26, 2016 |
|
#
?
Mar 26, 2016 21:02
|
|
|
This intrigues me. For sharpening, I shoot RAW and have sharpening at 0 in Lightroom. On export to JPG, I keep it at 0 and export 100% full-res JPEGs, then run them through Photoshop through Image Processor, applying an unsharp mask action and saving as 9/12 quality JPEGs. It's not 100% ideal, but I like the unsharp mask a lot better than Lightroom's sharpening. I've never been able to use it in a way that I like.
|
|
#
?
Mar 26, 2016 21:28
|
|
|
I use the high pass filter for sharpening, gives much more control over general sharpening and you can isolate individual parts as well. Someone else's tutorial http://www.photoshopessentials.com/photo-editing/sharpen-high-pass/ e: I do it the other way round to them, new layer, high pass filter and then overlay, usually at around 0.7 or when the lines start to become visible. learnincurve fucked around with this message at 21:45 on Mar 26, 2016 |
|
#
?
Mar 26, 2016 21:40
|
|
|
From memory, Elia Locardi uses a combination of the high pass filter and Google Nix for his sharpening. So if you like his style, that's a path to take.
|
|
#
?
Mar 26, 2016 21:57
|
|
|
SMERSH Mouth posted:As far as I can tell, the full suite of plugins only works for PS. It looks like only the HDR plugin works with Lightroom. I use LR 6 and all the plugins work fine. You might have to uncheck "store presets with this catalogue" under Preferences -> Presets. If this doesn't work you can add external programs manually in the External Editing menu (I had to to that for the HDR program because it didn't show up in the "edit in" menu for some reason).
|
|
#
?
Mar 26, 2016 23:40
|
|
|
I've been taking pictures with the Nikon 10-24 on my Nikon D7100 recently and I don't know if it's just me or my settings but my pictures never turn out as sharp as I expect it to be. Is it something with my settings or just the nature of the lens? I know it doesn't have VR but something still seems off.
|
|
#
?
Mar 27, 2016 13:31
|
|
|
Since we don't know your settings and can't see the pictures it's impossible for us to say. Post a couple shots or a Flickr link with setting metadata and we can be more helpful.
|
|
#
?
Mar 27, 2016 13:44
|
|
|
It should be sharp as a tack from f/5.6 - f/8. It could be that the lens needs calibrating, on the D7100 the setting is "AF Fine tune". It's not as accurate as sending the lens off to be calibrated, but it should make a difference if the lens is noticeably soft. If the lens is new then it might be worth exchanging it. But as VelociBacon said if you post examples of it at f/5.6 and we can tell you if it's really bad or not.
|
|
#
?
Mar 27, 2016 13:51
|
|
|
learnincurve posted:It should be sharp as a tack from f/5.6 - f/8. It could be that the lens needs calibrating, on the D7100 the setting is "AF Fine tune". It's not as accurate as sending the lens off to be calibrated, but it should make a difference if the lens is noticeably soft. If the lens is new then it might be worth exchanging it. But as VelociBacon said if you post examples of it at f/5.6 and we can tell you if it's really bad or not. Honestly given that he is a newish photographer I don't think it's likely to be an AF fine tune issue. But we'll see I suppose.
|
|
#
?
Mar 27, 2016 14:12
|
|
|
I'm sure I'm not alone in doing that thing where you think you are doing something wrong because you are new to photography, and you spend the longest time trying to fix an issue only to find out that it's actually something wrong with your gear. Or on the flip side, being more experienced and assuming something wrong with your gear only to find that you have done something very silly with the settings.
|
|
#
?
Mar 27, 2016 14:24
|
|
|
It is usually the flip side of the gear being wrong, but AF fine tune is really noticeable on these APSC cameras with high pixel density and high resolutions. They also show up older glass that was perfectly fine resolving to 10mp but not so much for 24mp. I still need to get the USB dock and fine tune my Sigma 18-35 across 16 points. Oh the joy that will be...
|
|
#
?
Mar 27, 2016 18:08
|
|
|
Has anyone converted an old p&s to an infrared camera? I just ordered two crappy cameras off eBay and these filters http://www.bhphotovideo.com/c/product/1127525-REG/lee_filters_181cls_cl181_cool_led_congo.html Any tips?
|
|
#
?
Mar 27, 2016 20:02
|
|

|
|
| # ? Jun 7, 2024 01:08 |
|
|
Did you mean to link to something else? A blue gel filter won't do anything for shooting infrared, you want an infrared filter (sometimes called a visible cut filter). I've converted an SLR and it was pretty easy. Just make sure you do it in a clean area with little dust and plenty of room to keep track of all the tiny screws.
|
|
#
?
Mar 27, 2016 20:54
|
|