


|
That is a really good idea for a lift! Ive been wanting to make one myself, but I kept overcomplicating it in my head. The simplest solution is the best solution.
|
 #
?
May 4, 2016 19:19
#
?
May 4, 2016 19:19
|
|


|

|
| # ? May 31, 2024 22:56 |
|
|
Yeah I saw lots of plans and there are some clever people but if I'm buying £40 in various hardware it's overkill. The only thing I didn't have handy was the threaded rod and now I've got 70cm spare. E: the angle of the arms from up to down is 9° to -8°, 50mm of plunge from 100mm of travel. Thinking about it I don't need a mitre saw, just a frame to put over the timber and run my track saw over it and a mitre fence to set the stock at the correct angle. Back to the scribbling board.
|
|
#
?
May 4, 2016 19:57
|
|


|
So it's on a plunge base then? I'm assuming the plunge base pushes in the opposite way of the lift too? That's a neat idea. Might have to punk it when I get off my rear end and do up a router table myself.
|
|
#
?
May 4, 2016 20:10
|
|

|
Yes is a plunge router (no separate base) pushing down, lever pulls up. No need for the locking lever.
|
|
#
?
May 4, 2016 20:15
|
|
|
Squibbles posted:Fancy methods? Do you whittle yours with a hatchet or something? Nice! I can recognize a good deal of wood now but I still have yet to actually work with walnut or cherry, I have a big rear end dense block of old walnut here my 90 year old neighbor gave me that I still don't know what to do with, if I had some chisels I could slot the sides of this birch bookshelf into it and use it as a weighted base. I actually started off with one tool, a 26" 'small forest axe' and took down a tree about as wide as I am with it, then practiced spoons with it and used all the wood that dried up and cracked in the firepit. After that I ended up adding a hatchet, then a hook knife from Del Stubbs, then I realized being able to afford one well made hand forged tool every four months is a pretty slow process, and luckily I got into buying a few Mora knives at 20 bucks a piece. Beyond that I've got a push knife, a tiny hand powered plastic handled Fiskars drill, and I think that's about it. My latest buy were two 8 pound wedges, and that must have cut something like half of the time off from every project I've started so far. Getting a 14" x 5 foot tall log for free from the town tree maintenance guys is great, but it ended up being like five major work outs to get things from log to spoon without a woodshop or power tools. Now I wedge and sledgehammer the gently caress out of logs and so far I've gotten pretty lucky with where they split. Anyway, I will probably post later asking you more experienced folks for some bookshelf tips, it's been a pretty big confusing project given the above information about hand tools and free logs of wood only.
|
|
#
?
May 4, 2016 20:19
|
|

|
Spigs posted:That is a great idea, like I said I'm still new to this and I think my biggest problem right now is over complicating my plans. The wood whisperer has plans, videos, etc for a pretty nice looking gaming table I think. Not sure how much they cost though
|
|
#
?
May 4, 2016 22:12
|
|

|
Cakefool posted:
Biggest pro and con at the same time is the blade size. 190x30 blades. This is good because it's the minimum size for most really nice blades, and my track saw takes the same blades. The downside is it will cut up to a 2x4 and that's it. It'll make picture frame perfect 45s. Dust collection is half decent, as in half the dust falls through the slot onto the floor.
|
|
#
?
May 4, 2016 22:55
|
|
|
GEMorris posted:Poplar is probably the best wood for beginners to work with, for cost and ease of use, but pine can be used to make great furniture and anyone saying different has a myopic view of furniture and craftsmanship. I'm a big fan of Douglas Fir for cheap(ish) decent wood.
|
|
#
?
May 5, 2016 03:10
|
|

|
ImplicitAssembler posted:I'm a big fan of Douglas Fir for cheap(ish) decent wood. West coast goon spotted We don't get that stuff down south but we do get plentiful cheap southern yellow pine.
|
|
#
?
May 5, 2016 03:18
|
|

|
GEMorris posted:West coast goon spotted I'm in the Midwest and SYP was around $7bf. Too loving high!
|
|
#
?
May 5, 2016 04:09
|
|
|
mds2 posted:I'm in the Midwest and SYP was around $7bf. Too loving high! Jesus Christ That'll buy you a 8ft 2x10 or 2x12 here
|
|
#
?
May 5, 2016 04:35
|
|
|
I'm going to remodel my sauna and found an importer of Canadian red cedar, 15 x 90 mm panel, 6 Euros per meter. But the smell, it will be worth it.
|
|
#
?
May 5, 2016 14:07
|
|

|
extra stout posted:Nice! I can recognize a good deal of wood now but I still have yet to actually work with walnut or cherry, I have a big rear end dense block of old walnut here my 90 year old neighbor gave me that I still don't know what to do with, if I had some chisels I could slot the sides of this birch bookshelf into it and use it as a weighted base. Cool. I keep my eye on craigslist and see downed trees for free or cheap pretty regularly. Kinda makes me wish I had a truck and a bandsaw mill or something but we really don't have the space to store logs while they dry out or anything so ehh, I'll have to stick with buying my lumber from local suppliers and paying an arm and a leg for the privilege. Have you seen Matthias Wandel's portable bandsaw mill? Pretty cool and doesn't look too hard to build.
|
|
#
?
May 5, 2016 15:16
|
|
|
I'm not even sure what I'll do with it yet but a delta scroll saw popped up on Craigslist for less than $75. Jumpin on that poo poo tomorrow. 
|
|
#
?
May 5, 2016 21:16
|
|
|
Did babbies first laminating project today. Worked out much better than I thought. Well laminate, I used 3mm birch ply, because that is like 4,59 for a sheet. Rather than the 30+ that they charge for actual 1mm laminate. Seeing how well this first part went gives me quite a bit of confidence that I can actually get this done properly on the rest of the cabinet.
|
|
#
?
May 6, 2016 00:26
|
|
|
Got a nice big shipment of S2S 2x8 nominal white oak, and spent two days stacking/treating/end sealing/etc. Also finally built a sticker bin.  I spray it with a solution of ferrous sulfate, borax and tannic acid to help prevent rot. This is all destined to be boardwalk and bridges, so it'll be outside the rest of it's life and needs to last ~20 years. Ferrous sulfate reacts with the tannin in oak and turns it REALLY REALLY bright blue for a few weeks, then it slowly fades to a weathered grey.
|
|
#
?
May 6, 2016 02:38
|
|


|
Whoa that's rad! What would happen if you sealed it well before it faded, would it stay blue?
|
|
#
?
May 6, 2016 03:28
|
|
|
Norm cutting tenon cheeks on the first episode of NYW.
|
|
#
?
May 6, 2016 05:33
|
|

|
wormil posted:Norm cutting tenon cheeks on the first episode of NYW. Haha, uhh looks totally safe and accurate?
|
|
#
?
May 6, 2016 05:58
|
|
|
how do people have their hands that close to something that could cut their hand off while handling something so small and top heavy god dang
|
|
#
?
May 6, 2016 07:25
|
|
|
I did that with the lid of a box in my second week woodworking. Had a bruise from having that poo poo thrown into my gut for like a month and a half. Have never been a dumb piece of poo poo with a table saw since (and am honestly not planning on buying one as I outfit my own shop). Further reflection makes me glad the machine I was using was a sawstop, just for the added layer of "maybe that wouldn't have cost me a hand".
|
|
#
?
May 6, 2016 07:40
|
|

|
A Saucy Bratwurst posted:how do people have their hands that close to something that could cut their hand off while handling something so small and top heavy god dang Honestly, it could only cut off the tips of his fingers if he slipped because of the fence. And I'm pretty sure he's just using that hand to steady the piece, the real work is from the other hand out of the picture. still would not recommend this technique fakedit- that's some Old-school poo poo right there, it's why we love Norm, right?
|
|
#
?
May 6, 2016 15:31
|
|


|
Master carpenters don't need your fancy pants commercial jigs cuz they have skills.
|
|
#
?
May 6, 2016 16:24
|
|
|
These last two posts are pretty inexcusable and I hope they are in jest. There's no rational reason to cut a tennon in that way on a table saw, it's just stupid unnecessary risk no matter what your skill level with power tools.
|
|
#
?
May 6, 2016 17:14
|
|
|
I like the design for this nightstand and so I'm going to try and make it this weekend at my makerspace. However the materials list seems a bit lacking and this is my first attempt at making something like this. I'm thinking I'm going to need sandpaper (what kind(s)?), wood glue, and wood stain(anything I should know about staining 2x4's?) that isn't listed. Is there anything else I should get?
|
|
#
?
May 6, 2016 20:14
|
|

|
That table as shown is held together entirely by screws, no glued joints. You can probably assemble the top and shelf by glue laminating them instead, you'll need a bunch of clamps then. If the lumber you buy is planed from the mill, you won't need sandpaper or rasps, except maybe to round off the edges. Consider that a well-sharpened hand plane will most often give a neater surface than an abrasive.
|
|
#
?
May 6, 2016 20:33
|
|


|
Edit: Nevermind. Thanks for your input.
|
|
#
?
May 6, 2016 20:37
|
|
|
So I've been making more picture frames, but I've run into a little bit of an issue with thinner frames. Alot of my frames made from thinner stock are breaking when I drive the metal tabs in to close the frame. I figured I could use some sort of joinery to soldify my joints, but with such small pieces it seems I have to do something fairly custom. I found an article that explains how to make splines for miter joints, but I don't want the spline to be visible on the outside of the frame. Miter joints are rough cut on a miter saw and finished with a miter trimmer (http://www.grizzly.com/products/Miter-Trimmer/G1690?utm_campaign=zPage). Obviously perfect miter joints are stronger, but lately I've been getting small closure errors that I can't fix with more trimming and setting the fences. I suspect that my blades on my miter trimmer need to be sharpened (as I havn't done that since I bought it...).  Here is one of the frames I had a problem with. It's an 8x10 made of satine rubane aka bloodwood. Hard as hell, but managed to rout the rabbets without chipping. It also smells like coconuts when you work it, which is really cool. Also, I was wondering if there would be any interest in a framing thread. I'd love to try and impart what little cobbled together knowledge I have collected since I started doing this in November.
|
|
#
?
May 6, 2016 20:45
|
|

|
Un chien andalou posted:So I've been making more picture frames, but I've run into a little bit of an issue with thinner frames. Alot of my frames made from thinner stock are breaking when I drive the metal tabs in to close the frame. How thick and how wide is the stock you typically use? This is exactly what biscuit joiners are meant for, but if your stock is < 1/2" thick, say, you run a risk of the glue swelling the biscuit to where it cracks brittle wood. (In which case, use a non water-based, non-pva glue which won't do that) And if it's narrower than, say, 1 1/2", you may have to cut down the small biscuits
|
|
#
?
May 6, 2016 21:55
|
|
|
wormil posted:Norm cutting tenon cheeks on the first episode of NYW. Serious question: how did he complete this cut? Like, does he push the piece all the way past the blade, just riding on the tenon tip and that tiny fence contact point?
|
|
#
?
May 7, 2016 00:02
|
|
|
Cobalt60 posted:Serious question: how did he complete this cut? Like, does he push the piece all the way past the blade, just riding on the tenon tip and that tiny fence contact point? Yep. It's pretty inaccurate (and unsafe, but I think that's obvious). I'll do a similar cut on tenon cheeks, but it's with a plywood box for vertical support in both directions. Hypnolobster fucked around with this message at 00:18 on May 7, 2016 |
|
#
?
May 7, 2016 00:16
|
|
|
Mr. Mambold posted:How thick and how wide is the stock you typically use? This is exactly what biscuit joiners are meant for, but if your stock is < 1/2" thick, say, you run a risk of the glue swelling the biscuit to where it cracks brittle wood. (In which case, use a non water-based, non-pva glue which won't do that) And if it's narrower than, say, 1 1/2", you may have to cut down the small biscuits The stock really depends on the wood I find, but typically I like to work with a minimum of 1 1/2 x 5/8. For this frame though, I could only find the wood in 2 x 2 x 12 blocks which I cut in 4, giving like 3/4 x 3/4 stock I'm not going to get a biscuit joiner, but I did think about cutting a slot right behind the rabbets at the joint and then cutting a strip of wood to shape to glue it in the slots. It should probably work, but its too finnicky to be useful. I guess I could always just get something like this: https://www.amazon.ca/LOGAN-F300-2-Logan-Pro-Joiner/dp/B0016ZPA9Y/ref=sr_1_28?ie=UTF8&qid=1462583347&sr=8-28&keywords=logan Has anyone used anything like this. Does it actually solidify joints? Price is ridiculous, but it seems I can pick it up on the US amazon for like a quarter of the price.
|
|
#
?
May 7, 2016 02:10
|
|
|
Anyone know of a good router for a router table? Mine can't be adjusted from above the table and I don't want to spend 700 on a lift nor do I want to DIY one. I have heard that newer routers allow for above table height changes?
|
|
#
?
May 7, 2016 02:15
|
|

|
In Australia the large Triton is the standard one for router table use. Big enough to drive as big a bit as you'll ever use, and has an above table winder. http://www.ebay.com.au/itm/TRITON-T...%3D111445331058
|
|
#
?
May 7, 2016 05:43
|
|

|
Guitarchitect posted:Anyone know of a good router for a router table? Mine can't be adjusted from above the table and I don't want to spend 700 on a lift nor do I want to DIY one. I have heard that newer routers allow for above table height changes? My Bosch router + table technically has a way to adjust the height from the top but it's super dumb because you still have to reach under to loosen a lever and push up from underneath while you adjust it. Plus the range of motion is limited and you have to hold down a toggle on the collar and slide the router body up and down into one of 3 positions. Would not recommend. The router itself works nice though and I have another identical body in a plunge base that works great. The router table plus fixed base is really finicky and annoying though.
|
|
#
?
May 7, 2016 05:58
|
|
|
Been a while since I last posted here, and my leanings have switched dramatically from wanting to go all hand tools to only using them to supplement the faster, easier cuts I can do with power equipment. My shop currently has a 6" jointer my grandpa found at an estate sale and gave to me, a 12" sliding miter saw I managed to snag on sale at Lowe's, and a handful of hand tools I've used to varying degrees of success. I've been debating what I need to make things easier for me to do the projects I find myself attempting most often, and I think the next piece of equipment I need to make my life easier is going to be a table saw. I've seen in this thread that there's a fair amount of love for the Delta at Lowe's, and that fits well within the budget I want to spend. My real question is, what safety gear is essential to starting out with a table saw for the first time? I have a healthy respect for how dangerous the machine can be, and have spent quite some time watching safety videos and tutorials and what not. Other than buying/making a couple of push sticks to move my stock, is there really anything else one needs to have or wants to have with a table saw to make it safe to operate from the outset? I figure my first projects will be making a crosscut sled and some jigs that will make repeatable, accurate cuts easier and safer, but didn't know if there are any gear I might need to look into along with the table saw purchase.
|
|
#
?
May 7, 2016 15:20
|
|
|
Buy a grrripper and hearing protection, also have some kind of dust collection or wear a dust mask. Don't use gloves or long sleeve shirts, and most of all have respect for the tools and watch a few how to be safe videos on YouTube, the best safety equipment is yourself and positioning yourself and knowing the right gear so you don't get injured. Also know the limitations of each tool and don't try and force a tool to do something it really can't and should not do.
|
|
#
?
May 7, 2016 15:32
|
|


|
Awesome. I definitely have a healthy respect for the tool. I've watched enough kickback videos and seen evidence in this thread to tell me it's dangerous/potentially deadly to use complacently. I've got good hearing protection, and planned on picking up a better dust mask than the cheap disposable ones I've been using. Eventually I'd like to get dust collection, but I figure it's more important to have things that can make dust/actually build the things I'm looking to build than spend the money on dust collection just yet. Once I've got a decent set up for my projects, dust collection will likely be the next priority.
|
|
#
?
May 7, 2016 15:36
|
|
|
Guitarchitect posted:Anyone know of a good router for a router table? Mine can't be adjusted from above the table and I don't want to spend 700 on a lift nor do I want to DIY one. I have heard that newer routers allow for above table height changes? I've been using my old 3hp Makita plunge, and Idk what all that lift stuff is even. I'd recommend a plunge router.
|
|
#
?
May 7, 2016 15:50
|
|
|

|
| # ? May 31, 2024 22:56 |
|
|
Redesigned my belt sander around a new motor mount, I used a single phase motor, the one that used to be on my lathe, and gave it a paintjob: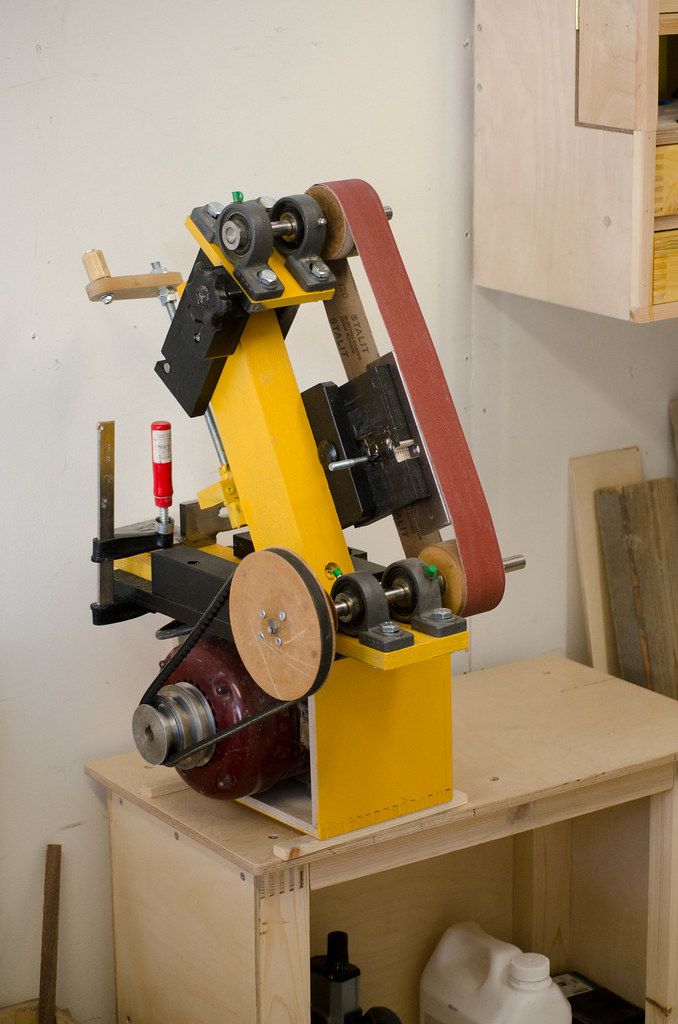
|
|
#
?
May 7, 2016 20:04
|
|
