


|
Mango Polo posted:That's exactly what you want a filter to do. You're harmonizing the different colors, which makes the transitions smoother. If you plan ahead, that means you'll want your final highlight to be a little lighter than what you actually want before applying a filter or glaze. I dunno, that just seems like a waste of time to me when I could mix the colors as appropriate before applying them in the first place. The only benefit I can see is for when you gently caress that up and made your gradient too severe.
|
 #
?
Jun 21, 2016 14:52
#
?
Jun 21, 2016 14:52
|
|


|

|
| # ? May 10, 2024 16:25 |
|
|
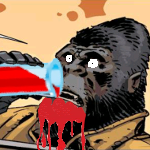
I've seen filters used mostly for blending camouflage on scale models, but it probably has its uses for wargaming models (apart from models with camo). I've never tried them, I think in wargaming/figure painting terms it would be called a glaze. I don't have much practice painting faces, but I tried my Scale 75 colors for the first time last night on this 1/10th scale (180mm scale?) RC car driver figure:  the face is about 1 inch (25mm) across
|
|
#
?
Jun 21, 2016 15:26
|
|

|
Avenging Dentist posted:I dunno, that just seems like a waste of time to me when I could mix the colors as appropriate before applying them in the first place. The only benefit I can see is for when you gently caress that up and made your gradient too severe. It depends on how smooth and how high contrast you want to go. It saves time when you're glazing down layers between 6 intermediary steps instead of going through 14 intermediary colors for the same gradient.
|
|
#
?
Jun 21, 2016 15:34
|
|


|
Gareth Gobulcoque posted:It depends on how smooth and how high contrast you want to go. It saves time when you're glazing down layers between 6 intermediary steps instead of going through 14 intermediary colors for the same gradient. This is the part I don't get. Why would a filter reduce the number of layers you need to paint for a smooth transition? If you apply it evenly, wouldn't it do the same thing as adding a drop or so of the midtone to each layer color on the palette? If you only apply it along the lines between each layer, then yeah I totally agree that it would work.
|
|
#
?
Jun 21, 2016 15:41
|
|
|
No. It's doing something slightly different. Filters better hide the transition line for what I'm sure are fascinating reasons. Using a base color through the whole gradient has a modulating effect on the tone, but doesn't change the transition line. Can't tell you exactly why, but I use either or both methods quite a bit and they are definitely doing different things from my experience. Sometimes art is more art than science, I dunno.
|
|
#
?
Jun 21, 2016 15:58
|
|
|
I really just can't wrap my head around that. Colors are weird.
|
|
#
?
Jun 21, 2016 16:02
|
|
|
Yeah, filters can hide the lines better and is what is essentially behind the idea of zenithal priming. The theory is that you are applying even basecoats of translucent paint over an already established gradient so you can end up doing less work overall. In my experience, I've only ever used filters if I gently caress up too badly in a blend and essentially this lets me not have to start over. You'll still have to blend more to get a bigger contrast out of it, like the really cartoony/anime types of minis, but if you want a more subtle transition it's fine.
|
|
#
?
Jun 21, 2016 16:36
|
|


|
Chill la Chill posted:Yeah, filters can hide the lines better and is what is essentially behind the idea of zenithal priming. The theory is that you are applying even basecoats of translucent paint over an already established gradient so you can end up doing less work overall. In my experience, I've only ever used filters if I gently caress up too badly in a blend and essentially this lets me not have to start over. You'll still have to blend more to get a bigger contrast out of it, like the really cartoony/anime types of minis, but if you want a more subtle transition it's fine. I greatly appreciate everybody who's posted with advice; I'm going to try some of the tricks you guys have mentioned, particularly thinning paints and glazing, and come back with some examples of what I've accomplished. Thanks again! ")
|
|
#
?
Jun 21, 2016 16:45
|
|

|
The reason filters (and glazes and washes, for that matter) work is because they are translucent. So what your eye is seeing is a combination of the light reflected off the pigment in the top layer, as well as light reflected off the layers underneath (with varying levels of absorption). This combination gives you a different effect than simply painting a surface in an opaque tint that is some combination of the two colors, especially if the surface has texture or curvature. The reason for this has a lot to do with the thickness and opacity of the upper layers, because the path length of light traveling through the upper layer(s) changes based on the orientation of the surface relative to the light source, meaning the relative amount of absorption/reflection changes. Exactly the same principle is in effect with filters as happens with your choice of primer color. Painting red over black (or brown) primer tends to yield darker, deeper reds than painting red over gray primer. And painting red over white primer gives very bright, vibrant reds. And this is why zenithal priming works - you can get color variation in a single coat of paint by varying the color of the primer underneath it, all because the paint is ever-so-slightly translucent. If it helps, the generally accepted terminology goes something like: Paint - everybody pretty much knows what this is, but if you're thinning your paints properly, it gets you more into... Glaze - that is, a paint that has the same kind of consistency as (well-thinned) paint, but is more translucent. This is usually accomplished by adding medium to the paint, which keeps its physical consistency more or less the same, but reduces its pigment density (and thus increases its translucency, as medium dries clear). Filter - generally speaking, a filter may have the same pigment density (and translucency) as a glaze, but has a thinner consistency. This helps it run into cracks and pool into recesses better. As such, you get nicely varying translucency based on the relative thickness of the pooling. Since this is micro-scale physics (specifically surface tension) at work, the result is often much smoother transitions than can be achieved by sequentially-layered glazes (unless those glazes are layered while wet, but wet-blending is beyond our scope here), especially when there's significant texture to the surface. Wash - a very translucent, very thin (consistency) pigment, again designed to pool in varying thicknesses based on the texture of the surface. Typically, the only difference between a filter and a wash is pigment-density (and hence translucency), as they usually have very similar consistency, being almost water-like. Obviously we're talking a spectrum here, and different painters will have different rules of thumb for what they think of as a glaze versus a filter, for instance. For me, a particular glaze and filter might have exactly the same translucency, but the difference is that a glaze stays where I put it (i.e. has a "paint-like" consistency), whereas a filter runs into cracks and crevices. Ilor fucked around with this message at 20:37 on Jun 21, 2016 |
|
#
?
Jun 21, 2016 20:31
|
|

|
Ilor posted:This combination gives you a different effect than simply painting a surface in an opaque tint that is some combination of the two colors, especially if the surface has texture or curvature. The reason for this has a lot to do with the thickness and opacity of the upper layers, because the path length of light traveling through the upper layer(s) changes based on the orientation of the surface relative to the light source, meaning the relative amount of absorption/reflection changes. That I understand, but what I don't understand is why that would produce an effect where an area that was originally a solid color (a single layer in your gradient's range) appear like a gradient itself. An even coating of a filter should maintain a constant color in that case. The only thing I can think of is that the filter might scatter light enough that it "fuzzes" the line between each layer, but I'd be really surprised if that were noticeable given how thin a coat of paint is.
|
|
#
?
Jun 21, 2016 21:07
|
|
|
Mango Polo posted:One thing you can do is first apply the fixer to the model, and then while it's still wet tap on the pigment. It doesn't hold as strongly as pigment first -> fixer second, but it's good enough to protect the pigment from varnish sprays.
|
|
#
?
Jun 22, 2016 00:04
|
|


|
Flipswitch posted:Cheers dude, I feel a bit stupid for asking this, but what's the best way to apply fixer to a pigment already on the model? do I just sort of dab it on? what stops it from coming off then? I've got some stuff back on my models but it's more how to keep it on there now. I'll watch some youtube vids on the morning and a friend did mention to me tonight it might be worth putting them in those little spray bottles to spray it on but it won't have the force to blow it all off. Basically wick it in from the side... kind of hard to describe, but basically let the capillary action to spread the fixer. That basically what I do with the bases of my tyranids; a single color with two pigments and then a fixer. I have little cordyceps on my tyranids that I apply fixer to and then sprinkle white on to represent spores. Decent pigment video: https://www.youtube.com/watch?v=OewiiZbGKv8 EDIT: I also matte varnish my models, which kills the texture of the pigment a big, but that and the sealer locks it in. Some colors CAN react to varnish however, so I would double check that before spraying your whole army. LordAba fucked around with this message at 01:11 on Jun 22, 2016 |
|
#
?
Jun 22, 2016 01:07
|
|

|
I've never had luck with varnish over pigment. It always takes away from the dusty look, so I varnish first, pigment second, and if I use fixer, that's a 3rd step. The only way I've found to protect the dusty look is to apply a enamel varnish that takes a while to dry. When it's 99% dry, but still curing, apply your pigment. The next day it will be fixed in place to the varnish.
|
|
#
?
Jun 22, 2016 01:26
|
|


|
Thanks for replies all. Will give it a go! I'm thinking of picking up the soil works terrain series from Scale75 tomorrow and that has a fixer in it, I don't own many pigment sets. Alternative is Vallejo Fixer and MDP Pro-Pigments which I can also get but not at a discount. Anyone here have much experience with these? Thanks for feedback so far all.
|
|
#
?
Jun 22, 2016 09:22
|
|
|
Avenging Dentist posted:That I understand, but what I don't understand is why that would produce an effect where an area that was originally a solid color (a single layer in your gradient's range) appear like a gradient itself. An even coating of a filter should maintain a constant color in that case. The only thing I can think of is that the filter might scatter light enough that it "fuzzes" the line between each layer, but I'd be really surprised if that were noticeable given how thin a coat of paint is. I think you are misunderstanding the concept. The filter helps the blend by reducing the contrast between the different layers. If you don't have any shading at all it will just change the colour of the base coat. It also harmonizes the colours by imparting a uniform tone to all the layers and this is probably also makes the blending smoother. The various paint shades you have are a mixture of colour pigments + black/white pigment. If you shade by just adding black/white to the mix, the colour gets increasingly desaturated the further you go from the base. If you shade by mixing in other colours (like most of us would), you change the pigment mix and the tone of you shade is different from the base tone. Applying a filter will even this out. To use more visual analogy - if you pull up Photoshop or any other graphics program and ask it to adjust colours you get sliders for Hue - Saturation - Lightness. Now in Photoshop you can shift all those individually, so if you wanted a single hue, you can shade it by bumping the lightness slider. For paints, mixing in black/white changes the lightness AND reduces the saturation. Mixing in a different shade will shift all three to various degrees. Anyway this is cobbled together from personal observation and in no way taught to me formally. I just knew that my art teacher hated using black/white and it was only after I realised the above that I understood why.
|
|
#
?
Jun 22, 2016 13:14
|
|

|
Z the IVth posted:I think you are misunderstanding the concept. The filter helps the blend by reducing the contrast between the different layers. If you don't have any shading at all it will just change the colour of the base coat. It also harmonizes the colours by imparting a uniform tone to all the layers and this is probably also makes the blending smoother. If all it's doing is reducing contrast, isn't that (roughly) equivalent to adding the appropriate amount of paint from your filter color to each of your layer colors? Based on what Gareth says, it's something more than that. You might get a different "sheen" (for lack of a better word) by adding a filter, but I'm having a hard time understanding how it helps smooth a blend in a way that pre-mixing the filter into your layer colors wouldn't. Maybe I should just do some experiments.
|
|
#
?
Jun 22, 2016 13:26
|
|
|
GoodBee posted:I can't answer your question but I recently replaced my GW red wash (which had gone off and turned pink) with Vallejo red wash and my Vallejo red is noticeably more matte than the GW red I was using before. Got a fresh bottle of the Ink and I'm back to a normal matt look, ironically it's a little less glossy than it was a few years back, but it's at the point I can easily work with it.
|
|
#
?
Jun 22, 2016 15:51
|
|

|
Avenging Dentist posted:If all it's doing is reducing contrast, isn't that (roughly) equivalent to adding the appropriate amount of paint from your filter color to each of your layer colors? Based on what Gareth says, it's something more than that. You might get a different "sheen" (for lack of a better word) by adding a filter, but I'm having a hard time understanding how it helps smooth a blend in a way that pre-mixing the filter into your layer colors wouldn't. Its more that, no matter how perfectly you pick your colors at the start, you usually need to unify at the end. This is common in digital art, where the base colors are approximated, the shading and lighting is added, and then chunks (or the whole shebang) is tinted in a single color so that every color in the composition shares some value with every other color
|
|
#
?
Jun 22, 2016 15:55
|
|

|
Mig Jimenez has been demonstrating using filters for a while for scale modelers: https://youtu.be/DcsffcZUa6k in the same way that everyone has been saying - you can subtly change a base color so you don't have to repaint a large surface or use filters to unify camo areas and help tone down the high contrast areas of camo patterns.
|
|
#
?
Jun 22, 2016 16:59
|
|
|
Avenging Dentist posted:If all it's doing is reducing contrast, isn't that (roughly) equivalent to adding the appropriate amount of paint from your filter color to each of your layer colors? Based on what Gareth says, it's something more than that. You might get a different "sheen" (for lack of a better word) by adding a filter, but I'm having a hard time understanding how it helps smooth a blend in a way that pre-mixing the filter into your layer colors wouldn't. See my second paragraph. When you add a filter it normalizes all the hues in your gradient, not just the contrast. If you play around with digital art this becomes much clearer Z the IVth fucked around with this message at 17:25 on Jun 22, 2016 |
|
#
?
Jun 22, 2016 17:08
|
|
|
We must be talking at cross purposes then, since digital art is what I'm using as a frame of reference for this. The only part I'm confused about is what Gareth mentioned: Gareth Gobulcoque posted:No. It's doing something slightly different. Filters better hide the transition line for what I'm sure are fascinating reasons. Using a base color through the whole gradient has a modulating effect on the tone, but doesn't change the transition line. Hopefully we can agree that, if you have a color with a filter over it, you can mix up a color like that on your palette directly (although it'll be a pain to eyeball that). It won't be a perfect match due to how light behaves when traveling through multiple layers of translucent paint, but I don't think that property alone is enough to hide the transition line as Gareth says. I'm especially interested in how (if?) that part works. Specifically, if either technique results in the same overall range of colors, and you do an equally good job at normalizing the hues, it doesn't seem like filters would change the results. But maybe they do? Or maybe it's just an easier technique for some people. I certainly agree that filters are a totally workable technique for modulating the colors on your models, though. I'm more curious about why it works as well as people say and how it compares to other techniques. Avenging Dentist fucked around with this message at 18:29 on Jun 22, 2016 |
|
#
?
Jun 22, 2016 18:26
|
|
|
Avenging Dentist posted:We must be talking at cross purposes then, since digital art is what I'm using as a frame of reference for this. The only part I'm confused about is what Gareth mentioned: It's already been explained multiple times why it works. I'm trying to think of a different way to explain it if you haven't understood what they are saying so far.
|
|
#
?
Jun 22, 2016 18:42
|
|
|
Flipswitch posted:Cheers dude, I feel a bit stupid for asking this, but what's the best way to apply fixer to a pigment already on the model? do I just sort of dab it on? what stops it from coming off then? I've got some stuff back on my models but it's more how to keep it on there now. I'll watch some youtube vids on the morning and a friend did mention to me tonight it might be worth putting them in those little spray bottles to spray it on but it won't have the force to blow it all off. Like LordAba said, load a brush with the fixer and press against the surface to let it flow over. Here's a video showing how to: https://www.youtube.com/watch?v=Lm5E3SPTmo8 In this particular case he's making use of an enamel wash instead of a proper fixer, but the technique is the same.
|
|
#
?
Jun 22, 2016 18:44
|
|
|
goodness posted:It's already been explained multiple times why it works. I'm trying to think of a different way to explain it if you haven't understood what they are saying so far. I get that it works; it just seems like people are overstating its benefits unless I'm missing something.
|
|
#
?
Jun 22, 2016 18:45
|
|
|
Avenging Dentist posted:I get that it works; it just seems like people are overstating its benefits unless I'm missing something. It's been explained a few times why it's different than just applying the filter to the paints before application, instead of at the end. But you haven't understood that yet.
|
|
#
?
Jun 22, 2016 18:49
|
|
|
Avenging Dentist posted:I get that it works; it just seems like people are overstating its benefits unless I'm missing something. The benefit is that it isn't an utter pain in the rear end to execute compared to adding 5-6 more layers. More layers means more complexity and you are trying to get an extremely specific colour mix by eye, and then adjust the shade on it. This might not even be possible physically since you can't tweak individual pigments unlikely in digital art where you can play with very specific parameters. On some parts it might be impossible to add sufficient layers to execute the colour transition you want. Say on individual strands of hair? Z the IVth fucked around with this message at 19:19 on Jun 22, 2016 |
|
#
?
Jun 22, 2016 18:53
|
|
|
For me the biggest benefit is convenience. The process I mentioned earlier for glowy red orbs is 7 colors plus a filter. But I don't need to mix those 7 colors at all. I just apply them, hit it with the filter, and it's magic. I'm going from black all the way to white (through red, orange, and yellow), but once the filter is applied, it becomes a smoothly-varying color transition. Examples: You can see it here on the orb at the front of the Annihilation Barge. And actually, my crappy lighting washes out some of the full tonal range, the effect in person is actually more vibrant. And here's the same technique applied to a much smaller surface:  Could I get a dark-to-bright red transition that is as smooth simply by mixing colors? Probably. But that would require me to mix colors rather than paint 7 colors straight-out-of-the-pot and filter them once at the end.
|
|
#
?
Jun 22, 2016 22:33
|
|
|
Ilor posted:For me the biggest benefit is convenience. The process I mentioned earlier for glowy red orbs is 7 colors plus a filter. But I don't need to mix those 7 colors at all. I just apply them, hit it with the filter, and it's magic. I'm going from black all the way to white (through red, orange, and yellow), but once the filter is applied, it becomes a smoothly-varying color transition. Examples: Huh, what kind of filter do you use?
|
|
#
?
Jun 22, 2016 23:14
|
|

|
Slimnoid posted:Huh, what kind of filter do you use?
|
|
#
?
Jun 22, 2016 23:31
|
|
|
I'm using filters in a much different way. For me those filter glazes are very watered down. Water with the memory of paint, and I'm building up 3 or 4 layers over my blends to help smooth and add depth. They're accomplishing broadly similar goals very differently. Like I said, sometimes art is more art than science.
|
|
#
?
Jun 22, 2016 23:40
|
|
|
Gareth Gobulcoque posted:I'm using filters in a much different way. Is this closer to what you're doing? http://flameonminiatures.blogspot.com/2014/01/black-color-painting-tutorial.html
|
|
#
?
Jun 22, 2016 23:51
|
|
|
Gareth Gobulcoque posted:I'm using filters in a much different way. For me those filter glazes are very watered down. Don't get me started on the need for more specificity when using the term "thin" as it applies to both pigment density and viscosity.
|
|
#
?
Jun 23, 2016 00:03
|
|
|
Yeah to me really thin paint used to build up layers is called a glaze. It's how I used to paint white, and also why I wanted to kill myself while I did it. Washes are glazes made to clump in the recesses. Filters are like they are in photoshop- a way to modulate the color underneath and add depth of color.
|
|
#
?
Jun 23, 2016 01:19
|
|
|
I think of a glaze as a consistency of paint which is thin and translucent. You can then use it to layer or to filter.
|
|
#
?
Jun 23, 2016 02:31
|
|
|
Z the IVth posted:I think of a glaze as a consistency of paint which is thin and translucent. You can then use it to layer or to filter. Yeah I totally get that. Since I don't use mediums my glaze is very thin, but I'm still using it in a very controlled way, whereas a wash is more willy nilly (and incidentally more heavily pigmented).
|
|
#
?
Jun 23, 2016 02:38
|
|
|
Too many posts about semantics, not enough about rad models Started my second tactical squad! These guys are made from Betrayal at Calth Marines with the Ultramarines accessory sprue. The sergeant's armor is technically Mk VII, but I figure for artificer armor he'd probably have something newer and fancier anyway. I also tried shooting on a black backdrop; some of the whites and skintones came out hotter than I'd like but I think I'll be using the black backdrop from here on out.       
|
|
#
?
Jun 23, 2016 04:01
|
|

|
SRM posted:Too many posts about semantics, not enough about rad models I think the black backdrop makes the blues come off less severe compared to how it would probably be for a white one, so probably a good choice. What are you using for a backdrop, anyway?
|
|
#
?
Jun 23, 2016 04:29
|
|
|
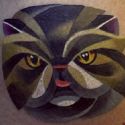
SRM posted:Too many posts about semantics, not enough about rad models We meet again my old friend.   Had a lot of fun with this guy , especially with the little vials he's got all over. I'm especially happy with how the transfer came out.
|
|
#
?
Jun 23, 2016 04:52
|
|

|
So I've spent quite some time on my latest batch and real happy with how they turned out. I'm ready to seal them, but I've had problems in the past where after I seal them it feels like quality of the paint job goes down, colors get less vibrant, contrast goes down, etc. Any tips on preventing that? Normally I use 2-3 sprays of Testor's Dullcoat, or 1 spray of Glosscoat followed by a Dullcoat.
|
|
#
?
Jun 23, 2016 06:28
|
|


|

|
| # ? May 10, 2024 16:25 |
|
|
Slimnoid posted:I think the black backdrop makes the blues come off less severe compared to how it would probably be for a white one, so probably a good choice. Thanks! I'm using a Limo Studio pop up lightbox, it came with a few different color backdrops, this being one of them. I have a cat so naturally the first time I use it, it's already got hair all over it.
|
|
#
?
Jun 23, 2016 07:58
|
|