|
Get a set of tiny files. I have a set with like 7 different types (flat, triangular, round, square, half-round, and I forget what else - you can tell which ones I use most) that all fit in the same handle (which in turn is hollow and can store the ones you're not using at the moment). These are great for trimming even small or hard-to-reach or weirdly textured stuff like the leg or arm wrappings of your survivor minis. And I think I paid less than $20 for the entire set. Between those and a moderately sharp #11 X-Acto blade, the world is your oyster.
|
 #
?
Jul 25, 2016 19:31
#
?
Jul 25, 2016 19:31
|
|


|

|
| # ? May 21, 2024 01:08 |
|
|
Well the other thing is some of those mold lines are not even mold lines but where stupidly small pieces fit together, and I really don't have the skill yet to treat those with a putty.
|
|
#
?
Jul 25, 2016 19:36
|
|

|
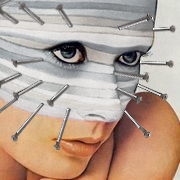
Hmmm, I think we might be talking about different things. I'm talking about the areas I've outlined in red:  These areas are where the two halves of the casting mold come together on a single part, not the places where multiple parts join together. During the injection process, tiny bits of material (pewter, plastic, resin, whatever) get into that crack between mold halves, forming a noticeable line on the mini. In some cases it can actually form a super-thin sheet (referred to as "flash") that sticks out from the mini. I think the problem is exacerbated by the fact that you color blends are so good - there's this beautifully smooth transition, so your eye gets drawn to the discontinuity. Trimming these off with a file or a sharp knife is absolutely worth doing. It's time consuming and can be a pain in the rear end for small minis with lots of detail (and the Kingdom Death minis certainly qualify in that regard), but it makes the finished product much nicer. As an aside, your photo set-up is also freaking sweet. The color of your back-drop matches the palette you've chosen for the minis themselves very nicely.
|
|
#
?
Jul 25, 2016 19:58
|
|
|
Ilor posted:Hmmm, I think we might be talking about different things. I'm talking about the areas I've outlined in red: The arms are where two pieces - literally the two halves of the forearms, are glued together.
|
|
#
?
Jul 25, 2016 20:18
|
|
|
dr_ether posted:The arms are where two pieces - literally the two halves of the forearms, are glued together. The sword looks glued together too? The whole model looks like it came as two halves that were glued together off center.
|
|
#
?
Jul 25, 2016 20:25
|
|
|
dr_ether posted:The arms are where two pieces - literally the two halves of the forearms, are glued together. Are these plastic or resin/pewter? If they're plastic, then plastic glue works pretty well to get a good join that you can smooth with a knife or a file, since plastic glue actually fuses the pieces. It's what I do with Malifaux figures. For resin/pewter, I usually try to cut/file down the raised side and then use a sandable putty on them; then I don't have to worry as much about getting it perfect immediately. I'm particularly fond of Mr. Dissolved Putty for small gap filling; it basically works like a thick paint that you can sand later. I haven't found any putty that lets me make a thinner layer than Mr. Dissolved Putty. ProCreate is a good two-part putty for medium-sized fixes, but I mainly like it because the grey color blends into the model better, making it easier to spot areas you sculpted wrong. Another thing I usually do is to have a single really bright light that I can use to get really high-contrast shadows on the model. That makes it easier to check my work for any areas I did wrong. Finally, for pewter, I actually polish it with 000 steel wool, since it helps make mold lines and such stand out really well.
|
|
#
?
Jul 25, 2016 20:27
|
|

|
Is this wet palette the same kind as the P3 one? https://www.amazon.com/Masterson-Sta-Wet-Painters-Palette-912/dp/B0027AANR6 It looks to be the same price on amazon but is much larger. The barely-6"x6" size of the P3 version always made me hesitant to buy it since it was so drat small.
|
|
#
?
Jul 25, 2016 22:12
|
|


|
They're all pretty much the same But save yourself a bit of cash and just buy the refills Any plastic tupperware and foam will work just as well
|
|
#
?
Jul 25, 2016 22:19
|
|


|
Chill la Chill posted:Is this wet palette the same kind as the P3 one? https://www.amazon.com/Masterson-Sta-Wet-Painters-Palette-912/dp/B0027AANR6 Probably? As far as I know wet pallettes are pretty much the same whether you buy one or make one yourself. I've got the P3 one and it seems like enough space for me. This one has the little side cups, which seems useful. Edit: I think I'd like a wet pallette with a lower profile than Tupperware. And maybe a little more weight to it. I do agree with making your own if you've never used one before, just to see if you like it before you spend money. GoodBee fucked around with this message at 22:28 on Jul 25, 2016 |
|
#
?
Jul 25, 2016 22:25
|
|


|
I have this one (or one very similar), and it's basically the same as the P3 one as far as I know: https://www.amazon.com/Sta-Wet-Palette-Keeps-Paints-Airtight/dp/B000C18GTE And $10 is definitely a price worth paying for the convenience.
|
|
#
?
Jul 25, 2016 22:30
|
|
|
dr_ether posted:The arms are where two pieces - literally the two halves of the forearms, are glued together. Wait, what?!? What kind of loving sadist designs minis where the arms are split lengthwise into two pieces? That's ridiculous. In that case, I think Avenging Dentist has the right of it.
|
|
#
?
Jul 25, 2016 22:32
|
|
|
Thanks for the advice. And yeah tupperware is a bit higher profile and when you factor the cost of a container+refill+sponge, making your own just saves you a couple bucks. Avenging Dentist posted:I have this one (or one very similar), and it's basically the same as the P3 one as far as I know: https://www.amazon.com/Sta-Wet-Palette-Keeps-Paints-Airtight/dp/B000C18GTE Yeah I saw this one too. I'm being indecisive since I know a larger one is also more unwieldy, especially with minis-based painting, but the one I linked is the same amazon price as the P3 one for quadruple the size! This http://handcannononline.com/blog/2012/06/15/a-beginners-guide-to-wet-palates-build-your-own/ page I saw a while back talked about liquid vs particle pigment paints. I haven't been able to find out which one Vallejo uses. I mostly use VMC/VGC so if they're particle pigments, the palette won't be useful anyway.
|
|
#
?
Jul 25, 2016 22:45
|
|
|
I've had no problems with Vallejo, Reaper, P3, or Army Painter on my wet palette using baking parchment paper. Any acting particularly funky usually differs from color to color rather than a specific brand. Some just will settle out after sitting and require mixing back up with a brush. On occasion some will seem to draw excess moisture into itself and become runny, pooling into adjacent paint. But this is on the timescale of sitting for a day or two, mind you.
|
|
#
?
Jul 25, 2016 22:55
|
|
|
Chill la Chill posted:This http://handcannononline.com/blog/2012/06/15/a-beginners-guide-to-wet-palates-build-your-own/ page I saw a while back talked about liquid vs particle pigment paints. I haven't been able to find out which one Vallejo uses. I mostly use VMC/VGC so if they're particle pigments, the palette won't be useful anyway. I don't think it matters especially. You'd probably only notice a difference with extremely small amounts of paint on the palette, at which point you don't really need a wet palette in the first place. Having both a wet and a dry palette is probably the way to go.
|
|
#
?
Jul 25, 2016 22:55
|
|
|
I never got a wet palette to work for me. Whenever I left the paint alone I'd come back to a mess of paint spread across the palette, completely unusable. These days I use a small silicone mat as my palette, so stuff doesn't get left on it unless it's dry.
|
|
#
?
Jul 25, 2016 23:02
|
|

|
I started with a wet palette, but stopped using it when I switched over to an airbrush. It helps when you do brush blends and that sort of thing.
|
|
#
?
Jul 25, 2016 23:06
|
|


|
For me the benefit of a wet palette is that the paint doesn't dry out as quickly during a single session. I don't think you could get paint to last for more than a day or two unless you were painting on a canvas (where you'd have larger quantities of thicker paint).
|
|
#
?
Jul 25, 2016 23:06
|
|
|
Avenging Dentist posted:For me the benefit of a wet palette is that the paint doesn't dry out as quickly during a single session. I don't think you could get paint to last for more than a day or two unless you were painting on a canvas (where you'd have larger quantities of thicker paint). If this is the reason, seriously look into a silicone mat. Properly thinned, paint lasts a very long time before it gets stuck to the palette.
|
|
#
?
Jul 25, 2016 23:10
|
|
|
I painted some of Karl Franz's Pyjama Pals.    This first unit served as a "test model" for the army and I'm not thrilled with how they came out. I got overconfident with Ceramite White and Mephiston Red's coverage over black, and had a hard time getting a truly smooth coat. For my next unit I: 1. Will try the scheme over grey primer 2. Won't batch paint 20 dudes at once, jesus christmas that was a bad idea
|
|
#
?
Jul 25, 2016 23:10
|
|

|
Mango Polo posted:He cool. I especially like the texture of the chipping, it's just the right size for the mini. Did you sponge it? I did, very lightly with some Heavy Charcoal on the backing foam from an Infinity mini  In my test models I found it was really easy to go overboard with it and I thought less is more with this guy. As it was he's very close to too much chipping. I'm going to do 5 more Mk IV guys with the same technique and see how they turn out. In my test models I found it was really easy to go overboard with it and I thought less is more with this guy. As it was he's very close to too much chipping. I'm going to do 5 more Mk IV guys with the same technique and see how they turn out.
|
|
#
?
Jul 25, 2016 23:12
|
|

|
signalnoise posted:If this is the reason, seriously look into a silicone mat. Properly thinned, paint lasts a very long time before it gets stuck to the palette. I usually just use my ceramic palette. It's probably about the same as a silicone mat, since the main reason to use ceramic over plastic is that paint sticks poorly to it.
|
|
#
?
Jul 25, 2016 23:14
|
|
|
Yeah, I already use a ceramic bathroom tile to paint. I thought this was the default since I was taught to use one from a GW learn-to-paint session years ago. I just get annoyed sometimes when I'm working with blending and keep having to add more and the color just isn't quite right anymore so I have to mix and blend again, etc. etc.
|
|
#
?
Jul 25, 2016 23:16
|
|
|
Tell me more about silicone and ceramic pallettes. I also think I want a pallette with more, smaller, round reservoirs. I'm currently using the cheapo plastic pallette everyone uses.
|
|
#
?
Jul 25, 2016 23:19
|
|
|
Ah yes, the ceramic tile. I've seen people use glass too.
|
|
#
?
Jul 25, 2016 23:20
|
|
|
Avenging Dentist posted:I don't think you could get paint to last for more than a day or two unless you were painting on a canvas (where you'd have larger quantities of thicker paint). Stick the wet pallet in the fridge and the paint will stay wet for as long as you need it to. I've quite literally had mine sitting in the fridge for a week inbetween sessions and found the paint was still fresh when I got back to it.
|
|
#
?
Jul 25, 2016 23:27
|
|

|
signalnoise posted:Ah yes, the ceramic tile. I've seen people use glass too. Yeah, I use glass.
|
|
#
?
Jul 25, 2016 23:38
|
|
|
God, I hate it when I notice a mold line after I've been painting for a while.
|
|
#
?
Jul 26, 2016 00:02
|
|

|
This might seem like a strange request, but I remember somewhere there was a list of 'the best' paint colours from various lines, for instance vallejo had the best/most useful reds, GW washes were good etc. I'm trying to expand my paint lines beyond Citadel, and would love it if anyone can remember where it was. I've tried searching the forums, but no luck.
|
|
#
?
Jul 26, 2016 00:39
|
|

|
You might mean my post, which tries to cover all the popular ranges.
|
|
#
?
Jul 26, 2016 00:44
|
|
|
Avenging Dentist posted:You might mean my post, which tries to cover all the popular ranges. Boom, you nailed it. Thank you so much!
|
|
#
?
Jul 26, 2016 00:45
|
|
|
How do you address join lines (not mold) lines to actually look like a single piece? I tried liquid green stuff and it's just not effective at all. I found that If I stick real green stuff in a very thin sheet between the pieces when assmebling and get it to shoot out the sides I can then scrape it off with a molding tool and that actually looks pretty smooth. A lot of work and not quite viable for many kinds of joins. I'm talking about stuff like giant cloaks that are two vertical pieces you glue together in the middle, arms or legs that are front and back half, etc.
|
|
#
?
Jul 26, 2016 06:10
|
|


|
If they're polystyrene, you can use plastic glue to chemically weld them, then sand down as needed. If you're working with metal or another kind of plastic, you're stuck doing the putty (I like milliput yellow/grey or white superfine depending on how deep into the process you are), sand, check for smoothness, repeat dance for as long as it takes to get the gap looking pristine. For anything but a showpiece model, I honestly wouldn't bother putting in all the work, you can get to "good enough" with any epoxy putty, some wet clay shapers to really wedge it in there and remove the excess, and some homemade sanding implements to get at and blend in awkward surfaces like interior curves in cloaks, etc.
|
|
#
?
Jul 26, 2016 06:28
|
|

|
Silicone clay shapers are totally rad. My technique for non-plastics is to pin, superglue, and add putty as needed. I already listed most of my techniques above. Having a sandable putty is extremely helpful, but in the end, practice is the most important thing. Another trick I use for poorly-fitting pieces is to sprinkle talcum powder over the superglue after I align the parts. It helps to reinforce the join and can be sanded fairly easily. As mentioned above, a high-contrast lighting setup is great for checking your work. Additionally, a quality camera can help reveal small things you may have missed.
|
|
#
?
Jul 26, 2016 06:43
|
|
|
Quick! I need a recipe for a striking orange with vallejo paints.
|
|
#
?
Jul 26, 2016 10:42
|
|

|
Not a viking posted:Quick! I need a recipe for a striking orange with vallejo paints. Undercoat or prime with white, then do orange ink coats and finish with sepia wash.
|
|
#
?
Jul 26, 2016 10:46
|
|

|
Wash with transparent yellow, it will saturate the color and make it very striking indeed
|
|
#
?
Jul 26, 2016 12:19
|
|
|
I use a wet pallet made from two sponges cut to fit into one of these: cut up a piece of parchment on top, and let it get moist and stop curling about and it works pretty good. Most of what I put on it will stay decent for about a week. But to echo what was said, for me it works better on keeping the paint wet for the session I'm working in.
|
|
#
?
Jul 26, 2016 19:18
|
|

|
Do you guys have any tips for Vallejo paints? I've been trying to look into picking some up, but the internet seems split between them being god's gift to earth and the worst paints in the universe. What do you guys think of the line, how does it react to water or wet palettes, and are there any colors to stay away from?
|
|
#
?
Jul 26, 2016 20:11
|
|

|
The Bee posted:Do you guys have any tips for Vallejo paints? I've been trying to look into picking some up, but the internet seems split between them being god's gift to earth and the worst paints in the universe. What do you guys think of the line, how does it react to water or wet palettes, and are there any colors to stay away from? There are a lot of different lines with different properties. I personally love the Vallejo Metal Air line, though some paint doesn't play well with it- specifically Badger's Minitaire will bead on the surface of VMA paint. I have a color from Vallejo Model Color, Luftwaffe grey of some kind, that I can't use because it rubs off too easily, even on a primed surface. Vallejo Surface Primer is amazing stuff, but you should not confuse that with the Primer Grey or Primer Green or whatever colors, which are just colors, and not actually Primer.
|
|
#
?
Jul 26, 2016 20:22
|
|
|

|
| # ? May 21, 2024 01:08 |
|
|
The Bee posted:Do you guys have any tips for Vallejo paints? I've been trying to look into picking some up, but the internet seems split between them being god's gift to earth and the worst paints in the universe. What do you guys think of the line, how does it react to water or wet palettes, and are there any colors to stay away from? I've never had any problems with the basic line. Mixes with water, extender, and medium with no issues but I'm not a pro or really even any good. signalnoise posted:Vallejo Surface Primer is amazing stuff It's the greatest. The 17ml dropper bottle is only a few bucks so you can easily try it out and keep it around for those days spray priming isn't possible.
|
|
#
?
Jul 26, 2016 20:30
|
|