


|
Samuel L. Hacksaw posted:Give the motor less voltage. Google around and find a cheap voltage divider or whatever. NOTE: A resistor or transformer will get very hot using this method, so you get to build another cage to keep people from touching thing. A transformer should be fine (but won't do what you want), a resistor will get hot though. If it's a synchronous AC motor you're not going to get anywhere by doing this sort of thing and should just buy a cheap VFD instead. The resistor method only works on DC motors, the transformer method (and using a resistor with an AC motor) will really not get you anywhere because a transformer or resistor can only change the voltage and current applied, not the frequency, and the effective rotating speed of an AC motor depends entirely on the frequency and the pole count. You CAN change the speed a little tiny bit by varying the voltage, but the motor will quickly lose torque/power and can't vary its speed very much at all before falling out of synch. As this article covers, you really have to vary the voltage and frequency at the same time, which is the job of a VFD. http://www.electricaleasy.com/2014/02/speed-control-methods-of-induction-motor.html The other speed control schemes they describe (changing the number of poles, rotor rheostat, cascaded motors, and EMF injection) either set the speed in stone at the factory (number of poles) or require a specially constructed motor that has the rotor set up for them already. This really is an excellent excuse to buy a VFD, which is great because they can be used on bridgeports and lathes and to run 3 phase shop equipment (if you buy the right one) off single phase power and... buy a VFD and use it to run metalworking stuff while not cooking pigs!
|
 #
?
Oct 19, 2016 20:18
#
?
Oct 19, 2016 20:18
|
|


|

|
| # ? May 25, 2024 03:44 |
|
|
Ambrose - you do a decent amount of work with nickel silver right? Have you found a way to reliably blacken it, preferably chemically? I tried some stuff from Rio and it rinsed right off. Also tried some selenium based cold gun blue and it did the same. I am planning to do some toner transfer etching and wanted to blacken the background after the etch was done.
|
|
#
?
Oct 19, 2016 22:51
|
|

|
My neighbour came over to assist tonight, we got a lot done, and he brought a huge 40cm sprocket and a gear motor with a tiny sprocket. We spent about 4 hours fabricating new mounts and adding pillow block supports and all kinds of poo poo. Turned it on, and it was spinning at around 20rpm. gently caress. Wasted the evening, or so it seemed. I was really close to just hooking up this old 48v DC motor, but using 12v to slow it down. It was still too quick, and lost most of its torque, plus it weighs loving 60 pounds.  Fortunately we slowed down, considered our options, and went back to my gearbox connected to his gear motor.  Works like a charm now, but the motor isn't ours, it will have to go back, so I still need a permanent solution, but at least this will work for this weekend.  We also made everything solid, welded up some angle brackets to support the motor section.  Thanks for all the advice guys, I appreciate it.
|
|
#
?
Oct 20, 2016 06:01
|
|


|
I assume when it's done that thing is gonna weigh like 400 pounds. How are you going to move it?
|
|
#
?
Oct 20, 2016 06:48
|
|

|
Skyhooks.  For real though, it's all modular, I can move the individual pieces no problem.
|
|
#
?
Oct 20, 2016 06:54
|
|
|
I saw one of those that was built on a trailer chassis. I imagine it was some sort of catering company doing hog roasts for hire.
|
|
#
?
Oct 20, 2016 07:14
|
|
|
Rapulum_Dei posted:I saw one of those that was built on a trailer chassis. I imagine it was some sort of catering company doing hog roasts for hire. No joke, that's what I am doing for my wedding next year.
|
|
#
?
Oct 20, 2016 23:17
|
|
|
Armorer, I remember blackening my silver in college with plain old pot ash. It worked well. Although it might not be the shade of black you are looking for.
|
|
#
?
Oct 21, 2016 16:29
|
|

|
I'm good for blackening sterling, I'm trying to blacken nickel silver, or German silver as its also called. It has no actual silver in it though. It's basically a high nickel content brass.
|
|
#
?
Oct 21, 2016 19:24
|
|
|
Best TIG result so far for me, except at the end when I touched the rod to the electrode and things went wonky, otherwise I would've had two nice overlapping passes of stacked dime beads  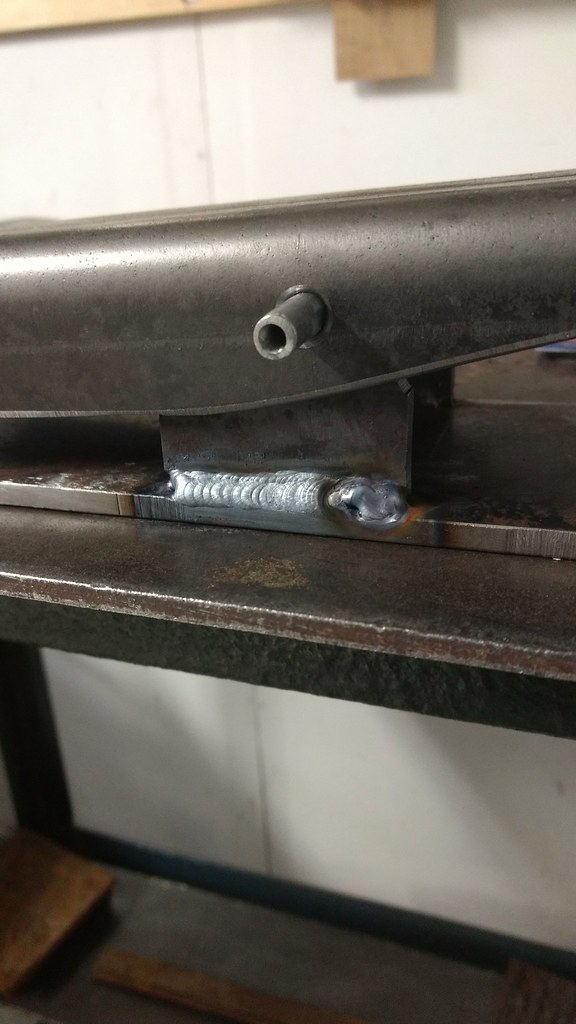 This is for the TIG pedal I am building, it will have three potentiometers, one connected to the pedal and two that will be here on the front, to set the lower and upper range. Copying the actual kemppi pedal on that design feature. You can't just set that on the welder on this machine. 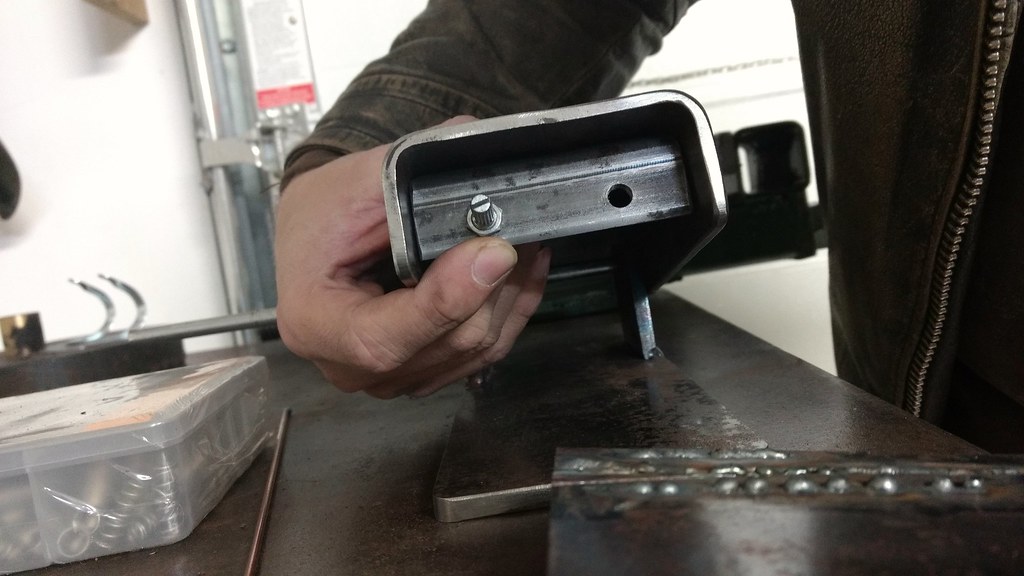
|
|
#
?
Oct 21, 2016 20:22
|
|

|
Yeah, nickel silver's a huge sumbitch to darken, it's got enough nickel in it to be really corrosion-resistant to the usual colouring agents. I had some luck in achieving a brown patina by fuming it with hot liver of sulfur. IIRC I degreased the piece well, put it in a kinda-enclosed container, put the liver in a lil tray directly next to the piece, and heated the tray up. For whatever reason the liver of sulphur won't darken the metal if applied directly as usually works. I never had the patience to apply the liver solution and let it sit overnight or whatever but that might work too.
|
|
#
?
Oct 21, 2016 20:39
|
|

|
Thanks for that, but I really need this thing to be black. I might end up having to go with a baked on enamel finish or cerakote or something like that I guess. I'll ask over in TFR if anyone has cerakote experience.
|
|
#
?
Oct 21, 2016 21:00
|
|
|
Yeah, if you want black-black a coating might be the ticket. Alternately, if there's something used to blacken stainless steel specifically, that might work, they'd both have to cope with the nickel factor.
|
|
#
?
Oct 21, 2016 21:47
|
|
|
Anyone in northern california? http://sfbay.craigslist.org/nby/tls/5808452444.html I'm not quite ready to start accumulating blacksmith stuff (we need to tear out and replace our patio) but this looks like a dang goldmine and I'm struggling with the idea of just going anyway and then figuring out where the gently caress to store a couple thousand pounds of kit for the next several months to a year.
|
|
#
?
Oct 22, 2016 02:29
|
|
|
goddamn I had no idea you can get a ready-to-go 1000W induction coil, sans power supply and fountain pump to cool the coil, off AliExpress for like <40$ shipped. for the light stock micro-hotwork i've been loving around with lately, that'd probably work pretty well... Ambrose Burnside fucked around with this message at 04:05 on Oct 22, 2016 |
|
#
?
Oct 22, 2016 04:03
|
|
|
armorer posted:Thanks for that, but I really need this thing to be black. I might end up having to go with a baked on enamel finish or cerakote or something like that I guess. I work at a weapons manufacturer and I asked some guys in assembly about it. They recommended a cheap air brush, with two coats of cerakote. Then one coat of clear coat if you want it. Sounded like it's kind of hard to gently caress up.
|
|
#
?
Oct 22, 2016 08:15
|
|

|
I'm going to buy a dapping set, and I think I need to get a sandbag to help shape the metal, since I am not necessarily going to be making hemispheres. Any sources for affordable ones? or DIY tips? Canadian resources are a bonus.
|
|
#
?
Oct 25, 2016 03:25
|
|
|
Slung Blade posted:Got the motor lined up, plugged in, shimmed and prepped. Turned it on and it still runs too fast, so I need to find a slower motor to plug in here. I'll try to mount that tomorrow if I can source one. If the motor is too fast, why not add a chain or belt and gear it down?
|
|
#
?
Oct 25, 2016 03:51
|
|
|
I'm interested in getting in to welding so I can work on personal projects. What's the best way to start? Is this the YouTube channel people were talking about earlier? I did some welding back in high school and college, but it's been over a decade. I have an engineering background so I'm comfortable with the process. It would be used for minor personal stuff like making shelves or tables, as well as supporting my high school robotics team.
|
|
#
?
Oct 25, 2016 03:53
|
|
|
Beer4TheBeerGod posted:If the motor is too fast, why not add a chain or belt and gear it down? Space. Also lining up enough belts, pulleys, and shafts was not possible in the time I had available. I can do some decently accurate work, but I don't have a machine shop. Regardless, I finished it. I posted pics in my country life thread if you want to see 180 pounds of slow roasted pig.
|
|
#
?
Oct 25, 2016 06:40
|
|
|
Beer4TheBeerGod posted:I'm interested in getting in to welding so I can work on personal projects. What's the best way to start? Is this the YouTube channel people were talking about earlier? Yes. Jody is awesome.
|
|
#
?
Oct 26, 2016 01:45
|
|


|
Found some sprockets for the pots, turned out to work as kinda cool looking dials. Better spring acquired and some steel wire. Pedal feels better to actuate now. Next step is get the 3rd pot hooked up to the actual movement of the pedal. Then I can mount the electronics and switch. And finally make a cable. I'm gonna try etching a circuit board now actually.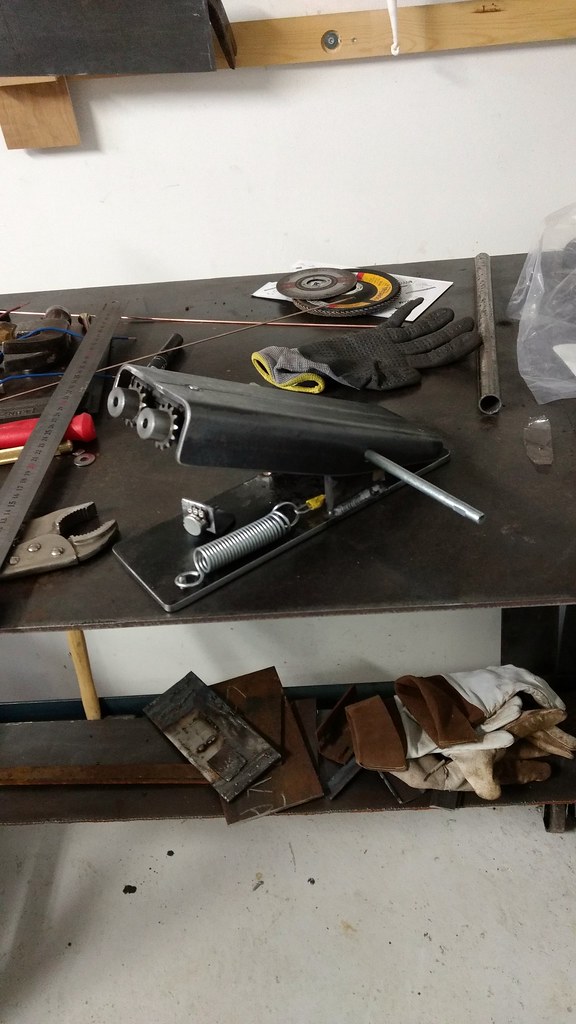
|
|
#
?
Oct 26, 2016 08:50
|
|
|
Forged in Fire chat! Episode 9, the Pandat. AKA wtf is a coal forge? no-one knows! And shop safety? Nah just hold that tiny thing in your hand while you grind it, what could go wrong. Actually, when I did a demo blacksmith thing, they gave me a lovely hand cranked coal forge, so i know that struggle. Nonetheless I know how to check for clinker and empty the tuyere. His Divine Shadow posted:Found some sprockets for the pots, turned out to work as kinda cool looking dials. Better spring acquired and some steel wire. Pedal feels better to actuate now. Next step is get the 3rd pot hooked up to the actual movement of the pedal. Then I can mount the electronics and switch. And finally make a cable. I'm gonna try etching a circuit board now actually. That's looking great. The fact that you're able to fabricate some working electronics is doubly impressive.
|
|
#
?
Oct 28, 2016 02:49
|
|

|
Pagan posted:That's looking great. The fact that you're able to fabricate some working electronics is doubly impressive. Well, it depends on how you define working Got some debugging todo now...... Also I am wondering about porta-bandsaws and I'd like to know if I was the only one who ever wondered if you can get new guides for them. I mean, they're angled at 45 degrees from the wheel on all the saws, this steers the piece being cut towards the frame, limiting depth of cut. I understand this is so you can hold them comfortable and cut stuff, wouldn't work well with straight guides. Still it would be cool if you could have another guide that does not twist the blade to use when putting the saw in a stand. You wouldn't constantly bump into the frame when cutting things then and have a near unlimited depth of cut.
|
|
#
?
Nov 1, 2016 07:03
|
|
|
I am learning machining and I thought that this project might be a good beginning project. Plus I would get a belt grinder out of it. I am unsure of the quality and the are some key specifications missing. Does this grinder look like it will stand up to some decent use. Any changes you would make or other instructions you would prefer? I do plan on giving one of the rollers a curve so it will track better. Any kind aluminum you guys prefer to machine?
|
|
#
?
Nov 2, 2016 08:52
|
|
|
Your post seems like it's missing a link to this grinder you're wanting to duplicate. I have plans for a grinder, probably gonna weld it from square steel tubing, loads of designs out there, seems very foolproof.
|
|
#
?
Nov 2, 2016 09:20
|
|
|
His Divine Shadow posted:Well, it depends on how you define working I suspect, but do not know, that the twist is so you're bearing down on the blade in a way that largely pushes it against the bandsaw wheels instead of perpendicular to the wheel (which could push it off the wheel or at least make the tracking all fucky)
|
|
#
?
Nov 2, 2016 15:28
|
|
|
http://www.instructables.com/id/Belt-Grinder/?ALLSTEPS Here it is. Thanks.
|
|
#
?
Nov 2, 2016 15:40
|
|
|
Ambrose Burnside posted:I suspect, but do not know, that the twist is so you're bearing down on the blade in a way that largely pushes it against the bandsaw wheels instead of perpendicular to the wheel (which could push it off the wheel or at least make the tracking all fucky) I think it's a compromise. The twist is kind of half way between so you can see what you're cutting and still have the motor housing clear the bar you're cutting. But I agree, more angle would make them way more useful in the vertical position. Mine has guide bearings so the blade won't push off the wheels at least, so maybe they could be changed to adjust the angle to taste.
|
|
#
?
Nov 2, 2016 15:49
|
|
|
6061 is a good all-around workhorse, it's the first thing most everyone goes for if they don't have particular strength needs or whatever. IRT the grinder, my preference would personally be to take the bits I like that they cover in detail (the wheels, the adjustable tracking system, etc) and replace the plate steel frame with a fabricated tubing one, but that's partially because working with a single large part that gets junked if you screw up any one step bad enough gives me indigestion, and welding all those reinforcing flanges on looks mighty finicky, moreso than a tubing job that'd be stronger out the door. I think I'd also sub the pneumatic tensioner thing for a conventionally-sprung or weighted solution (like putting the motor on a hinged board like a lot of DIY things do) because I'd be liable to get frustrated with a fixed lower-than-ideal belt tension. Ambrose Burnside fucked around with this message at 15:59 on Nov 2, 2016 |
|
#
?
Nov 2, 2016 15:56
|
|
|
ArtistCeleste posted:http://www.instructables.com/id/Belt-Grinder/?ALLSTEPS I hate it. There are completely pointless holes and slots all over the place, the belt is longer than it has to be, there's no surface behind the working area of the belt, and lets not even touch the safety implications of a completely unshielded 6' grinder belt
|
|
#
?
Nov 2, 2016 16:20
|
|

|
Ambrose, noted on the use of plate. I have a bunch of tubing that can be put to good use anyway. I use 6061 for forging. Guess it's a versatile alloy. Here's what I liked about this one. It's compact and simple. It's basically a belt attached to a motor. Whereas other designs I have seen are more sprawling with a large footprint. I have never made something like this. I don't have a lot of free time so I wanted a straightforward design. I also wanted some parts to machine. Again, new at machining, so these looked doable. I did wonder at the use of four rollers. I usually don't see more than three. I think a 2" x 72" belt size sounds good to me. I would use it primarily for putting edges on tools and sending faces on round hammers. I am completely open to suggestions for other designs. Edit: just found this one. He's got more information than the other guy and a plate to sand against. He also has specs for the wheels. http://dcknives.blogspot.com/p/2-x-72-belt-grinder.html?m=1 ArtistCeleste fucked around with this message at 20:22 on Nov 2, 2016 |
|
#
?
Nov 2, 2016 20:10
|
|
|
I'm moving jobs and setting up a new shop. I'm getting an amazing vise stand and a good vise, but the shop has wood floors. Any good way to bolt the stand down ? Here is the vise stand http://www.votawtool.com/adjustable-vise-stand-23537.html
|
|
#
?
Nov 2, 2016 23:52
|
|
|
Specifically what kind of wood floors? Are we talking about plywood or plank? In either case you probably want to get at least two of the hole over a joist and lag bolt them the hell in. How long will depend on the joists. The other holes can be bolted down with shorter lags if we're talking about something like an old barn with super beefy plank on the floor. If it's something more like plywood your options could be more limited any may include things like throwing in a 2x4 between a joist span to lag into.
|
|
#
?
Nov 3, 2016 00:00
|
|

|
Motronic posted:Specifically what kind of wood floors? Are we talking about plywood or plank? I don't know yet. Hopefully something strong. It is the second floor of a building of a large music store in Toronto, but who knows how old the floor is. I hope to find out next week. Maybe I could reinforce it by attaching an arm that connects to the wall it will be near.
|
|
#
?
Nov 3, 2016 02:55
|
|
|
Cut the bottom flange off or build an adapter to bolt it straight to the leg of a heavy duty work bench, like this guy did with a leg vise. Or, get some plate you can bolt it to, then weld some bar stock thick enough to keep the bolts off the floor and weld that to a 3/8ths thick base plate as big as you like and keep it semi-mobile.
|
|
#
?
Nov 3, 2016 05:10
|
|
|
If anyone is curious, the selenium based gun blue worked MUCH better on the etched nickel silver than on the initial surface of it. I did a test etch and figured I'd try it again just for the hell of it. I think it will work just fine on the finished piece. The test etch itself was kind of lovely though. The mordant was cold, and two hours sitting in it achieved almost zero etching depth. The toner transfer mask held up pretty well, but could also use a bit of bolstering if I have to leave the piece in that long. I'll do the final one tomorrow and post a pic. Edit: Here's the test etch in the meantime. You can see there is some random pitting all over where the mask failed to hold up. I'm hoping to minimize that and increase the etch depth on the next try.  The gun blue I used is Kleen Bore Black Magic, applied with a toothpick. I'll probably do several applications on the final one. armorer fucked around with this message at 19:56 on Nov 5, 2016 |
|
#
?
Nov 5, 2016 19:34
|
|
|
Im in the process of finishing my coal forge build and I realized that I still dont have an anvil. I live in the middle of nowhere, so running to the anvil store isnt an option. But the area is rotten with railways. Who the hell do I talk to about getting a length of rail without being a sneaky sneak and just taking some?
|
|
#
?
Nov 6, 2016 20:05
|
|

|
Old rail is gonna be made of good work-hardened steel but there's so little mass there I've never really gotten the appeal for anything bigger than a bench anvil. Realistically speaking, it's very unlikely anybody's gonna just give you any rail, they seem to get made opportunistically when people already have the rail in hand. What I and many others have done is go to a metal supply place and just buy a brick of 4140 steel. Stout with all the mass under the workpiece to maximize the rebound given the smaller size, and all you have to do to it once you get it home is grind a progressive radius or two into the edges to give you a horn-type working surface. Mine has different radii ground in on either side so if I need a really crisp edge for cutting sheet-metal or a big gentle curve for fullering I just flip the thing over.
|
|
#
?
Nov 7, 2016 00:51
|
|
|
|
| # ? May 25, 2024 03:44 |
|
|
Gray Stormy posted:Im in the process of finishing my coal forge build and I realized that I still dont have an anvil. If you are where I think you are, head down to Coplans on Saturday morning and browse through the steel pile. You're likely to find a chunk of steel that meets your needs. You'll get it for scrap price which is some ridiculously low value right now. Just beware you might get an alloy of steel that you can't touch without carbide tooling. Barring all of that PM me and I'll try and track you down a cut off.
|
|
#
?
Nov 7, 2016 01:04
|
|

