


|
Jaguars! posted:That's the kit I made earlier this year. Some dude in the comments of neb's link has a gallery here or you can see my hackjob earlier in this thread. It's a decent kit, not the highest quality I've done but not one of those horrible 1970s ones with warps or excess flash either. With that and loads of 1mm long parts it's not for beginners. Also my kit didn't come with decals or instructions, though hopfully that's a one-off. Instructions were easy to find on the net. That water base you have - is that just a picture? Looks good, either way.
|
 #
?
Jan 4, 2017 01:44
#
?
Jan 4, 2017 01:44
|
|


|

|
| # ? Jun 6, 2024 00:42 |
|
|
I got all the extreme weathering out of my system with the last kit, so this one is going to be almost completely clean, a tank fresh out of the factory. I got the Tamiya tank technician kit as well to make a workshop scene and to replace the extremely crude engine that Italeri included with the tank.
|
|
#
?
Jan 4, 2017 05:54
|
|

|
Jaguars! posted:Wiki seems to indicate that Q class destroyers had the same hull, so it would only be small configuration changes if anything. Although a lot of the upperworks are essentially identical, the K class had three twin 4.7 turrets, while the Q class had four single turrets, and they also had different AA and torpedo arrangements.
|
|
#
?
Jan 4, 2017 08:08
|
|


|
Nebakenezzer posted:That water base you have - is that just a picture? Looks good, either way. That's not mine, that's just a dude on scalemates. He did link the base though, http://www.coastalkits.co.uk/newstore/ships.html. NTRabbit posted:Although a lot of the upperworks are essentially identical, the K class had three twin 4.7 turrets, while the Q class had four single turrets, and they also had different AA and torpedo arrangements.  Somehow I was looking at pictures of them half the morning and still missed the single guns. Somehow I was looking at pictures of them half the morning and still missed the single guns.
|
|
#
?
Jan 4, 2017 10:41
|
|


|
Yeah, that thing I linked said you could get the guns from a Tamiya O class destroyer which is $17 on ebay. No idea about the rest of that gubbins.
|
|
#
?
Jan 4, 2017 13:37
|
|

|
Would a good option for airbrushing larger pieces (buildings /terrain) just be something like a Grex Genesis xgi .5 with their fan cap? I have a Iwata HP-CS with a .35 I like using, but it gets tedious when doing larger projects. I also don't need to get crazy with something too giant either. But that grex can convert to a .7 with a 50ml cup. Could throw it on my large compressor if I need to spit a massive (relatively speaking) amount of paint.
|
|
#
?
Jan 4, 2017 17:34
|
|


|
Unkempt posted:Yeah, that thing I linked said you could get the guns from a Tamiya O class destroyer which is $17 on ebay. No idea about the rest of that gubbins. Hmm, that actually works for the guns, and you can still arm the O class model because the tamiya blurb says it comes with both the 4.7" guns, and the 4" high angle mount guns the later O class were armed with. Doesn't quite solve the torpedoes and AA, but it's a start.
|
|
#
?
Jan 4, 2017 19:12
|
|
|
So I'm curious on doing a wash on a figure. Should I just thin out some oil paint and put it on him? Also should I topcoat first.
|
|
#
?
Jan 4, 2017 23:13
|
|

|
The_Rob posted:So I'm curious on doing a wash on a figure. Should I just thin out some oil paint and put it on him? Also should I topcoat first. for an oil/enamel wash the theory is you're using a lacquer thinner to remove the excess wash after letting it dry a little bit so you'd want the wash to go over a sealed model. My latest - Primer - Paint - Gloss Varnish - Transfers - Gloss Varnish - Ammo by Mig black wash - Satin Varnish  Love the design of the shore trooper but unlike most of the other bandai figure kits it really wants to be painted. The bare plastic tan armour looks awful. The white/black storm troopers look great built out of the box with no painting. Paragon8 fucked around with this message at 23:47 on Jan 4, 2017 |
|
#
?
Jan 4, 2017 23:42
|
|

|
You can wash with basically any thinnable paint, the type just affects the end result. Enamel is the cleanest wash (so long as its applied over a sealed model), and is good for filling in panel lines without making your kit look war-torn. Just thin it and dab the brush in the lines; the paint will flow down the channels, and as the thinner dries the paint will flatten (giving you the line effect while keeping the appearance of depth). Oil is super thick, but is really good for weathering, can be applied on top of anything, and almost brain-dead to use: take a large brush, load it with your desired color, then coat the entire model in the stuff. It takes so long to dry that you can wait anywhere between an hour to 2 days before cleanup. Take a paper towel and gently wipe off the excess oil, as too much pressure will remove the intended effect. Seal it after a few hours and you're golden. Neurolimal fucked around with this message at 23:52 on Jan 4, 2017 |
|
#
?
Jan 4, 2017 23:49
|
|

|
Neurolimal posted:You can wash with basically any thinnable paint, the type just affects the end result. Yeah I usually do the oil for my actual models but I'm talking a 1/35 figure. I want some details to pop but I don't want to actually detail paint everything. So it sounds like the enamel wash would work best with what I'm doing.
|
|
#
?
Jan 4, 2017 23:53
|
|
|
I have a bridge made out of a solid chunk of wood. It's just a slab of wood painted gray. I want it to look more like concrete, with weather staining and such. It's already in place so I can't do anything that would require it to be moved, and sprays are mostly out. I tried doing a wash with acrylic paint but it looks blotchy and bad. How can I get some good water/weather stains on it?
|
|
#
?
Jan 5, 2017 00:12
|
|

|
What has helped my weathering is the Deagostini Build the millennium falcon painting tute with Steve dymszo (at work, can't link  ) )He uses a post it note or tape to air brush little weather stains and oil streaks and such and creating panel lines where none physically exist. I'm sure others have done that too, but I hadn't seen it done before I watched them. Might help ")
|
|
#
?
Jan 5, 2017 07:20
|
|


|
NTRabbit posted:Hmm, that actually works for the guns, and you can still arm the O class model because the tamiya blurb says it comes with both the 4.7" guns, and the 4" high angle mount guns the later O class were armed with. Doesn't quite solve the torpedoes and AA, but it's a start. So combining the Kelly kit, the O class kit, and an out of print etched brass and resin detail kit can get me a 1:700 Quickmatch... but for the money I'd expect to pay for a 1:350 kit. Which is a significant difference considering the size of a destroyer.
|
|
#
?
Jan 5, 2017 08:16
|
|
|
How's Takom models compared to say, Tamiya? I just discovered this beauty but it looks pretty wild. Individual track pieces, is this bad? How do people attach the upper hull so the internals are still visible? Magnets? 
|
|
#
?
Jan 5, 2017 15:27
|
|


|
Individual track links are the way to go, vinyl is terrible and DS is only a little better. For all of my full interior models I leave the upper hull unglued. I saw a model where the guy put up the upper hull, turret, and turret roof on transparent plastic rods to show off the interior fully. Some people just cut holes in the side of the tank. AFVClub has a line of T-34s with full interior and transparent hulls, but that seems like a colossal pain in the rear end.
|
|
#
?
Jan 5, 2017 17:29
|
|
|
Yooper posted:How's Takom models compared to say, Tamiya? I have their KV-5 kit but I haven't built it yet. Looking at it in the box though Takom seems to make a pretty good kit. The instructions seem to have been bound in construction paper though.
|
|
#
?
Jan 5, 2017 18:10
|
|

|
Yooper posted:How's Takom models compared to say, Tamiya? Individual track pieces are annoying as hell, but most of the nice kits have them (or some alternative, like Dragon's "magic links") because the final product looks waaaay better than the vinyl strips or the kind with straight sections and then individual links for the curves. Assuming you don't gently caress up. The one takom kit I put together (object 279) was pretty good. Don't really have enough experience to generalize.
|
|
#
?
Jan 6, 2017 02:55
|
|


|
Is this the thread to talk about model train projects? I just completed a layout in my 3yr olds room (for xmas) and wanted to talk next steps or things I could do to fix a couple of issues. I'm not at the point of having built towns or anything around it, it's really just the shelving and the tracks at this point. It goes around the length of his room about 1 foot down from the ceiling and their are some suspended bits that I suspect could be better. Since I'm like $1100 in the hole as is I should probably just keep going, right?
|
|
#
?
Jan 6, 2017 15:47
|
|

|
Murgos posted:Since I'm like $1100 in the hole as is I should probably just keep going, right? Yes.  There's a few folks who do train stuff here, and do it well. I almost got my kid a train set this year (6 yo) but he's a tinkerer and the last HO set we had he thrashed trying to assemble-disassemble it. So he got a Lego train set for Christmas and we're all happy.
|
|
#
?
Jan 6, 2017 15:50
|
|
|
Hell yeah! Keep at it. This isn't a hobby for anyone concerned about money. As soon as you think you've got everything you need, some new wrinkle arises and then oops, money gone. Seems like any hobby where you build things with your hands, be it modelling or woodworking or metalwork, demands a constant influx of cash. Feed the beast!
|
|
#
?
Jan 6, 2017 16:28
|
|

|
Speaking of feeding the beast, I ordered a bunch of stuff from Mig Jimenez USA's webstore and haven't heard a peep about it shipping. Has anyone had any experience ordering from them? Will it magically arrive on my doorstep one day?
|
|
#
?
Jan 6, 2017 16:36
|
|
|
How long ago did you order? It might just be a general overload of holiday orders slowing things up. Plus they're based in Spain, so I think their US arm is just a drop-shipping/fulfillment service, so they may be a bit slower on things.
|
|
#
?
Jan 6, 2017 17:26
|
|
|
The order was during the holidays, so yah, probably stuck in the rush. But by god I've got a T-55 to weather!
|
|
#
?
Jan 6, 2017 17:30
|
|
|
My airbrush arrived early! The delivery guy showed up right as I was about to leave for work. Now I just want to go home and play with my new toy. Paasche's site says that I only need to spray cleaner and wipe down the needle after spraying, is that correct, or do I need to scrub the paint channel like with my old one?
|
|
#
?
Jan 6, 2017 17:32
|
|
|
Between colors you only need to spray some cleaner to clear the channel, but yeah, after a days paint session do a full breakdown of the needle and nozzle assembly and clean all parts and the internal shaft on the body of the brush. I've never seen an airbrush yet, that gets fully cleaned just by spraying cleaner. I can spray a full cup of cleaner through mine, and it'll spray perfectly clear, but once I break it down the needle and nozzle still have paint on them.
|
|
#
?
Jan 6, 2017 17:46
|
|
|
If anyone wants to add yet another resource to their modeling toolset, you should check out Toadmans Tank Pictures. He sells CD's or zip files of his extensive photo collection of a wide variety of military vehicles. For $5 bucks you can get a download pack of any given vehicle, and it'll include several hundred good-quality pics of said vehicle, nicely arranged in HTML so you can find what you're looking for easily. They're really good if you want to know what the real-world color of X part in a vehicle was, how internal stowage or accessories were arranged, the general condition of a vehicle, and endless details if you want to super-detail above and beyond what a kit includes. I cracked the box on my 1/16 scale T-34/85, so I picked up his pack that includes pics on both the T-34/76, and the 85, and it was well worth it. Loads of detail, and will be tons of help with color reproduction.
|
|
#
?
Jan 6, 2017 18:49
|
|
|
Yooper posted:Speaking of feeding the beast, I ordered a bunch of stuff from Mig Jimenez USA's webstore and haven't heard a peep about it shipping. Has anyone had any experience ordering from them? I'm in the UK but my Mig order appeared pretty much out of thin air despite the tracking info being gibberish. I'm sure shooting them an email won't hurt
|
|
#
?
Jan 6, 2017 20:00
|
|
|
Bloody Hedgehog posted:If anyone wants to add yet another resource to their modeling toolset, you should check out Toadmans Tank Pictures. There was a Polish armour museum website with 360 degree photos of the interior of Soviet tanks, but it shut down I got a disk of photos with the Hussar T-34-85 turret, but they were of a tank that was terribly preserved with rust and flaking paint to the point where it was pointless to try to use any of them. The colour was off, too (modern Green as opposed to 4BO).
|
|
#
?
Jan 6, 2017 20:23
|
|
|
Ensign Expendable posted:I got a disk of photos with the Hussar T-34-85 turret, but they were of a tank that was terribly preserved with rust and flaking paint to the point where it was pointless to try to use any of them. The colour was off, too (modern Green as opposed to 4BO). You got the disk from Toadman? The pics I got for both tanks are well preserved specimens in a military museum. As far as I can tell, all his pics are from well preserved vehicles, he doesn't take pics of poo poo-heaps that have been left out to decay.
|
|
#
?
Jan 7, 2017 06:15
|
|
|
There is a nice guy who's just started his own photography firm working from the same village I'm in so I popped over today to see what some proper shots of my models would look like. I think they are nice shots and I've given him some Gamesworkshop mans and some other 1:35 tanks to have a go with. See what you think. If any one is really interested I can link to the original 6016x4016 HQ images.         
|
|
#
?
Jan 7, 2017 17:37
|
|

|
Looks amazing!Bloody Hedgehog posted:You got the disk from Toadman? The pics I got for both tanks are well preserved specimens in a military museum. As far as I can tell, all his pics are from well preserved vehicles, he doesn't take pics of poo poo-heaps that have been left out to decay. It came in this kit, I don't know who took the photos. Also it turns out that my airbrush and compressor aren't compatible at all The fitting on the Paasche hose is much smaller on the airbrush end and much larger on the compressor end. Canadian Tire had no compatible adapters, either. The website says the hose is 1/8", but it's more like 3/8" when I measure it. Am I measuring the wrong thing?
|
|
#
?
Jan 7, 2017 20:36
|
|
|
Is that Tau thing GW or Forgeworld? looks ace regardless.
|
|
#
?
Jan 7, 2017 20:58
|
|


|
Flipswitch posted:Is that Tau thing GW or Forgeworld? looks ace regardless. Thanks, It's a GW Ghostkeel. https://www.games-workshop.com/en-SE/XV95-Ghostkeel-Battlesuit
|
|
#
?
Jan 7, 2017 21:29
|
|
|
Ensign Expendable posted:Looks amazing! Amazon should have adaptors. I got a 'generic' adaptor set that had one of every manufacturer of airbrush to my compressor for about 10 bucks if I remember correctly.
|
|
#
?
Jan 7, 2017 22:56
|
|


|
Ensign Expendable posted:Looks amazing! The fitting is probably 1/8" NPT or the metric equivalent, which is around 3/8" really. Look in the plumbing section of a hardware store.
|
|
#
?
Jan 8, 2017 01:36
|
|

|
1/8" NPT is 3/8"  you Americans and your system of measurements. I'll check some out, thanks. you Americans and your system of measurements. I'll check some out, thanks.
|
|
#
?
Jan 8, 2017 06:15
|
|
|
Yooper posted:Yes. Good deal. The nice thing about model railroading is that you can swap time for money, depending on what you want to do. I look forward to seeing what you've done so far!
|
|
#
?
Jan 9, 2017 04:17
|
|


|
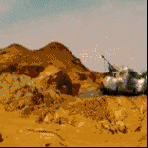
 This is my first time building a tank and I'm pleased with the results. I still need to weather the tracks and everything, but building a tank is really fun.
|
|
#
?
Jan 9, 2017 22:07
|
|
|

|
| # ? Jun 6, 2024 00:42 |
|
|
Tanks are great. Is that the Tamiya kit? Also your driver's hatch is upside down.
|
|
#
?
Jan 9, 2017 22:12
|
|