

|
Deceitful Penguin posted:Haha, lol, you mean you can sell yourself out to the Zigs? Isn't that basically just a very elaborate suicide? I mean, we've gotta become a skeleton somehow. Also gently caress it, this thread has made me pick up the game. I was having a pretty great time until a minotaur turned me into a greasy smear. This is gonna take some learnin'.
|
 #
?
Jul 13, 2017 17:40
#
?
Jul 13, 2017 17:40
|
|


|

|
| # ? May 15, 2024 21:34 |
|
|
I don't think we can - as a caster class (i.e. has a resource bar not called 'stamina', 'equilibrium', 'psi', or 'steam', I think) I don't think Zigur even appears for us on the map normally. Also I think the Zigs have a hateon for the undead - they can't be wilder classes at all, after all. (I have no idea what would happen if we learned Slime Spit from a loremaster escort. I know if you do so as a Vim-using class equilibrium skyrockets as soon as you use a Vim power)
|
|
#
?
Jul 13, 2017 18:30
|
|

|
The answer is that our equilibrium is stuck at zero, but every equilibrium-based skill we attempt to use will automatically fail. Funnily enough, this is not the case for enemy undead. If you play as a possessor and claim one as a body, you'll find that the basic 'summon' skill that all summoning-type enemies use is a wild-gift - everything from honey trees using it to summon bees to ghasts using it to summon ghouls has a variation on that same skill, with the only difference being the type of enemy summoned in question. Enemies have all sorts of rule-breaking features that you can claim for yourself if you play as a possessor, which is why they're a pretty fun class when they get rolling.
|
|
#
?
Jul 13, 2017 19:07
|
|

|
Inadequately posted:The answer is that our equilibrium is stuck at zero, but every equilibrium-based skill we attempt to use will automatically fail. Can you possess Bosses? Like Bill the Troll or something?
|
|
#
?
Jul 13, 2017 19:30
|
|

|
Yes, but It requires some tricky manipulation and a few levels. I think you have to put a category point into the tree containing the talent that controls what "tier" of enemy you can control. I had a run as a Cornac where I tried to play "catch em all" with the bosses so I know it works.
|
|
#
?
Jul 13, 2017 20:37
|
|
|
Annath posted:Can you possess Bosses? Like Bill the Troll or something? Yes! There's even an achievement (Two if you count EoR) for killing a Boss with the body of another Boss! (names omitted to prevent spoilers)
|
|
#
?
Jul 13, 2017 22:46
|
|

|
Inadequately posted:This green area is a Font of Life � living creatures standing it in have increased health regeneration and equilibrium reduction. Being a skeleton, we don�t benefit from it in any way, but at least we aren�t damaged by it.
|
|
#
?
Jul 14, 2017 02:04
|
|


|
Commander Keene posted:Doesn't it also affect stamina regeneration? At least IIRC my Bulwark's stamina regen jumped whenever I stood in one of those.
|
|
#
?
Jul 14, 2017 02:55
|
|

|
I tried the game and it was... kinda boring? With how the skills/cooldowns work, and the staggering array of item modifiers, it felt kind of like Diablo 3 played through a kinetoscope. It's not badly done by any means, and is a real accomplishment by the author, but it feels like these ARPG tropes bolted onto a turn-based game make it a bit less exciting. And I'm not an RL hater; played Nethack, Angband, Moria640, DCSS, Omega, Incursion, etc etc. I'm actually really glad the LP exists so I can see all the goodies without having to trudge through the game itself.
|
|
#
?
Jul 14, 2017 03:50
|
|


|
Certainly a valid viewpoint. Personally, I like all these ARPG tropes but don't have the reaction speed or mental energy required to really keep up with a lot of them (and I'm not sure my crappy old laptop/mouse would be able to keep up with the clickfest), so I'm glad a game like this exists where I can enjoy these things while taking it as quickly or as slowly as I feel like playing.
|
|
#
?
Jul 14, 2017 05:49
|
|
|
I see this game from the other direction, as an oldschool roguelike player I find the game more than a bit shallow. In addition the cool down based combat system and perfect information just makes it feel lacking. That said I am appreciating the LP.
|
|
#
?
Jul 14, 2017 08:44
|
|

|
See, I feel the other way. The perfect information is what makes it 100% tactical, you always know what you're dealing with, so by and large, if you die? It's gonna be because you hosed up your build or your tactics. The turn-based system means you've always got the time to consider your actions, reaction speed has no impact whatsoever on your ability to win. And the addition of a ton of active skills for every class, means that you're actually making interesting tactical decisions in combat, too(in some roguelikes, for some classes, their only decisions are prior to combat, whether/when to engage or not, and then once the fight starts, it's just bump-attacking over and over).
|
|
#
?
Jul 14, 2017 10:02
|
|


|
I gave this a shot because of the LP but the Diablo loot system was really tiring. You kill five scrub enemies and you get five cloaks of foo with +5% this, +3 that, -2% something and some crap on hit. Is this better than your cloak of blah with +4% and +4 and -2 and +whatever? Maybe, probably, but I cannot bring myself to care. I will stick to roguelikes where a cloak of magic resistance and a set of silver dragon scale mail is always good and I always know what they do without having to read an enormous random stat block of tiny trivial boring stat changes.
|
|
#
?
Jul 14, 2017 10:52
|
|

|
The perfect information system is an interesting point of discussion. I never played any of the true original roguelikes in their prime...but from what I've seen, it looks like they were still heavily reliant on player knowledge - if you didn't have a good idea what a boss enemy did (through previous runs), you got yourself into deep poo poo. So you still needed a similar level of information, it's just that the game didn't provide it - it all had to come from your experience and memory. I personally prefer having the information at my fingertips but can definitely see why just being handed what you need to know might seem shallow to a veteran of the classics. MagusofStars fucked around with this message at 13:53 on Jul 14, 2017 |
|
#
?
Jul 14, 2017 11:50
|
|


|
MagusofStars posted:The perfect information system is an interesting point of discussion. I never played any of the true original roguelikes in their prime...but from what I've seen, it looks like they were still heavily reliant on player knowledge - if you didn't have a good idea what a boss enemy did (through previous runs), you got yourself into deep poo poo. So you still needed a similar level of information, it's just that the game didn't provide it.l and it all had to come from your experience and memory. Part of what was fun about some early roguelikes, particularly NetHack and variants, was an entire sub-system they had based around identifying your items. If you know your wand could be a wand of death or a wand of heal, who do you point it at when Identify scrolls are rare? Thus there was a quite interesting system of engraving/dropping things in sinks/careful zapping to find which of your many wands or potions were useful in which situation. There weren't that many of them, either, so it wasn't hard to remember all of the possible options. I kind of liked it and it was part of the charm of NetHack, but it was incredibly new-user-unfriendly and not really compatible with modern game design decisions. You do still see echoes of it in Mystery Dungeon games where potions might be poison or heal, and such, but without the identify systems it's just an annoyance.
|
|
#
?
Jul 14, 2017 12:06
|
|
|
I grabbed this on Steam because of this LP and just got my first win on Nightmare. Pretty much all roguelikes rely on perfect information, Tome just gives it to you upfront rather than requiring you to work it out (or use a wiki.) The only major difference is there's no identification minigame but for me at least they get tedious pretty quickly. The loot system is probably the weakest part of the game to me. I think the problem ToME has is items have really wide and shallow stat spreads, like +5% resistance to 4 elements is common but +20% to one resist is like artifacts only and this makes it really hard for newcomers to understand what items are good for them. The random rare items don't help, where most of them have totally useless combinations of stats, either for your character or in general. However once you work the system out it becomes super exploitable, you can do what I did and get 100% spell crit chance and 300% crit damage and have the entire second half of the game be a victory lap.
|
|
#
?
Jul 14, 2017 12:47
|
|
|
CountryMatters posted:I will stick to roguelikes where a cloak of magic resistance and a set of silver dragon scale mail is always good and I always know what they do without having to read an enormous random stat block of tiny trivial boring stat changes. Are those better or worse than a cape of psionic resistance and a set of white dragon chain mail?
|
|
#
?
Jul 14, 2017 13:30
|
|


|
Hello Sailor posted:Are those better or worse than a cape of psionic resistance and a set of white dragon chain mail? The first one doesn't exist and the second is up to you because white resists frost while silver gives reflect And I didn't need to look that up because there's only a tiny subset of items in Nethack and its easy to remember which is which :P Which is why I prefer it to ToME. What's better, an oozing shimmering cloak or a scintillating fungal cloak? I also have this same argument wrt dark souls equipment where there's a small number of distinct, interesting items, vs diablo equipment where all items are completely identical except for a few unique artifacts. While having a hundred random tiny boons on all your items technically means you have thousands of "different" items, in reality it means they're all the same
|
|
#
?
Jul 14, 2017 13:54
|
|
|
Identifying items especially relying on player knowledge poo poo was the loving worst.
|
|
#
?
Jul 14, 2017 14:42
|
|

|
I definitely see the Diablo 3 loot issue. Is that something moddable, out of curiosity, or is it too much of a core game trait?
|
|
#
?
Jul 14, 2017 14:48
|
|

|
I was one of those players who was super intimidated by TOME's loot system and just put on whatever looked vaguely like an improvement. Once I *got* how the loot works the game became a lot better for me.CountryMatters posted:Which is why I prefer it to ToME. What's better, an oozing shimmering cloak or a scintillating fungal cloak? The answer to this depends of course on what you're playing, but I get your overall argument. TOME is a numbers game through and through. I would go as far to say that how its gear works is one of the cores of the game. Because I think it's cool here's a quick and dirty rundown on equipment: All equipment basically falls on three axes: what it is, what it's made of (its tier), and its color (how many egos it has and their type). TOME egos are all consistent, and their bonuses fall within a certain range. I'm pretty sure this comes from TOME's roots in Angband. So an iron longsword is an tier 1 base grey item. All grey iron longswords are identical. A Chilling Iron Longsword always adds something like 5-20 extra cold damage on a melee hit. This would be a green item (greens have one or two regular egos). A Chilling Iron Longsword of Evisceration adds cold damage like above and also adds crit chance, increases damage, and wounds the target (as the debuff). This is a blue item as "of evisceration" is a greater ego, but "chilling" isn't. (Two greater egos = a purple item.) A Temporal Warden for example would probably look out for items that grant temporal resistance penetration or just increase temporal damage such as the "Keeper's" or "Warden's" ego prefix (available on bows).
|
|
#
?
Jul 14, 2017 15:08
|
|

|
I gotta admit I never found the loot system too intimidating, aside from pink items that can run up some absolutely BAFFLING modifiers due to ignoring a lot of limits set on other items, and be hard to parse. Generally it's pretty easy to read if something's useless for you or useful for you, occasionally it can be hard to tell if one item is better for you than another, but that's often down to your playstyle and skill build more than anything objective.
|
|
#
?
Jul 14, 2017 15:53
|
|
|
The whole item metagame varies pretty widely with the difficulty you're playing on, too. On Normal you're generally at the expense of the RNG for most of the game, and on what good standard artifacts you can find, but can usually muddle through with substandard gear. Nightmare is probably the most finicky item-wise, since you'll be getting a lot of rare items, which vary very, very widely in bonuses, both scaling-wise and in variety. On Insane, you get thrown so many randarts and standarts from all the randbosses you'll be fighting that you can usually aim for the specific egos you want with a decently high chance of getting them, if you can survive that long.
|
|
#
?
Jul 14, 2017 16:42
|
|
|
I think part of my boredom also came from whenever I unlocked a new class, I'd stop what I was doing and go and make a new guy to check it out, so I've done the early game like 6 times now. Where I've stopped, and probably will give up, is on level 9 of a later dungeon where an annoying unique spawned who has the ability to vomit all over the ground and while he's touching the vomit he heals himself every turn about 120% more than the damage I can do in a turn, even with my special powered up melee attacks. It's a bulwark character so I'm too chufty for him to kill me, but I can't out-damage his healing either, which led to like a 20 minute stalemate before I just gave up and saved out, which was annoying.
|
|
#
?
Jul 14, 2017 21:33
|
|
|
Scaramouche posted:I think part of my boredom also came from whenever I unlocked a new class, I'd stop what I was doing and go and make a new guy to check it out, so I've done the early game like 6 times now. Where I've stopped, and probably will give up, is on level 9 of a later dungeon where an annoying unique spawned who has the ability to vomit all over the ground and while he's touching the vomit he heals himself every turn about 120% more than the damage I can do in a turn, even with my special powered up melee attacks. It's a bulwark character so I'm too chufty for him to kill me, but I can't out-damage his healing either, which led to like a 20 minute stalemate before I just gave up and saved out, which was annoying. Sounds like you got Borfast the Broken. I'd suggest backing out of the dungeon and seeing if you could clear any of the other minor dungeons(like the Ruined Dungeon, Hidden Compound, etc.) see if I couldn't scrape up a few more levels before giving it a shot again.
|
|
#
?
Jul 14, 2017 21:40
|
|
|
Borfast means Dreadfell, and Dreadfell is a serious run killer. Don't be afraid to back out (and don't open vaults in Dreadfell unless you're really, really ready.)
|
|
#
?
Jul 14, 2017 21:46
|
|


|
I didn't want to name names and places because of *SPOILERS* but I guess you guys ruined that ") I've been putting that place off, but it's kinda the last place to go. The only other dungeon on the continent I haven't been in is the one with the 33 level cap (normal mode). I opened all the vaults I came across there no problem, everything usually goes down to one LVL5 Assault followed up by a LVL5 Shield Bash.
|
|
#
?
Jul 14, 2017 21:53
|
|
|
 On our way out, we run into this cute little kitty cat.   Aww. Anyway, moving on.  Both the Maze and the Sandworm Lair are more or less of equal difficulty enemy-wise, and the order you tackle them in is entirely up to you. We have quite a lot of freedom at this level, in fact � we can start clearing out some of the sidequests/side dungeons now, but we�ll stick to the major t2 dungeons for now. We�re headed for The Maze first, located slightly above Angolwen in the mountains. 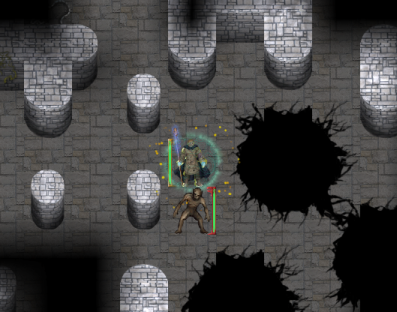 Oh boy, looks like we�ve got Alt Maze. Regular maze is pretty simple � a big sprawling labyrinthine floor, followed by another smaller labyrinth with the boss near the second floor entrance. Regular Maze is pretty bog-standard enemy-wise � lots of rogues and minotaurs with a couple of miscellaneous enemies like oozes and animals hanging around. Alt Maze is another beast entirely. In addition to standard maze enemies, undead and horrors are common. Instead of two floors there are four slightly smaller floors, and jumping down those big holes in the floor is the only way to descend. It�s certainly a much more interesting place to be, but we�ll have to be much more careful here. Incidentally, that�s our first ghoul that we�re fighting. Regular ghouls aren�t too much of a challenge, though they can inflict a nasty disease on us and have the innate ability that prevents them from being one-shot by a single damage instance.  A grannor�vin is our first horror of the day. These guys have darkness-based skills and can Call Shadows. As with most similar enemies, the main threat comes from their Shadows deciding to get their poo poo together for a concentrated assault.  We barely have time to finish him off before a Brecklorn makes their appearance. These guys know Spit Blight, a hard-hitting blight projectile that�s fairly difficult to dodge. Not too tough but annoying to melee because they move quickly and can easily outrun you while blight-blasting you to death.  As you can see, chests are fairly common in the Maze, and they have a larger than average chance of spawning an especially high-level artifact for some reason. We�ll cross our fingers and hope for the best.  That was not the best. Dremlings are corrupted dwarfs � they start out with Resilience of the Dwarves, but nothing else. Drems are big bulky enemies that have high melee retaliation damage and can stun, but are fairly slow. Drem Masters will power up any dremlings/drems around them, and this one appears to have spawned as a shadowblade rare just to make things harder. We teleport back and Attenuate them away. The drem master dropped a rare dagger (of no use to us) and the chest contained a regular sling (also of no use to us). Let�s check out the one to the left.  Good lord, these chests. Multi-hued dragonkind resist almost all kinds of common elemental damage and know every elemental breath + other dragon-based skills. Being hatchlings, these guys benefit only from the elemental damage resistance and have no other skills � aside from the one that spawned as a rogue. Also, there�s a bulwark rogue just hanging out with them. We do the usual �hop backwards, drop Attenuates� routine and claim our reward.  Ah, now that�s what I was talking about. This would be a pretty good mace for weapon users to find so early on. It does pure light damage, a neat quirk that a sun paladin would enjoy and others might find a niche use for.  Moving on. These pink guys are dredgelings � they can cast Dust to Dust and slightly resist Temporal damage. Annoying.  More annoying � these void horrors. They have up to 50% temporal damage resistance and can cast Entropy on us to remove our sustains. They like to open up battles by summoning Void Shards at us � weak enemies that pose no real danger, but killing them causes a random anomaly.  Maze lore! This stuff mostly refers to the regular maze, though. It doesn�t make much sense in the context of alt maze.  There was a Cursed ooze around the corner too. Enjoy the rare sight of a very angery slime ball.  And speaking of oozes, these guys came around the corner. They�re pretty much ooze horrors � hitting them causes them to split apart into smaller and smaller bits, and they do acid retaliation damage to you that reduces your armor/accuracy if you melee them. They are not, thankfully, Oozing Horrors, which are another thing entirely and something I�m desperately hoping to not run into for quite a long time.  This page is one of the requirements for unlocking the necromancer. To unlock it, all four pages of �How to Be a Necromancer� have to be found before the completion of a certain sidequest.  Horrors aren�t our only threat here. Plain old rogues can do a lot of damage with a critical flurry from stealth � don�t forget to take out the bandit lords as soon as possible. Nothing else of interest on the floor, so we hop into a hole.  On Maze 2, we run into our first Ghast. Ghasts are tougher ghouls who can also summon regular ghouls. Things can get ridiculous once we get to fighting ghoulkings, who can summon ghasts.  Despite all the twisted abominations we�ve been clearing out, the threat of the Snake Rare hasn�t dimished one bit. We blast this guy away from a very, very far distance.   One of the rogues dropped this Silent Blade. It�s an interesting weapon but the �simple attack� bit doesn�t get used much � since your other weapon would break stealth anyway, you�d pretty much need to be wielding two Silent Blades, and who relies on bump attacks as a rogue anyway?  Don�t ask how this ooze is dual-wielding revolvers, I don�t know either.  More maze lore lying around on the ground. Probability Travel doesn�t really get much use � it�s a spell that allows you to walk through walls but drains your mana by a large amount per tile traveled. Would be of use in the maze, I suppose.  Granna�vor party on Maze 3. One of the benefits of Attenuate is that whenever a granna�vor/ooze splits, their copies will also carry their debuffs, Attenuate included.  Dredges are big, tanky and hard-hitting. They start out slow, but they can cast Speed Sap, which increases their speed and lowers ours for a few turns. If they can get into melee range they can Grapple us, so we need to stay a good distance away from them.  Dredge Captains are a pain. They power up dredges nearby with their frenzy attack and come with a complement of Dredge bodyguards. Even isolated, they�re still a surprisingly hard-hitting enemy.  We�ve been getting a lot of chests, but nothing of note in them. One of them finally dropped another t5 artifact, but it�s a set of antimagic plate armor � possibly the least useful artifact that we could have found. Can�t win �em all, I suppose. Moving on.  We hop down to Maze 4, and are immediately accosted by the boss of Alt Maze. In regular Maze the boss would be the Minotaur of the Maze, a gigantic Berserker Minotaur � can be kind of annoying if he confuses you with Warshout, but not too much of a problem. The Horned Horror, on the other hand, is a much tougher challenge. A very fast brawler Minotaur, he can pulverize most adventurers with a flurry of fists in seconds. Unfortunately, he�s held back here by a crippling defect, which some sharp-eyed viewers might have spotted.  He spawned with a weapon! While holding that mace, he�s completely unable to use any of his brawler skills � the most he can do is bump attack is with it. With his skills off the table, the Horned Horror�s threat is completely neutered. It�s a semi-common bug with brawler rares/bosses � count yourself lucky if it happens to you. We blast him to death without much difficulty as a result, casting See the Threads a couple of turns before his death.   On timeline 2 he drops the Hornet Stingers. They�re fairly average for artifact arrows, but they can inflict a poison which can cause enemies to fail talent usage, which is a nice bonus.   On timeline 3 he drops the Kinetic Focus. It�s part of a set of a mindslayer-based mindstar set, alongside the Thermal and Charged Focus, and gains additional bonuses when used alongside them. Has a slight niche as the only mindstar to do physical damage.   We go with timeline 1, where he drops his associated artifact, the Stormbringer�s Gauntlets. Our Crystle gloves still outclass them, but at the very least they�re slightly more useful than the other two, being something we might actually wear. That�s one of the downsides of mages � choosing your weapon is rarely more complicated than looking at staves and going �which of these has the highest spellpower/damage bonus�. May or may not be a downside, depending on how much you like sorting through mountains of loot.  On our way out we run into yet another rampaging Cursed ooze. Not quite the funniest Cursed rares you can run into � those would be immobile enemies like poison ivies, who will just stand in place and Rampage at you over and over again.   It turned out to be wielding a rare axe. Skullcleaver is a good early axe for a reaver and most one-handed weapons users, and one of the few artifacts that can proc Greater Weapon Focus. Of slightly less importance now that Greater Weapon Focus has been nerfed, though.   We find someone�s thesis on dragons on the way out. We�ll be finding additional racial analyses by this guy over the course of the game � technically we already found one from a parallel universe, but we didn�t really get to read that one.  We find another field effect near a Font of Life. Standing in a Whistling Vortex slows down enemy projectiles and increases our ranged defense, but reduces ranged weapon accuracy. Note that field effects work by applying a 2-turn buff of the associated effect every turn you spend in them, and thus you carry their effects with you for about a turn after you leave them. That�s about all there is to the Maze. We Rod of Recall out and move on.  The Sandworm Lair is located on the beach to the west of Angolwen, on the leftmost side of the map. Magic-users should be careful here � lots of Zigur patrols tend to end up patrolling this area due to their weird pathing.  This is probably the most annoying dungeon gimmick in the entire game. The SWL is made of small isolated rooms in an ocean of sand. Invincible sandworm burrowers will move from room to room, digging out a tunnel behind them. However, the tunnels will collapse after a few turns, so you have to stay close to the burrowers. Regular Sandworm Lair consists of three floors of small rooms, Alt Sandworm lair consists of one long tunnel through which gigantic sandworm burrowers move, followed by a regular floor. Both are equally tedious. If a tunnel collapses on you, you�re in for a bad time. Collapsing tunnels deal major physical damage, and being stuck in the sand slowly drains your air. Once you run out of air, you suffocate and die, and there�s not all that many measures you can take to prevent it. The best way to handle the Sandworm Lair is to have some means of teleporting, or failing that, a belt/lamp of unlife, which makes you an unbreathing undead. Since we�re already an unbreathing undead skeleton, getting caught in a collapsed tunnel isn�t a death sentence, merely very inconvenient.  As you might expect, sandworms are the most common enemy in the SWL. This particular variant is one of the more basic types of sandworms, and no real threat.  Sand drakes are the most common non-sandworm enemy in the SWL outside of the standard oozes, and a fairly significant threat. They attack with Sand Breath, a very hard-hitting AOE physical attack that also comes with a chance to blind. It�s entirely possible for low-HP characters to be one-shot by Sand Breath, and if that doesn�t finish you off, blundering into a collapsing tunnel while blinded will.  Carrion worm masses are blight and acid-based enemies. They do blight damage with their melee attacks, and have one more trick up their sleeve (unrelated to that one being an oozemancer, that�s just rares being rares).  When killed, they explode into a pool of corrupted blood that does blight damage to anyone standing in them. Carrion worm masses tend to come in groups and blight pools will overlap, so the damage can really rack up if you�re trapped in them.  A gravity worm, with a gigantic corrosive tunneler behind him. Gravity worms know gravity spells � that�s him using Gravity Well on us right now. Thanks to Gravity Locus we�re immune to it, though the same goes for him thanks to his own Gravity Locus. The corrosive tunneler is similar to the carrion worm mass � when killed, they explode into a pool that does acid damage instead.  The chest contained an interesting prize � a marksman�s ring of misery. Rings of Misery are most beneficial for Cursed, but worth well with any other weapon-based class. They give a bonus to cunning, add bonus Bleed damage to every attack, can be activated for a hard-hitting attack that does major weapon damage as bleeding for several turns, and give all your attacks a chance to proc a Gloom effect. There are three possible Gloom effects � Stunned by the Gloom, Slowed by the Gloom and Confused by the Gloom. They function similarly to regular stun/slow/confusion, but are counted as separate effects, and as such regular stun/slow/confusion resistance doesn�t protect against them. In addition, gloom effects are all mental debuffs, and as such Physical save does not protect against them.   We find some sandworm lair lore on the way to the exit. Completing the Sandworm Lair is one of the requirements for unlocking the wyrmic class.  Yet another chest on Sandworm Lair 2. The Sandworm Lair is also notable for having a high chest rate + high artifact spawn alongside the Maze. Of course, the flipside is having to slowly trawl through the Sandworm Lair for loot. This one spawned a half-dozen sand drakes on top of us, and contained absolutely nothing of import.  One of the advantages of being a skeleton is that we can shield up and run into a collapsing tunnel for defense, as long as we can tank the physical damage caused by the tunnel�s collapse. Most enemies will run in behind us, get stuck and suffocate to death. It doesn�t protect us against the bigger sandworms though, who can pretty much walk through walls. We can dig through these walls if we want, but they�ll collapse regardless. Digging our way through the SWL would be impractical for us and suicidal for almost anyone else.   More racial analyses from Loremaster Greynot.  A plain old Giant Sandworm Tunneler. Unlike the gravity worm/corrosive tunneler, there�s not much else to say about them aside from �they big�.  More wyrmic lore. Wyrmics are weird and creepy.  Nothing especially notable on this floor despite the multitude of chests. Moving on.  The Sandworm Queen! We ran into her at kind of a bad time � a tunnel collapsed on us and boosted our Paradox pretty high thanks to Reality Smearing. Fighting her is going to be Anomaly Central. She�s not too much of a threat by herself (the most threatening thing she knows is Sand Breath), but she can summon a randomized assortment of sandworms to her aid, so the fight can get out of control quickly. We drop a couple of Attenuates on her while we run away and try to regenerate our Paradox. Attenuate removes her from reality while she�s offscreen, before we can cast See the Threads. It�s alright � the most valuable drop from her is guaranteed anyway.   Eating the Sandworm Queen�s Heart unlocks the Wyrmic class if you haven�t already unlocked it, gives you one level up�s worth of stats, talent and generic points, and gives you the Wild-Gift/Harmony tree as a locked generic tree � of little use to most classes, but can be worth considering for certain builds. There�s one other thing we can do with the heart later, so we�ll hang on to it for a bit.  You might have noticed a couple of other special features in the room where we fought the Queen � it�s time to deal with them. We start with opening the chest, and are promptly accosted by a randboss Doomed Gelatinous Cube. Doomed are bulky but not too hard-hitting, though they can be annoying due to their tendency to inflict Fear and Confusion. The main threat, as always, comes from their Shadows suddenly deciding to get their poo poo together for a concentrated assault. He drops a t3 randart plate armor, which we have no real use for. Now for the pedestals.  Stepping on a pedestal gives us a prompt asking if we want to inspect it. Should we inspect it, a dozen or so turns pass, then a random elite enemy materializes out of thin air.  The moment the third one dies, a Bringer of Doom materializes � a high-level random demon with at least two classes worth of skills.  We got a corruptor/gunslinger quasit! What a pain.  Seriously, look at this ridiculous skill list. Fortunately, he decides to focus his efforts on debuffing us, rather than overwhelming us with raw damage. It might actually have worked if we hadn�t had enough spell/mind save to shrug off most of the debuffs he attempted.   We kill him and get the Iron Mail of Bloodletting out of it. A good low-level artifact for vim-based classes, it increases healmod and life regen, and can be activated for Bloodcasting � vim-based spells/attacks will sap HP instead of vim while Bloodcasting is active.  We found one more wyrmic poem. On the plus side, this is the last wyrmic poem we find, so he probably got his wish. On the downside, he probably died happy. That�s about all there is to the Sandworm Lair. Before we head onwards, we�ll be finishing up one last piece of unfinished business.  We hit level 20 from killing the Sandworm Queen, and gained an additional cat point out of it. We promptly go over to the tinker cave and shove it into the machine, along with 500 gold.  For our efforts, we�re rewarded with the Automated Portable Extractor. It functions identically to the Transmogrification Chest, but depending on the item transmogrified, may also award us with extra ingredients.  Unlocking tinkers also grants us access to the tinker store, where we can buy tinker schematics and implants. Now, what exactly are tinkers?  Answer: little metal widgets that can be stuck onto various pieces of our equipment to grant them additional bonuses.  To create a tinker, we need three things � we need to know the tinker schematic, we need enough talent levels in the relevant tinker skills, and we need ingredients for it. The resultant tinker is entirely dependent on the materials used to create it � for instance, if we had three t5 weapons to melt down for voratun lumps right now, we could make a t5 Armor Reinforcement tinker right away. We start off with one point in the first two tinker skills for buying the category, which eases up on generic investment considerably. Picking up tinkers now isn�t something that�s going to pay off right away. However, now that we have tinkers, tinker schematics will start dropping in place of runes and infusions, and EoR artifacts will start turning up alongside main campaign ones. It�s best to pick up tinkers relatively early so that you have a higher chance of getting the tinker schematics you need, since it�s still kind of a crapshoot. That�s about it for now. The last (and hardest) t2 dungeon coming up in the next update.
|
|
#
?
Jul 15, 2017 03:51
|
|
|
^^^ update above. I know you guys were breathless waiting to see how it turned out, but I killed that vomiting guy by equipping +speed gear and simply outrunning him. Every time he threw up I'd step back so he would follow and wasn't in the healing range and eventually chipped him down. Took another 20 minutes of essentially column dancing.
|
|
#
?
Jul 15, 2017 10:30
|
|
|
Nicely done! Also, the Alt Maze can be absolutely murderous for caster classes, unless they nerfed the Horned Horror recently(it's been a long time since I last got the Alt Maze). Since, basically, he's got a ranged grab ability that keeps you in melee range, chokes you for damage AND silences you so you can't cast any spells or use any runes. I think the only way out of it for a caster would be if they had a Movement Infusion that could Free Action them out of it(though I forget if Free Action removes all pins/grabs, or merely prevents them sticking in the first place).
|
|
#
?
Jul 15, 2017 12:16
|
|
|
movement infusions have to be preemptively cast; they only prevent the application of such effects and do not clear them
|
|
#
?
Jul 15, 2017 17:06
|
|
|
I'm trying this out again with some of the advice in the thread, and I'm a bit baffled by archers. Are they just insanely broken? As an archer I can instakill everything up until the second tier dungeons and I can even facetank anything I want. I'm never in any threat at all, and I only died when I stupidly opened the boulder-giant vault in the mountains. I've also tried a few mage classes and their damage output seems like crap compared to generic archer stuff, and melee classes who are at deaths door in melee with a couple enemies, when my archer can just ignore them and reload while auto-killing anyone that tries to attack him. It seems...weird
|
|
#
?
Jul 15, 2017 20:29
|
|
|
PurpleXVI posted:Nicely done! Yeah, I forgot to mention his Tentacle Grab ability, which we shrugged off with relative ease when he tried it on us. It has a range of 6 so you're good if you stand further away than that, but he does have Spinning Backhand as a distance closer so you have to stay alert. A movement infusion ought to prevent the grab if you pre-cast it, though whether it'll prevent both the pull+grapple or just the grapple is something I'm not sure about. In this particular case we'd be pretty safe even if he grappled us with it though, since all he can do is bump attack us with his crappy mace, which we can easily facetank with our vast array of shields. CountryMatters posted:I'm trying this out again with some of the advice in the thread, and I'm a bit baffled by archers. Are they just insanely broken? As an archer I can instakill everything up until the second tier dungeons and I can even facetank anything I want. I'm never in any threat at all, and I only died when I stupidly opened the boulder-giant vault in the mountains. Yeah, archers are kinda...overturned at the moment. Prior to 1.5 they were widely considered the worst class in the game (possibly tied with bulwark) - high-damage glass cannons with an annoying tendency to get killed from getting pulled into their own arrows. The archer rework kind of over compensates for that - it'll probably be tuned down in later versions. Also, most mages are actually defensive classes once you get past the early game - spells/mindpowers just don't scale at the same level as weapon damage, and simply can't compete damage-wise. Caster-type classes generally stay competitive through superior range, scouting, defenses and mobility, though exceptions like the corruptor exist. Of course, ranged weapon users get the best of both worlds. 1.6 is set for a massive rework of how physical/spellpower and weapon mastery works, so that's going to be fun to relearn. Leif. posted:Sorry if this is asked and answered, but would it be possible to a screenshot of equipment/stats at the end of an update? (The stuff you're actually using, to be clear.) Can do, but since I'm a few updates ahead don't expect to see it until several updates in the future. Inadequately fucked around with this message at 20:39 on Jul 15, 2017 |
|
#
?
Jul 15, 2017 20:31
|
|
|
Sorry if this is asked and answered, but would it be possible to a screenshot of equipment/stats at the end of an update? (The stuff you're actually using, to be clear.)
|
|
#
?
Jul 15, 2017 20:33
|
|


|
Inadequately posted:Yeah, archers are kinda...overturned at the moment. Prior to 1.5 they were widely considered the worst class in the game (possibly tied with bulwark) - high-damage glass cannons with an annoying tendency to get killed from getting pulled into their own arrows. The archer rework kind of over compensates for that - it'll probably be tuned down in later versions. Yeah, generally the physical classes tend to have the best offense, but often come out a bit short in terms of utility abilities(scouting, etc.), though a lot of them have Track, which gives them a really good scouting option if they have any investment in Cunning at all. On the other hand, if you're a physical character, you probably have less options for taking advantage of what you scout than a caster does, since a caster can often open the battle from around a corner with AoE abilities that damage enemies or drop status effects on them, otherwise softening them up, and forcing the enemy to spend that vital first turn walking into view and eating the first hit, rather than doing it himself. Casters also have the advantage of usually being the ones to have shields of various flavours, which are universally awesome(excepting Displacement Shield, that skill is absolute, utter, flaming garbage, through being a combination of highly unreliable and, unlike most other shields, not being instant-use, but instead eating a turn to pull up). Non-casters also rarely get to teleport, which is pretty much the ultimate panic button(especially if, like the Paradox Mage's, it's an instant speed teleport). That generally follows the ToME pattern for reworks or new classes, though, immediately after launch they tend to kick seven flavours of rear end, then they slowly get tuned into line. Mind, I don't think it's necessarily bad, it builds some hype for the new class, gives you a chance to learn them with a flatter difficulty curve, etc. I don't think pre-1.5 Archers were the worst class in the game at that point, though, at any time I'd hand that prize to a three-way tie between Doomed, Bulwarks and Anorithils(for being, in order, too random, too weak and too boring).
|
|
#
?
Jul 15, 2017 22:50
|
|
|
 We open up this update on a happy note: the (dark) gods have seen fit to open a portal to the Lost Land of Poosh. Like the Bearscape, it�s a special zone that can be entered once for a shot at rare enemies and a fabulous prize. Most of these dungeons are best challenged at level 20+ for safety � we�ll be getting to them in an update or two. First off, we have to clear the last of the t2s.  Daikara is the last and most dangerous of the t2 dungeons. The entrance is located in the mountains above Last Hope and the lumberjack camp. Zigur Patrols often end up here due to their pathing, so mages should take care when entering the area.    So first off, we got a sun paladin escort. That�s going to be annoying � escort missions rarely turn out well in either version of Daikara, for reasons that will soon become very clear. Secondly, that volcano message � and that rare fire elemental over to the right � tells us that this is Alt Daikara. Both versions of Daikara are a challenge, but Alt Daikara is distinctly harder than regular Daikara. As you can see, fire-themed enemies are common, alongside the original inhabitants of Daikara.  Those inhabitants in question? Snow giants, of all shapes and sizes. This one is a regular snow giant, but even he has a couple of tricks up his sleeve � he�s immune to poison and confusion, and will try to confuse us with Mind Disruption before bashing our face in.  Umber hulks and xorns are common to both versions of Daikara as well. Their main gimmick is being able to swim through mountains like water, carving out a tunnel behind them a la sandworm burrowers. Not a major threat in and of themselves, but their tunnels tend to attract a lot of attention.  Oh boy. These guys are hands-down the most annoying enemy in Daikara, and the main reason why Daikara is the hardest of the t2 dungeons. Snow Giant Boulder Throwers all know Throw Boulder, a very hard-hitting radius 1 AOE (a 3x3 square) that does major physical damage and knocks you backwards. As a spell-like talent, it can�t be dodged or mitigated with armor � physical resistance is the only way to decrease its damage. Facing more than one at a time can easily spell your doom for melee characters � even if you survive the initial volley of boulders, chances are you�ll have been knocked back far enough that by the time you get back in range, Throw Boulder will have gone off cooldown.  Facing multiple boulder throwers isn�t an especially rare occurrence, either. Snow giants often come in large groups � here�s a snow giant party right now. Alongside the regular snow giant and boulder thrower, there�s a snow giant thunderer on the right (attacks with Chain Lightning and Lightning, beam-based lightning spells) and a snow giant chieftain behind him (an extra-buff snow giant that hits a lot harder).   From the snow giant chieftain�s corpse, we recover another page of Greynot�s racial analyses.  The escort portal isn�t much further up, thankfully, and we escort them without any further issue. For escorting a Sun Paladin we have our choice of two chants � positive-energy based sustains that increase our defenses, or we can pick up the entire chant tree. We pick the Chant of Fortress, which boosts our physical resistance, physical save, armor and armor hardiness by a small amount.  Not a moment too soon � there�s another snow giant party up ahead. The �lava floors� in Alt Daikara are, thankfully enough, completely cosmetic � standing on them won�t harm us in any way.  We find the remains of an ill-fated expedition. Not surprised it failed � if your plan revolves entirely around a wyrmic, it might be time to rethink it.  We run into our first vampire in Daikara. Vampires often come with a base-level set of necromancer skills, in addition to other spells based on the type of vampire we�re fighting. This one comes with the standard set of vampiric sustains � Blur Sight (increases defense), Phantasmal Shield (does light retaliation damage whenever hit in melee), and Blurred Mortality (can survive at up to �X HP, with X based on talent level and spellpower).  In Alt Daikara, volcanic boulders will fall from the sky occasionally, transforming anything they hit into lava floors. This doesn�t do any damage, but can open up avenues to enemies that you would prefer to be closed � the main reason why Alt Daikara is more difficult than regular Daikara. Above us is a random tinker schematic � now that we have Tinkers unlocked, we can find them in place of runes/infusions sometimes. This one gave us Explosive Shell, a gunslinger-based tinker we have no use for.  The next floor contains an anorithil escort. Anorithil escorts are on par with tinker escorts for certain builds in terms of usefulness. We�re not going for one of those right now, but they�ll still come in handy if we can escort them successfully.  The portal is thankfully not too far from the entrance, and we claim our reward. Anorithils give an interesting set of rewards � most notably, the locked Celestial/Light generic tree. Celestial/Light grants a powerful set of healing/defense focused spells that actually grant positive energy on use � not something we actually need, but it means that Light spells are functionally free and can be used with no concern for resources, only cooldown. They would be invaluable if we weren�t going tinkers, but since we are, they�re not quite as necessary. Instead, we just pick out one spell. Healing Light is a straight up �restores health� spell, while Bathe in Light is a bit more interesting � it creates a healing zone that buffs damage shields, heals us slightly and increases healmod while we stand in it. Bathe in Light was one of the most broken healing spells pre-1.5 due to slightly wonky scaling that boosted it to ludicrous levels with high enough spellpower, but since then it�s been tuned to a more reasonable level. It�s still pretty useful for us, since our frontline defense is our multitude of damage shields.  Yet another expedition note. Hint: If your rogue refuses to wear light armor, he might not actually be all that good a rogue.  There�s not all that much to say about faeros. They resist fire damage, take extra cold damage and cast high-level Flame � that�s pretty much it. We find a steam generator implant near this one � not something we need right now, but we�ll hang on to it just in case.  Now that we have tinkers, steamsaws and steamguns will start dropping alongside regular weapons. Steamsaws can be wielded in both mainhand and offhand, and count as both a sword and shield. However, the only class that can actually access the steamsaw mastery talent is the sawbutcher, so there�s usually no reason for any other class to wield one. As you can see, steamsaws require steam to attack (even with basic bump attacks), and their damage type is �physical bleed� � hitting an opponent with a saw will do physical damage and bonus damage as bleeding over time.  On Daikara 3, we run into a lesser vampire. These poor creatures are the lowest tier of vampire � the only vampire sustain they come with is the standard Blurred Mortality.  We also run into a Greater Faeros. In addition to being bigger and tougher than a regular faeros, these guys come with Fiery Hands, which increases their fire damage, adds bonus fire damage to their melee attacks and increases their stamina regen.  Yet another entry from the doomed expedition.  We find an interesting anomaly near the dropped expedition entry. The Temporal Rift, as you might expect, takes you to a zone full of temporal-based enemies. The Temporal Rift is dangerous for several reasons, the most notable of which is not immediately obvious. In Adventure Mode, most of the time when you die, you�re given the option to respawn on the world map outside the dungeon you last entered � useful if you died from wandering into a zone way above your head. However, this isn�t true for the Temporal Rift � you can only respawn in the Temporal Rift, and the only way to exit is by clearing the entire zone, no Rod of Recalling out. We won�t be entering it ourselves for quite a while. Naturally, temporal-based enemies are extremely resistant to temporal damage, our main damage type. We don�t have any significant resistance piercing yet, so even if we survived, battles would be an endless slog. It�ll be a while before we come back here. Clearing the Temporal Rift on most classes unlocks the Temporal Warden, if you haven�t unlocked it yet. Playing as a Temporal Warden actually gets you a different scenario � in place of the temporal rift, you fight an unhinged Paradox Mage version of yourself from a different timeline. Killing them gets you some nice rewards, but if you fail to do so within a hidden time limit, the PM will dump a billion points of temporal damage on you, killing you instantly � but then time reverses and the PM disappears, without you having lost a life. �Dying� in this manner unlocks the Paradox Mage class, if you haven�t unlocked it yet.  We find yet another demon statue in Daikara, with quite the selection of nasty bodyguards � a fire dragon family, led by a fire wyrm. Wyrms are the third and final tier of dragons, just above drakes. In addition to Fire Breath and Wing Buffet, Fire Wyrms also know Devouring Flame (an AOE field of fire that damages and drains the health of anyone caught in it) and Bellowing Roar (a physical AOE that damages and confuses anyone caught in it). There�s not a lot we can do to mitigate those moves right now, even if we can see them coming, aside from �shield up and cross our fingers�.  And right on cue, we�re promptly buffeted by a half-dozen wings, confused with a Bellowing Roar and set on fire. If the screen looks blurry, that�s because it is � that�s the �confusion� overlay. One small mercy granted to us � shield talents, being instant, will never fail even when confused, though this does not hold for our Bone Armor.  After a long, grueling slugfest of a battle, we finally clear out the last of the dragons and head for the statue � only for a meteor to annihilate it from existence the second we get close. We�ll just have to imagine what it said, I suppose.   While clearing out snow giants, we run into a special one, Burb the Snow Giant Champion�and proceed to beam him to death offscreen, without even realizing it was him until after the fact. He�s a souped-up Snow Giant that knows a few ice spells, but not too much harder than a regular snow giant champion unless you run into him early. He dropped these gloves from EoR � they�re pretty average, but anything that inflicts a chance to fail talents is always very helpful.  Oh boy, Alt Daikara 4. The fourth floor is the major difference between Daikara and Alt Daikara, and accounts for 90% of the difference in their difficulty ratings. Normal Daikara 4 is functionally a normal Daikara floor with a boss on it, whereas Alt Daikara 4 is a massive wide-open plain broken up by a few scattered trees � trees that are usually promptly worn away by wandering xorns and/or meteors. As you might imagine, a wide-open plain is not the most conducive environment for fighting a myriad number of enemies with very hard-hitting, unavoidable AOE attacks. And that�s before the boss of Alt Daikara even comes into play.  And speak of the devil. Varsha the Writhing is an ancient, powerful fire wyrm - she knows all the fire wyrm skills previously mentioned at higher talent levels than regular wyrms, along with Firestorm and a movement infusion for quickly closing in. Firestorm isn�t really a major issue � the fact that she knows level 9 Fire Breath and level 8 Wing Buffet is. Fortunately, since she came to us, we don�t have to go to her, saving us the perilous journey across the floor. Plus, we�re close to the stairs, and can retreat back to the safety of the previous floor if need be. On regular Daikara, we�d be facing Rantha instead, an ancient and powerful ice wyrm. Rantha doesn�t hit quite as hard as Varsha, but comes with a multitude of freezing skills and can keep adventurers frozen indefinitely while casually clawing them to death.  A greater faeros gunslinger decided to join in the fun. NOT HELPING.  We Time Skip Varsha away, allowing us to focus on taking out the gunslinger.  Varsha promptly returned, just as angry as ever. The barrier was a last-ditch effort to delay her while we retreated back to the stairs � most of our defensive skills and shields were on cooldown, our paradox was starting to get out of hand, and we�d be in a lot of trouble if she unleashed a Bellowing Roar and confused us. Thankfully, just before we stepped onto the stairs and as she rounded the wall, that lucky Attenuate instakill chance kicked in as she dropped under 20% health, removing her from reality altogether.   For our efforts, we�re rewarded with the Wyrmbreath gloves. These gloves give a bonus to fire and darkness resistance, boost fire damage and Willpower, and can be activated for a low-level Fire Breath. Slightly more interesting on a brawler � they convert half your damage of any type to fire damage, and give additional fire damage procs.  We start slowly clearing out the rest of the floor. On our way we run into this fancily-named spider. These guys are acid-themed, and will corrode our armor if we melee them.  Speaking of acid, here comes a venom drake. Venom Drakes know Acid Breath and Corrosive Spray, two acid-based AOEs with a high chance of disarming enemies caught in them.  The third vampire of the day. This one is just a regular everyday vampire, slightly tougher than the lesser variant but still not a major threat.  We finish him off, but not before he manages to cast Circle of Death. Circle of Death attempts to inflict Bane of Confusion or Bane of Blindness on creatures caught in them every turn � magical effects similar to Confusion and Blindness, but with additional darkness damage over time. Naturally, being magically-inflicted, legally distinct debuffs, neither regular physical/mental save nor blindness/confusion resistance protects against them.  Most of the enemies on the floor have been alerted to our location, and are now heading towards us. I have a vague feeling that our Precognition spell might be placing enemies we spot on alert. Oh well, saves time and gives us a pretty defensible spot, and if things get hairy we can always retreat to the previous floor.   The last of the expedition notes. Wyrmics, man.   Also, another page of racial analyses from Loremaster Greynot, on the subject of dorfs. The rest of the floor was fairly average, both enemy-wise and loot-wise. Aside from the temporal rift, we�re almost done with the major t2 dungeons. As you might recall, there was one other bit of business we left unfinished earlier.  We head through the Old Forest once more, and this time when we hit the Lake of Nur we don�t turn back. Unlike some of the other �watery� zones we�ve been dealing with, the Lake of Nur actually is deep water � every turn we spend in it, we lose air, and if we run out of air we start drowning. There�s a couple of ways to get around that � we can wear an item with the �of the depths� ego, which grants us waterbreathing, or a belt of unlife, which renders us unbreathing. Or be an undead skeleton, and just not give a single drat. 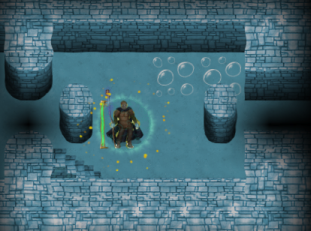 Completing Lake of Nur without waterbreathing is hard, but possible thanks to these air bubbles. Standing in one of them will replenish your air supply, but they hold a limited supply of air and will eventually dissipate if you stand in one too long. Auto-exploring is not recommended in Lake of Nur 1 if you don�t have waterbreathing � just try to figure out where the stairs are and book it.  Aside from the usual aquatic enemies � eels, squids, turtles and the like � the most prevalent enemy here are these water imps. They�re fairly similar to crystals � pop up, hit us with Water Bolt, phase door away. Annoying, but not too lethal unless you really let your guard down.  Interesting! Looks like we�ve gotten Alt Lake of Nur. As you might have guessed from the series of notes in Old Forest, Lake of Nur is horror central. Regular Lake of Nur gives us an unflooded Lake of Nur 3 and �regular� horrors, while Alt Lake of Nur 3 is underwater and comes with a set of unique underwater horrors. If you have waterbreathing/unlife and aren�t too concerned about air, Alt Lake of Nur is probably the easier one � the underwater horrors are generally easier. Of course, they�re still horrors, so it�s best to not let your guard down. And don�t worry about missing out on anything horror-wise � I guarantee you we�ll see far more horrors before the LP is through.  The burning fire cloaked in shadow at the top is a Boiling Horror. These horrors are fire-themed � in addition to the standard-issue Flame and Fireflash, they know Blastwave (fire AOE centered around the caster that knocks everyone back) and Burning Wake (causes all your fire spells to leave a trail of fire on the ground that does additional fire damage over time). They also know Thermal Aura, which adds additional fire damage to their TK-wielded weapon/gem, but since they�re not wielding one it�s currently going to waste. We drop an Attenuate on this one, run away and watch the problem take care of itself.  The next horror of the day is this Ravenous Horror. It casts Drain and Blood Grasp, blight-bolt spells that replenish its vim/HP, and Blood Lock, a spell which prevents us from healing for a few turns.  Next up, this swarm hive. Their main defense is summoning little swarming horrors, which can Blindside you for additional damage. This one is also a bulwark, but since it�s completely immobile we can just drop Attenuates on it from out of LOS all day. Incidentally, swarming horrors will explode into a pool of air bubbles when killed, which is really helpful if you�re still reliant on that whole �breathing� thing.  The most difficult of the aquatic horrors didn�t spawn this time � a bulky earth-based horror with a focus on physical damage spells. We clear out the rest of Lake of Nur 3 without much trouble, and prepare for the real challenge of Lake of Nur.   Lake of Nur 4. You might have noticed a couple of things here. The first is that we�re in a tiny room with barely any space to maneuver or hide. In fact, we can�t even teleport in here, though that won�t be made apparent unless we try to do so. The second is that we�re fighting a twisted little monstrosity called the Weirdling Beast. So what exactly is this thing capable of? Let�s take a look.  Hoooooo boy. Let�s break it down, bit by bit. Runes/Infusions: The main reason why the Beast is so hard to kill despite its relatively low HP � Healing, Regeneration and Devourer give it massive healing capability, and unless you can burst it down quickly the beast can heal from the verge of death to full health in a few turns. Taint: Devourer is a special infusion(?) unique to the Weirdling Beast � when used, it removes 4 physical/magical effects and/or sustains from the target and heals 75 HP per effect removed. Starfall: A radius 2 AOE spell that does heavy Darkness damage and stuns anyone caught in it for 4 turns. Corrupted Negation: A radius 3 AOE spell that does blight damage and removes up to 5 magical/physical effects/sustains from anyone hit. Bone Grab/Shield: The former is the pull n� pin move we all know and love, the latter is a specialized magical shield � every bone shield charge will absorb a single damage instance regardless of damage done, but fade after that. Bone shield charges refill slowly, once every few turns. With Bone Shield 5, the Beast starts with 5 shields and recharges one every 6 turns. Acid Blood: A passive that deals acid damage to any melee attackers, damaging them and reducing their armor and accuracy. Soul Rot: The standard blight-bolt spell of choice, with an increased 25% critical hit chance. Gloom: At a ridiculous level of 8, the Weirdling Beast�s Gloom effect has a solid 20% chance of inflicting a gloom effect on us whenever we spend a turn in its radius. Mind Sear: A very low-cooldown beam of pure mind damage. Manathrust: Ditto, but with pure arcane damage instead. Time Prison: An interesting one � similar to our Time Skip, it removes the target from time for a few turns. Unlike Time Skip, the affected target still physically exists on the battlefield, but can�t be harmed or interacted with in any way. Does no damage, but has a longer effect as a result. Freeze: High single-target cold damage, high chance to freeze them for six turns. Telekinetic Blast: similar to our Repulsion Blast, knocks back enemies and does physical damage. TL;DR: this thing has a metric ton of disabling/debilitating effects, at least two ways to remove all our sustains and buffs, a rainbow of raw damage-dealing beams and an insane amount of healing/regeneration capability. It�s enough of a threat that I�m going to burn See The Threads just to see how the first few turns go � if we can even survive that long, we just might be able to handle this monstrosity.  On Timelines 1 and 2, the Beast opens with a Freeze/Starfall combo, keeping us frozen/stunlocked for most of the STT duration. Thankfully, on timeline 3, the Beast spends most of its turns walking slowly towards us as we drop Attenuates on it. By the time it actually starts pulling out its defensive measures (devourer, regeneration, healing), Attenuate removes it from existence.  These items aren�t our prize, but we�ll take them anyway. The daggers are t4 items, so they�ll be useful for tinkers.  This is the real prize. We start off by examining that big blue orb in the center.  The device seems to be made of pure crystal. It projects a very accurate map of the known world � including the forbidden continent of the south. There seems to be a hole about the shape and size of your Rod of Recall. - Insert the Rod into the Orb As you take the rod close to the orb it seems to vibrate and react. A shadow appears in a corner of the room! You retract the rod immediately but the shadow stays. It looks like the horrors you fought when coming inside, only less degenerated. The shadow appears to be roughly humanoid, but it has no head and its limbs look like tentacles. It does not seem hostile.  With that accomplished, we start chatting with our spooky ghost butler.   What are you and what is this place? What are you and what is this place?The creature glares at you with intensity. You �see� images in your head. You see titanic wars, now forgotten. You see armies of what you suppose are Sher�tul, since they look like the shadow. They fight with weapons, magic and other things. They fight gods. They hunt them down, killing them or banishing them. You see great fortresses like this one, flying all over the skies of Eyal � shining bastions of power glittering in the young sun. You see the gods beaten, defeated and dead. All but one. Then you see darkness; it seems like the shadow does not know what followed these events. You shake your head as the vision dissipates, and your normal sight comes back slowly. Those are Sher�tul? They fought the gods? They had to. They forged terrible weapons of war. They won. But then where are they now if they won? They are gone now. I cannot tell you more, master. Master? I am not your mas� You possess a control rod. You are the master. Err�okay. So why do I understand you? The texts are unreadable to me. You are the master; you have the rod. I am created to speak to the master. So what can I do here? You are the master. You can use this place as you desire. However, most of the energies are depleted and only some rooms are usable. To the south you will find the storage room. Thanks. What else can I do here? The fortress is designed as a mobile base for the Godslayers � it can fly. It is also equipped with various facilities: exploratory farportal, emergency containment field, remote storage� However, the Fortress is badly damaged and has lain dormant for too long. Its energies are nearly depleted. Take this Transmogrification Chest. It is linked by a permanent farportal to the Fortress. Any items you put in here will be sent to the power core and dismantled for energy. There are, however, unwanted byproducts to this operation: the generation of an energy known as gold. It is of no use to the Fortress and thus will be sent back to you. I have already found such a chest in my travels. Will it work? Yes it will. I will attune it to this fortress�done. Thanks. They had to. They forged terrible weapons of war. They won. But then where are they now if they won? They are gone now. I cannot tell you more, master. Master? I am not your mas� You possess a control rod. You are the master. Err�okay. So why do I understand you? The texts are unreadable to me. You are the master; you have the rod. I am created to speak to the master. So what can I do here? You are the master. You can use this place as you desire. However, most of the energies are depleted and only some rooms are usable. To the south you will find the storage room. Thanks. What else can I do here? The fortress is designed as a mobile base for the Godslayers � it can fly. It is also equipped with various facilities: exploratory farportal, emergency containment field, remote storage� However, the Fortress is badly damaged and has lain dormant for too long. Its energies are nearly depleted. Take this Transmogrification Chest. It is linked by a permanent farportal to the Fortress. Any items you put in here will be sent to the power core and dismantled for energy. There are, however, unwanted byproducts to this operation: the generation of an energy known as gold. It is of no use to the Fortress and thus will be sent back to you. I have already found such a chest in my travels. Will it work? Yes it will. I will attune it to this fortress�done. Thanks. Completing this quest grants you the Transmogrification Chest, if you have not previously obtained it. From now on, any item we transmogrify with the chest will grant us fortress energy. Unfortunately, this does not include the APE, so we�ll have to decide whether we want fortress energy or tinker ingredients when transmogrifying items. Tinker ingredients generally win out � we don�t really need that much fortress energy for the most part. For now, we transmogrify all our gems to get a jumpstart on fortress energy, unlocking some of the other dialogue options with the butler.  Would it be possible to upgrade my Cloak of Deception so I do not need to wear it to pass as a living being? Yes, Master. I can use 10 energy to infuse your cloak. When you take it off, the effect should still persist. However, I suggest you still carry it with you, in case something manages to remove it from you. That could be quite useful. Yes, please do it. Would it be possible to upgrade my Cloak of Deception so I do not need to wear it to pass as a living being? Yes, Master. I can use 10 energy to infuse your cloak. When you take it off, the effect should still persist. However, I suggest you still carry it with you, in case something manages to remove it from you. That could be quite useful. Yes, please do it.We can finally ditch the cloak-switching shenanigans and wear whatever cloak our hearts/stats desire whenever we feel like it. As the butler says, it�s still a good idea to hang on to the Cloak of Deception � the passive effect can be removed in some situations, but putting the Cloak of Deception back on and taking it off again generally fixes it. You asked me to come, about a farportal? Long ago, the Sher�tul used Farportals not only for transportation to known locations, but also to explore new parts of the world, or even other worlds. This fortress is equipped with an exploratory farportal, and now has enough energy to allow one teleportation. Each teleportation will take you to a random part of the universe and use 45 energy. Beware that the return farportal may not be near your arrival point; you will need to find it. You can use the Rod of Recall to try to force an emergency recall, but this has a high chance of breaking the exploratory farportal forever. You may use the farportal, but beware � I sense a strange presence in the farportal room. I will check it out, thanks.This option is unlocked once we have 45 energy in the orb. Notably, unlocking the farportal room does not actually use up the energy, only if we actually jump into the farportal. Hopping into the farportal takes us to a randomized dungeon at the cost of 45 energy. Dungeons range from �easy� to �functionally impossible�, and there�s no way of telling which is which until you try. To exit a dungeon, you have to reach the final floor and defeat the dungeon boss, which generates an exit farportal for you. Farportal dungeons are generally dangerous enough that most people don�t press their luck, but they�re fun to mess around with if you�re behind on the loot/EXP curve, or just confident enough in your abilities. Of course, before we get into that, there�s one other thing we have to take care of.  The farportal room always starts with a randboss horror guarding it. These things are a good bit tougher than your average horror, and depending on your luck, can give even the Weirdling Beast a run for its money. This time we got a bulwark/PM Blade Horror. Blade Horrors are physical-damage based horrors � they can shield themselves from it with their Kinetic Aura, and inflict it with long-ranged psionic attacks. Not too threatening as far as horrors go � though their big brother is something else entirely. Right now it�s currently using Temporal Fugue, a PM spell that essentially splits it in three, generating two temporal duplicates that will attack independently for several turns. Every duplicate only does one-third the damage, but any damage they take will be spread out among the three of them. It�s a fun spell, and I�m planning to unlock the relevant spell tree for it with my next cat point, though that�ll be a while away. As long as we stay out of melee range, this guy isn�t much of a problem, though if we did then it�d be another matter entirely � blade horrors have boosted attack speed, and for a defensive class bulwarks hit surprisingly hard. Fortunately, the limitations on teleporting also apply to him, so we knock him back all day with Repulsion Blast while Attenuating away. We get a randart steamsaw from it, which is nice but not something we really need. We can also hop into the farportal now if we wish, but we abstain from that. You asked me to come, about the Rod of Recall? The Rod of Recall you possess is not a Sher�tul artifact, but it is based on Sher�tul design. The Fortress now has enough energy to upgrade it. It can be changed to recall you to the fortress. That could be quite useful. Yes, please do it.Using the Rod of Recall will now take us to the fortress, and exiting the fortress will put us on the world map outside the dungeon we recalled out of. This might seem slightly more inconvenient at first, but it�s actually quite useful later on. Are there any training facilities? Yes master, a training facility is available to the north, but it is not yet powered on. I will need 50 energy to do this. That could be quite useful. Yes, please do it.We unlocked the training room. Let�s check it out.  The training room is to the north of the orb room. The control orb can be used to generate target dummies of varying resistances to practice your spells/skills on. These are pretty useful for weapon-using characters � it might not be immediately obvious which weapon(s) actually do more damage in practice when melee procs and everything else are factored in, unless you actually try using them in battle, and the training room provides a pretty clear visualization of damage done. In addition, damage done to training dummies counts for most damage-related achievements, which helps with unlocking certain spell trees and prodigies.  Touching this warphole thing shows a list of all lore any of your past characters have ever obtained. A fun read if you�re bored sometime and feel like piecing together Eyalian history for yourself.  The storage room is located below the orb room. As you can see, dropping items here will automatically sort them out into their different types � useful if you�re the hoarding type.  Below the storage room is the item vault. A donator-only feature (a category which also includes you if you�ve paid for this game or its DLCs on any platform whatsoever), using the item vault allows you to store items from your current character into an interdimensional bank, which other characters can retrieve from the vault. Of course, since any character has to first reach this point in order to access the vault, there�s rarely any point in vaulting early-game gear/artifacts. Vault slots are limited based on how much you�ve paid/donated, but if you�re willing to wait, you can just make a �mule� character that hangs around in the fortress all day to vault/unvault items. Some people tend to look down on vault usage � I�m personally of the opinion that it�s a video game, and you might as well do whatever you find most fun.          We check out some of the d�cor. No idea what it means, but it sure is fancy.   That�s about all there is to the Sher�tul fortress for now. There�s a couple more cosmetic options we can unlock, but we don�t have the fortress energy for that yet. Taking this exit returns us to the surface, generating a small entrance portal in this forested area. Of course, now that we�ve bound our Rod of Recall to the fortress, we can get there anytime by recalling there, and will exit to our last known location on the worldmap from now on. With that, we�ve pretty much covered all the t2 dungeons, Temporal Rift aside. We�ll probably be checking out that bad weather in Derth next, followed by clearing out some of the other side dungeons and sidequests. Inadequately fucked around with this message at 10:58 on Jul 17, 2017 |
|
#
?
Jul 17, 2017 07:32
|
|
|
The Weirdling Beast can be an absolute rear end gently caress, even on Normal. Some classes have a hard time putting out the damage to slam through his self-heals, it's not that his damage is super high, he's just a relatively durable enemy. Which is a rarity. Generally most of the enemies you meet are dangerous because of the damage they can put out in brief, horrible bursts, or because they can lock you down with various status effects. Most enemies don't actually have any self-heals(or use them terribly, a lot of enemies with self-heals like Reassemble will lead the fight by using it, rather than saving it till they're actually injured, for instance), and little or no health regeneration, which means that whittling them down while kiting around with teleports and speed infusions is often pretty viable. The most memorably tough enemies, however, are the ones who can actually repair themselves to some extent, like the Weirdling Beast or Borfast.
|
|
#
?
Jul 17, 2017 17:26
|
|
|
PurpleXVI posted:The Weirdling Beast can be an absolute rear end gently caress, even on Normal. Some classes have a hard time putting out the damage to slam through his self-heals, it's not that his damage is super high, he's just a relatively durable enemy. Which is a rarity. This. A thousand times this. I've ended up in fights with the Weirdling Beast as a Sun Paladin or a Bulwark that have essentially turned into staring contests because neither combatant was able to effectively stick damage on the other. (Usually those end when one of us sticks a disable at the right time.) Plus his ability to just shut off all your sustains ranges from 'largely inconsequential' to 'utterly crippling' depending on your class
|
|
#
?
Jul 17, 2017 20:20
|
|
|
Sustain strippers are notably rough on archmages and necros, since they both have critical sustains they depend on to stay alive.
|
|
#
?
Jul 18, 2017 01:58
|
|
|

|
| # ? May 15, 2024 21:34 |
|
|
Are you planning on showing off Insane difficulty at all? I've been trying it and it's very different. I wouldn't even say it's much harder than Nightmare simply because of the ridiculous loot you get.
|
|
#
?
Jul 18, 2017 12:44
|
|