


|
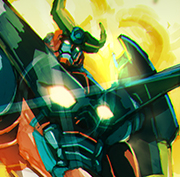
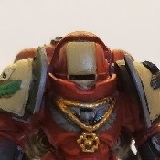
My local store held a painting contest yesterday. Contestants had a month to paint a Warhammer/AoS model of their choice, to be judged by someone with an actual background in art. Naturally, I chose loving SLAMBO.  I did my best to mimic the studio scheme, that blended green took 3-4 hours to do. It was done with three shades of green and then tied together with a glaze. Highlights were done in yet another two shades of green and took another couple of hours.  Not to mention the metallics and other details. Either way, this model was a ton of fun to paint and I got to try out new techniques I will probably never, ever use again. As ever, there are a couple of things I'd like to touch up, like the highlights on the eyebrow ridge, but all entries are being kept on display at the store for two weeks. Not to mention the metallics and other details. Either way, this model was a ton of fun to paint and I got to try out new techniques I will probably never, ever use again. As ever, there are a couple of things I'd like to touch up, like the highlights on the eyebrow ridge, but all entries are being kept on display at the store for two weeks.Anyways, back to the contest, there were a lot of great entries, including one by a commission painter. I thought I'd maybe take second or third, but the main competition, a skaven grey seer on a monstrous rat ogre-beast (formerly the End Times version of Thanquol and Boneripper), was apparently missing some attention to detail and I squeaked by. It was actually a tie, but the judge gave it to me because I had the higher painting score. I didn't even know what I was competing for and it turned out I won a $35 gift card. SLAMBO 
Safety Factor fucked around with this message at 23:37 on Jul 30, 2017 |
 #
?
Jul 30, 2017 23:19
#
?
Jul 30, 2017 23:19
|
|


|

|
| # ? May 9, 2024 11:37 |
|
|
That green practically glows and the blending on the horns is awesome. Well deserved win.
|
|
#
?
Jul 30, 2017 23:30
|
|

|
I am absolutely loving all the extremely vibrant colors everybody's painting lately. In the grim darkness of the far future, things are looking less grimdark for once ")
|
|
#
?
Jul 31, 2017 00:12
|
|

|
Safety Factor posted:My local store held a painting contest yesterday. Contestants had a month to paint a Warhammer/AoS model of their choice, to be judged by someone with an actual background in art. Naturally, I chose loving SLAMBO. Dude that SLAMBO is loving sick
|
|
#
?
Jul 31, 2017 00:15
|
|

|
Safety Factor posted:SLAMBO drat that is some pretty green. 
|
|
#
?
Jul 31, 2017 01:07
|
|


|
I'm getting ready to paint up some Black Templars and I have no idea what to do for basing. I'm generally pretty terrible at choosing a basing scheme for armies. Proper theme and whatnot that goes with the army or even colors that compliment the armor color. Any ideas or general rules of thumb?
|
|
#
?
Jul 31, 2017 01:39
|
|

|
I've been out of the paint game for embarrassingly long, are you supposed to thin P3 paints? Knee-jerk reaction I though all paints should be thinned, but these very quickly start to feel like washes.
|
|
#
?
Jul 31, 2017 01:48
|
|

|
Serenade posted:I've been out of the paint game for embarrassingly long, are you supposed to thin P3 paints? Knee-jerk reaction I though all paints should be thinned, but these very quickly start to feel like washes. yes.
|
|
#
?
Jul 31, 2017 02:20
|
|

|
Serenade posted:I've been out of the paint game for embarrassingly long, are you supposed to thin P3 paints? Knee-jerk reaction I though all paints should be thinned, but these very quickly start to feel like washes. Yeah but they flow much better out of the pot than GW paints do.
|
|
#
?
Jul 31, 2017 03:28
|
|
|
So I'm a massive fan of firefly: the board game and recently finished collecting all the addons. Ironically the one "add on" I haven't gotten is the replacement resin ship miniatures, but I wasn't sure if I'd be any good at painting so paying £100 for resin minis didn't seem a good idea. So I figured I'd have a practice run with the standard plastic minis and go from there. HOLY CRAP is painting fun! I've painted many things in many ways over the years but never done miniatures. I'm totally hooked, to the point I almost bought a warhammer set just to paint it (I don't even play warhammer). Anyway, I've painted my first few ships ok but now I'm onto the 7 firefly ships. But I'm having a lot of trouble with the engine glow. I'll post a link the one of the miniatures in question [url="Firefly painting miniatures wip https://imgur.com/gallery/P2Nwb"]Firefly painting miniatures wip https://imgur.com/gallery/P2Nwb[/url] See the gridded area at the rear? Those recessed squares need to glow a nice orangey yellow. First I tried, steady hands, squinty eyes, to fill in those recesses and it began ok, but unfortunately 5 of the minis are smaller and lack detail physical detail too. So when I looked back at them after painting I just wasn't happy. Those squares looked more like circles and it just wasn't good enough. Does anyone have any suggestions as to how they'd go about painting that area? My next attempt was going to be over paint past the edges so the engine parts are 100% covered and then repaint from the outside inwards where it's supposed to be silver. If that makes sense. I'm a total beginner to this so any help/advice/judgement would be appreciated I'll see if I can get some decent pictures of my finished ships so far, is imgur still a good cool host to use? Which code do I use to not break everyone's tables and/or cause the full filesize image to load instead of thumbnail?
|
|
#
?
Jul 31, 2017 03:51
|
|

|
Your notion is right. A good general rule of thumb is to paint from inside out, meaning do the most recessed areas and then pull the edges back in as opposed to trying to play Operation with your brush on a tiny little area. Painting the squares with their glow without a lot of concern for the ridges, then reclaiming the ridges with your metallic color is the way to go.
|
|
#
?
Jul 31, 2017 04:00
|
|

|
Captain Hair posted:HOLY CRAP is painting fun! I've painted many things in many ways over the years but never done miniatures. I'm totally hooked, to the point I almost bought a warhammer set just to paint it (I don't even play warhammer). Most of us in this thread probably don't even play warhammer anymore  The game is kinda poo poo, you play because you love the fluff or the miniatures or the painting or some combination of the 3. The game is kinda poo poo, you play because you love the fluff or the miniatures or the painting or some combination of the 3.If you haven't, go watch all of Duncan's videos on the WarhammerTV page. He's the Bob Ross of miniatures, for real. Almost everybody in this thread swears by him. He took me from poo poo to passable painting very quickly. Even if you're not doing warhammer minis yet the same concepts apply.
|
|
#
?
Jul 31, 2017 04:05
|
|
|
Captain Hair posted:My next attempt was going to be over paint past the edges so the engine parts are 100% covered and then repaint from the outside inwards where it's supposed to be silver. This is basically the first rule of painting miniatures. Start with the most recessed area, and work out to the most raised area. It's easier to clean up paint on a raised area than a recessed area. As for making it look like it's glowing, the easiest way is to just paint it a bright yellow. If you're looking to get more advanced, you can try to do highlights to add depth. For normal things, you want darker paint in the recesses, but lighter paint on the edges. This makes it easier for you to see the shape of the model. Here's a simple example:  Notice how the raised edges are light blue and the crevices are dark blue. For engine effects, you can do something very similar, like so:  Note that if you're trying to do something like a flame, you usually use the inverse of the above rule, where the recesses are the lightest and the raised areas the darkest: 
|
|
#
?
Jul 31, 2017 04:08
|
|

|
Forgot to crosspost this from the Bones thread: JackMann posted:Finished up an orc.
|
|
#
?
Jul 31, 2017 05:26
|
|


|
Captain Hair posted:So I'm a massive fan of firefly: the board game and recently finished collecting all the addons. I'm doing my Dropfleet Commander ships with brightly glowing engines and for the most part i just thin the paints, add some Vallejo Flow Improver and let them run into the recesses. You'll probably want to modify the gradient a bit but i think something similar could work. Here's a shot of the engines:  And here is a step by step guide i did for the scheme: https://docs.google.com/document/d/1cT1xAa0Cigac--IN5Kdhxazao0PgUaa_3myIbAntCrA/ For imgur, if you stick l, m or s directly in front of the jpg you get various sizes with just the normal img tags. Bistromatic fucked around with this message at 12:18 on Jul 31, 2017 |
|
#
?
Jul 31, 2017 08:46
|
|
|
Cross-postin pustules Sorry for blurry, best I could get with cell phone and one lamp.
|
|
#
?
Jul 31, 2017 13:43
|
|
|
Bistromatic posted:I'm doing my Dropfleet Commander ships with brightly glowing engines and for the most part i just thin the paints, add some Vallejo Flow Improver and let them run into the recesses. You'll probably want to modify the gradient a bit but i think something similar could work. That ship is gorgeous! 
|
|
#
?
Jul 31, 2017 16:03
|
|


|
Yeast posted:yes. S.J. posted:Yeah but they flow much better out of the pot than GW paints do. Thanks, you were right. Working with regular acrylic paint as a base on larger gunpla, I had forgotten what working in the scale entails. What thin paint really looks like. I think I'm going to round out my pallet with some Reaper paints, those similarly require thinning, right?
|
|
#
?
Jul 31, 2017 16:17
|
|
|
Simply: unless it's specifically airbrush paint then it probably needs to be thinned as condition and usage demands. The thickness out of bottle/pot will differ in consistency from batch to batch and color to color. Too thick? Yeah, thin it.
|
|
#
?
Jul 31, 2017 17:35
|
|
|
Finished my Decimator and Upsilon Shuttle for X-Wing. Using my airbrush more and more now. I feel like I'm getting a hang of delivering candy coats. 
Z the IVth fucked around with this message at 19:20 on Jul 31, 2017 |
|
#
?
Jul 31, 2017 19:08
|
|

|
You guys Z the IVth and Bistromatic those are no poo poo the best spaceship paintjobs I've ever seen Z those screens / lenses are so ridiculously good, you nailed the gradient and the lighting. (Also... are you my great-grandfather? Or my grandson? I can never remember...) And both of you have such bright lines and really cool Chris Foss style line work... I mean wow its like classic pulp scifi magazine covers! Bistromatic that engine burn is so bright, it just screams power. The contrast against the rest of the ship's cool color scheme is SO effective. And Z once again, that freehand Kanji and the freehand skull? gently caress you guys, you're too good at this!
|
|
#
?
Jul 31, 2017 19:15
|
|
|
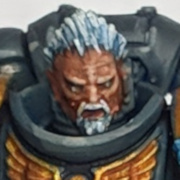
Ran out of grey primer but found some black from an age ago and figured I'd do Black Templars/Iron Hands/Raven Guard or some poo poo as black has been my bane since the Black Templars came with the 3rd Edition Box Set. I need some advice though. After a quick 30 min or so dicking about this is where I've got this Bigmar to. Currently he's: - Black - Dark Grey - Light Grey - Thinned some of the fatter highlights with a layer of black (I really need to get a small brush to avoid having to do this) I'm tempted to spot highlight with pure white, or alternatively wash the highlights with blue for "effect". So should I: a) Leave the highlights alone retard. You never go full white. b) Go a shade lighter. Full retard. c) Paint him in Caliban Green and stick them Bigmars with their little bro's
|
|
#
?
Jul 31, 2017 20:18
|
|
|
richyp posted:Ran out of grey primer but found some black from an age ago and figured I'd do Black Templars/Iron Hands/Raven Guard or some poo poo as black has been my bane since the Black Templars came with the 3rd Edition Box Set. I need some advice though. a), then break out the metallics and go to town on some Iron Hands. There aren't enough of them bouncing around.
|
|
#
?
Jul 31, 2017 21:15
|
|
|
Legendary Ptarmigan posted:a), then break out the metallics and go to town on some Iron Hands. There aren't enough of them bouncing around. Sorry brother, he's started on the path of the Templar (I also went full retard on the highlights). Done for tonight, hopefully tomorrow I can finish him off and start on one of the actual non-character units.  EDIT: On close inspection I think he regrets joining the Templars, either that or constipation  richyp fucked around with this message at 22:26 on Jul 31, 2017 |
|
#
?
Jul 31, 2017 21:42
|
|
|
This guy is extremely cool.
|
|
#
?
Jul 31, 2017 22:05
|
|

|
Gumdrop Larry posted:Painting the squares with their glow without a lot of concern for the ridges, then reclaiming the ridges with your metallic color is the way to go. Excellent thanks, I just had a test run at that method seems to work much better. I'm also going to try reclaiming the edges with drybrushing, as I noticed last time I drybrushed the silver highlights it only caught the edges and left the recessed squares. I'll have a play around Zaphod42 posted:Most of us in this thread probably don't even play warhammer anymore I'd totally paint a friends set, but yeah I doubt I'll get one for myself. Just not quite my thing. On the other hand I'm really into dnd 3.5, so the idea of painting up my own minis for that is super exciting! I'll have a look at that youtube guy thanks, been looking for someone to watch paint Avenging Dentist posted:...painting miniatures... Excellent thanks very much for the advice so far I've been using GW Flash Gitz yellow so I must be on the right track! Those are some great examples too, I'll add them to my folder of reference material stuff.Bistromatic posted:I'm doing my Dropfleet Commander ships with brightly glowing engines and for the most part i just thin the paints, add some Vallejo Flow Improver and let them run into the recesses. You'll probably want to modify the gradient a bit but i think something similar could work. Oh wow that's pretty incredible, I zoomed in and the detail just kept on going! Really like the look of the engine glow. I'll give that guide a read thanks very much No pics yet but yeah over painting then reclaiming the edges seems to work really well so far. I wish I'd stored extra of the shade I mixed for them so I could use it for touch ups, but live and learn. Gonna have to buy myself a few of those tiny paint by numbers pots or something to keep custom shade mixes in. I managed to find a few phone photos (read: real poor) of the ships I've done so far, I'll try and not break the tables...   These are the 3 reaver ships. First minis I've ever painted, had great fun doing it. Plus some sloppy newbie skills get hidden by the rough look of the ships so figured it made sense to start with them.  And this is the S.S. Walden, it's supposed to by a garbage scow/prey on derelict ships. I did another pass on it after this picture though. Gave it an orange drybrushing for highlights/faded paint, re weathered it all, then did a final run picking out all the little details I could. Boy does taking pictures really show off every imperfection and mistake. Gives me a lot more respect for the minis I've seen posted in this thread. Cheers again for the help everyone [url="Assorted pics of WIP Painting Firefly minis https://imgur.com/gallery/GSolW"]And here's a link to the gallery[/url] Captain Hair fucked around with this message at 22:36 on Jul 31, 2017 |
|
#
?
Jul 31, 2017 22:28
|
|
|
richyp posted:Sorry brother, he's started on the path of the Templar (I also went full retard on the highlights). Done for tonight, hopefully tomorrow I can finish him off and start on one of the actual non-character units. This dude is looking real nice. I'm not a huge fan of the red checkers, though. Have you considered doing the shoulder trim red instead of bronze? It's the only think I'd really consider changing.
|
|
#
?
Jul 31, 2017 22:38
|
|


|
Alokgen posted:This dude is looking real nice. I'm not a huge fan of the red checkers, though. Have you considered doing the shoulder trim red instead of bronze? It's the only think I'd really consider changing. Thanks. The bronze areas are a base layer for the gold colour that I'll do when I start the metal's properly tomorrow, same as the silver being lighter metals. I went for a gold shoulder rim because in the new Marine Codex it says that BT Lieutenants are called Castellans and the image showed a Primaris Lieutenant with gold trim on the shoulders rather than the usual red. The red checkers I'm not too fussed about either, I just felt it needed something to tie the other colours together that wasn't black and white. It might look better when I add some depth to the black checks, and I may overlay something on it too
|
|
#
?
Jul 31, 2017 22:49
|
|
|
The black and its highlights look fine. Thinning them down with the base color is just part of the process. At least it is for me.  Personally, I aim for blue-grey highlights to make the black look polished and reflective. Forgive the old GW paint names, but they're what I use: Shadow Grey Fortress Grey Space Wolves Grey on the sharpest edges/corners
|
|
#
?
Jul 31, 2017 23:11
|
|
|
I've gotten used to airbrush handling for priming and basecoats, plus the coarse work for vehicles and terrain. Is it worth it to get a finer detail airbrush for finer detail work, or is it better to invest in masking products? Related, how much of a pain is maintenance of a Badger Krome or Renegade compared to the 105?
|
|
#
?
Jul 31, 2017 23:18
|
|

|
A super fine detail needle for the 105 is like $10-15 for what it's worth.
|
|
#
?
Jul 31, 2017 23:26
|
|
|
grassy gnoll posted:I've gotten used to airbrush handling for priming and basecoats, plus the coarse work for vehicles and terrain. Is it worth it to get a finer detail airbrush for finer detail work, or is it better to invest in masking products? For what its worth, the value return on any needle under a .3 is pretty minimal unless you're also committing to some serious dollars. I'd recommend an Iwata if you're adding a second airbrush to your line. I use a 105 for basecoating, priming, terrain and varnishing - but I now use an Iwata HP-C+ with a .3 needle for detail work. The trigger precision and build is that much better than the Badger. It really helps for the finer work. At the end of this year I might treat myself to a Harder & Steenbeck for ultra detail work, but they're not exactly cheap. http://www.harder-airbrush.eu/en/infinity.html#infinitycrplus
|
|
#
?
Jul 31, 2017 23:57
|
|
|
Finished Mr Black Primer.
|
|
#
?
Aug 1, 2017 11:30
|
|
|
Looking sick, well done
|
|
#
?
Aug 1, 2017 11:37
|
|
|
Cross postin'NTRabbit posted:
Seeking further opinions NTRabbit posted:Joining the cross postin' craze, my next set of Forge Fathers, do these ones work better than the first lot? Same colour scheme, but I used Army Painter Strong Tone dip instead of the all over nuln oil wash on the previous lot NTRabbit posted:Late June I got one of those GW dry brush paints, and went over the previous squad to come up with this, better or worse? I've got some feedback from Atlas Hugged in the Mantic thread, but more feedback sources is always helpful. Also yes, I know the dry brush got a little loose and I need to touch up some spots on the red.
|
|
#
?
Aug 1, 2017 12:33
|
|


 OATH COMPLETE


|
darnon posted:A super fine detail needle for the 105 is like $10-15 for what it's worth. Yeast posted:For what its worth, the value return on any needle under a .3 is pretty minimal unless you're also committing to some serious dollars. Thanks, guys. I was searching for ultra fine instead of super fine and didn't get squat but the higher-end airbrushes! Go me! What in particular differentiates a high-end airbrush from the rest? I get that the $20 specials are machined poorly and made of crap metal. Is it a function of ergonomics or just really, really precise manufacture, or something else altogether?
|
|
#
?
Aug 1, 2017 15:26
|
|
|
Generally you're paying for better precision machining.
|
|
#
?
Aug 1, 2017 15:33
|
|

|
I want to buy a face mask/respirator/whatever the gently caress it's called to not get my lungs painted from the inside. People pointed me to 3M brand. The problem is, there's a shitton of different filter classes etc. What model do I get that's good for airbrushing/spraying minis?
|
|
#
?
Aug 1, 2017 16:45
|
|
|
3m 5000 series.
|
|
#
?
Aug 1, 2017 17:00
|
|
|
|
| # ? May 9, 2024 11:37 |
|
|
Specifically if you are going to be using enamel then you want one rated for organic solvents. A 5925 filter should be one for the abovementioned 5000 series mask. If you're going to be airbrushing acrylic most of the time and occasionally enamel (spray cans) then might be worth getting some prefilter covers as well so you don't need to swap the actual cartridge as often. darnon fucked around with this message at 17:24 on Aug 1, 2017 |
|
#
?
Aug 1, 2017 17:16
|
|