
|
davebo posted:Speaking of dehumidifiers, does anyone have recommendations as to brands/units? I had one at my old house and it only lasted about 4 years. No pump included, I just manually emptied it every once in a while, but I could put it where the condensate pump is or elevate it to drain into the tub sink. https://www.lowes.com/pd/Hisense-100-Pint-3-Speed-Dehumidifier-with-Built-in-Pump/1000195205 This right here. As far as I know it's still the only inverter-based one. Quiet, built in pump, doesn't cost $30 a month in electricity to run.
|
 #
?
Aug 1, 2017 12:56
#
?
Aug 1, 2017 12:56
|
|


|

|
| # ? Jun 13, 2024 01:09 |
|
|
I semi-built a patio with paver tiles in my backyard as a base for a shed. It's an 11x9 rectangle and I am bad at leveling the sand that goes beneath the paver tiles so it's a bit uneven. What's the best way to even out and compact the sand layer? For compacting purposes all I have is a regular tamper.
|
|
#
?
Aug 1, 2017 15:12
|
|

|
The Midniter posted:I semi-built a patio with paver tiles in my backyard as a base for a shed. It's an 11x9 rectangle and I am bad at leveling the sand that goes beneath the paver tiles so it's a bit uneven. What's the best way to even out and compact the sand layer? For compacting purposes all I have is a regular tamper. A level, mason twine and some stakes to jam i the ground. Make as many reference points as you need to get it right.
|
|
#
?
Aug 2, 2017 04:19
|
|
|
The seal failed in one of my windows and I'd like to try replacing it myself if it's doable. It's the upper pane. How do I get it out? I've looked up videos on replacing windows but they're for different types than the kind I have, and I'm not sure what they're even called. They're in an aluminum frame and have like a vinyl trim around the glass. The house is 5 years old.  
|
|
#
?
Aug 2, 2017 18:32
|
|
|
I have a 2 car garage door that has been stopping about 6 inches off the ground when opening more and more often lately. I don't believe it's the laser pointer safety things - they seem to be in line and they never change color when it stops (1 is green and 1 is orange always - the same as my other garage door). What are some other likely reasons for this to happen? This garage door has always been pretty loud and vibratey compared to the other one. Everyone couple of years I oil all the parts with white lithium grease and try to clean/wipe them down as best I can without using anything else. It's about 10 years old now, and I replaced the control/logic part of the opener one time when it broke but I believe the motor is original. I have a garage door company coming tomorrow to look at it, I just want to be prepared if their solution is "you need a new garage door".
|
|
#
?
Aug 2, 2017 20:17
|
|

|
Can you move the door easily with the opener disengaged?
|
|
#
?
Aug 2, 2017 20:26
|
|


|
Enourmo posted:Can you move the door easily with the opener disengaged? Yes, it moves pretty easily. Although when I disengaged it (with the door down) I noticed that it moved about an inch from where it connects to the motor track - and it was really hard to push back into place after I moved the door up and down a bit. Maybe I just need to somehow adjust the track backwards an inch so that I don't have to push as hard as I possible can to get it back into place? Edit: I played with the settings on the opener and got it functioning a bit better. I decreased the down distance (didn't know I could do that with a dial) and increased the up force a bit. I was playing around with the down force when I caused it to overheat, so now I'm hoping that it will cool off and be fine in half an hour ") Good thing I already have an appointment for tomorrow... Droo fucked around with this message at 21:20 on Aug 2, 2017 |
|
#
?
Aug 2, 2017 20:46
|
|
|
Droo posted:I have a 2 car garage door that has been stopping about 6 inches off the ground when opening more and more often lately. I don't believe it's the laser pointer safety things - they seem to be in line and they never change color when it stops (1 is green and 1 is orange always - the same as my other garage door). What are some other likely reasons for this to happen? This garage door has always been pretty loud and vibratey compared to the other one. Everyone couple of years I oil all the parts with white lithium grease and try to clean/wipe them down as best I can without using anything else. It's about 10 years old now, and I replaced the control/logic part of the opener one time when it broke but I believe the motor is original. Garage door height settings are either the switches along the track (for Genies anyway) or set screws on the opener itself.
|
|
#
?
Aug 2, 2017 22:25
|
|
|
Jerk McJerkface posted:My friend's dad died of West Nile virus two years ago. I never heard of that happening before but there you go.
|
|
#
?
Aug 2, 2017 22:58
|
|


|
Droo posted:Yes, it moves pretty easily. Although when I disengaged it (with the door down) I noticed that it moved about an inch from where it connects to the motor track - and it was really hard to push back into place after I moved the door up and down a bit. Maybe I just need to somehow adjust the track backwards an inch so that I don't have to push as hard as I possible can to get it back into place? Make sure your track is clean, lubed w/ white lithium, and the track is true. Ours started doing that and eventually jumped the track. One of the bracket screws was loose and eventually tore through.
|
|
#
?
Aug 3, 2017 04:08
|
|

|
davebo posted:Speaking of dehumidifiers, does anyone have recommendations as to brands/units? I had one at my old house and it only lasted about 4 years. No pump included, I just manually emptied it every once in a while, but I could put it where the condensate pump is or elevate it to drain into the tub sink. We have a 50-pint Frigidaire dehumidifier in our basement and it does a great job. Prior to getting it, we were finding condensation all throughout the basement floors and the walls were cool and moist to the touch. All of that is gone now. We use this basement room as the TV room, so while it's audible when running, it's not a TV-watching killer. We just slightly turn up the volume. It also comes in a 30 and 70 pint version. Cheaper on Amazon, Home Depot, etc., but the manufacturer link is: http://www.frigidaire.com/Home-Comfort/Dehumidifiers/FFAD5033R1/
|
|
#
?
Aug 3, 2017 14:23
|
|

|
Wife and I have lived in our house for just under 2 years now. The previous owners did a lot of DIY jobs and their shortcuts become more and more noticeable the longer we live here. I'm pretty sure that they did the kitchen backsplash tiling themselves. Aesthetics aside (they wen't for a "farmhouse" feel with sandstone tiles), it wasn't the most level of tile work and spacing between tiles was noticeably off in spots. So anyways, wife finally gave me the go ahead to begin demo work so that we can re-tile. These have been a bit of a bitch to take off as it appears as though the installers heavily buttered the walls/tiles. I've also gone through two blades on my grout scraper (maybe they used cement?). There are a few spots where they failed to cover up holes (mainly around electrical outlets). Instead, they just crumpled up builder's paper and used a fibrous mesh to hold the plaster and tilework together:  Question 1: I was thinking of just patching these areas with new sheetrock but is there a valid reason for them to have done it this way? There are other spots where removing a tile basically crumbles whatever is backing the wall. It doesn't look like modern sheetrock (in this photo, the clean side had more modern sheetrock and adjacent to it is the disastrous side) so maybe it's really old sheetrock or something different altogether? I figure that removing any more tilework on this side will likely result in more of this mess. I too figure that I'll just place new sheetrock here.  Question 2: Any suggestions on how to continue removing the tilework without creating more holes or destroying the crumbly backwall? Really only having this issue here. Question 3: There doesn't appear to be any insulation behind these walls. Granted its an inner wall (so makes sense to me). Our house is from the early 1940s and super hot in the summer and freezing in the winter. Still, no need to add insulation, correct? Not sure what they do with modern homebuidling.
|
|
#
?
Aug 3, 2017 14:48
|
|
|
I think you're just about hosed. May as well re hang all the affected sheetrock.
|
|
#
?
Aug 3, 2017 15:09
|
|

|
Tortilla Maker posted:Wife and I have lived in our house for just under 2 years now. The previous owners did a lot of DIY jobs and their shortcuts become more and more noticeable the longer we live here. I'm pretty sure that they did the kitchen backsplash tiling themselves. Aesthetics aside (they wen't for a "farmhouse" feel with sandstone tiles), it wasn't the most level of tile work and spacing between tiles was noticeably off in spots. Ugh. I'd rip that all down and put up proper cement board and tile. And interior insulation is mostly for soundproofing.
|
|
#
?
Aug 3, 2017 17:23
|
|
|
Having done a bunch of tile work in old houses as of late, I'd say there's no way you're going to get around re-hanging Sheetrock or cement board. You need at least a reasonably smooth surface to start with. You might be able to get a drywall guy to patch and skim coat it but that seems like a worse option.
|
|
#
?
Aug 3, 2017 19:03
|
|

|
kid sinister posted:Ugh. I'd rip that all down and put up proper cement board and tile. And interior insulation is mostly for soundproofing.
|
|
#
?
Aug 3, 2017 21:10
|
|


|
Rip that poo poo down and put up some Hardibacker cement board. It's waterproof out of the box and you don't need any stinking tile. Here is my question: I've a bunch of 150W outdoor halogen floodlights that I'm sick of paying to run. Have LEDs yet come along to the point where I can get the same brightness?
|
|
#
?
Aug 4, 2017 09:49
|
|
|
DreadLlama posted:Rip that poo poo down and put up some Hardibacker cement board. It's waterproof out of the box and you don't need any stinking tile. yes. soraa makes 120W-equivalent single-emitter PAR38-form-factor LEDs. 18.5W each. your choice of color temperature. 60 degree spread on the beam. even if they're for outdoor yard / farm / meth lab use, having them not look blue is kinda worth an extra buck or dozen. run you like fiddy bucks each. dimmable, though. rated for outdoor use (presumably in an enclosed or semi enclosed fixture.) for cheap and non-dimmable, GE makes some multi-emitter 26W ones that are probably brighter but i honestly thought they looked like poo poo when my rep brought them to try out. obviously the hardware store probably has some bullshit that satisfies the specs of what you want, but since grudgingly switching from incandescent at home, i've added "lamps" to my list of poo poo not to cheap out on, which includes things such as condoms and electrical components. e: specifically, 1190 lumens, if "equivalent watts" bugs you as much as it bugs me SoundMonkey fucked around with this message at 11:44 on Aug 4, 2017 |
|
#
?
Aug 4, 2017 11:33
|
|


|
Thanks, but that's kind of a "no" for me. For reference, Lowe's sells a "100W equivalent" 6-pack of 23W bulbs that put out 1500 lumens and are unfortunately not bright enough for illuminating far end of the meth lab. I'm looking for at least 2000. Fakeedit: nevermind, found something: https://www.amazon.ca/Sylvania-Dimmable-Replacing-Halogen-3000K-Warm/dp/B01B0M9V2Y
|
|
#
?
Aug 4, 2017 14:29
|
|
|
DreadLlama posted:Rip that poo poo down and put up some Hardibacker cement board. It's waterproof out of the box and you don't need any stinking tile. You gonna grout the seams of that or just go au naturel?
|
|
#
?
Aug 4, 2017 16:08
|
|


|
https://www.lowes.ca/caulk/ge-se1108-sil-i-98-oz-white-unsanded-silicone-window-and-door-caulk_g1334126.html
|
|
#
?
Aug 5, 2017 02:47
|
|
|
SouthShoreSamurai posted:So this is what the underside looks like. I have no experience with these, so I have no idea if the noise heard previously was from what are obviously damaged blades, or if I should be worried about the other parts as well: Update time (because I have another question). The pros replaced both spindles. I put the deck back on today, and it sounds great. Only one snag: When the deck is at height level 1-4 and I disengage the PTO, everything works perfectly. When I move the deck to height level 5, the blades come on again on their own (even if the PTO is still disengaged.) Clearly I hosed something up, any ideas? I'm guessing maybe the throttle is too short?
|
|
#
?
Aug 5, 2017 19:22
|
|


|
Going purely on how my mower is built, is it possible your deck's belt tensioner is too tight? On mine, I could see that causing that issue.... sort of.
|
|
#
?
Aug 6, 2017 05:45
|
|

|
I was told might be some people here with knowledge in sound proofing so I'll quote my post from the woodworking thread:His Divine Shadow posted:Oh yeah is anyone here good with sound dampening design? Based on my understanding of acoustics, ejecting the air into a big box would slow down the air velocity and reduce noise, insulating the box with vibration dampening foam like in the video should also help to muffle noise.
|
|
#
?
Aug 8, 2017 06:50
|
|

|
If you are going to make a rolling shop vac muffler, you may also consider installing a cyclone pre filter canister. https://www.google.com/search?q=shop+vac+cyclone+diy I would make the shop vac muffler big enough to hold most of the different shop vacs, and possibly have the sound travel upwards to help with heat. Instead of buying sound absorbing foam, you can make layers of towels stretched onto a frame to form sound deadening panels.
|
|
#
?
Aug 8, 2017 11:13
|
|


|
It's a shop vac muffler in the video, what I am building is of a different scale, here's the cyclone I've already made standing in a bucket Since that it's been put into a frame in the room it will be permanently mounted. I also already made a smaller cyclone for the smaller shopvac in the picture: 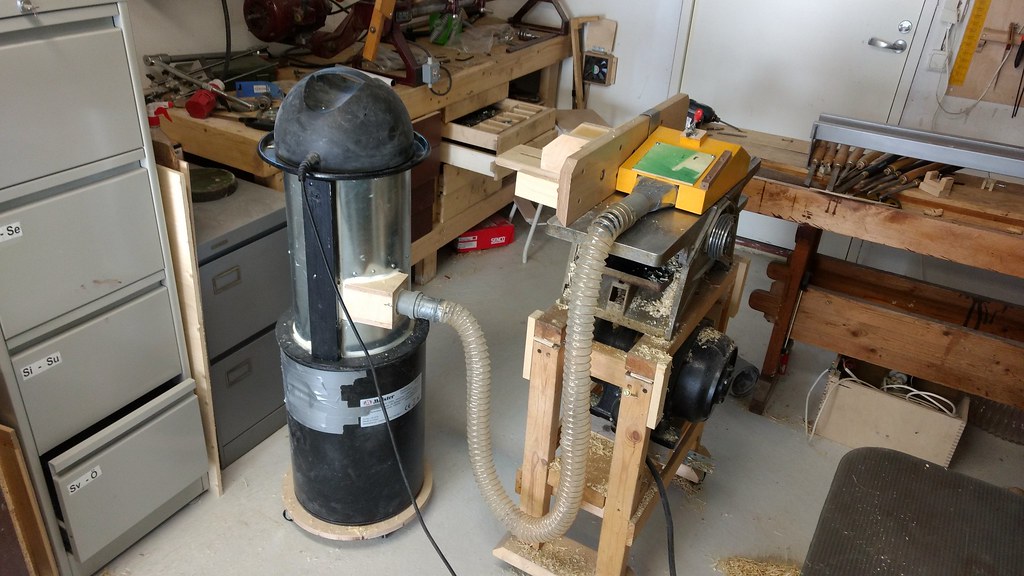
His Divine Shadow fucked around with this message at 12:00 on Aug 8, 2017 |
|
#
?
Aug 8, 2017 11:57
|
|
|
That first cyclone you have looks massive, what are its dimensions? Sorry about the confusion on my part, as I only watched the video. The bill pentz link was not working earlier, otherwise I might have realized that you already knew about cyclones. Of course, you literally had that word in your quoted post, I guess I could blame the late hours. Update on my kitchen sink: I got the bastard off rather easily, it only had two screws in the front corners, and two nails in the back corners. They were screwed/nailed into blocks of wood that were just sort of wedged into the underneath corners of the sink.  Behind the sink, the single wall construction(1" tongue and groove slats) were cut right below the counter. Once I removed the sink and cabinet, the remainder of the wall was floating on a few nails at the top.  Here is the previously remodeled plumbing and the inside of the bathroom single wall construction. There is a slightly raised and capped drain right in front of the ladder. I have no idea why the original owner would put what I presume to be a cleanout under the floor of where the cabinets are installed. Also, when the kitchen plumbing was previously repaired, they left cast iron water supply lines that went up into the attic towards the shower. Those cast iron pipes were subsequently capped in the attic, but they didn't bother to remove it completely. This left two sections of old iron pipe weighing down on the newer copper pipe that were sorta floating in this space.  I have installed a whole bunch of studs for installing the drywall and new cabinets. I had an electrician friend come and fix a few of the gently caress ups I did, after I took this picture. Also, notice the right side where the bathroom closet was right against my kitchen wall. That got pushed back.  I did a fantastic job loving up this drywall, especially on the lower left side. I actually cut that part out to be the upper left piece, but accidentally made the cuts mirror image so they could only (badly) fit on the bottom left. Made a huge access hole for the sink plumbing. It is actually too big for the sink cabinet.  Mostly fixed the drywall and primed it. Planning on tiling anyway. And first cabinet is installed and actually level.  And the next week or so building the cabinets and installing them. They are face frame all plywood cabinets. I am saving so much money assembling them at work one by one.  Still waiting for the 6" special order cabinet to come in, as well as deciding on which style of cabinet between the oven and corner base cabinet. I have also made the exciting choice to leave bare concrete right up and under the base cabinets. I'm thinking it is one of the dumber choices I have made so far. Still have to close up that window above the where the oven is and install a new 36" kitchen door to our garage. Then install a cabinet above the oven and get a new vent for that oven. The Gardenator fucked around with this message at 13:57 on Aug 8, 2017 |
|
#
?
Aug 8, 2017 13:51
|
|
|
Whenever I have to mud drywall it is painfully obviously where the mud starts and where it is. Like it has a different texture than the drywall and the paint doesn't give it enough to match well. Knockdown or Orange Peel seems like too much, do I need to just be better with sanding or wet sanding with a sponge? I've also read of people doing a roll skim with watered down mud on a paint roller, how horrific of an idea is that? Unfortunately there's just more mud than there should be because one of the edges is not completely level with the piece next to it. (This is a patch on a bowed wall, tried to shim it and match as close as possible. Well as close as my ability allows.)
|
|
#
?
Aug 8, 2017 21:33
|
|

|
Wider knife, wider feathering of the mud. When you mud drywall on a new install you are typically feathering each side of the joint with a 12" knife (at least that's what i do on butt ends, which is what you're dealing with for a patch). Yes, this often means you would actually be skim coating your entire patch and feathering out onto the rest of the wall. There should be no texture at all to mud when it's done. Or new drywall. So if it's flat enough to not notice the texture difference are in the paint. Chances are good you are using different paint/different nap roller to apply it. Protip: use a painter's light or similar bright single point light source shining up/across the wall to make the high and low spots obvious. Use small amounts of mud at a time and multiple coats. And use real pre-mix mud (the slow stuff), not the stuff you mix up that cures. At least not until you get really comfortable with mudding.
|
|
#
?
Aug 9, 2017 14:29
|
|
|
Not sure if it's better to ask here or the Post your Projects thread, but I'll start here since this thread gets more traction: I got an old charcoal grill from the "free swap" area of the dump, cleaned it up, and would like to make it a smoker. I know I can just put some charcoal in with some wood chips/chunks on top, and control the temp with the vent holes, but I'd prefer to create an external smoke box with some sort of electric heat (probably via hot plate) so I can better control the heat and smoke level, and also not have to deal with charcoal. Then I realized I've never done any sort of metalwork before so I don't really know how to start or even if I can do this. I basically just want a small rectangular metal box (bottom and top open so the heating element can go in the bottom and the top can vent smoke to the grill) and then some sort of pipe/duct to connect the hot box to the grill. But of course, I have no welding supplies, and wanting to do this as cheaply as possible, so I'm sort of looking for a "pre-fabricated" piece of metal that's roughly 12-14" square metal, maybe 10-12" inches high. In theory, some sort of ductwork would be ideal, but it's my understanding that's typically galvanized metal, which when heated could release zinc fumes into my food or just the air if I'm standing next to the smoker. Do they make stainless steel or aluminum ductwork? Aluminum should be fine, right? I mean...there's plenty of aluminum cookware. And to connect the two I figured aluminum dryer house would work? Again, assuming it's regular aluminum and not, like, plastic coated or anything, it should be safe, right? Ideally, I'd like to have a couple lengths that I can swap out so I can hot smoke for things like chicken, brisket, etc... and then put in a nice long hose to cold smoke things like cheese or bacon (but obviously only if the weather outside is cool enough.) SO is this feasible, or just a stupid idea that will frustrate me and I should just stick to using charcoal?
|
|
#
?
Aug 9, 2017 16:59
|
|


|
Would pop rivets be good enough for the assembly? If so no welder needed, just get some sheet steel, bend it up and drill and rivet. Babies first metalworking project.
|
|
#
?
Aug 9, 2017 18:48
|
|


|
cakesmith handyman posted:Would pop rivets be good enough for the assembly? If so no welder needed, just get some sheet steel, bend it up and drill and rivet. Babies first metalworking project. Hmm...possibly. I could rivet it together, then maybe some HVAC sealing tape on the outside seam (so any weird fumes from them getting hot don't go into my food) to make a slightly better seal?
|
|
#
?
Aug 9, 2017 19:55
|
|
|
DrBouvenstein posted:Hmm...possibly. I could rivet it together, then maybe some HVAC sealing tape on the outside seam (so any weird fumes from them getting hot don't go into my food) to make a slightly better seal? How hot do you think the smoke is going to be? Most galvy coatings are good up to 250�C. That said, aluminum duct exists and is pretty cheap. I don't have a link for the box, but an HVAC store should have a 12" return air box or supply plenum with a 4" collar at one end, probably in the $50 range.
|
|
#
?
Aug 9, 2017 22:32
|
|


|
I have one set of windows in my house that are single-paned; everything else in the house is more recent. Is there a good way to kind of shore up these windows? I got some of that cheap plastic wrap last winter but the cats made quick work of it
|
|
#
?
Aug 11, 2017 20:10
|
|

|
You can get film that goes on the exterior, but an even better choice is a storm window if you have the ability to install them.
|
|
#
?
Aug 11, 2017 20:33
|
|

|
beepsandboops posted:I got some of that cheap plastic wrap last winter but the cats made quick work of it better do what my old neighbor did and use six mil plastic on the insides instead god that place looked hideous in winter
|
|
#
?
Aug 12, 2017 01:38
|
|
|
So, our house has a stamped asphalt driveway (just a simple "alternating brick" pattern) that may have last been sealed ... never? Don't know. Probably went in around 2002, when the rest of the house was renovated by a narcoleptic. Anyway, given weathering, I'm guessing this thing is supposed to be sealcoated. Does anyone know if there is a different procedure/material for sealcoating this instead of the regular old black tar-like stuff?
|
|
#
?
Aug 15, 2017 18:18
|
|

|
Itty-bitty electronics questioning here - this evening, I googled around to see if I could diagnose an issue I'd been having with my tablet (Galaxy Tab Pro 12.2), and it appeared that a battery-connector re-seat might help. Welp, being a previously-refurbed tablet, it appears that Samsung's techs did their own fix, consisting of slopping enough solder into the connector that it no longer disconnects, and thus the gentle pressure to disconnect actually, uh, de-surface-mounted the connector itself.  I can either try to find someone to re-solder it, or attempt to do it myself if I have to, but... I'm not seeing shiny pads to solder to, but rather what looks kind of like resin. (I'd attach a picture, but that tablet is my best camera so I can either try to find someone to re-solder it, or attempt to do it myself if I have to, but... I'm not seeing shiny pads to solder to, but rather what looks kind of like resin. (I'd attach a picture, but that tablet is my best camera so  .) Based on this lovely description, am I totally screwed? .) Based on this lovely description, am I totally screwed?
|
|
#
?
Aug 21, 2017 07:52
|
|

|
Pretty much, yep.
|
|
#
?
Aug 21, 2017 08:47
|
|
|

|
| # ? Jun 13, 2024 01:09 |
|
|
Ygolonac posted:Itty-bitty electronics questioning here - this evening, I googled around to see if I could diagnose an issue I'd been having with my tablet (Galaxy Tab Pro 12.2), and it appeared that a battery-connector re-seat might help. Welp, being a previously-refurbed tablet, it appears that Samsung's techs did their own fix, consisting of slopping enough solder into the connector that it no longer disconnects, and thus the gentle pressure to disconnect actually, uh, de-surface-mounted the connector itself. We actually have an electronics thread here in DIY. Still, what you're seeing is rosin. Heat it up so it melts and wipe it off. Clean up the pads with some soldering wick, then resolder your connector.
|
|
#
?
Aug 21, 2017 17:53
|
|