


|
 2nd Squadron Orders Join the general push forwards. Lenisto - Be ready to move forwards into Vlad Woods, remaining towards the northern edge of it to reduce exposure to tank fire. Set up your HMGs to support 1 Squadron's moves. Habeas - Capture and secure Boris. Your orders look good for this.
|
 #
?
May 19, 2019 00:04
#
?
May 19, 2019 00:04
|
|


|

|
| # ? Jun 5, 2024 03:32 |
|
|
2nd Squadron, 1st & 2nd Platoon Main body is still waiting for the big push. The AT rifles in Vlad should stay in the woods but move to get better LOS on the Tiger and target it. It looks like the HMG in those woods that took the hit is still active but they need some time to recover and man the gun again? They are vulnerable but should remain where they are. The other HMG just above them should continue moving towards Vlad to be with the main force but keeping that 30-50m between units.
|
|
#
?
May 19, 2019 06:34
|
|

|
1st Squadron 1st Platoon Orders Immediate: Get the HMG to setup somewhere in zelda and target the troops on the southern edge of the map. If they can't be seen, area fire, I want to see lots of suppressive fire! 1-2 squad scout group to advance SW cautiously. Rest of 1-2 to catch up with the scout group, then both to advance to contact. Don't waste time reuniting the groups. As soon as the smoke mission hits the target:  1-1 to Advance FAST SW toward the creekbed and go to ground somewhere in the low bit. Platoon HQ to go directly south toward same, space at least 50m apart. AT rifles move as shown and face West. When the smoke mission is finished: Squadron HQ can start walking down to Zelda.
|
|
#
?
May 19, 2019 06:46
|
|


|
Lenisto posted:
Your AT Rifles are still in Woodfall on the west side, all of them have full ammo and their AT rifles. The ones in Vlad are OTF's survivors and none of them have AT Rifles. The HMG that got knocked out is also OTFs and is destroyed and cannot be recovered. Jaguars! posted:
Can I get a confirmation that you want one of your AT rifle teams to sit out in the open west of Zelda Shrubbbery? Are they a diversionary target? Also, mortar HQ is a combat squad and doesn't have a radio, your best bet for calling in support for the assault is 2nd Squadron HQ which is currently dropping smoke, they might be able to drop HE following the smoke mission as its tubes still have 70 odd rounds.
|
|
#
?
May 19, 2019 07:48
|
|

|
Yeah, just a sort of a picket to check that the enemy isn't heading back into Natasha mainly, If they come under intense fire crawl them backwards. Similarly about mortar HQ, I'm probably just going to use it as a unit for a low intensity job
|
|
#
?
May 19, 2019 08:07
|
|
|
T-70: Back up, then drive across the ford, try not to get shot, then position by Boris to put fire on the German gunline on the north side of the town. If the Tiger appears to be threatening to kill it at any point, try and break contact as quickly as possible.
|
|
#
?
May 20, 2019 00:12
|
|


|
Abongination posted:Your AT Rifles are still in Woodfall on the west side, all of them have full ammo and their AT rifles. The ones in Vlad are OTF's survivors and none of them have AT Rifles. Oh shoot, I didn't have a chance to look at the thread at work today. Sorry about the confusion Abongination! I should have checked the units closer.
|
|
#
?
May 20, 2019 09:36
|
|
|
Turn 11  Lenisto posted:Oh shoot, I didn't have a chance to look at the thread at work today. Sorry about the confusion Abongination! I should have checked the units closer. All good mang, I'll have to do another unit click through soon.
|
|
#
?
May 20, 2019 14:25
|
|
|
Orders are due: Wednesday, May 22 at 7PM EDT Wednesday, May 22 at 11PM GMT Thursday, May 23 at 7AM AWST
|
|
#
?
May 21, 2019 17:11
|
|
|
Army Orders  All right comrades, artillery hosed up the bombardment like the idiots they are and will be executed later. Now we have one last chance to pull a win here and it is a hail mary approach at best. SWAT: Advance as fast as possible across the nearby ford, flank around the woods and storm the church objective. 1st Squadron: Troops in the south area flank through the southern woods as fast as possible and storm the church objective. Everyone else except T-70 and AT rifles: Suppress the german trenches to the north and the HMG positions in the town buildings to help our assaulting forces. AT Rifles and T-70: Do everything that you can to mobility kill the Tiger tank to help our assaulting forces.
|
|
#
?
May 21, 2019 17:44
|
|
|
Orders - 1 Squadron No change. Once the smoke mission finishes, move the Sq HQ to Zelda. Orders - 1 Sq 1 Platoon  HMG to supress the south enemy if possible. If the enemy is killed or flees from the killing zone, set up in a position that will cover the HMG buildings once the smoke clears. I'm not sure which one is the mortar HQ but it's the one to move to the SW end of the swamp. Jaguars! fucked around with this message at 11:25 on May 22, 2019 |
|
#
?
May 22, 2019 11:21
|
|
|
Provisional orders 1sq 2pl Pack up one of the HMGs and send it via the sacred-zelda route. Crawl the house infantry south behind the wall and begin feeding them across to Natasha one squad at a time. Jaguars! fucked around with this message at 21:50 on May 22, 2019 |
|
#
?
May 22, 2019 21:12
|
|
|
orders for my lads. SMG & 3rd platoon: move half the forces on SLOW up to the river edge facing southwest, while the other elements cover them and TARGET BRIEFLY once a minute on the foxholes and trench on the other side. Once they're in place, the forces covering them can also move up so they can actually see their opposition. AT: keep moving up as per last order, inputter's contingency as to movement speed. HMG: pour fire on the northern foxholes and trenchlines. If needed, move them into better position. INPUTTER'S NOTE: Stop my dudes from doing anything suicidal. If you have a great opportunity to exploit, go for it but it better lead to significant results at a fairly low risk to my remaining men.
|
|
#
?
May 22, 2019 21:22
|
|


|
2nd squadron orders that i hope make it in time: follow Koolkev's lead. HMGs move west into positions where they can see the German trenches from Boris. Infantry follow suit amd they should target the trenches as well. AT rifles (those who have one) concentrate on that Tiger! Sorry for the lack of map Abongs!
|
|
#
?
May 23, 2019 01:07
|
|
|
Turn 12
|
|
#
?
May 23, 2019 12:34
|
|
|
1 Sq Orders Squadron HQ to walk to Swamp via Zelda. 1 Sq 1 Platoon  Maximum possible firepower from 2 squad and HQ! I don't care if they're targeting the enemy directly or not, I just want continuous fire in the area. Mortar HQ to walk to a rally point before sprinting forward in the final assault, going to ground within grenade range. Possibly put a waypoint in the middle of the run so they all arrive together? Edit: HMG to fire in the area of the mortar shown in the last video. Jaguars! fucked around with this message at 22:18 on May 25, 2019 |
|
#
?
May 24, 2019 09:42
|
|
|
Jaguars! posted:Oyforce: sorry for wandering off, everyone. looks like these are my standing orders? the last video doesn't seem to really go over the troops in vlad, what's their situation? if they're providing covering fire, i'm happy... i'd like to request a sitrep on vlad and allow abong to bring up anything he sees as suboptimal, if he wouldn't mind, thanks
|
|
#
?
May 25, 2019 04:58
|
|

|
Use these ones which cover both parts of 1 Squadron: https://forums.somethingawful.com/showthread.php?action=showpost&postid=495191170 Jaguars! fucked around with this message at 22:19 on May 25, 2019 |
|
#
?
May 25, 2019 22:15
|
|
|
Orders are due: Monday, May 27 at 7PM EDT Monday, May 27 at 11PM GMT Tuesday, May 28 at 7AM AWST
|
|
#
?
May 26, 2019 15:49
|
|
|
Jaguars! posted:Use these ones which cover both parts of 1 Squadron: thanks. something like this, then, for the next 3 minutes? - higher priority units (SMGs, RFLs) retreat to Mikhail and rest until it's time to cross in a non-Tiger-adjacent area - ATRs fire at the Tiger if they have any "anti-tank" rifles left - if not, they join the MGs in providing fire support against enemy positions
|
|
#
?
May 26, 2019 15:57
|
|
|
Army Orders  Sorry for the delay everyone. SWAT: If you can try and position your guys to hose down the area where the HMG is which I believe is about where the red cross on the map is. However, have the first two teams sprint across the area where the HMG can see them and then make their way down past the woods towards the church. Of course only have them do so once the HMG location is being suppressed. Northern forces: Continue to exchange fire with the german defenders in the forward trenches. Units in Boris try and get everyone into the trenches for maximum cover. HMG forces in Mikhail: Continue to fire on suspected german HMG positions near Sveltana/edge of village. Anyone who can't see that fire fire on the Tiger to make it button up and/or kill that commander. Vlad forces: If the Tiger pulls back then advance all forces across the ford to Boris and support the troops there in defeating the northern german defenders. Ignore the yellow arrow I added it by mistake 1st Squadron: Your orders are all good, carry on.
|
|
#
?
May 26, 2019 17:36
|
|
|
2nd Squadron: 3rd Platoon, SMG Platoon, HMG detachment, & AT detachment We advance like the encroaching winter on the fascists! Legend Red: SMG Platoon Yellow: 3rd Platoon Blue: AT Section Green: HMG Section 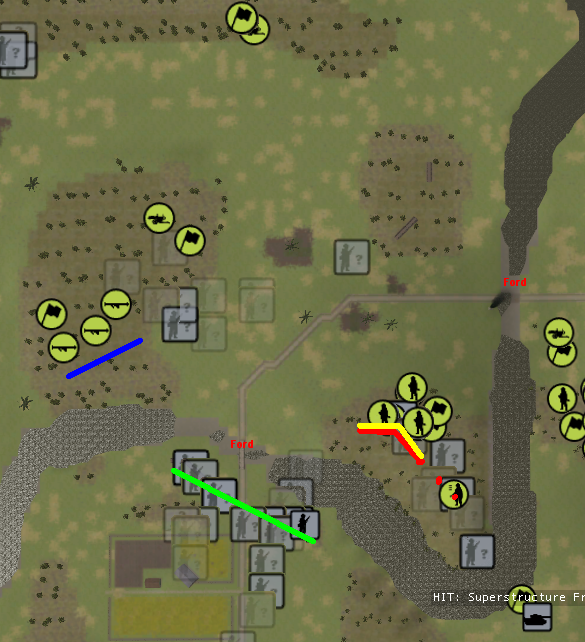 SMG Platoon: Get in the trenches and foxholes denoted in RED. Fire at the Germans. INPUTTER'S NOTE: If they can't see the opposition, have them target where the foxholes and trenches are anyways. 3rd Platoon: Get in the trenches in YELLOW. Fire at the Germans. Recover the platoon MG and put it to use shooting at Germans. INPUTTER'S NOTE: If they can't see the opposition, have them target where the foxholes and trenches are anyways, I want to make the Germans keep their heads down. AT Section QUICK up to the BLUE line, then take cover and put fire into the German positions across the river. I want as much fire done just to make sure as many Germans have their head down as possible while SWAT is in the open. HMG section: The HMG in the Shaft needs to kill that loving mortar already. If it fucks off/dies, put fire into the back trench line where you can see troops. The other HMG is to set up where it can target the Green line and pour fire into it. INPUTTER'S NOTE: if we can target the HMG that can see SWAT, hit it with whatever we've got.  HAVE YOU HELPED THE FRONT? habeasdorkus fucked around with this message at 18:13 on May 27, 2019 |
|
#
?
May 27, 2019 18:11
|
|
|
Provisional Orders for SWAT & RECON 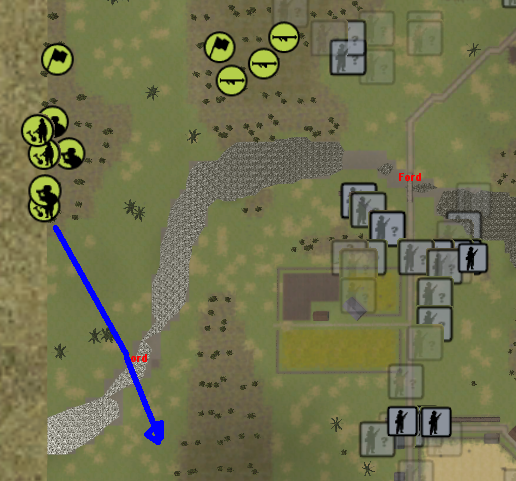 SWAT and Recon are to move NORMAL until they're at the edge of the woods, then FAST across the ford. If Units are TIRED, they should HIDE when they get to the edge of the woods for 1 minute before dashing. Tiring or better, just send them running.
|
|
#
?
May 27, 2019 18:18
|
|
|
Turn 14
|
|
#
?
May 28, 2019 11:51
|
|
|
2nd Squadron Orders Lenisto - Now's your time to shine. Advance your platoon through to Tanya at speed, and if you can, secure the buildings on the outskirts of the village. Habeas - Put down fire to pin down German forces around the northern ford. Prevent them moving to interfere with Lenisto's movement. 2nd Squadron HQ - Join Lenisto's advance.
|
|
#
?
May 28, 2019 11:55
|
|
|
Now is the time. I think it's time to charge with everything we have in the east. The Germans have smoked the north and have moved the Tiger over in what I believe is an attempt to cover their retreat from the front trenches and back onto the objective. I don't think they've spotted our reserves, we can punch out of Vlad and hard into Tanya and town, hopefully cutting off or inflicting casualties on troops moving back towards the objective. I half expect them to pull their reserve trench inf back into town to combat our southern forces while freeing up space in the town trench for the retreating troops, at least that's what I'd most likely do. I also expect troops to attempt to move through Tanya and the wood that SWAT is trying to get to. Lens HMGs are currently positioned behind Boris and I think they should attempt to get into foxholes and the eastern most length of the long trench in order to put down fire on anyone that tries to fall back. As long as they are firing that's fine for us. The germans pulling out will take time and we can have between 1 - 3 minutes to charge madly forward before they can react properly. If they don't have a ton of contingencies we can flood in like a tidal wave. If they don't move at all then it's all the better for us, we can cut the majority of their men off from the objective and fire straight down that Town trench line. Our spotting rounds will also be landing in and around that trench before our final barrage comes in. There are for sure Germans holed up in the south eastern town but we can overwhelm some and bypass others. As long as we can occupy some buildings we can provide a solid base of fire to cover our hops in. I think we can do this.  Let's hear from everyone else once you've watched the video and discuss how we should proceed, we're in the decisive few minutes now. Abongination fucked around with this message at 12:04 on May 28, 2019 |
|
#
?
May 28, 2019 12:00
|
|
|
haven't watched the video yet but i'm up for another try at invading tanya from vlad!
|
|
#
?
May 28, 2019 14:55
|
|
|
oystertoadfish posted:haven't watched the video yet but i'm up for another try at invading tanya from vlad! Second squadron has more than enough troops to saturate Tanya, lets bring your troops down to Natasha and we'll force the Germans to defend in yet another direction 
|
|
#
?
May 29, 2019 07:01
|
|
|
Heck yes, this is looking good! Would this be a good time to try some alternate types of moves? If the Germans are so focused on falling back and pre-occupied with the north should we just Fast move across that clearing? Or better to regular move or Hunt to try to get some shots at anyone out of trenches?
|
|
#
?
May 29, 2019 07:07
|
|
|
Yes, definitely! Fast move all the way would work, or you could preserve some energy and have them move slower until they reach the river bend then fast across the zone where the enemy is visible. Having troops fire up the river could also work to put a lot of extra pressure on the Germans up there. The beauty of commanding a platoon is that you could do all of these things because you have multiple squads! It takes some extra time to do the orders but you get better results IMO.
|
|
#
?
May 29, 2019 10:45
|
|
|
1 Sq Orders Sq HQ to head directly for the south end of Natasha, alternate between walking and jogging. HMG in the Zelda area and the tankfantry in the cabbage farmhouse are to stay and cover units moving south. You can cancel their fire orders if you don't think they are hitting anyone. 1 Sq 1 Pl Setup my AT units to cover the houses in the Tanya-Natasha Gap. If units can be seen in the houses open fire.  Rest of the units in Natasha are to walk up the forest in line abreast. If they contact anyone all units are to target the area ASAP. Go no further than the end of the arrow. 2 Squad is to reunite and move to the German prisoners and process them (Same procedure as medicing a friendly) If they finish that then walk west to the next forest. Mortar HQ is to walk to the end of U-boot forest and cross the open ground to the next forest. If Kevz has no plans for Regt HQ, send them to the U-boot woods conning tower and set up their radio, I'd rather have that +1 leadership transmitted down to the Sq HQs than any combat they could do.
|
|
#
?
May 29, 2019 11:42
|
|
|
so, two questions to clarify my understanding, with a map to illustrate: 1: am i commanding (some of) the troops circled in black? 2: which route are we thinking for these troops: red, gold, or pink? and if those questions are off-base you can let me know!
|
|
#
?
May 29, 2019 13:40
|
|
|
Army orders All right comrades this is the final stage. Thanks to Abongination for the great map and idea, it was what I was hoping to aim for. SWAT: Continue to push men across the ford as quickly as possible, the more men we get across the more we may be able to get into the objective. Northern forces: Get the MG teams into the defenses and have everything fire on the german northern defenders kill as many as possible and generally keep them in place. Vlad and Mikhail forces: Ura! Time to sound the attack, have all forces advance on Tanya and push into the houses in the edge of the town. The remaining machine guns alive try and have them suppress known or expected german HMG or defensive positions until our forces start their direct assault. Cabbage houses: All survivors are to advance towards the edge of Tanya and the german defenses and assault them. 1st Squadron: Jaguars rather than going through Natasha I would prefer that you used it to block the german defenders line of sight and flank around to take the objective from the south. Killing germans is secondary to securing the church objective.
|
|
#
?
May 29, 2019 17:17
|
|
|
1st Squadron in Vlad URA! https://www.youtube.com/watch?v=j-5ycjbfELM more specifically, execute the arrows circled in blue below in concert with 2nd Squadron assets:  note how most of the force keeps attacking toward the eastern edge of town. edit: change to orders: The HMGs are to move to the cabbage house at a speed that won't make them unusable for the next 3-minute turn. oystertoadfish fucked around with this message at 05:42 on May 30, 2019 |
|
#
?
May 29, 2019 17:39
|
|
|
Orders are due: Thursday, May 30 at 7PM EDT Thursday, May 30 at 11PM GMT Friday, May 31 at 7AM AWST
|
|
#
?
May 30, 2019 00:18
|
|
|
Limited posting opportunities today, so no fun maps. 3rd Platoon/SMG Platoon/AT Section/HMG Section Get as much fire on the northern line as possible. Shoot at heavier guns if you can see them, and if you can't see anything target the area briefly. Inputter should move troops out of cover into cover as necessary, and move troops for better vantage points as necessary. We're only here to keep them occupied, so we need to keep putting out fire regardless of the casualties. Also, a loving Order of Lenin to anyone who domes that goddamned Tiger commander. Provisional SWAT orders: Guys across the ford are to scout into and through the woods, staying low and trying not to draw attention. Everyone else, move across the ford at FAST speed until they're behind the woods, and then start making their way south at NORMAL speed to loop around the woods and make a run for the church. @ me on Discord if any of this is against intentions, and I should have a chance to update.
|
|
#
?
May 30, 2019 13:09
|
|
|
 2nd Squadron, 1/2 Platoons As ordered, so obeyed. The HMGs in Boris should move immediately into the trenches and foxholes and start firing on the German trenches. If the Germans do start pulling back after the first minute or two they should focus on those in the open but otherwise just lay as much fire into the trenches as possible. Everyone in Vlad (ATs, infantry, HQ units) move Fast across the open ground between Vlad and Tanya. Once they hit woods they should slow down and split up: AT rifles face towards the northern German trench line and keep firing on the Tiger (the top purple arrow) 1st Platoon and 2nd Platoon head towards the houses and each attempt to occupy their own. The HQ units will likely be trailing behind still but ideally next turn they will be able to move into cleared houses and allow the infantry to keep advancing/clearing.
|
|
#
?
May 30, 2019 19:22
|
|
|
Turn 15
Abongination fucked around with this message at 05:08 on May 31, 2019 |
|
#
?
May 31, 2019 04:46
|
|
|
well the vlad -> tanya charge went a lot better than the first try, lol. i guess many minutes of suppression and driving the enemy back helped, as well as the sheer numbers that went across this time. also, the tiger was loving around elsewhere, that was a big help
|
|
#
?
May 31, 2019 14:03
|
|
|

|
| # ? Jun 5, 2024 03:32 |
|
|
I feel like we might have snookered them. Also, our anti-tank rifles might be nothing vs the tiger, but they're pretty good at shooting buildings, right? We should make sure we use those against MGs pointing out windows. habeasdorkus fucked around with this message at 14:10 on May 31, 2019 |
|
#
?
May 31, 2019 14:06
|
|