


|
Thermopyle posted:So the only difference is the branding? Sainsmart seems to import and toss extra branding on them (and a ton of other products from other manufacturers). I think it's some kind of official resale with rebranding deal but I don't know why they do it. I believe you have to do returns or warranty through sainsmart instead of creality, but they're all over amazon and seem to respond to one star feedback. If something breaks on the Ender 3 you'll get better support googling the issue than from Creality anyway. Maybe sainsmart will be an improvement.
|
 #
?
Jul 9, 2019 18:50
#
?
Jul 9, 2019 18:50
|
|


|

|
| # ? May 8, 2024 04:48 |
|
|
BMan posted:So the filament just vanishes from existence or??? Sagebrush posted:I'm not really sure about your experimental setup. How are you getting more than 100% of the filament out that you put in? You must be including oozing in the figure I guess? And why did you jump directly from 210C to 230C? And if your temperatures are all off by 10-15 degrees, it means that only the hottest values there are appropriate PLA temperatures, and everything else is obviously too cold. And a Volcano is a different situation from a standard nozzle anyway. And how did you determine that your error figure is +/- 1%? I didn't need a 220C though, the trend is clear. This is from back when the accepted print temperature for PLA was "180C to 210C" and I was questioning if that was accurate and even given a max +15C offset in the extruder temperature, all of those temperatures are above the 180C minimum. The +/-1% wasn't the measurement error, but what I was hoping to shoot for as far as answering the question of how fast I can print at a given temperature. I think you're missing my point though, which was that "Every extruder easily does 15mm3/sec with very good accuracy" is not correct for many circumstances, especially considering the uncertainty of the OP's configuration. I feel it would be careless to calibrate slightly faster given that this only takes 10 minutes compared to hundreds of hours of printing that will follow and may have up to 20% error before the skipping steps or stripping filament was noticed.
|
|
#
?
Jul 9, 2019 18:50
|
|

|
Rexxed posted:Sainsmart seems to import and toss extra branding on them (and a ton of other products from other manufacturers). I think it's some kind of official resale with rebranding deal but I don't know why they do it. I believe you have to do returns or warranty through sainsmart instead of creality, but they're all over amazon and seem to respond to one star feedback. If something breaks on the Ender 3 you'll get better support googling the issue than from Creality anyway. Maybe sainsmart will be an improvement. Ehh, I ordered it. We'll see what happens!
|
|
#
?
Jul 9, 2019 18:52
|
|

|
Thermopyle posted:Ehh, I ordered it. We'll see what happens! I'm looking forward to filament sales during prime day. Manufacturers seem to dump rolls of unpopular colors and/or black or white for $10-12 pretty often. I've used a lot of plastic this year.
|
|
#
?
Jul 9, 2019 18:55
|
|
|
Rapulum_Dei posted:He forgot to mention he�s using a 2mm nozzle? nope, stock .4 mm nozzle
|
|
#
?
Jul 9, 2019 19:12
|
|

|
Sagebrush posted:Do an M503 to read your current e-step settings and verify it's not something totally wacky. Thanks for this. Fired up the printer after getting home from work today and lo and behold extrusion seems sane-ish now. Looking at the M503 output, I think I hosed up something and somehow enabled M200 volumetric extrusion because it's reading as disabled now and was not explicitly disabled before.
|
|
#
?
Jul 10, 2019 05:13
|
|
|
CapnBry posted:I think you're missing my point though, which was that "Every extruder easily does 15mm3/sec with very good accuracy" is not correct for many circumstances, especially considering the uncertainty of the OP's configuration. I feel it would be careless to calibrate slightly faster given that this only takes 10 minutes compared to hundreds of hours of printing that will follow and may have up to 20% error before the skipping steps or stripping filament was noticed. Fair enough. I stand by my E3Dv6/Titan which has so far handled everything I've thrown at it. Swap it for a Volcano and I've done at least 50mm3/s in PLA with no obvious signs of underextrusion. The filament goes in so fast the spool just continuously turns. In other news, I spent the last week+ tracking down an absolutely infuriating periodic stepper driver disconnection error. I had to take the printer (which is Not A Prusa) down almost to its bare frame, swapped nearly every part with a known good one, probably uploaded thirty different sets of firmware, ended up staring for two days at the motherboard's SPI lines with a four-channel oscilloscope and a logic analyzer, chasing a 100-nanosecond pseudorandom transient voltage spike. Today I came to the batshit insane but apparently correct conclusion that the moving extruder carriage was building up a static charge from its polycarbonate wheels rolling around, and that energy was periodically discharging into the printer's electrical system, which was causing a nanosecond-scale ripple on the PSU, which was pulling one SPI CS line down long enough for an induced burst of noise to be interpreted as a data command, which was resetting the driver to its default settings. I ran a couple of ground wires from the carriage and the x-rail to the frame ground and the problem appears to be solved. Does that sound like fun to all you newbies looking to get into 3D printing? No, of course it doesn't. Get A Prusa.
|
|
#
?
Jul 10, 2019 05:46
|
|


|
Problem solved: extruder gear was slipping against the filament and wasn't actually pushing it through the hotend.
|
|
#
?
Jul 10, 2019 07:55
|
|
|
Sagebrush posted:batshit insane but apparently correct conclusion that the moving extruder carriage was building up a static charge from its polycarbonate wheels rolling around, and that energy was periodically discharging into the printer's electrical system, which was causing a nanosecond-scale ripple on the PSU, which was pulling one SPI CS line down long enough for an induced burst of noise to be interpreted as a data command, which was resetting the driver to its default settings. I ran a couple of ground wires from the carriage and the x-rail to the frame ground and the problem appears to be solved. Holy poo poo  Nice troubleshooting, that's some serious determination.
|
|
#
?
Jul 10, 2019 17:53
|
|

|
Is it possible to print usable threads and fasteners on a cheap printer, say for instance the Ender I impulse bought from Woot yesterday? Or any printer for that matter... I got some prints in today that I ordered which has some threaded holes and matching screws but the threads are so godawful that I can't assemble it. I'm going to reprint them when I get mine from Woot next week but maybe I'd be better off just tapping the holes in post and using off the shelf fasteners? Kibbles n Shits fucked around with this message at 18:53 on Jul 10, 2019 |
|
#
?
Jul 10, 2019 18:26
|
|


|
Kibbles n Shits posted:Is it possible to print usable threads and fasteners on a cheap printer, say for instance the Ender I impulse bought from Woot yesterday? Or any printer for that matter... Just design nut traps into your parts.
|
|
#
?
Jul 10, 2019 19:03
|
|


|
BMan posted:Just design nut traps into your parts. 1)Hexagonal nut traps 2)threaded brass inserts you push in with the tip of your soldering iron(works great with harder plastics, I've had less luck with TPU/flexibles for the obvious reason of the threads not biting into the soft plastic) 3) or simply model the hole as wide as the inner shaft but not as wide as your bolt thread and just tap into the plastic if it's not going to come apart that often
|
|
#
?
Jul 10, 2019 19:13
|
|

|
4) Heat up a screw and use it for a thread former. I did it in some HIPS with 6-32 screws last week. I designed the screw holes to be a little bit undersized, then drilled them out to the recommended size (#35). Then I used my soldering iron to heat the screw up and bottomed it out in the holes. It works fine holding a PCB in place, I wouldn't trust tapped plastic with much more than that though.
|
|
#
?
Jul 10, 2019 19:25
|
|
|
Sagebrush posted:Today I came to the batshit insane but apparently correct conclusion that the moving extruder carriage was building up a static charge from its polycarbonate wheels rolling around, and that energy was periodically discharging into the printer's electrical system, which was causing a nanosecond-scale ripple on the PSU, which was pulling one SPI CS line down long enough for an induced burst of noise to be interpreted as a data command, which was resetting the driver to its default settings. I ran a couple of ground wires from the carriage and the x-rail to the frame ground and the problem appears to be solved. This is amazing. Name and shame the printer
|
|
#
?
Jul 10, 2019 19:30
|
|
|
I'm glad mine has linear rails then. I briefly considered doing a D-Bot (or whatever it was) with VSlot. My apartment doesn't have any grounding except in the kitchen and bathroom. :|
|
|
#
?
Jul 10, 2019 22:48
|
|

|
AgentCow007 posted:This is amazing. Name and shame the printer It started out as a MendelMax nearly 7 years ago. Today it is...something different. But the basic motion system of polycarbonate wheels on 20xx extrusions is the same as on dozens of different printer models today, including thread favorite Ender 3. The machine had been using an ancient RAMBo with built-in A4988s forever but I recently upgraded it to an SKR 1.3 and TMC2130s to quiet it down. That was when the weird stuff started happening. I assume that the machine has been making the little static pops and snaps for its entire life, but the 5v RAMBo was less sensitive to noise than the 3.3v SKR, and the A4988s obviously don't have any of the fancy SPI stuff so even if there was noise it wouldn't necessarily do anything. Anyway grounding the extruder carriage and its rail eliminated the problem so keep that in mind if you're looking at the new generation of motherboards and drivers.
|
|
#
?
Jul 11, 2019 04:15
|
|
|
BabelFish posted:I've only got a MK2.5S, but right after I did the upgrade to S I discovered that the new hotend fan shroud was so good at cooling that on large flat PLA prints at 100% fan speed the hotend couldn't keep up with all the reflected cool air. I turned on the dynamic cooling option and set the low speed to 75%, high and bridging speed to 100% and have had no issues since. Thanks! This was in fact a print with two large surfaces (think two XL playing cards side by side) and it consistently failed on the second layer. I scaled down to one part, and redesigned it with some speed holes, and finally set fan speed to 75%, and, so far, 1.5 successful part. bring back old gbs posted:1)Hexagonal nut traps This man speaks the truth. I have had good luck with hexagonal nut traps. If you dimension them to true nut size they'll usually bind just enough that the nut stays put.
|
|
#
?
Jul 11, 2019 10:58
|
|


|
Is NinjaFlex sensitive to moisture? Finally thought of something I could do with mine but it�s very small so I�m hesitant to crack the roll open.
|
|
#
?
Jul 13, 2019 19:47
|
|

|
Not really, no. I have a roll that's been open for more than a year and it prints fine. It is quite sensitive to proper temperature and drive tension though. 227C works well for me, and you should adjust your idler tension until it's just barely gripping the filament (i.e. much less tension than for a hard filament). With a Titan extruder that's all the way loose + 1.5 turns back in. If it's undertensioned it obviously won't feed, but it it's overtensioned the filament tends to get bent out of line with the extrusion path and it spills out the side and jams. Start with a maximum extrusion rate of 2.5mm3/s and then start printing faster if it looks like your extruder can keep up.
|
|
#
?
Jul 13, 2019 20:01
|
|
|
Thank you!
|
|
#
?
Jul 13, 2019 22:47
|
|
|
Rexxed posted:Sainsmart seems to import and toss extra branding on them (and a ton of other products from other manufacturers). I think it's some kind of official resale with rebranding deal but I don't know why they do it. I believe you have to do returns or warranty through sainsmart instead of creality, but they're all over amazon and seem to respond to one star feedback. If something breaks on the Ender 3 you'll get better support googling the issue than from Creality anyway. Maybe sainsmart will be an improvement. Sainsmart is my go-to for "can get it from china" electronics. I've gotten 10-packs of nano clones, many dozens of unos, lcd shields, IMU boards, power supplies.... and an ender 3 and 3018 desktop CNC. Their product support is really, really good. I had 5 power supplies in a 10-pack fail to power up, and they said "one shipment went out without filter caps installed, our bad" and sent me a 20-pack of caps and 10 replacement supplies. So I have 20 power supplies and 10 replacement caps if any of them fail. I only got actually burned on their "GENUINE FTDI USB SERIAL" thingy, and it was because they didn't know they were getting knockoffs from their supply chain. I had to throw away five bricked modules. That's FTDI's fault, though, not SainSmart's. As for threads: FDM is one tool in your toolbox. The smallest thread I feel comfortable printing is 1/4" NPT. Anything smaller than that gets six perimeters with a hole at thread minor diameter and tapped with a normal tap. If the thread needs to be sturdy, then it gets a threaded insert. I'm not a fan of nut traps as a personal preference. This philosophy extends beyond threads for me. I consider a printed part in the same class as cast parts: gross features included, needs finishing for precision. I print friction-fit stuff at dimension and the ~.1mm of slop lets me file or sand stuff to a precision fit. The above desktop CNC makes finishing printed parts to absolutely on-dimension pretty nice, honestly. Thanks to whomever in this thread mentioned the heat gun for removing stringing. That also seems to temper the outside to make it less brittle.
|
|
#
?
Jul 13, 2019 23:41
|
|


|
Speaking of Sainsmart I just got my Ender 3 from Woot today, got everything assembled and working, but I'm having a hard time leveling the print bed. I followed these instructions and I got all four corners the correct height, but when I auto-home the machine it returns the nozzle to a point that's a few mm below the printing bed. Is that normal or did I level it incorrectly? Edit for grammar Edit: Never mind, after a dozen more iterations of the leveling process it seems correct now. Kibbles n Shits fucked around with this message at 02:14 on Jul 14, 2019 |
|
#
?
Jul 14, 2019 01:32
|
|
|
I got my Sainsmart Ender 3 as well. Did a bed leveling with bed leveling gcode I found on reddit. Started a print of the test dog and it was going pretty great until my daughter pulled the power plug and the resume feature didnt work. Started another print and the filament ran out mid-print. Now, I'm half way through my third attempt at printing that fuckin dog. If we hadn't hosed up, the thing would've printed the first dog just fine. Pretty happy with this thing! Since this is literally the first time I've 3d printed anything or actually even held something that was 3d printed, I don't really have anything to compare it to, but I feel like it's pretty good? 
|
|
#
?
Jul 14, 2019 17:11
|
|
|
Having half a dog print is part of the Ender 3 experience. Welcome.
|
|
#
?
Jul 14, 2019 17:21
|
|

|
I tested mine with the Benchy boat, "normal" profile in Cura  Not pictured: gaps in the surface layer of the boat deck. What's weird is that on the other side of the boat there are defects that are mirror opposites of the side visible in the pic. Where there's a blob of too much filament, there's a corresponding low spot on the opposite side. I feel like I must have assembled my printer incorrectly or something, but I made drat sure everything was square and level...
|
|
#
?
Jul 14, 2019 18:28
|
|
|
Thermopyle posted:I got my Sainsmart Ender 3 as well. You have some pimples, banding, and weird stuff at the base of the tail. I would try reducing the temp by 5-10 degrees and print that same dog. If not, then make sure everything is tight because banding could be a result of that.
|
|
#
?
Jul 14, 2019 20:28
|
|


|
I think that that's the model included with the printer as .gcode so there's not a lot of tweaking to do with it, but here's the stl: https://www.thingiverse.com/thing:2879047 One of the first mods I printed for my Ender 3 was the v2 extruder knob: https://www.thingiverse.com/thing:2776404/files It makes it easier to feed filament in if you can't get it to go straight through the extruder. Cutting the filament at an angle also helps it get into the PTFE. edit: I had to scale the knob up 1 or 2% to get it to fit on the extruder shaft well. Rexxed fucked around with this message at 21:39 on Jul 14, 2019 |
|
#
?
Jul 14, 2019 21:21
|
|
|
Just finished my first 3D print, it's the test rook for resin 3d printers. STL came with my printer on a thumb drive so decided to try it out. https://imgur.com/a/rrIgVZa Holy gently caress I am impressed for a $250 printer (Elegoo Mars). The resin is pretty decently priced these days too. Looking forward to printing some of my 3d models I've done in the past 10~ years. Cut myself with a lovely drywall spatula while trying to get them off the print bed, and I don't think I washed all the resin off on the bottom hence the wonkyness. ceebee fucked around with this message at 01:03 on Jul 15, 2019 |
|
|
#
?
Jul 15, 2019 00:51
|
|
|
The one thing I've been surprised about with my first 5 prints on my ender 3...it takes a lot of elbow grease to get prints off the bed surface. After reading on and off about 3d printers for a year it seemed like the problem people would have was their prints not adhering enough. I was hoping my 9 year old daughter would be able to use it without my help, but it's too tough to get the prints off for her.
|
|
#
?
Jul 15, 2019 02:32
|
|
|
Thermopyle posted:The one thing I've been surprised about with my first 5 prints on my ender 3...it takes a lot of elbow grease to get prints off the bed surface. After reading on and off about 3d printers for a year it seemed like the problem people would have was their prints not adhering enough. A lot of the difficulty depends on the build surface, plastic, and the tool you're using. I've taken to using a sharp chisel to get between the glass print bed and the print, because PLA sticks down well with some glue stick. I use the glue more as an interface layer so I can remove parts more easily. PETG doesn't stick as well so I can pull it off by hand, however. ABS will pop off by itself as the bed cools down. I do think that it may be a bit much for a nine year old although I've seen young-ish kids doing 3d printing on their own youtube channels, although I think it's usually 12+.
|
|
#
?
Jul 15, 2019 03:44
|
|
|
ceebee posted:Just finished my first 3D print, it's the test rook for resin 3d printers. STL came with my printer on a thumb drive so decided to try it out. Tilt the model and use supports. It decreases the force need to separate a layer from the clear FEP sheet by making each layer have less contact area and as a result, you get less failed prints. Hollowing your prints is also helpful for reducing contact area (and saving resin!) In my very limited experience, the auto generated raft is also easier to separate from the build plate. Just soak it with alcohol and wait a minute or two.
|
|
#
?
Jul 15, 2019 04:30
|
|
|
canned air isn't as cheap as it used to be but if you hold a can upside down and spray the edge of the print it'll detach itself from the bed pretty quick
|
|
#
?
Jul 15, 2019 05:39
|
|

|
So I've resuscitated my printer and printing has gone pretty well after I leveled it a bit tighter than on the first few attempts (Like tight enough to have the paper scratch), but I'm trying to print this https://www.thingiverse.com/thing:3700643 and after the first layer it rips up some part of it (even printed it with a huge raft) and after that it's just spurting little filament pieces everywhere. Any idea what I can do to improve this? After I changed my profiles to print the first layer very slowly I've had very good results ever since, but this I can't seem to figure out.
|
|
#
?
Jul 15, 2019 06:49
|
|


|
What material, what bed surface and prep, what settings, take picture of the first layer, etc
|
|
#
?
Jul 15, 2019 07:03
|
|
|
Thermopyle posted:The one thing I've been surprised about with my first 5 prints on my ender 3...it takes a lot of elbow grease to get prints off the bed surface. After reading on and off about 3d printers for a year it seemed like the problem people would have was their prints not adhering enough. I was thinking about it and it might be worth looking at a magnetic base with a spring steel bed in this case, with the big piece of spring steel you flex it to break the plastic off. I don't know if a nine year old could do it, but it may be worth consideration: https://www.youtube.com/watch?v=XRwaE0R9CVg The spring steel has a layer on top which is PEX which is reportedly able to hold but not be destroyed by PETG or ASA, etc: https://www.fabbaloo.com/blog/2019/4/10/the-wham-bam-pex-solution I've never used one but it's something to consider.
|
|
#
?
Jul 15, 2019 07:29
|
|
|
Rexxed posted:I was thinking about it and it might be worth looking at a magnetic base with a spring steel bed in this case, with the big piece of spring steel you flex it to break the plastic off. I don't know if a nine year old could do it, but it may be worth consideration: I really want to try one of those for the MakerGear M2 
|
|
#
?
Jul 15, 2019 15:32
|
|
|
Thermopyle posted:The one thing I've been surprised about with my first 5 prints on my ender 3...it takes a lot of elbow grease to get prints off the bed surface. After reading on and off about 3d printers for a year it seemed like the problem people would have was their prints not adhering enough. You can also get this sticking issue if you print too close to the bed. Jamming the plastic into the bed just makes it find every nook and cranny and just wedge itself completely in. You can either fix it by changing your slicers first layer setting or adjusting the height of the autolevel if your printer uses that.
|
|
#
?
Jul 15, 2019 15:41
|
|
|
I'm really alternating between being happy with and still frustrated by my heavily modified Ender 3. Just deciding if I buy a Prusa and set it on fire or maybe upgrade the board to 32 bit and build an enclosure so I can make the parts for a Voron.
|
|
#
?
Jul 16, 2019 01:37
|
|


|
Sagebrush posted:What material, what bed surface and prep, what settings, take picture of the first layer, etc PLA at 200�C , glas, glas with glue, blue tape, blue tape with glue. Which settings specifically? Can't take pictures RN, but the layer often gets ripped off so not really something to take pictures of anyway.
|
|
#
?
Jul 16, 2019 07:57
|
|
|
|
| # ? May 8, 2024 04:48 |
|
|
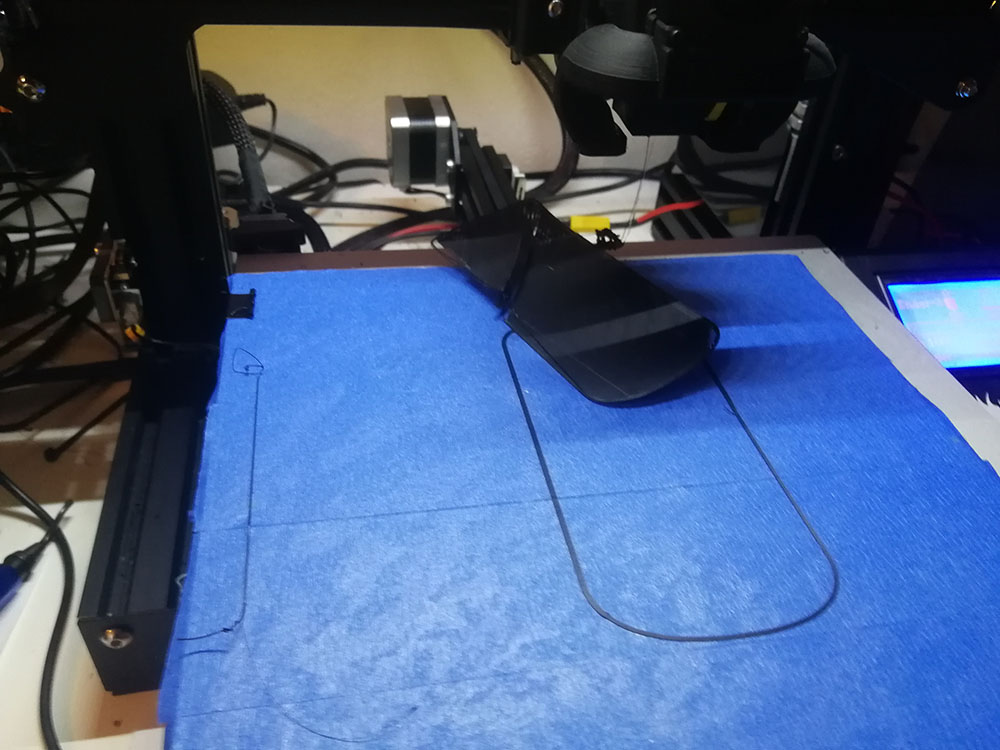 Here's a picture of the latest failed print, seems to have ripped off straight after the first layer. The layer itself is almost exactly 0,2 mm thick, just as specified.
|
|
#
?
Jul 16, 2019 13:16
|
|