


|
Monaghan posted:Finished another robot. Love a GM! I like the weathering, especially the big dent on the knee - Sniper models ought to have beat-to-poo poo knees from crouching down to take a shot.
|
 #
?
Apr 6, 2020 22:58
#
?
Apr 6, 2020 22:58
|
|


|

|
| # ? May 24, 2024 17:28 |
|
|
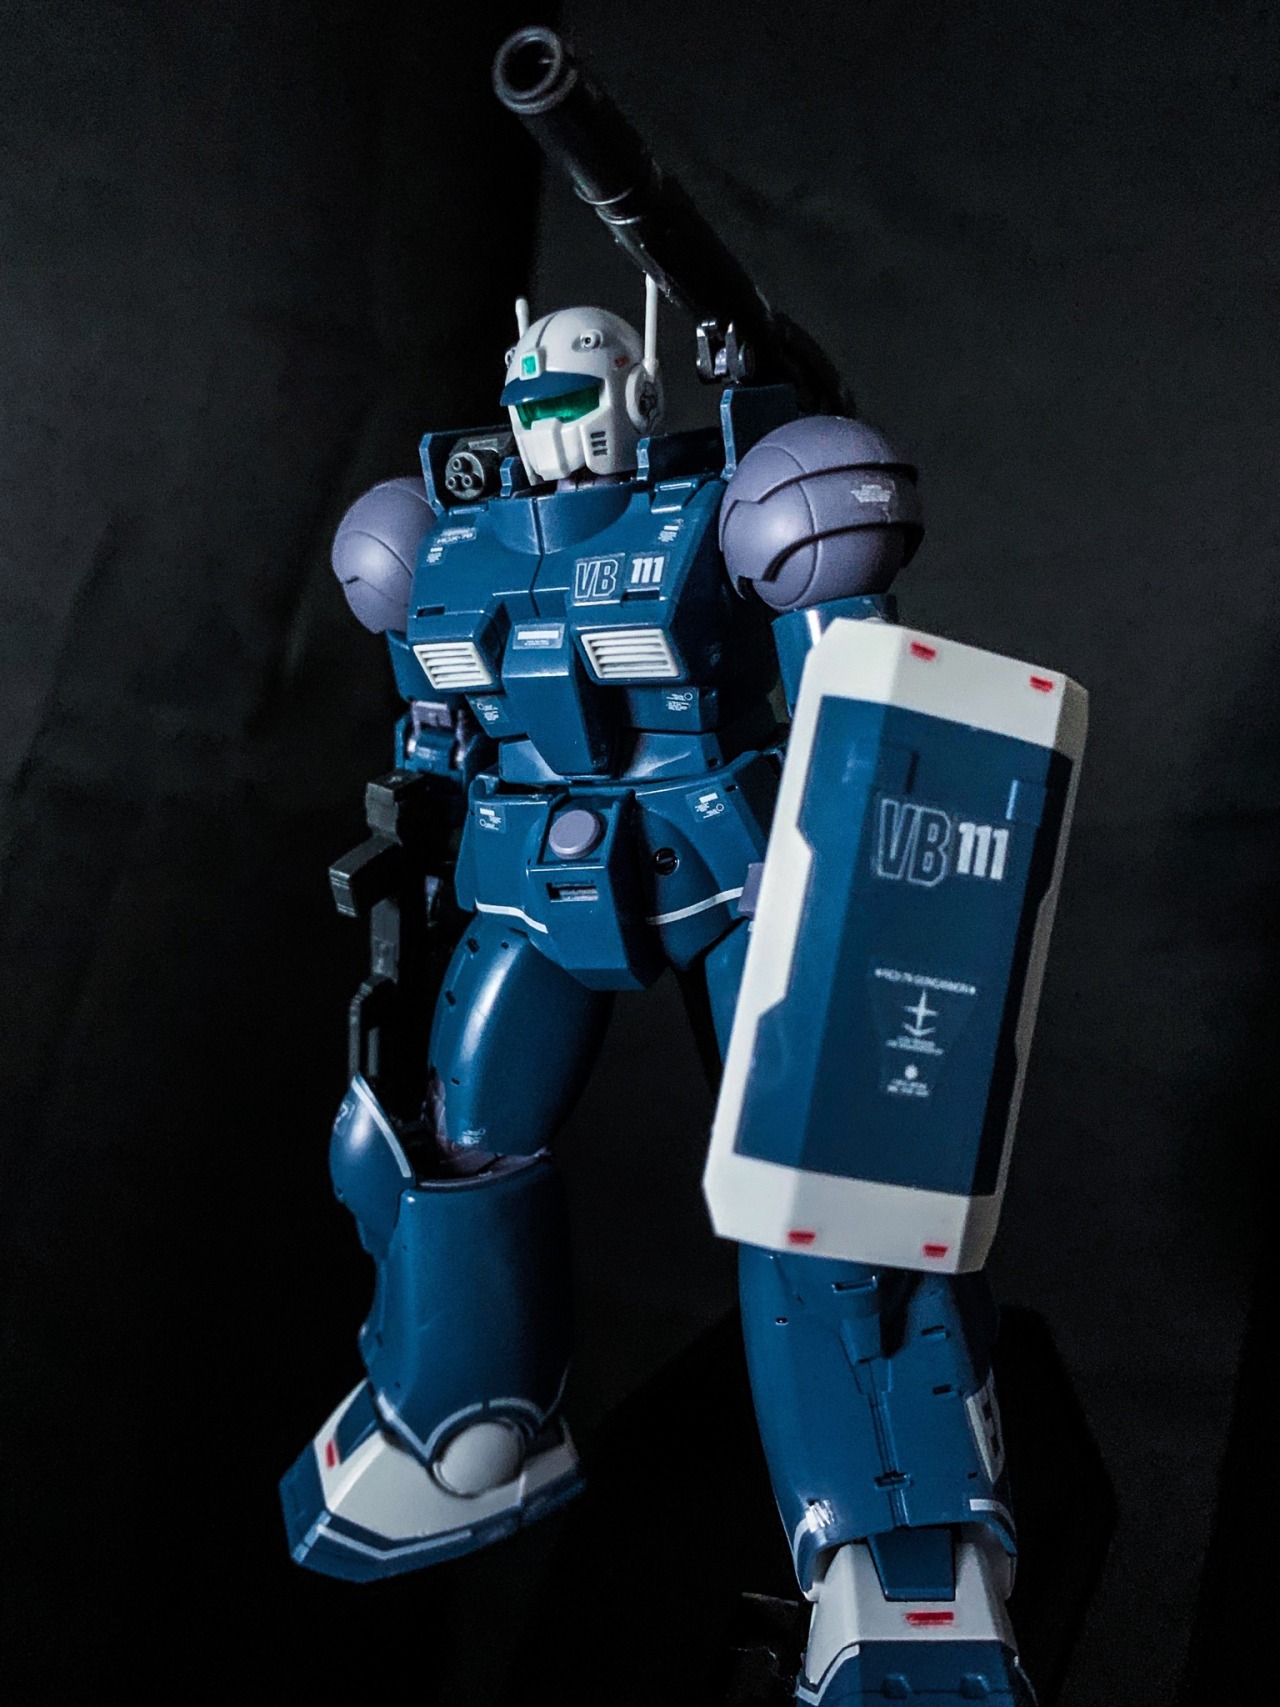
Awesome! I love that build, is a really nice kit. Here's my take on it that I posted a while ago.    My first proper airbrushed kit to boot!
|
|
#
?
Apr 7, 2020 00:04
|
|
|
https://twitter.com/figsoku_r/status/1247298603346874368
|
|
#
?
Apr 7, 2020 00:24
|
|


|

|
|
#
?
Apr 7, 2020 01:06
|
|

|
cleaned out my closet during my isolation, and so I have 5 gundam model kits unbuilt that I want to build so I can break down the boxes and not have them take up so much space. goons, choose your character(for me to build) I'm thinking either the Heavyarms or Turn A first, then maybe the Nu Gundoom, then the EZ8 and RX-79 since I've built those kits before, long ago.
|
|
#
?
Apr 8, 2020 01:20
|
|


|
Turn A. It's probably the best kit of the set, with the engineering letting it keep up with more modern kits, unlike the other four.
|
|
#
?
Apr 8, 2020 01:23
|
|


|
I vote for Turn A as well, mostly because I'm gearing up to build one myself. I'd like to hear outside input about it.
|
|
#
?
Apr 8, 2020 01:24
|
|

|
Alright, turn a it is And, to show my gunpla building chops have not dulled at all, literally the first thing that happened on the very first loving step was I dropped an incredibly tiny piece and it immediately bounced off halfway across the room under a piece of furniture All is as it should be
|
|
#
?
Apr 8, 2020 02:03
|
|
|
dont lose the cow
|
|
#
?
Apr 8, 2020 02:06
|
|
|
Azubah posted:I vote for Turn A as well, mostly because I'm gearing up to build one myself. I'd like to hear outside input about it. the back assembly sucks but I'm guessing it's that way to accommodate Moonlight Butterfly
|
|
#
?
Apr 8, 2020 03:49
|
|
|
Been building the RG Exia and I really love it, but I had to admit defeat at the cheek vents because haha, Jesus christ
|
|
|
#
?
Apr 8, 2020 04:31
|
|


|
Babysitter Super Sleuth posted:Been building the RG Exia and I really love it, but I had to admit defeat at the cheek vents because haha, Jesus christ Wait till you wrestle with the transparent plastic strips  . .
|
|
#
?
Apr 8, 2020 04:36
|
|

Neddy Seagoon posted:Wait till you wrestle with the transparent plastic strips I built the head last of the body so I already wrangled with those fuckers, I�ll take them over trying to install the cheek vents without tweezers any goddamn day.
|
|
|
#
?
Apr 8, 2020 04:46
|
|
|
Working on my RG Zeta. I just attached the legs to the waist unit and this is the first time ever I thought that the thing would explode apart if I looked at it wrong
|
|
#
?
Apr 8, 2020 07:28
|
|

|
Unlucky7 posted:Working on my RG Zeta. I just attached the legs to the waist unit and this is the first time ever I thought that the thing would explode apart if I looked at it wrong Trust your instincts.  I love the Zeta and the RG is probably one of the best looking interpretations of the design but gosh darn am I scared to touch it. I love the Zeta and the RG is probably one of the best looking interpretations of the design but gosh darn am I scared to touch it.My new God Hands finally arrived today so I was able to start digging into the PG Perfect Strike in between work. I'm fairly impressed so far, the instructions and parts count look a lot more like the kind of thing I was expecting from a PG, very different from my first PG, the Mk-II, which has some really weird design choices in construction. Stupidly though, my favorite thing in the whole kit is the 2-stage molded  . . On the down side, while it is Perfect Grade and it is the Perfect Strike, it's inevitably not quite perfect. For one they don't give you all the parts for the Skygrasper, which feels strange as they already give you a lot of the parts on the Aile Striker pack runners and at this price tag I don't quite see why they can't throw in the extra 2-3 runners to complete it. Also, despite all the new runners, they expect you to use some of the shield bracket pieces from the base kit for the Sword Striker claw-shield thingy so you can't swap them over without disassembling one, which I really don't understand because it's literally just 2 pieces.
|
|
#
?
Apr 8, 2020 10:21
|
|

|
Babysitter Super Sleuth posted:Been building the RG Exia and I really love it, but I had to admit defeat at the cheek vents because haha, Jesus christ RG Exia is the closest I�ve been to just giving up on a kit. Incredibly small bits and incredibly tedious. My sword just flops around and doesn�t stay in any single position well.
|
|
#
?
Apr 8, 2020 11:35
|
|

|
Captain Invictus posted:cleaned out my closet during my isolation, and so I have 5 gundam model kits unbuilt that I want to build so I can break down the boxes and not have them take up so much space. goons, choose your character(for me to build) Having done one, I'd not bother with the Gundoom. I prefer the look of it � I like the slight design changes and increased surface detailing compared to the old HG � but the quality is pretty poo poo. Panel lines crossing a part boundary don't always match up, badly-placed seam lines, that kind of thing.
|
|
#
?
Apr 8, 2020 12:46
|
|


|
Unlucky7 posted:Working on my RG Zeta. I just attached the legs to the waist unit and this is the first time ever I thought that the thing would explode apart if I looked at it wrong Oh man, I feel you. I think I transformed it once to say I did, then put it in robot mode and left it that way. The only build I've done that has intricate transforming that feels solid is the MG ZZ Ver.Ka. There's a few pieces (the shields and V fin, really) that are a bit finicky, but otherwise it's super solid and doesn't feel like a grenade. The MG Proto Zero build is solid as well but that's not super intricate either.
|
|
#
?
Apr 8, 2020 14:49
|
|


|
Taking advantage of the plamo in the title - I finished the Vic Viper from Gradius IV, kit by Atelier Sai. Engineering and fit were on par with Motor King or other Chinese clones. Very much a snap kit, very much requires paint - I don't trust the waterslides that came with it, given how yellow the paper was.  Panel lines are extremely shallow and I loving hate white, when I got enough thin coats of white paint on, then a gloss coat, they basically jammed the panel lines and made it a bitch and a half to get a wash in there. I repainted and recoated a few before I just decided to give up and place my faith in the flat topcoat. Ironically, the Gradius logo was among the easier parts. The letters are recessed. Primed the base, sprayed blue, then did a relatively solid layer of sunset red at the very bottom and light layers to build the gradient. The next day I filled the letters in with Silly Putty (poster tack was a bit difficult to mold into the recessed letters), painted the base, touched up any missed bits outside the letters, and bada bing, done.  I FINALLY got cockpit masking down. I cut thin strips of masking tape and used them on the edges of the glass parts, then used Vallejo masking fluid to get the area within the glass to be masked. It was so loving easy, I was stunned. Vallejo fluid is fairly low viscosity but has good surface tension, so once it touched the edges of the tape, it stopped cleanly and formed a nice solid barrier. There were a few flecks that I gotta toothpick out. I am never, ever again working with transparent orange. A real bitch to get right. The innards were Vallejo Mecha Color light steel with I think Mig Jimenez Starship Wash.  There was supposed to be orange parts covering the forward gun-looking thingies but one of them snapped. Rather than have a mismatch I just left it open. Huzzah, cannons! I also love the fact that the display stand can mount the fighter either in horizontal or vertical. More models need to do this, it looks awesome to have the overhead view.  The inner parts of the lobes didn't shine up all that nicely in the photos but the inner ones are Mr. Metal Color Iron, with the exhaust vents polished to a high shine that didn't show up at all. The inner-INNER ones are Vallejo Mecha Color Light Steel with Starship Wash.  It's pretty cool that they have hatches for the innards and missile racks that can be positioned opened or closed. I did paint the options but I gotta spend some time figuring out how to stretch sprue in a curve such that it can suspend them. Sorta like the Qubeley and Sazabi effect parts, but clear. Don't do this kit unless you love Gradius and are willing to do some peg shaving, weird supergluing, and other plamo fun stuff.
|
|
#
?
Apr 8, 2020 15:40
|
|


|
Was it USA Gundam Store or Gundam Planet that was super sketch?
|
|
#
?
Apr 8, 2020 16:57
|
|

|
grassy gnoll posted:Was it USA Gundam Store or Gundam Planet that was super sketch? USA Gundam Store has been really bad about not shipping things promptly or responding to questions for several of us. I haven�t heard any complaints about Gundam Planet.
|
|
#
?
Apr 8, 2020 17:10
|
|


|
MJP posted:Vic Viper Looks great. For your panel line issues I know that a lot of aircraft modellers will rescribe the panel lines before primer and paint to make sure they are pronounced and deep enough.
|
|
#
?
Apr 8, 2020 17:45
|
|
|
 My dude has knees on his feet
|
|
#
?
Apr 8, 2020 23:14
|
|

|
Azubah posted:I vote for Turn A as well, mostly because I'm gearing up to build one myself. I'd like to hear outside input about it. finished it, trip report: it's a decent kit, looks very nice when finished, but I did not really enjoy the assembly and there's a lot of poo poo that likes to *TOING* off because there's a fair number of thin panels layered on things. The gun is flimsy as hell, the figure has trouble holding anything, the fingers are extremely loose. Decent amount of articulation, but again, the nature of certain pieces to just shoot off the figure ain't great. Particularly the forearm dark grey -> white paneling likes to pop off at the slightest provocation. I know you can glue them, but most gunpla kits I've built in the past didn't need that like this might. DigitalRaven posted:Having done one, I'd not bother with the Gundoom. I prefer the look of it � I like the slight design changes and increased surface detailing compared to the old HG � but the quality is pretty poo poo. Panel lines crossing a part boundary don't always match up, badly-placed seam lines, that kind of thing.
|
|
#
?
Apr 9, 2020 03:20
|
|
|
 discovered during this build I am not very good at tiny sticker placement :/
|
|
#
?
Apr 9, 2020 05:22
|
|

|
Do you use an exacto knife to apply stickers? It's the best way I've found, just get a tiny bit of the sticker attached to the blade, steady your arm on a table edge, leave the piece in question on a firm surface, and gently, carefully lower the sticker down onto the exact spot you need, then slide the blade tip out from under and smooth it out. Works every time. well, except for curved/angled surface stickers, but those are designed by satan himself so it's not surprising nothing works for those
|
|
#
?
Apr 9, 2020 05:35
|
|
|
Captain Invictus posted:Do you use an exacto knife to apply stickers? It's the best way I've found, just get a tiny bit of the sticker attached to the blade, steady your arm on a table edge, leave the piece in question on a firm surface, and gently, carefully lower the sticker down onto the exact spot you need, then slide the blade tip out from under and smooth it out. Works every time. woah, no I�ve been using tweezers - this changes everything; thanks!
|
|
#
?
Apr 9, 2020 05:40
|
|
|
Also after you've placed it down lightly use a toothpick on the side of the sticker to move it around.
|
|
#
?
Apr 9, 2020 05:41
|
|
|
Captain Invictus posted:Do you use an exacto knife to apply stickers? It's the best way I've found, just get a tiny bit of the sticker attached to the blade, steady your arm on a table edge, leave the piece in question on a firm surface, and gently, carefully lower the sticker down onto the exact spot you need, then slide the blade tip out from under and smooth it out. Works every time. Actually, yeah, I had been doing that on the Tallgeese and my reprolabels Transformer decals.
|
|
#
?
Apr 9, 2020 05:46
|
|
|
Captain Invictus posted:Do you use an exacto knife to apply stickers? It's the best way I've found, just get a tiny bit of the sticker attached to the blade, steady your arm on a table edge, leave the piece in question on a firm surface, and gently, carefully lower the sticker down onto the exact spot you need, then slide the blade tip out from under and smooth it out. Works every time. Pro-tip; Use a toothpick. You can place really fidgety stickers carefully with them and roll the toothpick off to put stickers perfectly in place.
|
|
#
?
Apr 9, 2020 06:36
|
|
|
Captain Invictus posted:I'll probably just suffer through it anyways, I like the look of the finished figure and it doesn't look overly complex, even if the quality isn't top shelf. Unless these weird bootlegs sell for a mint, then I'd sell it, but I can't even find one of these specific kits for sale anywhere to judge the value. Fair. I don't think it'd go for much; the MC Model kits were always cheaper than the equivalent Bandai kits and I don't see any reason for the price to spike that much. If you're going in eyes-open you might even enjoy it.
|
|
#
?
Apr 9, 2020 09:41
|
|
|
Neddy Seagoon posted:Pro-tip; Use a toothpick. You can place really fidgety stickers carefully with them and roll the toothpick off to put stickers perfectly in place. Extra-Pro-tip: use some soapy water to set them in place. It gives you some time to move them around before it dries. https://www.youtube.com/watch?v=CEW2WEbW57w&t=594s
|
|
#
?
Apr 9, 2020 13:11
|
|


|
Thanks for the trip report!
|
|
#
?
Apr 9, 2020 13:16
|
|
|
Old Swerdlow posted:Looks great. For your panel line issues I know that a lot of aircraft modellers will rescribe the panel lines before primer and paint to make sure they are pronounced and deep enough. They were great as normal panel lines, but I think it's more that I suck at painting white and either overdid it or did it wrong. I still gotta git gud at rescribing; I have a panel scriber that does a good job and Dymo tape, but I've never gotten up the cojones to use it properly. I might try it on a less critical aircraft model from my backlog one of these days. I think I did on another kit that never made it to panel lining phase because Reasons, which I don't recall. Test hulk, I guess. Edit: anyone aware of places that sell Gunpla and AK Interactive 3rd generation acrylics? I wanna get me a Wodom Pod and some more of the paints, they're pretty darn interesting so far but USAGundamstore is the only one so far and I'm hesitant given how iffy they've been. MJP fucked around with this message at 15:14 on Apr 9, 2020 |
|
#
?
Apr 9, 2020 14:41
|
|
|
I have to admit I am tempted to just stop right here and leave RG Zeta like this Why does my iPhone take photos so big yet they look so terrible  EDIT: Actually? I may actually leave it like that, on account of having so much trouble trying to fit the collarbone piece without it coming apart completely. Whatever, I am dealing with this later. I am still waiting on my RG Eva and Crossbones. I hope those aren't as miserable as this. Its not the small parts, it is the feeling that things don't fit right. Unlucky7 fucked around with this message at 05:22 on Apr 10, 2020 |
|
#
?
Apr 10, 2020 03:38
|
|
|
P-Bandai US updated with four more kits for pre-order: MG Re-GZ Custom MG Tenneth A. Jung's GM Sniper Custom MG GN-X III (A-Laws Type) RE/100 Vigna-Zirah Interestingly, unlike the previous batch, these have a June delivery time rather than September. Unlucky7 posted:
I'm finishing up the RG Crossbones and it's pretty solid. One thing to watch out for is to make sure you plug the upper arm into the shoulder bit ALL THE WAY before moving it since it has a slotted peg. I nearly tore the peg off since it was juuuust barely not in all the way. It's such a tiny MS that the RG Unicorn's extended leg is as tall as it is. Applying water-slides to it has been tedious. Each wing/booster of the core fighter has 11 decals.
|
|
#
?
Apr 10, 2020 05:39
|
|


|
Okay I think I fixed it or at least got it partway there by reassembling some pieces but taking them apart was a challenge on its own. EDIT: Yeah I don�t think I have it right but I think I got it as good as it will get at this point Unlucky7 fucked around with this message at 08:26 on Apr 10, 2020 |
|
#
?
Apr 10, 2020 08:09
|
|
|
The RG Zeta is not fun to build or pose. I broke one of the ab pieces just trying to get it in place correctly.
|
|
#
?
Apr 10, 2020 18:23
|
|

|
I finished my entry for my local gunpla group's build off where everyone had to use a MG Ball kit. I kitbashed it with a bunch of stuff to create a Warhammer 40k Ork Morkanaut which was a ton of fun to do. You can check out the full imgur album here and I also wrote an article on the process here!     
|
|
#
?
Apr 10, 2020 19:38
|
|
|
|
| # ? May 24, 2024 17:28 |
|
|
That rules. Makes me wonder what i could cobble together with an MG ball out of spare parts I've got lying around.
|
|
#
?
Apr 10, 2020 19:46
|
|
