|
My experience is the sand is written off.
|
 #
?
Oct 20, 2020 17:23
#
?
Oct 20, 2020 17:23
|
|

|

|
| # ? May 27, 2024 10:06 |
|
|
Rapulum_Dei posted:My experience is the sand is written off. Does it fall apart from the heat of the pour or do you have to pound it out?
|
|
#
?
Oct 20, 2020 17:28
|
|


|
You have to chip it out, it�s closer to sandstone than sand. If you look at some of the early Sv seeker videos he makes his whole moulds from silicate sand. Edit: wish we had enough content to do a casting thread 
Rapulum_Dei fucked around with this message at 21:03 on Oct 20, 2020 |
|
#
?
Oct 20, 2020 21:00
|
|
|
Rapulum_Dei posted:
Be the change you want to see in the world.
|
|
#
?
Oct 20, 2020 21:11
|
|

|
Have any of you done plaster casting of aluminum? I don't have access to a kiln to more properly drive all the water out of the plaster cast so does anyone have any suggestions on going about it with an oxy acetylene torch? The primary issue along with that is that I will possibly only have one plaster mold so this needs to work. I want to make an aluminum cast of a paw print of my girlfriends sick and dying 17 year old cat so she has a sentimental keepsake separate from an urn of ashes. If the high temp of molten aluminum is a limiting factor, I could also buy some bismuth tin to cast with instead. I just already have good aluminum scrap for casting.
|
|
#
?
Oct 21, 2020 13:27
|
|

|
If you only have a single mold and are worried about failure, I would consider making copies with silicone rubber (try Smooth-On products) beforehand so you don't have to worry.
|
|
#
?
Oct 21, 2020 13:47
|
|


|
I've been using an old electric oven to drive the moisture out of the plaster but yes, 100% seconded on the silicone so there's room for error.
|
|
#
?
Oct 21, 2020 14:47
|
|

|
Yep, definitely make a mould. You could also try cold casting with a bronze filled resin, it looks really good when it works.
|
|
#
?
Oct 21, 2020 15:11
|
|
|
Got a bunch of old rusty parts that I decided to clean up and I'm here to sing the praises of citric acid in warm water. Attacks the rust without eating the base steel, not a super noxious fume, and it's (generally) safe for people. I still wore gloves because I know what happens when lemon juice finds a cut on your hand. Dump parts in there, let soak, don't worry about letting them go for too long, rinse, WD, oil. Now I have plenty of un-rusted quick change collets. Muriatic acid works but eats away at the steel. CLR works and I don't see it eating the base metal, but for the price of (1) 32 oz bottle, I bought 10 lbs of citric acid. Also, bonus, it takes mill scale off, too. (I know that's also technically rust, but, y'know)
|
|
#
?
Oct 21, 2020 17:36
|
|


|
+1 for making a silicone mould from the plaster master model, it'll let you make as many secondary positive models as you need with, for this application, involves negligible loss of fidelity/detail if done properly. It's a very handy technique that augments metal casting very well, and is basically a prerequisite if you ever want to do production runs or do batch casting of multiple parts in a single pour. Tips for working with silicone rubber as a mould tooling material, minding that I was taught by a theatre/film prop-maker and am not familiar with wider industry techniques: -I -think- a tin-cure product like Smooth-On's Mold-Max line is fine here and that you don't need to spring for platinum-cure but double-check this. consider looking for a thinner-pouring product that's advertised as not needing vacuum degassing, it'll help you get a better finish without specialized tools. - along with the RTV silicone itself, you will also need a range of disposable dixie cups and popsicle sticks for working with the silicone, vaseline as a release agent, a couple pounds of sulphur-free plasticine for casting into, some 1/2"ish plywood offcuts, and an accurate scale and/or disposable graduated measuring cups depending on if the silicone components are mixed by volume or weight - Cast a test part from a plaster master before using the actual paw impression, so you work out any kinks in the process with something that doesn't matter. - Sulphur-free plasticine is ideal for the 'blocking-up' of the mould- that is, how you make the container the silicone itself is cast into. Buy a couple pounds- make sure it's sulphur-free or it'll screw with the curing of some silicone rubbers!- and cut some 1/2" plywood up into die-sized-ish squares to use as the base. Use a wire cutter to chop it up into blocks and build up the sides of your tool mould on a sheet of plywood/masonite, blending the inner edges together to seal it tightly. this technique lets you build tooling to whatever dimensions you need and avoids most of the messiness of clean-up b/c nothing sticks to the plasticine. Also use vaseline over exposed surfaces to guarantee a clean release + decrease the odds of any contaminants in the sulphur loving up the silicone cure. -Set the model in a base plasticine layer over the wood; push the plasticine over the part edges to eliminate any undercuts that can trap air - Mixing and pouring the silicone is critical to getting good results. follow the directions closely and don't eyeball anything, and work in such a way that you're not pouring from container to container and losing product on the mixing cup sides. Combine the silicone components gradually and mix very well, don't leave any uncombined product on the sides/bottom. When you go to pour into the mould, pour onto a high point and let it flow into the rest of the mould on its own, don't move the cup around and don't try to pour it directly into voids- this avoids entrapping air and gets the best coverage - Plasticine also lets you make very good two-part conforming moulds by embedding your model part-way in a plasticine base to the part-line, pouring the first mould half, waiting for it to fully cure, removing the base plasticine, add vaseline over the first half to prevent new silicone from bonding to the old, and then pour the second mould half over the first. this isn't necessary for your application but it's really useful for creating duplicates of all kinds of 3d objects so it's worth playing with if you have the silicone to spare it's been a few years so double-check the above, but yeah, it's a very powerful and flexible technique that lets you duplicate virtually anything you can block up a tool for, and lets you do -real- mass production with surprisingly limited resources. For example, I was able to take a single set of 5 token models and with only a few 'duplication cycles' produced a huge 100-part mould that was used to directly cast pewter tokens 100 at a time, no machine tools or factory setting required, and the final products were almost indistinguishable from the starting masters.
|
|
#
?
Oct 21, 2020 18:47
|
|

|
2 more simple tips Mix more than you think you need. IF you mix too little do NOT try and quickly mix more and add it. Let what you have set and then add a fresh pour when it�s gone off.
|
|
#
?
Oct 21, 2020 20:39
|
|
|
That�s smart, yeah. I think my standard was to mix 110% of my final needed volume of silicone, so on top of any error-margins or to-be-safe fudging, and it never steered me wrong. Just prep a small simple for-fun mould at the same time you prep the real project, so you can make good use of any excess. Wrt the finickiness of individual batches and mixing: I�d go so far as to take notes for each batch with the exact weight of both components, even if the product is mixed volumetrically (tare the mixing cups out! i forgot this once!) and any process hiccups or experiments; a 1% variation in the ratio of B component used can completely ruin some formulations, so once you find a winning formula you will want to stick closely to it.
|
|
#
?
Oct 21, 2020 21:30
|
|
|
Thank you guys so much. All this information is really helpful and i'll definitely be going the silicone route. My issue with driving moisture out of the plaster is that i only have access to a strong torch to melt aluminum at work and theres no oven. I suppose i could more gradually heat it up by placing it on a block of aluminum or brass and aiming the torch at the metal block. Would an initial heat on the plaster in an oven at home make a worthwhile difference to drive some of the moisture out before a later heat with the torch during casting?
|
|
#
?
Oct 22, 2020 03:28
|
|
|
I think that's worth a try. I'd do some experiments with test pieces though, and obviously wear safety equipment when dealing with molten metal.
|
|
#
?
Oct 22, 2020 03:46
|
|
|
I think I�d take a look in local goodwill/charity shops for a ugly pewter thing. More weighty and ages better than aluminium.
|
|
#
?
Oct 22, 2020 08:13
|
|
|
I just did a little googling and apparently there is a smooth on product called Mold Max 60 designed for metal casting under 560F That entirely removes the issue of any moisture flash boiling in a plaster mold and exploding. Mold Max 60 is definitely the way to go if I use pewter.
|
|
#
?
Oct 22, 2020 10:27
|
|
|
If you're open to using pewter, you have a few more options for producing a simple open-backed casting by pressing the plaster casting into a reusable casting medium. Oilsand is cheap and easy to source but has a lousy surface finish; there's also a very fine-grained oilsand branded as "delft clay" that combines good surface finish with sand-type reusability. There's even "casting putties" like Babbitrite, but I wasn't super-impressed with it when I did a test casting with it, it's better used tor "damming" operations in the same way you use plasticine for blocking-up of silicone moulds
|
|
#
?
Oct 22, 2020 14:50
|
|
|
I know a guy that casts stuff out of aluminum, and he uses Bentonite for the molds. If there is a drilling company near you they'll probably sell you a bag. Only thing is they usually come on bags of 50lbs. THat might be too much if you're only casting the one thing. However, clumping cat litter is pretty much bentonite......
|
|
#
?
Oct 23, 2020 11:23
|
|


|
Edit: errr imgur sucks
|
|
#
?
Oct 29, 2020 22:37
|
|

|
An hour and a half of flux core mig has gotten me to this point https://twitter.com/rottentunagames/status/1322679905814020096?s=21 Gonna go get a tank of c25 next week and I guess start actually trying to make some stuff
|
|
#
?
Nov 1, 2020 00:23
|
|


|
Sockser posted:An hour and a half of flux core mig has gotten me to this point  yup, that's kinda the look. yup, that's kinda the look.Buy some plate and run some long beads. Get used to gun angle and travel speed. Change a setting, run another bead. Change your gun motion, run a bead. Repeat until you can make a consistent bead that has acceptable penetration. Beware your machine's duty cycle. And congrats on making the jump, welding is really useful in a ton of situations.
|
|
#
?
Nov 1, 2020 15:24
|
|


|
Alright so like, I�m mostly getting the hang of this Are there like... some standard learner projects to try my hand at to better my skills, rather than just randomly welding pieces of tubing together over and over https://twitter.com/rottentunagames/status/1323099444531892230?s=21
|
|
#
?
Nov 2, 2020 04:18
|
|
|
not really, holding the poo poo in place while you weld it is a whole other can of worms from just running beads. Do the boring thing and get the fundamentals down.
|
|
#
?
Nov 2, 2020 04:30
|
|

|
Sockser posted:Alright so like, I�m mostly getting the hang of this That being said, welding skills and fabrication skills aren�t the same. Getting good at welding doesn�t mean being good at fabrication-I�ve know very good welders who can barely read a tape measure. A cutting table or welding bench is a good place to start. Building a simple jig to keep parts square as you weld them is good practice. Weld opposite corners of a rectangle to minimize warping etc. Keeping things square and in place as you weld them is the hard part.
|
|
#
?
Nov 2, 2020 04:37
|
|
|
For straight learning: As mentioned above, weld a lot of lines. You're aiming for consistency of the bead and control of your puddle. Mess with different settings of heat and wire speed. There are charts and stuff but it's also very handy to be able to recognize common faults: too fast, too slow, too much/too little wire, running too much or too little current, etc. Practice with different materials. Tubing will take different setups then inch square bar or flatbar. Practice out how to weld different thicknesses. First time I did a weather vane I blew through the decorative part and the fletching when attaching them to the shaft of the arrow, since it was half square and they were sheet metal and I Weld a few basic joints and then cut (and etch if you have the ability). It's possible to make a weld that looks fine but doesn't actually have good structure. Take pictures and show us unground welds if you want analysis. I'm a fine enough welder for railings and such but I'm no pro and don't have a good eye to just look and tell you a weld is bad and why, but I'm sure we have some folks here who can do that. It was helpful when learning to have someone go over my shoulder and point out how I had set the weld up wrong and let me get better at self analyzing the process. For projects: I think a great introduction is a small bedside table or anything similar. Two feet tall, top is a foot square, do one stretcher somewhere to keep the legs together. Use a stick of half inch square or really anything similar, it's pretty cheap materials wise especially compared to tubing. Finish the top with wood or a tile or just some plate/sheet metal.  Real basic, no skill table (just pretend the forging is straight bar). Teaches you to account for material thickness, checking that something's square, tacking or compensating for a weld pulling angles in or out, and finally it's useful. Best of all, unless your welds just fall apart you can royally screw this up and still have a mostly functional piece at the end of this, it'll just be a bit wobbly or skewed. There's plenty of small household stuff like that you can do and it's more fun than burning lines (once you've run a lot of lines. Can't skip the practice). Fella I'm working with recently said it well: welding correctly is a skill, but learning how to lay a piece out and plan and assemble it is an equally important and totally distinct skill. E: lol at the two replies while I was writing this, everyone on the same page apparently. Normally you ask two smiths best way to do something you get three different answers threelemmings fucked around with this message at 23:57 on Nov 2, 2020 |
|
#
?
Nov 2, 2020 04:58
|
|
|
You want a practical "learning" project? Build a cart for your welder. Using your welder. Then report back to us. You can probably find some basic plans on the internets somewhere.
|
|
#
?
Nov 2, 2020 12:31
|
|
|
Welding cart, welding table, corner clamps, dog kennel, shelf/hanging basket brackets are all good starter projects.
|
|
#
?
Nov 2, 2020 20:51
|
|
|
Rapulum_Dei posted:Welding cart, welding table, corner clamps, dog kennel, shelf/hanging basket brackets are all good starter projects. Now that I think of it. The 'welder's handbook' by Richard Finch has some basic plans for some of these things. Not sure what edition is out these days. I think I have the fifth or so edition and I've had it for more than a decade. There might be one or two newer ones by now.
|
|
#
?
Nov 2, 2020 23:58
|
|
|
ran into this very clever printable design for a wire spool w integrated straightening "rollers", might come in useful to someone doing finer work: https://hackaday.io/project/163624-wire-spool-holder-with-straightener 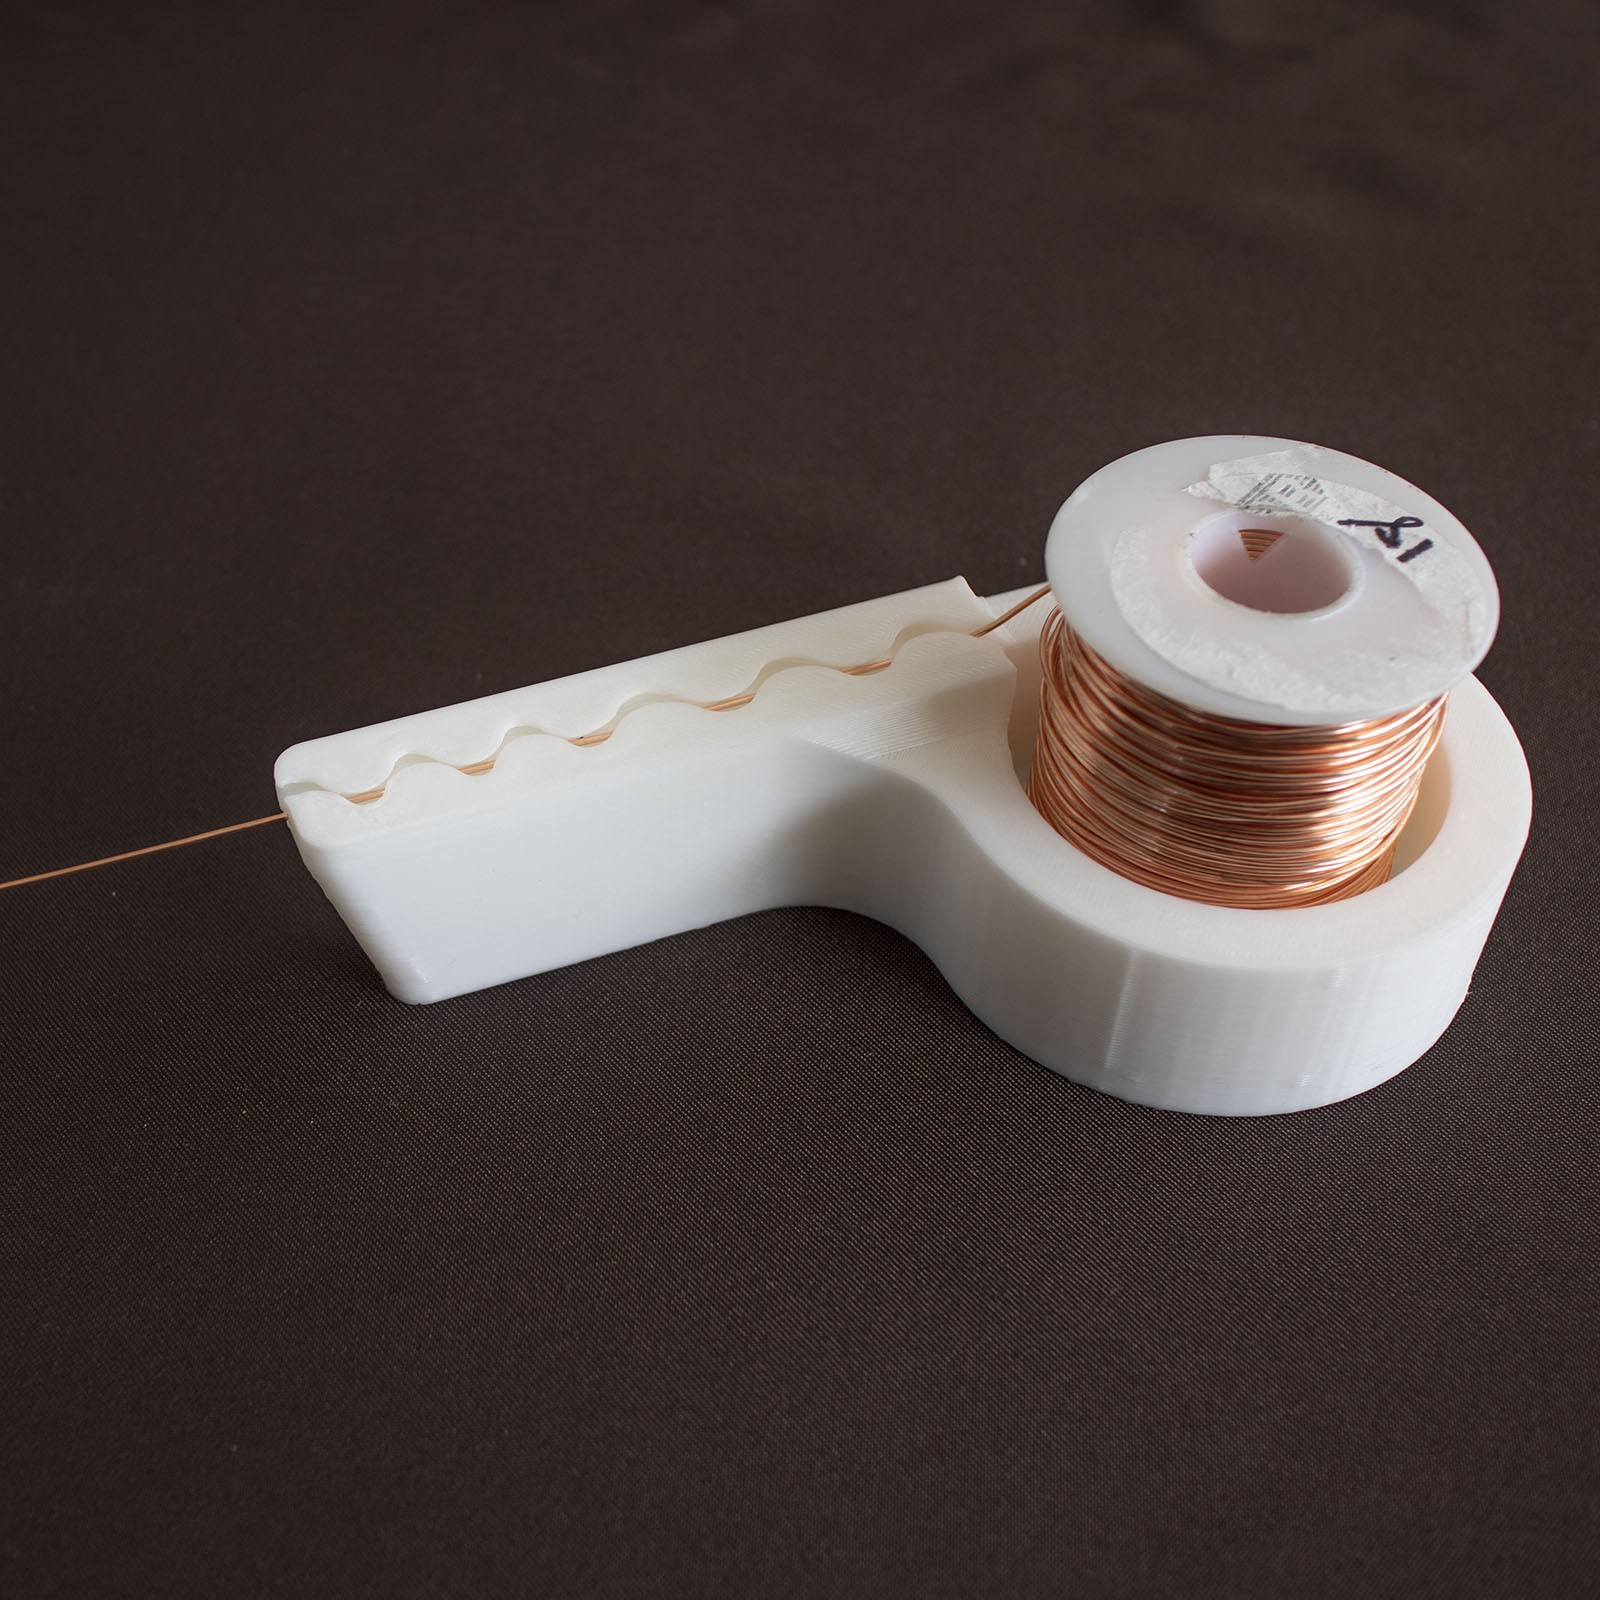 wire straightening without spending a couple hundred dollars is a big fiddly timesink and i still don't have a professional solution there despite doing a shitload of jewellery-scale wirework. if i were gonna do a production run using a lot of a specific wire profile in the future it might be worth exploring first Ambrose Burnside fucked around with this message at 22:42 on Nov 3, 2020 |
|
#
?
Nov 3, 2020 22:39
|
|
|
I agree with everything here, but I would like to add that holding things in place IS what welding is about, at least in my limited experience. I've spent the last two years working for a shoddily run ironworking company, fabricating and doing installs of everything from stairwells to railings. The guy who does the actual welding told me "If you are running your welder 20% of the time you are doing fantastic. In reality it's closer to 5%." Now, these guys had about as much professionalism as headless chickens, but based on what I saw from most of the other contracting crews, that's about average. Most of the time was spent laying things out and clamping them so they don't move, making sure it's square, level, plumb, and straight. Pick 3 ") The fab table is the same way, and having used a Build-Pro table, it's worth the investment if you're doing this for a living. We had projects that required subassemblies small enough to fit through a door, but then needed to be welded onsite. Hope everything was done right, because a 1" mistake on a 15' long truss is a big deal! The fab table is the same way, and having used a Build-Pro table, it's worth the investment if you're doing this for a living. We had projects that required subassemblies small enough to fit through a door, but then needed to be welded onsite. Hope everything was done right, because a 1" mistake on a 15' long truss is a big deal!Layout and surface prep are 90% of it. If those aren't right, nothing you do with the gun will matter. Yes, it's important to know how to do the actual welding, but I was initially surprised at how little time is spent making sparks.
|
|
#
?
Nov 5, 2020 14:05
|
|

|
Pagan posted:I agree with everything here, but I would like to add that holding things in place IS what welding is about, at least in my limited experience. My first job out of college was at a place that made frozen custard machines. We had a frame welder that was super professional, his jig plates were just beautiful. But even with that most of his day was spent on layout and then wham-bam there was a perfect frame. The TIG guys though, that was almost non-stop welding and dyna-filing of stainless steel. When I design big assemblies I always put in adjustable sections that can be fit on site, or just things that make me not look like "that" engineer. We'd test machines and I'd fill up 55 gallon drums with flavorless custard. It ruined my enjoyment of custard from ever on.
|
|
#
?
Nov 5, 2020 14:51
|
|
|
Pagan posted:I agree with everything here, but I would like to add that holding things in place IS what welding is about, at least in my limited experience.
|
|
#
?
Nov 5, 2020 15:13
|
|
|
Pagan posted:I agree with everything here, but I would like to add that holding things in place IS what welding is about, at least in my limited experience. I think that's exactly why we all hit on it, most new learners or dabblers don't even realize that is in the skillset so it's got to be said as they enter the fold. Think of youtube, if you watch it and learn about welding, basically all of it is solely about control of the stick/gun, and a lot of stuff in real life is similar, including the community college here. I've been thinking about that table as a basic class at the place I've been teaching at a few times a week exactly for that reason, people come in thinking they can weld a little, bit if you ask them to make something apparently the results are iffy, no matter how good they are at laying a straight bead. Also as mentioned it depends on the job, doing rails and suchlike is a lot of fiddling and little bursts of weld, but apparently in large industrial welding like pipes, ships, and vessels there's a lot more just running and layering beads, so you do occasionally get some amazing welders that apparently have a harder time putting together rails suchlike since there's a lot of small little layout traps that will bite you when it comes to install. threelemmings fucked around with this message at 15:34 on Nov 5, 2020 |
|
#
?
Nov 5, 2020 15:29
|
|
|
So the guy at work who normally deals with raw stock and the band saws was out for a week. The guy who had to pick up the slack.... 
|
|
#
?
Nov 5, 2020 22:46
|
|

|
Looks fine to me
|
|
#
?
Nov 5, 2020 22:55
|
|
|
honda whisperer posted:So the guy at work who normally deals with raw stock and the band saws was out for a week. He's just saving you time on shimming, with that stair step cut.
|
|
#
?
Nov 6, 2020 01:58
|
|
|
threelemmings posted:I think that's exactly why we all hit on it, most new learners or dabblers don't even realize that is in the skillset so it's got to be said as they enter the fold. Think of youtube, if you watch it and learn about welding, basically all of it is solely about control of the stick/gun, and a lot of stuff in real life is similar, including the community college here. I've been thinking about that table as a basic class at the place I've been teaching at a few times a week exactly for that reason, people come in thinking they can weld a little, bit if you ask them to make something apparently the results are iffy, no matter how good they are at laying a straight bead. Excellent points. I'm an okay welder. I just look like I know what I'm doing because I've learned to spend a little more time on that layout step. As for the second point, that's good to hear. As someone who used to be in charge of things like scheduling and payroll, I had some real, um... questions about how this company ran things. It seems pretty dumb to have the one guy who charges the most, have him put down the welder and hold a spirit level while the laborers stand back and watch. At scale, that would lose a ton of money. Makes sense that bigger, better run places take advantage of their specialized labor.
|
|
#
?
Nov 6, 2020 02:04
|
|
|
You�re describing a welder vs a fabricator I would have said.
|
|
#
?
Nov 6, 2020 21:12
|
|
|
Hiya, I've been taking welding this semester of college and poo poo owns. I want to get a flux core wire welder just for babbys first home welder. A flux core looks like it might be the best bet for a simple garage setup I think.. I'm definitely hooked on this. Earlier this week I banged out a valveless pulse jet on the TIG welder. Welds look like rear end from a butt, but the thing works!   I love my loud farting tube baby. I'm not sure if imgur kept the sound actually.
|
|
#
?
Nov 6, 2020 22:06
|
|


|

|
| # ? May 27, 2024 10:06 |
|
|
 This axe us about 50-70 years old. It's a Keesteel 3 1/2lb My dad's dad owned it when he was younger and it has basically sat to rust in a shed for at least 10+ years. I posted earlier after the electrolysis bath I gave it but I finally got my act together and cleaned it up. Just put some renwax on it and now I need to build a handle McSpergin fucked around with this message at 08:33 on Nov 11, 2020 |
|
#
?
Nov 11, 2020 08:29
|
|