|
Austrian Infantry army attacks the Lines of Torres Vedras League of Ancients January 2021 Field of Glory Napoleonic tournament. Battle #2  Wellington looks toward the Austrian Army, and places his battalions with care. One of the redoubts with Portuguese Militia is to his right. Following his first failed attempt to breach the first line of TORRES VEDRAS in SOUTHERN PORTUGAL before nightfall, EMPEROR NAPOLEON has sent one of his Marshall's forward with a large AUSTRIAN CORPS of infantry, cavalry and artillery to attack elsewhere on the line. The VISCOUNT LORD WELLINGTON has placed his defenses on top of two hills and entrenched his troops to defend a road that leads towards LISBON. Will the huge mass of Austrian infantry overwhelm the thin red line on the ridge, or can the British IMPETUOUS HUSSAR LIGHT BRIGADE lead a charge to GLORY or be a charge to their armies DOOM....  Looking north from the hill with the two redoubts, towards the Austrian lines. The battlefield was centered on two redoubts built as part of the Lines of Torres Vedras, north of Lisbon. Napoleon could not remove the last English army from the continent until it was taken. Portuguese Militia occupied the left western one, Portuguese Line Infantry the right eastern one. To the north west was a small farm, and to the direct west a small village. Both area's had been fortified into strong-points as part of the defence line. A large vineyard was to the rear of the hill, and was very difficult terrain to cross. Cavalry and artillery would find it near impossible to move through towards the defenders line of communication if they approached it from the east. A small rough field was to it's north, and a small rise and forest were near the Austrian army form-up area. Several roads crossed the area.Intelligence indicated that the Austrian army would be attempting an ENVELOPMENT attack on one or both flanks.  The Anglo-Portuguese (with Spanish, German and Scottish troops) formed up early. The Allied army deployed in a longer than normal arc. A lack of a river to defend one flank was thought to be a mistake, but at least the vineyard covered one flank, and the western village the other. I decided to defend the left side with the LIGHT DIVISION as it was my most vulnerable, and the strong-points were on that side. The FIRST DIVISION defended hill redoubts and stayed hidden on the reverse slope of the hill. The CAVALRY DIVISION was in reserve, south of the east-west road and close to the LINE OF COMMUNICATION.  The famed LIGHT DIVISION defends the left flank. The Light Division was conceived as the flanking unit of the army. While the first division would HOLD the enemy, the Light Division would attack on the flank and use the movement and firepower to cause damage. This was the first battle I've played where that plan actually worked....Spanish Guerrillas occupied the western town. The strong-point to the north was defended by the Loyal Lustrian Legion with it's attached artillery battery. Between the two fortified building areas the 95th Rifle's were in extended line. The Division reserve was a superior elan Highlander infantry unit with skirmish attachment. If the enemy attempted to envelope my left flank, the light troops would hold them off in the strong-points while the cavalry would come to their support. 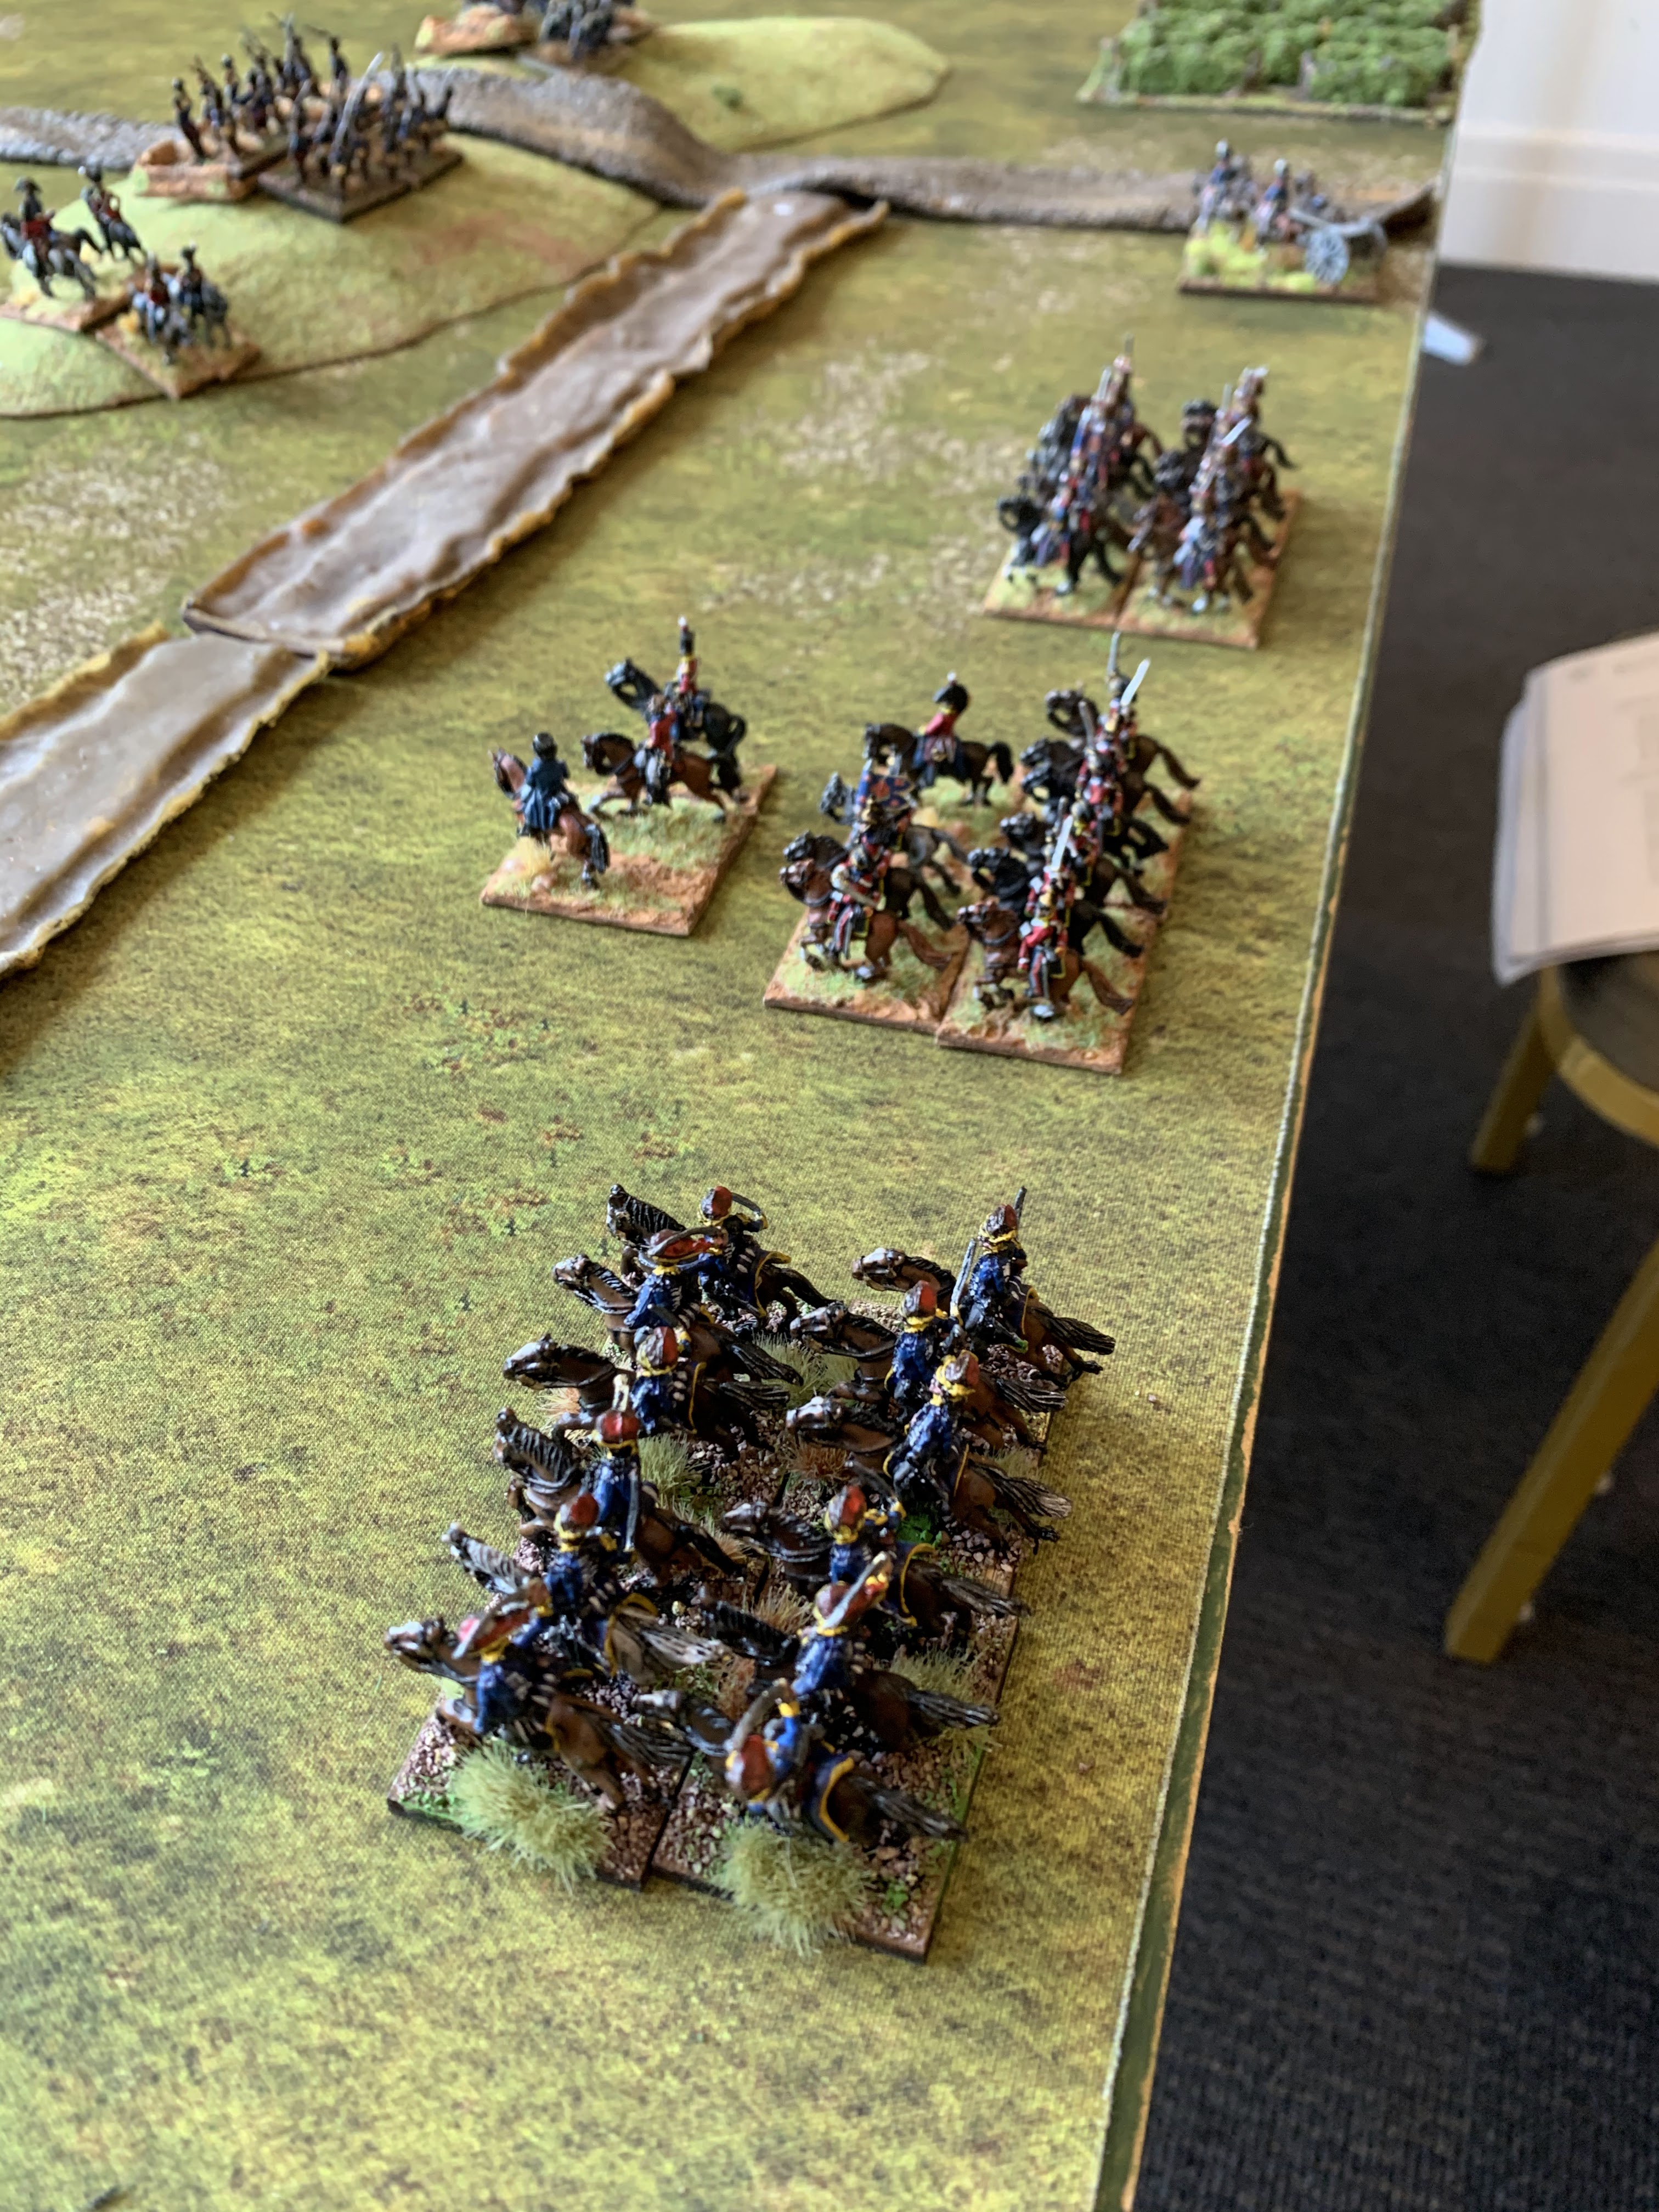 The Calvary division in reserve. The Cavalry division was made of a unit of IMPETUOUS BRITISH HUSSAR'S to the west (closest to camera), a unit of IMPETUOUS HEAVY DRAGOONS and a unit of (poor) Portuguese Dragoons (furthest from the camera).  The Line of Torres Vedras redoubts covered the road juncture and line of communications. A Portuguese Militia unit held the left side, and a Portuguese Line infantry unit the right. The other units of the division, remained hidden on the reverse slope of the hill.  Lord Wellington stands on the hill waiting for the attacking corps to arrive Placing the Corps commander on the hill tactically didn't make much sense,. but it was THEMATICALLY IMPORTANT DAMMIT. So starting on the hill in full view of the enemy he did.  THREE Austrian Divisions move forward. Three Austrian divisions moved onto the battlefield. A small cavalry division guarded the western flank. Two infantry divisions advanced together in Austrian Doctrine, in one solid block.  Austrian Heavy and Light Cavalry. The left unit was a SHOCK HEAVY CAVALRY Brigade, with attached Brigade Commander AND Horse Artillery battery, making it the most powerful unit on the battlefield. The gun battery made it superior to my own SHOCK HEAVY DRAGOON unit. The Hussar unit was not as good as the British Hussars from Bad Cav Island, but were not IMPETUOUS.  Middle Austrian Infantry Division The smaller infantry division had attached artillery and skirmishers, but was UNREFORMED, meaning they had no inbuilt light infantry companies in the battalions and attacked in slow lines, rather than the French thought of attacking in faster column. Therefore, they had a large drop in firepower compared to British and Portuguese Line units with their dedicated light companies and attacked light battalions firing in two lines instead of three.  The larger Eastern Infantry Division The right flank Austrian infantry division was larger, and I suspected the Austrian envelopment division would be coming to support it on my far right flank, probably with a lot of cavalry.  The Austrian camp and line of communication I was highly unlikely to be able to reach it, though the Spanish Guerrillas would like to think they could have made it.  With the Austrians deployed, the reminder of the FIRST DIVISION is reveled behind the hill. It was made up of two large Infantry Brigades with attached artillery batteries and light infantry companies. A third smaller unit of Highlanders with superior elan was the division reserve.  As the Austrians advance, the allied army moves to refuse the flank and block the gap between the redoubt and vineyard. I suspected the last enemy division would be coming to my right flank, so moved the cavalry and light division up to attempt to flank the attacking enemy, while the First Division would hold the hill with the Portuguese dragoons in support.  The redoubt militia in top hats look towards the advancing Austrian Infantry.  THE CAVALRY ARRIVES As expected, but sooner THAN expected (they arrived the first turn they could), a large Austrian SECOND CAVALRY DIVISION appeared on my far right flank.They were obviously going to attack my Line of Communication.  The Infantry attack gets into position. As they approached the eastern redoubt, the Austrian infantry split up and moved towards the base of the hill. They did NOT move to directly assault the hill...which vs British Trained Infantry on a ridge line...was probably not the best battle plan. I believe the Austrian general had never actually attempted to attack British troops on a ridge line.  The East Cavalry Division advances to match the infantry line.  The Austrians pause to firm up their line of battle. The Vineyard now showed it's use. It served to completely block the enemy cavalry from getting behind my lines, and the infantry between it and the redoubt could form in DEEP TACTICAL FORMATION and be very difficult to force out. And the Austrian shooting was going to be less powerful vs British Line with artillery and skirmish attachments...  The Allied army forms a Hinge. With good terrain to fight on, I moved the Light Division and cavalry to positions to flank the enemy Corps. The Highlander units moved to fill in the gaps with the Portuguese dragoons as the final reserve for the defence line.  The Unreformed Austrians attempt to win a firefight with British trained infantry and light infantry backed up by artillery. At this point, two infantry divisions were attempting to engage a Highlander unit between the two redoubts, the Portuguese in the redoubt and two large British infantry brigades on the hill. Those of you who know your history, can foresee how this will turn out for the Austrian's. The Austrian's should have moved to close range as soon as they could, a lesson they would learn too late. In front of the left most redoubt, the IMPETUOUS HEAVY DRAGOONS moved to a position to charge the Austrian left cavalry division. The IMPETUOUS BRITISH HUSSARS were behind them, with the Rifle Brigade in a position to support the Highlanders.  CHARGE!!!!!!!!!!!!!!!!!! The IMPETUOUS HEAVY DRAGOONS charged and were themselves intercepted and counter-charged by the Austrian HEAVY SHOCK CAVALRY.  The right flank Austrian Cavalry is stuck between a hard redoubt and rocky vineyard. On the far right flank, the enemy infantry attack was getting nowhere. Out shot by British trained infantry and not able to maneuver between the redoubt and vineyard, they were unwilling to get closer.. The cavalry that did to get close fell back after taking damage from British muskets and artillery.  As the heavy cavalry fight, the infantry decide attacking the hill is not a idea they wish to partake in.  The Heavy Cavalry fight is a draw. Despite the horse artillery battery in support, the fight between the two heavy cavalry units ended in a draw. Both units were wavering and spent. The Austrian light cavalry brigade to the north east, sensed the British weakness and prepared to charge. The Spanish irregulars were moving into a position to be behind the Austrian army and were now behind the enemy heavy cavalry.  Approaching the decisive moment of the battle! On the left, the Austrian Hussars charged the spent British Dragoons, weakened from their previous fight. In the centre and right, the Austrian infantry and cavalry was disrupted and out of order from the British fire and shells coming down the hill.  Get in close range went the cry! The Austrian infantry finally got close to the allied line to engage at close range, as the British Dragoons are charged by the Austrian Hussars on the left. However, the attacking infantry is still being disrupted by the gunfire coming out of the redoubt and down the ridge line. The Allied army is barley impacted beyond the spent and tried dragoon brigade.  THE DECISIVE MOMENT HAS ARRIVED. HUZZAH! The Highlander unit on the road took too many causality's and broke as did the Heavy Dragoons. However, only the Rifle brigade was somewhat rattled and fell back. Every other unit passed their tests. The IMPETUOUS BRITISH HUSSAR'S then charged the Austrian light cavalry in the flank. Tired and weakened from their fight with the Dragoons, they broke.And ran into the next Austrian unit. Who saw their fellow cavalry routed, and routed too. Into the next unit. And the next. And the next. A FAILURE CASCADE ripped through three divisions of troops.  RUN! RUN FOR YOUR LIVES! THE BRITISH HUSSAR'S ARE COMING! The result was that 5 enemy brigades disintegrated and the remaining units were all disrupted from seeing the rest of the army fall apart  The victorious IMPETUOUS BRITISH HUSSAR'S observe the results of their charge. With so many units broken and routed, and only 2 allied units destroyed, the battle was over. Anglo-Portuguese DECISIVE VICTORY The is the first and so far only battle I've fought were all the divisions did exactly what they were designed to do. The First Division held the pinned the enemy, while the Light division flanked and the cavalry committed the decisive charge at the hinge of the enemy using the carefully husbanded reserves, to archive a decisive victory and the enemy army destroy for minimal (though not zero) causalities.The unreformed Austrians, despite having attached skirmishers and artillery didn't have the firepower to match the British infantry units on the hill. They would have better luck I think attacking on my left where I didn't have the redoubt and hill, and attacking the strong point would use their numbers better. If nothing else, charging up the hill as soon as possible.  Final score card 21 to 4. Comstar fucked around with this message at 23:31 on Jan 19, 2021 |
 #
?
Jan 19, 2021 22:56
#
?
Jan 19, 2021 22:56
|
|


|

|
| # ? May 9, 2024 22:54 |
|
|
Comstar posted:They're...really long though. With a lot of pictures. I don't want to overwhelm the thread. If no one minds (check the blog to see the length of it) and someone else asks for it, I'll post it here. Draw and quarter anyone who complains.
|
|
#
?
Jan 19, 2021 23:07
|
|

|
I�m just glad someone�s playing an actual game
|
|
#
?
Jan 21, 2021 21:04
|
|


|
Wargaming vicariously through others as my country perishes in a plague.
|
|
#
?
Jan 21, 2021 21:06
|
|


|
 Beware of doxxing... Drismam? Historicals: Wargaming vicariously through others as my country perishes in a plague.
|
|
#
?
Jan 22, 2021 09:06
|
|
|
Class Warcraft posted:Wargaming vicariously through others as my country perishes in a plague.
|
|
#
?
Jan 22, 2021 09:22
|
|
|
Tias posted:Beware of doxxing... Drismam? What? Is posting the somewhat illegible score card a bad thing now? quote:Historicals: Wargaming vicariously through others as my country perishes in a plague. I'm wondering how long it will be for someone kickstarts a wargame to see if you change history and take the Capital building or have Whatif's of what happens when different National Guard units decide to intervene on different sides. I really need to finish my game of Pandemic Season 1 that was...paused by the Pandemic. We never did find out what happened. Anyways, we all wore masks. The restriction was lifted the next day. Next Tournament will be in March. This was the replacement for the one that usually runs at Cancon in Canberra over  . The Austrian's attempt a 2nd time to break through the The Lines of Torres Vedras. . The Austrian's attempt a 2nd time to break through the The Lines of Torres Vedras.
|
|
#
?
Jan 22, 2021 10:19
|
|
|
So I went ahead and backed the "March to Hell: Rome" Kickstarter, which has 3d printable stuff for both 28mm and 15mm Romans and various opposition (I believe Britannia and Germania, off the top of my head). I've never dabbled in ancient history wargaming before, so I was wondering what rulesets you nice goons ITT would recommend for both scales. I've heard of Hail Caesar by Warlord and Infamy! Infamy! by 2FL, but I thought I'd ask you all and see what other ones might be out there.
|
|
#
?
Jan 22, 2021 16:31
|
|

|
Sydney Bottocks posted:So I went ahead and backed the "March to Hell: Rome" Kickstarter, which has 3d printable stuff for both 28mm and 15mm Romans and various opposition (I believe Britannia and Germania, off the top of my head). I've never dabbled in ancient history wargaming before, so I was wondering what rulesets you nice goons ITT would recommend for both scales. I've heard of Hail Caesar by Warlord and Infamy! Infamy! by 2FL, but I thought I'd ask you all and see what other ones might be out there. I backed this as well. I've read through the rulebooks for Hail Caesar and SPQR and wasn't particularly impressed with either. So basically, I'm in the same boat.
|
|
#
?
Jan 23, 2021 00:41
|
|
|
I've got the infamy ruleset, seems good for a larger skirmish. There's good goonhammer review: https://www.goonhammer.com/goonhammer-historicals-review-infamy-infamy/
|
|
#
?
Jan 23, 2021 01:15
|
|
|
I picked up a bunch of 6mm Romans and Gauls to put together a couple To The Strongest armies. Also I threw in a British Nappy army and a French Nappy army while I was at it (both 6mm). No idea what I'll do with those!
|
|
#
?
Jan 23, 2021 01:41
|
|

|
Apologies for the bad formatting - trying to convert blogger code to bbcode is a bit of a nightmare this time for some reason. Reading the battle on https://comstarshistoricalwargames.blogspot.com/2021/01/the-third-attack-on-lines-of-torres.html my blog might be easier. The third attack on the Lines of Torres Vedras (LoA Tournament game #3, Jan 2021) Following his second failure to break through the LINES OF TORRES VEDRAS, the EMPEROR of France, NAPOLEON, has launched a third assault to break the ANGLO-PORTUGUESE army and complete his CONQUEST of EUROPE. Losing patience with the repeated FAILURE of the subservient allies of Russia and Austria, The Emperor commits a full Corps of FRENCH infantry to launch a PROBING attack to discover a weak point in the defenders line. Will the mass of SUPERIOR infantry, HEAVY artillery and OUTNUMBERING cavalry break the lines this time, or will the outnumbered defenders continue to HOLD THE LINES OF TORRES VEDRAS...  Viscount Wellington with his ADC's and staff, observes the French advance guard from a ridge line. Viscount Wellington with his ADC's and staff, observes the French advance guard from a ridge line.In my third game of the League of Ancients January 2021 Field of Glory Tournament, I faced a French 1805-07 army lead by Paul Graham, who was also at his first tournament. Despite playing less games, he was much more familiar with the rules and was able to correct and help me with them several times. My apologies for getting so many wrong. [timg]https://1.bp.blogspot.com/-axwoMZP7xY4/YA6pBisDkuI/AAAAAAAAJys/sq8akmwUyEUDNVf82gks382uArSwJkJgwCPcBGAsYHg/s4032/IMG_6229.HEIC][/timg]The Battlefield, facing North. The town of Torres Vedras is in the south east corner. Two small ridge lines acted as the line of defence for the allied army. Two rough and very difficult to move through forests lay to the north. Two steep hills were north of the town. A river running low circled the town but was fordable in most places. The main road ran north-south. [timg]https://1.bp.blogspot.com/-wfFVq_G6d5c/YA6pBkvGU2I/AAAAAAAAJys/JL_KEXnLFBopgCpHldhC5TjAR8CDzBeHACPcBGAsYHg/s4032/IMG_6230.HEIC][/timg]The town of Torres Vedras, looking North West. [timg]https://upload.wikimedia.org/wikipedia/commons/e/e7/Lines_of_Torres_Vedras.jpg][/timg]The location of the battle, and the area of the previous two. The attacks had so far failed to penetrate past the first line. [timg]https://1.bp.blogspot.com/-u9MtvHrGMuM/YA6pBmY-TNI/AAAAAAAAJys/roSsTkiKRhkxbZkC3Of1QzmFCNTJPkPogCPcBGAsYHg/s4032/IMG_6232.HEIC][/timg]The Allied army deploys into the defence line as the French vanguard approaches. I gave serious consideration to just deploying my entire army behind the bank of the river but decided it would leave my line of communication to exposed on the road, even if would be defended by two redoubts and covered by flanking fire. I could have given up the town and not split my army up, but following my experiencing vs Richard's Russians where I had done that and lost the bridge without fighting for it, I decided to put my Light Division on that side of the river. With all but 1 unit as light troops, they could cross it if needed. The first division held the centre, and the cavalry division on the left to hold that side. I expected to be outgunned again so stayed behind the ridges. [timg]https://1.bp.blogspot.com/-gs4AypiAJ9c/YA6pBi8QzkI/AAAAAAAAJys/N7ymu5W0znEczSMz6eLzxceZJfmAkm2_QCPcBGAsYHg/s4032/IMG_6233.HEIC][/timg] The First Division holds the centre. I placed the two redoubts on either side of the main ridge. The Portuguese conscripts on the left, the Portuguese line infantry on the right on the road to the LoC. Behind the ridge were two large British infantry brigades with attached skirmish and artillery batteries, and the division reserve Highlander brigade with superior elan. Again, I did something stupid but it just looked right, and put the Corps Command right on the hill facing the enemy. [timg]https://1.bp.blogspot.com/-5n6HXD9lKFs/YA6pBimVdGI/AAAAAAAAJys/YskMlF0-vvUWAjDu8VGFqwv6P1vSKXzjwCPcBGAsYHg/s4032/IMG_6234.HEIC][/timg]The actual town of Torres Vedras. The Light Division held the town. The Loyal Lustrian Legion with an artillery battery on the river corner, the 95th Rifle brigade the bridge. Behind them was the division reserve Highlander brigade with superior elan and the Spanish irregular guerrillas occupying the town. I didn't really need to put the irregular's IN the town, but it seemed the right place to put them. I probably should have put them in FRONT of the bridge, as they were the only unit I had that can move out of my deployment zone. In fact I now think I should have put them on my far left flank and moved them into the forest there. My handling of the these troops has been poor all tournament. [timg]https://1.bp.blogspot.com/-dTfkIxekQU8/YA6pBmXJVII/AAAAAAAAJys/VumysGRgwzEQicuJFwYGK_vEzP5-8So2QCPcBGAsYHg/s4032/IMG_6235.HEIC][/timg]The Cavalry Division in brigade formation. This time I remembered to put all the cavalry in one brigade formation for ease of movement. What I still should have done is put the heavy Dragoons with their own brigade commander off by themselves and had the division commander move the light cavalry units separately. [timg]https://1.bp.blogspot.com/-bpDUUwN0WHk/YA6pBvjKvoI/AAAAAAAAJys/3jzzMhKSsJguEDesyBqstbsopjQ70KmpQCPcBGAsYHg/s4032/IMG_6236.HEIC][/timg]Watching and waiting for the French assault. Corps Command started on the hill again. Wellington did this deliberately several times in real history and it actually worked to slow or prevent a French assault! French Marshal's had a complex about seeing Wellington on a hill and assumed his entire army would be lurking behind it every time. [timg]https://1.bp.blogspot.com/-TDlHRVnhDZo/YA6pBqUd4-I/AAAAAAAAJys/_ZoV6Ifyao8sGb6wNM1D7EMuagltlQCYQCPcBGAsYHg/s4032/IMG_6238.HEIC][/timg]The French vanguard deploys into line. Seeing my army laid out for them, the French clearly decided to attack my centre. They had to go around the forest to do it. On the left side is a heavy artillery brigade, a large infantry unit with cavalry and artillery battery, a small unit with the same support and a dismounted dragoon unit. On the right is a light infantry brigade, a line infantry unit with artillery (and both with cavalry detachments) and a light cavalry unit. The amount of cavalry the French had as attachments and in mixed divisions meant my skirmishers would be useless as medium range, and the heavy artillery was designed to destroy my redoubts! [timg]https://1.bp.blogspot.com/-ZaHkQ9IHu4k/YA6pBsco8DI/AAAAAAAAJys/z1FUL6DM2csPuYlKqXah3rJGBSkGVpa1ACPcBGAsYHg/s4032/IMG_6239.HEIC][/timg]The French 1st Division [timg]https://1.bp.blogspot.com/-bBeAo4Tan8s/YA6pBkXnA3I/AAAAAAAAJys/RHX8b5pHYqQR9zXPygx1H9HzVsf4n2UNQCPcBGAsYHg/s4032/IMG_6240.HEIC][/timg]The Advance Guard division. [timg]https://1.bp.blogspot.com/--5cq1DSMF9M/YA6pBp3F9uI/AAAAAAAAJys/unBK16P0k_gdLJC0l6AI_7gJBiuQTFh_gCPcBGAsYHg/s4032/IMG_6242.HEIC][/timg]The Portuguese conscripts nervously watch the French Heavy Artillery to their north. [timg]https://1.bp.blogspot.com/-YC2MvQccXuE/YA6pBhMowHI/AAAAAAAAJys/ckTmSO2CQsMjH9HGA-oDd7PB2YG3Lal5wCPcBGAsYHg/s4032/IMG_6245.HEIC][/timg]As the French line advances, the British cavalry move forward, and the Highlander unit moves to cover the flank of the redoubt. I had two divisions baring down on 3 infantry brigades. I needed to break up or slow down the left one. [timg]https://1.bp.blogspot.com/-2CU5sJ59osY/YA6pBmvUzpI/AAAAAAAAJys/1vLbAYSi21wWYTxeDWpxWHLnjLGB8SoJACPcBGAsYHg/s4032/IMG_6246.HEIC][/timg]The Light Division reserve prepares to cross the river. A French cavalry unit guards their own flank. I knew there were two more divisions of enemy troops coming,, and I thought they might go for the town, so I didn't move out of it. Memories of losing the 95th Rifles to a charging cavalry unit made me cautious. I decided to use the Guerrillas across the river, and send the Highlander reserve brigade tro support the redoubt. [timg]https://1.bp.blogspot.com/-twykJKlWClw/YA6pBkFArpI/AAAAAAAAJys/jNYj4BWltMkTaFSjxNLO3RrYm6Sl1zu-gCPcBGAsYHg/s4032/IMG_6247.HEIC][/timg]The Allied cavalry division watches the advancing French. [timg]https://1.bp.blogspot.com/-WFWrWmc3meM/YA6pBpSSF6I/AAAAAAAAJys/pSPtTFemZlEupibWgWWJkN6G9ndOBrrHACPcBGAsYHg/s4032/IMG_6248.HEIC][/timg]The 1st Division moves to it's firing positions. [timg]https://1.bp.blogspot.com/-SrWFhG51fyc/YA6pBnCxQJI/AAAAAAAAJys/LRZ5PJLpKQQNZHtn3l7imvwYmm0C-pAiwCPcBGAsYHg/s4032/IMG_6249.HEIC][/timg]The two French divisions prepare to attack the line. The Heavy Artillery unit deploys and prepares to fire on the redoubt. The French were clearly aiming for my left flank and the conscript unit inside the western redoubt. Their cavalry on the right hang back to cover their flank. The heavy artillery spent the entire game trying to ploy forward and failing every time. [timg]https://1.bp.blogspot.com/-0z7DhpBLgzg/YA6pBhC8CTI/AAAAAAAAJys/pr_gbRoeCW8Jo1wQJJQ9f2kOGw7iJz6NwCPcBGAsYHg/s4032/IMG_6250.HEIC][/timg]The allied cavalry splits up. The IMPETUOUS HUSSARS move to the left to perhaps get behind the French line. The heavy Dragoons and Portuguese Dragoons prepare to cover the flank. I was thinking I MIGHT be able to get the Hussar's through the forest and headed to cut his Line of Communication. It forced his infantry to go into square and slowed down his attack. [timg]https://1.bp.blogspot.com/-Enfe0r-q3Ds/YA6pBjKwgHI/AAAAAAAAJys/B4vnz2sfuSACeRKb5UALq_XBH2j-6NKSACPcBGAsYHg/s4032/IMG_6251.HEIC][/timg]The French infantry move to attack the ridge line while the heavy artillery bombards the western redoubt. I think he needed to wait for reinforcements here- he had 2 small units facing two large ones of mine. [timg]https://1.bp.blogspot.com/-YN8WunhijvY/YA6pBkd1oTI/AAAAAAAAJys/66Z7zxCRYKImLth9_egFhv8EbkP-tpUngCPcBGAsYHg/s4032/IMG_6252.HEIC][/timg]The Spanish Irregulars cross the river. This was also maybe to get nearer his Line of Communication. The irregulars can move backward as fast as they go forward, so could always come back if needed. [timg]https://1.bp.blogspot.com/-iDHWQR0yxMU/YA6pBrPwZ9I/AAAAAAAAJys/4R_2NZaNQeI92t6cm7igzRFledYWxeQ-ACPcBGAsYHg/s4032/IMG_6253.HEIC][/timg]The Heavy Artillery rattles the Portuguese Conscripts. [timg]https://1.bp.blogspot.com/-AHLE1ahkoNw/YA6pBiUVfNI/AAAAAAAAJys/1WONle5uYz4g8emSJNnS2KioRvljiUNhQCPcBGAsYHg/s4032/IMG_6254.HEIC][/timg]The French Vanguard advances closer, covered by artillery and cavalry. The enemy attack that was so powerful is breaking up into small advances. Neither side has the strength to push an attack. [timg]https://1.bp.blogspot.com/-YI46fnsAOjQ/YA6pBnI6fNI/AAAAAAAAJys/UhX8VpOKpjAeJj3jHC-7RP6gyvIbA2TawCPcBGAsYHg/s4032/IMG_6255.HEIC][/timg]The first wave of French reserves arrive down the main highway. Two infantry units and another cavalry unit. I needed to see where these guys would go before committing anything. I guessed they were headed for the other redoubt. [timg]https://1.bp.blogspot.com/-KnGXLFg2V7s/YA6pBpeRFrI/AAAAAAAAJys/WONDmrS-6OwOJj5iFAtdNnRcy3JAvV-egCPcBGAsYHg/s4032/IMG_6256.HEIC][/timg]French artillery fire and skirmishers fail to cause many causalities but do prevent the British infantry from moving their artillery on top of the ridge line. I was getting more disrupted, but I was VERY lucky with the conscripts- needing a 5+ and being forced to re-roll 6's they held on! Also I'd moved by Portuguese Dragoons into a position to hit his vanguard unit in the flank. I don't know why his other unit to the top left didn't advance faster. [timg]https://1.bp.blogspot.com/-RLsH9IImtdc/YA6pBrtCd3I/AAAAAAAAJys/l5riEd9yvxU_vs47QLTXt0qU5qEAT3F-gCPcBGAsYHg/s4032/IMG_6257.HEIC][/timg]The IMPETUOUS BRITISH HUSSARS move to try and get behind the French lines, forcing their flank guard to form square and cease their advance. This may be why. He's been forced to put a flank into square, and I could in theory hit the large unit IN the flank with the Hussar's. [timg]https://1.bp.blogspot.com/-g6yj2KNv7g8/YA6pBhWqJwI/AAAAAAAAJys/vzLXYQfTNiAs5V2Lpx_AGMtKx0u3PH9kwCPcBGAsYHg/s4032/IMG_6258.HEIC][/timg]With their flank slowed down to form square, the mass French advance is breaking up. The heavy artillery fire is failing to damage the redoubt. I got very luck with my morale rolls here, but he was making his too. [timg]https://1.bp.blogspot.com/-6G8VJ9zvsl8/YA6pBlww0xI/AAAAAAAAJys/r6oZ2gbYqrQQSW3TP7DgR5jVkGhBWGidwCPcBGAsYHg/s4032/IMG_6259.HEIC][/timg]The French reserves force the Spanish irregulars to move back to the safe side of the river. I thought at this point they were surly going for the town. With a 2nd division still to arrive they might have had the strength to do it. [timg]https://1.bp.blogspot.com/-_3DhH3DLWww/YA6pBu7d53I/AAAAAAAAJys/i4WP7QI1-2M7MMFcybTjZVxJ4w_btPd5QCPcBGAsYHg/s4032/IMG_6260.HEIC][/timg]The British skirmishers disrupts down the French advance. I did manage to get enough hits in to disrupt his centre. Two large tooled up British Infantry units on a ridge line should do that. [timg]https://1.bp.blogspot.com/-eJJ_lEACPLo/YA6pBmzWlqI/AAAAAAAAJys/XZM8cmujSTMyVD62X4eMzjcxIFWBV6DbwCPcBGAsYHg/s4032/IMG_6261.HEIC][/timg]The French light troops in turn disrupt the British line, while the heavy artillery continues to pound the redoubt. Though he was doing the same damage to me. The redoubt and staying BEHIND the ridge line was what saved my army here. Otherwise the heavy artillery unit would have been blasting me away. [timg]https://1.bp.blogspot.com/-tNZvxEoxgOg/YA6pBpY0-BI/AAAAAAAAJys/uKYR3eF0ltcJ20XJWMLhTTPS0GB_lTyoQCPcBGAsYHg/s4032/IMG_6262.HEIC][/timg]The left flank attack is slowing down due to the presence of British cavalry, as the allied centre re-orders itself. . I could have maybe charged with BOTH units of cavalry here- Light and Shock heavy might have been enough to either break the square OR pass through. However, he'd placed his square in a position so that my cavalry didn't have enough room TO hit another unit on the other side, and would have just bounced. I need to remember that tactic. I should have done it on my right flank later. [timg]https://1.bp.blogspot.com/-IfkIwv1EtuY/YA6pBnmgLZI/AAAAAAAAJys/trnZTANSEy82yBETcLZaUM5iNn73VJb5wCPcBGAsYHg/s4032/IMG_6263.HEIC][/timg]The French reserves move down the highway towards the second redoubt while the Light Division's Highlander unit moves to support it. He redirected his reserves to attack the redoubt. I had my Highlander unit there, so it would have been a tough attack to succeeded in. And my Light infantry could move into the river and do some damage from a flank, though not too much. [timg]https://1.bp.blogspot.com/-hzDKh6QFjU8/YA6pBlejxkI/AAAAAAAAJys/ITt3d3LhkocgL5xg4-TxV6iJdojh1ckRwCPcBGAsYHg/s4032/IMG_6264.HEIC][/timg]A heavy French Cavalry division arrives as reinforcements while the French left infantry is stuck in square but is starting to climb the left ridge. His reinforcements arrived and it was two heavy cavalry units. Probably an equal fight to my British cavalry, so long as his infantry in square didn't cause any issues to them. His large unit is still being very hesitant to advance and can't move faster than it's flank guard in square. [timg]https://1.bp.blogspot.com/-wIgshBdbZps/YA6pBggsR1I/AAAAAAAAJys/u6UssTTWYIIUUJrXQUnHeroNiPa7yce-wCPcBGAsYHg/s4032/IMG_6266.HEIC][/timg]The French reserve division moves to attack the main defence line. He as now moving away from the town and towards a position to hit my ridgeline unit. [timg]https://1.bp.blogspot.com/-qn_lNcwLP1g/YA6pBhL3jMI/AAAAAAAAJys/sKo2f2AZAYsED3ohYXXEMd-fpPRGCWhdACPcBGAsYHg/s4032/IMG_6267.HEIC][/timg]PORTUGUESE DRAGOONS! PREPARE TO CHARGE! I didn't NEED to charge my Portuguese Dragoons, but I thought now or never. [timg]https://1.bp.blogspot.com/--3UvidEqD-g/YA6pBhfvdMI/AAAAAAAAJys/AHArhQkKZSsMtwxsA_OYqQtBEhxU4j2kACPcBGAsYHg/s4032/IMG_6268.HEIC][/timg]CHARGE!!!!!!!!!!!!!!!!!!!!!!!!!!!!!!!!!!!!! They had to pass in front of the artillery who were able to support the infantry, who DID manage to form square, but still were wavering by the end of it. [timg]https://1.bp.blogspot.com/-6rMKoa8_JVg/YA6pBpzOXmI/AAAAAAAAJys/d7RlqphfpjUY1_HzwFz8oWr-QjJoNjBagCPcBGAsYHg/s4032/IMG_6269.HEIC][/timg]RETREAT!!!!!!!!!!!!!!!! Despite wavering the French brigade, the Portuguese Dragoons are forced back and rout. I'm not sure what happened, but my Dragoons routed, I think because of having to cross in front of the artillery. I was lucky it didn't impact the rest of my army. [timg]https://1.bp.blogspot.com/-hifRyFDOkEk/YA6pBteKKcI/AAAAAAAAJys/rwlUsfJ9VdczmG-NNurBSD3kWinBaf9agCPcBGAsYHg/s4032/IMG_6270.HEIC][/timg]HUZZAH!!!!!! FOR KING AND COUNTRY! The British Infantry charge down the hill at the wavering French infantry. It DID mean my infantry were now able to charge over and down the hill towards his wavering unit! [timg]https://1.bp.blogspot.com/-7ILA4hot3J8/YA6pBm7__pI/AAAAAAAAJys/QGg_R6dN-qcccgqPiDz4cxHpqp1HxSEHgCPcBGAsYHg/s4032/IMG_6271.HEIC][/timg]ROUTED! The attack destroys the French line! Several units nearby are also disrupted by this event, but do not break themselves. They unsurprisingly lose that fight, though this time his centre didn't collapse when it lost that critical fight, it did disorder the other units there. I could probably have charged his other infantry unit and rolled up his line. [timg]https://1.bp.blogspot.com/-nf1P1TdKtfI/YA6pBnpBvjI/AAAAAAAAJys/Dy6DJLGJbJYrHyhkCabPl1u2aY42LJTSwCPcBGAsYHg/s4032/IMG_6272.HEIC][/timg]The French centre is holding while the reserves move to attack the ridge line. French cavalry on the left hold off the light division from advancing into their flank. I think I could win the fight on the right - my Portuguese inn the redoubt, the Highlanders and the large British unit next to them. His centre was under pressure and my left was still holding him off and would be fighting from a redoubt and another Highlander unit. His reinforcement heavy cavalry will still 2 turns away and stuck behind his infantry, though they would be able to defeat my Hussar unit. My Light Division was not really doing much. I should have moved the Rifle's into square and just moved towards the enemy flank. His cavalry wouldn't have been able to do much and it would have caused damage to his infantry attacking my centre. [timg]https://1.bp.blogspot.com/-RlH0gjgjDFs/YA6pBm38GtI/AAAAAAAAJys/1Ue0IOOfbds_nnUyNV728F1aehYMprh-wCPcBGAsYHg/s4032/IMG_6274.HEIC][/timg]The British left flank cavalry force the French right into square. French fire fails to unnerve the British Dragoons. I was lucky my Dragoons weren't getting hit by the infantry in square, I should have moved them back a bit, but that might have had the same impact. They were stopping the large infantry unit from advancing past the square guarding their flank. I should have probably charged the rear unit as it was an irregular unit and would have been easy meat. [timg]https://1.bp.blogspot.com/-BgPqvNFVjlE/YA6pBs2HNvI/AAAAAAAAJys/dNiuI7NXDwoJNBIwfOwO5985mnzYD5giQCPcBGAsYHg/s4032/IMG_6275.HEIC][/timg]As night falls, the French attack is stalled. We'd run out of time at this point, but I think I had the advantage. His vanguard division was disrupted, and my right side was facing better odds than before. His Heavy Dragoons had arrived too late. [timg]https://1.bp.blogspot.com/-zi_jix5xigs/YA6pBkpIVuI/AAAAAAAAJys/jbqa1jnO9Xkp5JDxpkCNik66p2GMRztyQCPcBGAsYHg/s4032/IMG_6276.HEIC][/timg]The left is stuck in square, the centre is disordered and the right has taken too long to get into position and is still facing fresh troops. The battle is OVER. THE LINE HAS BEEN HELD. It's a narrow 1 point victory, and both armies have only lost 1 brigade each, but I'd say I won the battle. The line held. [timg]https://1.bp.blogspot.com/proxy/9QfNpyTBk23o3Aaj-n-0KZaPVLqUYUNNcPFVIuDOjs6CzHAJHD0IB6bMEx5r47KU53eAZCHzM4M330Hn6QLwhjS1HR84HtDi=s512][/timg]The remains of the Lines of Torres Vedras in modern times. Napoleon never broke through. [timg]https://1.bp.blogspot.com/-i2SBuBUIejg/YA6sVC5TTQI/AAAAAAAAJzE/q2sdhKaXua08WdjPX-cr7xrVy1X5Rd1ZQCPcBGAsYHg/s4032/IMG_6313.HEIC][/timg]Final Score 13-12. Copy of the French army list.
|
|
#
?
Jan 25, 2021 16:20
|
|
|
Sydney Bottocks posted:So I went ahead and backed the "March to Hell: Rome" Kickstarter, which has 3d printable stuff for both 28mm and 15mm Romans and various opposition (I believe Britannia and Germania, off the top of my head). I've never dabbled in ancient history wargaming before, so I was wondering what rulesets you nice goons ITT would recommend for both scales. I've heard of Hail Caesar by Warlord and Infamy! Infamy! by 2FL, but I thought I'd ask you all and see what other ones might be out there. I love Ancients. There are a lot of Ancients rules out there. Personally I'm most interested in the Punic Wars era - Rome vs. Carthage, a couple centuries before the Rome v. Britannia/Germania era, so that's my focus. Most rules will cover both, but there are some that specialize in a specific war or era. I really like this era because it�s sort of the WWII of the Ancient world � big, giant war between the big powers of the day and their allies. And, of course, elephants are involved. Today there's a divide in Ancients in that some rules are really set up for 28mm models, Warhammer style, while others cover 15mm models with 2-4 models per base. The latter is the way most Ancients games were played prior to about 2000 due to the popularity of a rules set called DBA (De Bellis Antiquitatis) and its spinoffs. I have 28mm armies myself. I haven�t really played in 15mm scale for a long time, from what I see played lately this scale has faded in popularity, but it might come back. As always, see what�s popular in your area before you invest in an army. When I first got into Ancients the most popular rules set at the time was Warhammer Ancient Battles (1st or 1.5 edition). This was based on old square-base Warhammer Fantasy, but with all of the magic and such stripped out. It made for a good, straightforward game. The big advantages were the fact that it was easy to teach to someone who already knew GW games and there was good support in the form of a lot of supplements covering eras from the Trojan War to the late Medieval era. In 2010 they released a 2nd edition that wasn't that great, and in 2012 GW dropped their Historicals line, killing the game. You can track down the rules relatively cheap on eBay (or :files:) and it's still a decent game. The basic rulebook has army lists for Early Imperial Rome v. Barbarians, these cover Rome v. Britannia/Germania just fine. When GW dropped Warhammer Ancient Battles some of the people who worked on it immediately wrote Successor rules sets using almost rules that are almost exactly the same. Clash of Empires was one, War and Conquest is another. They�re so close that you can use your old WAB supplements, so it might be worthwhile to get one of these rulebooks to see if you�re interested. Hail Caesar came out at about the time that WAB died. It�s a very different system, but you could use an army set up for WAB with it so many approached it as a WAB successor. It�s a serviceable game, but it�s not really my favorite. It is a very loose system where you often have to improvise as you play. I�m not some sort of hardcore tournament player who demands exactly precise rules, but Hail Caesar is still a little too loose for my tastes. It works okay for a very casual game with friends where you can agree on a lot of things beforehand, but even then you�ll probably end up �winging it� and making up ways to cover edge cases as you play. It is also quite generic; armies tend to feel a bit flavorless as a result. When WAB died without a clear Successor (Like Alexander) a lot of the interest in Ancients faded in my area, but recently it�s been coming back strong (or was before Covid). The big reason for this was some really good new skirmish rules sets came out. The big advantage of these was that you could get a game in with a lot less models and time than a more conventional �rank and flank� game with big armies like WAB. Instead of painting over a hundred models for a �small� game you could play a very satisfying game with 30-50 models. Clash of Spears was the first of these new skirmish games. It covers the Punic Wars, but I�ve heard that they�re coming out with Imperial Rome v. Britain/Germans in the near future. The game already has rules/lists for Gauls, and if you�re willing to be a tiny bit creative the existing Roman list could easily cover Imperial Rome v. barbarians. I highly recommend this game. This is the size of a full big Clash of Spears army:  This army would also work with a game called Saga. This game initially covered Dark Ages stuff like Vikings and Saxons, but it�s been adding Ancients recently. It uses a relatively simple system for most of the game, but also has a system that uses things called �battle boards� and dice with funny symbols � you roll the dice and allocate them to give your units bonuses and such. They just came out with a supplement called Age of Hannibal with covers the Punic Wars but, like above, could easily be adopted to Imperial Rome. I can�t really comment on Infamy, Infamy. I bought a copy of the rules and read it, but I haven�t gotten a game in due to Covid. It looks good from what I�ve seen, but don�t want to comment on it until I�ve played it. I know they�re working on a Punic Wars add-on, when this is out and game groups can meet in person I hope to play. SPQR? Well, I don�t have a copy, but I haven�t heard anything good about it. One of the people in my group bought a copy and immediately told the rest of the group to skip it. There are also some unusual games like Impetus. ("IMPETVS"). This game uses very large bases with multiple figures on each base; each base becomes sort of a mini-diorama. You could use an existing 28mm army with it. I have the rules but haven�t played it yet. Cessna fucked around with this message at 17:47 on Jan 25, 2021 |
|
#
?
Jan 25, 2021 17:37
|
|

|
Here's what I said the last time this came 'round.Springfield Fatts posted:I like To The Strongest! for quicker games as the grid really saves time on the most laborious part of ancients, maneuvering. There's no individual model removal, but only two friendly units can occupy a square so you might be restricted in how grand a scale you're aiming for modelling purposes. But if you go with the 6" suggested grid that's a pretty big frontage you can have for each unit. For more crunch I like L'Art De La Guerre (or ADLG) as it's like a cleaned up DBA/DBMM with graphical examples of play and parsed in text that's way easier to understand.
|
|
#
?
Jan 25, 2021 19:55
|
|
|
Cessna posted:This army would also work with a game called Saga. This game initially covered Dark Ages stuff like Vikings and Saxons, but it�s been adding Ancients recently. It uses a relatively simple system for most of the game, but also has a system that uses things called �battle boards� and dice with funny symbols � you roll the dice and allocate them to give your units bonuses and such. They just came out with a supplement called Age of Hannibal with covers the Punic Wars but, like above, could easily be adopted to Imperial Rome. It seems a popular system, but the dice and battle board scare and confuse me so much. I suspect I'd get paralyzed trying to decide out which dice to put where (not to mention the symbols seem very confusing to look at). It doesn't help I don't understand why they use that system in the first place?
|
|
#
?
Jan 26, 2021 01:18
|
|
|
Comstar posted:It seems a popular system, but the dice and battle board scare and confuse me so much. I suspect I'd get paralyzed trying to decide out which dice to put where (not to mention the symbols seem very confusing to look at). It doesn't help I don't understand why they use that system in the first place? I've lost like 10 SAGA games in a row because to be good at it you really need to study the battle boards to understand what all the potential moves are and how they could interact with each other which is too much work for me so I just decide poo poo as I go and then get crushed.
|
|
#
?
Jan 26, 2021 01:24
|
|
|
I ended up playing it without ever owning SAGA dice and once you realise that the dice are a simple 3/2/1 ratio it really helps you evaluate the options on the board.
|
|
#
?
Jan 26, 2021 01:58
|
|

|
Comstar posted:It seems a popular system, but the dice and battle board scare and confuse me so much. I suspect I'd get paralyzed trying to decide out which dice to put where (not to mention the symbols seem very confusing to look at). It doesn't help I don't understand why they use that system in the first place? It's possible to play SAGA without the battle boards. Just ignore them entirely and it becomes a quick, easy skirmish game. Play a few games, then try adding the boards - or don't.
|
|
#
?
Jan 26, 2021 02:03
|
|
|
Comstar posted:It seems a popular system, but the dice and battle board scare and confuse me so much. I suspect I'd get paralyzed trying to decide out which dice to put where (not to mention the symbols seem very confusing to look at). It doesn't help I don't understand why they use that system in the first place? It adds at least two things: resource management (do you assign SAGA dice to activate units or abilities) and abilities. Unlike in, say, Age of Sigmar, neither your activations nor unit abilities are guaranteed - you have to roll the SAGA dice and proportion them as best you can. And since you lose dice as you lose units (notable exception: levies, which suck and don't bring a dice, neither take it away, this also serves to reign in shooting as levies are usually the archers), you can't be too spendrift with lives. This makes vikings a bit tricky to play, since a few of their abilities dump defense in favor of attack, or outright kill your dudes to kill his dudes.
|
|
#
?
Jan 26, 2021 08:21
|
|
|
Saga is cool and a great gateway for historicals conversion because it's small, fast, and armies get "powers" which is nice chrome to get fantasy or scifi people playing.
|
|
#
?
Jan 26, 2021 17:42
|
|
|
A British Army training exercise - Anglo-Portuguese Army vs Anglo-Portuguese Army Field of Glory Napoleonic. You can read it with better formatting, more comments and see my previous battles and thoughts on MY BLOG (LoA Tournament game #4 Jan 2021) With LISBON safe and secure following three successful defenses of the LINES OF TORRES VEDRAS, Lord WELLINGTON has decided to conduct a TRAINING EXERCISE. The exercise is designed to test the offensive power and maneuvers of his ANGLO-PORTUGUESE army. Two different corps of troops will conduct a MEETING ENGAGEMENT while umpires will observe and report the results...  Portuguese, British and Scottish troops observe the approaching "Red enemy force" from a hill top. For my 4th game in the League of Ancients January 2021 tournament, I played another Anglo-Portuguese Peninsula army 1809-11 army Dave has defeated me multiple times, though I did get one victory when he was/is teaching me the game in my 2nd ever game. Dave literately wrote the book on how to win Field of Glory Napoleonic battles...and he was using the same basic army list as I was. I did not go into this battle with much confidence... Dave, knowing full well my love of a redoubt defence, blocked my 4th use of it in this tournament of using a prepared defence. I blocked his ability to do frontal and prepared attack. We both choose to do a PROBE mission. As Richard had told me in the first game, probe is a good choice for smaller armies, as it allows you to see where the enemy deployment is, and know where any flanking advance will come from. So effectively we had the oldest, more favorite scenario I have ever had in wargaming - THE MEETING ENGAGEMENT.My first computer wargame I ever got was Kampfgruppe in '88 on the Amiga 1000. Meeting engagements were my favorite scenario from then on.  A strong, defensible position. the hills on my right flank were rough with a marsh to their north. The village sat on my right flank and a forest and a gentle hill on my left. A difficult forest was to me far left. Another village was to the north. A minor river, rough, was to the far west. As we both had a Probe mission, we had to roll who was the attacked and Dave won, so I still ended up being the defender. I decided to try and fight on a narrow front with one flank covered. I ended up with some rough hills and a village on my right that would make it well nigh impossible for anything to come that way. My left had a forest I wanted to move my light infantry into (I have 3 brigades of light infantry). I decided to hold the centre. The Light Division reserve would arrive first and deploy to the left where the forest and hill were, and the Cavalry Division reinforcement would arrive later at some future point, all in the centre.  The First Division deploys in depth. With a narrow gap to defend, and working on the assumption that Dave would be advancing on me, I placed my two large British units on the road, blocking it completely. Behind them I put the Portuguese conscripts with the Highlander's to the right, able to enter the forest if needed. The Portuguese line infantry defended the town. I should have put the Highlanders behind the main units, and the Conscripts in the town. The Highlanders are the divisional reserve, and the conscripts would have been a better "lure" in the town, though I strongly suspect Dave would ignore the town anyway. Putting the conscripts in the town also means the guard a flank and not be near anyone else.  Two Angelo-Portuguese divisions advance. Dave had 4 divisions, which is useful in a probe mission. I'm glad I didn't try and attack!  My left flank is weak Dave was obviously going for my left flank.  Corps Command looks over the infantry line towards the Red force. Some of the conscripts behind him aren't sure which way to face, which is perfectly in character.  The attacking "Red" force moves on my left flank The very obvious advance on my left confirmed my choice to bring on the light troops there.  The Light Division arrives from reserve. The Loyal Lustarian brigade on the left, the 95th in the centre on the hill. The Spanish guerrillas in the rear. The Highlander unit is on the right, as the other Highlander unit moves into the forest. I decided to sit on the hill - Dave didn't have much more artillery than I did, and no dedicated corps level artillery unit. What I SHOULD have done is move down the hill and lure him forward. Then have my cavalry come through and change beyond it.  More enemy "Red" units arrive - enemy cavalry Dave's cavalry division moved into the centre on the road, but his KGL veterans with officer moved to support his infantry.  Uhhh...what where which way now? Dave's attack then made a massively complicated change. Units started going every which way and facing every direction. It looked to me that the centre would be vulnerable if I could flank his forces moving around the forest...  Forward out of the position! It looked to me I had a chance of getting on the flank of his advance, so moved out of my defensive position and moved my (now arrived as soon as possible) reinforcement cavalry up to directly support the infantry. I would to attempt to flank him as he moved forward and use my cavalry to cover my right flank. The Light division would hold the hill and forest on the left. 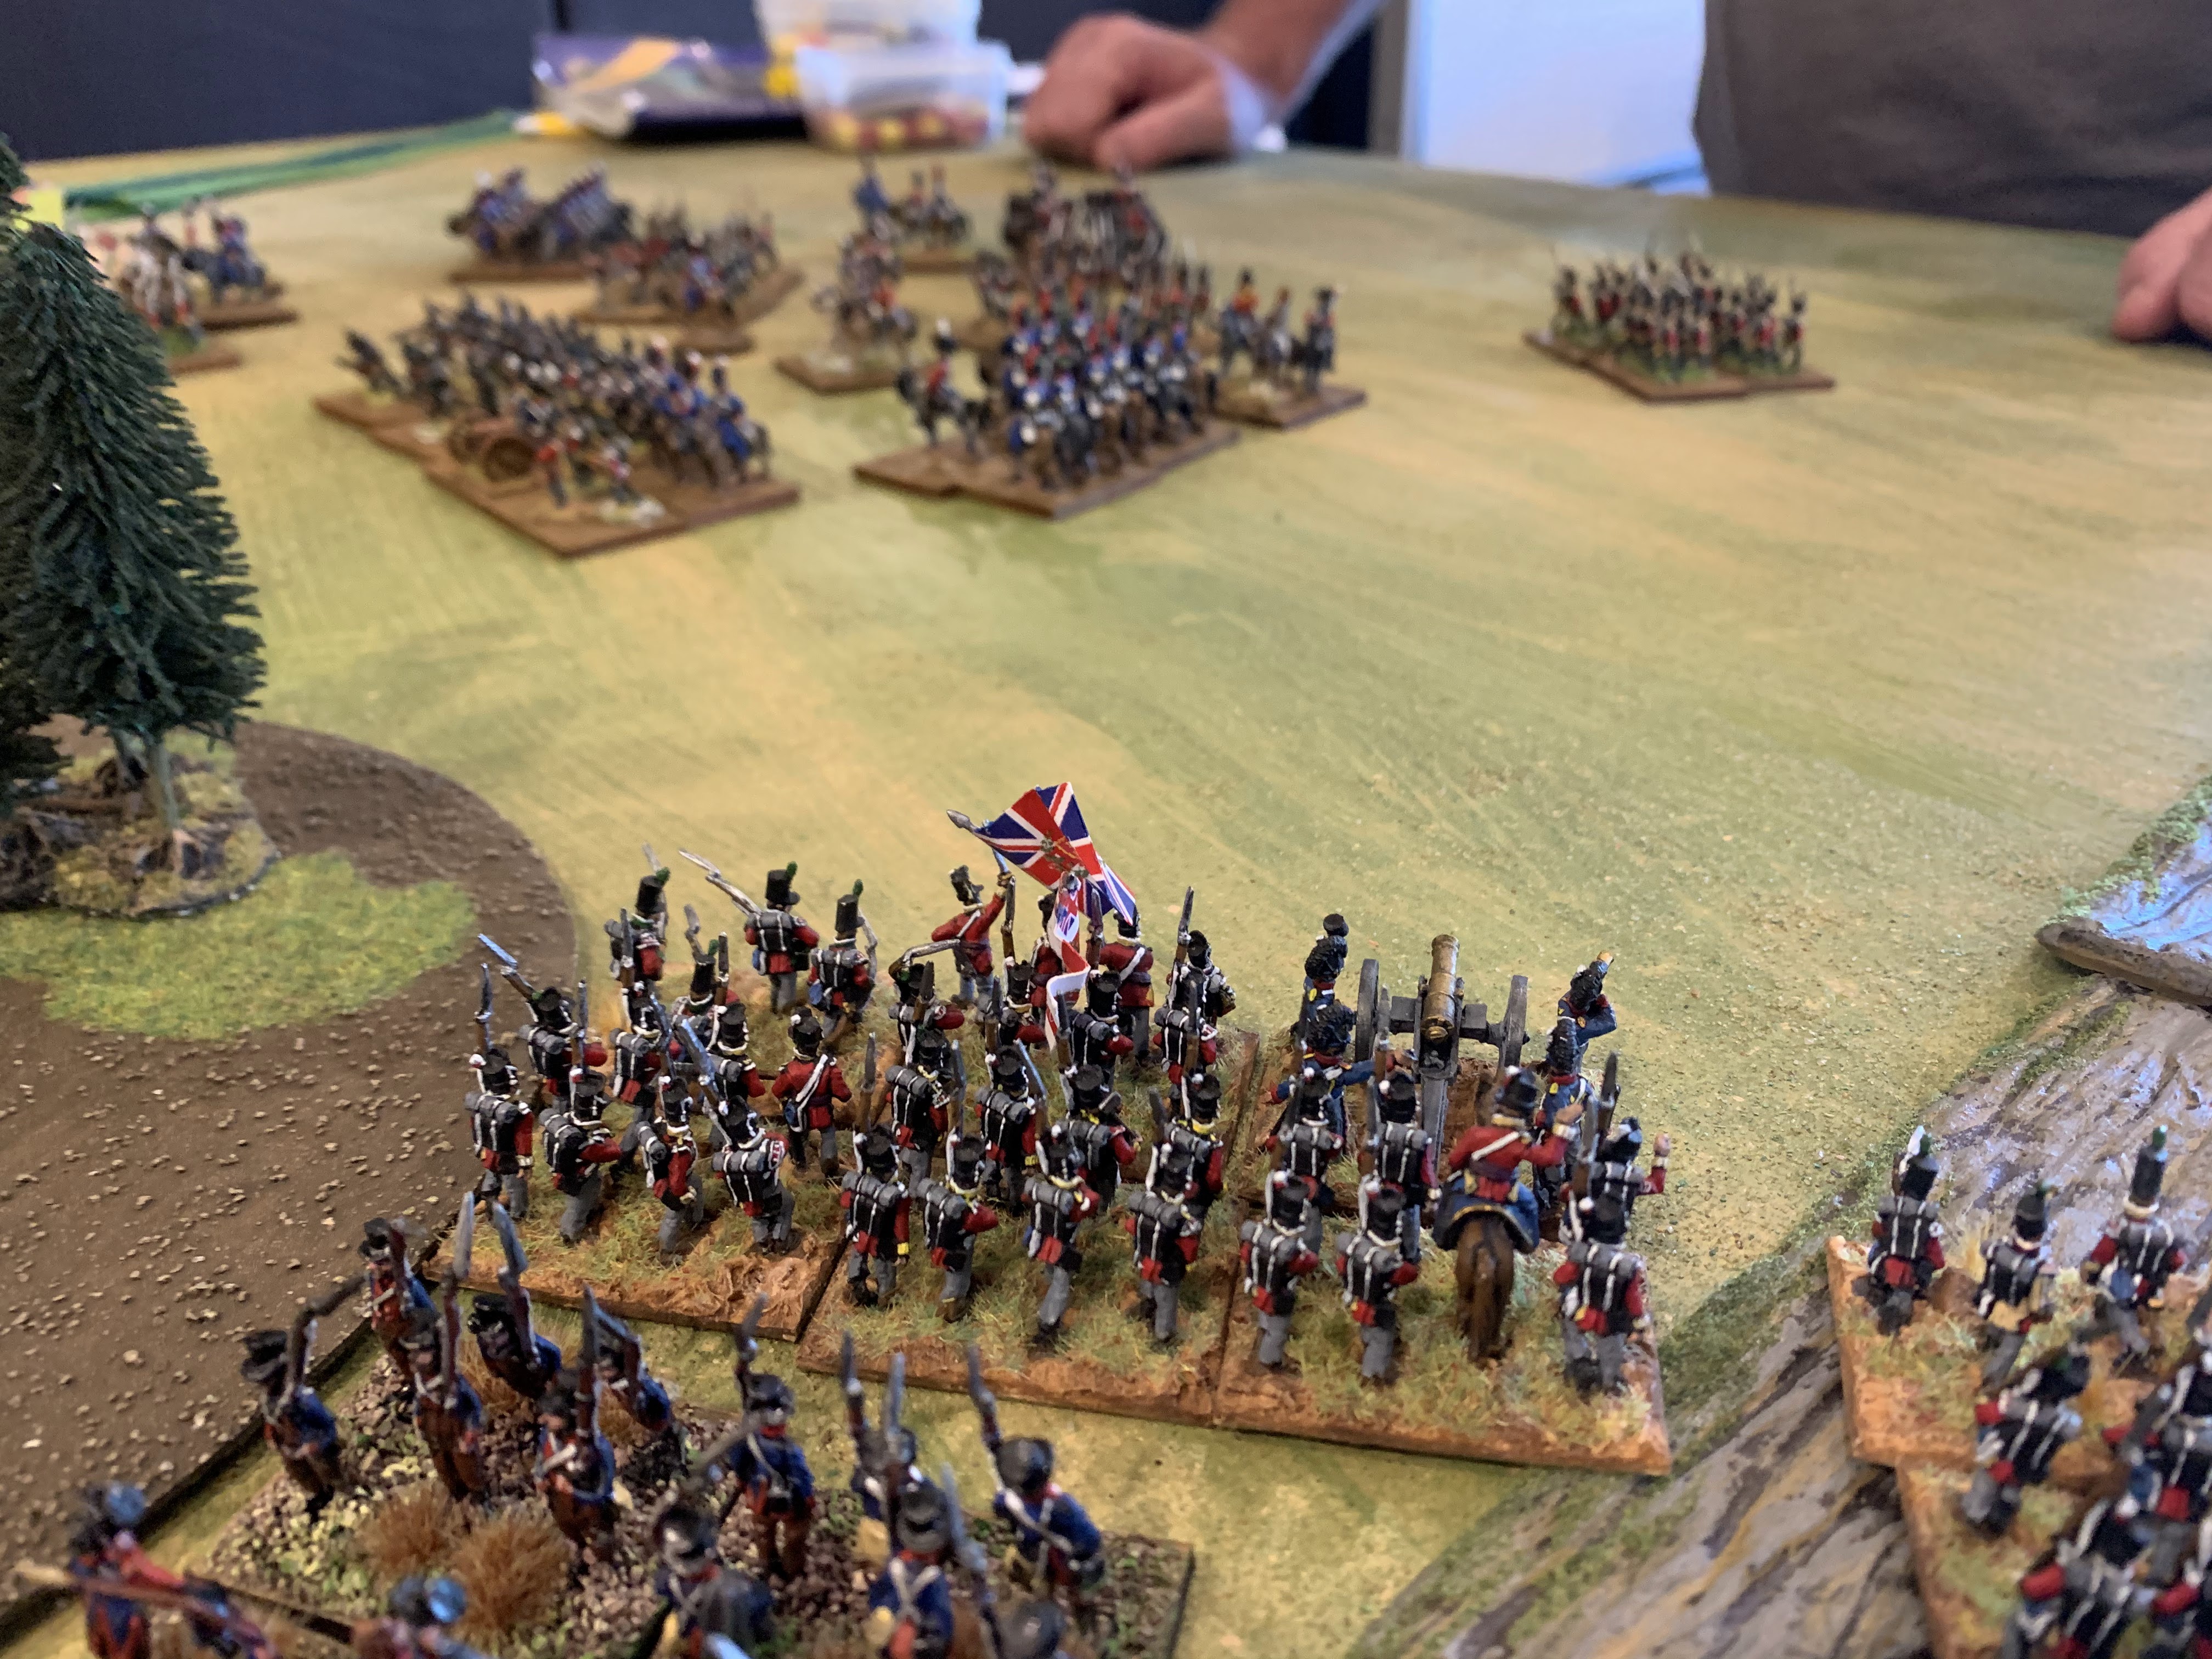 Forward!  Dave's troops form line. After all the complicated and mystifying maneuvering, Dave had got everything right where it needed to be. I do not think I could have performed such a complicated change in direction. What I should have done is STOP HERE and get my light infantry into the forest and hit than angle he has north of it.  Under fire. I'd advanced forward and my one large unit was under fire from two small units, but not in arc to fire back. I can't recall or workout why the Conscripts behind them were also disordered. The large unit to their front might have taken two hits.  The armies line up. In the back right cornor you can see a Portuguese Division arrive for Dave's as reinforcements. My Light Division was holding the hill. I should have moved forward, but there was ONE cavalry unit on that flank that was scaring me from advancing. My cavalry was all tangled up on the right behind my Portuguese troops. I had my heavy cavalry moving left. I should have advanced anyway. What I really needed was to get the light infantry in the forest and hit his angle. And I needed my heavy shock cavalry to move faster left.  The British and Portuguese light cavalry move right, tangled up behind the Portuguese Line infantry. My line was all wrong, I'd advanced to far forward with the left large unit, I should have moved it only 3 inches and the unit to the right 6. And the Portuguese needed to be further right to allow the cavalry space. If my cavalry was in FRONT I could have perhaps moved my infantry to close range. The large unit on the left, despite having a charismatic commander with them, couldn't reform from their disordered state. Note Dave's infantry is not in a straight line but is deployed in a staggered formation.  On the left flank, his advance has stopped. I was hesitant in moving my infantry forward, but I had cavalry support right behind them. I'd got two units into the forest but the Spanish irregulars weren't going to hit much.  My line unit is wavering! I couldn't re-form my unit despite getting 3 dice to do it a turn and his heavier firepower of and my split firepower wasn't doing anything against him. I didn't have enough room to pivot the unit as it would move it further away and I couldn't advance closer as a wavering unit either!  My left flank moves forward. I got my left flank moving forward, now I had my cavalry unit here. I needed to engage this flank before my centre fell apart. The Loyal Lusterian brigade turns right to get into the forest.  The center isn't working either. My unit is still wavering (still failing every morale roll!) and my troops in the forest aren't through it yet. I'm shooting at his elite light infantry unit and not causing enough damage to worry it. What I should have done is put my unit into deep tactical and free up room on the right of it.  Right flank is still tangled up I'd finally got my light cavalry untangled but now it faced a super heavy shock Dragoon unit!  CHARGE! With my left infantry unit wavering the elite Red Force Riflemen charged, as did his Heavy Dragoons. This was going to be bad. Neither of my units was getting flank support, though the infantry was getting rear support. The Hussar's weren't getting that because the Portuguese dragoons needed to be behind them. 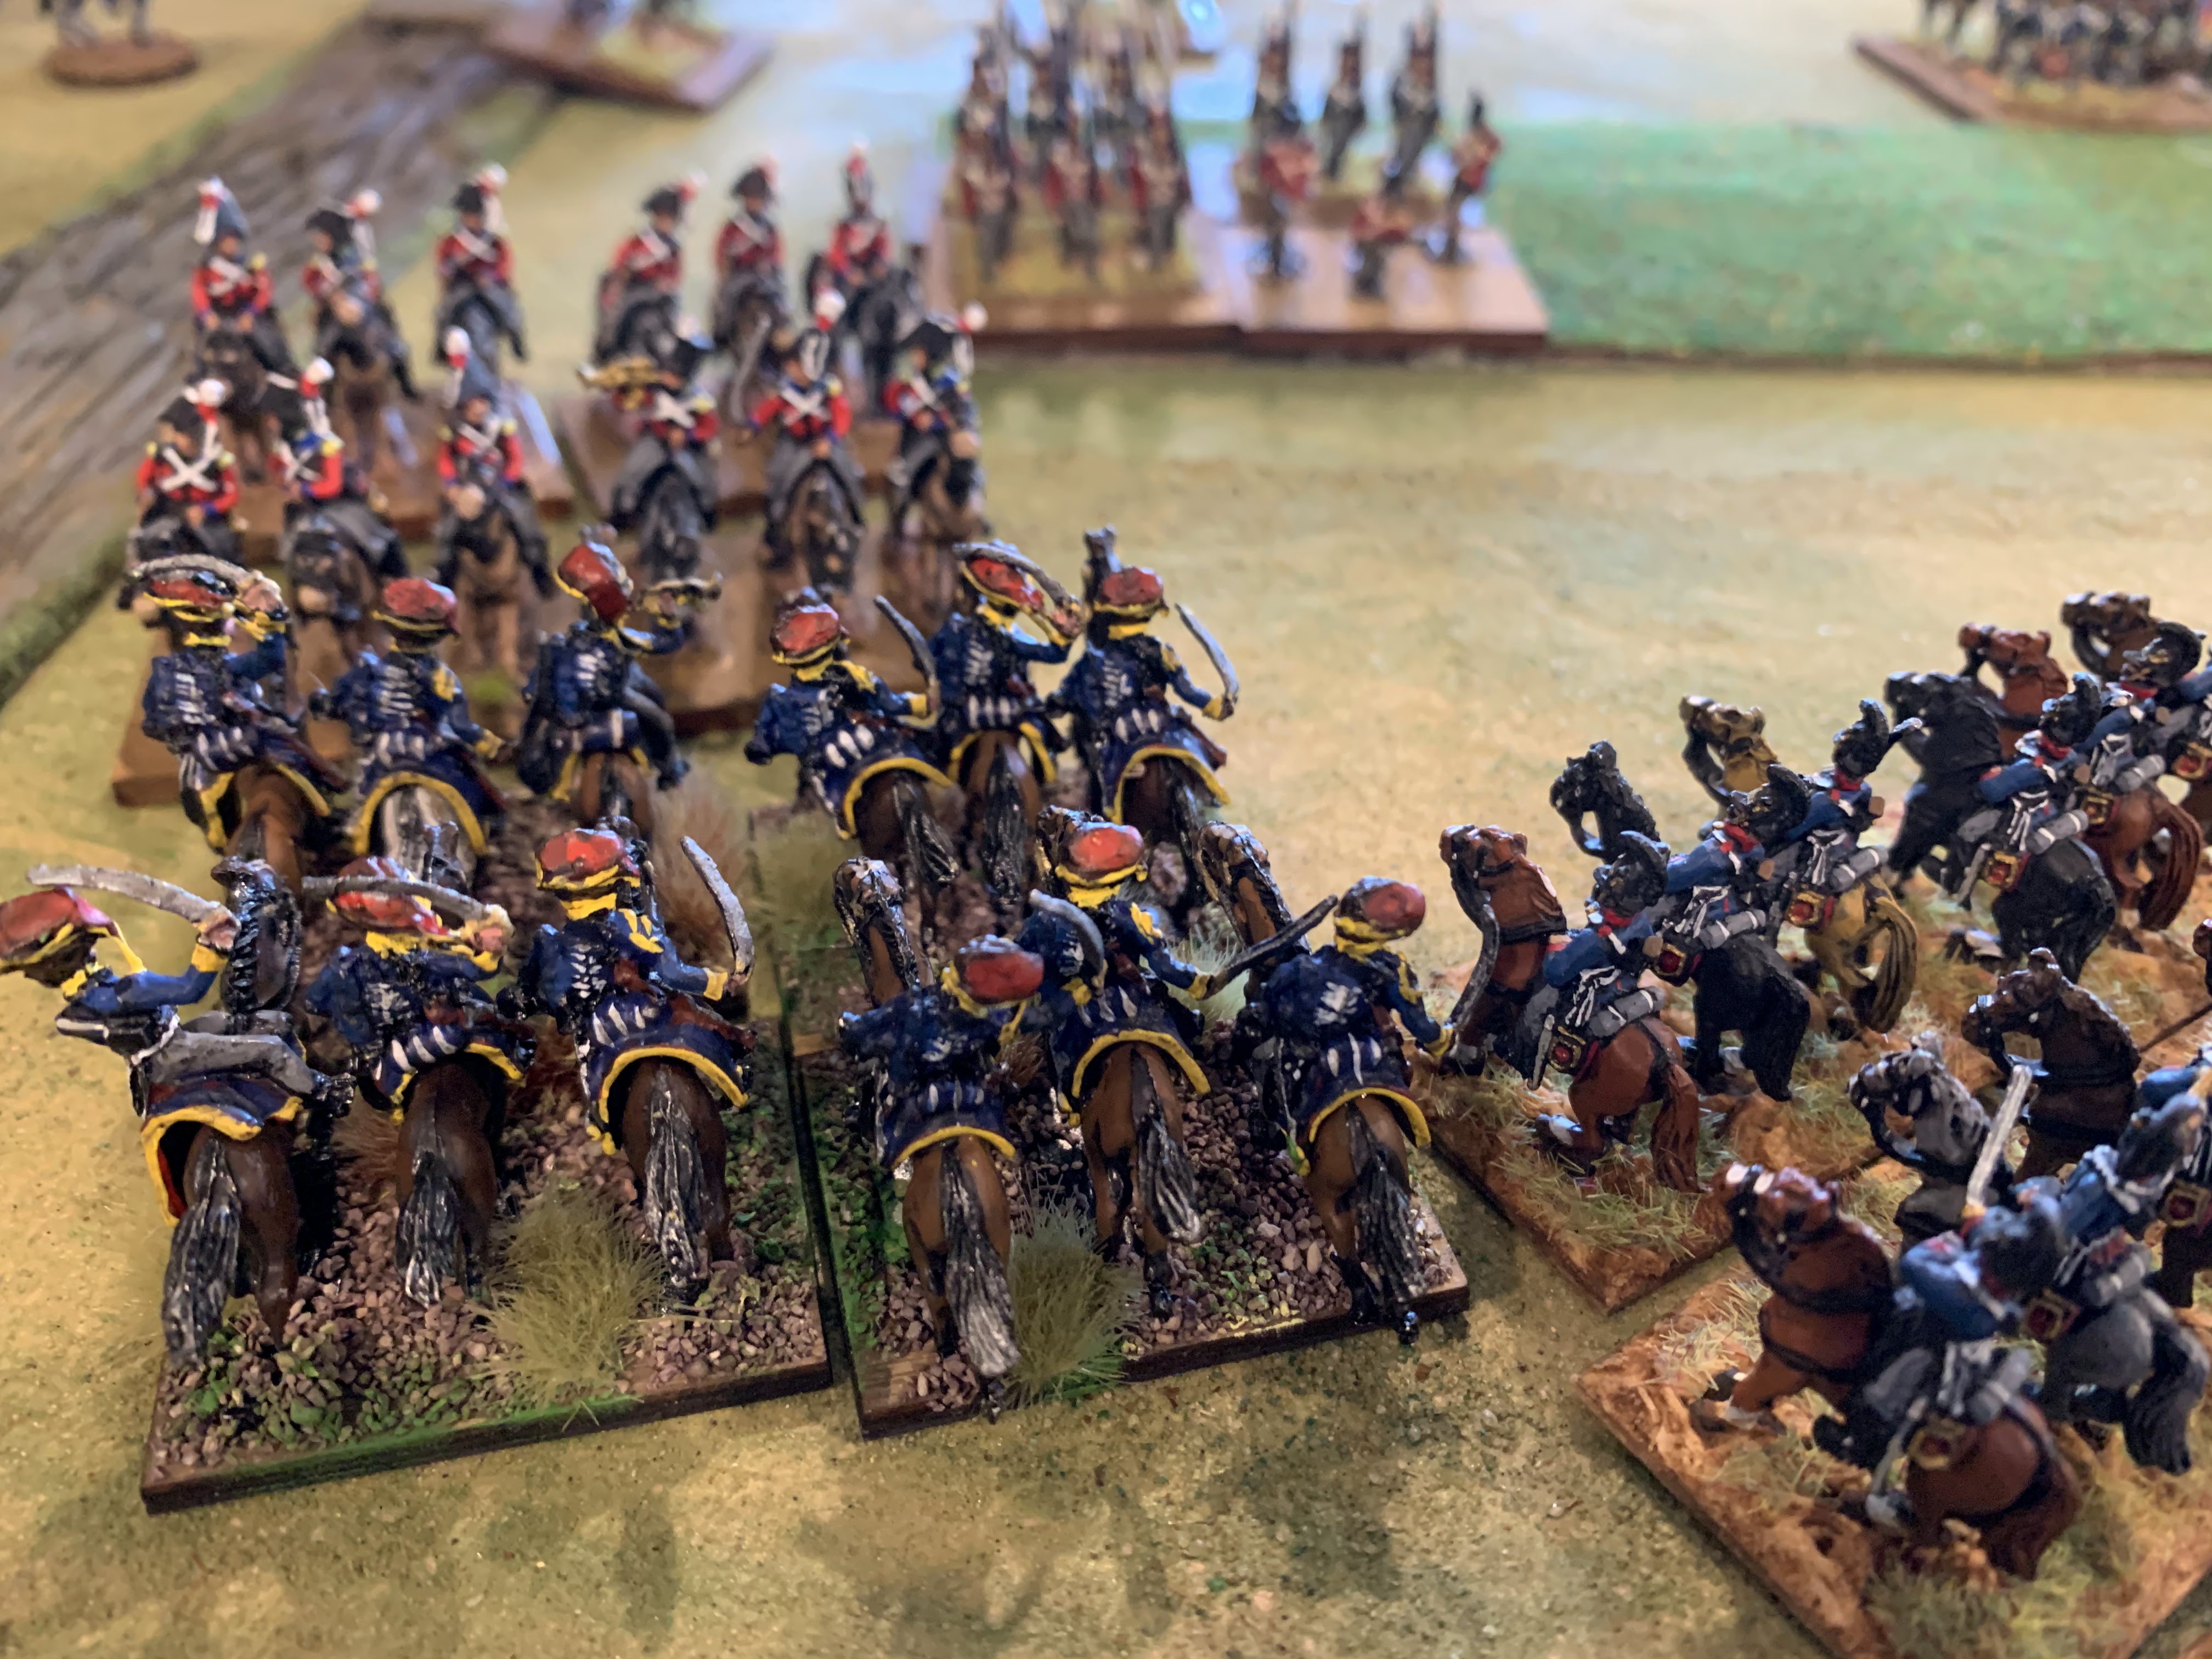 Light Cavalry, vs Super Heavy Cavalry  Elite Troops charge into wavering foot infantry  RUN AWAY! EVERYONE RUN AWAY! E V E R Y O N E . The results were catastrophic. Both large line units, the Hussars, the Portuguese Dragoons ALL ROUT.  This is as bad as it looks. M Both remaining units left in the centre and now wavering and going to be very easy meat even if they manage to rally.  Way to late to do anything My left flank was way to late to do anything. RESULT: Complete Defeat! Of the 4 battles at this tournament, this was the only one that I lost in a complete rout. According to the score I did some damage or rout one unit(?) but I don't recall seeing it. Dave would complete the Tournament coming 2nd. Comstar fucked around with this message at 13:38 on Jan 31, 2021 |
|
#
?
Jan 31, 2021 12:47
|
|
|
Class Warcraft posted:I've lost like 10 SAGA games in a row because to be good at it you really need to study the battle boards to understand what all the potential moves are and how they could interact with each other which is too much work for me so I just decide poo poo as I go and then get crushed.
|
|
#
?
Jan 31, 2021 18:10
|
|

|
HerrBrau posted:Irish warband 
|
|
#
?
Jan 31, 2021 21:30
|
|
|
Love the napoleonics battle reports, it's nice to see that someone out there is getting some games in. ") Anyways, previously I posted so trial pics of the first batch of American GI's I was painting. Well... I ended up converting up everything I'd need for a platoon, most of the infantry support options and a few extras as well. It ended up being 66 minis. And what better way to kick off the year than a Mother of All Batch Paints?  I spent the weekend getting them all ready to the washing phase. Not sure if I'll break them up into smaller batches for highlights and details after that, but it feels good to get the block painting done on all of them in one go.
|
|
#
?
Jan 31, 2021 21:50
|
|

|
Not historical, but I trust grog goons to have good taste: anyone have any cyberpunk skirmish wargaming rulesets they'd recommend? There are a ton of cool models coming out in the 3D printer scene and I want an excuse to field minis like this: 
|
|
#
?
Feb 2, 2021 20:45
|
|
|
Reality's edge and Hardwired come to mind, got em both but haven't had a chance to play yet.
|
|
#
?
Feb 2, 2021 20:55
|
|
|
Wowshawk posted:Reality's edge and Hardwired come to mind, got em both but haven't had a chance to play yet. From reading the rules would you say one would be a better fit for a player who prefers fast beer and pretzel gameplay rather than super intricate rulesets?
|
|
#
?
Feb 2, 2021 20:58
|
|
|
Reality's Edge is a based on the This is Not a Test ruleset, which is pretty accessible I'd say. But: you can get pretty lost in kitting out your crew. There is a ton of stuff to buy, upgrade or graft unto the flesh. I wanted to try out a test game a couple of months back with a buddy and we didn't really want to spend a bunch of time on constructing a gang on a sunny afternoon. I think Hardwired might be more up your alley in that regard. The author wrote Zona Alfa and Nightwatch, much more "loose" rulesets without a lot of fuss. Downside is you might have to houserule some stuff. Edit: Hardwired is solo/coop btw.
|
|
#
?
Feb 2, 2021 21:16
|
|
|
Stargrave, the s/f version of Frostgrave is supposed to be out in April(?). If you are looking for real loose, beer and pretzels, that might be your jam. Hell, depending on how loose you were about things, you can easily use Frostgrave and just swap stuff out as tech or cyber junk rather than magic.
|
|
#
?
Feb 2, 2021 22:11
|
|


|
Thanks everyone, these all look like good options!
|
|
#
?
Feb 2, 2021 23:15
|
|
|
7TV would probably work, too.
|
|
#
?
Feb 3, 2021 13:17
|
|

|
Another army saved from the ARMS  SEPARATE SEPARATE  FROM FROM  GUNS GUNS  https://www.warlordgames.com/bolt-action-british-canadian-infantry/
|
|
#
?
Feb 3, 2021 21:29
|
|
|
This was a long time coming. Those old British sculpts were dire.
|
|
#
?
Feb 3, 2021 21:38
|
|
|
About time, Warlord Games. 
|
|
#
?
Feb 3, 2021 23:40
|
|

|
The bones of Reality's Edge seems totally fine, and the Civilians/Mission stuff is dope, but the actual campaign stuff seems dire. You get given an ultra-tech headpiece but still have to hire dickheads off the street to go do jobs. Zone Raiders is more scifi than cyberpunk, and other than the injury chart, seems much more tenable for campaign games. Zona Alfa also looks pretty easy to reskin to doing the stalker-punk version of cyberpunk. And I'm pretty sure Unit9 is a spinoff from the Human Interface war/boardgame kickstarter.
|
|
#
?
Feb 4, 2021 02:08
|
|

|
JcDent posted:Another army saved from the Horrible proportions and grotesque faces, but what are you gonna do, it�s Warlord. I�m glad some people are excited 
|
|
#
?
Feb 4, 2021 10:31
|
|
|
Endman posted:Horrible proportions and grotesque faces, but what are you gonna do, it�s Warlord. I�m glad some people are excited It's also an old man's war again, but I guess pop culture just doesn't do "soldiers are actually hella young"
|
|
#
?
Feb 4, 2021 13:08
|
|
|
Does anyone know anyone who does 18mm Napoleonic Spanish Guerrillas? I got a unit of Spanish irregular horsemen from Stonewall figures but I need some infantry that I'll paint myself, because it's not many figures and bad paint jobs won't matter. I've been reading The Spanish Ulcer: A History of the Peninsular War and I think I chose the wrong army. The hammering I've been taking in battles would be MUCH better represented by having a Spanish Army. Get 25,000 troops together from whatever mismash lost the last battle, try and fight a defensive battle, have your own army demand to go on the attack, lose 5000 men and 15000 civilians in the ensuring fiasco, and then get lynched by the survives for losing. AND DO IT ALL AGAIN NEXT WEEK. And Keep coming back and the French don't hold an inch of ground beyond the length of their bayonet and needing an entire brigade to get one message from one corps to another. it would be very thematic of how I keep playing and losing, with the odd victory. I've got enough troops now for my FOGN Anglo-Portuguese army but I need more magnetic bases to finish them. Updates from my blog.  Once I get the army ready in a few weeks I can finally start some solo campaigning. Comstar fucked around with this message at 14:49 on Feb 4, 2021 |
|
#
?
Feb 4, 2021 14:37
|
|
|
I've been on a pretty insane WW2 bender the last month. I converted and painted most of the American infantry I had at home, now there's just basing left: That's 50 infantrymen (rifles, BARs, rifle grenades and NCOs with SMGs) 2 bazooka teams 3 .30 cal teams 2 Forward observer teams sniper team medic 60mm mortar team crew for a 57mm anti-tank gun (gun is half painted) 5 engineers (including flamethrower) a handful of extra crews to sprinkle out' That's pretty much everything american on legs that we need for the winter of 44. I have a half-built M10 that I'll give them, and we already have a slew of Shermans and a M3A1 halftrack. I'm considering buying a jeep and a M8 too, that'll cover pretty much everything.
|
|
#
?
Feb 14, 2021 20:59
|
|
|
|
| # ? May 9, 2024 22:54 |
|
|
So, I've been considering doing some historical wargaming, but I have issues with most of the common scales. I saw that 2mm is an option for Napoleonic period stuff. From what I saw, the scale appeals to me for both cost and ability to scale armies closer to realistic sizes. If anyone has any experience, I'd be interested in rule set recommendations and good sources for models. I'd also be interested if 2mm rulesets exist for later periods, mainly WW2 or Cold War. If I'm going to play with my toy tanks as an adult, I'd like to do so in a way that maintains verisimilitude of range/scale, but also allows me to play on a reasonably sized surface and to build up armies and terrain without dropping tons of cash. Alternately, for Cold War tank style games, could you drop the scale by basing a tiny tank on a larger base and using appropriately scaled terrain?
|
|
#
?
Feb 15, 2021 06:51
|
|