


|
FISHMANPET posted:So I'm working on rebuilding an old bike of mine. It's a cheap hybrid bike I got back in 2006 (a Giant Cypress ST). It's a dumb project to put any effort into such a cheap bike, but I really like the frame geometry, and I've wanted to learn more about the insides of a bicycle. Can you remove the bottom bracket from the drive side first then use a hacksaw to cut the plastic retainer out? Or use a crank bolt and a load of washers/ spacers to stop the park tool from slipping? mikemelbrooks fucked around with this message at 14:00 on Mar 20, 2021 |
 #
?
Mar 20, 2021 13:57
#
?
Mar 20, 2021 13:57
|
|


|

|
| # ? Jun 8, 2024 08:00 |
|
|
Bottom Liner posted:Can someone point me to the correct rubber hoods for my SRAM Rival brifters? It's a 1x11 and every set I've tried and the set the bike shop ordered for me aren't right, they don't have a cutout where the actual shifter engages so they end up just ripping from getting stretched every time I shift. Are they hydro or mechanical levers?
|
|
#
?
Mar 20, 2021 18:12
|
|

|
mikemelbrooks posted:Can you remove the bottom bracket from the drive side first then use a hacksaw to cut the plastic retainer out? I've done the washer/spacer/bolt trick to hold the tool to the bottom bracket, which just made it easier to shear off the plastic. I tried a little bit on the drive side (which is metal) but it didn't budge. I didn't want to force it too much until I was sure I could pull it from that end without damaging the threads inside the frame.
|
|
#
?
Mar 20, 2021 18:46
|
|

|
jammyozzy posted:Are they hydro or mechanical levers? Mechanical
|
|
#
?
Mar 20, 2021 18:58
|
|

|
FISHMANPET posted:Having run back to my LBS once already on this I'd like to avoid it again if possible, but if it requires specialized tools (like, a blowtorch) I can have them give it a try. Any suggestions? https://www.steintool.com/portfolio-items/cartridge-bottom-bracket-handle-tool/ An alternative is to get some big washers and use the crank bolt to hold your bottom bracket tool in place so you can crank on it without it slipping. The non drive side cup will likely have to be broken to be removed. I just did this yesterday with a hacksaw blade and an old lovely screwdriver.... But it was a frame that I was prepared to scrap. Even if it goes without damaging anything, the threads probably could benefit from being chased.
|
|
#
?
Mar 20, 2021 19:42
|
|

|
Bottom Liner posted:Mechanical I think page 24 of this spare parts catalogue lists the hoods you need. I feel your pain, stores generally seem to be awful at listing actual SRAM part no's, I ended up buying and returning two pairs of hoods for my hydro Apex levers that were wrongly listed as compatible before finding the right ones.
|
|
#
?
Mar 20, 2021 21:46
|
|
|
I replaced the chain (actually 2.5 chains, it's a recumbent) and look what I found on the X9. Luckily the nearby REI had the part because a few weeks ago someone else had the same issue and they (luckily) ordered an extra set just in case.
|
|
#
?
Mar 21, 2021 22:38
|
|

|
I got a carbon fork for my Surly, sacrilege I know. Now I have to figure out how to cut a carbon steerer tube. What is the difference between the Park Tool SG 7.2 and the SG 8? Would I be ok just using two hose clamps as the saw guide like some people are saying online? I'm planning on using a tungsten carbide grit hacksaw blade. Any advice appreciated, I know nothing about working with carbon stuff.
|
|
#
?
Mar 22, 2021 20:38
|
|

|
a loathsome bird posted:I got a carbon fork for my Surly, sacrilege I know. Now I have to figure out how to cut a carbon steerer tube.
|
|
#
?
Mar 22, 2021 20:52
|
|
|
mikemelbrooks posted:If you are only going to cut one steerer I would just use a hose clamp, advice: Err on the side of caution, you can always cut it shorter but you can't cut it longer, wear gloves and a mask. A good mask. Like a shop quality N95. Carbon dust is bad poo poo. If you don�t have a good mask I think the recommendation is to spray some shaving cream where you are cutting to collect the dust.
|
|
#
?
Mar 23, 2021 00:34
|
|

|
funkymonks posted:A good mask. Like a shop quality N95. Carbon dust is bad poo poo. If you don’t have a good mask I think the recommendation is to spray some shaving cream where you are cutting to collect the dust. Luckily I have a whole bunch of N95s now  (KF94s but close enough) (KF94s but close enough)
|
|
#
?
Mar 23, 2021 01:15
|
|
|
Nothing is as quiet and smooth as a new chain (chains in my case) that have been degreased and then lubed with Silca Super Secret. The quiet of the drivetrain is sweet.
|
|
#
?
Mar 23, 2021 16:39
|
|
|
Finally got my bottom bracket out, by taking it back to the bike shop, another $16 well spent. Apparently all it took a cheater bar and hammer (and probably a high-quality wrench) to get it off, but that was more leverage than I was able to get. I'm scoping out certain new parts to buy, including at least a new bottom bracket and crankset (since those both had to be partially destroyed to get them off). I was quite happy with the geometry and ratios of the bike before, so I'm keen to keep that unchanged. And since there are a million pieces that seem seemingly identical to my untrained eye, I'm trying to limit myself to things my local shop stocks (with the assumption that those will be common standard components). So I'm looking at the Shimano Tourney FC-TY501, specifically the 48-38-28T with 175mm arm length. I can't figure out how to decipher it from the product page, but apparently, that needs a bottom bracket with a length of 122.5 mm. I know I need an English threaded 68mm bottom bracket with a square spindle. The BB-UN55 seems to be the defacto standard for square spindle bottom brackets, and it's in stock at my local shop, except, according to their site, not the 122.5 mm length. It also seems like the BB-UN55 is being discontinued to be replaced with the BB-UN300, so if they'll have to order something for me either way, either one would be fine, as long as it's 68x122.5? I know chainline is a thing which is why some of these sizes matter. I'm not sure what I want to do for my back wheel cassette, I may have one I can use. I was given another near-identical bike so I may just reuse the rear derailleur and rear freewheel/cassette from that bike. Is there anything I need to consider with my crankset purchase that will have an impact on what cassette I can use?
|
|
#
?
Mar 25, 2021 03:49
|
|
|
FISHMANPET posted:And since there are a million pieces that seem seemingly identical to my untrained eye, I'm trying to limit myself to things my local shop stocks (with the assumption that those will be common standard components). The main objection I have with it is that the stamped steel rings, while possibly replaceable, have a non-standard mounting system, with pinned together rings: 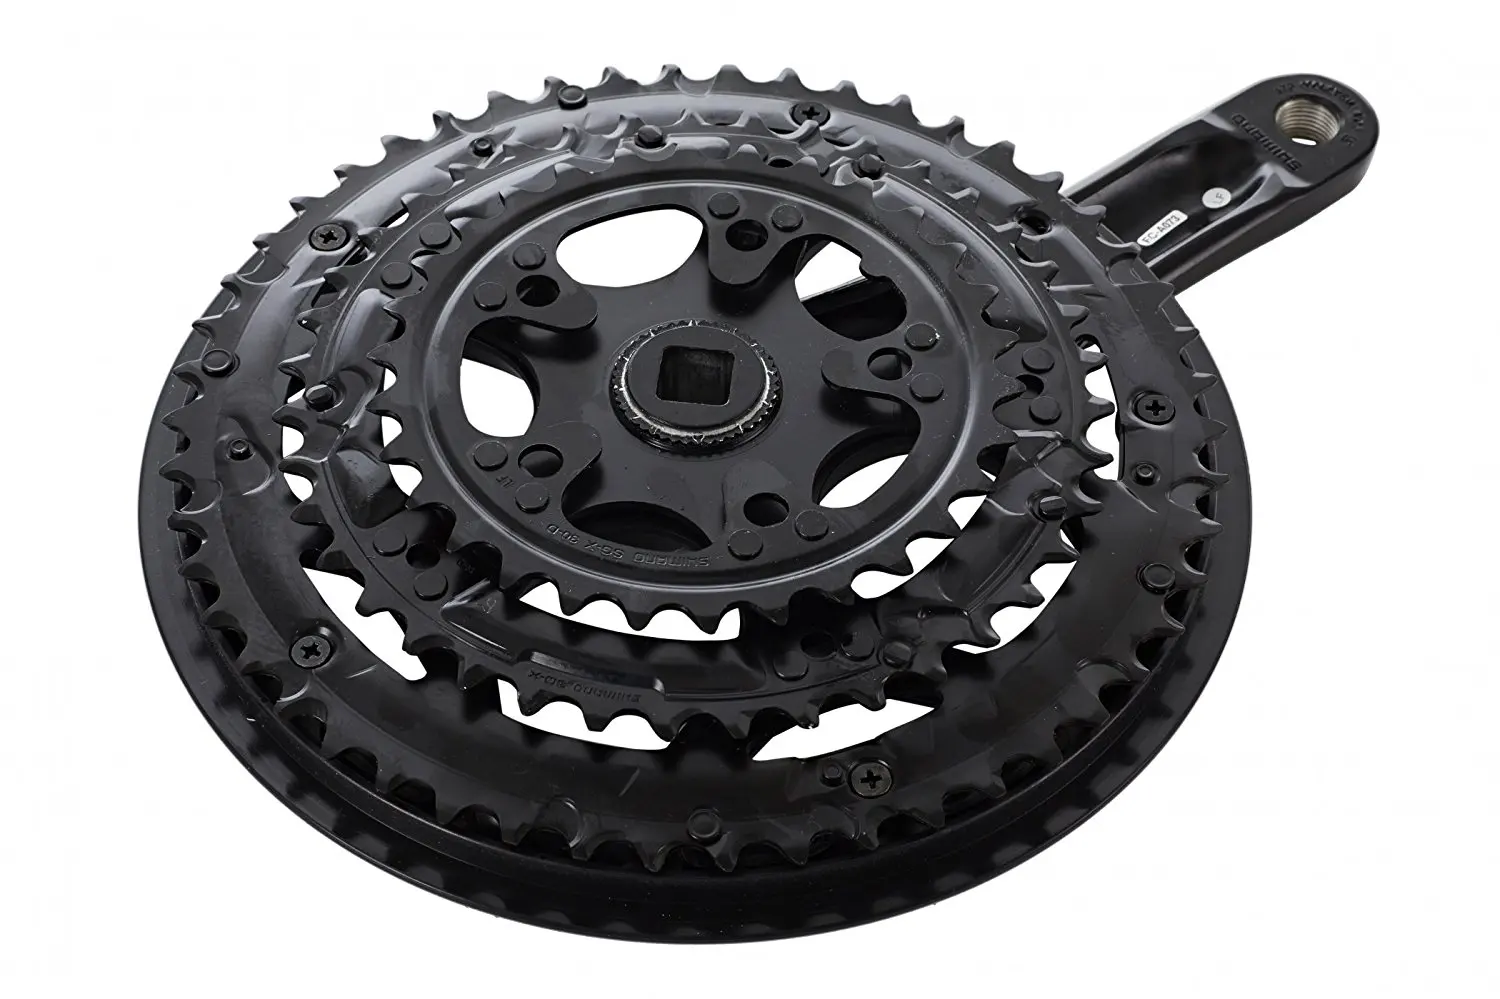 If something were to happen to one of the chainrings, or when it gets worn out, you're meant to replace the entire crank+chainring assembly. This might actually be cost effective in terms of $/year, but it seems wasteful. Especially if you're looking to maintain the bike yourself down the road, and keep it indefinitely, it might be worth getting a crank with the usual holes for crank bolts to fix the rings:  Where you keep the crank forever and swap rings ($20-30) as they wear out. I suspect parts availability for loose rings will be better than that tourney triple in coming years, but I could be wrong. Old triple MTB cranks and their chainring standards are also aging out of existence. quote:It also seems like the BB-UN55 is being discontinued to be replaced with the BB-UN300, so if they'll have to order something for me either way, either one would be fine, as long as it's 68x122.5? quote:I know chainline is a thing which is why some of these sizes matter. It is possible to have a chainring size range and cassette size range that is so big that your derailleur can't handle some extreme gearing combos, but if you stay in the same generation of parts (and keep the same chainring sizes), this is very unlikely. kimbo305 fucked around with this message at 04:19 on Mar 25, 2021 |
|
#
?
Mar 25, 2021 04:16
|
|

|
It looks like as far as "in stock" they have an Altus/Acera M311 (which appears to have the some stamped construction as the TY501) and an M361, which does appear to be a standard assembly. From what I've found Altus/Acera is the next "step up" in Shimano component quality, but both of those appear to be previous generation so the only information I can find on Shimano's site is exploded parts views. Googling other sites (and I did manage to find this datasheet) it looks like the M361 also requires a 122.5mm bottom bracket. This is all going by what's listed on my bike shop's website, I know they get parts through QBP so it shouldn't be a problem to order some other "active" Shimano crankset, the problem I have at that point is there are so many options that I'm not sure where to start looking, if the M361 is going to have some problems (though at $58 for the M361 vs $27 for the TY501 that's probably about as much as I'd want to spend on this right now). FISHMANPET fucked around with this message at 16:58 on Mar 25, 2021 |
|
#
?
Mar 25, 2021 16:55
|
|
|
FISHMANPET posted:if the M361 is going to have some problems (though at $58 for the M361 vs $27 for the TY501 that's probably about as much as I'd want to spend on this right now). The next tier of cranks will be using a more modern external cup bottom bracket, which IMO is easier to service (and remove) but really not any more durable.
|
|
#
?
Mar 25, 2021 17:52
|
|
|
My brakes suck. Norco Storm 5, mechanical disk brakes, bought last November and with just over 1000 km of commuting on it so far. This week has been extremely wet here; we're on top of the hill so the water runs away from us, but massive rain Sunday-Monday-Tuesday soaked us as well as the usual downstream places that have been pretty much devastated. I can't really complain, my commute got messed up not my whole life. And the rainbow on Wednesday was lovely. I rode through plenty of dirty water this week, both in the form of rain and the flooded MUP of my commute. I think grit and water got between the pads and the rotor, and my braking ability is now terrible. It's also really variable, if I "warm up" the brakes early in my ride by pedalling and gently working the brake, they will be (somewhat) less awful 5 minutes later, but I'm never able to get them as good as they have been in the past. Obviously, I need to clean my bike - it's filthy from all the splashing. That's in the plan for this weekend. The problem is, I've never really worked with disk brakes before. I know I need to adjust them anyways, they slightly rub on one side of the rotor while there's a gap of a couple of millimetres on the other side, both front and rear. I've got the owner's manual and it provides basic instruction - but are there any tips or warnings? Something I need to do to avoid headaches like lost screws or something?
|
|
#
?
Mar 26, 2021 00:43
|
|

|
ExecuDork posted:My brakes suck. Dirt and water between the pad and rotor isn't really a huge problem, the issue is more that the brakes aren't great imo. Maybe look for a pair of used hydros on pinkbike, it's well worth it. It could be that the pads were contaminated with oil or something in the water puddles but if they're fine once they're warm that's not what I would expect there.
|
|
#
?
Mar 26, 2021 00:54
|
|

|
Some things I'd do to check things out: > Take your wheels off, clean the rotors with a shop towel and some isopropyl alcohol. > Take your pads out. Check and see how much material is left. If you have 3 business cards around, that's a good depth that if you're close or below, changing out the pads is a good idea. > If your pads have enough material left, I would take some sand paper and sand off the top layer. Be sure when you put everything back together you bed things back in to make sure you're braking power is OK before going out on a ride. As for the rubbing, you might be able to center it up by eye, but I haven't done it with mechanical discs in a while so I'm unsure what the easiest tricks are. With hydros it's not too bad.
|
|
#
?
Mar 26, 2021 01:21
|
|

|
ExecuDork posted:My brakes suck. FIXED! I washed my bike and then got to work on the brakes. The inner pads, both front and rear, are held in threaded plugs, and both had backed out. This meant when I squeezed the lever and the outer pad was pushed towards the rotor, there was nothing on the other side of the rotor to push back and the rotor was only lightly pushed, not squeezed. Thus my terrible braking. Setting the inner pads correctly involved simply rotating the threaded plug then tightening the set-screw that's supposed to stop this from happening. This process is complicated by the presence of the wheel, and my crappy tools.  Wash bike and adjust brakes by Martin Brummell, on Flickr Wash bike and adjust brakes by Martin Brummell, on FlickrFilthy bike.  Wash bike and adjust brakes by Martin Brummell, on Flickr Wash bike and adjust brakes by Martin Brummell, on FlickrClean (-ish) bike.  Wash bike and adjust brakes by Martin Brummell, on Flickr Wash bike and adjust brakes by Martin Brummell, on FlickrFront inside pad in its plug.  Wash bike and adjust brakes by Martin Brummell, on Flickr Wash bike and adjust brakes by Martin Brummell, on FlickrGood-enough rear brakes. Success! My brakes now work very well. I also cleaned, dried, and lubed the chain and all of the gears. Happiness is a smooth, silent drivetrain and effective brakes.
|
|
#
?
Mar 29, 2021 00:24
|
|
|
  pad gap pad gap
|
|
#
?
Mar 29, 2021 00:35
|
|
|
Don't clamp your bike by the top tube. Also your flickr stream is very pretty and that old blue bike with the silver fork is fuckin rad and I hope you still have it.
|
|
#
?
Mar 29, 2021 00:44
|
|

|
Thank you. I do still have the pretty old blue bike, it's my Frankenbike from the tip shop and is currently lacking a bottom bracket, along with the rest of the drivetrain. I hope to turn it into my backup commuter, eventually. For now it's just gathering dust and spiders in the garage but it's safe and I haven't forgotten about it. First I have to stop being so lazy. The ongoing discussion about 3-chain-ring cranksets and so forth is very interesting. While I'm here, what's involved in replacing a BB? The old one is gone, the shop stopped work on that bike when they realised the cost of parts & labour was going to greatly exceed the value of the bike and approach the cost of a new bike. I could buy a BB from them and have them install it, but save the rest of it (chain, both deraileurs, cassette - probably new wheels, too - chain rings, crank, pedals) for myself and the used / discount market. The cables are internal, other than squeezing cables (and I guess scratching the paint), what's wrong with clamping by the top tube? \/\/\/ Cool, thanks! Seatpost from now on. ExecuDork fucked around with this message at 01:16 on Mar 29, 2021 |
|
#
?
Mar 29, 2021 00:51
|
|
|
A BB in my shop is 23 bux and the tool to install it is 8. If it doesn't thread in nicely you might need the threads chased and that requires specialized tools. A shop should do it for 10-20 bux. The top tube is actually fairly thin and while the frame is designed to withstand the forces present in riding, it's susceptible to damage from the force of the clamp. Might be fine when it's static but apply some torque and you might wreck your frame. Whenever possible clamp by the seatpost or barring that the seat tube wirh a seatpost in it. The few times you can't do that (installing a dropper) be very careful, clamp lightly and don't put torque on the frame.
|
|
#
?
Mar 29, 2021 01:10
|
|
|
Where can I buy a new one of these? Preferably for less than $339 + $15 shipping I saw on ebay. The clamp on seems to be way cheaper, can they be converted?
|
|
#
?
Mar 31, 2021 05:07
|
|
|
Stitecin posted:Where can I buy a new one of these? Preferably for less than $339 + $15 shipping I saw on ebay. The clamp on seems to be way cheaper, can they be converted? Did the rivets holding the braze-on come off? Cause those don't come with the derailer and getting a new one won't particularly help with your problem. You can use mostly any front derailer for road doubles though, it might just not be as perfect with your shifters if you go cheap or with another brand.
|
|
#
?
Mar 31, 2021 05:16
|
|

|
Yes the rivets got yanked out of the frame, I posted about it a few pages back. The frame is off for carbon fiber repair this week so I need to start looking for a derailleur and a hanger. I'd like to get this done as cheap as possible and sell/replace the bike at the end of this summer so doing it "right" enough to hold its value is also a consideration.
|
|
#
?
Mar 31, 2021 05:27
|
|
|
Can't you take the derailleur off of the broken hanger, or am I missing something? E: I was definitely missing something simmyb fucked around with this message at 09:11 on Mar 31, 2021 |
|
#
?
Mar 31, 2021 06:45
|
|

|
simmyb posted:Can't you take the derailleur off of the broken hanger, or am I missing something? Yeah, that mount looks like it�d fit any number of band clamps. Could you have the repair shop replace the area with a cylinder instead of fixing the braze on interface?
|
|
#
?
Mar 31, 2021 07:06
|
|
|
Stitecin posted:Where can I buy a new one of these? Preferably for less than $339 + $15 shipping I saw on ebay. The clamp on seems to be way cheaper, can they be converted? It's just the cage that is broken, right? Assuming the repair shop is installing a new braze-on, you should be able to just buy a spare part cage and not replace the whole derailleur.
|
|
#
?
Mar 31, 2021 07:39
|
|

|
bicievino posted:It's just the cage that is broken, right? Assuming the repair shop is installing a new braze-on, you should be able to just buy a spare part cage and not replace the whole derailleur. I am not sure, it looks like there's a bit of twist in the black linkage and possibly some paint cracking, but the twist might be by design and the cracking might not be new.
|
|
#
?
Mar 31, 2021 22:36
|
|
|
Stitecin posted:I am not sure, it looks like there's a bit of twist in the black linkage and possibly some paint cracking, but the twist might be by design and the cracking might not be new. This one is in good shape and costs 31 USD https://www.ebay.com/itm/254916822120
|
|
#
?
Mar 31, 2021 22:51
|
|
|
bicievino posted:This one is in good shape and costs 31 USD That is why I was asking about buying a cheap clamp on derailleur and converting it to my braze on. A '05 R3 has square tubing near the bottom bracket.
|
|
#
?
Apr 1, 2021 00:57
|
|
|
Stitecin posted:That is why I was asking about buying a cheap clamp on derailleur and converting it to my braze on. A '05 R3 has square tubing near the bottom bracket. Looks like you're outta luck on both fronts, then. That FD is definitely integrated into the band clamp.
|
|
#
?
Apr 1, 2021 01:30
|
|
|
You can fully disassemble a 10spd campy derailleur and replace the broken parts from that $31 donor. Sorry, I missed that in your original question. Edit: or here's a record braze-on one for a nice price https://www.ebay.com/itm/campagnolo-record-10-speed-front-derailleur-Braze-On-/143986264181?_trksid=p2349624.m46890.l49286 bicievino fucked around with this message at 05:54 on Apr 1, 2021 |
|
#
?
Apr 1, 2021 05:51
|
|
|
I need one of these: https://hollandbikeshop.com/en-gb/b...m-frames-black/ But I'm in the USA. Any ideas where I can find one and not pay 10-20x the cost of the part in shipping? (I've also left a voicemail with the shop I bought it from, maybe the'll have something).
|
|
#
?
Apr 2, 2021 23:45
|
|


|
I don't know where you can get one but this is basically the reason 3d printers were invented.
|
|
#
?
Apr 3, 2021 00:07
|
|

|
Maybe. If I had nylon filament. I could probably make it work with PLA+. I whipped something up out of a leftover scrap of Kydex that will probably work fine until I can get the real part or get around to modeling the part.
|
|
#
?
Apr 3, 2021 00:40
|
|
|
Salt Fish posted:I don't know where you can get one but this is basically the reason 3d printers were invented. Are any of the materials used in those strong enough for these kinds of applications? Everything I've seen from them is a soft-ish plastic.
|
|
#
?
Apr 3, 2021 01:05
|
|
|

|
| # ? Jun 8, 2024 08:00 |
|
|
With a high infill, it'd be plenty strong for setting the tension. Might drift/crush a bit if the bolt on the axle loosens over time. If I were making that thing, I'd prob line the working face of it with a snipped out strip of tin can.
|
|
#
?
Apr 3, 2021 01:27
|
|