|
Admiral Joeslop posted:Reaper has a lot of decent and cheap minis. Be careful of their Bones line; they're lower quality but even cheaper and require some extra prep work. I got to see the Frostgrave plastic kits in the flesh for the first time recently, and I was surprised by how fun they look to build and paint. And they're pretty cheap. But for random minis to just do paint practice on, honestly, ask your local gaming community. I've donated a bunch of minis for clubmates' kids to practice on and so on, you're bound to end up with more minis than you'll have the time to paint. Second option is second hand, there are lots of minis that are almost worthless on the second hand market that you can scoop up in droves.
|
 #
?
Aug 9, 2021 21:56
#
?
Aug 9, 2021 21:56
|
|


|

|
| # ? Jun 4, 2024 23:22 |
|
|
this is me. i have been going back in after and picking out the colors and highlights but it feels silly after zenithal priming and all.
|
|
#
?
Aug 9, 2021 22:02
|
|

|
DevCore posted:I want to get started and practice but I don't want do jump into it with sets that are pricey. What they have are things like this. It can be shipped but I am sure not as good of deal if shipped (or even what their shipping is like).
|
|
#
?
Aug 9, 2021 22:13
|
|


|
GreenBuckanneer posted:I was following along with the painting suggestion for space wolves  This guy was done using the steps described in the citadel paint app except with the paint color converted to Vallejo equivalents, he was primed in bone (I prefer to prime in bone and brown instead of white and black), based in Sombre Grey (The Fang) , washed with AP Strong Tone, layered in a 50/50 mix of Sombre Grey and Wolf Grey and highlighted in Wolf Grey (Fenrisian Grey), with a final drybrush pass of Wolf Grey mixed with a touch of White. When they say to 'layer', they mean to color everything except the recesses the wash has settled into, so you'd still have a lot of your basecoat and wash visible. On my guy that means the top half of the boots, any upwards facing panels of armor, the outer layer on the lower legs, etc. I have an entire army of 'off color' 2nd edition space wolves from my youth because I did not have access to Citadel paints so I did the army in 99 Cent craft paints from Michaels.
|
|
#
?
Aug 9, 2021 22:42
|
|


|
GreenBuckanneer posted:I was following along with the painting suggestion for space wolves Primer is required because it clings onto the plastic and gives acrylic paint a surface to cling to. Otherwise it would just slide all over the smooth plastic and look awful. I don't know the specific instructions of the top of my head but it should be something like: Prime, Base in The Fang (grey blue), Nuln Oil aiming for the crevices and panel lines (shading step) and then highlight Fenrisian Grey (light grey) on edges of armour and on various topmost bits of the model. E;fb by someone who has done that colour scheme
|
|
#
?
Aug 9, 2021 22:43
|
|
|
lilljonas posted:Yeah polyurethane resin is what I have experience with. In liquid form it tends to give your hands rashes when you work with it a lot, even when wearing gloves. That's pretty much it. The really no-no part is sanding the cured product without a mask and inhaling that dust, which is very bad in the long run. The UV resin used in resin 3d printers is a completely different beast, not only is it toxic but it can give you burns if exposed to UV (as in most light) when it's in contact with your skin. On top of all that, it's a sensitizer and overexposure to uncured resin can give you a permanent allergic reaction just when in proximity to it. There are guys in the 3d printing threads with more experience and details, but I would not suggest using UV resin for gluing together models unless you really know what you're doing especially since super glue works just fine for the job.
|
|
#
?
Aug 9, 2021 22:48
|
|

|
TheDiceMustRoll posted:Airbrushing is "I really like this poo poo, time to go balls deep and spend mucho dollars on it." level of commitment. This was the conventional wisdom until a few years ago, but you can get a cheap (under $120) generic airbrush and compressor off Amazon, Harbor Freight, or Michael's with a black Friday coupon. Look for double action on the brush and a tank on the compressor. Even if you never master airbrushing, this setup will let you prime and varnish in any weather, and it pays for itself by replacing those rattlecans. Obviously don't buy one with your first minis, but don't be afraid to (eventually) grab a beater airbrush setup to learn on.
|
|
#
?
Aug 9, 2021 22:58
|
|


|
Bucnasti posted:The UV resin used in resin 3d printers is a completely different beast, not only is it toxic but it can give you burns if exposed to UV (as in most light) when it's in contact with your skin. On top of all that, it's a sensitizer and overexposure to uncured resin can give you a permanent allergic reaction just when in proximity to it. You can buy UV resin nail polish that'd work as UV glue, and it's safe to handle
|
|
#
?
Aug 10, 2021 07:37
|
|

|
Silhouette posted:You can buy UV resin nail polish that'd work as UV glue, and it's safe to handle And resin nail polish curing lights are a cheap source of UV light, and they're sized to put two hands under them. That lets you put a generous printing allotment under UV light at once, and for much cheaper than a UV light branded for use with 3D printers..
|
|
#
?
Aug 10, 2021 08:15
|
|


|
moths posted:This was the conventional wisdom until a few years ago, but you can get a cheap (under $120) generic airbrush and compressor off Amazon, Harbor Freight, or Michael's with a black Friday coupon. For me the big deal with airbrushing is not the cost, but the extra work. Living in an apartment with my wife, I can't airbrush at home. It's just not doable, even with a so called "quiet" compressor. I can do it at my club when it's not game night, but I have yet had an experience where I don't spend hours in total cleaning before and after the actual airbrushing. Airbrushing is cool and fun, but it's also very frustrating at times, and requires far more time cleaning and prepping than brush painting. My point is that if you just watch youtube videos or hear from experienced painters, that frustrating part where you disassemble and clean and assemble and disassemble and clean and assemble and disassemble and clean and assemble and STILL ONLY GET BUBBLES IN THE PAINT CUP and disassemble and clean and assemble and disassemble and clean tends to, well, not be highlighted as much. That said I still go to the airbrush when I'm painting large numbers of tanks or other vehicles. I just know I'll be cursing the entire time.
|
|
#
?
Aug 10, 2021 08:49
|
|
|
I just spray water and airbrush cleaner a few times when I'm done and then give the needle and cup a thorough wipe with airbrush cleaner and I haven't had to pull apart my airbrush in a while. Then again I mostly spray inks and vallejo metal colour now so maybe they're just that thin.
|
|
#
?
Aug 10, 2021 09:03
|
|
|
I spray just about everything through mine short of oil paints, and the worst I have to do is throw my priming airbrush into the ultrasonic cleaner for a bit every few months. I find it so little extra effort that it's my primary painting tool for huge portions of every miniature I do.
|
|
#
?
Aug 10, 2021 09:22
|
|

|
DevCore posted:I want to get started and practice but I don't want do jump into it with sets that are pricey. WizKids minis are cheap (2 for $5), decently detailed, and widely available.
|
|
#
?
Aug 10, 2021 12:07
|
|

 Lord of change progress so far So far have learned quite a few techniques from painting this. Really light dry brushing was crucial to getting the highlighting done.
|
|
|
#
?
Aug 10, 2021 15:39
|
|

|
 This is what I mean, it looks "wrong" to me like I hosed up, so I'm putting it aside for now while I work on other ones from the box.
|
|
#
?
Aug 10, 2021 17:24
|
|

|
Are you following one of the Citadel painting guides, like in the app or whatever? They use the term 'layer' in an ambiguous way. It's a 'layer' paint that they're referring to (which are like 'base' paints but a bit thinner - just a GW jargon/marketing thing really), but this could mean that you're supposed to paint a thin layer on top of the previous base coat (e.g. as a glaze/zenithal effect)... or more likely it means use the layer paint to edge highlight. For your model, looks like it meant edge highlight. It might be worth checking out the Warhammer youtube channel to see if they have any guides for Space Wolves. They usually demonstrate pretty clearly what kinds of techniques are used and what areas they're painting for each step.
|
|
#
?
Aug 10, 2021 17:37
|
|
|
I think it looks fine to me. Unless you're really really going for the boxart look. But half the fun of this is making things yours. You painted them. They're your little works of effort. So make them personalized.
|
|
#
?
Aug 10, 2021 17:54
|
|
|
mllaneza posted:And resin nail polish curing lights are a cheap source of UV light, and they're sized to put two hands under them. That lets you put a generous printing allotment under UV light at once, and for much cheaper than a UV light branded for use with 3D printers.. Yep. My wash & cure station is a tupperware container of isopropyl and a nail curing oven, cost me like $15 total.
|
|
#
?
Aug 10, 2021 18:16
|
|
|
GreenBuckanneer posted:
I think it looks really good. One suggestion is to thin the paint a bit more (and use another layer if necessary), since it looks like there are a couple of brush strokes visible. That is usually an indicator a slightly too thick paint. As far as the nuln oil goes, the general idea is to paint on top of it in the highest place, like leg/chest/arms etc, but leave it dark in the recesses, like between the fingers, under the knee caps, and so on.
|
|
#
?
Aug 10, 2021 20:07
|
|
|
Revelation 2-13 posted:I think it looks really good. One suggestion is to thin the paint a bit more (and use another layer if necessary), since it looks like there are a couple of brush strokes visible. That is usually an indicator a slightly too thick paint. As far as the nuln oil goes, the general idea is to paint on top of it in the highest place, like leg/chest/arms etc, but leave it dark in the recesses, like between the fingers, under the knee caps, and so on. I was having a hard time thinning the Fenrisian Grey adequately, honestly. It was so chunky even after shaking the poo poo out of it with a metal ball in the pot. I really have to move away from citadel pots I think.
|
|
#
?
Aug 10, 2021 20:16
|
|
|
CyberPingu posted:
Is that the Duncan method? I got about that far then got bored of the project.  I'm hoping to restart work on it once I get done working on my Imperial Fists for the Goonhammer Open narrative. 
|
|
#
?
Aug 10, 2021 20:19
|
|

|
Thanks for the good tips everyone! Definitely have a better jumping off point.
|
|
#
?
Aug 10, 2021 20:42
|
|


TheBigAristotle posted:Is that the Duncan method? I got about that far then got bored of the project. Yeah it is. It's only the 2nd thing I've painted so wanted a bit of guidance before jumping in at the deep end.
|
|
|
#
?
Aug 10, 2021 22:46
|
|
|
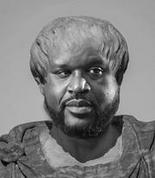
GreenBuckanneer posted:
Looks good to me, for one thing your head is way better than a lot of ones I've seen out there. The furs and the aquilae look great and the sword looks good too. I think what you're seeing is that you've painted all of the power armour over with Fenrisian Grey but it's too thick. You want it way thinner so it's a glaze and it's kind of gently brushing on just enough paint to lighten whatever you're putting it on top of. Making sure your paint is thin enough is especially harder with lighter shades because then your brushstrokes become apparent if it's too thick. Great if you want impasto but probably not if you want a GW look. Also one more step that differentiates yours between the 'Eavy Metal boxart is that they very aggressively edge highlight which exaggerates the contrast on a model and make it seem even brighter than it is.
|
|
#
?
Aug 10, 2021 22:52
|
|
|
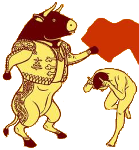
drat that is some good looking yellow tba 
|
|
#
?
Aug 10, 2021 22:55
|
|


|
Here is the space wolves from GW. I saved a bunch of these when deciding on what to go with: https://youtu.be/3FAfm01AIVE
|
|
#
?
Aug 10, 2021 23:46
|
|


|
CyberPingu posted:Yeah it is. It's only the 2nd thing I've painted so wanted a bit of guidance before jumping in at the deep end. Duncan rocks
|
|
#
?
Aug 11, 2021 00:48
|
|
|
Really happy with how this Dragsta turned out. 
|
|
#
?
Aug 11, 2021 01:47
|
|
|
S.W.O.R.D. Agent posted:Here is the space wolves from GW. I saved a bunch of these when deciding on what to go with: https://youtu.be/3FAfm01AIVE Unfortunately I already went throughout the start collecting box and based them all so far with abaddon black and the fang, then went over as light as I could as thin as I could with fenrisian grey  but yes that looks super easy
|
|
#
?
Aug 11, 2021 02:12
|
|
|
I don't know if it's the heat, the crappy Amazon airbrush/compressor or my lot of stynlrez primer but I have determined that it is infinitely easier and quicker to brush prime. I spray a sheet of paper to judge how much I need to give and its fine then I move to the mini and nothing. Give it a bit more and then it sputters. So maybe it's not thinned enough and its drying on the tip but now it's not laying down dry. Had enough, treat the primer like a shade and let it dry for 24 hours.
|
|
#
?
Aug 11, 2021 03:05
|
|

|
Sometimes you just get a bad batch of primer You can get very little bottles of Vallejo primer, try one of those first then consign the airbrush to the garbage heap. E: fwiw that sounds like bad primer.
|
|
#
?
Aug 11, 2021 04:42
|
|


|
MasterBuilder posted:I don't know if it's the heat, the crappy Amazon airbrush/compressor or my lot of stynlrez primer but I have determined that it is infinitely easier and quicker to brush prime. I spray a sheet of paper to judge how much I need to give and its fine then I move to the mini and nothing. Give it a bit more and then it sputters. So maybe it's not thinned enough and its drying on the tip but now it's not laying down dry. Had enough, treat the primer like a shade and let it dry for 24 hours. I've had a bottle of Stynylrez go bad, gets a bit gummy, starts clogging my airbrush non-stop. Only happened once with a bottle of black that I had owned for some time. Still a fan of the product and airbrush priming in-general. Re: cheap Amazon airbrush, everyone should seek out a Badger 105 if they can. The savings from a cheap airbrush just aren't worth it. The Patriot 105 is very resilient and reliable
|
|
#
?
Aug 11, 2021 14:51
|
|
|
do badger still do their crazy sales every year or have they stopped those? if you�re prepared to wait a few months you can get a 105 for like $60 or something
|
|
#
?
Aug 11, 2021 15:04
|
|
|
jesus WEP posted:do badger still do their crazy sales every year or have they stopped those? if you�re prepared to wait a few months you can get a 105 for like $60 or something You just missed it. I think it ended a few days ago?
|
|
#
?
Aug 11, 2021 15:08
|
|

|
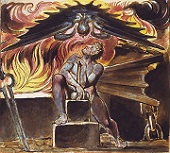
trying my hand at OSL. what do i do to make this lantern look better? Very obviously have to clean up the mini a bit bit i think the glow kinda works? 
|
|
#
?
Aug 11, 2021 15:37
|
|
|
TheBigAristotle posted:I've had a bottle of Stynylrez go bad, gets a bit gummy, starts clogging my airbrush non-stop. I own both a $25 PointZero from Amazon and a Patriot 105. I've actually been much more impressed with the PointZero. It comes with a 0.2, 0.3, and 0.5mm needle/cap (whereas the Patriot only comes with 0.5mm, 0.35mm purchaseable separately). The PointZero's comes with a trigger backstop for better control, a needle protector so the needle isn't exposed while brushing if you accidentally drop it, and a spray nozzle that actually screws on (extremely important so that when you're removing the spray cap to clean, you can't accidentally drop the nozzle, and god drat once those things are dropped they are gone forever due to how small they are)
|
|
#
?
Aug 11, 2021 16:01
|
|
|
punishedkissinger posted:trying my hand at OSL. what do i do to make this lantern look better? Very obviously have to clean up the mini a bit bit i think the glow kinda works? Looks great! I'm not pro when it comes to OSL but if you wanted to, I say go even brighter/more contrast!
|
|
#
?
Aug 11, 2021 16:24
|
|

|
AndyElusive posted:Looks great! I'm not pro when it comes to OSL but if you wanted to, I say go even brighter/more contrast! Thanks! I'm going to edge back in with some of the base colors and clean up the sloppiness a bit, then I'll lighten my wash and try and really brighten it up.
|
|
#
?
Aug 11, 2021 16:28
|
|
|
punishedkissinger posted:trying my hand at OSL. what do i do to make this lantern look better? Very obviously have to clean up the mini a bit bit i think the glow kinda works? This guy looks great!
|
|
#
?
Aug 11, 2021 16:38
|
|


|

|
| # ? Jun 4, 2024 23:22 |
|
|
punishedkissinger posted:trying my hand at OSL. what do i do to make this lantern look better? Very obviously have to clean up the mini a bit bit i think the glow kinda works? The glow's a good start, but if you're looking to punch it up it could use some direct highlights on all the raised areas facing the lantern. To make them easy to spot, I marked those areas in pink. The ground could also use some highlighting to sell the effect, just be careful because the base of the lantern will create sort of a square where it isn't casting any light. I'd do a light drybrushing of your yellows and oranges on the floor outside that square, and then you can either leave that square as-is or give it a heavy black wash to help sell the effect that everything else is brighter because of the lantern.  Edit: If you do go the black-wash route, you'll probably want to hit the areas behind the guy's legs as well to make it look like he's casting a shadow. Those would be fairly wide cones because of how close he is to the light source. So basically everything in the light blue areas you probably want to be pretty dark. PoptartsNinja fucked around with this message at 16:57 on Aug 11, 2021 |
|
#
?
Aug 11, 2021 16:52
|
|