


|
ddiddles posted:Also considering robbing people for their lumber, prices are stupid. great news! it only gets worse when you escape the gravity of 2x4s and plywood!
|
 #
?
May 28, 2022 07:10
#
?
May 28, 2022 07:10
|
|


|

|
| # ? May 22, 2024 17:57 |
|
|
Congrats on the new space. Sounds like you're on the right track for building up the shop and having a healthy fear of the spinny sharp things.
|
|
#
?
May 28, 2022 16:57
|
|

|
I recently designed a desk for my studio. I live in a city and have no space to do big projects, but my dad has a garage at home and offered to build it as a birthday present.  It turned out surprisingly well, considering I had never designed a piece of furniture before and he had never built a desk before. All of the tolerances were great (i.e. sizing of the sliding keyboard tray and 19" rack inserts), the desk was level, it could support the necessary weight. It was perfect. Except for the finish. Three weeks out, the finish is still extremely tacky- if I stop moving my mouse momentarily it 'sticks' to the table and small bit of force is needed to get it moving again. Simply touching the surface of the desk is sticky, and leaves a very noticeable smudge/fingerprint impression. Setting anything on the table (like the midi devices or clamps in the picture) leaves a permanent impression or smudge before long. He is convinced the finish will dry with time, but my experience (from finishing a couple guitars) is that stains applied too thick never dry right. My dad tends to to get a bit impatient, and isn't the best at following directions. I learned he used Saman branded 'One Step Wood Stain & Varnish', marketed as an all in one 'Seal, Stain and Varnish'.  The directions very specifically say to apply in thin, even coats leaving drying time between coats. However, I came to learn my dad had applied the finish much thicker than intended, almost like a paint, to get the dark black Ebony coat in the picture  The can advises cleaning with 'warm soapy water' or 'mineral spirits', and some articles online suggest this can help fix a tacky finish by dissolving leftover pigment. But I have tried wiping down a hidden section of the desk with both (I also tried Naptha) and there's not much improvement or decrease in tackiness. The cloth I applied it with doesn't appear to be lifting any pigment either. When I tried to scrub harder I ended up scuffing a section- which did feel less tacky but also looked bad. Is it likely that it will eventually lose tackiness if I keep applying mineral spirits/naptha/soapy water? If I let it dry for a few more weeks/months? Is there something I could apply to seal/harden it? Or has the finish been borked and needs to be redone? PoizenJam fucked around with this message at 18:04 on May 29, 2022 |
|
#
?
May 29, 2022 17:57
|
|

|
PoizenJam posted:I recently designed a desk for my studio. I live in a city and have no space to do big projects, but my dad has a garage at home and offered to build it as a birthday present. Probably take it back to his garage to dry out, based on current humidity. If you have a space heater, use judiciously. Soap and water are not going to help, and mineral spirits does not penetrate the immediate surface as far as I know.
|
|
#
?
May 29, 2022 19:21
|
|


|
Taking it back to the garage is not possible... It's half a continent away. He delivered it during a road trip. Unfortunately, a complete disassembly also has to be avoided at all costs, as I will be using the desk for work. But if some additional drying in a warm, dry environment might help as you suggest... I suppose, is use air conditioning for humidity control for the room, close the door and windows, and run the computer through some brutal benchmarks so it acts as a space heater. 
|
|
#
?
May 29, 2022 21:11
|
|
|
I ran out of the really nice 1/4" underlayment plywood that I've been using for backs and drawer bottoms. It was 5 equal thickness birch plys and I think ~$18 a sheet a few years ago. Haven't seen it since and now I have to convince myself to spend ~$45 on absolutely garbage 1/4" plywood. 3/4" MDF is almost $60 right now too. So now the lathe stand has half a back and no top.
|
|
#
?
May 30, 2022 21:47
|
|


|
I just wrapped up the cabinet I've been building over in my project thread. Real proud of how this thing turned out. Black cherry, dovetailed case and drawers, frame-and-panel door with a carved panel.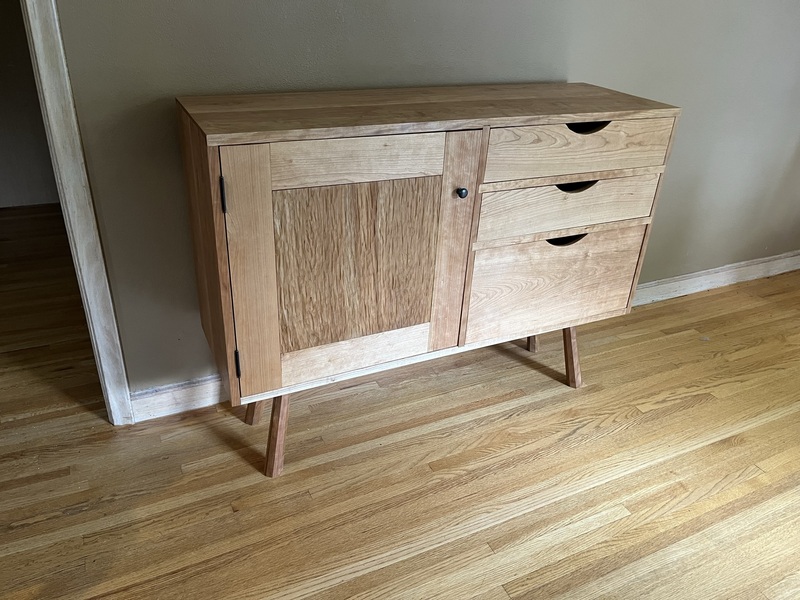 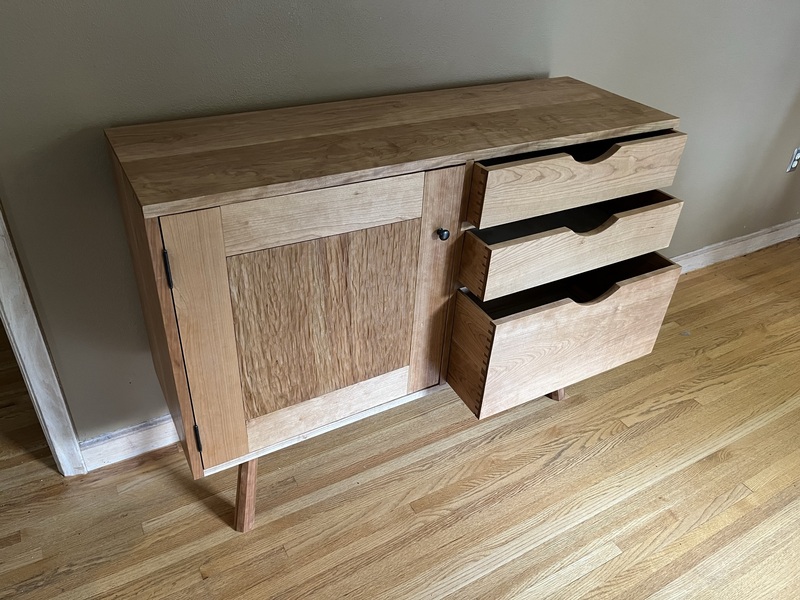 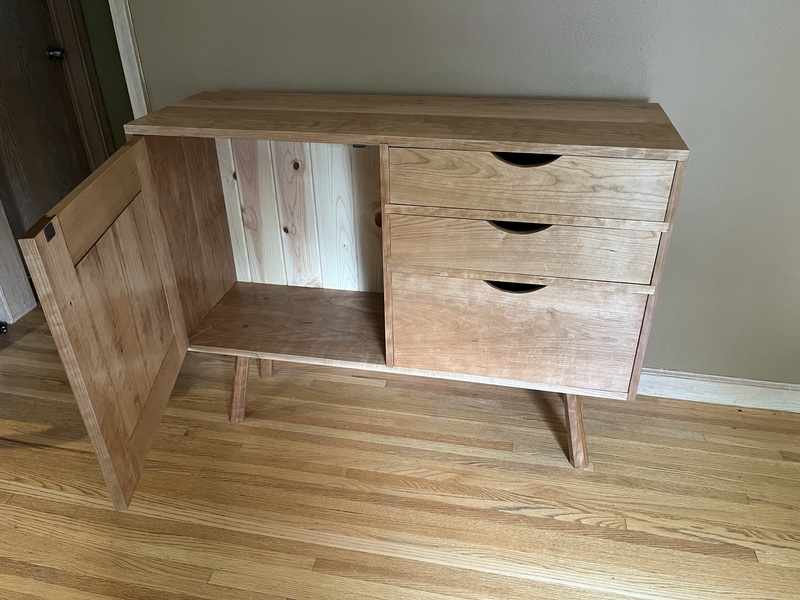
|
|
#
?
May 30, 2022 22:19
|
|

|
Looks fantastic and the thread was a joy to follow!
|
|
#
?
May 30, 2022 23:49
|
|


|
The jointer is operational! Square enough I think.  Yes I still need a belt guard. Don't think I'm going to bother with the blade guard, I can close the fence up to the very front edge.
|
|
#
?
May 31, 2022 01:01
|
|
|
ColdPie done their cabinet and Nomnomnom done their jointer. Good work both of you.
|
|
#
?
May 31, 2022 02:00
|
|
|
ColdPie posted:I just wrapped up the cabinet I've been building over in my project thread. Real proud of how this thing turned out. Black cherry, dovetailed case and drawers, frame-and-panel door with a carved panel. drat, this looks class. Nice job! So I somehow managed to transfer my 3d model into the real world.  Came together pretty easily for the most part, I decided I'm going to keep the miter saw on its stand, taking it off and on to use the table saw would be annoying. I might build something against the wall that has the miter saw and planer in it, but this bench will be the longest thing I make in a while. I forgot that the fence track sticks out a good 4 inches when its set to 0 so my 25x25 cutout for it was too shallow. Didn't feel like cutting through anything else for it right now so I just extended its platform out and will do it properly depending on how many times I hit my shin on it.
|
|
#
?
May 31, 2022 17:03
|
|

|
^^^^ that's super cool! I hope one day to have a sweet homemade station like that. Right now I'm almost finished with babby's first woodworking project(not counting 8th grade shop class): a tabletop ring game  I have enough wood to make 3 more, planning on giving the better ones away at gifts but I'm not too unhappy with my (first ever) miter cuts and forstner bit attempts! I gotta say cutting at a 46° angle is more awkward than I thought it would be, lol
|
|
#
?
May 31, 2022 17:50
|
|


|
I'm making a coaster/trivet for my desk because the one I have doesn't have enough absorbing capacity for how humid it gets sometimes. I'm using pine - is there a finish I can put on it that will still allow it to absorb water freely while making it look a bit nicer than plain pine?
|
|
#
?
Jun 1, 2022 14:10
|
|

|
Finishes do almost nothing to inhibit humidity, if that's what you're asking.
|
|
#
?
Jun 1, 2022 17:49
|
|
|
The Slack Lagoon posted:I'm making a coaster/trivet for my desk because the one I have doesn't have enough absorbing capacity for how humid it gets sometimes. I'm using pine - is there a finish I can put on it that will still allow it to absorb water freely while making it look a bit nicer than plain pine? If you want the coaster to act like a sponge, unfinished is probably best. Oil or wax will make it look a little nicer and don't really provide much real waterproofing, but they can cause water to bead on the surface which may not be what you want.
|
|
#
?
Jun 1, 2022 17:53
|
|

|
The Slack Lagoon posted:I'm making a coaster/trivet for my desk because the one I have doesn't have enough absorbing capacity for how humid it gets sometimes. I'm using pine - is there a finish I can put on it that will still allow it to absorb water freely while making it look a bit nicer than plain pine? You could put a layer of cork on top
|
|
#
?
Jun 1, 2022 17:56
|
|

|
generally you don't want to encourage your wood to absorb water cause that's what makes it, y'know, warp and crack and poo poo. And because then you're leaving a wet sponge on whatever you got the coaster to protect. if a regular coaster isn't cutting it for your water emission rate you might be better served by some kind of saucer type arrangement, with a lip.
A Wizard of Goatse fucked around with this message at 20:38 on Jun 1, 2022 |
|
#
?
Jun 1, 2022 20:29
|
|

|
I'm doing the marquetry & parquetry for a couple upcoming projects, thought I would share. Herringbone in black ash and sapele.  Spiral with an assortment of wood species.  
|
|
#
?
Jun 1, 2022 21:42
|
|
|
To be clear, the coaster is made of scrap wood so I don't care too much about it
|
|
#
?
Jun 1, 2022 22:09
|
|
|
ColdPie posted:I just wrapped up the cabinet I've been building over in my project thread. Real proud of how this thing turned out. Black cherry, dovetailed case and drawers, frame-and-panel door with a carved panel. Wow, you're good. That's gorgeous.
|
|
#
?
Jun 1, 2022 22:28
|
|


|
Meow Meow Meow posted:I'm doing the marquetry & parquetry for a couple upcoming projects, thought I would share. I've never really wanted to dig into marquetry until this moment right here.
|
|
#
?
Jun 1, 2022 22:33
|
|
|
put grooves in the coaster, give the water somewhere to go
|
|
#
?
Jun 2, 2022 01:10
|
|
|
Meow Meow Meow posted:I'm doing the marquetry & parquetry for a couple upcoming projects, thought I would share. hell yeah
|
|
#
?
Jun 2, 2022 02:03
|
|
|
Meow Meow Meow posted:I'm doing the marquetry & parquetry for a couple upcoming projects, thought I would share. Dude. You're owning it. That frog needs to be a wood SA smilieMods
|
|
#
?
Jun 2, 2022 04:38
|
|
|
I'm looking around for some generic T-channel for a router table and I found this: https://woodworksupply.co.uk/collections/metritrax-t-track-components/products/metritrax-universal-l-track-aluminium-metric-1200mm I've looked at a number of images of pro and home-made router fences and I can't puzzle out what design this L-track would actually be good for. What do you think?
|
|
#
?
Jun 2, 2022 19:37
|
|

|
Miter saw fence with stop blocks
|
|
#
?
Jun 3, 2022 00:39
|
|

|
Similar track is used on my table saw mitre gauge. A stop slides on the top, the front can have a sacrificial fence held on with T bolts.
|
|
#
?
Jun 3, 2022 01:44
|
|
|
They specifically say router table fence though
|
|
#
?
Jun 3, 2022 08:38
|
|
|
Router tables need stops as well, you could accomplish the same by having a wooden fence and then routing a groove to install a regular T-Track on the top of the board so that you could install a similar sliding stop block, but that's more effort than just getting this L-Track.
|
|
#
?
Jun 3, 2022 15:47
|
|


|
Jaded Burnout posted:I'm looking around for some generic T-channel for a router table and I found this: If you look at the very end of the track, it forms a hieroglyph which translates as "useless faff for the unsuspecting"
|
|
#
?
Jun 3, 2022 17:23
|
|
|
Mr. Mambold posted:If you look at the very end of the track, it forms a hieroglyph which translates as "useless faff for the unsuspecting" Very possibly. I've not made a router table fence before so I thought if it might save me some time, might be worth it. Seems I'm "the unsuspecting".
|
|
#
?
Jun 3, 2022 18:03
|
|
|
Jaded Burnout posted:Very possibly. I've not made a router table fence before so I thought if it might save me some time, might be worth it. Seems I'm "the unsuspecting". If I cut mortises or used my router table to cut much joinery, I would probably want a router table fence with stops and very fine adjustments etc. I do those tasks in other ways and mostly use my router table for pattern routing and making molding profiles. �Straight stick� does basically what I need a fence to do.
|
|
#
?
Jun 3, 2022 19:21
|
|
|
A router table fence should ideally be split with the two halves able to be moved and clamped independently, so that you can rout an entire surface off and the outfeed side of the fence catches the thinner side as you feed the workpiece through. Also so you can expose just part of the router bit beyond the fence. IMO a router table fence is the most complex, and one of the best arguments for buying a pre-made one vs. a table saw or band saw fence that can just be a solid straight block.
|
|
#
?
Jun 3, 2022 19:34
|
|

|
is there a "thinking mans" type picnic table? like one that's a little fancier than the classic? i was looking to build one and wasnt sure if the design had since evolved e: like this maybe but idk with all that lumber its gonna be heavy af and cost a pretty penny too 
BIG-DICK-BUTT-FUCK fucked around with this message at 19:56 on Jun 3, 2022 |
|
#
?
Jun 3, 2022 19:54
|
|

|
BIG-DICK-BUTT-gently caress posted:is there a "thinking mans" type picnic table? like one that's a little fancier than the classic? i was looking to build one and wasnt sure if the design had since evolved Here's this chevron top that Deteriorat and I both did: https://forums.somethingawful.com/showthread.php?noseen=0&threadid=2819334&pagenumber=849&perpage=40#post516533061
|
|
#
?
Jun 3, 2022 20:00
|
|


|
BIG-DICK-BUTT-gently caress posted:is there a "thinking mans" type picnic table? like one that's a little fancier than the classic? i was looking to build one and wasnt sure if the design had since evolved If you want something in that style but lighter you could build one of these with more outdoor-appropriate legs and make the slats actually do something. old-fashioned scaffolding uses the same kind of design. They're not especially heavy but I wouldn't expect a bigass wooden table that can withstand staying out in the weather to be super light either. A Wizard of Goatse fucked around with this message at 22:31 on Jun 3, 2022 |
|
#
?
Jun 3, 2022 22:03
|
|
|
Leperflesh posted:A router table fence should ideally be split with the two halves able to be moved and clamped independently, so that you can rout an entire surface off and the outfeed side of the fence catches the thinner side as you feed the workpiece through. Also so you can expose just part of the router bit beyond the fence. IMO a router table fence is the most complex, and one of the best arguments for buying a pre-made one vs. a table saw or band saw fence that can just be a solid straight block. OK so maybe buy one of these boys and make the table compatible with it? (I'm planning to turn part of my bench into the router table) https://trenddirectuk.com/trend-rt-fence-a-router-table-back-fence.html
|
|
#
?
Jun 3, 2022 23:30
|
|
|
I got a Jacobs chuck for my lathe. My lathe has MT2 tapers, the chuck says it's an MT2 taper as well, but it fits super loosely, and it wants to slip out when I put it in the headstock. Here's a video of putting a live center in the tailstock with just hand pressure, and I can't easily get it out without the knockout bar: https://m.youtube.com/watch?v=_ZFgw5nyKQs&feature=youtu.be And here's trying to put the Jacobs chuck in. Even a few taps with a rubber mallet doesn't seat it: https://m.youtube.com/watch?v=wwiE7VYidJo&feature=youtu.be I wiped the taper down with denatured alcohol, and got the inside of the head/tailstock tapers as well, but that didn't do anything. The taper on the chuck looks pretty similar to the taper on my centers, but maybe longer?
|
|
#
?
Jun 4, 2022 19:00
|
|


|
more falafel please posted:I got a Jacobs chuck for my lathe. My lathe has MT2 tapers, the chuck says it's an MT2 taper as well, but it fits super loosely, and it wants to slip out when I put it in the headstock. Have you tried extending the tailstock out further? If the chuck taper is longer than your live centers it may be bottoming out.
|
|
#
?
Jun 4, 2022 19:17
|
|
|

|
| # ? May 22, 2024 17:57 |
|
|
Kaiser Schnitzel posted:Have you tried extending the tailstock out further? If the chuck taper is longer than your live centers it may be bottoming out. Good call, that works for the tailstock! Unfortunately I can't extend the headstock, and it looks like it's bottoming out about 1/8" before it would seat:  Anything I can do short of grinding some metal off the end (I'm probably not going to do that)? I'll definitely want this to mount in the tailstock for drilling holes, but what I want to use it for now is to mount a mandrel for turning handles for things with threaded inserts, so I need to do that in the headstock. I guess I could use a spur center in the headstock and mount the mandrel in the tailstock and just turn it that way with a bit of waste on the headstock end? edit: tried to go at it with a hacksaw after seeing folks on turning forums talking about grinding the tang off. 5 minutes in and it's basically just a scratch. 
more falafel please fucked around with this message at 19:41 on Jun 4, 2022 |
|
#
?
Jun 4, 2022 19:26
|
|