|
You could experiment with Dynamesh in zbrush.
|
|
|
|

|
| # ? May 28, 2024 21:42 |
|
I would probably just make a new subtool sphere/cube/suitable primitive, dynamesh it and sculpt it into shape to fill the hole, then merge it into the jacket and dynamesh them together, polish out the join. You could use an insert mesh brush to add in a primitive without having to bother with a new subtool. If you keep a copy of the jacket you can project your fixed, dynamesh version to it when you're done to recapture any detail lost in the dynamesh process. Store a morph target before you project and then revert any areas that don't project well with the morph brush
|
|
|
|
Standard reprojection workflow: 1. Duplicate scan data subtool. 2. Dynamesh the new duplicate subtool to close holes. Make sure to dynamesh at a resolution between 800-1204 and up depending on detail. 3. Duplicate dynamesh subtool and zremesh that duplicate. Zremesh resolution is variable but the default is 5k polys. You may want to opt for 10k or more instead depending on detail. 4. Project detail back into zremesh subtool from dynamesh OR scan data subtool AS NEEDED. Make sure to mask off areas you don't want to project detail back into. Do this reprojection ONE subdivision at a time. Do not project detail at a high level unless you build up one level at a time. Do this by projecting THEN dividing THEN projecting - rinse, wash, repeat. Until you get all the detail back you need but now with better topology and no holes. 5. Smooth zremesh subtool as needed to repair mesh and / or get rid of unwanted noise. 6. Personally, I would smooth out the strap stuff completely at the lowest subdivision of the zremesh subtool. 7. Recreate strap with the curve strap brush. You will need to delete subdivisions to do this but you can always reconstruct the divisions later if you need to. Or you can add the strap to the dynamesh subtool alternatively. Point is that the curve / IMM brushes won't work with a mesh which has subdivisions. 8. Sculpt zremeshed coat with subdivisions so you can "erase" / smooth stuff out easier. 9. Delete the scan data and / or dynameshed subtool AS NEEDED. It might be a good idea to keep the original scan data on the bottom just in case. I have found this almost always helps if you want to reproject detail in later. There is also morph targets and a morph brush which will help getting detail back. 10. Fin. Enjoy an adult beverage if that's your jam. Here is a video which goes over the same stuff roughly. It doesn't cover a jacket or strap but it does cover scan cleanup stuff. https://www.youtube.com/watch?v=RyvwFQVvllk sigma 6 fucked around with this message at 07:55 on Jun 27, 2022 |
|
|
|
sigma 6 posted:4. Project detail back into zremesh subtool from dynamesh OR scan data subtool AS NEEDED. Make sure to mask off areas you don't want to project detail back into. Do this reprojection ONE subdivision at a time. Do not project detail at a high level unless you build up one level at a time. Do this by projecting THEN dividing THEN projecting - rinse, wash, repeat. Until you get all the detail back you need but now with better topology and no holes. When it comes to protecting the detail back on I've done it one subdiv at a time and done it straight on the highest subdiv. Both seem to work for me so I'm wondering what the benefit of the first method is? It's good being able to store a morph on the highest level, project once, and then morph away any projection errors.
|
|
|
|
EoinCannon posted:When it comes to protecting the detail back on I've done it one subdiv at a time and done it straight on the highest subdiv. Both seem to work for me so I'm wondering what the benefit of the first method is? It's good being able to store a morph on the highest level, project once, and then morph away any projection errors. Doing it one division at a time is more of a fail safe thing. Meaning - less chance of problems - especially on slower computers. You can adjust the projection one division at a time which allows for better correction. In case you need to move a lip or eyelid around during projection etc. Eyelids, and overhangs, notoriously get messed up during this process so it is a good way to be corrective about it as you move up in divisions. If you can go right for the highest level and you are confident about the strength of your machine vs. highest division polycount AND it looks good - then sure - but I find going one division at a time to usually be safer. The morph targets and morph brush are very helpful but only work on one division. The number of times I have had to fix eyelids makes projecting one division at a time worth the extra time IMO. For clothes or less exact stuff or stuff with no overhanging shapes / geo, I am not sure if it matters as much. Also - anyone ever use these tablets? https://www.xencelabs.com/us/product/xencelabs-pen-tablet-medium-bundle Seems REALLY expensive compared to competition, however Pavlovich seems to really like it. https://www.youtube.com/watch?v=70VM2DqcNeA Given that Huion has a tablet with a screen built in it for much less money, I am very tempted to go Huion Kanvas over Wacom or Xencelabs. https://store.huion.com/products/kamvas-13?vid=1051 Only thing deterring me is a good friend has the 4k 24 inch Kanvas and barely uses it. He claims he doesn't like the surface much but I think it has more to do with an overall preference to traditional mediums. For me it is more about having a good portable tablet vs. a touch screen computer like the Zenbook Duo Pro, so a 13 or 16 inch is fine. The Xencelabs has a lot going for it but price isn't one of those things. Also - I am left handed so do any tablets with built in screens have the ability to flip directions? I want buttons on the right vs. left hand of the tablet. Something tells me none of the tablets with screens can flip backwards to accommodate lefties. The old wacom tablets without screens could do this but that was years ago. EDIT: Looks like a lot of the Huion tablets have a left handed mode and can be flipped but I am still not sure about ones with screens built in. Never seen a "digital ink" tablet before... hunh. https://www.amazon.com/dp/B07XC5D1K5?tag=bgfg-tabletcompare-us-20&th=1&psc=1&geniuslink=true sigma 6 fucked around with this message at 19:07 on Jun 27, 2022 |
|
|
|
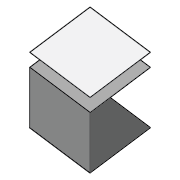
One other dumb quick question. I have a shape I need to reproduce digitally An approximation is fine as long as it looks the part.   I whipped a real quick approximation up in 3DS Max, but obviously the faces aren't properly planar.   Max has a 'Make Planar' button, so I can pick a polygon, hit it, and it'll flatten that side out. Problem is, as it is doing that it also deforms the adjacent shapes. How can I model something like this so that I can keep the face 'cuts' clean and planar?
|
|
|
|
There used to be a paper model unwrap plugin for max...name escapes me.
|
|
|
|
Harvey Baldman posted:One other dumb quick question. Not sure about Max, but Blender has a Bisect tool that works really well for making these kinds of planar rock faces: https://www.youtube.com/watch?v=Dbn0CQaibTs
|
|
|
|
You could try using Boolean intersections. Any convex polyhedron can be constructed using intersecting planes. You can approximate an infinite plane with a really big cube. Edit: Actually the bisect tool would probably be easier, just use that.
|
|
|
|
For a second I thought you guys were talking about this. https://tamasoft.co.jp/pepakura-en/ EDIT for content:   Better surface dev but still missing a seat and steering wheel. sigma 6 fucked around with this message at 17:54 on Jun 29, 2022 |
|
|
|
Hey does Blender have an easy to implement option to have an animated camera always look at an object, and if so what would it be called?
|
|
|
|
Listerine posted:Hey does Blender have an easy to implement option to have an animated camera always look at an object, and if so what would it be called? You can apply a Track To constraint to the camera
|
|
|
|
Neon Noodle posted:You can apply a Track To constraint to the camera Fantastic, thank you.
|
|
|
|
Anyone headed to SIGGRAPH in a couple of weeks? I'm happy to share that we can present our theatre company's performance Delirious Departures at the Immersive Pavilion! Feel free to drop by, check it out and say hi! I'll be the Asian guy running around making sure people don't walk into stuff.
|
|
|
|
I completely missed out the news of Zbrush's sale til they started mailing out discounted offers on Maxon subscriptions. What the gently caress. Guess I'm staying with Zbrush 2022 til it's obsolete.
|
|
|
|
Synthbuttrange posted:I completely missed out the news of Zbrush's sale til they started mailing out discounted offers on Maxon subscriptions. What the gently caress. Yup, or until they break your license and you can't get Maxon to fix it at their end. Does anyone have any experience using a SpaceMouse from 3DConnexion? Does the dial let you zoom in and out instead of having to hold Alt and scrollwheel on a mouse?
|
|
|
|
At least for us C4D users we get zremesher in Cinema now!
|
|
|
|
xzzy posted:If mechanical, look at the stuff from Keychron. I picked up a small Keychron a few weeks ago, and it's been fantastic to use. I got a flat form factor with the mint switches and it's just been lovely, this was a great recommendation, thank you.
|
|
|
|
Listerine posted:Yup, or until they break your license and you can't get Maxon to fix it at their end. It's been over a decade since I used one of these (with SolidWorks and Blender), but yes. They're pretty configurable so you can kinda do whatever you want, but full camera control with the main joystick thingy was very straightforward. I don't do the kind of modelling work I used to do to necessitate one for myself, but I'd highly recommend it if that's what you're doing. They feel really nice and are much more suited to that type of work than a typical mouse, though obviously you won't have the same 20+ years of familiarity. Buying the right tools to preserve the health of you hands, arms, shoulders, and back is invaluable.
|
|
|
|
Cross postin' from the chicken thread. I'm remaking my photogrammetry guide website for my students. This is my example object: Edit: I paid my 9 year old 50 cents a full captured rotation to shoot it. He was very thrilled to use my remotes.
|
|
|
|
I'm trying to make a model to 3D print in Blender and am running into a problem that I think will be solved by deleting face #2. I did a boolean union of the half cylinder and the rest of the model. The geometry looks like there should be three separate faces, but when I select it, it is all one face (light pink area). How do I split this into three faces so I can delete face #2? In the image below, face orientation is turned on. The top face and two edge faces closest to the camera are hidden for clarity.
|
|
|
|
K to knife cut Or Select the two vertices that an edge should be on and press j. I dont trust booleans to make sensible faces though so id delete the face and build it myself by selecting all the bordering vertices and creating each segment with f
|
|
|
|
Was the half cylinder just under the surface there or something? You could try booleaning it with a full cylinder instead
|
|
|
|
Synthbuttrange posted:K to knife cut Maybe it is because I don't know what I am doing with the knife tool, or maybe my model is too screwed up, but the knife tool wasn't working. Selecting the vertices and hitting J didn't do anything. I think maybe it was because the vertices aren't connected to the face or something. I don't know. I took the third option and deleted the face then rebuilt everything and that seemed to work. The layers looked good in the slice. I'll find out in 8 hours when the print is finished. Jenny Agutter posted:Was the half cylinder just under the surface there or something? You could try booleaning it with a full cylinder instead I used the magnet tool so the flat face of the half-cylinder was touching the face of the model, but I think that created two faces when I did the boolean union. It probably would have worked better if I did what you said and had the two objects actually intersecting when I did the boolean. Chalk it up as a learning experience.
|
|
|
|
Oh yeah perfectly coplanar faces and booleans are a bad mix
|
|
|
|
Yeah, scale up your cylinder by like 1.01x and it should be fine.
|
|
|
|
 https://twitter.com/JimMorren/status/1565290803358060545?s=20&t=tjZhGOWfiF8-NRAa9603iQ
|
|
|
|
In ZBrush, I was playing with the surface noise modifiers... I'm noticing after I hit 'apply to mesh', the results I'm getting are substantially different than the preview. I'd be pleased as punch if I could keep the mesh looking like the preview. Is there a trick I'm missing to this?
|
|
|
|
I think the preview is showing the noise as a bump map type thing so it's not accurately visualising the real displacement. Also the preview is independent of poly count so it always looks sharper. Afaik it's just one of those ZBrush things, you fiddle with the values till you get what you want.
|
|
|
|
I sculpted 11 sharks and some various smaller pieces for a museum exhibition in Sydney, I can't show any zb stuff cos it hasn't opened yet but it got written up in a few papers https://www.smh.com.au/culture/art-and-design/foam-fibreglass-and-fake-teeth-how-to-build-a-shark-20220830-p5bdz6.html https://www.perthnow.com.au/local-n...ition-c-8014517
|
|
|
|
jesus christ thats a huge rear end printer
|
|
|
|
That's loving cool. Great sculpts and amazing paint-jobs. The finished sharks look lovely. It must be fun to work in a hybrid zone between digital and practical work. Do you guys do mammals as well? How do you handle stuff like fur?
|
|
|
|
I think Eoin's also done a few animals for a park somewhere at least once, should be somewhere in the thread
|
|
|
|
EoinCannon posted:Here's a thing I did a while back which is kind of fun cos kids can play on it here it is
|
|
|
|
anatomi posted:That's loving cool. Great sculpts and amazing paint-jobs. The finished sharks look lovely. It must be fun to work in a hybrid zone between digital and practical work. Do you guys do mammals as well? How do you handle stuff like fur? Yeah my day job is screen based so it's fun and satisfying to do things that end up being real. I do freelance stuff for CDM, not on the staff there I've only done a few mammals for print and most clients don't want cool, stylised hair with lots of volume cos they don't won't it to break if it's outside and being touched. Usually it's a kind of smooth linear groom. I use clay buildup for volume, then weave brush a bit and rake and just standard with a tight alpha on it.
|
|
|
|
I see! I find it heartwarming that your work ends up connecting physically with people (and especially children)Synthbuttrange posted:here it is
|
|
|
|
Smashing it as per usual. Great to see your new work!
|
|
|
|
This little project has consumed me entirely for the last 4 weeks, but now it's done. https://vimeo.com/748129523/fa84008a3e I shot all the footage on an inspire 2 with a coworker last year, we've been sat on it since. 4 weeks ago we had a shortlist of 30 ungraded shots and an absolute mess of revit models with no details. I was in charge of the footage, tracking, lighting & integration, and 4 people on my team worked on the model - cleaning it up, adding details, getting the trees, roads and paths in etc. It's been a pretty heavy lift! 
|
|
|
|
cubicle gangster posted:This little project has consumed me entirely for the last 4 weeks, but now it's done. This is insane. Excellent work.
|
|
|
|

|
| # ? May 28, 2024 21:42 |
|
I'm following this tutorial and am hitting a snag when it comes to the displacement. I am in cycles GPU, have texture and bump selected in the settings. When I connect the texture node to the displace node, it just moves the entire plane up as if the texture was pure white instead of using the actual texture image. Any ideas? https://www.youtube.com/watch?v=dzq4byOD4Ug&t=265s
|
|
|


