


|
Rody One Half posted:Even as a kid the wild women were confusing to me. Who are these people supposed to be? Steppe priests, I guess? The implication seems that they wanted the villagers for sacrifices but just wanted them to do logging? No idea, just a nice little add-on to a map. Don't get enough of that in a lot of these missions.
|
 #
?
May 23, 2023 20:10
#
?
May 23, 2023 20:10
|
|


|

|
| # ? Jun 1, 2024 06:09 |
|
|
Could be a reference to warrior women attested in Scythian tribes and other related peoples like the Sarmatians
|
|
#
?
May 23, 2023 20:42
|
|

|
Attila the Hun - Part 3: The Walls of Constantinople Age of Empires II: Definitive Edition - Rich Corinthian Leather Mission 3 Starting Text "By this time, the Romans had considerable experience dealing with barbarians. They could civilize the raiders to some extent by offering them otherwise useless land on the Roman borders as a token tribute. Before Attila, this tactic seemed to be working on the Huns, who settled in the Danube River valley. All that changed when Attila seized command. He was much more aggressive and unpredictable than the previous Hunnic kings. He demanded that the tributes from Rome be increased and when the Romans refused, Attila made war on the Eastern Roman Empire. He marched on the great city of Constantinople, whose double walls had never fallen. Attila was done with raiding. Now the Huns advanced slowly, eradicating everything in their path. The Romans would reinstate the tribute, or they would be destroyed."  This scenario's mission is all about the bling: to win, have 10,000 gold stockpiled at once. There are a couple of complications: First, you can't build Markets, so you can't just hide in the corner of the map and sell a billion food and wood until you win. Second, there's only one gold pile on the map and it's just southwest of Constantinople. Third, while you could theoretically win this scenario with baseline trash units, in practice you're going to build units/research techs that cost gold. All of these factors combine to force you to go out and plunder to complete the mission objective, and at least for the first town, be relatively resource efficient in doing so. (There are, nevertheless, ways to cheese this. But most of them aren't relevant until you've defeated at least one of the minor cities anyway.) Marcianopolis starts attacking you nearly immediately. Never with more than a few Long Swordsmen and Light Cavalry at a time, but it's a rude opening to the scenario.  I spend most of my starting resources on building a large enough force of Cavalry Archers to contain them. It doesn't really give me a good opportunity to build any Tarkans to destroy their Town Center, but at least I don't have to worry about my economy being tanked by constant raiding.  Constantinople: The Huns have built a castle on Roman land! Let us send them 500 gold as a sign of goodwill. Complete certain objectives, and Constantinople will pay you gold to try and get the Huns to leave. Except all this actually accomplishes is providing more fuel for your war machine.  Constantinople: You have destroyed our shipyards! We will pay you 500 gold to cease these attacks. (after destroying the second Dock) Curse you, Huns! Will 500 more gold stay your hand? I think if you destroy the rest of the town and leave these shipyards up, you might be able to build a fleet of trade cogs and farm enough gold off them to eventually complete the mission that way. Might not be able to defend them cost-effectively from Constantinople's own boats though, haven't tried it to confirm.  Constantinople: The Huns have torched Marcianopolis! Please, take this 3000 gold and just go away. In addition to stopping their ceaseless raids by forcing them to resign, torching Marcianopolis' Town Center gets you 3000 gold, enough to solve most of your immediate need for gold. Really, gold is pretty plentiful throughout this scenario, it's just hitting the 10,000 mission objective that takes some effort.  Hun Soldier: Perhaps we underestimated the defenses of Constantinople. We are not equipped for a direct siege, though perhaps we can destroy their docks... Constantinople proper has Crossbowmen, Monks, Onagers, and if you get deep enough into the interior, Cataphracts. It also has a decently sized Fire Ship navy. If you play conservatively you don't ever need to attack the city, but I like to make at least one assault on it at some point during the mission for fun.  Constantinople: You Huns are disrupting our trade routes. Take this gold and be gone!  Constantinople: Now the Huns destroy our places of worship. Truly, they are barbarians who love nothing but gold. There truly is a wide variety of stuff that you can break in this mission to force the Romans to hand over their lunch money. Of note is that this Monastery used to be bugged and gave out food rather than gold for some reason.  Constantinople: Philippopolis has lost its town center. Why won't these Huns just leave?  Constantinople: Attila, King of the Huns, if we give you 500 more gold, will you cease these raids?  Constantinople: Now the Huns are attacking the docks at Philippopolis. Can nothing be done about them? Philippopolis, if anything, is even easier to take down than Marcianopolis. They just have a bunch of Pikemen and Crossbowmen. Maybe a few more Towers, but no walls.   There are also two relics sitting in the vicinity of Philippopolis that can be garrisoned for passive gold income, and since Constantinople is not an aggressive player, you could just sit and wait and eventually obtain victory.   Constantinople: The Huns have claimed two more docks, in the shadow of our castle, no less. Perhaps we should buy them off... But that's boring. Breaking into Constantinople is easy enough, as long as you can manage the city's static defenses, but actually fighting your way through can be a bit of a challenge, especially if you go straight for the heart of the city. Complicating that is that you have to take down both Docks to get the event to trigger rather than each dock individually, although you get a 2500 gold payout for doing so. In my case, that was enough to get 10,000 gold and trigger the end of the scenario. Hun Soldier: The Romans have given us the gold we need. Now we can truly establish a Hunnic empire! Mission 3 Ending Text "'Who was this man?' I asked, 'to threaten the Roman emperor?' Titles such as 'Emperor' meant nothing to the Huns. Attila was not an appointed ruler, only the strongest among the Huns. The amenities of his 'office' meant nothing to him. While his chieftains and council ate off of silver plates, Attila's own plate and goblet were hewn from simple wood. His Scythian guards had jewels on their sword hilts and their cloaks were clasped with gold, but Attila showed no such affectations. He was interested only in conquest. Some said he was trying to build a legacy to rival that of Alexander the Great. All of the barbarians wanted to possess Rome, as if it would buy them instant legitimacy as a world-spanning Empire. Unlike most of the other barbarians, however, Attila was actually going to get his chance." This mission is really made by that guy from Constantinople getting increasingly panicked about you burning down all of Thrace to the ground.  He has more lines, too! We didn't even get to hear him reacting to the Huns torching Constantinople's trade cogs, or the Castle, or getting close to the Wonder, let alone destroying it... Extra Slides Mission 3 - Intro Slide 1 Mission 3 - Intro Slide 2 Mission 3 - Intro Slide 3 Mission 3 - Intro Slide 4 Mission 3 - End Slide 1 Mission 3 - End Slide 2 Mission 3 - End Slide 3 Jossar fucked around with this message at 12:35 on May 24, 2023 |
|
#
?
May 24, 2023 03:12
|
|


|
I always did love that just getting CLOSE to the wonder is enough to make the guy sound more panicked than any other time in the map, and pay out a bunch more.
|
|
#
?
May 24, 2023 13:19
|
|

|
"This Will Be The End Of The Huns' Campaign", Says Increasingly Nervous Byzantine For The Seventh Time This Year
|
|
#
?
May 24, 2023 13:58
|
|


|
Attila the Hun - Part 4: A Barbarian Betrothal Mission 4 Starting Text "The Western Roman emperor had a sister named Honoria, who after weary years of confinement to her parlor, made the preposterous decision to send a letter to Attila the Hun. She asked him to marry her. One suspects Honoria did not know what she was getting into. Attila was plentifully supplied with wives, but he immediately saw the advantage that such a union could put him in. Suddenly, his plans changed. He would not invade the Eastern Roman Empire at Constantinople, but the Western Empire, at Rome. Indeed, he claimed half of the Western Empire as his dowry. Attila sent the Huns to march across the Rhine River, and made alliances with the other barbarian chieftains. Some, namely the Burgundians and the Ostrogoths, joined the Hunnic confederation, while others, such as the Visigoths, sought to seek Roman favor by opposing the Huns. When Attila entered the Roman province of Gaul, he could claim that he merely sought by force what was his by right of betrothal to Honoria."  Hun Soldier: Our forces are weak and scattered from recent attacks. We must regroup before we ravage the Frankish countryside. You start the mission with all of your villagers and Light Cav scattered... which does nothing. It's a short distance and everyone is easily reunited. Maybe you could theoretically run into some wolves, but in my experience if you do that, you're already moving too close to Burgundy's location on the map anyway.   I build a base and boom. There are some early attacks, most prominently from Metz, but nothing that can't be taken care of with a little bit of a standing army built up.  Burgundy: Please spare us, oh great Huns! We would join you if you could only tribute 500 gold and then build a castle in our town to help defend us! (after tributing 500 gold) We appreciate your show of good faith. Now if you build a castle within our town, we will know that you can be trusted. You have 10 minutes. (after building a Castle) Hopefully, we are not making a mistake... but for now, we ride with the Huns! At about 25 minutes in, or if you start hammering them too hard, Burgundy decides they really don't want to fight and would rather just take a bribe to switch sides. They'll scout the map for you effectively, but are otherwise kind of useless. It's up to personal preference as to whether it's more efficient for you to defeat them or pay them off.   Since we're finally in a scenario that lets us reach the Imperial Age, I switch away from mass production of Tarkans to a couple of Trebuchets and build more Hussars and Cavalry Archers instead. Metz falls easily to a large enough massing of forces.   Orl�ans is a bit of a tougher fight, mainly because unlike Metz and its focus on Throwing Axemen, they like to throw around a mixture of Paladins and Halberdiers. Orl�ans also likes using Trebuchets to try and knock out your units, but two can play at that game, and your Trebuchets are more accurate than theirs!  Orl�ans has a monastery with 4 relics garrisoned in it, which is supposed to be incentive for you to actually research Atheism and cut off their gold supply. But if you're specifically worried about that, it's also possible to snipe the relics right at the beginning of the scenario and turn the tables on them in terms of gold production.  Western Roman Empire: You have burned your last town! Oh poo poo, it's the  Raze Orl�ans' Town Center and the WRE spawns an army in to serve as the last challenge of the scenario. These guys can be quite tough if you face them head on, especially since the switch to Romans means that they can do a decent job keeping pace with your army thanks to Centurion boosts. Instead, I retreat to a nearby Castle I built outside of Orl�ans, and with enough distance to traverse, the Romans eventually lag behind/break formation, allowing my Castle and Cavalry Archers to mow them all down individually. Once the WRE's army is defeated, the scenario immediately ends. Mission 4 Ending Text "The old priest hung his head as he related what happened next, and I could tell the weight of the memories caused him great sorrow. Attila would stop at nothing until he reached his fianc�e, Honoria, and his goal of ruling the Roman Empire. The ravaging of Gaul was unprecedented. People were tortured, their bodies torn asunder by wild horses, or their bones crushed under the weight of rolling wagons. Their unburied limbs were abandoned on the public roads as prey to dogs. Heads on stakes stretched from Gaul clear back to the Danube River, from whence the Huns had come. They lay siege to Orl�ans, for Attila had learned much of siegecraft since he had faced the walls of Constantinople. But as the Huns set to their fell task, a great cloud of dust appeared on the horizon. Aetius and the Roman army had come." Well, the people of Orl�ans are certainly less happy to see us than they were when we were playing Joan of Arc, that's for sure. Then again, we are basically taking the role of the English in this scenario, right down to allying with the Burgundians. This is a perfectly ordinary scenario, which serves to introduce you to Imperial Age Huns' mechanics and dynamics. Nothing less and nothing more, except maybe the bit where you have to figure out how to deal with the Legions showing up. But they also bring nothing to the table except a really big army, so it's really easy to feed them into a giant kill zone, even on higher difficulty settings. Extra Slides Mission 4 - Intro Slide 1 Mission 4 - Intro Slide 2 Mission 4 - Intro Slide 3 Mission 4 - Intro Slide 4 Mission 4 - End Slide 1 Mission 4 - End Slide 2 Mission 4 - End Slide 3 Mission 4 - End Slide 4 Mission 4 - End Slide 5
|
|
#
?
May 25, 2023 02:45
|
|
|
Of note: originally, those Legionaries and Centurions were Champions and Elite Cataphracts, the Byzantine unique unit. The Forgotten Expansion introduced a custom Centurion and Legionary unit that was editor-only and very similar to what became the Romans' unique units in Return of Rome, specifically for use in custom scenarios or campaigns that involved Roman forces, but I don't remember if the Definitive Edition used those here before Return of Rome or not.
|
|
#
?
May 25, 2023 03:05
|
|
|
I'm not sure if this was fixed or not, but there is an exploit to skip the fight against the romans; before defeating Orleans, you block of their spawn location with buildings, which means they can't appear and will resign almost immediately. A more time consuming approach to get basically the same thing is chopping/sieging through the woods north of the Metz towards the top of the map, where you will find the Romans "placeholder" unit (just there so they aren't defeated at the start due to having no units), a samurai. Kill the samurai and the Romans will be defeated prematurely and the map will end upon destroying Orleans TC.
|
|
#
?
May 25, 2023 19:06
|
|
|
Attila the Hun - Part 5: The Catalaunian Fields Mission 5 Starting Text "'And now,' said Father Armand, 'is where I entered the story.' The battle between Hun and Roman was fought at the end of June, 451. The Romans were commanded by Aetius, a brilliant and celebrated general who had been held hostage by the Huns when he was a boy. Aetius knew Attila and he knew the Hunnic ways. Since he had returned to the Western Empire, Aetius had done more than any man to keep Rome alive throughout the period of barbarian invasions. His army was not large enough to face Attila alone, so Aetius convinced tribes of the Alans and Visigoths to ally with him. Even though these dubious allies had a common hatred of the Huns, it was still a remarkable achievement on Aetius' part to have drawn them into a effective military relationship. The Huns were eager for battle. Attila's shamans looked at the entrails of cattle and the color of sheep bones, and prophesized that the Huns would meet defeat on the Catalaunian Fields. However, they also foresaw that the commander of the opposing force would be killed. Attila must have thought this a fair trade, because he brought battle to Aetius and the Goths. Before blood was drawn, Attila stood before his assembled troops clutching the sword of Mars in his fist. He told them, 'It is a right of nature to glut the soul with vengeance. I shall hurl the first spear at the foe. If any man can stand at rest while Attila fights, he is a dead man.'"   Ostrogoths: Attila! You brought us to this accursed battlefield. Now you must keep the Romans from killing us all! This scenario is a 3v2 Deathmatch with you and your Ostrogoths ally versus the Visigoths, Alans (playing Huns), and the Western Roman Empire. You start out with a large number of resources... although not as much as you would get in a true Deathmatch and not nearly as much as you think.  Ostrogoths: This river will run red with the blood of Visigoths and Romans! I'm sorry, did I say a 3v2? Make that a 3v1. The Ostrogoths are useless and just run around doing nothing of consequence except stealing your sheep, providing a Market to trade with, and maybe serving as a distraction for the Romans and Alans.   With my economy and army fully in gear, I get to work smashing the enemy forces. The Visigoths are the first priority, mostly because they're the closest to you. They also like building forward Barracks and will do the typical Goth infantry flood if left unchecked.  If you attack the Visigoths early enough, you can even manage to take them down before they build up Castles, but hey, that's what I have Elite Tarkans for. As it turns out, once fully upgraded and massed these guys are really good at their job. Just leave the actual fighting to the Cavalry Archers instead.  The Alans are mostly in a support role for the other two armies and don't pose too much of a threat on their own. I bulldoze them on the way to dealing with the WRE.   The Romans are the strongest enemy force and have all of their signature units, including their cheap Scorpions. Their base is also very well fortified. But by this point you control the rest of the map and can just block them in and hammer them to death at your own pace.  Hun Soldier: The Roman army lies scattered. Now there is nothing to stop our invasion of Italy! Mission 5 Ending Text "It was a catastrophic battle, one of the largest and greatest the world has ever seen. The stream was turned into a torrent by the rushing of blood. I pity those that were forced to slake their thirst from it. 'Cadavero vero innumera', the Romans said afterwards. 'Truly countless bodies.' Perhaps 300,000 men were left dead on the Catalaunian Fields. It is said the ghosts of those killed continued to fight for several days. I passed within inches of the fell Hun king as he stalked the battlefield, trying to determine which of his chieftains and allies yet lived. When he found me, huddled beneath my shield, I made my peace with God. But Attila did not seek my decapitation. He saw that I was a holy man, and ordered me to join his retinue of foreign advisors. 'That is how you know so much of the Huns,' I offered. The priest nodded. Despite the carnage, the outcome of the legendary battle was unclear. Attila had lost much of his cavalry, but the Roman army would never recover from its losses. For a time, no one knew if the Hunnic king would continue to pursue the hand of Honoria. 'But what of the prophecy?' I asked. 'Did Aetius die on the battlefield?' 'Nay. It was Theodoric the Goth, not Aetius, who died and fulfilled the prophecy. Aetius knew that if he utterly destroyed the Huns, then the Visigoths would have no need for a Roman alliance and Rome would face yet another barbarian threat. And so, Aetius retired from military life, hoping that the outcome of the Catalaunian Fields would leave the Huns and Goths in a stalemate. He hoped he had done enough to save his empire. He had not." It's a pretty neat touch that this mission is Deathmatch style rather than Random Map style like most of the other campaign scenarios default to when not engaging in scenario specific mechanics, but it also means that there's very little to talk about. Thanks to the extra resources speeding up build up time, this was a pretty quick mission, even without me explicitly trying to go for the achievement that requires beating the level in under 30 minutes. It does lack a little bit of gravitas for how much everybody's hyping up the Battle of the Catalaunian Fields as this incredible bloodbath in the narrative, though. Extra Slides Mission 5 - Intro Slide 1 Mission 5 - Intro Slide 2 Mission 5 - Intro Slide 3 Mission 5 - Intro Slide 4 Mission 5 - Intro Slide 5 Mission 5 - Intro Slide 6 Mission 5 - End Slide 1 Mission 5 - End Slide 2 Mission 5 - End Slide 3 Mission 5 - End Slide 4 Mission 5 - End Slide 5
|
|
#
?
May 26, 2023 03:30
|
|
|
beating this mission in under 30 minutes is one of the other hardest achievements in the game- I am curious how the change to romans from byzantines effects things. unlike with the goths, legionaries aren't a threat to you cav archer horde, and centurions are kind of a wash compared to cataphracts- but now their buildings have less HP, so sniping castles/town center to force resign them is easier. also one of the new missions from return of rome is a contender for hardest mission/achievement I think first pyrrhus mission
|
|
#
?
May 26, 2023 07:05
|
|

|
Mazerunner posted:also one of the new missions from return of rome is a contender for hardest mission/achievement I think first pyrrhus mission this one is super easy to cheese and i got it on my second try Your allies don't surrender until you've destroyed the four stables on the right flank. There's enough stone in your starting area and about your allies bases that you can built fortifications around all allied town centres and fill them with composite bowmen and guard towers. surviving teal's centurion rush is the hardest part, but if you've knocked out their academies beforehand they don't rebuilt. from there it's just fending off a few packs of red's camel riders and you're good.
|
|
#
?
May 26, 2023 07:32
|
|


|
Sally posted:this one is super easy to cheese and i got it on my second try hmm. what difficulty did you do it on? I did it on hard- I did not find I had much room to delay finishing off orange, both because of teal's doom rush and because orange would just mass cavalry making it impossible to take them out
|
|
#
?
May 26, 2023 08:17
|
|
|
oh i am faffin about on standard. this achievement pops whatever difficulty you are on
|
|
#
?
May 26, 2023 09:12
|
|
|
Random note: before the Definitive Edition, the Alans were represented by Vikings instead of the Huns.cncgnxcg posted:I'm not sure if this was fixed or not, but there is an exploit to skip the fight against the romans; before defeating Orleans, you block of their spawn location with buildings, which means they can't appear and will resign almost immediately. Oh, also, regarding this: I believe the spawn location of the Roman Troops was made unbuildable, and the hidden unit over in the trees was replaced with some sort of invisible object to prevent this kind of cheese. BlazetheInferno fucked around with this message at 13:26 on May 26, 2023 |
|
#
?
May 26, 2023 13:07
|
|
|
Attila the Hun - Part 6: The Fall of Rome Mission 6 Starting Text "As far as Attila was concerned, Honoria was waiting with open arms in Rome. The very next year, partially recovered from his losses, Attila turned his attention to Italy. The Huns crossed the Alps and moved down the Italian peninsula, launching another great invasion that terrorized the inhabitants of the Western Roman Empire. He meant to take Rome, and crown himself emperor. This was not the Rome of Caesar, mind you, but a withering Rome, beaten from earthquakes and barbarian wars. And this time, there was no General Aetius to hold off the Huns' savagery."  You start this scenario with a moderate amount of troops and some civilian infrastructure. But you've got to build up a base and get moving quickly. Why?  At 45 seconds in, Patavium starts building a Wonder. Each of the enemy cities in this map will try to build a Wonder. Patavium even does it twice. I think this is the devs trying to create the best possible use case for Atheism... but alas, it's still worthless. Unless you're being overwhelmed by the enemy factions' military might, in which case you're doomed anyway, their Wonder victories are just going to take too long to really matter. There is an achievement for preventing even a single Wonder from going up.  Apart from building the standard array of military production buildings, I make sure to build a Castle here at the southern approach to my base. I am going to be constantly attacked by Mediolanum off-screen for the rest of the mission, and this Castle is all that stops them from being a tremendous thorn in my side.   After building up a little bit of an army, I attack Patavium, just to break through and sabotage their Wonder building efforts and troop building capacity. They can't be defeated this early on, but clearing out some of Patavium prevents them from getting in the way while attacking the other cities, which otherwise tends to happen due to its central location on the map.     Attacking Patavium triggers Aquileia into starting construction on its Wonder. This also marks a brief bout of aggression from all of the enemy factions on my advance forces, which I clear out before starting an attack on Aquileia proper. To summarize: Patavium is playing Britons and while not overly aggressive, loves building Longbowmen/Arbalesters/Petards/Trebuchets/Mangonels, all the kind of units that can sneak attack you or harass you from a distance if you leave them alone. Mediolanum is playing Teutons and loves throwing Paladins/Champions/Onagers/Crossbowmen directly at you. They're probably the biggest direct threat on the map, but it's easy to contain most of their aggression via static defenses as stated above. Aquileia is playing Celts and uses Paladins/Scorpions/Halberdiers/Monks, though they have a couple of Champions to start. They're moderately aggressive, but the biggest annoyance is that unlike the rest of these cities, they have their Wonder locked behind a second set of walls. Verona is playing Franks and has their standard assortment of Paladins and Throwing Axemen, with the occasional Monk thrown in. They're not as aggressive as Mediolanum and Aquileia, though moreso than Patavium. But they've built their base into the biggest deathtrap of all four enemy cities.    The attack on Aquileia is a bit slower/more costly than I had planned thanks to a pretty sizeable defensive army and they manage to get their Wonder up. I consider restarting or at least doing a save rollback to try and grab the achievement, but ultimately I decide that since this isn't a completionist LP, it's not worth the time investment.  Once you crush Aquileia's standing army, they fall apart pretty easily, and resign soon thereafter. This will not be the case for the rest of the cities.    I go back and finish torching Patavium, which removes them as a real threat for the rest of the mission, but again, does not defeat them. The devs worked really hard on this one to try and avoid having you sequence break it.  At about 45 minutes in (faster on higher difficulties), Mediolanum starts to build their Wonder.  It's also at this point that I start running out of gold in the big set of mines back near my base and have to start placing forward mining camps to eat up all the other gold on the map. At this one in particular I build a Castle, to try and cage up Verona and stop it from mounting any offensives while I focus on dealing with Mediolanum.   Unlike Aquileia, Mediolanum continues to produce troops and put up a fight once you break through their initial army/walls. So this serves as a good tar pit for your forces, while...  Verona starts construction on their wonder, specifically keyed to you trying to siege Mediolanum.  This means you have to finish things up with Mediolanum as quickly as you can, so you can pivot your army to the final fight. For most of these cities, the most effective set of buildings to take out beyond the Town Centers and Castles is their Stables, since everyone except Patavium loves using Paladins this mission.  With Mediolanum defeated, it's time to take out Verona.   Verona doesn't have a stable army, so much as a continuous flood of Paladins and Throwing Axemen, and they've built their base so that the Throwing Axemen and the Towers can continuously fire on you while trying to make progress, which turns this siege into a bit of a grind. Destroying Verona's Town Center is the trigger for the final Wonder, as Patavium rushes everything that they have to try and build another Wonder in their home base. If you've thoroughly sacked Patavium, it's a bit of a farce, as you can just position a couple of Cavalry Archers near the build site to shoot any approaching villagers.  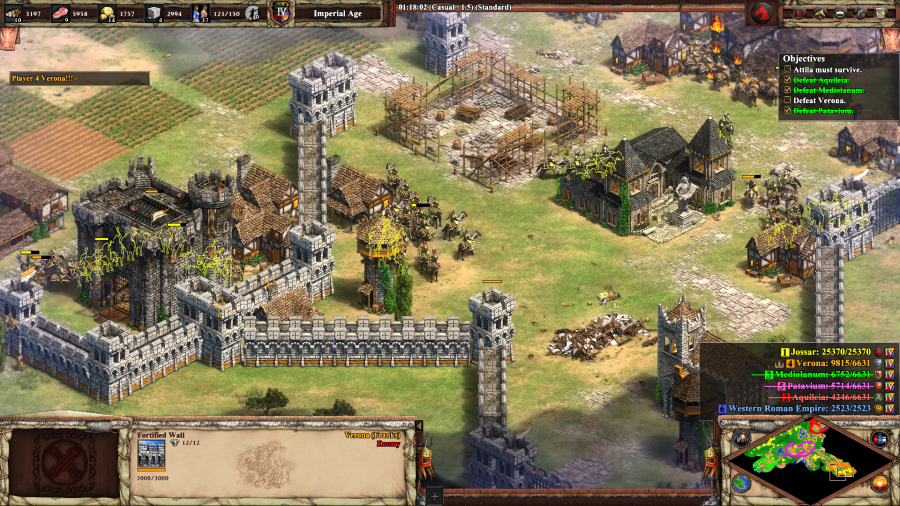 With that taken care of, you're free to destroy Patavium's last town center (located in Verona's base) and continue your march through Verona until they finally surrender as well. Once you do so, Rome chimes in: Rome: Attila, before we pursue this wanton bloodshed any further, we request that you come personally to a meeting with Pope Leo I in Rome. ...okay wait a minute, this is not the last time we're going to see this happen. Why are they referring to him by his regnal number, when he's the first of his name?  Pope Leo I: Attila, might I have a word with you in private, please? Ride Attila down to Rome in the southern corner of the map, and surprisingly there is no last act twist of any kind, the scenario (and the campaign) just ends. Mission 6 Ending Text "The city of Aquileia at the tip of the Adriatic was wiped off the face of the earth. The fugitives from that pitiful city took refuge among the islands, marshes, and lagoons at the head of the Adriatic Sea and there founded the town of Venetia, or Venice. 'But what of the Pope?' I asked. No one knows what Saint Leo said to the Hunnic king, but that very day Attila turned his army around and started back for the Hun lands on the Danube. Attila the Hun died shortly thereafter. Since he had failed to claim Rome, he could not have Honoria, and instead brought another wife into his harem. On his wedding night, Attila suffered a nosebleed and choked to death. For a man who had boasted that 'where my horse has trodden, no grass grows' it was a curiously anti-climactic death. The Hunnic warriors cut their hair and gashed their faces, so that the king should be lamented. not by tears of maidens, but by the blood of warriors. Attila's bloody reign of conquest lasted nineteen long years. Father Armand was silent for a long time. He glanced over at the head on a stake. ' A Hunnic trophy,' he said. 'I think the man was a Visigoth. He died at the Battle of the Catalaunian Fields. I keep it here so that I may see it every day and remember.' 'Remember what, Father?' I asked him. The scent of a burning village. The sound of butchery. The way peasants would flee before the Hun riders. The way we would ride them down. The way it felt to conquer alongside Attila and the Huns. He leaned so close I could feel his breath. 'Sometimes...  ...I miss it.'" Fun fact: the old Huns' jingle plays in-game whenever you research Atheism. A lot of the things that make this scenario stand out don't really matter that much in the end, so it's mostly just notable for giving you a good Post-Imperial Age fight against multiple tough opponents. But in that respect it's pretty satisfying, especially if you're trying to go for the achievement. That sort of sums up my opinion on the Attila campaign overall. I think people tend to focus on the unique parts, which were mostly concentrated in the first half of the campaign, and overhype them to an extent which isn't really justified. I mean, even in the story: everybody (including myself) loves the narrator twist, but we had one of those back in Barbarossa! It's still a very good, solidly built campaign though. Extra Slides Mission 6 - Intro Slide 1 Mission 6 - Intro Slide 2 Mission 6 - Intro Slide 3 Mission 6 - End Slide 1 Mission 6 - End Slide 2 Mission 6 - End Slide 3 Mission 6 - End Slide 4 Mission 6 - End Slide 5 Mission 6 - End Slide 6 Mission 6 - End Slide 7 Mission 6 - End Slide 8 Mission 6 - End Slide 9 Mission 6 - End Slide 10
|
|
#
?
May 26, 2023 17:04
|
|
|
Campaign Vote #9 A. Montezuma - Aztecs B. Sforza - Italians C. Vlad Dracula - Turks/Magyars/Slavs D. Bari - Byzantines E. Pachacuti - Incas F. Prithviraj - Gurjaras G. Battles of the Forgotten - Persians/Mayans/Vikings/Magyars/Chinese/Japanese/Britons/Turks Voting lasts for 24 Hours from the time of this post. In the event of a tie, I will act as the tiebreaking vote between the two tied options. Please bold your vote in order for it to be counted, as well as noting if you are changing your vote from something else.
|
|
#
?
May 26, 2023 17:09
|
|
|
It's the voice actor who sells the twist at the end, I think. Adds a little more spice and emotion to the narration. C. Vlad Dracula
|
|
#
?
May 26, 2023 17:12
|
|

|
Definitely the original voice actor, combined with that ghoulish grin in the art that sells it best. The replacement voice and art in DE just doesn't measure up, sadly. I feel the same way about the William Wallace campaign's narrator. The original had something special that just isn't there in the new Definitive Edition voice. As an aside, it's worth remembering that Verona's represented by the Franks, making those paladins they flood at you all the more dangerous. Patavium hiding a second Town Center inside Verona is mean. Let's get the last Conquerors Campaign out of the way, I say: let's go with A. Montezuma.
|
|
#
?
May 26, 2023 17:20
|
|
|
God, that ending  EDIT: Btw I vote A Negostrike fucked around with this message at 17:29 on May 26, 2023 |
|
#
?
May 26, 2023 17:22
|
|


|
I don't think it's quite the same twist as the Barbarossa one, we know this guy joined the Huns for a while, it's the part where he's revealed to be more hosed up from the experience (or hosed up in the wrong way) than you'd assume. Props for using the original artwork for this, it's a bit DUN-DUN in its mood but it really helps selling it. Anyway, let's conclude The Conquerors with Montezuma.
|
|
#
?
May 26, 2023 17:24
|
|
|
Definitive Edition: "Sometimes...I miss it."  Original: "Sometimes...I miss it." Also adding another vote for finishin the Conquerors with A. Montezuma
|
|
#
?
May 26, 2023 17:37
|
|
|
Nothing like riding down some peasants and setting them on fire. Aztec Montezuma
|
|
#
?
May 26, 2023 20:39
|
|

|
Aztecs. The gods hunger for blood!
|
|
#
?
May 26, 2023 21:18
|
|


|
|
|
#
?
May 26, 2023 21:29
|
|

|
A. Montezuma Let's finish off the last of the original era campaigns. Regarding the ending narration, I think the original's unrepentant psycho killer fits the theme of the Atilla campaign better than DE's guy with PTSD that can't adjust to a peaceful life.
|
|
#
?
May 26, 2023 22:16
|
|
|
YaketySass posted:I don't think it's quite the same twist as the Barbarossa one, we know this guy joined the Huns for a while, it's the part where he's revealed to be more hosed up from the experience (or hosed up in the wrong way) than you'd assume. Props for using the original artwork for this, it's a bit DUN-DUN in its mood but it really helps selling it. Yeah, I think that's a better way to look at it, you assume that since he's a priest recounting this tale of one of the most notorious warlords in human history that he'll be nothing but aghast at the horror and violence that he witnessed, but instead he shows a crack that reminds you that even unassuming people can enjoy the fury of war and conquest, despite their better nature. Its not for nothing that people have engaged in these kinds of things through almost all of history. Oh yeah, Montezuma too.
|
|
#
?
May 27, 2023 01:36
|
|
|
Mazerunner posted:beating this mission in under 30 minutes is one of the other hardest achievements in the game- I am curious how the change to romans from byzantines effects things. unlike with the goths, legionaries aren't a threat to you cav archer horde, and centurions are kind of a wash compared to cataphracts- but now their buildings have less HP, so sniping castles/town center to force resign them is easier. Surround the town centers with houses Can't attack what you can't path to.
|
|
#
?
May 27, 2023 04:43
|
|

|
I really like that Catalaunian Fields is a deathmatch-esque scenario, since the Huns are still a toptier pick in that specific mode (no houses and access to fully upgraded paladins is very good in deathmatch). The achievement is quite tough, especially if you're bad at multitasking, as the most reliable way to win under 30 minutes is to begin harassing all three opponents from the start to disrupt their base building as much as possible. Still a bit of a cakewalk compared to the Sack of Rome, imo. The achievement in the final mission is very easy though, since you can snipe all the wonders from outside the city walls with trebs, meaning you can delay finishing off enemies until you have the time. Also, Montezuma cncgnxcg fucked around with this message at 14:22 on May 27, 2023 |
|
#
?
May 27, 2023 12:16
|
|
|
Monty
|
|
#
?
May 27, 2023 17:12
|
|

|
Vote's closed! Off to the New World! Or I suppose from Montezuma's perspective it's just the world. The Fifth World, maybe? I dunno, I'm sleep deprived from playing cultivation themed games.
|
|
#
?
May 27, 2023 18:06
|
|
|
Montezuma - Part 1: Reign of Blood Age of Empires II: Definitive Edition - Aztecs Theme Very well, then let us begin, the tale of the last of the eagles.  The Americas are... a lot sparser than the other side of the world, let's put it at that.   Mission 1 Starting Text "Passed down to you by Cuauht�moc, Eagle Warrior of Tenochtitlan. An omen appeared above the forest, the shape of an ear of corn, but blazing like daybreak. It seemed to bleed fire, drop by drop, like a wound in the sky. I am a warrior, not a priest, and knew not what to make of such a sign. I consulted with the seers and magicians to see if another great war was coming, but they answered only in riddles. "The gods want more sacrifice," was their answer. That was always their answer. Much of our empire of rain forests and volcanoes has been conquered in the name of sacrifice. The magicians tell us that we must make a sacrifice every single day for the sun to continue to rise. It took the relay teams two full days to carry my message the two hundred miles to our city of Tenochtitlan. After two more days, my uncle, Montezuma, emperor of the Aztecs, sent his reply. Montezuma's priests foretold that the god Quetzalcoatl might soon return from his long exile. How else to explain the omen? Montezuma ordered my warriors to increase their efforts to consolidate the rain forest between our lands and those of our enemies. We must establish control over four shrines that are sacred to Quetzalcoatl, the feathered serpent. Because the Aztec Empire is mighty and constantly expands, we have made many enemies. We must defend these shrines from our enemies in order to prepare for Quetzalcoatl's eventual return."  Aztec Villager: I hear the growl of the jaguar. Is this a bad omen? Don't worry about it. This scenario is kind of weird because it was really designed as more of a tech demo for the original Mesoamerican civs and maps than anything else, which is why the two prominent enemy civilizations are Mayans rather than other Aztecs. This also extends to all the wildlife, which has been replaced appropriately: sheep are now turkeys, wolves are now jaguars. Boar are now javelinas, but don't look any different, unlike the real animal which is smaller.  The Native American civilizations are a bit atypical compared to most of the others. By default they don't get Stables, and up until the Definitive Edition couldn't use them even if converted (now they can produce the Xolotl Warrior, which is functionally a Knight except in name, but they still don't have the Cavalry specific Blacksmith techs). They also don't get gunpowder units, although that's shared with a couple of old world civilizations, like the Huns, as it turns out. So you're left with a fairly streamlined tech tree, although there is one notable addition in the form of the Eagle Scout/Warrior line. These guys are made at the Barracks and are a fast moving Infantry unit that starts out as only good for scouting, but eventually turns into a kind of replacement for cavalry except with respect to specifically anti-Infantry units. Anyway, I move my starting Eagle Scouts just to show off what happens if you get close to one of the flags shown on the map. The Monastery adjacent to it transfers to your control, with a relic on the ground next to it. There's no real benefit in doing this before you're ready - remember, if one of the enemy forces destroys the Monastery, that fails the mission.  It only takes a few minutes for the previously alluded-to jaguars to pop out from the jungle and attack your villagers. They're easily dealt with, but the distraction is annoying while you're trying to build up an economy.  All three of the enemy forces will send probing attacks towards your base, Xochimilco being the most active among them, but your starting towers can fend them off. It's at about this time that the previously alluded to jaguars pop out from the jungle and attack your villagers. They're easily dealt with, but the distraction is annoying while you're trying to build up an economy.  After reaching Castle Age, I produce a Monk to start the relic garrisoning process. Aztec Monks are among the best in the game, if not the best, thanks to being incredibly tanky if you have all of their techs researched, so you always want to throw at least a few into the mix.  I build a mixed force of Eagle Warriors, Monks, Elite Skirmishers, and the Aztecs' Unique Unit, the Jaguar Warrior (anti-Infantry Infantry unit). Jaguar Warriors aren't really that great of a choice here because they have pretty bad pierce armor (although better than they used to have when the scenario was originally developed), and as previously stated most of the opponents are Mayans, who happen to be an Archer civilization. I probably should have thrown in some Rams, too. But with a pop cap of 75, my economy was working in fits and starts, and I figured it was better to just get moving with whatever I could build.   Marching straight through the jungle instead of via the northern road lets me claim the second Monastery and its relic, and also lets me attack Tepanaca from its' less well-defended side. Before the Definitive Edition, you could walk in without encountering any walls at all, and if you were sufficiently good at micro, you could avoid Tepanaca's Towers and run straight up to the third Monastery.  In this case, I try to be a bit more thorough about ransacking their town first.  Meanwhile, Xochimilco and Tlatiluco are just throwing themselves against a Castle I set up on the western side of my base, to no avail.  Tepanaca: You defile our sacred temple, Aztecs! The gods demand a sacrifice! One thing that the devs did in order to try and prevent you from just grabbing the Monastery with a single Monk, garrisoning the Relic, and then focusing entirely on Xochimilco was setting a bunch of Eagles to pop out of the jungle and try and destroy the Monastery once you claim it. But it only takes a couple of fully upgraded units to defeat them and keep the area secure.  Xochimilco has a sizable base, but here's the thing...  Unlike Tepanaca, where the town is in direct proximity to the Monastery and thus threatens a potential counterattack if left standing, Xochimilco has no way of getting to the fourth Monastery. They're just a roadblock. So all you need to do is set up a defensive perimeter at the river in the back of their base, so you can build a Dock and get some units across.   Across the river are a ton of jaguars guarding the final Monastery and relic. Supposedly if you only bring Monks and Eagle Warriors they won't attack, but as long as Xochimilco's not nipping at your heels, it only takes a couple of Jaguar Warriors to carve a path to the Monastery. Drop the last Relic in, and the mission ends without ceremony. Mission 1 Ending Text "When my warriors had captured the shrines and defeated the Xochimilco and Tlatiluco, we made the long journey back to Tenochtitlan, laden with gifts for Emperor Montezuma: jade, feathers, and of course, prisoners. The sheer vastness of our city on the lake seemed staggering after having been in the rain forest for so many days. Emperor Montezuma lives in the most sumptuous rooms with his wives and concubines. While we spoke, he drank frothing chocolate from a golden cup. Musicians played their drums and flutes and masked women danced. When my uncle, Montezuma, first ascended the great pyramid many years ago to become emperor, there was a great celebration. Yet now some question his leadership. He sometimes makes decisions slowly, and rarely does he lead the warriors into combat. Montezuma's priests informed us that Quetzalcoatl, the feathered serpent, would soon return to Tenochtitlan to reclaim his kingdom. Since I had helped prepare for his coming, I was given a new obsidian macana and promoted to the rank of Jaguar Warrior. There was more feasting and dancing that night. The air was heavy with perfume. But I noticed as I walked down the steps of the emperor's palace that the omen still hung heavily over the lake, spraying sparks over the midnight sky. So says Cuauht�moc, Jaguar Warrior of Tenochtitlan." The cutscenes are good framing, but it's kind of a boring scenario. Even on higher difficulties, once you've claimed and fortified an area, it's basically impervious to your opponents' attacks and it's just a question of how long it takes you to win. Had it not been for one or two waves of troops hitting the Castle, I would have forgotten Tlatiluco even existed: they're in the southwestern part of the map, off in the fog of war. Extra Slides Mission 1 - Intro Slide 1 Mission 1 - Intro Slide 2 Mission 1 - Intro Slide 3 Mission 1 - Intro Slide 4 Mission 1 - Intro Slide 5 Mission 1 - Intro Slide 6 Mission 1 - Intro Slide 7 Mission 1 - End Slide 1 Mission 1 - End Slide 2 Mission 1 - End Slide 3 Mission 1 - End Slide 4 Mission 1 - End Slide 5 Mission 1 - End Slide 6 Jossar fucked around with this message at 22:01 on May 27, 2023 |
|
#
?
May 27, 2023 21:24
|
|
|
Eagles also have higher pierce armor, not as ridiculous as huskarls, but enough to counter archers. They also have conversion resistance, so they're essentially light cav without a horse. The mesoamerican civs also have unique techs that boost them in different ways. Also, I believe the ambush at the Tepanaca monastery doesn't happen if Tepanaca has been defeated already. And wild animals/wolves/jaguars generally seem to ignore everything that isn't a villager, unless specifically scripted to attack something. Which makes it kinda weird that alot of scenarios have relics guarded by animals, which will just ignore the monk coming to pick up the relic. cncgnxcg fucked around with this message at 07:23 on May 28, 2023 |
|
#
?
May 28, 2023 07:20
|
|
|
I remember wolves etc attacking military units and monks so it might be that they used to but it was changed at some point.
|
|
#
?
May 28, 2023 09:11
|
|
|
Competitive Multiplayer Overview: The Aztecs Unique Unit: Jaguar Warrior - infantry with bonuses against infantry Unique Techs: Atlatl: Skirmishers +1 attack and range Garland Wars: Infantry +4 attack. Civ Bonuses: Start the game with an Eagle Scout. Villagers carry +3 extra resources. All military units are created 11% faster. Monks gain 5 HP for every researched Monastery technology. Start with +50 gold. Relics generate +33% gold. Competitive Rating: Above Average Forget the infantry, the calling cards of the Aztecs in competitive multiplayer are their monks, skirmishers, and archers. Aztec monks are bar none the toughest in the game, get a full suite of upgrades, and give the Aztecs a credible claim on being the best monk civilization in the game, period. Backing these monks up are archers and skirmishers with an almost complete range of upgrades that are created 11% faster, Atlatl for the skirmishers, and access to siege rams and siege onagers. The relic gold generation keeps the Aztecs in the game where other civs might run out of gold faster, and if it comes down to it, Garland Wars pikemen are surprisingly dangerous and the Aztecs do have an infamously nasty tech switch into infantry if they can catch their opponent off guard (they probably won't). What holds the Aztecs back in the competitive scene is, in general, a lack of speed. All Mesoamerican civs lack cavalry, yes, but Aztec eagle warriors are also nothing particularly special pre-Garland Wars. The Aztecs struggle at the map control aspect of the game, and they're something of a late bloomer civ with their most iconic advantages only coming online in the Castle Age for a hefty investment of gold. These advantages are workable on some maps, and Aztecs are rightly feared on closed maps like Arena. The more open a map is, the more the Aztecs tend to falter. Monks and skirmishers are great, but they're not really game-winners in and of themselves so much as they strangle the enemy's ability to win the game. Aztecs likewise struggle on mixed and water maps, none of the Mesoamerican civs are naval powerhouses and the Aztecs are no exception, missing a number of important unit upgrades and techs. I rate the Aztecs as above average due to a combination of their closed map dominance and that there are some players in the competitive scene who are renowned for their monk micro skills. Aztecs can deliver some powerful hammer blows if given the chance, the question is just whether the game will still be competitively viable by that time.
|
|
#
?
May 28, 2023 13:14
|
|
|
Montezuma - Part 2: The Triple Alliance Mission 2 Starting Text "Passed down to you by Cuauht�moc, Jaguar Warrior of Tenochtitlan. The gods were still uneasy, for another omen appeared that same year. The temple of the demon Huitzilopochtli burst suddenly into flame, although it was made of stone. When the people hurried to pour water on the fire, it burned with even greater violence. I asked our emperor Montezuma what we needed to appease the gods. His haughty priests made the predictable reply. The Aztec Empire needed more prisoners. The sun god, the rain god, and even the Feathered Serpent, Quetzalcoatl, were angry deities that required sacrifice. Our city-state of Tenochtitlan is allied with two others, together composing the Triple Alliance. Montezuma intended for the Triple Alliance to attack our longtime enemies, the Tlaxcala. I sent the traditional shield, arrows, and cloaks to the Tlaxcala, declaring to them that they would soon be attacked. Then we marched out into the forests, our jaguar and eagle banners ready to clash with the heron banners of the Tlaxcala. Birds in the rainforest canopy took to the sky, eager to be away from the violence that was to come."   Aztec Warrior: Emperor Montezuma insists that you make war on the Tlaxcala. Tlacopan Warrior: Montezuma oversteps his authority... but we will comply.  Aztec Warrior: Montezuma of the Aztecs demands that, as a member of the Triple Alliance, you attack the wicked Tlaxcala. Texcoco Warrior: Montezuma asks us to do much for the Aztecs, but we shall do his bidding... for now. You start the scenario with a couple of Eagle Scouts and instructions to visit the neighboring Town Centers to get them on a war footing. This wakes the factions up, switches them to Ally status, and mainly serves as set-building/a warning that your allies are going to backstab you at some point.  Aztec Warrior: Now we can attack the Tlaxcala. Villagers are being sent by transport from Tenochtitlan to establish our forward base. Only then do you get your starting villagers. Absolutely nothing of consequence happens between now and the build up to attack Tlaxcala.    Tlaxcala has an absolutely massive military production complex on an island in the middle of the jungle, but if you destroy it, their Town Centers are practically defenseless apart from a few Eagle Warriors and static defenses.  Aztec Warrior: We have destroyed all of Tlaxcala's town centers. Now they will surely surrender.  Tlacopan Warrior: Now that we are rid of the Tlaxcala, let us rid ourselves of these Aztec taskmasters as well. Texcoco Warrior: Agreed. Destroy all of Tlaxcala's Town Centers and they resign, with your allies immediately turning on you.    I'm so bored at this point that I try to do a simultaneous attack on both enemy towns to wipe them out in one fell swoop. Unfortunately, my micro remains terrible, but even then I'm still able to cripple most of their armies/infrastructure before I need to build back up and take them out one at a time. Texcoco falls first, since it happens to be closer to my main base.  Aztec Warrior: We have found a hidden temple to Tlaloc, the rain god. The magicians say that if we bring 10 jaguar warriors to this location, we will be rewarded.  Mysterious Voice: These warriors shall receive the blessing of the rain god and will fight with the skill of ten normal men! Guarded by a set of Tlaxcala gates in the center of the map near Tlacopan's base is this hidden Monastery, with an Ornlu reskin named "Son of Ornlu" and a jaguar in front of it. Bring 10 Jaguar Warriors there and they get a 400 HP boost. It's not really necessary, but it's a nice little bonus to have.  Aztec Warrior: None shall challenge the will of Montezuma and the Aztec Empire! After finishing off the last of Tlacopan's base, you've functionally won the scenario, but you aren't done. What happens next is (mostly) an in-engine cutscene.  Aztec Warrior: ...but wait... what is this that approaches?  Hern�n Cort�z: I claim these lands and all the gold they bear in the name of Charles of Spain. Until all of the gold is brought to me, I shall not return home. To prove it, I am sinking my ships.  Aztec Warrior: Who is this man who has arrived? Could it be that the god Quetzalcoatl has returned? With Cort�z' arrival, the mission is now complete. If you manage to break the trigger for his arrival or otherwise preemptively destroy his units you still win, it just messes with the cutscene. Mission 2 Ending Text "The first messengers to arrive to Tenochtitlan told of mountains or towers that floated on the sea. Each story told to Montezuma was more fantastic than the last: they could fire stone balls, shooting sparks and raining fire that could crack open weapons. Huge deer with no antlers carried these gods on their backs. Their swords were iron, their bows were iron, their shields were iron, and their clothes were iron. Surely this was the return of Quetzalcoatl! Montezuma heard these reports with growing alarm, as he shifted nervously on the icpalli, his legless throne. He ordered expensive gifts to be sent to the new arrivals, in the hopes that Quetzalcoatl would spare Montezuma when the Feathered Serpent came to Tenochtitlan. 'He has come back,' Montezuma whispered to me. 'He seeks his place on the throne, for that is what he promised when he departed.' I held my weapons tightly but said nothing. How could I challenge the word of our emperor? So says Cuauht�moc, Jaguar Warrior of Tenochtitlan." I'm really hoping that when we start fighting the Spanish that this gets more interesting. Extra Slides Mission 2 - Intro Slide 1 Mission 2 - Intro Slide 2 Mission 2 - Intro Slide 3 Mission 2 - Intro Slide 4 Mission 2 - Intro Slide 5 Mission 2 - End Slide 1 Mission 2 - End Slide 2 Mission 2 - End Slide 3 Mission 2 - End Slide 4
|
|
#
?
May 28, 2023 15:22
|
|
|
I'm sure nothing bad will happen because of this mysterious stranger's arrival.
|
|
#
?
May 28, 2023 15:50
|
|
|
Montezuma - Part 3: Quetzalcoatl Age of Empires II: Definitive Edition - Voodoodoodoo Mission 3 Starting Text "Passed down to you by Cuauht�moc, Jaguar Warrior of Tenochtitlan. Another omen. The lake around the great city of Tenochtitlan rose and boiled. It foamed until it washed against the houses of the city, sweeping many of them into the lake. I accompanied our dignitaries to meet with the new arrivals. We journeyed towards the coast, through the lands of our enemies the Tlaxcala. When we emerged from the forest, the strangers welcomed us, although they kept their weapons nearby. I told them that we were Aztecs, representatives of the great Montezuma. The leader said that his people were Spanish and he named himself Cort�z, although he seemed pleased when we referred to him as Quetzalcoatl. Although their armor and animals seemed otherworldy, they did not seem like gods to me. We presented Cort�z gifts of finest cotton and plumes of bird feathers, but he seemed more interested in the gold ornaments. He asked again and again if there was more gold to be found in Tenochtitlan. By now, Cort�z had advanced all the way to the lands of Tlaxcala. There was initial warfare made between Tlaxcala and the Spanish. However, when Cort�z heard stories about the size of Tenochtitlan, and the numbers of our brave Aztec warriors, he suggested that the Spanish and Tlaxcala join forces and attack the Aztecs."  Aztec Warrior: We do not know the intentions of these Spanish arrivals. For now, our enemies are the Tlaxcala.  Aztec Warrior: The Spanish are attacking our allies in Tabasco. We must come to their aid. (after a minute or two) Our runners have confirmed that the Spanish and Tlaxcala have formed an alliance against us. Now we must do battle with them both. This scenario starts with you having a well developed base in the Imperial Age, but still needing to build up an economy and an army. Right from the get go, the Spanish attack an allied village to the north to confirm their dastardly intentions. Saving the allied village used to be literally impossible: before the Definitive Edition, Tabasco was scripted to resign a certain amount of time after the attack, no matter what. Now it is possible to save them, and it gets you an achievement, but it's pretty difficult. I send my starting Eagle Warrior up there to distract the Spanish forces long enough for Tabasco's static defenses to take them out...  Aztec Warrior: It is to no avail. The Spanish beasts and weapons are more powerful than our warriors. Tabasco is lost. Unfortunately, my Eagle gets shot up by Conquistadors and the Spanish send in another wave of Battering Rams and Cannon Galleons to finish the job.  Aztec Warrior: The Spanish armies are dangerous because of the beasts they ride into battle. If we could capture these animals, then the Spanish would be much less of a threat. (after a few seconds) This is the pen where we will corral the captured Spanish horses. There's an alternate victory condition for this scenario - capturing 20 Spanish horses will serve as a substitute for their defeat. In practice, I found that by the time that you complete this mission, you've basically defeated the Spanish in all but name, but it saves you from having to deal with the last few Spanish Cannon Galleons hidden around the top of the map.    Unlike the last couple of scenarios, in this one the Spanish waste no time in going straight for the jugular. Defeating the initial wave of whatever they have leftover from Tabasco buys you some time, but when they next attack it's with a moderately sized army made mostly of gunpowder units. Their Bombard Cannons in particular are very nasty, and will tear your base to pieces if you don't have a fully trained army to deal with them by that point.   I'm not sure if Tlaxcala is passive, or is just really slow to get their offense going, but in this case we met in the middle. Because the Aztecs are a very gold heavy civilization, you're going to find yourself running out of piles relatively quickly, which organically brings you into conflict with Tlaxcala over the resource mines in the west of the map. Once you start claiming the area, they quickly become active and fight back, sending Skirmishers and Trebuchets against your camps.   My defense of the forward mining bases eventually morphs into an offense to take out Tlaxcala for good. If you're able to hold off Tlaxcala's attacks, they don't really have much else to throw at you and quickly fold.   The outer reaches of the Spanish base are defended by several Cannon Galleons and Champions. The Champions come at a steady stream, but once you destroy the Cannon Galleons, the Spanish seem unwilling or unable to rebuild them.   Here are the horses. Free them from their Palisades and send them back to your base, but you have to be careful about letting them move automatically for two reasons. The first is that the horse pathing is terrible and results in them getting stuck all the time. The second is that the Spanish like to keep a few Conquistadors hidden in the jungle, and they seem to have orders to shoot the horses on sight to prevent you from winning the mission via the capture mechanic.  Aztec Warrior: It is here that the Spanish sunk their own transports to prove their determination to conquer our lands. Cort�z must be nearby.   From this point on, it's just a straightforward fight to clear out the rest of the Spanish base so I can reach the horse palisades and free enough to win the mission. Anything involving gunpowder is a high priority target, especially the Bombard Cannons. The Spanish also seem to have researched at least some of the building HP techs to make taking down their Castles and Bombard Towers tougher, but that's what multiple Trebuchets are for. Get twenty horses in the pen and you hear the following: Aztec Warrior: Now that we have all of the Spanish horses, they will be unable to send their deadly knights and conquistadors into battle! (after a few seconds) We have defeated the Tlaxcalans and slowed the Spanish advance, but I fear the final confrontation is yet to come. Mission 3 Ending Text "Although the Aztec warriors fought well that day, my men were frightened by the beasts that the Spanish rode into combat, and by the noise of their exploding weapons. Although we had survived the attack, I thought it best to withdraw towards Tenochtitlan and share with Emperor Montezuma all that we had learned. I do not know if my uncle, Montezuma, was being cowardly or merely trying to preserve us from the wrath of the gods, but he sent more gifts to Cort�z along with an invitation to visit our great city as his personal guest. I was there when Montezuma met Cort�z on one of the causeways leading into our great city. The Spanish had evidently never seen anything like Tenochtitlan, and they stared in wonder at the brightly colored markets and pyramids rising out of a man-made island in the middle of gigantic Lake Texcoco. Some of the Spanish soldiers asked whether it was all a dream, the first glimpse of things never heard, seen or dreamed before. Montezuma led Cort�z to the top of the Great Pyramid, where he pointed out the various canals and neighborhoods of the city. But Cort�z was mostly interested in gold ornaments, and helped himself to any which he encountered. I was no longer convinced that this man was Quetzalcoatl. So says Cuauht�moc, Jaguar Warrior of Tenochtitlan." This one was fun! It's a strangely large difficulty spike compared to the last two missions, but the Spanish are an active and dangerous opponent, and Tlaxcala's presence on most of the mines means that you're forced to adopt an offensive mindset relatively quickly rather than just sit back and boom. The only thing that could have made it better is if the alternate victory condition was a bit more truly separated from defeating the Spanish, but that's a minor quibble. Extra Slides Mission 3 - Intro Slide 1 Mission 3 - Intro Slide 2 Mission 3 - Intro Slide 3 Mission 3 - Intro Slide 4 Mission 3 - Intro Slide 5 Mission 3 - End Slide 1 Mission 3 - End Slide 2 Mission 3 - End Slide 3 Mission 3 - End Slide 4 Mission 3 - End Slide 5
|
|
#
?
May 29, 2023 15:33
|
|
|
Montezuma - Part 4: La Noche Triste Mission 4 Starting Text "Passed down to you by Cuauht�moc, prisoner of Tenochtitlan. The next omen we did not see, but heard: the voice of a weeping woman who cried in the night that she could not hide her children. Indecision plagued Emperor Montezuma. Was this man Quetzalcoatl, or was he just a man? As the emperor brooded, the citizens grew restless. Cort�z kept a close watch on the emperor, and soon Montezuma became a prisoner in his own palace. Thus did the Spanish take Tenochtitlan without a siege. The Spanish collected all of the gold they could find. They were not interested in our art or ornaments, but merely melted down the gold for return to Spain. They also outlawed any further sacrifice to the gods. When the priests protested, they were killed. The citizens and warriors of Tenochtitlan were enraged. We knew, even if our emperor did not, that these men were not gods. Riots broke out in marketplaces and at the palace. When Montezuma himself appeared on the walls urging the Aztecs to be at peace, the people threw stones at him. It was time to remove these so-called gods from Tenochtitlan!"  Jaguar Warrior: I must make my way back to Tenochtitlan and end the Spanish influence there, but how?  Jaguar Warrior: Out of my way, pig! You start the scenario with a single buffed up Jaguar Warrior and nothing else, left to wander the jungle to make your way back towards Tenochtitlan. A lot of people assume that this is supposed to be Cuauht�moc, but it's never been officially confirmed one way or the other, even after they added an actual Cuauht�moc unit to the scenario editor.   Aztec Warrior: If you truly mean to free Tenochtitlan, then we will fight alongside you. Many Aztecs are held prisoner to the north. They would join us as well. Wander around the jungle and you find a number of scattered Aztec forces who will join you. They also give you your next mission objective, to get across this part of Lake Texcoco and free a number of additional Aztec warriors trapped in the Tlaxcalan main base to the north.  Aztec Warrior: There are transports on the beach ahead, but they are guarded. We will need several Aztec warriors to defeat them.  You could theoretically take out the Tlaxcalan forces stationed on the bridge and make your way across, but there's a lot of enemy units and it's not really worth it. Instead, go a bit to the west and punch out these three guys to get access to Transport Ships so you can glide across the lake.  Spanish Conquistador: What are you doing so close to the city? Stirring up trouble, no doubt. You then experience a series of vignettes on your way to the jailed warriors. First, a couple of Spanish Conquistadors try to shoot you for sneaking around Tenochtitlan, and you quickly put them to the macuahuitl. Which is presumably like being put to the sword, but a lot messier.  Aztec Warrior: A Tlaxcalan priest! We must be cautious. Hmmm... I wonder what would happen if we opened that jaguar pen?  Then you set a bunch of jaguars free to maul this priest, before they run off into the jungle, leaving you clear to move on ahead.   Aztec Warrior: Montezuma was tricked by the Spanish. Vengeance shall be ours! Finally, there is one unavoidable fight against a minor group of Tlaxcalan warriors, which also gives you another round of reinforcements.  Aztec Warrior: We have reached the Tlaxcalan outpost. We do not have time to destroy every building. Let us free the prisoners and escape.  Aztec Warrior: Vengeance shall be ours. We can gather our strength across the lake, but to get there we must steal a transport from Tenochtitlan! (after a few seconds) I have heard tales of an island in Lake Texcoco that is covered with gold, but is sacred to Tezcatlipoca, the jaguar god. The game's advice is pretty on point here: kill the Tlaxcalan forces attacking you, open up the pen and get out. Tlaxcala is otherwise pretty passive, and not worth taking out in its entirety except for maybe one or two of their military production facilities.   Run through the rest of the Tlaxcala base, across the bridge, and you'll wind up at Tenochtitlan's docks. The area is lightly defended by the Spanish on both land and sea, but you're given some Fast Fire Ships to deal with the Spanish ships and Transports to move your army to the other side of the lake again. And no, before you ask, you can't use the Transports from before to skip this section, those guys are locked behind the bridge with all the Tlaxcala warriors and are now functionally useless.  As promised, there is an island to the north that has a lot of gold piles on it, but is guarded by a whole bunch of jaguars and wolves, including Ornlu again. I have my army make a brief pit stop to clear it out before continuing onwards.  Aztec Warrior: We can train priests at this monastery and use them to capture villagers from Tenochtitlan. Make it back across Lake Texcoco and you're rewarded with the ability to start the base-building part of the mission. On Standard this is unnecessary, as you get a Monk to start with. In either case, go back to where the Tlaxcala are and convert at least one villager before building a base. You don't even need to boom all that much for reasons that will become readily apparent.   Aztec Warrior: The Spanish thought that Tenochtitlan was theirs, but they did not count on the strength and courage of Aztec warriors! The victory condition for this mission is to destroy a Wonder that the Spanish are building before they can win a Wonder victory. Fortunately, they only have one Villager working on it, so it takes a while to get up in the first place. The Wonder also happens to be positioned within Trebuchet range of the western approach to the city. Using your already large army and a couple of Trebuchets, all you need to do is camp outside the walls, destroy anything that approaches the trebs, and sling your way to victory. Mission 4 Ending Text "The Spanish called it la noche triste, which meant "the night of sorrows" in their language. At first, the Spanish barricaded themselves in our homes and palaces, but we continuously attacked their quarters. With stones, slings and arrows, we drove the Spanish and Tlaxcalans through the streets of Tenochtitlan and across the three bridges or over the walls into Lake Texcoco. Thousands died. Those Spanish that were not killed by macanas or javelins were drowned by the weight of the treasure they refused to leave behind. Tenochtitlan lay in ruin, but the city was ours again. Many brave Aztec warriors died that night as well, including noble Montezuma. The Spanish claimed that our own people had killed him with thrown stones. Thus it was a night of sorrows for us as well. So says Cuauht�moc, defender of Tenochtitlan." I think they should have just let this one be a 100% RPG mission, culminating in you sneaking an army into the center of the city and defeating the Spanish forces there. I'm not really sure what the base-building and Wonder-destroying adds to the scenario. Extra Slides Mission 4 - Intro Slide 1 Mission 4 - Intro Slide 2 Mission 4 - Intro Slide 3 Mission 4 - Intro Slide 4 Mission 4 - Intro Slide 5 Mission 4 - Intro Slide 6 Mission 4 - End Slide 1 Mission 4 - End Slide 2 Mission 4 - End Slide 3 Mission 4 - End Slide 4
|
|
#
?
May 31, 2023 00:53
|
|
|
Montezuma - Part 5: The Boiling Lake Mission 5 Starting Text "Passed down to you by Cuauht�moc, Emperor of Tenochtitlan. The death of Montezuma only served to further inflame the fury of my people. I planned to lead the attack personally against the Spanish. 'That is as it should be, Cuauht�moc,' the priests told me, 'for you are now our emperor.' I took my place on the icpalli throne and the headdress of the emperor was placed upon my head. A crown is never a comfortable thing to wear. Cort�z had still not made it far from Tenochtitlan, for the Spanish were weighed down with our stolen gold. As they fled around the shores of the lake, my warriors pursued them from canoes. I sent additional warriors by land, for it was obvious now that Cort�z was attempting to flee back to the safety of his allies in Tlaxcala. We caught up with the Spanish on the north side of Lake Texcoco."  Jaguar Warrior: The Spanish shall never again set foot in Tenochtitlan! Let none escape our blades!   You start this mission with a series of scattered island bases, with one devoted to military production and another devoted to farming, as well as sight on gold piles on the other side of the map. You also have a moderately sized army charging off into the lake to beat back the Spanish. This mission has two major gimmicks: the first is that nearly all of the bottom half of the map is covered in shallows, in theory allowing for combined arms attacks with land and naval units. In practice, this doesn't work so well: as the Aztecs, you have a fairly terrible navy and so there's no real incentive to go toe to toe with the Spanish, who have a pretty good navy. Except for a mission trigger zone, there's nothing here that can't be reproduced on the land side of the map, and it's more useful to do so in the long run, because it's closer to the front lines of where you'll be fighting the Spanish and the Tlaxcala.  Aztec Warrior: In their haste to flee, the Spanish abandoned these carts filled with gunpowder. (after a few seconds) My Emperor, we have been studying Spanish horses and cannon, and have found that there is no reason Aztecs could not use these weapons, provided we had the proper materials. (after a few more seconds) If we capture Spanish horses, it is possible that we could train cavalry of our own. If we capture their stores of gunpowder, we could even create some cannons to use against the Spanish.  Aztec Warrior: We have created a bombard cannon. The second major gimmick is that there are a number of trade carts (Gaia units are Saracens, which is why they have camels) and pens filled with horses scattered around the map. Bring them back to the torch zone on your military island, and you trade them in for Bombard Cannons and Xolotl Warriors. The former in particular are a nice option to have for breaking down walls and buildings faster. The latter used to be Tarkans before the Definitive Edition, and I can't say I'm a fan of the change, even if it is more thematic.  Aztec Warrior: We have captured a Spanish horse. If we return it to our citadel, perhaps we can learn to ride it into battle!  Aztec Warrior: We have trained a horse rider.  While smashing open these pens, I also discover the main standing Tlaxcala army. If you didn't lose too many units while chasing down the Spanish, you should be able to defeat them here, no problem. Their walls, unlike the Spanish ones, hide additional piles of gold for you to mine.  Something I discover while building up on the west part of the shore here is that the Spanish have a number of Bombard Cannons set to defend the area, but will never move from their position, even to take advantage of your weakness. Just means there's more incentive to get those buildings up on this side of the shore and clear out a proper staging area.   Really, I should have taken all of my troops here and circled around the lake to join my camp on the western side, but I wanted to see how much damage I could do, so I let them loose on the Tlaxcalan base from the eastern entrance. They do more than I was expecting, but less than I had hoped, before being destroyed by the defending Spanish forces.  Aztec Warrior: It is an old Spanish ammunition depot. These wagonloads of gunpowder might be useful... Meanwhile, back in the west, I take out those Bombard Cannons and start moving forward, picking up various goodies along the way. This one is particularly notable for the description explaining why the Spanish have left all this gunpowder out in the wilderness, although I don't know when they would have gotten the time to build such a depot in the first place.  The Spanish finally start trying to mount an offense, but by this point it's too late: my base is fully up and operational and their Rams shatter themselves on my army.    Tlaxcala takes the brunt of your offense, while the Spanish send out Gunpowder units to protect themselves and fight back where they can. It almost mirrors the dynamics of a multiplayer game with Tlaxcala being the flank player and the Spanish being the pocket player.   The Spanish surrender when you destroy their Town Center, independent of anything else that they have left, but the Tlaxcala fight on until you destroy their base. Mission 5 Ending Text "I hoped that the surviving Spanish on the edge of the lake could see as their captured comrades were dragged up the steps of the great pyramid. Perhaps they would then understand why we feared the wrath of the feathered serpent, Quetzalcoatl. Perhaps they would know fear as well. With the fighting subsided, there was much work to be done. Our city had suffered much from the Spanish occupation and the fighting in the streets. The priests set out repairing the temples, for the Spanish had cast down the idols that we had placed there. We began a celebration to give thanks to the gods when a great plague struck Tenochtitlan. Many of our people became helpless and could only lie on their beds. Many others died. We did not know if the gods were still unhappy with us, or if this was some weapon unleashed by the Spanish. Regardless, if Cort�z returned, he would find a much weakened city. I could not let that happen. So says Cuauht�moc, Emperor of Tenochtitlan." The added mechanics provide some nice toys for you to mess around with, especially since the Aztecs will very rarely see them in normal play, but ultimately there's nothing here that truly incentivizes you to play this mission differently than you would play any other build up and destroy scenario. Maybe if the Spanish/Tlaxcalan wall of Docks reached all the way across the map instead of you being given multiple free landing zones. Extra Slides Mission 5 - Intro Slide 1 Mission 5 - Intro Slide 2 Mission 5 - Intro Slide 3 Mission 5 - Intro Slide 4 Mission 5 - End Slide 1 Mission 5 - End Slide 2 Mission 5 - End Slide 3 Mission 5 - End Slide 4 Jossar fucked around with this message at 00:44 on Jun 1, 2023 |
|
#
?
Jun 1, 2023 00:29
|
|
|

|
| # ? Jun 1, 2024 06:09 |
|
|
Worth noting, the Xolotl Warrior is statistically identical to a Knight. But since the Aztecs lack any cavalry-related techs, they don't get any upgrades. Also, it is actually possible to build Xolotl Warriors in random map games. If an Aztec or Inca player converts an enemy stable, they will be able to use it to train Xolotl Warriors (same cost as a Knight), though Mayans lack the tech to convert buildings. However, all three civs can also potentially receive a starting stable depending on the map type. Interestingly, in Post-Imperial Starting Age games, the Xolotl Warrior gets a few stat buffs to HP, damage, and armor, putting them roughly on par with a Cavalier. But from what I can see, this is the ONLY time they get this buff.
|
|
#
?
Jun 1, 2023 02:06
|
|