


|
Dreylad posted:I didn't know about using chalky watercolours as pigment, although I had a suspicion there was a way to get pigment colours without paying miniature paint companies a lot of money for them. Thanks thread! Avoid Michaels, go support your local supplier, odds are their prices are better too. You can just straight up buy pigments, then you are only getting pigment and no filler.
|
 #
?
Apr 28, 2024 19:02
#
?
Apr 28, 2024 19:02
|
|


|

|
| # ? Jun 5, 2024 04:03 |
|
|
Yeah, I just bought a bunch of pigments for use in making paints from scratch and they've been great for any modelling task you care to name. You can buy a couple of pots the size of a foundation container in an array of colors. It'll give you more pigment than you'll be able to use in a lifetime, plus you can mix the stuff to make your own shades. Mine came from https://earthpigments.com/
|
|
#
?
Apr 28, 2024 20:05
|
|

|
SkyeAuroline posted:
|
|
#
?
Apr 28, 2024 20:26
|
|


|
Geometrical designs on a curved surface are rough. You can also make a custom decal and print it on transfer paper (or I think there might be websites that do this for you?)
|
|
#
?
Apr 28, 2024 20:33
|
|
|
If you are going to freehand a pattern like that. Try doing all of the straight lins first, so it's a grid. You could possibly stencil the grid using thin model masking tape to do one set of lines, then mask again for the other direction. Then go back and paint in the break points afterwards.
|
|
#
?
Apr 28, 2024 20:38
|
|

|
Flipswitch posted:For poo poo like this I'd highly recommend buying or making a stencil unless you're one of those freehand wizard lunatics. I was only doing it once, so probably not worth a stencil in this case. I am considering one for hazard stripes though, when I go back to my IW. Plus, in this case, it basically went "if I don't try it, I'll never know if it's reasonable to freehand; if I do try it and it goes badly, at least it's still more painted than most of my opponents". Waiting on the last bits of highlights to cure before I varnish him and get him on a base.  e2: oh gently caress there's a tiny spill of bronze I need to fix too e: Lovely Joe Stalin posted:If you are going to freehand a pattern like that. Try doing all of the straight lins first, so it's a grid. Then go back and paint in the break points afterwards.
|
|
#
?
Apr 28, 2024 20:39
|
|

|
Lovely Joe Stalin posted:If you are going to freehand a pattern like that. Try doing all of the straight lins first, so it's a grid. You could possibly stencil the grid using thin model masking tape to do one set of lines, then mask again for the other direction. Then go back and paint in the break points afterwards. There's another trick with freehanding that dovetails into the watercolour conversation - sketch your design with watercolours and finalise it before you apply the acrylics. If you varnish the surface beforehand you can erase any watercolours with a damp brush which makes painting with them incredibly easy. For my next freehand I'm thinking of just using watercolours and locking it in with varnish.
|
|
#
?
Apr 28, 2024 21:05
|
|

|
freehanding is 100% easier if you learn to do it with things that can look organic instead of exact. lightning, graffiti, arabic script, damage, handprints, filth. don't think that painting graffiti on a miniature is as easy to do as RL but you don't need perfect lines as badly. also, marine shoulder pads look like they're a big flat east surface to learn with, but that is a cruel lie. they are a weird loving dome that makes freehand three times as hard. (near)cylinders like greaves or the blank back of a power fist are much easier learning surfaces if you're painting marines. vehicle doors or flat shields taken (or printed) from another model kit are even easier. if you're gonna be learning on a shoulder pad, make it one that isn't glued on. (they aren't that hard to pop/break off and replace, either.) it makes it a lot easier to dunk in isopropyl if you don't like it.
|
|
#
?
Apr 28, 2024 21:43
|
|
|
SkyeAuroline posted:
Quoting this for attention and adding to my last comment. There is a "trick" with these Celtic knot type designs. You want to paint the entire thing as solid lines first before you split the lines to make the knot appear. This tutorial summarises it nicely https://jaiunplanningcharg.wordpress.com/2021/02/10/tutorial-celtic-knot/
|
|
#
?
Apr 28, 2024 22:16
|
|
|
Z the IVth posted:Quoting this for attention and adding to my last comment. I hate how simple and obvious this is because I would have never thought of it.
|
|
#
?
Apr 28, 2024 22:26
|
|

|
 Decided to give it a go because I can't stop myself. 1. Watercolour guides 2. Stroke one way 3. Stroke the other way 4. Clean up and make gross cuts 5. Make holes bigger 6. Make small cuts between the bands 7. Tidy up even more, highlight and clean off guides. With practice it can probably be made even sharper but this is really a design that would be best done as a decal.
|
|
#
?
Apr 28, 2024 23:18
|
|
|
Z the IVth posted:
I made an even more complicated version of this pattern as a guitar headstock inlay for one I build ~6 years ago. I'll never make that mistake again.
|
|
#
?
Apr 28, 2024 23:21
|
|


|
And as marine sized TIMG that looks awesome. 
|
|
#
?
Apr 28, 2024 23:22
|
|


|
I got some kroot today and i'm happy with how they came out. I painted the poncho pink first and it hit it with yellow to get that orange. i did the same thing with blue to get the kroot hound that color        And, a disaster! it finally happened! 
|
|
#
?
Apr 29, 2024 01:32
|
|

|
oh also!  the Spire Scouts won me a painting contest at the local store* the Spire Scouts won me a painting contest at the local store**it was from the other painters so
|
|
#
?
Apr 29, 2024 01:40
|
|
|
the leader is outstanding. 10/10 concept
|
|
#
?
Apr 29, 2024 01:57
|
|
|
Z the IVth posted:
Protip: water through the airbrush will take off the watercolor and leave the acrylic completely untouched.
|
|
#
?
Apr 29, 2024 02:17
|
|


|
Ominous Jazz posted:I got some kroot today and i'm happy with how they came out. I painted the poncho pink first and it hit it with yellow to get that orange. i did the same thing with blue to get the kroot hound that color And I feel you on the paint. I forgot that Scale 75s bottles are garbage that clogs incredibly easily and had a cap explosion from some Necro gold yesterday.
|
|
#
?
Apr 29, 2024 02:29
|
|


|
Did guy    
|
|
#
?
Apr 29, 2024 03:12
|
|

|
unholy poo poo dude
|
|
#
?
Apr 29, 2024 03:17
|
|
|
I like the blue energy coming out of the dead guy.
|
|
#
?
Apr 29, 2024 03:25
|
|

|
 Got my first ever space marines* for kill team painted *well original flavor marines, i did some chaos marines too
|
|
#
?
Apr 29, 2024 04:04
|
|

|
Blood Ravens! 
|
|
#
?
Apr 29, 2024 04:52
|
|

|
Well, poo poo. I'm a little intimidated going after Light Show Belakor now, but I also painted some Chaos gremlins.  I did Hellboy so I could figure out how to do this one.     Lessons learned: If you do a lot of effects on your face with inks, let them cure over night instead of varnishing over them in the next couple of hours, because they will reactivate and run. Edge highlighting on pink foam is really hard to make look nice. I'm going to try to seal the stuff with some thinned mod podge next time, because those edges are ratty as hell. Purple continues to be the all-purpose Chaos shade color.
|
|
#
?
Apr 29, 2024 07:00
|
|
|
NinjaDebugger posted:Protip: water through the airbrush will take off the watercolor and leave the acrylic completely untouched. I just wash it off with a brush. I've sprayed varnish on watercolour before to lock it in when I've been lazy with making sure all the painted bits are covered with acrylic.
|
|
#
?
Apr 29, 2024 09:52
|
|
|
I bought an Infinity Giraldez and it's so lovely as an airbrush I don't want to put paint through it.
|
|
#
?
Apr 29, 2024 11:08
|
|
|
grassy gnoll posted:Well, poo poo. I'm a little intimidated going after Light Show Belakor now, but I also painted some Chaos gremlins. These look pretty great to me. The frost on the shield and the ice pillars particularly! Any roughness on the edges of the pillars isnt visible in the timg, and even in the full sized close-up just reads as imperfections in the crystal.
|
|
#
?
Apr 29, 2024 16:51
|
|


|
 Also trying out some Oathmark orcs for use in a One Ring ttrpg- trying for sort of a jaundiced sickly skin
|
|
#
?
Apr 30, 2024 03:15
|
|
|
The black primer and the paint overspray makes it look like he's an orc mafia hitman
|
|
#
?
Apr 30, 2024 04:38
|
|
|
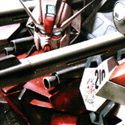
Harvey Mantaco posted:Did  Actual question for people who know airbrushes. I have an Neo for Iwata CN, and when it works, it's been working fine. However, there's been a bit of an issue where I'm noticing bubbling, and on occasions pretty severe bubbling, coming from the threads around the nozzle cap, both at the front where it screws into the needle cap as well as in the back where it screws on to the body of the airbrush. I double checked, to make sure I didn't lose an o-ring somewhere, and yeah, there's no o-ring on the official Iwata schematic. I'd cleaned it, and while there doesn't appear to be any paint in the bubbles anymore, it is still bubbling sometimes. I've tried both beeswax and thread tape, and while they stop the bubbling, it also kills the airflow pretty much completely unless I unscrew the nozzle cap slightly (which also brings back the bubbling). I can get it to work, and it does spray just fine, but it's a bit obnoxious to try and work around the issue instead of fixing it. I'm just not too sure what else to do, outside of chuck the whole thing and get a new one.
|
|
#
?
Apr 30, 2024 06:21
|
|


 guy
guy
|
Aniodia posted:
Bubbling and air leaks around those seals can happen, it just one of the quirks of airbrushes. An old trick is to swipe a little beeswax/chapstick on the threads, and that will seal it tight when you screw it back together.
|
|
#
?
Apr 30, 2024 07:34
|
|

|
SkyeAuroline posted:
Perhaps try a stencil. Make your own even. To paint two simple straight black lines on an Eldar banner I created my own little 1mm x 5 mm or so stencil in a common piece of paper. It didn't give me perfectly smooth lines but they came out close enough that all I had to freehand was some touching up and smoothing out, like doing highlighting. Sorry I just saw everybody else give the same advice I did that thing where I saw the post and typed without finishing the thread
|
|
#
?
Apr 30, 2024 15:22
|
|


|
Okay, next stupid question: Do y'all string your bows on minis? If so, what method do you use? I've seen that you can heat up sprue frames and stretch them to get a thin thread of plastic. It seems like that might be a good approach, but so far I've just left them with no bowstrings.
|
|
#
?
Apr 30, 2024 15:47
|
|

|
Fishing line? A brass rod? Paperclip? Copper wire?
|
|
#
?
Apr 30, 2024 15:53
|
|
|
armorer posted:Okay, next stupid question: Do y'all string your bows on minis? If so, what method do you use? I've seen that you can heat up sprue frames and stretch them to get a thin thread of plastic. It seems like that might be a good approach, but so far I've just left them with no bowstrings. Yes. Fishing line. ... This is the worst method I've ever heard of, do not do it.
|
|
#
?
Apr 30, 2024 15:55
|
|
|
Also I think that heating up sprue thing comes from Louise Sugden having to figure out a creative way to accomplish something without UHU glue because GE wouldn't let her use a non-GW product on something
|
|
#
?
Apr 30, 2024 16:02
|
|
|
GW would rather have you johnny tremaine yourself with sprue than admit that other products exist
|
|
#
?
Apr 30, 2024 16:04
|
|
|
Spanish Manlove posted:Fishing line? A brass rod? Paperclip? Copper wire? Ah, yeah fishing line would work great!
|
|
#
?
Apr 30, 2024 16:06
|
|
|
Stretched sprue is a normal technique that is almost as old as molded styrene models though? Use a candle (like a tea light candle). I find it works best to melt all the way through and touch the melted ends together and pull until you have a string of the desired length.
|
|
#
?
Apr 30, 2024 17:17
|
|


|

|
| # ? Jun 5, 2024 04:03 |
|
|
Okay, I'm throwing myself on the mercy of the court here: I have tried multiple brushes and have had the same result every time - the brush holds its point until it hits the miniature, after which it starts fraying, with a number of flyaway hairs springing free of the point and making a mockery of my attempts to paint with it. Winsor-Newton Series 7 do it, Da Vinci brushes do it. I'm wondering if the problem is that I'm getting too big a brush. I buy Size 2 brushes because you can switch back and forth between covering a lot of ground and suddenly narrowing it down to a fine point depending on how you use the brush, but I'm thinking that maybe the reason why I'm getting so much brush splintering is because I'm only getting paint on the last 20% of the brush and the rest of the brush is just wet. When I go home tonight I'm going to try some brush soap on it, maybe some hair conditioner, but I'm not sure if that's going to make much of a difference. Has anybody else had problems with this kind of thing?
|
|
#
?
Apr 30, 2024 17:35
|
|
