

|
Update 32 - High Seas Genocide Last time, we completed the plot elements of the Islands of Freedom, bringing back the maps of the dwarven kingdom to aid in the invasion from Darion. In doing so, we uncovered a slave ring that had sold dwarven slaves, implying that this diplomatic situation may be more complicated than it seems. With a war hanging over the kingdom, it is essential that we uncover the truth as soon as possible...  Haha, so of course we are ignoring all of that. Instead, we are returning to deal with the pirates infesting the waters around the Islands, as well as one last bit of exploration here. 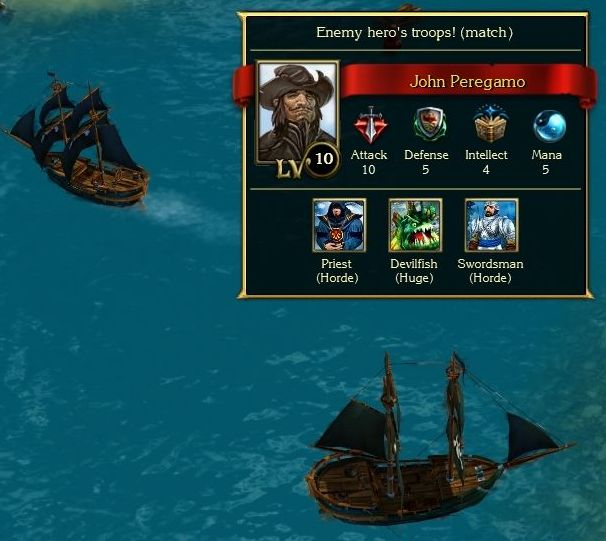 All of the sailing pirates are Hero fights. Interestingly, unlike most enemies, they do not aggro on you or chase you down. You must initiate a fight on your own. (This does not carry forward into future games, though)   : Can't you be more polite? It was just an accident. : Can't you be more polite? It was just an accident. : You think you'll get off light, you port rat? I have to re-plank the hull because of you. No, that won't do. Either you pay me 3000 gold coins for repairing the ship, or my guys will teach you a lesson you'll not soon forget. : You think you'll get off light, you port rat? I have to re-plank the hull because of you. No, that won't do. Either you pay me 3000 gold coins for repairing the ship, or my guys will teach you a lesson you'll not soon forget.So, we could pay 3000 gold to get away... if we want to just throw money out for no reason. : Well now, as our ships are stuck together anyway, and my crew can easily get to your ship too.: Now you're talking, let me be torn to pieces by a thousand cuttlefish! Let's see whose cutlass is longer?: I don't know about a cutlass, but my sails are certainly bigger. See if you can catch me! (Run away...) And with that, we are free to sail away - no gold required. All of these pirates give us that option, so there's never a reason to pay to leave even if you don't want to fight. Of course, we do want to fight, so we smack right back into him. : (same vague pirate insults): Look at yourself. You don't have a steersman at all. And you stinking so bad of rum that I can smell it from here.: What is it with this guy? First he destroys my ship and then he insults me?: Let me introduce myself, my drunk captain! I am the King's Royal Treasure Searcher, Baron Bill Gilbert!: Treasure Searcher? Ha-ha! All of us here are Treasure Searchers. And we don't like your king so much either. I hope, young boy, that you know some short prayers.: I know a couple - I'll read them over your grave. (Get prepared to grapple...)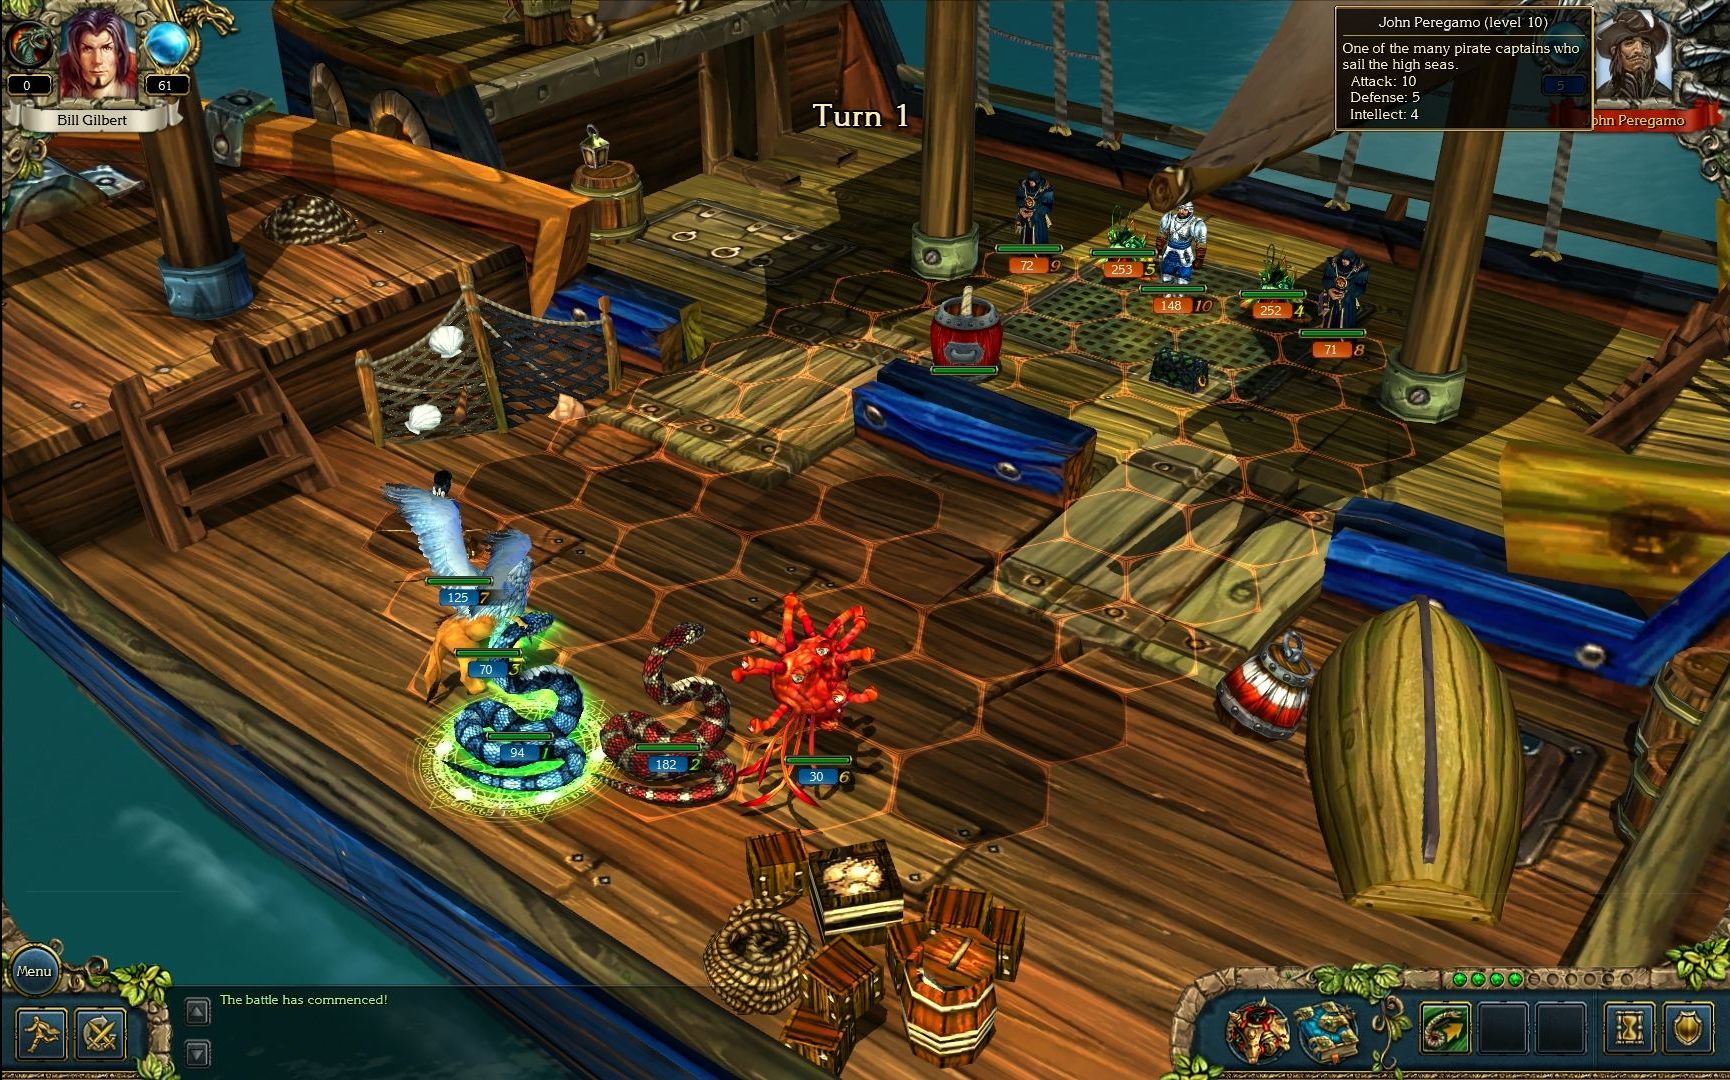 Welcome to the naval battlefield. We will be seeing a ton of it this update. Every pirate fight will have basically the same fight layout. I find these battlefields to be extremely easy to fight in, especially as the Mage.  As usual, we start out with the usual Ice Snakes. Between that and the Ice Arrow from our Bowmen, we can slow down almost every melee unit. This is where the first element of the ship fights comes in handy. The battlefield is quite long from end to end, and this exaggerates slow effects.  Using the Evil Beholder's Mind Control, we take advantage of the tough stack of enemy Swordsmen to help deal with his remaining ranged stacks.  Soon after, our beasts have eaten their way through the survivors.  Many of these fights will be fairly abbreviated - we have quite a few to get through, and the strategy doesn't change much.  Sailing along the coast, we locate the next victim.  : Sorry, captain, I didn't know that this is your territory. : Sorry, captain, I didn't know that this is your territory. : You know what? Ignorance of the law is no excuse. So, you'll have to pay anyway...: Interesting laws you have here. How much do I have to give you? : Don't worry, you freshwater sailor, I won't take much from you. 4000 gold coins - and you may sail in peace... until our next meeting.: And what are the other options?: Of course! The first option - you can pay more, ha-ha. The second - you can turn out to be the cursed Black Jack himself, in which case I'll be the one to pay. But judging by the looks of you, I doubt it! And the third option - we board your vessel and rob you blind! : You know what? Ignorance of the law is no excuse. So, you'll have to pay anyway...: Interesting laws you have here. How much do I have to give you? : Don't worry, you freshwater sailor, I won't take much from you. 4000 gold coins - and you may sail in peace... until our next meeting.: And what are the other options?: Of course! The first option - you can pay more, ha-ha. The second - you can turn out to be the cursed Black Jack himself, in which case I'll be the one to pay. But judging by the looks of you, I doubt it! And the third option - we board your vessel and rob you blind!Most of the pirates have this dialogue at the end of their tree, at which point we can choose between paying, fighting, or just leaving (again, why would you ever pay?). Of course, we are going down the fighting route. : I choose the third option! (Grapple vessels...) Hey, at least Greedy here managed to hire some actual pirates for his crew.  The second reason the pirate ship battlefields are easy - the boarding ramps between the two ships form two narrow lanes for the enemy to approach. This slows them down, bunches them up, and often splits their forces. Our spells are more effective, and we can deal with the melee troops that reach us fairly easily.  With the mass freeze effects, I barely noticed that Greedy here actually gives all of his troops +1 speed... a huge bonus if it was on a more usual battlefield.  Instead, we just crush Greedy and his troops.   These pirate fights are worth a good amount of experience, and Bill hits Level 15. As usual, Leadership is the choice when available.  Now that we have a Leadership buffer, we can chow down on these Roast Rats we got from the dwarven slaves. If we had eaten these while at full troop counts, our stacks would become uncontrollable unless we dismissed a few of each troop. Instead, I usually wait for either the next Leadership level, or I'll eat them one by one when picking up banners on the map.  Since the level gave us plenty of Leadership to spare, Bill eats all 7 Rats - giving us +14 Rage and Mana.   Getting higher max Mana not only lets us have more to use in a fight, it speeds up the rate at which Mana recovers outside of combat. This make life easier (less waiting outside of combat), and it also helps us keep more Rage between fights. Higher max Rage also means we will get more coming in during combat.  Our next prey is spotted sailing into a bay - no escape for you!  Finally, a pirate who hired pirates.  : Who says? : Who says? : I say it, because I have the the ownership of these waters, signed the Governor himself - and that gives me a right to impose tribute on any vessel that sails in these waters. (Yes, those typos and bad grammar are in the original text): Very interesting goings on around the Islands. And how much am I supposed to give you? : I say it, because I have the the ownership of these waters, signed the Governor himself - and that gives me a right to impose tribute on any vessel that sails in these waters. (Yes, those typos and bad grammar are in the original text): Very interesting goings on around the Islands. And how much am I supposed to give you?From there, same old dialogue as before, with the same outcome. 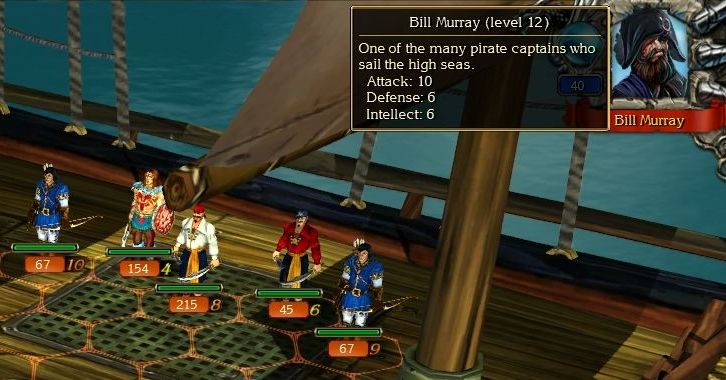 Yeah, this looks like an actual army a pirate might hire, instead of a bunch of fish and priests.  The large stack of Barbarians gets lured into a Snake trap.  In turn, Bill Murray serves up some fried Snake. I don't know that Fireballs are the safest option aboard a wooden sailing vessel, but it is much more effective at hurting my troops than his actual army.  If you can make all remaining stacks sleep or miss their turn somehow, an enemy hero cannot use their spells, since they never get to act. Of course, the same can apply to you.  Bodies litter the ship once we are done with Bill Murray.  We take a few more casualties, entirely caused by the Fireball.  The last pirate of the Western Freedom Islands is found trying to sail through a narrow passage, but can't slip by our ship.  : Well, I'm the chief here. What do you want? : Well, I'm the chief here. What do you want? : The world is in danger! The people are in danger! Something unknown is coming, and it will destroy the whole world! And you, captain, will die as well. Everyone, everyone will die! : The world is in danger! The people are in danger! Something unknown is coming, and it will destroy the whole world! And you, captain, will die as well. Everyone, everyone will die!Well, that's different, at least... : It sounds to me like you've gone completely crazy.: I... Only I can help you to save yourself! Survive! You don't wan't to die, right captain?: So, what's your secret?: You think I'm stupid? No, I won't tell you, you can't trick me into sharing the secret. My secret. I... I'll tell you, but you have to give me gold for this... A lot of gold! Your life is worth a lot of gold, right? When I have the gold, I'll be able to build a big ship, and sail to the edge of the world! I'll sail away from here, and when the world dies, I will remain! Only me...: How much do you want for your secret?: Not much... Your life is worth far more... I want only 5000 gold coins for my secret.Sure, right... just step on to my ship and I'll give it to you.  Mad Orris is back to relying on lots of Devilfish, but does have a significant Sea Dog contingent.  With the better Mana recovery, we are much more likely to be entering battles with enough Rage to cast things like Evil Shoal. Of course, the effect is starting to be a little weak.  Looks like Mad Orris had convinced some other poor sailor to had over their loot in exchange for his 'secret'. Well, it's mine now.  Having looted his ship, we go to town on his troops.   With the seas of the Western Islands clear, we move on to the Eastern Islands. Immediately, we find a pirate to hunt down.  After the initial dialogue, Bill Kill has the same dialogue as Bill Murray, so let's just skip to the massacre part. 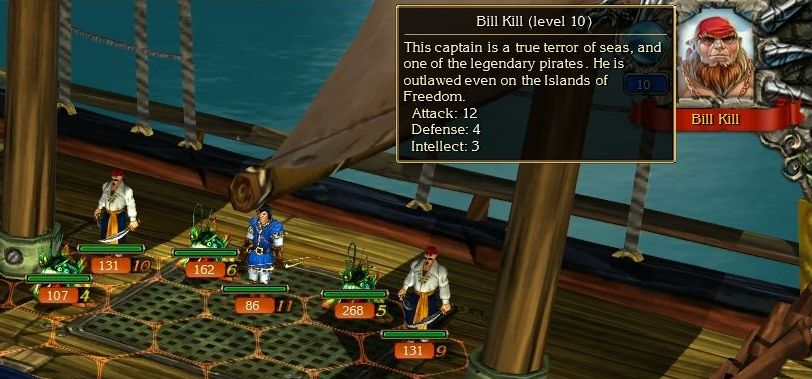 Oh no, not a true terror of the seas!  Ok, maybe the level of terror has been exaggerated slightly. Or maybe Bill needs to take a new title on. Royal Treasure Searcher isn't nearly as catchy.   Likewise, Ron Wet Nose here repeats the same lines as Bill Kill. The verdict for unoriginality is death!  He does pack a large amount of Inquisitors onto his ship.  However, the extra stacks just mean the AoE spells are more effective.  By this point, I started getting a bit impatient, resulting in a few extra Snakes dying needlessly.  Of course, Resurrection is a spell that exists to correct mistakes like that.  The last pirate of the Islands looks to have hired some Elves instead of Bowmen.  : What water? What nonsense are you talking? : What water? What nonsense are you talking? : Take a look around! You are sailing on clean water, right? And you are polluting it! When was the last time that your people cleaned that ship? And the garbage you throw overboard, right? If everybody spit in the sea and threw the remains of their breakfast overboard, we'd have a stinking puddle instead of the sea! That's why you have to pay.: Even if I pay you, will the sea become cleaner?: Sea, cleaner? Hey... I don't get...: I know your kind. Thought you'd make some easy gold? No way! (Grapple the vessel...) : Take a look around! You are sailing on clean water, right? And you are polluting it! When was the last time that your people cleaned that ship? And the garbage you throw overboard, right? If everybody spit in the sea and threw the remains of their breakfast overboard, we'd have a stinking puddle instead of the sea! That's why you have to pay.: Even if I pay you, will the sea become cleaner?: Sea, cleaner? Hey... I don't get...: I know your kind. Thought you'd make some easy gold? No way! (Grapple the vessel...)Aww, an environmentalist pirate would have been a pretty cool idea, instead of it just being another excuse to take our gold.  Like Ron Wet Nose, Jimmy here decided to split his troops into a many stacks, always something nice to see.  Mind Control always helps stop ranged aggression in the first round of combat.  I get a bit too aggressive up the right plank, nearly leaving my troops open to a double-swipe from those Sea Dogs. A judicious use of Rock Wall blocks the danger off. As the game goes on, this ability becomes better and better, outclassing the small amount of damage the other abilities do.  The Sea Dogs take a turn to bust the Wall down, which just lets my Snakes get to him first.  Finally, the pirate menace of the Islands has been eliminated.  If we are done with the pirates, why are we still here? Also, you might notice a change in our army. Once again, Priests have joined in, swapped into the place of the Evil Beholders.  Well, there's one last area of the Islands we haven't seen. Just nearby Redbeard's shack, there's this little bay with a cave entrance.  Before we head in, the beaches need exploring. The first one holds a Magic Rune in addition to some extra gold.  The other beach looks out onto the ocean, and yields two bunches of gold.  Time to head underground and explore.  Well, of course it's underwater. We went into a cave about 2 feet above the sea.  Like most caves, we get plenty of Crystals. Definitely happy to see that, since the Level 3 spell upgrades are expensive.  Unlike most of the caves, this one is a tad haunted.  Quite haunted, in fact.  As usual, the priority is to take out the Skeleton Archers. Their damage output is insane compared to most other troops.  We brought the Priests along for two reasons. First, of course, we get the double damage to Undead. Second, Evil Beholders are pretty useless in this area, since Undead units are immune to Mind effects.  You've got to know in this game when not to attack. The Cursed Ghosts here will easily restore all the damage I'd do in their retaliation if I attacked with the Griffins.  Instead, two turns of attacks by the Royal Snakes eliminates these apparitions forever.  Priests remain great against Skeleton Archers, avoiding that reduction to damage the Bone ability gives them.  Finally, the large Zombie stack is surrounded and easily picked apart.   A quick break between ghost fights lets us pick up a nearby Magic Rune. We are now saving these up for the second level of Higher Magic.  The next fight is more Ghosts and Archers, but this time we can get rid of the Archers on turn one.  We get another crystal from the battle itself.  With the Archers gone, we can focus magic on the Ghosts. Fire Arrow is extremely effective against them.  Without ranged support, the Ghosts are toast.  Well, that makes up for one of the Rats we ate.  Deeper in the cave, we spot this dangerous army around a corner. This is our first sight of Bone Dragons, the Level 5 Undead troop.  Despite the appearance of Bone Dragons, those giant Skeleton Archer stacks are far more threatening. This fight is making me really miss a spell that is normally found by now. Oh, Blind, where are you?  And that's that for those Dragons. Don't worry, we will see them in actual action eventually.  Even a full powered Ice Snake can only kill a little more than 200 Skeleton Archers. In order to get rid of these huge stacks as fast as possible, its more effective to cast Doom on them to guarantee some critical hits.  The Royal Snakes gets that critical without retaliation, but I'll protect my Griffins with a Glot's Armor.  Even the smaller Archer stack can do hundreds of damage. I'm actually a bit worried about running out of these Snakes, since they are a bit fragile.  So let's Sacrifice a few Griffins to... wait a minute. Welp, I forgot completely that we can't use Sacrifice on a unit protected by Glot's Armor (although that would have been a great combo).  I'm not willing to Sacrifice any other troops, so Resurrection it is.  It turns out that Resurrection was nearly good enough anyways.  That strong army must have been guarding something, right? Nope, just some bones.  I guess they were technically guarding the exit, but we could easily have gotten around without fighting. Maybe the other side will have something good?  Ruin Guy? Is this a knock-off Megaman boss?  Despite my joking, Ruin Guy can be a really hard fight at this point in the game, especially if we weren't a Mage. He has very strong physical stats and a good size army with a variety of units.  We start off targeting his large Vampire stacks, since we want to take advantage of them starting off in the lower Health bat form. The splash damage does a good amount to his small stack of Bone Dragons as well.  As Ruin Guy moves up, we can see that we have devastated his main force, though his Skeleton Archers are mostly intact.  I move my melee troops up to engage, destroying his weakened stacks fairly easily.  Ruin Guy does come with the Raise Dead spell, letting him bring back a few more Vampires. His Intellect isn't high, so the amount raised is pretty paltry, especially when isolated.  Before long, we've left his Skeleton Archers with barely a leg to stand on.  This battle went very well indeed. My practice run was not nearly as smooth as this.  Okay, so what was this whole Undead tunnel and hero guarding? Sure, a Crystal is nice...  But the tree stump is empty...  Ah! A buried chest!  Ah! A spell we already have! And that's it. At least we got a few Crystals and a bunch of experience.  With that, our adventures in the Islands come to an end (ok, we will be back later for one more quest, but that's not going to be for a long time). As we have completed a major region, I will be doing a set of charts and figures as before to show off how our adventure has been going numerically. Then, we will complete some quests on Darion that have been sitting in our quest log since before we came to the Islands. ---------------------------------- Bonus Material Marking the Map  Talkin' 'bout Troops Bone Dragon  Resistances: 50% Poison Critical Hit %: 10 Defense Bonus: 6 Talents  Poison Cloud: Releases a cloud of poison, which inflicts 60-80 points of poison damage to all targets in the area. Poisons the targets with a chance of 90%. Poison Cloud: Releases a cloud of poison, which inflicts 60-80 points of poison damage to all targets in the area. Poisons the targets with a chance of 90%.Abilities Undead Bone Flight Gully's opinion: I have to confess that I have never used the Bone Dragon in my own army. Of the dragons, they are the weakest in general. That doesn't mean they aren't tough fighters. Their Speed is good enough to easily fight a target of your choice if they have moved up in the first turn. Poison damage is often not great, with the number of resistant targets in the game. They do have an excellent AoE talent that deals a good amount to an area, which is great for avoiding retaliation. However, despite their high Defense, they are surprisingly fragile Level 5 units - their Health is not high, and they have no good resistances (although arrows will do little to them). Fighting them: Bone Dragons are usually easy to fight, especially if you are a Mage. They have low Health, and no resistance to either Fire or Physical, so spells can tear them apart. Don't use Poison damage or arrows, and you will be fine. Be careful not to advance up during the first round, their Speed usually will leave them sitting in range of your whole army. Poison resistant creatures (like Royal Snakes) are great against them. Beyond that, strong physical attacks will do the job.
|
 #
?
Sep 20, 2017 15:48
#
?
Sep 20, 2017 15:48
|
|


|

|
| # ? Jun 12, 2024 13:17 |
|
|
I love the Mad Orris dialogue, especially in retrospect. (I think there's more if you indulge him?) That druid staff isn't fully upgraded, is it? Please tell me that you're planning at some point to upgrade it in full and go with an all-animal party. (I fondly remember a run where I was a warrior dual-wielding those, apparently the bonuses stack in this game?) I also find it funny how you say "especially as a Mage" - I really loved running this game as a high-Intellect, high-Rage Warrior (see the above druid-staff dual-wielding run).
|
|
#
?
Sep 20, 2017 18:12
|
|
|
meristem posted:That druid staff isn't fully upgraded, is it? Please tell me that you're planning at some point to upgrade it in full and go with an all-animal party. (I fondly remember a run where I was a warrior dual-wielding those, apparently the bonuses stack in this game?) Not yet. I've been keeping an eye on that Keepers fight, last time I checked it was just a little beyond my abilities. The final tier upgrades can have pretty tough battles involved. I never would have thought of using a double-staff build as Warrior though, that's pretty awesome. As for my 'especially as a Mage' comments, in my opinion we are starting to hit the high-water mark of being a Mage in this game. We have Level 3 Chaos Magic, a decent amount of Intellect, and Higher Magic (almost at Level 2 now). We aren't quite as powerful as we can get (there are still a couple of powerhouse spells to find, and our Intellect will still be increasing), but damage increases will start to slow down. For now, though, we are in that area of easily destroying most armies via spells. I find that the Mage in the mid-game is ridiculous. In the late game, the army sizes will outpace our spell damage though, and we will run into more troublesome enemies. They did a better job in the later games of balancing things out between classes, I think. I'll have to go back and check if I missed dialogue from Mad Orris though, thanks for the heads up there.
|
|
#
?
Sep 20, 2017 18:52
|
|
|
Those pirate names. 
|
|
#
?
Sep 20, 2017 21:17
|
|

|
Bonedragons are kinda nasty in Heroes of Might and Magic 4 but I can't recall any other game where you need to care about them. Maybe later in the KB series they dump a bucket of imbalanced abilities over them in an attempt to beef them up?Picayune posted:Those pirate names.
|
|
#
?
Sep 20, 2017 22:05
|
|

|
Gully Foyle posted:I find that the Mage in the mid-game is ridiculous. In the late game, the army sizes will outpace our spell damage though, and we will run into more troublesome enemies. They did a better job in the later games of balancing things out between classes, I think. You can level up Soul Draining to fire off each round (Rest 1), take 40% of unit health, and cost only 35 Rage. (That's the optimum way to upgrade it - don't level up to 50%, this raises the cost of the spell to 70 Rage.)
|
|
#
?
Sep 21, 2017 17:11
|
|
|
Poil posted:Bonedragons are kinda nasty in Heroes of Might and Magic 4 but I can't recall any other game where you need to care about them. Maybe later in the KB series they dump a bucket of imbalanced abilities over them in an attempt to beef them up? Not really? I can't recall them getting much of a buff, although possible they got boosted stat-wise a bit. Basically, if you want to use an all-Undead army, they are a powerful troop. Their great speed is really good for flying past the melee troops to the squishier ranged/magic troops. If you are using a non-Undead army, just stick with other dragons if you want a similar ability. meristem posted:I only played the second game, although apparently the quality drops afterwards...? Either way, maybe try to increase your Rage pool even as a Mage? For that one Spirit? You know *that* one? With high Rage pool fuelling its ability and then two spells fired off via Higher Magic... Well, that might be an ideal way to level up that Rage ability... but you'd have to be very, very lucky for the game to offer you all that. You also get less Rage experience as a Mage, so it's very hard to get that many levels. We will see that ability used a lot for sure, but it's not going to be as impressive for us.
|
|
#
?
Sep 21, 2017 18:28
|
|
|
Update 33 - Stats and Stuff - Freedom Islands Edition Time to take a more mathematical look at the swathe of destruction as we swept through the Freedom Islands, and how it compares to the overall picture. A Brief Overview Battles Fought Darion - 155 Freedom Islands - 81 Overall - 236 Enemies Killed Darion - 22426 lives ended, valued at 436246 Leadership (19.45 Leadership/kill, 147 kills/battle, 2814 Leadership/battle) Freedom Islands - 44139 lives ended, valued at 1219057 Leadership (27.6 Leadership/kill, 545 kills/battle, 15050 Leadership/battle) Overall - 66565 lives ended, valued at 1655303 Leadership (24.87 Leadership/kill, 282 kills/battle, 7014 Leadership/battle) Friendly Losses Darion - 635 lives lost, valued at 11365 Leadership (17.9 Leadership/loss, 4.1 losses/battle, 73.3 Leadership/battle) Freedom Islands - 1464 lives lost, valued at 55140 Leadership (37.7 Leadership/loss, 18.1 losses/battle, 681 Leadership/battle) Overall - 2099 lives lost, valued at 66505 Leadership (31.68 Leadership/loss, 8.9 losses/battle, 282 Leadership/battle) The Journey in Graphs Leadership destroyed - Freedom Islands   Leadership destroyed - Overall   Troops destroyed - Freedom Islands   Troops destroyed - Overall   Kill Analysis - Type and Level Type of Troops - Freedom Islands   Type of Troops - Overall   Level of Troops - Freedom Islands   Level of Troops - Overall   Top 5 Lists Freedom Islands Enemies Killed (#) 1. Skeleton Archer (6075) 2. Devilfish (5665) 3. Fire Dragonfly (3516) 4. Thorn Hunter (3249) 5. Sea Dog (3181) The enemies killed by number is still dominated by Level 1 troops. Skeleton Archers remain the top enemy by number, particulary owing to that last Undead cave (over 3500 Skeleton Archers were killed there). The nautical Devilfish and Sea Dogs are well represented though. Although Pirates didn't quite make the Top 5, they barely missed out at 3170 killed on the Islands. Enemies Killed (Leadership) 1. Sea Dog (127240) 2. Skeleton Archer (85050) 3. Pirate (79250) 4. Devilfish (67980) 5. Priest (63150) When looking at Leadership value, Sea Dogs far outstrip anything else, while the Skeleton Archers fall into second place. A surprise appearance by Priest in number 5, mostly due to the pirate crews in the final update. Friendly Losses (#) 1. Pirate (623) 2. Sea Dog (190) 3. Snake (188) 4. Royal Snake (124) 5. Bowman (106) The fragile pirates suffered heavy losses in the first few updates, resulting in them dominating this list. The snake troops, who have been staples for most of the Island fighting, take spots 3 and 4, while heavily-targeted Bowmen sneak on at place 5 (it would have been higher if we had used them more often) Friendly Losses (Leadership) 1. Pirate (15575) 2. Sea Dog (7600) 3. Royal Snake (7440) 4. Snake (5640) 5. Bowman (5300) This list is no surprise - pirates, snakes, and bowmen. Overall Enemies Killed (#) 1. Skeleton Archer (9526) 2. Thorn Hunter (6861) 3. Devilfish (6026) 4. Fire Dragonfly (4383) 5. Sea Dog (3315) When looking at the whole game, Skeleton Archers are easily dominating the list of enemies destroyed. The heavy influence of the fighting in the Islands brings both Devilfish and Sea Dogs onto the leaderboard, knocking out the spiders we saw in the top lists after the first section. Enemies Killed (Leadership) 1. Skeleton Archer (133364) 2. Sea Dog (132600) 3. Pirate (81825) 4. Bowman (74350) 5. Devilfish (72312) The Sea Dogs have made a valiant run to replace Skeleton Archers at the top of the Leadership list, falling just short. Pirates, Bowmen, and Devilfish join in as Level 2 troops. Meanwhile, Thorn Hunters, Skeletons, Ghosts, and Cave Spiders are all knocked from their spot on this list. Friendly Losses (#) 1. Pirate (623) 2. Thorn Hunter (293) 3. Sea Dog (190) 4. Snake (188) 5. Lake Dragonfly (166) The heavy pirate losses from the Freedom Islands are dominating the list as expected, while the use of the relatively fragile Sea Dogs and Snakes get them a place on this list. Friendly Losses (Leadership) 1. Pirate (15575) 2. Royal Snake (7800) 3. Sea Dog (7600) 4. Bowman (6700) 5. Snake (5640) With Royal Snakes in near continuous use, their losses continue to mount up. Similarly, our return to using Bowmen keep them up on the Leadership lost list. Ancient Bears and Marauders have been knocked off by the use of Pirates and Sea Dogs. That concludes our look at the numbers. Next time, we will return to Darion to complete a few quests before striding off to uncover the mystery slave ring, and to start/prevent a war with the dwarves.
|
|
#
?
Sep 21, 2017 18:30
|
|
|
"Ruin Guy"? I think I saw them in Color Splash, they were just Shy Guys in grey robes and stone masks.
|
|
#
?
Sep 22, 2017 01:09
|
|


|
Update 34 - Bill's Day Job Before Bill heads off to new lands, we have a couple of quests to clear back in Darion proper.  We start off in the Verlon Forest region, by an old run-down castle. When we explored this area before (so long ago), I just walked by the place. But this guard with golden armor is hard to ignore.  Before we talk to him, I should point out that our hero has had a couple of changes. We've been relying very heavily on using multiple types of Snakes and taking advantage of the stacking bonuses of the Ring of the Snake King, the Snake Boots, and the attack bonus provided by Frog Feanora. While this combination is very powerful, it's time to break free from that, at least a bit. So we've kissed Feanora, returning her to human form (for +3 Intellect), and have exchanged the Snake Boots for the Boots of the Mystic, which gives us another +2 Intellect and a bonus to Slow/Haste spells. In keeping with that, we've dropped the Snakes. We've brought back the Shamans, and a new unit has joined for now - the Polar Bear. These are the next step up from the Ancient Bear, with more stats for more leadership.  : Maybe I can help you somehow? : Maybe I can help you somehow? : I see you bear the insignia of the royal Treasure Searcher. This means that I have a very important task for you. You will need a treasure - not a simple one, but the true royal treasure.: Sounds very interesting!: The deserted castle of Hard the Terrible hides many mysteries and secrets. At night, people hear strange sounds and knocking coming from it. Recently they have discovered the papers of a former royal treasurer, Earl Redcliff. According to these papers, a part of the royal treasury was kept behind a portrait, in a hiding place that only the old king knew. Your job... well you see the royal chest is full of jewels... You must find it. Will you try?: I'll try, why not... But I want you to describe this picture...: By description, Redcliff was a handsome and brave man but he was also a bit of an eccentric. For example, he liked to wear a dress during the carnival. Certainly the earl was a many-sided person.: That's interesting, very interesting. I will try to find the treasure.: Excellent! I shall open a passage to the castle for you. But be carewful, for the stories of ghosts are not just romantic gliding on a beautiful legend - the ghosts are very real, and they are dangerous and bloodthirsty creatures!: Don't worry; I'll put an end to all the ghosts. : I see you bear the insignia of the royal Treasure Searcher. This means that I have a very important task for you. You will need a treasure - not a simple one, but the true royal treasure.: Sounds very interesting!: The deserted castle of Hard the Terrible hides many mysteries and secrets. At night, people hear strange sounds and knocking coming from it. Recently they have discovered the papers of a former royal treasurer, Earl Redcliff. According to these papers, a part of the royal treasury was kept behind a portrait, in a hiding place that only the old king knew. Your job... well you see the royal chest is full of jewels... You must find it. Will you try?: I'll try, why not... But I want you to describe this picture...: By description, Redcliff was a handsome and brave man but he was also a bit of an eccentric. For example, he liked to wear a dress during the carnival. Certainly the earl was a many-sided person.: That's interesting, very interesting. I will try to find the treasure.: Excellent! I shall open a passage to the castle for you. But be carewful, for the stories of ghosts are not just romantic gliding on a beautiful legend - the ghosts are very real, and they are dangerous and bloodthirsty creatures!: Don't worry; I'll put an end to all the ghosts. Harmon here will also give us a bit of background on the castle that's a bit long to include here (see the bonus material for that). For the moment, there's nothing to do but head inside the castle.  The entrance hall is showing a great deal of disrepair, but the old banners and statues make the royal heritage clear.  Off to one side, a skeleton lays against the wall - if not for the quest marker, it'd be the same as any other skeleton we've passed by.  : What did you say, my headless friend? : What did you say, my headless friend? : Knock-knock!: I can't understand. Let's do it like this: one "knock" means yes, double "knock knock" means no. Ok?: Knock!: Ok, now we're getting somewhere! Well, what do you need? Let me guess... Seems like... I think... No, I'm pretty sure that you need your other arm!: Knock-knock!: Well, both the arms are there. Let me take a closer look at you. Ears? But skeletons don't have ears! Besides, there is no place for them to stick to... Holy Dragon! You don't have a head! : Knock-knock!: I can't understand. Let's do it like this: one "knock" means yes, double "knock knock" means no. Ok?: Knock!: Ok, now we're getting somewhere! Well, what do you need? Let me guess... Seems like... I think... No, I'm pretty sure that you need your other arm!: Knock-knock!: Well, both the arms are there. Let me take a closer look at you. Ears? But skeletons don't have ears! Besides, there is no place for them to stick to... Holy Dragon! You don't have a head!You know, for having over 20 Intellect, Bill really is pretty stupid. : Knock!: How do you eat then? Though, I guess you don't need food... Oh! Do you want me to find your head?: Knock!: Ok, sure... As we add the missing skull to our scavenger list, it's time to start checking out the portraits in the castle. Unlike most backgrounds, we can mouse over any painting in this castle and the cursor will show it as an interactable object (you can't see the cursor as I'm not capturing it during recording).  Every time you do, this spoooky animation protrudes from the frame... mostly resulting in finding nothing at all.  A few of the paintings contain armies that appear when you touch the frame. They appear very close by and immediately attack, so it's difficult to avoid battle when this happens (though it is possible).  This portrait was apparently haunted by hundreds of Ghosts and Skeleton Archers.  With our change of equipment and wife bonus, our spell damage has been boosted considerably. We get about 500 more damage to the main target of Ice Snakes, and a smaller boost to the splash targets.  The Boots of the Mystic give us a boost to our Slow and Haste spells. Each of these spell effects is increased by -1/+1 Speed respectively, as well as one bonus turn of duration. We can use this to slow these large Ghost stacks down to a crawl.  We can see that the normally speedy Ghosts (Speed of 4) have been reduced to walking (well, floating) one hex at a time. Still, it's hard to break through these Ghosts with physical damage.  Let's try out one of the other tools in our spell book. Hell Breath is a Chaos spell that buffs a troop with additional Fire damage to their base damage. It only works on basic attacks, not special moves.  The Griffins make a decent target, since they have no special attack to worry about.   The spell is... not that spectacular. Against normal troops, a 20% boost in damage is pretty small. It's a bit better against these Ghosts, since the bonus damage bypasses their Physical Resistance. It serves best when facing Plant-type units, since they take double damage from Fire. As a Mage, this spell is pretty useless. Even in the end game, a direct damage spell will do way more. However, it can serve a use as a Warrior, since it doesn't depend on Intellect and it scales better with larger and stronger armies.  The Fire-Griffins do help the rest of the troops get rid of the last Ghosts.   Zerock hits Level 11. Once again, we get the chance to boost Smashing Sword. The Rage cost is still quite low, so I'll gladly boost that damage again. It's actually been keeping up pretty well so far, and will be useful throughout the game as a way to spend a bit of Rage.  Continuing our search, we find the a lavish bedchamber with a four-poster canopy bed.  Well, we know the fate of the old king and queen - at least they died together, I guess. I can't imagine it's very comfortable to wear a crown in bed though.  There are a few paintings in the room, one of which spawns another ghostly enemy.  This time the enemy has a large Skeleton stack, but there are fewer Archers.  This time, I'll use Slow on the Ghosts immediately. This gives us a lot of time to deal with the Skeletons before the Ghosts can even get close.  It's a good thing, since just the Skeletons alone prove to be a nuisance. Even against my tough Polar Bears, they can inflict a great deal of damage.  As the troops deal with the Skeletons, we use spells to whittle down the slowed Ghosts. We can now do a cool 1K damage with Flaming Arrow. Not bad for only 5 Mana, eh?   Having cleared the bedroom out, it's back to the halls to search. In a nearby room of broad columns, a spider comes crawling to attack.  The Undead Spiders are here in large numbers... but not nearly enough to worry me.  We still want to deal with the Archers first. It feels great to have my precious Shamans back in the line. This totem blocks both remaining stacks from doing anything to my troops.  We find a scroll of Kamikaze in the battle as well. This spell turns a troop into a living bomb that will explode in a few turns, damaging itself and nearby enemies. I'm not a fan of this spell, I find it very hard to use effectively.  Back in the battle, the remaining troops are easily cleaned up.   Turning a corner, we find an unexpected patch of nature, in the form of an overgrown courtyard garden.  An Altar of Experience stands among the trees. We touch it for the bonus, a measly 165 Experience (about a quarter of most battles these days).  As we rest in the sunlight, another wandering army of spooks finds us and charges.  This one is more Skeleton Archers than anything else. Of course, they are largely destroyed on the first turn through a combination of Ice Snake x2, Priests, and a cast of Ghost Axes by the Shamans.  The remaining Cursed Ghosts are assaulted by my beasts.  One of them tries their Shriek talent, knocking back my troops... except for my Polar Bears. Being Level 4, there are a number of spells and abilities that won't affect them.  If we can take out all the Archers in the first turn, fights like this are easy to do without a loss.  Just outside the courtyard, we find a skull on the ground. Somehow, we know that this is the skull we are looking for, as opposed to the many others we can see lying around the castle.  We know who this hopefully belongs to, let's circle around and take it back to the headless bones.  The hallway leading back has a few portraits to check out, one of which holds a number of spiders.  We haven't talked much about Undead Spiders... basically they are Spiders who are Undead (surprise). Just like Cave/Venomous Spiders, they have a decent Speed of 3, and a pretty good attack for their cost. But like the other Spiders, they are also very fragile, and that goes double when hit by Holy attacks. They are rarely a concern unless numbering in the thousands.  After victory, we continue back to the entrance hall and hand the skull back to its presumed owner. : Knock...: Here's your head! Catch it! That unearthly green glow is a little concerning, but the skeleton is back in one piece.  : And who are you? : And who are you? : My name is Morse, I used to serve in the Royal Guard. I was a personal security guard of the Queen. When the king was sealed behind these walls, I stayed here secretly to protect her from the old king. I was hid in secret rooms, talking to the queen with the help of secret messages, so the king could never guess my presence.: I see. You must have been very devoted to your queen if you dies for her, were you not?: Yes, I loved her. But I couldn't tell her about my feelings. But tapping messages for her through the cold stone wall made me the happiest man in the world. Ah... Ok, Bill Gilbert. You have rendered a service for me, and one good turn deserves another. There is a secret room where the old banner of Darion is kept. I am sure it can help you to gather more warriors to your army. Go to the end of the passage. There is a torch on the wall. Turn it and the door opens.: Thank you, guardsman, I see that you were a good person. : My name is Morse, I used to serve in the Royal Guard. I was a personal security guard of the Queen. When the king was sealed behind these walls, I stayed here secretly to protect her from the old king. I was hid in secret rooms, talking to the queen with the help of secret messages, so the king could never guess my presence.: I see. You must have been very devoted to your queen if you dies for her, were you not?: Yes, I loved her. But I couldn't tell her about my feelings. But tapping messages for her through the cold stone wall made me the happiest man in the world. Ah... Ok, Bill Gilbert. You have rendered a service for me, and one good turn deserves another. There is a secret room where the old banner of Darion is kept. I am sure it can help you to gather more warriors to your army. Go to the end of the passage. There is a torch on the wall. Turn it and the door opens.: Thank you, guardsman, I see that you were a good person. Let's hunt down that secret room. Near the bedchamber, there is one set of noticeably different torches. If we manipulate the left one...   And there's the old banner. It's basically just a normal banner, giving us +64 Leadership. We also get a chest with 3200 Gold. Not a bad reward.  Returning to the search for the treasury, we head deeper into the castle. At the back, we find an extravagant hall with two levels.  The top level is patrolled by a ghost. Before we head down, we should take care of this specter.  This is a pretty ideal army for us to fight. Since Ice Snake is doing enough to 284 Skeleton Archers at a time...  After our casting, there's barely an army left to fight.   The upper mezzanine holds nothing of interest, so we head downstairs.  Nice throne!  Finally, we find the portrait we are looking for (not that you'd necessarily know ahead of time).   The royal treasury is even more run down than the rest of the castle, even the floor is crumbling away. Inside the treasury, a legion of bony men await.  About a thousand each of Skeletons and Skeleton Archers have been waiting here, guarding the treasure.  Ouch! These large stacks can inflict quite a lot of damage, especially on a critical.  Of course, we can do much more, and my troops are far more durable.  Still, that hit hurt my Polar Bears. As the nearest Polar Bear reinforcements are all the way back on the Freedom Islands, and the nearest Griffins are in my reserve slot, Sacrifice will save us a lot of time.  Those poor Griffins though... 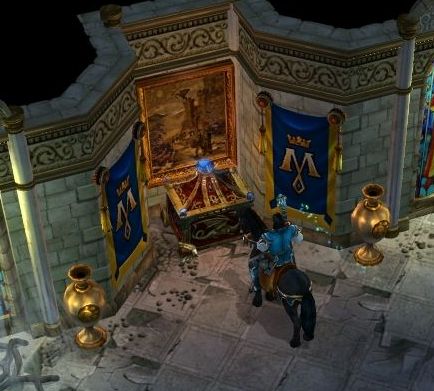 Nothing left but to pick up the massive treasure.  Oh man, we are gonna be so rich after getting our hands on this! Let's take this back to Richard Harmon outside. : So, have you found the treasure already? That must be a very heavy chest.: Yes, I've brought the chest. Are we going to split the money or what?There's the Bill we all know and love. Money first, duty second. : Good job, Bill Gilbert! But we have no right to appropriate the money to ourselves. It is the money of our king, Mark Leonard the Second! So, please hurry to the castle. I think the king will be very glad to see the treasure of his ancestor.: Ah. Of course I will bring it to him.Well drat. Maybe the king will give us the half we deserve?  : Yes Bill Gilbert, I see you've come to me with some important news? What is that chest for?: I was sent by Sir Richard Harmon, who guards the old royal palace. I've found the royal treasure, and he told me to bring it to you.: Fine, fine! Many people tried to find it, but without success... Still, I'm not at all surprised that it was you, our Royal Treasure Searcher, who found it! You deserve a reward, my faithful knight... (Reward: 4800 Gold, 275 Experience): Thanks - I suppose it wasn't so hard. : Yes Bill Gilbert, I see you've come to me with some important news? What is that chest for?: I was sent by Sir Richard Harmon, who guards the old royal palace. I've found the royal treasure, and he told me to bring it to you.: Fine, fine! Many people tried to find it, but without success... Still, I'm not at all surprised that it was you, our Royal Treasure Searcher, who found it! You deserve a reward, my faithful knight... (Reward: 4800 Gold, 275 Experience): Thanks - I suppose it wasn't so hard.Aw, man, that chest was super heavy... 4800 gold probably isn't even close to half.  While we are in the capital, I exchange out the Priests for Bowmen once again. We've finished dealing with Undead for a while, but I still want to keep some ranged damage.  Our next order of business is to go back to the Magic Range. We passed by and spoke to the guard here, Commander Nerold, waaay back in Update 8. However, the content would have been far beyond our capabilities at the time. Now, however...  Upon entering the Range, the portal turns red. As any gamer can probably tell, this means the exit is locked, leaving us unable to leave until the quest is done.  Standing in a ring of columns is our first foe - a powerful gang of Beholders and Spiders.  These Evil Beholders are powerful, but we know that they are also fragile. Our powerful spells eliminate the entire stack of Evil Beholders and half of the regular kind.  The Cave Spiders move up, while my own troops close the distance.  I get a bit aggressive in taking on these spiders, but I can afford the loss of a few Griffins with my reserves.  That wasn't too bad, that army was very vulnerable to spells.  Three paths lead away from the columns, each leading to an altar representing one of the schools of magic. To exit the range, we need to activate all three.  That's one down.  Of course, there's a catch. Each one we activate releases a strong army of matching troops. The Chaos Altar gives us our first real fight with Demon troops. In my opinion, this is the hardest of the battles here, so I usually take it on first (while my troops are full strength).  The Demon army is a well balanced force. They have plenty of ranged units in their Imps and Scoffer Imps (the smaller red dudes), a ton of fast melee in their Cerberuses (Cerberi?) (the three-headed dogs), and a good sized stack of very strong Demons.  We start off by cutting down the Imp and Demon numbers. Ice Snake is an especially good choice here, since all Demon troops have 50% resistance to Fire.  Too bad my troops can't say the same. Both kinds of Imps can throw powerful fireballs that can catch multiple troops at a time.  The speed of the Cerberi means we can't spend time being fancy, so we will directly engage them immediately.  Meanwhile, we keep focusing down the Demon stack. Trust me, you do not want a good-sized stack of these attacking you.  The Cerberi, with their three heads, always attack all three forward hexes simultaneously.  The Scoffer Imps may, instead of chucking fireballs, taunt one of your stacks. The taunted troop immediately advances as fast as possible towards the Imps, attacking them in melee if possible.  It only lasts one turn, though. Next turn, my Shamans regain their senses and start butting heads with these Cerberi.  Before too long, the last demon falls.  A few losses, but not too bad. Later on, Demons will be one of the most annoying and strongest armies we will face.  The fight does push us over the next level. We get a good stack of Magic Runes (which will be put into use by the end of this update), and a choice between Intellect and Mana. For now, I will pick Intellect again. This is actually a bit of a tough choice now.  Next, its time to hit up the Altar of Distortion.  Unsurprisingly, this gives us an army of Elven troops to battle.  Once again, this army is well-balanced. This many Sprites can be annoying, since they have the No Retaliation ability.  The army also has two strong ranged stacks. We've seen the Elf unit before, a powerful archer which can do double damage every other turn. On top of those, this army also gives our first look at the Hunter. These guys are essentially an upgraded Elf. Lacking the Double Shot talent, Hunters instead get great base stats and the ability to do bonus damage to any beast-type unit it attacks - including my Griffins, Snakes, and Bears.  Meanwhile, I can't stop the Werewolves from rushing forward to claw at my Bowmen.  On top of that, the Sprites get a Bless spell cast on them by the Statue in the battlefield. Fortunately, I can use my powered-up Slow to keep them away from my own troops.    As my Bowmen step back to gain breathing room, the Werewolves decide to transform back into their Werewolf Elf form for extra damage. Somehow, despite having the same Initiative as before, this moves their order of action to after my Shamans. I immediately slam a Totem of Life in between the troops, saving my Bowmen from another mauling.  We clean up the remaining units. The Bowmen were the only unit that got hit hard.  We activate the third and final altar, the Altar of Order.  Interestingly, we don't need to fight the army that shows up here. The quest to complete the Magic Range was to visit each altar, not to defeat the armies. Having hit all three, we are free to leave if we want.  Of course, what fun would that be? So we turn away from the exit and tackle the Human army that appeared.  Despite the apparant strength, this army is probably the easiest to fight, as it consists almost entirely of slow melee stacks.  A couple of Ice Snakes and one Freezing Arrow later, we've slowed both the Knight stacks and the huge group of Peasants to a Speed of 1.  This lets me focus a bit on the faster Guardsmen before the bulk of his army moves up.  The Lunge talent is very good against stacks like these Knights, especially when they are slowed. Additionally, the Poison damage helps get through the physical resistance provided to these heavily armored units.  The Knights are slowly whittled down through magic and attacks.  Oof, don't underestimate Peasants. They may be the weakest troop in the game, but a stack of nearly 1K can really hurt if you let it get close.  In the end, the enemy corpses pile up and stand as a testament to our victory.  We lost a few along the way, but our path out of the Magic Range is now clear.  Alright, let's get our reward!  : Excellent! You've passed the test! You are standing before me alive, and that means that the Range has not beaten you. Here, this is a document which credits you with passing the test on this Range. Go now to the Magic Academy, present the document to Master Trigius, and claim your reward.: I thought that I was going to get that reward right away. And now I have to go to Verlon Forest? Damned tricky mages. : Excellent! You've passed the test! You are standing before me alive, and that means that the Range has not beaten you. Here, this is a document which credits you with passing the test on this Range. Go now to the Magic Academy, present the document to Master Trigius, and claim your reward.: I thought that I was going to get that reward right away. And now I have to go to Verlon Forest? Damned tricky mages.Back to the Magic Academy we go. : I was sent by Commander Nerold. I passed the test on the Magic Range. Nerold gave me this document and sent me here to claim my reward. : You have passed the Magic Range? That's interesting... And how did you manage it? Anyway, accept my congratulations, this is a difficult test and not everyone can pass it. Your reward is a Magic Staff that increases Intellect.: Thank you, Master. : You have passed the Magic Range? That's interesting... And how did you manage it? Anyway, accept my congratulations, this is a difficult test and not everyone can pass it. Your reward is a Magic Staff that increases Intellect.: Thank you, Master. The undescriptive 'Magic staff' is actually an Adherent's Staff. This gives us the same Intellect boost as our current weapon, with an additional +10% damage to lightning. Of course, we don't have either Lightning spells or lightning damage, so that's not particularly useful. This staff, when fully upgraded, does give the largest Intellect boost in the game.  If we pay careful attention to the quest log, we also know that we get 2 Magic Runes in addition to the staff (and a scroll that I will talk about some other time). These two runes join the runes we got from leveling up and bring us to 15 in total - the perfect amount needed to level up Higher Magic. Now we can cast two spells in a round twice per combat instead of once. Our next goal is to get the second Reserve slot open, and to get the Tactics skill in the Might tree. Spare Magic Runes will be used to either boost the Destroyer skill (more combat magic damage) or boost Mana/Mana recovery.  Next time we will get back onto plot related items, and start our journey to the dwarven realms. ---------------------------------- Bonus Material Learning Lore Richard Harmon, the guard outside the Old Royal Castle, will tell us a bit of the history of the castle and the kingdom. : I greet you, Sir Richard. Yes, I would like to listen to the story of the old castle.: As you may know, our former King Hard the Terrible, grandfather of King Mark, was a very cruel king indeed, and many of his people starved during his reign. The king always suspected everyone of betrayal, and suspected all the servants of theft. Scarcely a day passed that hadn't executed someone. The people tried to rebel, but this only increased the king's cruelty. But his wife, Queen Martha, was very kind and sympathetic woman. She tried to smooth over all those terrible things her husband had done. She gave food and money to poor people, and did her best to help families of those who had died. When King Hard learned of this, he decided to execute all of those who she helped. Having seen that her husband had completely lost his mind, Martha asked all the people to leave the castle, said goodbye to her little son Ron, and ordered the walls sealed with stones from the outside. There she remained with her mad husband. And so they were together entombed. After this, the capital was moved to the north, to Greenwort. The noble Ron Leonar, named the Peacemaker, grew up there, where he ruled Darion well. And his noble children, Karl and Mark, grew up there as well.: That's very interesting, thank you.Marking the Map   Talkin' 'bout Troops Polar Bear  Resistances: 10% Physical, -10% Fire Critical Hit %: 30 Defense Bonus: 4 Talents  Running RunningAbilities Critical Attack Brutality: When the bear takes damage, his Attack doubles until the end of the turn. Hibernation: The creature can fall asleep from inactivity. Wakes up when it is attacked. While sleeping, the creature can recover its health. Resistant to Cold: Allows the creature to take less damage from Ice spells. The creature cannot be frozen. When combat takes place on frozen terrain, the creature's Defense is increased by 50%. Gully's opinion: Not my favourite bear. Although Polar Bears are basically piles of stats, it's just not quite worth it for what you get. You do get pretty good damage, high critical chances, and even double attack if they've been damaged recently, so when that all works out their damage output is high. They are also quite sturdy - great Defense (particularly on snowy terrain), decent Health, and some resistance. Like all other bears, they are slow units, even with the Running talent. Basically, even though they are fine as a unit, you just end up paying a little too much - 150 Leadership is a lot. You can get nearly 2 Ancient Bears for each Polar Bear, so I'd rather take that. Fighting them: Like other slow melee units, use spells and range to whittle them down. Be aware that Freezing Arrow or Ice Snake won't work on them, so the Slow spell is the way to go. They are also slightly weak to Fire damage. Undead Spider  Resistances: 50% Poison, -10% Fire Critical Hit %: 10 Defense Bonus: 1 Talents: None Abilities Night Sight: During nighttime and underground combat, Attack is increased by 50%. Cursed: When attacking, the creature has a 50% chance to curse the enemy. Undead Gully's opinion: These guys are like the other spiders - moderate mobility and fragile. They do have a strong poison damage attack, which can be nice against physically resistant units. They don't benefit that much from their abilities though. Both Night Sight and Undead give bonuses underground/at night... but those are % boosts to Attack, and the Undead Spider just doesn't have the base stats to take advantage of that. If you are using an Undead army, there are so many other better choices. And you aren't going to bother using Undead Spiders in a non-Undead army. Fighting them: Only a concern in vast numbers, in which case Slow is your friend. Otherwise, they take large damage from anything that's not poison. They can do pretty good damage if you let them get up to you in numbers though. Spells Seen Hell Breath  Causes the friendly target to inflict additional fire damage with its base attack. Crystal Cost: 2 / 5 / 10 Mana Cost: 10 / 15 / 20 Level 1: Fire Damage: +20%; Duration: 2 turns Level 2: Fire Damage: +30%; Duration: 3 turns Level 3: Fire Damage: +40%; Duration: 4 turns Gully's opinion: This Chaos magic spell is usually a pretty poor choice. It costs a lot of Mana just to boost one unit moderately. In the right circumstances (against Undead or Plants especially), the boost is heightened. Still, if you have access to Chaos magic, just using a Flaming Arrow is usually easier and more effective. The exception is for Warriors - the spell doesn't rely on Intellect, bigger stacks benefit more from these proportional effects, and you get a bigger damage bonus if you have higher Attack. Items Identified Adherent's Staff  Description: An adherent's staff, decorated with runic symbols. Effects: +2 to Intellect, +10% to Damage from lightning Type: Weapon Race: Humans Cost: 6000 Upgraded From: Disciple Staff Upgraded To: Archmage's Staff Info: The staff of a mage-apprentice can be a dangerous weapon in skillful hands. Combat spells cast with help of the staff inflict increased damage. The most effective spell is Lightning - a popular battle spell. Confirmation Certificate  Description: A certificate which confirms that you've passed the test on the Magic Range. Type: Quest Info: A certificate which confirms that you've successfully passed the test on the Magic Range. It is required by the Magic Academy. Skull  Description: A strange yellowed skull. Type: Quest Info: A typical skull of a humanoid creature. In the old days it even had a body. Large Chest  Description: The chest containing the jewels of the royal family. Type: Quest Info: The huge heavy chest, decorated with gold and jewels, the emblem of the royal family emblazoned on the lid.
|
|
#
?
Sep 27, 2017 20:11
|
|
|
Finally some demons. The treasure guy finds treasure for the king, not for himself. It is good to be the king. 
|
|
#
?
Sep 27, 2017 22:19
|
|
|
King Hard the Terrible
|
|
#
?
Sep 28, 2017 02:19
|
|
|
Occasionally I forget that we're just in the business of treasure searching, and then, hey presto, it's a treasure so huge we can only search it.
|
|
#
?
Sep 28, 2017 02:49
|
|
|
Update 35 - Mine Games This time, we are back on the plot track, attempting to figure out how dwarven slaves ended up on the Freedom Islands. Beware: this update is rather dialogue heavy, more than I expected when I originally planned it out.  The King sent us to check out Rotten Hake, who was mentioned by Lucky James before we killed him off.  : Hey, what did the Royal Treasure Searcher forget in our forest? Are there any treasures hidden around here, or some entrance to an ancient temple?: According to the laws of Darion, you have been sentenced to death for slave trading. Do you have anything to say in your defense?: You figured me out at last You've become quite a good bloodhound there, Bill Gilbert. I knew I shouldn't get involved in this stuff. How did you figure it out, anyway? Ah, I get it. My people told me that you just returned from the islands. You must have met James there, right? Please try to understand, I had no choice. I'm not a murderer, set on slaughtering defenseless dwarves. Slavery for them was the better way out. They had to disappear forever. The baron made it pretty clear for me.: Wait a minute, what baron? I thought you were the only person involved in this.: Understand me right - I'm not even that interested in the slave trade! Listen here... One day Baron Ahey, the new owner of Creiston Mines, he come to me. He promised me a pile of money for little spot of work - I just had to rob this cart. I gave him some of my people to help. How was I supposed to know it was gonna be the dwarven ambassador? When I finally figured out what I got myself in for, it was way too late to back out. The baron ordered me to kill all of them, but... well we ain't murderers, Bill Gilbert. The dwarves who survived the assault were sold to the Islands. Lucky James was looking for workers to work in the mines, and I decided - well, it's better for them to become slaves than to die...: Well that's a gloomy story. It's not just slave trading, but it's conspiracy too. It's because of you that the war with Kordar began.: You think I don't know that? I just figured it out too late. The idea was that the baron could buy out the Creiston Mines from the king, because it looked like the dwarves stopped paying the rent. You see, the rent was in those carts. Ahey got the dwarves' gold, and the mine at the same time. Clever guy, that Ahey. Ah, but involved me in it too. As a reward I got thirty dwarves I had to kill, and I had to promise that nobody's gonna ever hear about our.... you know, what you said, searcher, our conspiracy.: I see... Ok I won't kill you right now. This situation is complicated. I shall let the king decide your fate - and Ahey's as well. : Hey, what did the Royal Treasure Searcher forget in our forest? Are there any treasures hidden around here, or some entrance to an ancient temple?: According to the laws of Darion, you have been sentenced to death for slave trading. Do you have anything to say in your defense?: You figured me out at last You've become quite a good bloodhound there, Bill Gilbert. I knew I shouldn't get involved in this stuff. How did you figure it out, anyway? Ah, I get it. My people told me that you just returned from the islands. You must have met James there, right? Please try to understand, I had no choice. I'm not a murderer, set on slaughtering defenseless dwarves. Slavery for them was the better way out. They had to disappear forever. The baron made it pretty clear for me.: Wait a minute, what baron? I thought you were the only person involved in this.: Understand me right - I'm not even that interested in the slave trade! Listen here... One day Baron Ahey, the new owner of Creiston Mines, he come to me. He promised me a pile of money for little spot of work - I just had to rob this cart. I gave him some of my people to help. How was I supposed to know it was gonna be the dwarven ambassador? When I finally figured out what I got myself in for, it was way too late to back out. The baron ordered me to kill all of them, but... well we ain't murderers, Bill Gilbert. The dwarves who survived the assault were sold to the Islands. Lucky James was looking for workers to work in the mines, and I decided - well, it's better for them to become slaves than to die...: Well that's a gloomy story. It's not just slave trading, but it's conspiracy too. It's because of you that the war with Kordar began.: You think I don't know that? I just figured it out too late. The idea was that the baron could buy out the Creiston Mines from the king, because it looked like the dwarves stopped paying the rent. You see, the rent was in those carts. Ahey got the dwarves' gold, and the mine at the same time. Clever guy, that Ahey. Ah, but involved me in it too. As a reward I got thirty dwarves I had to kill, and I had to promise that nobody's gonna ever hear about our.... you know, what you said, searcher, our conspiracy.: I see... Ok I won't kill you right now. This situation is complicated. I shall let the king decide your fate - and Ahey's as well.Let's see what the King has to say about this sudden yet inevitable betrayal by one of his vassals. : So, what news do you bring of the slave traders? How far have these pests spread into Darion's lands?: Your Majesty! Everything is much worse than it seemed. It appears that we have been betrayed, that Baron Ahey has involved himself in a treasonous plot! (Retell Hake's story...): That explains it. Well done, Bill Gilbert. So it turns out that those robbers, hired by the baron, attacked Torn Digor's envoys as they were coming to pay their lease of the mines? And we swallowed that scoundrel's bait! We sold the rights to the mines to Baron Ahey, because we didn't get the gold from dwarves in time. Not knowing anything was wrong - the dwarven king was sure that we got the gold - he sent his pitmen to the mines where they were met by Ahey's armed cutthroats, ambushed and killed. It's not surprising that the dwarven king sent in his troops! But what shall we do now? (Reward: 84 Experience): I think that it's time to visit Baron Ahey... Confronting him directly seems to be the right idea...: Yes, the baron shall suffer the punishment he deserves... But it's much more important to settle this misunderstanding, and restore peace with the dwarves! So, you, Bill Gilbert, are departing to Kordar, to the dwarven King, Torn Digor, on a diplomatic mission! Apologize to His Majesty on our behalf and conclude a new peace treaty with him. For our part, we are ready to repay the dwarves' losses twofold, and grant them full reign in Creiston Mines for one hundred years, rent-free.: Why me? This mission would be rather more fitting for a true diplomat.: Ha-ha, Bill Gilbert. First, because of the traitor Ahey. We shall sentence him to death, and you must carry out the sentence. Second, the dwarves and monsters living down there will hardly be glad to see you. Third, because Torn Digor will far more readily sign a treaty with one he considers a worthy warrior. He's a true dwarf, a war dog. He respects strength - and if he feels it in you, he'll sign whatever you want. Understood?: Yes, I understand. I am off, Your Majesty.Uhhh, you want to tell me where I am actually going? : I wish to know how I can find Baron Ahey's castle.: Go to the east to Arlania province, there you shall travel toward the mountains, straight along the road. The entrance to Creiston Mines is watched by royal guards. Order the guards' chief to lift the siege of the mines. Ahey's castle is there, underground, near the waterfall. You will see that it is easy to find.: I just wanted to ask you where I can find the king of the dwarves, Your Majesty.: Taron castle is the capital of Kordar. In the past, one could travel there in a dirigible, but now there's only one way - and it lies under the sea. In the mountains of Arlania, there's an entrance to Creiston Mines. You can get to dwarves through them. You'll have to cross the whole of Kordar to reach the capital.: Thank you for the explanation. It's easy to miss, but the Magic School has a new quest marker hanging over it.  : I'm pleased to see you once again visiting us in the Magic School, young man. What brings you here this time?: I've head that Mages are always in need of some herbs or chicken's legs for their experiments and potions. Maybe I can help you?: Chicken legs? Herbs?! Who do you take us for, young man? This is Magic School, an institution for the scientific study of magic - not a Witch's Coven! However, we do need some assistance along similar lines. This year we decided to introduce a new subject: a practice course on directed mutations. And for the research, we need a number of rare species of animals, each of which evolved as a result of spontaneous mutation. Collect them for us and I will see that you're well rewarded! We need: thirty Lake Dragonflies, ten Royal Snakes, and one Cyclops.: Sounds good. I agree!: Excellent! The sooner you find them, the sooner we'll be able to commence our research! I would advise you to have a look at the menagerie first. And do be attentive as you approach the swamp or the lake. Maybe you'll find some eggs.: Ok, I'll do that. By the way, can you remind me where I can find these animals?: As for Dragonflies, you can find them on the river farm or ask the peasants if they've caught sight of them. Snakes are sometimes brought to the menagerie, and there're always lots of them in the swamps. It's going to be really hard to get a Cyclops, though. These creatures are not only rare, but also quite dangerous. You might try to look in Creiston Minces. By the way, I think it would be easier for you to get snakes' and dragonflies' eggs, and to obtain the needed animals from them.: Thank you, I'll commence the search immediately. : I'm pleased to see you once again visiting us in the Magic School, young man. What brings you here this time?: I've head that Mages are always in need of some herbs or chicken's legs for their experiments and potions. Maybe I can help you?: Chicken legs? Herbs?! Who do you take us for, young man? This is Magic School, an institution for the scientific study of magic - not a Witch's Coven! However, we do need some assistance along similar lines. This year we decided to introduce a new subject: a practice course on directed mutations. And for the research, we need a number of rare species of animals, each of which evolved as a result of spontaneous mutation. Collect them for us and I will see that you're well rewarded! We need: thirty Lake Dragonflies, ten Royal Snakes, and one Cyclops.: Sounds good. I agree!: Excellent! The sooner you find them, the sooner we'll be able to commence our research! I would advise you to have a look at the menagerie first. And do be attentive as you approach the swamp or the lake. Maybe you'll find some eggs.: Ok, I'll do that. By the way, can you remind me where I can find these animals?: As for Dragonflies, you can find them on the river farm or ask the peasants if they've caught sight of them. Snakes are sometimes brought to the menagerie, and there're always lots of them in the swamps. It's going to be really hard to get a Cyclops, though. These creatures are not only rare, but also quite dangerous. You might try to look in Creiston Minces. By the way, I think it would be easier for you to get snakes' and dragonflies' eggs, and to obtain the needed animals from them.: Thank you, I'll commence the search immediately.Actually, I think the easiest way will be to have them in my army already, like these Royal Snakes. : I've found ten Royal Snakes for you.: Fine, give them to me. Here are 1000 gold coins, as I promised. It must have been hard with the snakes, eh?: Gods, no, it's actually been much much easier with the Royal Snakes.: By the way, our main animal specialist, master Ferran, claims that unlike common snakes, royal snakes are intelligent enough to understand human speech! Of course, I don't believe him, but let's not let him get wind of that, eh?: Hmm. The teachers at the temple taught us that snakes couldn't hear at all - they just feel heat and detect movement. Well, thanks for the gold! We make a brief visit to Verlon Forest, where the River Farm has plenty of Lake Dragonflies for sale. I tried doing as he suggested and hatching some eggs, but they kept giving me Fire Dragonflies instead. : I found thirty Dragonflies, it wasn't hard.: I don't even want to ask... but how did you manage to catch these nimble creatures?: Umm, maybe you've heard of this thing called money, which one can pay for goods and services at this thing called a shop?: Anyway, here is your 500 gold. By the way, you know that these animals - some call them Dragonflies, others call them Small Dragons, but in fact they are a hybrid of polypterous insect and animal. They are able to exhale either acid or fire. Quite extraordinary really, and it likely means they passed into Endoria from another world!: Very interesting. Thanks, and I'll be seeing you later.The last animal, the Cyclops, is the hard one of the three to collect, and the reason we didn't start this quest until now.  We have to head to Arlania to get to Creiston Mines. While there, it's a good time to restock on our reserve of Griffins. They've been steadily whittled down, especially when Sacrificed for other troops. Plus, there is a quest that's been waiting for us.  : Well, Searcher. You have done well and proved I can trust you.: Thank you, Your Majesty. May I help you with anything else?: Here there lives one artist who asserts that he is the very best. Recently, we decided to immortalize our greatness on the canvas. That is why I commissioned from this artist, a portrait of myself. At once I gave him all the gold he requested, but the portrait remains unready even now. Could you visit him and ask him where our portrait is? (Reward: 2600 gold, 130 Experience): Which artist? And where can I find him?: His name is Alex Artist. He lives in the northern part of our island. You should recognize his home at once.: Ok, I'll go to the artist. : Well, Searcher. You have done well and proved I can trust you.: Thank you, Your Majesty. May I help you with anything else?: Here there lives one artist who asserts that he is the very best. Recently, we decided to immortalize our greatness on the canvas. That is why I commissioned from this artist, a portrait of myself. At once I gave him all the gold he requested, but the portrait remains unready even now. Could you visit him and ask him where our portrait is? (Reward: 2600 gold, 130 Experience): Which artist? And where can I find him?: His name is Alex Artist. He lives in the northern part of our island. You should recognize his home at once.: Ok, I'll go to the artist. Somehow I missed this buried chest the first time we visited here. I'm glad I had a reason to come back.  : Welcome to my workshop, traveler! Do you want to buy some of my canvases, or you just decided to admire my work?: Well... I came to you by order of Harl, the Griffin King.: From Harl? Yes... he ordered his portrait. And I have almost finished it. I have only to add a few more details. Just to paint a golden crown and a regal look. But I haven't the necessary decorative gilt, and I can not finish the picture without it.: Where can we get this gilt?: Dwarves make good gilt. I've always bought it from Decar. But after not seeing eye to eye with dwarves, in the art of sculpture last time I was in the tavern, these bearded dwarves don't want to see me anymore. Maybe you can find Decar and buy his gilt for me?: Where can I find this Decar?: He is usually either in a tavern or hangs about the entrance to Creiston Mines. He buys ore and jewelry there.: Ok, I'll find him. : Welcome to my workshop, traveler! Do you want to buy some of my canvases, or you just decided to admire my work?: Well... I came to you by order of Harl, the Griffin King.: From Harl? Yes... he ordered his portrait. And I have almost finished it. I have only to add a few more details. Just to paint a golden crown and a regal look. But I haven't the necessary decorative gilt, and I can not finish the picture without it.: Where can we get this gilt?: Dwarves make good gilt. I've always bought it from Decar. But after not seeing eye to eye with dwarves, in the art of sculpture last time I was in the tavern, these bearded dwarves don't want to see me anymore. Maybe you can find Decar and buy his gilt for me?: Where can I find this Decar?: He is usually either in a tavern or hangs about the entrance to Creiston Mines. He buys ore and jewelry there.: Ok, I'll find him. Alright, time for some actual non-dialogue content! Heading up the path to Creiston Mines, we find a Cyclops guarding a Mana shrine.  Of course, this army was meant to be beaten a long long time ago, so it's virtually no threat.  Hell, our Flaming Arrow is able to kill a Cyclops in a single cast, even with their Fire Resistance.  Our Polar Bears feast on the Berserker flesh.    Always glad to have more maximum Mana. The double Higher Magic casting can get very expensive.  Back on the path, we find the entrance to Creiston Mines, guarded by a golden-armored man. But first, there's a path over to the left of the mines.  This wandering Hero was the reason we didn't head up towards the mines the first time we were in Arlania, because she was far beyond our power. Now, though...  Drammina's army comes with a sad story, but that doesn't stop us from going for the offense.  Her army is just too small to resist the destruction of Bill's spells.  The final blow is delivered by the Shamans, before Drammina can even act. I feel kinda bad now...   With Drammina gone, we can access this small camp. We get to pick up a spare Mind Rune, and find the dwarf that the artist angered.  : I'd like to buy some decorative gilt. : I'd like to buy some decorative gilt. : Gilt, you say? Before now, the only person to buy my gilt was the artist from the griffin's island. It was him who sent you, wasn't it?: Yes. He said you had a quarrel, that's why he's afraid to ask you.: Yeah, that's right. Well, if you really want to help him, you'll have to do a bit of work. A precious ore is mined in Creiston Mines. I'll give you the gilt in exchange for this ore. Bring me 7 pieces of ore, and you'll get what you need.: Ore? Alright, but tell me how to recognize it. : You know, besides the fact that it will be an interactable object that I can pick up.: It is reddish. You should probably try to find it in carts. You humans don't need this ore. So nobody's bothered with it since Baron Ahey became the owner of Creiston Mines.: Ok, I'll bring this ore to you. : Gilt, you say? Before now, the only person to buy my gilt was the artist from the griffin's island. It was him who sent you, wasn't it?: Yes. He said you had a quarrel, that's why he's afraid to ask you.: Yeah, that's right. Well, if you really want to help him, you'll have to do a bit of work. A precious ore is mined in Creiston Mines. I'll give you the gilt in exchange for this ore. Bring me 7 pieces of ore, and you'll get what you need.: Ore? Alright, but tell me how to recognize it. : You know, besides the fact that it will be an interactable object that I can pick up.: It is reddish. You should probably try to find it in carts. You humans don't need this ore. So nobody's bothered with it since Baron Ahey became the owner of Creiston Mines.: Ok, I'll bring this ore to you.And this is why you don't want to accept this quest before you've gotten permission to head to the Creiston Mines. Harl's shop becomes inaccessible if you've started this quest, so no more Griffins for you until you finish it. With nothing left to do outside, it is time to head to Creiston Mines.  : Friends... I'm Bill Gilbert, the royal Treasure Searcher... : Friends... I'm Bill Gilbert, the royal Treasure Searcher... : I'm sorry, Searcher, but according to special orders of His Majesty, the pass to Creiston Mines is close.: And what's happened?: Haven't you heard? Dwarves... All of the sudden a whole assault party in heavy armor appeared from the Kordar side of the mines, and tried to take over the entire complex... A lot of good men were killed, but the baron's people came in time... Then we turned the tables on these devils. They were running away from us, yelling, dropping their shields and axes. After that, the mines were closed, all workers were removed, and guards set up posts on every important point. We're waiting for another dwarven attack.: Why did they attack you?: Who knows... Maybe they drank too much beer, or decided not to pay the rent anymore and take the mines by force. But they were sadly mistaken... His Majesty doesn't concede Darion territory, whether the Islands of Freedom or these here mines.: I really need to get in there.: Sorry, can't help you... It's an order.: Maybe you'll think twice? I have a key that can open any door... It's the color of gold, and features His Majesty's profile...: You offering me a bribe? I understand that my service is no picnic, and salary could be a lot better... but still, your offer is just offensive for me!: It was just a test! Well done! You've passed the test! I'll tell the king that you are honest, firm and morally steady!: I serve his Majesty and Darion!: Ok, well done then... : I'm sorry, Searcher, but according to special orders of His Majesty, the pass to Creiston Mines is close.: And what's happened?: Haven't you heard? Dwarves... All of the sudden a whole assault party in heavy armor appeared from the Kordar side of the mines, and tried to take over the entire complex... A lot of good men were killed, but the baron's people came in time... Then we turned the tables on these devils. They were running away from us, yelling, dropping their shields and axes. After that, the mines were closed, all workers were removed, and guards set up posts on every important point. We're waiting for another dwarven attack.: Why did they attack you?: Who knows... Maybe they drank too much beer, or decided not to pay the rent anymore and take the mines by force. But they were sadly mistaken... His Majesty doesn't concede Darion territory, whether the Islands of Freedom or these here mines.: I really need to get in there.: Sorry, can't help you... It's an order.: Maybe you'll think twice? I have a key that can open any door... It's the color of gold, and features His Majesty's profile...: You offering me a bribe? I understand that my service is no picnic, and salary could be a lot better... but still, your offer is just offensive for me!: It was just a test! Well done! You've passed the test! I'll tell the king that you are honest, firm and morally steady!: I serve his Majesty and Darion!: Ok, well done then...Well, that didn't work... : Are there other ways into the mine?: No, there is only one way into the mines, and it's now closed. There is no other way either to the mines or to Kordar. They used to fly to Kordar in... what-d'ye-call-em... dirigibles, but after the war had begun, the dwarves stopped flying here.: Can I reach Kordar by sea?: No. You should have seen this Kordar - it's ice-covered stone. And there are a lot of reefs and rock, and no way ships can moor. You can only get there by air or under the ground. The dwarves live under the ground. I don't know if they have any towns on the surface...: I see. Ok, I have to go...Alright, alright... on with the show. : I am under orders from His Majesty. Open the mines and to remove all the guard posts!: Great news! I'll inform the other posts...: Come on... The guard stands down, and goes to tell his buddies inside the all-clear has been ordered. We follow him into the dark entrance.  Welcome to Creiston Mines, the link between the human lands of Darion and the dwarven kingdom of Kordar.  As with the mines we found on the Islands, Creiston Mines is full of dwarves hacking away at the walls. Also as before, the dwarves have a lot to say, but aren't much for conversation. A sampling of what they have to say (each in a separate conversation):  : Don't you see I'm busy? Go where you may.: I heard that Ahey found a gold mine. There was so much gold in there that he could buy up half of your Darion.: (Singing) Gold-gold, gold-gold...: I have a wife and children at home. And oh, how I miss them.: (Muttering) Into the bag... me, digging here... hmm... and catch rats for breakfast... me again?: Oh! I feel bad that I fell into the clutches of Ahey's people in our native Kordar caves. I know these caves like the palm of my hand, every pass, every turn.: The dwarves say that it was Ahey and his people who robbed our envoys who were carrying the rental payments to Kronberg. : Don't you see I'm busy? Go where you may.: I heard that Ahey found a gold mine. There was so much gold in there that he could buy up half of your Darion.: (Singing) Gold-gold, gold-gold...: I have a wife and children at home. And oh, how I miss them.: (Muttering) Into the bag... me, digging here... hmm... and catch rats for breakfast... me again?: Oh! I feel bad that I fell into the clutches of Ahey's people in our native Kordar caves. I know these caves like the palm of my hand, every pass, every turn.: The dwarves say that it was Ahey and his people who robbed our envoys who were carrying the rental payments to Kronberg.Unfortunately, these ones won't sell us rats to eat. I'm not sure if they will if you didn't buy any from Lucky James' miners. Either way, no more for us. 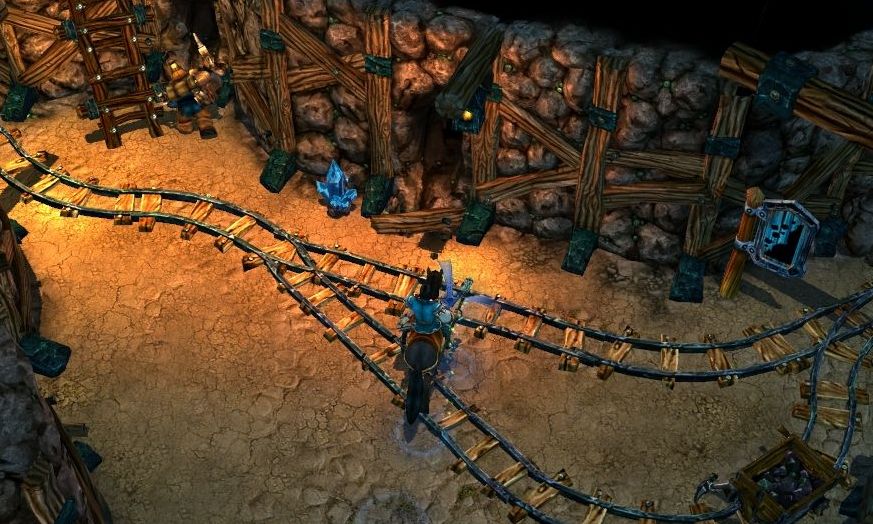 After talking with a few dwarves, we come to a split in the path. I like the subtle lighting cues here, with the torch-lit path leading the correct way (that is, the correct plot direction). Of course, we go the other way first.   The first thing we run into is a cart full of reddish ore. For some reason, we only take one piece. Bill, this quest would be a lot faster if we just took all seven pieces from this cart. No? Ah well.  Further down the mine tracks we see another cart full of ore. Unfortunately, it's been left in an enclosure with a bunch of Beholders.  The battlefields in the mine come in a couple of varieties. One of them is this kind, which has a significant bottleneck at the center of the field between the two sides. Restricted fields usually help the player, but the armies we find usually have a large amount of Beholders, so it doesn't do that much.  Of course, we know that the low Health Beholders are pretty weak to spells, and only the Snakes survive the initial blasting.   After victory, we claim the ore, and also a few nearby banners. The mines here are full of them, giving us probably half a level worth of Leadership. Never gonna complain about that!  This Beholder comes out of nowhere to surprise my army. To be fair, there is a 'Beware of Beholder' sign there (I love that sign).  Joining the Beholders are a whole bunch of Spiders, including the slightly more powerful Fire Spider. These are the only Level 2 spiders, and are roughly as powerful as Swordsmen. Despite their name, they don't do Fire damage - their name only relates to their decent amount of Fire Resistance.  Of course, they aren't in numbers that can threaten us here.   Sleem reaches Level 12 after the fight. This choice is an easy one. I barely use Cloud of Poison - even if I improved the damage, it is still kind of pathetic. Evil Shoal, on the other hand, is very much still a decent AoE ability. Reducing the rest period is very nice, since it will let me use Sleem more often.  The passage where the Beholders emerged from just leads to a hole of unknown depths. Perhaps the Beholders live even further below ground, emerging to attack the mines when the dwarves opened these shafts up.  The dwarves working in the mine don't seem to be bothered by the Beholders. Maybe they've invented some kind of repellent spray? Whatever method they use, it doesn't help us out.  The second variety of mine battlefield is a bit more open in the center, though there are still a few obstacles creating lanes between the two sides.  The spread out enemies here are a bit more resistant to our spells, and I can't kill off all the Beholders immediately.  One of the annoying things about Beholders is that the stack number doesn't affect their chance of inflicting Sleep... even a stack of 1 can easily send low level troops to dreamland.  These Venomous Spiders are swarming in numbers that we need to at least be cautious around. The Shaman's totems once again provide good distractions.  Probably my favourite use of Glot's Armor is to absorb the retaliation attack from a large stack before ganging up on it with other troops.  We lose some Bowmen this time from the Beholders that survived the initial magical assault.  The Beholder was guarding this dead end over an underground lake. We pick up this Banner and head back.  Finally, the track leads to a ramp down to another dead end area (and a Magic Rune, sweet).  Spiders and Beholders, check.  The barrels here make it possible to prevent the Spiders from gathering together, so we can take the stacks on one at a time.   We can explore the area where the Beholder army was to find another ore cart hiding in this shed. That's three down, four to go. We've now explored the entire side path from the start of the mines. Back to that initial branch point.  The correct path is guarded by this wandering Giant, Hadock.   Hadock's army is pretty similar to the ones we've been fighting, though he's hired a few Priests and Dwarves to go along with the cave dwellers. Hadock himself is very strong, boosting his armies physical stats immensely.  Of course, physical stats don't save you from powerful damage spells and giant swords made of fiery rock.  Hadock uselessly uses his turn to cast Dispel on the Freeze-effected Dwarves. What a waste of a spell.  Hadock's army was just too small to be a danger. This is the power of Mages.  A small path leads of the main tracks into this smaller cave. Hadock will patrol into this area if you came here early and wanted to avoid fighting him. It does contain a Magic rune and some Crystal, so it's well worth exploring.  The army here looks tough, but the tightly packed troops just provide better targets.  The Evil Beholders are eliminated, leaving a variety of spiders to contest the battlefield.  The age old conflict, Bear v. Spider.  Spoiler, the bear wins.  A sweet looking statue of a miner guides us along the main path.  Ahey's castle sits just past a bridge over the underground lake we saw earlier. Lucky for us, his cannons are purely decorative. As we approach, Ahey shouts at us from his battlements.  : Oh, news from the capital has reached this place quickly... As I understand it, you now know that you are sentenced to death for high treason and conspiracy against Darion? : Oh, news from the capital has reached this place quickly... As I understand it, you now know that you are sentenced to death for high treason and conspiracy against Darion? : Get out, Bill Gilbert! Only your death awaits you here. I have a whole army here - and perhaps I will become your king, after dethroning the weakling Mark! I have learned quite a lot from the dwarves. The whole of Darion will be aflame. You'll see this soon.: I didn't expect a warm welcome. I shall show you no mercy. : Get out, Bill Gilbert! Only your death awaits you here. I have a whole army here - and perhaps I will become your king, after dethroning the weakling Mark! I have learned quite a lot from the dwarves. The whole of Darion will be aflame. You'll see this soon.: I didn't expect a warm welcome. I shall show you no mercy. No diplomacy or alternate paths are allowed here. After all, the king gave us a direct order to execute the traitor.  Ahey's castle is heavy on the dwarven architecture - full of gears, piping and rough-hewn stone. Ahey's army is pretty varied - he has supplemented his regular human forces with some hired robbers and a number of dwarven mercenaries.  Ahey himself is a well-rounded hero, with a large mana pool as well.  Our spell fury is initially focused on his Bowmen - as you've seen, I like targeting ranged troops first.  Ahey casts Pygmy on my own Bowmen, and his unscathed Alchemists start throwing pots of fire and acid at them.  Hmmm, the Griffins have two tempting targets here, which shall we attack?  Trick question, let's attack both! In addition to the Adherent's Staff and pair of Magic runes we got from completing the Magic Range, we also received a scroll of Fit of Energy. This Order spell is a very interesting option. When casting it, we can give extra Action points to a troop. Specifically though, we can cast it on a troop that has already attacked to allow them to attack again (as long as there is a target in range).  Our Griffins here get a blast from some angelic trumpets, prompting them into action... eventually. If you are using the spell to get a second attack (which you will always do), be aware that the affected troop is sent to the back of the line, initiative-wise.  Still, it is fairly effective, and lets these Griffins eliminate two targets in one turn. This spell is far better for non-Mages. It doesn't depend on Intellect at all, the spell works fully even at Level 1, and obviously the stronger your troops are, the better the spell is. Mages can usually do better by just casting some other damage spell.  Ahey's remaining Alchemists continue to bombard my Bowmen, but that won't save him from my wrath.  His last troop falls, and the army storms the castle. The traitor is found and dragged before Bill for judgement...  As per our orders, Ahey's head is separated from his body, and the castle is seized for the king.  Somehow, the king immediately sends a representative to take charge of the castle. In the castle's dungeon, a few remaining troops are freed for us to buy, including a few Cyclops.  Of even greater interest is this snazzy helmet, which is perfect for us. This replaces the Bandage of Concentration we have been using for a net gain of +2 Intellect and +1 Defense.  : How can I get to Kordar? : How can I get to Kordar? : That is no problem. You have to go to the waterfall on the flying thing that dwarves constructed specially for this. There will be a straight road to Kordar beyond the Waterfall. Be careful, though. Dwarves have surely organized sentry posts, expecting a retaliatory attack.: I have to go, you look after everything... : That is no problem. You have to go to the waterfall on the flying thing that dwarves constructed specially for this. There will be a straight road to Kordar beyond the Waterfall. Be careful, though. Dwarves have surely organized sentry posts, expecting a retaliatory attack.: I have to go, you look after everything... From Rupert's suggestion, we find this odd platform near the waterfall. As soon as we stand on it, it begins to fly up and away to the cliff on the far side of the lake.  The plateau on the far side has a number of treasures for us, including some Magic crystals and another piece of ore.   Just like any good RPG, any waterfall should be immediately searched for hidden items. In this case, we find even more Crystals, and another Altar of Intellect.  This ore cart might have been in a good hiding spot... if the camera didn't give us a clear view of it.  Continuing along, cart #6 is found in a dark corner, but the sparkling ore gives itself away.  The final ore cart is not hidden at all. We have all seven pieces of ore now, but let's see what lies along the path before we go back.  An impressive metal door lies at the end of the mines. As we approach it...  The door splits apart to reveal the exit.  Our path to Kordar lies open to us. We could continue... but there are some items of business to take care of before we go.  First, we stop back at the castle to pick up a single Cyclops for the collection quest. 5000 gold is a hefty price tag, but we should get a good reward for it. As we head back to Darion, we can chat with the dwarven miners on the way. They remain pretty taciturn, but they do seem happier (a bit). : Thank you for settling the problems with Ahey.: Creiston Mines are ours again. And now I can be proud of my work.: Oh... I thought that if the drat baron was killed, we would be able to go home. Oh well, better forget it.Outside of the mine, we can drop off the ore we have collected. : So? Have you gathered the ore?: Yes! Here's the various ore I collected. It took me a while...: Hmm... Excellent! But why do you work so hard for this foolish painter? Bah, alright, take the can with the gilt.: Thank you very much, Decar. See you.Gilt in hand, it is time to visit the artist. : What about Decar and the gilt? Do you have it?: Yes, I found Decar. But it turned out that you have such a bad reputation that he didn't even want to sell me the gilt. He forced me to collect for him myself. Me, the Royal Treasure Searcher!: Look at it this way. It's not so terrible as it might seem. The ore is a treasure. There is no loss of honor. What is the result of your dealings with Decar? Have you brought the gilt?: Yes, I have the gilt for you. Don't worry, here, take it. And give me a picture.: Well... The picture is ready. I have only to some dabs of gilt. Well... here... that's all. It's a great portrait! You know, Harl has paid me only 5000 gold. But looking at this amazing artwork that I made, I think that 5000 gold is not enough. I want another ten thousand gold for the portrait.Oh no. That won't do, Alex, that won't do at all. Bill gets paid, not the other way around. : Look at it like this. Your work will hang in the castle of Grffin's King. This is a great credit to any artist. Just don't forget sign the picture.: Maybe it is a credit. But a greater credit for him is to possess this portrait.: Sure, you are right! And the king will appreciate it, you can believe me. If you will observe your previous agreement, then henceforth he will order pictures only from you. And he will recommend you to everybody.You know, I don't think Bill has the authority for any of this negotiation. : Hmm.. Maybe you are right. I didn't think about this. There are so few kings in our world. You know, I'll ask for the position of court artist. Hundreds of generations of Griffins will admire my pictures. For the glory that I shall have in the coming centuries, I am ready to give this picture to King Harl for free. Here, I return all advance payment. Take it and give it to his Majesty. Give also my request about the position of court artist.: A perfect decision! King Harl will appreciate it!  The gilt has not only let Alex complete his commissioned portrait of Harl, but also a new painting for us to buy. And we are glad to pay even the extravagant amount of 50K for it. +20 Mana is a pretty significant chunk of additional spell-casting fuel. We don't have any open slots, but we can replace one of the two Bronze Rings we are currently using (each providing +5 Mana), for a net gain of +15 Mana.  Speaking of paintings, let's take a look at the commissioned portrait. I have to say, I do agree with the artist's opinion of his work, even if he is an arrogant rear end. Let's bring this back to Harl. : Have you visited the artist?: Yes, I have. The artist is extremely proud of this work, and considers it to be the best one he has ever created.: That's great news! Thank you, Bill Gilbert! (Reward: 2600 Gold, 130 Experience)Kind of a meager reward when all is said and done... However, remember that 5000 gold the artist gave to us to return to Harl? Yep, Bill just pockets that and says nothing to the Griffin king. It's not even an option. No harm, no fowl, right? Next, we can return the Cyclops to the Magic School to complete the animal collection. : I've managed to find a Cyclops. And believe me - it wasn't easy!: That's just great! To tell you the truth, I had some doubt that you'd be able to get the Cyclops. I present you with 4000 gold coins, to reward you for bringing us the creature. It's a lot of money, but it's worth it.: A lot of money? Screw you, that's 1000 less than I paid for the drat thing. What kind of scam are you running on me here?: Long ago, there were many such creatures, but the mages hunted them down, nearly bringing them to extinction. The stone skin of these creature can successfully resist fire and cold, acid and poisons, so mages used the Cyclops as subjects of experiments, testing various combat spells upon them.: Ah, that's sad about the Cyclops. Anyway, thanks for the money.: Wait a minute! It's not yet time to thank me, I haven't finished my speech! Ahem. These were the last creatures we needed, so you may now consider your quest complete! Thanks to you, we will now be able to commence a study of the influence of magic flows upon an animal body's spontaneous mutation. Excellent job - and a well-earned reward! (Reward: Scroll of 'Target', Scroll of 'Fireball', Scroll of 'Peacefulness', 56 Experience)Whoo.. what a great prize. An absolute tiny amount of experience, and three spells which we have already. And two of them are pretty useless at that. This reward does guarantee that a non-mage will eventually be able to get the Fireball spell, though.  One thing that's actually nice is that the Magic School now has a few additional spells for sale, including this great find. Teleport is a very fun and useful spell. We will see it in action later for sure. Ok, sidequests out of the way... only thing left to do is to report in with the King. : So, Bill Gilbert, did you bring the peace treaty? Or maybe you have more important concerns than concluding the alliance between our states.: The traitor is killed, and so justice is rendered, Your Majesty! And I managed to find out that shortly before the attack, the baron found a very rich gold deposit in the mines...: Well, this explains everything! Having got hold of Creiston Mines he certainly started to explore this gold deposit without informing the exchequer, and therefore rob the treasury of taxes rightfully due... In his greed, he tuned innocent dwarves into slaves, led Darion to war on false pretenses, and stole from his own kingdom. But in hte end he brought himself to his grave! Thank you, Bill Gilbert, for righting this terrible wrong! (Reward: 5800 Gold, 300 Experience).: I'm happy to serve Your Majesty! Bill's journey through the mines has been very good for him. +3 Intellect, +1 Defense, +19 Mana, and a bunch of Leadership. Not bad for a day's work. Next time, we take our first steps in the new land of Kordar, and make a new (and powerful) friend. ---------------------------------- Bonus Material Learning Lore So this update became slightly too big for the character limit for a single post. Thus, the bonus material for an alternate end to the portrait quest has been put into a separate update. Marking the Map  Talkin' 'bout Troops Fire Spider  Resistances: 50% Poison, 25% Fire Critical Hit %: 16 Defense Bonus: 3 Talents  Web WebAbilites Poison Protection Fire Resistance Immune to Mind Spells Gully's opinion: Fire Spiders are decent but not exceptional troops. Doing the same damage as Swordsmen (and having the same Speed), they also have slightly higher attack and are slightly cheaper. On the other hand, they are much more fragile. And the Web talent is pretty meh in my opinion. Generally, I'd rather just take Swordsmen, who at least have Smashing Blow to help out. Fighting them: Treat them like Swordsmen. Slow them if the numbers require it, and use first strikes to reduce their numbers when you engage. Obviously, use non-Fire (and non-Poison) damage as much as possible against them. Spells Seen Fit of Energy  Adds some Action Points to the friendly target, and allows a target which has spent all its action points to attack one more time this turn. Crystal Cost: 6 / 6 / 6 Mana Cost: 20 / 20 / 20 Level 1: Gives Action Points: 1 Level 2: Gives Action Points: 2 Level 3: Gives Action Points: 3 Gully's opinion: This Order spell is great for non-mages. It doesn't require any Intellect, and the Level 1 version is perfectly capable. It works really well with ranged troops (who can attack again anywhere), but also works great with any stack in melee, especially to attack a stack that has used up its retaliation. The more powerful the stack you target, the better the spell (hence why it is better for non-mages). Just remember that the second attack will not occur immediately. Items Identified Battle-Mage Helmet  Description: A bright leather helmet, decorated with magical symbols. Effects: +3 to Intelligence, +1 to Defense Type: Helmet Race: Humans Cost: 18000 Info: This light and comfortable helmet is designed specifically for battle mages. Image of Sorcery  Description: This picture increases magic power of its owner. effects: +20 to Mana Type: Artifact Race: Humans Cost: 50000 Info: The magical symbols expressed in this picture attract Mana flows. Decorative Gilt  Description: A can of golden gilt. Type: Quest Info: You should give this to the artist, so that he could finish his paintings. Ore  Description: This ore is rich in precious metals. Type: Quest Info: This excellent ore is fit for the smelting of different metals. Peace Treaty (Unsigned)  Description: The peace treaty with the Kordar, signed by King Mark. Type: Quest Info: The king of dwarves, Torn Digor, should sign this peace treaty. Portrait of King Harl  Description: A portrait of the griffin King, Harl. Type: Quest Info: You can see the greatness of griffin's king in this magnificent painting!
|
|
#
?
Oct 5, 2017 18:30
|
|
|
Update 35b When we go to pick up the picture for the Griffin King, there is an alternate ending to that quest. We start at the moment when Alex Artist demands an additional 10K gold for his masterpiece. : Another ten thousand? Have a heart, you greedy paint-dauber! Of course I can ask Harl for more money, but I think it's the height of impudence to behave like this to this royal griffin.: My picture is PERFECT! And even if you simple people without a spark of talent - even if you cannot understand it, well at least I can see it, and I know that my picture is just priceless! That is why I can't give it to you for less than fifteen thousand gold. Tell this to Harl.: Are you sure you want to do this? Aren't you afraid that King Harl will not entrust you to paint any royal pictures anymore? And you will not be able to become a court artist.: I don't care! My name will go down in history either way. And who will remember this poor king without my works? In fact, his descendants will remember him only through looking at my pictures.: Maybe you are right. Ok, I'll talk to Harl about it.Off to the Griffin king... : Have you visited the artist?: Yes, I have... And he has dared to ask for additional payment for his picture! He wants another ten thousand gold.: Another ten thousand? He really is a madman! Tell jim that Our Majesty cannot allow himself to be run by a shameless artist! I have paid him enough money. Moreover, I've been waiting for the portrait so long that really he must pay me for waiting! So he should honor the terms of our agreement, otherwise he can get himself off of this island.: Excellent answer, Your Majesty!Back to the artist... : Well, did you bring the gold to purchase my priceless work?: King Harl asked me to tell you that he has no intention of changing the terms of the agreement. And if you disagree, you can leave his island, for some other place in Darion.: Why are you so severe? So rude! Well, I've thought everything over; I'll let him take the picture. And tell him, that I will always be happy to paint for His Majesty.: Now you're talking.Picture in hand, we can finally return to Harl. : Has that madman given you the picture?: Of course, he didn't dare object; you are the king, after all.: That's great news! Thank you, Bill Gilbert!And we get the same reward as before. This route has more fun with the dialogue, but it's also an extra trip back and forth, and you lose out on the 5000 gold returned down payment that you conveniently forget to mention in the other path to the end of the quest. Gully Foyle fucked around with this message at 19:01 on Oct 5, 2017 |
|
#
?
Oct 5, 2017 18:31
|
|
|
Stealing 5000 gold from the king? Uh oh. Man those mine fights looked hilarious with the enemy stacks all grouped up perfectly for fireballs and hungry hungry fishes. 
|
|
#
?
Oct 5, 2017 22:29
|
|
|
Yeah, that brings up a question - are the enemies always going to start out bunched together in the backline, or do they start spreading out as the game progresses?
|
|
#
?
Oct 6, 2017 04:06
|
|
|
Glazius posted:Yeah, that brings up a question - are the enemies always going to start out bunched together in the backline, or do they start spreading out as the game progresses? Almost always they will still be in the backline. Sometimes they are a bit more spread out, depending on how many stacks there are and how much space they have, and there are a few different formations that we will see that extend troops more towards the center of the field. Exceptions tend to be in Hero fights (especially against castles) and Keeper fights (where the enemies are usually guarding the Gremlin towers). We will also face higher Initiative troops that may act first and disrupt that nicely bunched area for blasting. But those are exceptions. By and large, the enemies will start out as you have seen so far. The ability to wreak havoc in the first turn or two is primarily why Mages are often considered a bit OP. Poil posted:Stealing 5000 gold from the king? Uh oh. Well, we didn't steal 5000 gold from the king (the one we work for), just a king.
|
|
#
?
Oct 6, 2017 04:39
|
|
|
A very pointy king.
|
|
#
?
Oct 6, 2017 05:15
|
|
|
Update 36 - Ice Ballin' With Creiston Mines cleared and the treacherous Baron Ahey executed, we need to get through the dwarven kingdom of Kordar and get the peace treaty signed. Once again, we head through the mines to the exit...  Emerging into the sunlight, Bill is immediately accosted by a nearby dwarf bearing an axe nearly as wide as his beard.  : Calm yourself, bearded warrior! I am the ambassador of His Majesty, King Mark! : Calm yourself, bearded warrior! I am the ambassador of His Majesty, King Mark! : Ha! All the better... You killed our ambassadors, and now we can return the favor.: I'm carrying a peace treaty. The dwarven ambassadors were killed by conspirators, who wished to launch a war. Do not do something that you will later regret, brave warrior.: Hm... Ok... I'll let you pass... And I will inform the other posts up ahead about you. But let me tell you one thing: be more cautious. I don't think that the presence of the human king's armies in Kordar is going to look real good to the mountain clans...: I'll be careful. Thanks!: Remember, human, wherever you go, you'll be watched by dozens of eyes. Just give us one cause, and our axes will drink human blood.: How can I get to the capital?: To Taron? It's easy for a dwarf, but might be too difficult for a human. You should go down to the Lower Hadar by elevator, and find the way to Taron Mines from there. By the main road, you'll come to the Miner's Square. Marble stairs lead you up to Ardan's Peaks, right to Taron. Good luck, ha-ha...: Thanks! : Ha! All the better... You killed our ambassadors, and now we can return the favor.: I'm carrying a peace treaty. The dwarven ambassadors were killed by conspirators, who wished to launch a war. Do not do something that you will later regret, brave warrior.: Hm... Ok... I'll let you pass... And I will inform the other posts up ahead about you. But let me tell you one thing: be more cautious. I don't think that the presence of the human king's armies in Kordar is going to look real good to the mountain clans...: I'll be careful. Thanks!: Remember, human, wherever you go, you'll be watched by dozens of eyes. Just give us one cause, and our axes will drink human blood.: How can I get to the capital?: To Taron? It's easy for a dwarf, but might be too difficult for a human. You should go down to the Lower Hadar by elevator, and find the way to Taron Mines from there. By the main road, you'll come to the Miner's Square. Marble stairs lead you up to Ardan's Peaks, right to Taron. Good luck, ha-ha...: Thanks!As the guard suggests, the name 'Upper' Hadar isn't for nothing. Kordar has extensive underground areas that act as separate maps, which we will need to pass through to get to our destination.  Alright! Time to get goi-  : Where did you say that source was? : Where did you say that source was? : Directly to the south. Gallop further along the path and turn right. I'll tell you when we are nearing the place.: Ok. : Directly to the south. Gallop further along the path and turn right. I'll tell you when we are nearing the place.: Ok. While the interruption by Lina is sudden, it is not unwelcome. We want to get our third Spirit of Rage activated as soon as possible, so we head south. This area of Upper Hadar is green but very rocky, and there are signs of dwarven mining operations everywhere.  Time to get all Solid Snake here and carefully, carefully sneak by these armies.  Luckily, even when spotted, we can just run away. No Alert mode to worry about here.  Well that's an interesting looking artifa- : My devices even start to sparkle. There's a generator very close. Aha, here it is - on the ground behind the bridge.: Let's get closer. But first I'm going to need to kill the monsters.Bill is a liar here, you can easily get to the generator without getting in any fights. : Oh! Gods of the abyss! What... what is that, a generator? Ha-ha, oh, don't make me laugh... I thought Endorian technologies would have no chance of surprising me! Ok, jokes aside. The energy it has accumulated should be quite enough for me; so don't just stand there - pull the lever!: Wait-wait! But I'm standing in the circle.: Don't worry, the lightning won't even touch you; it will be drawn into my accumulators. I've already got them activated for recharging. Come on, don't just stare at it! [The devices are recharged at: 0/100]: (Pull the lever...) : Great! Look, look - my charge indicators are blinking. That means that everything's ok, and the devices are charging. Come one, press it again! [The devices are recharged at: 25/100]: (Pull the lever...): Well, ok, the process has started, the energy is accumulating. A few more charges and we can get out of here... What are you waiting for? Give me some more! [The devices are recharged at: 49/100]: (Pull the lever...): Oh, I feel good... Do you hear that Mana-booster droning? Combat Orb is already coming online, we should only recharge the satellite, since it lost most of its energy... [The device are recharged at: 72/100]: (Pull the lever...): Yeaarrrgghh!!!!: [This time Lina's devices have let her down! The lightning broke away and nearly killed you. Fortunately, it turned out alright.] Oops... that's odd! I tried to activate the Orb and... Whew! It's the first time I've ever see that before. Well, come to think of it, it's also the first time I've recharged my devices from the lightning coming out of this huge can... I hope you're ok! [The devices are recharged at: 95/100]: (Pull the lever...): Relax, it's over. Now that my devices are recharged fully, you don't have to stand under those thunderbolts anymore.: Finally!: Was it scary? Well, now you'll learn what a real battle techno-mage from Litan is like! As defined in our agreement, I will now conclude our transaction. Endorian world resident, I am now at your disposal!: That's fine with me! : Great! Look, look - my charge indicators are blinking. That means that everything's ok, and the devices are charging. Come one, press it again! [The devices are recharged at: 25/100]: (Pull the lever...): Well, ok, the process has started, the energy is accumulating. A few more charges and we can get out of here... What are you waiting for? Give me some more! [The devices are recharged at: 49/100]: (Pull the lever...): Oh, I feel good... Do you hear that Mana-booster droning? Combat Orb is already coming online, we should only recharge the satellite, since it lost most of its energy... [The device are recharged at: 72/100]: (Pull the lever...): Yeaarrrgghh!!!!: [This time Lina's devices have let her down! The lightning broke away and nearly killed you. Fortunately, it turned out alright.] Oops... that's odd! I tried to activate the Orb and... Whew! It's the first time I've ever see that before. Well, come to think of it, it's also the first time I've recharged my devices from the lightning coming out of this huge can... I hope you're ok! [The devices are recharged at: 95/100]: (Pull the lever...): Relax, it's over. Now that my devices are recharged fully, you don't have to stand under those thunderbolts anymore.: Finally!: Was it scary? Well, now you'll learn what a real battle techno-mage from Litan is like! As defined in our agreement, I will now conclude our transaction. Endorian world resident, I am now at your disposal!: That's fine with me! Indeed, the "Thunder Can" has gone silent, and serves no further purpose.  The third Spirit, Lina, joins our services! : Finally, somebody to talk with. It's so boring in that damned Chest.: What about the other spirits that are in the Chest with you?: For a thousand years I've been bored out of my mind with them. They're no company. The stony one is hopelessly stupid; the swamp prince is always sleeping. But at least he can entertain me with a good conversation; you can see at once that he's got some culture. Talking with the Guard makes me sick. Try it and you'll see what I'm talking about.: Year, you probably are pretty bored.: That's not even the word for it! Over the centuries I've memorized all the records in my visio-crystals, reassembled all my devices three times, and optimized all my spells. Well, if I had only done this a couple of thousand years ago, I'd be sitting in my castle in Litan right now, not locked away in this damned Chest. And I'd be in my own body, not trapped in a matrix projection...: What? I have no idea what you're talking about.: Oh yeah, I forgot who I'm talking to. A shining representative of the standard Middle Ages. Great company you are! Have you even invented gun-powder yet? Or the "Teleport" spell? Anyway, I've seen that you have cannons that can fire cannonballs. Or do they also work by magic?: That's a dwarven invention. You just heat the plate that has the sun symbol on it, and thunder-powder shoots the ball out of the barrel. And you'd better stand aside and cover your ears!: Hmm... it's even worse than I supposed. Though I guess it cour be worse still. Judging by your psychophysical characteristics, your race was simply created by someone not long ago. I think you just haven't had enough time to evolve - or perhaps your evolution has been artificially restrained. So, what did you want from me?Since we are the first person she has talked to in a thousand years, Lina is particularly garrulous. Nothing wrong with that, but it gets a little long. Most of it has been shoved into the bonus material for this update. However, let's see what she says about what she will bring to the fight for us. : What do I need to do to get myself a famous combat sorceress?: Let me see what devices in my arsenal are still working. Well... The mana-booster works, but it's created for a single warrior, so you'll have to use it in an unusual way - just by scattering the sources of energy on the battlefield. The idea being that your warriors should manage to activate them first. I'm sorry it's a bit clumsy, but this weapon is designed for individual use. The Combat Ball is almost ready for use; you'll definitely like this thing. Basically you can think of it as an additional combat unit, and quite a strong one.: The more I talk to you, the more alien and strange words I learn.: That's just the beginning! Well, let's see... The "Ice Trap" spell would also be useful, I guess. And my pride - my own invention - Gizmo! Multi-functional Satellite-bodyguard. Intellectual "friend or foe" recognition system, emergency reanimation function, adrenaline booster function and built-in gamma-destructor. Actually at the moment it's malfunctioning, but I'll repair it soon enough. Oh, uh, maybe for medieval knights I should explain it like this: this thing heals your friends and burns enemies.In her long-winded way, Lina gives us the outline of the abilities she will give us. Unlike the other two Spirits we have, Lina has no direct damage abilities. Instead, all of her abilities amount to some kind of support. By and large, I'm not a fan of her abilities - well, three of them at least. The fourth, though... that's an exception, and one that will be used extremely liberally for the rest of the game. For more on Lina's background and history, see the bonus section.  Time to clean up the troops we avoided on the way in. We snuck by so that we'd have more fights in which to bring our new friend up to speed, so it's time to use these guys as training.  The battlefields in this region are pretty open affairs, with only occasional rocks or stumps to block areas. You may also notice a change in the line-up. Since we have access to them in the Creiston Mines, we are trying out these Cyclops (Cyclopses? Cyclopi? Cyclopodes?) as our ranged unit.  For once, we are beaten in initiative, and this solitary Emerald Green Dragon flies across the field to chomp on the Shamans before we can act.   While my troops deal with that menace, Bill can basically eliminate most of the backline.  Let's bring out Lina. We want to start leveling her up as fast as we can.  Lina appears out of a swirl of crystals and ice.  The ice coalesces into a figure seated on a throne.  She gathers power into herself...  And unleashes it onto the battlefield!  Ok, that's not very impressive looking. The Chargers ability drops blue and red orbs at random locations onto the battlefield.  If you get a unit to the hex where an orb sits, you absorb that energy and the troop gets +1 Action Points for that turn. Blue orbs, of course, give you Mana. This is basically the only edge case I've found for the Chargers ability, in that it is the only way to transform Rage into Mana.  Sure, we can get some Rage from the red orbs... but we still had to pay way more to use the ability. Eventually, it is theoretically possible to generate Rage, but that requires many levels put into the ability. The action point bonus is nice, but since the locations are random, you normally spend far more movement going out of the way to get the orbs than you'd ever get back.  As a side note, I find that the Cyclops victory howl at the end of combat portrays a note of sadness.  Anyways, we easily clear the battlefield.  In the far south, we can find an Alchemist Lab, and a spare Might Rune.  Unsurprisingly, the Alchemist Lab sells Alchemists.  The troops we avoided on the way in have gone out wandering, so we go to track them down.  Once again, the powerful Giant unit joins the enemy forces. These guys are the highest level Dwarf troop (which is mildly ironic, I think).  But I'm still not going to talk about them, since they are destroyed before their turn.  Meanwhile, the aggressive AI gets rewarded by a free Bless cast by this statue.  See, this is another reason the Chargers ability is annoying. Random locations mean random, so your precious orbs that you just paid Rage for may settle down on the opposite side of the field. And yes, the AI units can pick them up and get bonus action points.  Griffins are decent at tracking down these orbs, with their high Speed and flight. In this case, they can't quite make it, exchanging blows with the Hyenas and losing a couple of Griffins in the process.  Meanwhile, the Polar Bears do much better against the remaining Miners.   Ah, there we go! On reaching Level 2, we get to pick up Lina's second skill, Ice Orb. This is the exception to Lina's unimpressive ability line-up, and one of my favourites in the game.   We've cleared the enemies out of the south here, so a bit of looting is in order.  On the way back north, a bear surprises me.  This army is an interesting mix of units, heavy on the ranged focus with Cannoneers, Catapults, and Beholders.  We see that some armies are starting to pack a lot more stacks. Even after the spell phase, the left wing of this army is more or less intact.  The Catapults decide to target my Cyclops. Where my Bowmen would have taken a good number of losses here, this blast barely scratches the rock hide of these guys. The Cyclops are less powerful on the offense, but their toughness is superb.  Alright, let's break out this bad boy.  The Ice Ball looks a bit goofy, like a large magical golf ball.  Being a ball, the Ice Ball can only move in straight lines. Once started moving in a direction, it will move until it runs into an obstacle.  Remember how the damage in the ability was listed at 110-130? Well, that's a bit deceptive. Not only does the Ice Ball have a great Attack stat (at 40), but each hex the ball passes through before hitting an enemy increases damage by 100%. So here the ball is doing a whopping 15x the listed damage (between the Attack boost and the distance).  Yeah, that's pretty nice. Oh, and the Ball can get critical hits for even more.  However, the damage aspect is secondary to the main role... decoy and damage sponge. The Ice Ball starts with 300 Health, great Defense (40), and great Physical resistance. And enemies love to target it, even when your actual troops are in range. It will take quite a bit of damage that would have hit your troops, and keep enemies distracted.  The Ice Ball can't retaliate against enemy attacks, but enemies also can't retaliate against it in turn.   The path heading north is guarded by this Alchemist.  Interesting, it seems that Demons have emerged from their realm to join enemy armies. This is actually plot-related, but it also means that we will start to see them in enemy troops around here, in addition to the Dwarven and other miscellaneous troops.  It's pretty rare to get the Ice Ball to roll the full length of the field. My usual method is to wait until the enemies have all moved before placing the Ball for maximum carnage. If you plant it ahead of time, there is a risk that no enemy will be standing in the path of the Ball when it gets to attack (it only has an Initiative of 2, so it usually will go last).  The Ice Ball works very well alongside the Shaman totems at forming disposable walls blocking enemy attacks. It also prevents archers from using ranged attacks if they can't move away from the Ball.   Of course, we can level up the Ball quite a bit. I grab this attack bonus, boosting the base damage by about 50%, and the Health by 25%. We do need to be a bit careful, since the Rage cost rises rapidly.  In the norht of this region, we find a small dwarven village.  Dwarven beer has a very high reputation, let's see what they have on tap here.  : Why not? Hey, a beer for me and my new friend! [Pay 10 gold coins...] : Why not? Hey, a beer for me and my new friend! [Pay 10 gold coins...] : [The dwarf drains his glass in two gulps.] Oh, thank you, kind man. If you could even guess how dry my throat was!: So what's happened, smith?: What kind of smith am I now? I have neither a smithy nor orders. I've pawned even my father's hammer.: Pawned? Why?: This rascal named Lew Klisan tricked me into buying a treasure map from him. He said that there's a place on the map where I can find a Titan's Tear. You heard of that, right, human? However, you don't understand me. If you were a smith, you could understand what it would mean for a smith to get a Tear. Anyway, I sold all my property, bought the map and hired a ship. Captain Rodriges, the ship's owner, promised me to find the treasure and bring me the Tear. It's been a long time since, and still I have no news. The damned pirate tricked me!: Quit your drinking; it's time for singing, smith! I've met the captain, may he rest in peace! He hadn't found the treasure, but he gave me the map.: Have you found the Tear? To be honest, I've despaired of getting the Tear. I visit taverns and drown my sorrows in beer. I'm sorry, human, but I can't buy the Tear off you, even if you have found it. My last coin sank to the bottom of that glass of beer.: Oh, come on, dwarf. Take your Tear. Better for you to have one iron tear than a set of salty ones. It's not right when a smith spends all his time in taverns.: Thank you! I've heard many stories of human greed, but you... Wait, human. I have no money, but I do have a scroll, I wanted to sell it, but who needs magic scrolls in a country, where there are no wizards? I guess that it's one of the dwarves' old spells that summons the powers of the Depths. Take it. [The dwarf takes out a magic scroll and gives it to you. And it's no common scroll, but one that contains a powerful spell "Geyser"!]: Thank you. Now get to smithing, and stay out of the tavern! : [The dwarf drains his glass in two gulps.] Oh, thank you, kind man. If you could even guess how dry my throat was!: So what's happened, smith?: What kind of smith am I now? I have neither a smithy nor orders. I've pawned even my father's hammer.: Pawned? Why?: This rascal named Lew Klisan tricked me into buying a treasure map from him. He said that there's a place on the map where I can find a Titan's Tear. You heard of that, right, human? However, you don't understand me. If you were a smith, you could understand what it would mean for a smith to get a Tear. Anyway, I sold all my property, bought the map and hired a ship. Captain Rodriges, the ship's owner, promised me to find the treasure and bring me the Tear. It's been a long time since, and still I have no news. The damned pirate tricked me!: Quit your drinking; it's time for singing, smith! I've met the captain, may he rest in peace! He hadn't found the treasure, but he gave me the map.: Have you found the Tear? To be honest, I've despaired of getting the Tear. I visit taverns and drown my sorrows in beer. I'm sorry, human, but I can't buy the Tear off you, even if you have found it. My last coin sank to the bottom of that glass of beer.: Oh, come on, dwarf. Take your Tear. Better for you to have one iron tear than a set of salty ones. It's not right when a smith spends all his time in taverns.: Thank you! I've heard many stories of human greed, but you... Wait, human. I have no money, but I do have a scroll, I wanted to sell it, but who needs magic scrolls in a country, where there are no wizards? I guess that it's one of the dwarves' old spells that summons the powers of the Depths. Take it. [The dwarf takes out a magic scroll and gives it to you. And it's no common scroll, but one that contains a powerful spell "Geyser"!]: Thank you. Now get to smithing, and stay out of the tavern!Oh, dear Hrut, you don't know half the extent of Bill's greed. Lucky for you, you had a treasure on you more valuable than nearly any amount of gold. We will see how Geyser works shortly. If we go back to the tavern...  : I wanted to see the smith; do you know where he is? : I wanted to see the smith; do you know where he is? : I don't know. He left after you spoke with him. He had a look on his face like his uncle had died and bequeathed everything to him.: I see. Thank you.: I came just to have a rest and look at your goods. : I don't know. He left after you spoke with him. He had a look on his face like his uncle had died and bequeathed everything to him.: I see. Thank you.: I came just to have a rest and look at your goods. We could get a few Giants for ourselves here if we so wished.  This house is the only other main feature of the village (well, that and the barely visible elevator beside it... more on that in the future).  : Hyenas? So... what has happened? : Hyenas? So... what has happened? : One day my elder son brought home a pair of hyena cubs - funny beasts for the younger children to play with. I didn't object, and soon we became very attached to them. But the hyena's began to breed, it became difficult to feed them, and in their hunger they began to attack us. I thought about killing them all, but I couldn't bring myself to do it. Please, kill the hyenas for me, and I will tell my children that they died of a rare disease. I'll pay you for your help. (Reward: 4400 Gold, 250 Experience).: Ok, I'll kill the hyenas. : One day my elder son brought home a pair of hyena cubs - funny beasts for the younger children to play with. I didn't object, and soon we became very attached to them. But the hyena's began to breed, it became difficult to feed them, and in their hunger they began to attack us. I thought about killing them all, but I couldn't bring myself to do it. Please, kill the hyenas for me, and I will tell my children that they died of a rare disease. I'll pay you for your help. (Reward: 4400 Gold, 250 Experience).: Ok, I'll kill the hyenas. I guess we know where all the Hyenas the other armies had came from.  Each of the two armies is nearly identical, with something around 1000 Hyenas in both of them and nothing else.  Let's check out that new spell that Hrut gave us. Geyser is a Distortion spell that gives a spin on the AoE class of spells. Rather than target an area, Geyser hits a random number of enemy stacks for moderate damage.  It's a very dramatic effect. Currently, these damage numbers aren't that impressive, but this is only the Level 1 version. At Level 3, Geyser will hit upwards of 8 enemy stacks for about 3x this damage. The great part of this spell is that unlike most AoE spells, the enemy position doesn't matter, and you don't need to worry about friendly fire. It will hit the stacks no matter where they are. And since it is a quest reward, this is one of the few guaranteed spells in the game. The downside, however, is that it is extremely mana-intensive to use, and crystal-expensive to upgrade. Even Level 1 Geyser costs 20 Mana, and at Level 3 it will cost 40 Mana per cast (double the cost of our Ice Snake spell).  We came into this fight a little mana-depleted, so we need to rely on Ice Ball to help us out with the Hyenas.  It does a great job of absorbing a ton of Hyena critical strikes.  Even the sturdiest unit will eventually perish, though. In this case, the Ice Ball melts away when it has taken too much damage.  Your sacrifice was not in vain, Ice Ball.   Ice Snake remains our main damage-dealer. For now, Geyser just isn't worth it. I might end up leveling it later on, however, especially if I buy Distortion Magic 3 and can afford the crystal cost.  This time, the clean-up is much easier.   Lina already unlocks her third ability, Ice Thorns. This is another barrier-type ability. The ability is decent, but it is also very expensive to use. I will try to show it off in an update soonish. Meanwhile, with the Hyenas exterminated, let's talk to Giram. : There are no hyenas anymore! Excellent! Now I'll have to think of what to say to my children. But that's my problem. Thank you, and here, take the money as we arranged.: Thank you, and of course you could just tell your children that the hyenas have run away to the forest.: Do you need anything else? Of course, thanks for the help with hyenas, but please don't take advantage of our hospitality.: Well, I just wanted to ask if you had anything for s sale... Hey, wait! I thought you wanted me to kill these things off! With this corner of Upper Hadar cleared out, I could end the update here. However, there's some business that I want to take care of sooner rather than later.  We have a number of items sitting in our inventory begging to be upgraded. The central prize of them all is the Druid's Staff.  The Staff is guarded by a potent army of beasts and Elves.  Even with all of our Intellect and spell-prowess, we still fall just short of being able to kill these towers in one casting.  Smashing Sword helps finish off one tower...  The second weakened tower is struck by the Shaman's Ghost Axes... leaving the tower at 1 Health. Out of like 2700. Argggh!  The central tower is guarded by these Druids, and my Royal Snakes can't quite get there right away.  Meanwhile, the speedy Lake Fairies on the right flank zoom up and spray magic into their face. This is the one type of damage the Cyclops have no significant resistance to, and one Cyclops perishes (that's 25% of the stack!).  The left flank, on the other hand, is threatened by these Ancient Bears. The Shaman's totems will help slow them down though.  An Ice Ball is summoned to help with that task.  With the left flank secured for the moment, the Royal Snakes come back down to help take on the Lake Fairies. Over two turns (and with a couple of spells as well), the stack of over 1K are taken out.  With spells being used to reduce the Fairies, we need to use physical attacks on the remaining Tower. This results in a few retaliatory Lightning Bolts, but the tower eventually falls.  Soon, it's only the Ancient Bears left. However, my delaying tactics are almost out. We need to get reinforcements there pronto. The geometry of the arena is in the way, however. It would take 2-3 turns for my Snakes to go around this chasm.  Time to break out this bad boy. The Teleport spell is a Distortion spell that, well, does what you think it would. At Level 1, you can only Teleport up to 3 hexes away. At Level 2, the range extends to 5 and at Level 3, Teleport gets your stack to any open space in the field.  Teleport is a great addition to the spell book. You won't need it often, but it is very useful when you do. Even if the battlefield geometry isn't in the way, you can use Teleport as a pseudo-Haste - at Level 1 it will move your troop three hexes further, compared to only one for Haste. Warriors love this spell, as it is very cheap to use and gets their powerful stacks to where they need to be.  The affected troop continues on with just as many Action points as it had before the Teleport. These Royal Snakes can immediately strike at the Ancient Bears.  Victory is expensive, especially for the Cyclops stack...   But it is so worth it. The Great Druid's Staff is an amazing piece of equipment. Not only do we get a further boost of +2 Intellect, all animals in our Army get 50% bonus attack. That covers Snakes, Spiders, Dragonflies, Griffins, Bears, Wolves, Hyenas, and even Beholders. So in our army, that is a +9 Attack for both Griffins and Royal Snakes, and +11 Attack for the Polar Bears.  With the main prize down, there's a couple of other items we want to boost. Next in line is the Cloak of Wizardry.  The arena for the Cloak is enormous, and the enemy units are entirely ranged. Luckily, this is also a much easier fight since the equipment is lower in level.  A Flaming Arrow is sufficient to destroy the towers in a single cast each.  Once the towers are gone, I spend a turn casting Sacrifice, giving up some Griffins to restock on Cyclops. The stock of Cyclops back in Creiston Mines only had 2 left after the ones we bought, so there's very little to spare.  It does mean another chunk of Griffins as casualties, but there are nearly 4000 of them left to hire from King Harl.   The Cloak becomes the Cape, and we get a small boost to our mana pool and additional Magic Resistance for all of the troops.  Finally, there's the Bronze Ring. We used to have two of these equipped, but one got slotted out for that Image of Sorcery from the artist.  This arena is even easier, and could have been done long ago.  This time, the Griffins won't let the tower retaliate.  The Horsemen remaining just don't match up to these Snakes, especially with the Great Druid's Staff equipped.  The last Priests fall beneath the blow of a huge flying boulder.    The upgrade to the Silver Ring gives another +5 Mana for our pool.  I also go ahead and upgrade the other Bronze Ring sitting in the inventory. I doubt I will ever equip it, but it does give a little more experience and gold. The battle is nearly identical, except a tower torches one Griffin instead of casting some other spell.  With the upgraded equipment, Bill's stats are looking extremely healthy. Our Mana pool has passed the 100 mark, and Intellect has hit another key breakpoint at 28 (since there's a boosted effect every 7 points). At this point, I will probably stop taking Intellect boosts at level up over almost anything else. Next time, we will continue to explore the eastern reaches of Upper Hadar. ---------------------------------- Bonus Material Learning Lore Let's continue our chat with Lina. : So who are you, sorceress?: Oh, yes, let me introduce myself - first class battle sorceress Lina Itanieles. A mercenary - indeed, one of the best mercenaries - plus a mage-constructor, though a class lower in that profession. Nevertheless, my battle devices are in high demand on my native Litan! Also I'm a close relative of the Emperor.: The Emperor's relative? So you're of noble blood?: One of the highest, believe me. My great-aunt was the daughter of the second cousin of a cousin of the fourteenth wife of the cousin of the mother of the Emperor, may she be glorified in all the ages throughout the universes.: Insert Spaceballs reference here: In your world does everyone look like you?: I know I'm quite charming, thank you for the compliment. Nevertheless, I might turn you off a bit - what with your standards, the inhabitants of my world might seem rather unpleasant to you.: You're certainly charming, but I didn't mean your attractiveness.: I know what you're talking about. The matter is that I'm not in my own flesh now. This is a holographic projection, a phantom, an unbodied spirit. During one terrible fight I overestimated my power and my body was quite simply destroyed. Fortunately, my will and my devices helped my mind to survive apart from my flesh. I managed to place my mind's matrix into a mobile cryostat - that's a device that supports my mind's activity, and allows me to create this visual projection.: Can you explain it more simply? Don't forget I'm a silly... middle-knight or what-do-you-call-it...: That's why you look so funny. Sorry, I know it must be difficult for you to understand that there are plenty of other worlds besides yours where amazing creatures live. Though I understand that the Demons visited you once, so you must have some understanding of this. Anyway, the throne I'm sitting on is a complicated mago-technical device in which my spirit is protectively enclosed. The device allows me to live, move around, and it creates this image that you're talking to. Your mages can definitely leave their bodies too, so you see I did something similar to that. But my body... you know...: What does the word "mage-constructor" mean?: I'm an expert techno-mage, my silly medieval knight. I can invent, assemble, repair, and improve complex techno-magical devices. Generally speaking, I make different mechanical things, which work with the aid of magic. By the way, my workshops were always heaping with orders; clients came to me even from different worlds.: I wanted to ask you another thing.: Go on then; ask your question... At least chatting with you is better than chatting with that stony blockhead, or that fanatic who can only talk about his precious Temple.: Do you know anything about this Chest?: I'm sorry but I can't really help you. I tried to examine it with my devices, but except for the fact that a very powerful but unknown magic is enclosed in it, I can't tell you anything. Though there's one thing I can tell you. To control the Chest you don't need the kind of Mana which is used for casting spells in your world. Instead you need Rage. By this I mean the world's psycho-emotional background energy. Strong emotions - like pain, anger, spite, rage... They feed the Chest.: How did you get into the Chest?: Ever since the day I lost my body, I dedicated all my efforts to searching for some way to create a new spirit receptacle. I was sure that one of the worlds must have what I was looking for. In my search I wandered to the world of Demonis. It's a strange one, very poor from a magic point of view, but with very intense psycho-background - which immediately had all my devices going haywire. There the Chest's owner came across me. I tried to stand up to him, but while all my devices were going mad, my magic was barely enough to hold myself together. It's not easy to maintain your life being outside your body - your chances are close to zero, you know. So I was captured.: Tell me about your world.: You'd like to know about Litan? Well, it the most wonderful world, and as a mercenary-mage I've seen a lot of worlds. Of course, some might say that it is a typical futile workd of sand and stones - where summer sand melts from the heat and turns into glass - but it's my native land. We've left you far behind in our development. Litan is a world of techno magic, one of the ancient worlds. We create complex precision devices and multi-dimensional conjurations. We learned to travel to the other worlds long ago, and obtained various precious secrets from all over, improving our science and magic. Oh, what's the use talking about it. But yes, I'd like to show you my world. One day's walk around my palace by Calestan Sand falls - that alone would be enough to amaze you to the end of your days.: (Close the Chest...)Marking the Map   Here is a look at the world map, now that we have reached a new continent. Talkin' 'bout Troops Ice Ball  Resistances: 25% Physical, 80% Magic, -100% Fire Critical Hit %: Unknown Defense Bonus: 2 Talents: None Abilities Ice: Being created from ice, the Ice Ball takes less damage from Physical Attacks, but takes increased damage from Fire Ball: The creature moves only along a straight line and stops when it collides with any obstacle. The damage inflicted by the ball is increased by 100% for every cell it transverses, Magic Immunity: Gives the creature 80% Resistance to Magic Damage. No spells effect the creature. Gully's opinion: Not really a normal troop, obviously, but the Ice Ball is an important part of your army. On the offense, the Ice Ball can inflict a pretty serious amount of damage... if you are lucky. With the Ball ability, the +100% damage per hex rolled can be huge. In this way, it is best used against ranged troops. Not only do ranged troops rarely move out of the path, you also get the maximum rolling distance. On the defense side, the Ball is a great soaker of enemy damage. Depending on your luck in leveling (and amount of Rage you are willing to spend), the Health of the Ball can get really high (I think up to 2500). With that, the great Defense stat, and the Physical Resistance, the Ice Ball can take a beating (although any Fire-wielding units can inflict serious damage). The Ice Ball can be used as a wall to block enemy melee troops, or you can throw it in front of enemy archers to block their shots. If the enemy archer can't move away for some reason (if they are cornered or slowed), the archer will have to just punch the Ball. All in all, the Ice Ball is a fantastic use of Rage, and is a key 6th stack for your army. Fighting them: Not applicable - there is no enemy that can use Rage or summon the Ice Ball. Spells Seen Geyser  Geysers hit your enemies from under the ground, tossing up your enemies and doing physical damage to them. Crystal Cost: 7 / 14 / 28 Mana Cost: 20 / 30 / 40 Level 1: Damage: 50-100; Geysers: 4 Level 2: Damage: 100-200; Geysers: 6 Level 3: Damage: 150-300; Geysers: 8 Gully's opinion: This Distortion spell is a potentially devastating addition to the spell book. First, it is the only AoE spell in the Distortion school, so it's an alternative if you don't want to get high level Chaos Magic. Second, it's a guaranteed spell since it's acquired by quest. Third, the way it functions makes it super-easy to use. It will only ever hit enemies, it will hit the prescribed stacks no matter how spread out they are, and it does equal damage to all targets. The only downside in how it works is that you can't select which targets are hit. If you get it to Level 3, though, 8 targets is usually more than enough. The big downside is the cost. Not only is it pretty expensive to learn and upgrade, the mana cost is huge. Only Mages can really afford to cast it, and even with a decent Mana pool, 40 Mana per cast rips through your reserves very fast. Still, the unique targeting aspects can make it well worth it when other spells aren't suitable. Teleport  Moves the friendly target to a free cell. Crystal Cost: 2 / 5 / 15 Mana Cost: 5 / 8 / 12 Level 1: Moves a friendly target into a free cell on the battlefield within the area of 3 cells. Level 2: Moves a friendly target into a free cell on the battlefield within the area of 5 cells. Level 3: Moves a friendly target into any free cell on the battlefield. Gully's opinion: This Distortion spell is only useful in certain situations, but it is great when those situations come up. Because of that, it is always good to have this spell available. First, Teleport lets you get around traffic jams and awkward battlefield layouts. Second, you can use Teleport as a pseudo-Haste spell, getting your troop 3 hexes closer even at Level 1. Third, you can use it to extract troops if they get surrounded - this is particularly useful when facing Demonesses. Finally, it lets you place troops that have position-sensitive skills perfectly. This is great for Sea Dogs or Knights in particular, who have talents that target multiple nearby stacks, but can have trouble getting in position to use effectively. Warriors should love this spell - doesn't require Intellect for anything, is cheap and effective even at Level 1, and works well with your more powerful troop stacks. But any Hero should learn this spell. Items Identified Great Druid's Staff  Description: A wooden shaft twined 'round by grapevine, and crowned with an owl figurine. Effects: +4 to Intellect, +50% to the Attack of animals Type: Weapon Race: Elves Cost: 40000 Upgraded From: Druid's Staff Info: A sacred relic of the forest mages, the staff of the Great Druid is the symbol of highest wisdom and unity with the forces of Nature. Like its creators, this living staff abhors violence, and considers the life of every living creature invaluable. Silver Ring  Description: An elegant silver ring, decorated with crystals and runes. Effects: +10 to Mana Type: Artifact Race: Humans Cost: 14000 Upgraded From: Bronze Ring Upgraded To: Golden Ring Info: The crystals, which are widely used by mages for the accumulation of magic and the concentration of will, gives an additional power to runes, turning this ring into a very useful artifact. Cape of Wizardry  Description: A silvery mantle, covered with sparkling runes. Effects: +10 to Mana, +20% to Magic Resistance Type: Armor Race: Neutral Morale: Normal (50) Cost: 15000 Upgraded From: Cloak of Wizardry Upgraded To: Mantle of Wizardry Info: This cape is not only a symbol of a powerful mage, but it provides good Magic Resistance, which makes it especially useful in combat against Mages.
|
|
#
?
Oct 13, 2017 01:15
|
|
|
Geyser is such a pain when you're fighting against it and the enemy hero just keeps spamming it every single turn.  Letting the giants take their turn can be fun. Be glad they giants aren't the Heroes of Might and Magic 5 kind with teleport and a chainlightning melee attack.
|
|
#
?
Oct 13, 2017 08:11
|
|
|
Based on a map, we are at about half the game?
|
|
#
?
Oct 13, 2017 11:59
|
|

|
NHO posted:Based on a map, we are at about half the game? Not quite half, I'd say. Closer to maybe 40%. The world map is a bit deceptive. For instance, Kordar has only two surface regions, but there's extensive underground areas. Ellinia has a separate mechanism that extends the content in that land a bit too, but I don't want to spoil it for anyone who hasn't played. Beyond that, there are several regions we will be visiting that aren't on the world map either. Poil posted:Geyser is such a pain when you're fighting against it and the enemy hero just keeps spamming it every single turn. Yeah, Geyser can definitely be one of the more annoying enemy spells, since you can't do anything about it by smart positioning. We will see more Giants soon enough, and see their special ability for sure.
|
|
#
?
Oct 13, 2017 15:25
|
|
|
The ice ball looks like an interesting unit. I like those kind of... almost, trap units?
|
|
#
?
Oct 15, 2017 02:58
|
|
|
Update 37 - Dwarven Security Measures Let's start hiring some locals, they can help us gain passage through the mountains in Kordar. To start with, we'll replace the Polar Bears in our army with these Alchemists. Despite their strength, the Polar Bears have been a bit underwhelming.  Ooh, a pyramid? Time to play tourist.  Very snazzy indeed. I like the faces, but I feel like cutting those corners away would be structurally problematic.  : Yes, tell me. : Yes, tell me. : In ancient times, King Fandor Leonar ruled Endoria, but he was fond of traveling and always dreamed to tour all over the world and reveal all its mysteries. Once his son became old enough to take his father's throne, King Fandor equipped his ship and began a great journey. It took many years to travel all over Endoria, but upon his return he told amazing stories, many of them so wonderful and striking that some people considered the king to be a liar, or even man. Nevertheless, King Fandor became the first man to travel all over the world, and made a single map of Endoria. It is believed that this map has unique properties. Any king will give a lot of money to possess this map. But the wise and careful Fandor hid his treasure in a pyramid that can opened only by a man who has repeated his route, traveling all over the world. In the memorable places, he left obelisks - high stone pillars. After visiting all 13 of the obelisks, the traveler will gain access to the Pyramid. Many have tried to retrace Fandor's route, but no one have managed to do it.: How can I know how many obelisks I've visited?: Turn around. Do you see 13 stones? There are the same number of obelisks. Touch one obelisk and one of the stones will be lit up - but only for you. Yes, every man sees the stones lit up only by him. When all of them are lit, the door of the Pyramid of Discoveries will open to him.: Excellent! I travel a lot and I'll try to find all the obelisks. : In ancient times, King Fandor Leonar ruled Endoria, but he was fond of traveling and always dreamed to tour all over the world and reveal all its mysteries. Once his son became old enough to take his father's throne, King Fandor equipped his ship and began a great journey. It took many years to travel all over Endoria, but upon his return he told amazing stories, many of them so wonderful and striking that some people considered the king to be a liar, or even man. Nevertheless, King Fandor became the first man to travel all over the world, and made a single map of Endoria. It is believed that this map has unique properties. Any king will give a lot of money to possess this map. But the wise and careful Fandor hid his treasure in a pyramid that can opened only by a man who has repeated his route, traveling all over the world. In the memorable places, he left obelisks - high stone pillars. After visiting all 13 of the obelisks, the traveler will gain access to the Pyramid. Many have tried to retrace Fandor's route, but no one have managed to do it.: How can I know how many obelisks I've visited?: Turn around. Do you see 13 stones? There are the same number of obelisks. Touch one obelisk and one of the stones will be lit up - but only for you. Yes, every man sees the stones lit up only by him. When all of them are lit, the door of the Pyramid of Discoveries will open to him.: Excellent! I travel a lot and I'll try to find all the obelisks. Here's the ring of stones. Looks like we've found 9 of the 13 obelisks so far.  Make that 10... it's easy to overlook the obelisk right here in the circle.  As soon as we read that obelisk, one of the unlit stones unleashes a burst of light.  A path with some rails leads away east near the village we found. Maybe we can find a path through the mountains?  Nope, not this way. A rough rock wall blocks the path forward.  Turning around, we find an angry pack of dwarves descending on us from higher ground.   The only army around here with Alchemists is mine, thank you very much.  Alchemists are interesting units. They come with 3 Talents. Their first is the Potion of Poison, which lets them toss a jar that explodes for 5-15 poison damage, damaging the target and any units surrounding it, and inflicting poison on them all.  Too bad the Poison DoT effect is basically worthless. I mean, 7 damage? That would barely kill a Peasant. However, the Poison status does lower Attack by 20% as well, which is more useful.  Not a bad haul here for a battlefield chest.  Alchemists second Talent is Fire Water. This attack is stronger than the Poison bottle, but only affects one target for 10-20 Fire damage. Of course it inflicts the Burning status. Again, the DoT isn't worth it, but it does inflict a guaranteed debuff of -20% Defense as well.  However, Alchemists come equipped with only 1 charge of each long range bottle attack. Once those are used up, they are limited to a very short range attack where they squirt acid from their tank. This attack can only reach 3 hexes away, though. On the other hand, this attack is stronger than their bottles at 10-25 poison damage. The short range does mean the Alchemist needs to get close to their enemy. If you face an army of mostly ranged units, Alchemists can quickly become pretty poor if you don't spend some Mana to give them Haste, or Teleport.  We finish off the battle with an Ice Ball running over the Marauders.   Speaking of Ice Balls, we can level ours up again. This time we get a defensive buff, adding another 200 Health to the Ball and a small amount of damage. The Rage cost has tripled from the base, though. Since my Mage is a bit limited in the Rage department, I'll be hesitant about any further levels to the Orb that increase the cost.  At the top of the hill the dwarves came from, we get a nice view back to the Creiston Mines and Hyena pen. Not much else up here though.  On the way back, there's a Magic Rune to pick up that was hidden from view by this tree.  The only other path in Upper Hadar leads east from the south of the region. The path leads upwards into the mountains, leading to a rapid change in climate. Hope we packed winter clothing!  The entrance to the mountain passes is guarded by this army though.  This battle acts to highlight the role luck can play in your fights. Notice that both Emerald Green Dragon stacks started on the hexes that are set a bit further back than the others  As a result, the dragons can't quite get to my troops in the first turn. If these stacks had been placed in the slightly forward hexes, they would have reached and chomped on my troops immediately.  Instead, I get to ice these guys down first.  Finally, we get to see a Giant in action. Giants are big, beefy, and extremely slow melee units. But they do have a very fun Talent, Earthquake. Every other turn, the Giant can leap into the air, sending shockwaves out when his massive body hits the ground.  The Earthquake hits all enemy troops, dealing more damage the closer the troop is to the Giant... except flying units like my Griffins can fly into the air, and take no damage. This is true of any Flying or Soaring unit. A single Giant doesn't do much damage, but larger stacks can be a bit annoying.  That said, Giants are one of the least threatening Level 5 units in the game. Apart from the Earthquake, they've got not that much going for them. Sure, they have a pile of Health, and deal great damage... but they have a Speed of 1. They do have the Running Talent, but the AI will always waste that immediately. After that, it is super easy to avoid fighting the Giant, and to use spells and ranged attacks to bring them down. Melee units like Royal Snakes with attacks that reach across a hex are also great at tearing them down.  Meanwhile, you can send your faster units out past the Giant to take on troops that will actually hurt you.   We continue using the other Spirits when Lina is resting. Here we get the chance to expand the area affected by the Rockfall ability. Now it will affect an area similar to Fireball or Ice Snake. The damage is still minimal in comparison, though.  These snow covered forests often hide little goods tucked away, and they can be surprisingly hard to see, since the snowy trees and snowy ground are pretty similar looking.  For instance, I had to rotate the camera to an overhead position to see this path easily.  One of the sidepaths holds a Fountain of Gladness.  These Fountains will give you a Rune when visited.  The forests aren't devoid of life, and there are many animals like this squirrel leaping from tree to tree.  Continuing deeper into the icy paths, another Giant guards a small hill.  Both the Giants and Cyclops are good targets for the initial spell barrage.  Sometimes the randomness of Lina's chargers does work out in your favor and they practically fall into your lap.  The Alchemist's basic attack has a special property. Being a stream of acid, it hits everything between the Alchemist and the target. Enemies, friends, neutral objects... doesn't matter. So on one hand, the Alchemist can be very powerful if positioned right. On the other, you might not be able to attack without hitting an ally. In this case, it's just a Totem, so I fire away.  A couple of Snakes are lost when I forget that Marauders can attack across an empty hex, even when slowed.   A wishing well coughs up this helmet... too bad it is a) worse than what we are wearing (giving only +2 Defense), and b) another copy of a helmet we have already acquired.   Directly across from the well is a Rage Fountain. For once, we can really take advantage of this to get full Rage before the next fight.  Heading to the south of the area, we dig up a rune beneath a pair of tall rock pillars.  When we pass through the pillars, we find a circular path around a bulge of rock, patrolled by a few armies. The first one we hit is a Hero, Master Dizi.  Hmmm, a king's servant tempted by gold... that doesn't sound familiar at all. Master Dizi has a strong set of offensive stats.  This is bolstered by giving his troops +1 Speed, making them far more tricky.  He does have some spell casting talent, tossing a Poison Skull on the Alchemists. One dies, but their Poison Resistance saves a second.  We can use our Rage windfall to bring out the now fairly expensive Ice Ball. It smashes into the back of the larger Miner stack.  The Alchemist's Poison bottle will hit your own troops, like the Ice Ball. How does an Ice Ball get poisoned?  We have enough Rage left to cast the upgraded Rockfall. This ability does have an advantage over most AoE spells since it won't hit any friendly troops in the area.  The last Miner goes down under the beak of the Griffins.   We chase down the other enemy in the area.  Wow, that's a lot of big dudes. Hope that ice sheet can take the weight of them all.  Before the Furious Goblins can act, the Griffins get sent into the face of danger to pick up a fairly measly amount of gold.  In turn, they get assaulted by both Goblin stacks, but easily kills them both using their unlimited retaliation ability.  Ok, Giant, we are on an actual sheet of ice over freezing water. Maybe an Earthquake jump is not the best idea?  Sheesh, I'll just have to kill you for your own safety.  The only prize to fighting these two enemies is a few crystals. I shouldn't complain, it could have been just more gold instead.  The end of the mountain paths lead to this small dwarven village... if you can call it that.  The only building is empty, but we do find a second elevator here.  The only residents are standing over some complicated device, looking a bit distressed.  : Oh, sorry. I will not disturb you anymore. : Oh, sorry. I will not disturb you anymore. Maybe the other one will be a bit more forthcoming?  : What's happened? : What's happened? : You know, my son has finally become a man; he is 40 years old today. Now he even has the right to drink beer. So I've decided to make him a present, to welcome him to adulthood. I decided to hide the present os that he could only get it using his wit. I ordered a special door and an intricate runic lock. And I had hidden the present behind the door. It's just that my son, well, he's a bonehead, and he's failed to put the runes together correctly. And I forgot the right combination of runes that opens the door as well. Please, will you help us?: Why not help a good ma... good dwarf... like you? Of course I'll help.: That's great! Speak to my son. He has all the information we have about the lock. With the help of that, he should be able to open the lock. Maybe you'll manage to do it. Well, thank you. (Reward: 77 Experience, 4 Magic Crystals): Ok, I'll speak to him. : You know, my son has finally become a man; he is 40 years old today. Now he even has the right to drink beer. So I've decided to make him a present, to welcome him to adulthood. I decided to hide the present os that he could only get it using his wit. I ordered a special door and an intricate runic lock. And I had hidden the present behind the door. It's just that my son, well, he's a bonehead, and he's failed to put the runes together correctly. And I forgot the right combination of runes that opens the door as well. Please, will you help us?: Why not help a good ma... good dwarf... like you? Of course I'll help.: That's great! Speak to my son. He has all the information we have about the lock. With the help of that, he should be able to open the lock. Maybe you'll manage to do it. Well, thank you. (Reward: 77 Experience, 4 Magic Crystals): Ok, I'll speak to him. : Do you really want to help? Here is a piece of paper where my dad painted the runic scheme which should open the lock. : Do you really want to help? Here is a piece of paper where my dad painted the runic scheme which should open the lock.Alright, we can take a look. I'm sure this high-tech dwarven lock will have a devilish puzzle that will take all of our concentration and intellect and -  Are you... are you serious? : How can you have failed to cope with this simple puzzle?: It's easier said than done. Look at your fingers, they are so thin. YOu just try to run over this picture with my fingers.: Well... There are plenty of ways to cope with this task without poking your fingers. Ok, I'll help you.Alright, audience, it is your job to solve this riddle for children. Next time, we will - nah, I'm joking.  It takes all of two moves to solve the lock.   : Here it is, my son! Congratulations! You begin your adult like now, and I want to give you a present.: Well, what is the present? It looks like a cart, but...: It's the latest model, just recently brought from Mehgard! Increased capacity - the PGP 902A! Wow Dad! This is the best present ever! I couldn't even dream of something like this!: Incredible!: Yes, son, it's precisely that cart. By the way, it is specially made to custom order. The frame is made of ferritic steel, and the handles are all covered with sharkskin. I know that you young guys go in for that sort of thing! Thank you, human! If it weren't for you, I would have to blow open this damned door with thunder powder. And who knows what could happen to the cart.: I was glad to help you. Good luck!: Thank you, human! If it weren't for you, I would remain without my present.: Happy birthday, Krezhik! : Here it is, my son! Congratulations! You begin your adult like now, and I want to give you a present.: Well, what is the present? It looks like a cart, but...: It's the latest model, just recently brought from Mehgard! Increased capacity - the PGP 902A! Wow Dad! This is the best present ever! I couldn't even dream of something like this!: Incredible!: Yes, son, it's precisely that cart. By the way, it is specially made to custom order. The frame is made of ferritic steel, and the handles are all covered with sharkskin. I know that you young guys go in for that sort of thing! Thank you, human! If it weren't for you, I would have to blow open this damned door with thunder powder. And who knows what could happen to the cart.: I was glad to help you. Good luck!: Thank you, human! If it weren't for you, I would remain without my present.: Happy birthday, Krezhik! With that, we have completed all of Upper Hadar... well, the parts of it we can reach anyways. Next time, we will head to the underground and search for a path under instead of over the mountain. Hopefully no Balrogs will be involved. ---------------------------------- Bonus Material Marking the Map  Talkin' 'bout Troops Alchemist 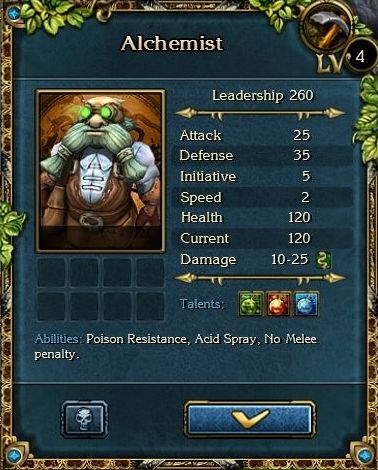 Resistances: 25% Poison Critical Hit %: 10 Defense Bonus: 4 Talents  Potion of Poison: Throws a bottle of poison, which inflicts 5-15 points of poison damage to the target and all neighboring troops, as well as poisoning the targets. Charges: 1 Potion of Poison: Throws a bottle of poison, which inflicts 5-15 points of poison damage to the target and all neighboring troops, as well as poisoning the targets. Charges: 1 Fire Water: Throws a bottle of flammable liquid, which inflicts 10-20 points of fire damage and burns the target. Charges: 1 Fire Water: Throws a bottle of flammable liquid, which inflicts 10-20 points of fire damage and burns the target. Charges: 1 Holy Water: Throws a bottle of holy water, inflicting 15-25 points of magic damage to undead creatures and decreasing their combat ability. Can only be used against the undead. Charges: 1 Holy Water: Throws a bottle of holy water, inflicting 15-25 points of magic damage to undead creatures and decreasing their combat ability. Can only be used against the undead. Charges: 1Abilities Poison Resistance Acid Spray: It discharges an Acid Spray within the area of 3 cells, which burns all in its reach. An enemy has no ability to retaliate. The alchemist recieves some of the bonuses which apply to archers. No Melee penalty Gully's opinion: Alchemists are really interesting units that are just short of being really good. They have a wide variety of combat options, are able to inflict both Poison and Fire damage, and even have a special boost when fighting Undead. However, it is difficult to use Alchemists properly in longer fights, since their bottles only have a single charge each, and their main attack is very short ranged on a unit with 2 Speed. Acid Spray is in theory a very strong ability, able to attack multiple troops at once with no retaliation. However, it is difficult to get them in position to put it to good use, and you often find that you can't fire without hitting one of your own troops. Haste and Teleport spells can be used to amplify their prowess by getting them into the correct spot. Their Health isn't great, but they do come with very high Defense, so they can be decently sturdy for a ranged stack. All in all, I find them just a little lacking. Fighting them: Spread your units out if possible so that their poison bottle doesn't get multiple hits. With low Health, these guys are also prime spell candidates. Be wary of sending multiple melee units to attack them though. Giant 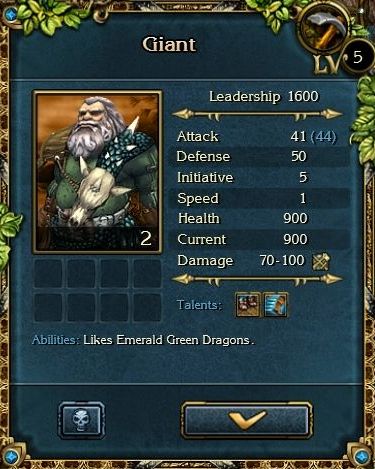 Resistances: None Critical Hit %: 25 Defense Bonus: 7 Talents  Earthquake: Cast's "Earthquake." All ground troops take damage. The closer the troops stand to the Giant, the more damage they take. Neighboring troops take 40-50 points of damage. Reload: 1 Running Earthquake: Cast's "Earthquake." All ground troops take damage. The closer the troops stand to the Giant, the more damage they take. Neighboring troops take 40-50 points of damage. Reload: 1 RunningAbilities Likes Emerald Green Dragons: Considers Emerald Green Dragons to be very delicious and nutritious food. Morale of Giants is increased. Gully's opinion: Probably one of the weakest Level 5 units. They do have great Health, high Defense, high Damage, and the Earthquake skill is a nice AoE that can be cast repeatedly. On the other hand, look at that Speed of 1. That is terrible. Sure, they do have the Running talent to help out a little bit, but they still so slow. For a melee unit, that Speed is basically unusable, and a Haste spell is really required. I think the only reason to take Giants over other Level 5 units would be to try out an all-Dwarf force. Fighting them: Depends on the size of the stack. Smaller Giant stacks can be fairly safely ignored while fighting elsewhere. Spells do a good job against them, since they have no resistances. Ranged troops can whittle them down over time. Especially good, though, are troops like Royal Snakes that can attack across a hex. Gully Foyle fucked around with this message at 14:24 on Oct 15, 2017 |
|
#
?
Oct 15, 2017 14:21
|
|
|
It would be pretty amusing to fight like, a tier 5 demon or something on a bridge down there
|
|
#
?
Oct 15, 2017 18:44
|
|
|
I don't think I've ever used alchemists myself. They always seemed to be too weak for their cost. But I could be wrong, since I'm not very good at this game. Giants only have 1 speed? Yikes, that's half of the snail knights. Did they improve that for later games? Deceitful Penguin posted:It would be pretty amusing to fight like, a tier 5 demon or something on a bridge down there ")
|
|
#
?
Oct 15, 2017 20:00
|
|
|
I like the Alchemists! But that's because - obviously this doesn't work on the Cyclops or the Giants - I tend to start fights at this point by mitigating the enemy with Fear/Blind/Magic Shackles in addition to the Ice Ball (I like having level 3 of MS at this point, really helps). All of the dwarven units have really low speed, so you really first have to let the enemy come to you while you put off the archers for later. And because dwarves have a lot of easy to get artifacts decreasing leadership costs or boosting morale, I do tend to use all-dwarven armies if I can. Since the dwarven melee units inevitably turn out to be sacrificial lambs with this style of play, I usually end up with hundreds, if not thousands, of them in reserve.
|
|
#
?
Oct 15, 2017 22:37
|
|
|
How long do battles usually last by this point? Seems like two one-shot powers would get you most of the way through one.
|
|
#
?
Oct 16, 2017 07:32
|
|
|
Giants , you could have fooled me if you said that they exist only to frustrate players and preventing loseless victories. Too slow for players to be useful but always able to jump one or two times for the AI who have no leadership restrictions like the player does.Poil posted:I don't think I've ever used alchemists myself. They always seemed to be too weak for their cost. But I could be wrong, since I'm not very good at this game. They're better in the next game, they can refresh their potions. Their alternate version is unmistakably better though. Still, I used them to annihilate the undead in the sequel, the undead themed area is at a much higher level than here.
|
|
#
?
Oct 16, 2017 09:22
|
|


|
Deceitful Penguin posted:It would be pretty amusing to fight like, a tier 5 demon or something on a bridge down there Well, there may not be a bridge... and I don't remember if we will see any Level 5 demons specifically, but... Poil posted:I don't think I've ever used alchemists myself. They always seemed to be too weak for their cost. But I could be wrong, since I'm not very good at this game. On the Alchemists, agreed, that is my general opinion. I'm using them for LP demonstration, not because they are great. But they are still alright, and are fun to use. As for Giants, regrettably they are just as slow in subsequent games. I believe the Earthquake is a bit more powerful though. meristem posted:I like the Alchemists! But that's because - obviously this doesn't work on the Cyclops or the Giants - I tend to start fights at this point by mitigating the enemy with Fear/Blind/Magic Shackles in addition to the Ice Ball (I like having level 3 of MS at this point, really helps). All of the dwarven units have really low speed, so you really first have to let the enemy come to you while you put off the archers for later. And because dwarves have a lot of easy to get artifacts decreasing leadership costs or boosting morale, I do tend to use all-dwarven armies if I can. Interesting strategies, I like it. As a Mage, I don't usually get Distortion 3 until later, in favor of the destructive power of Chaos. But that is definitely a viable way to do it, although I would have trouble doing that in the current run ( haven't found Blind ). We haven't quite gotten to see the powerful Dwarven artifacts yet, but they can do quite a bit of work. I just find all-dwarven armies a little boring, since you have literally zero choices for your troops.Glazius posted:How long do battles usually last by this point? Seems like two one-shot powers would get you most of the way through one. Being a Mage, not long at all. The average battle is like 3 turns or so, probably. So, the Alchemist potions last fine for that. The issue is that the average battles aren't a problem, it's the harder ones which take longer. So Alchemists tend to lose power just when you need them. Delacroix posted:Giants At least in this game, there is no in-game reward for lossless victories (apart from keeping your army intact, of course), so I don't mind that aspect when fighting Giants. Alchemists are definitely much better in the next game though. Not only can they refresh their potions, DoT effects get boosted seriously, so being able to Poison whole groups of enemies is incredibly good. Finally, their Holy Water Talent isn't useless when not fighting Undead, they get a replacement if there are no Undead present.
|
|
#
?
Oct 16, 2017 15:00
|
|
|
Update 38 - Our Own Worst Enemy We've exhausted all the paths in Upper Hadar, and have found no ways to cross the mountains. But we have found two elevators that can take us into the underground.  The elevators must have some kind of weight sensor, and activate as soon as we get on the platform.  Dwarven houses and industries are plentiful in Lower Hadar, along with the ever-present mine cart rails  I guess there's be some kind of sign we can't see that has the owner's name on it.  : Dwarf, open your eyes! In your opinion, who do I look like? : Dwarf, open your eyes! In your opinion, who do I look like? : To put it mildly.... Either a human who is lost his way in the mines, or a very sick dwarf - so skinny, so deformed, and your beard coming out and your nose is so tiny.: Ah, the hilarious dwarf I see. Look, dwarf - my merry fellow - maybe you need some help?: If you are not afraid to spend some time in the mines, sure I would pay you well - if you'll do me an errand.: First, tell me what's the matter, and then I'll decide.: The problem is... All our warriors were moved into the Taron Mines to hold back the demons. And here in the Lower Hadar, other monsters have multiplied and there is nobody here to kill them. Many of my miners are missing, and every shift another miner becomes dinner for the terrible monsters. Every minur has a special copper badge, in case he's ever eaten. And we gather these badges after... accidents. However, we haven't managed to find 9 badges. And we have to file a report on every lost worker.: And what should I do? Rummage all Lower Hadar in searching these badges?: Yes! I like you humans - you're so quick-witted. And at the same time it's occasionally annoying as well. You should look in the most difficult-to-reach and dangerous places. We have already searched everywhere else.: Ok, I'll find the badges. : To put it mildly.... Either a human who is lost his way in the mines, or a very sick dwarf - so skinny, so deformed, and your beard coming out and your nose is so tiny.: Ah, the hilarious dwarf I see. Look, dwarf - my merry fellow - maybe you need some help?: If you are not afraid to spend some time in the mines, sure I would pay you well - if you'll do me an errand.: First, tell me what's the matter, and then I'll decide.: The problem is... All our warriors were moved into the Taron Mines to hold back the demons. And here in the Lower Hadar, other monsters have multiplied and there is nobody here to kill them. Many of my miners are missing, and every shift another miner becomes dinner for the terrible monsters. Every minur has a special copper badge, in case he's ever eaten. And we gather these badges after... accidents. However, we haven't managed to find 9 badges. And we have to file a report on every lost worker.: And what should I do? Rummage all Lower Hadar in searching these badges?: Yes! I like you humans - you're so quick-witted. And at the same time it's occasionally annoying as well. You should look in the most difficult-to-reach and dangerous places. We have already searched everywhere else.: Ok, I'll find the badges.Sure, we'll go find these dogtags. Although if they are meant for after miners have been eaten, isn't there always going to be a pretty good chance the badges are now resting in digestive tracts? Also, look at how callous Bill can be if we decide to turn this quest down: : Sorry, but I don't have the time for this right now. You know, the dead miners with their badges will probably not go anywhere. So maybe I'll visit you later.Ouch, talk about ice cold.  To go along with the Alchemists, we are going to drop off the Cyclops and fill our traditional ranged spot with these Cannoneers. These are the 'archers' of the Dwarven units, but are quite expensive - a bit more than 4 Bowmen at 220 Leadership per Cannoneer (I say 'archers' since they don't benefit from the Bowmen Commander skill).  The underground is full of many paths, some better maintained than others. Luckily, unlike other caves and mines we have been through, these underground areas are considered full regions, and therefore come with a map we can view.  In the darker passage off the main tracks, a few wandering armies are poking around.  The underground battlefields here are once again often full of various debris and wreckage, creating constricted areas around the mid-field. Since we are currently using only one melee troop that depends on finding a path on the ground, this is great for us.  With a couple of spells and a Smashing Sword, the ranged stacks (and I'm including the Giants in that definition) have been destroyed.  The Cannoneer is never a terrible choice for a ranged unit, though I find them a bit underwhelming. Their base damage is only 6-10 damage - really poor for a unit that costs 220 Leadership. This is mitigated a bit by their high Attack value (30), making them better than most ranged units at hitting tougher units. They also have very good Initiative (6), so they can usually act before the enemy. However, the main draw is their Salvo talent shown here. The Cannoneer loads 3 cannonballs into his gun, and unleashes a barrage of metal into the target. This is literally a triple-strength attack, doing 18-30 damage. It can be used once every three turns. Being able to front-load a whole lot of damage into their first attack is very attractive.  With the constrained paths, it is easy to create walls and barriers using our Totems (and the Ice Ball if necessary), while my ranged forces and spells can continue doing damage.   Immediately behind the last army is another one, composed of the expected underground natural monsters.  That's quite a few Cyclops to get through.  The Ghost Axes from the Shamans make for a great weapon against the Cyclops, since it bypasses both their high Defense and all of their resistances.  Griffins are especially good in these cramped underground battles, since they can bypass the obstacles and reach any vulnerable stacks sitting in the back.   Before we even get a chance to see the third ability in action, Lina is able to learn her fourth and final ability, Gizmo. Gizmo is another summonable creature, but quite a bit different than the Ice Ball.  Past the guards, there is a side-path extending in both directions. To the north, we get to a dead end and find the first missing badge.  Turning to the south-east, the passage extends deep into the rock. More cave monsters are lurking in this area. You may notice that this army is rated much weaker than the others we have been facing.  Indeed, we don't even need full-power spells to get rid of the few Evil Beholders.  Let's check out Gizmo... wow, that's a lot of abilities. Gizmo is an interesting ability that I have never quite gotten fully enabled. Initially, it can only act to damage enemies and heal friendly units. As it levels up, it can potentially gain a wide array of buffs and debuffs.  Woah, it's huge! Well, no - that's just the dramatic angle the camera gave me during the summoning animation.  When you summon Gizmo, it will appear hovering over the hex you designate. During its turn, it will float over to a nearby unit - usually the closest one, and fire out a ray - hurting or healing depending on the unit. I'm not sure what type of damage it does - Lina did describe it as 'burning' the enemy, so possibly Fire.  With victory, we get a special prize. It turns out that some of the badges did indeed end up in the stomach of a Beholder or spider, and we need to defeat the troop to extract it. The wandering armies that have these badges all seem to be weaker than the normal enemies in the area.  We come across another elevator, but the engineer working on it indicates that this one may not be working well.  : Of course I can help you. Why not? : Of course I can help you. Why not?Given the number of miner badges around and the wandering monsters, I don't think his assistant is ever coming back.  Past the lift, the tracks resume. The mines here are full of Magic Crystals.  As usual, the armies in the tunnels are made of a mix of cave-dwellers and a few dwarven units.   Within a turn or so, most of the enemy is dead, and Gizmo is working on the remaining spiders. Gizmo may not be that impressive, but it is really Rage-efficient. It only costs 7 Rage initially, and lasts for 3 turns (shooting for 100-300 damage each turn). It's like an additonial (weak) archer stack that can't be targeted. Additionally, the cheap cost makes it easier to get experience for Lina.  After 3 shots, Gizmo floats off-screen, returning to its home planet.   A small tavern stands at a crossroads, selling some Evil Beholders and mercenary Barbarians. Not sure how those guys found their way down here.  After refreshing ourselves at the tavern, Bill leads his army back north along a different path. Another copper badge can be seen floating here, but this army needs to be dealt with.  The Cyclops here will be quickly destroyed, but this leaves his gunners intact.   It's a duel, cannons at dawn! My Cannoneers shoot last, but give better than they get.    Even the chests are stuffed full of Crystals.  A small side cave leads to yet another elevator.  First, we have to deal with this... pack of wolves? I guess wolves can use caves for their dens.  This army was so weak that they didn't even get to move. As before, this drops another badge. I think that brings us to 4?  Yet another crystal, and more importantly a free Might Rune can found near the elevator.  The elevator ascends, bringing us back into the snow and cold. We emerge in a small bowl surrounded by icy rocks, with a solitary dwarf standing nearby.  : It sounds good. What's the Test? : It sounds good. What's the Test? : The Test allows every man worthy to learn about himself. You grow closer to your own mind, in the Truth Arena. You long to... learn yourself; so that you will become better, purer, and stronger.: I agree to take the Test.: The Truth Arena opens only for a worthy person. Not just anyone can enter Arena... You must be sufficiently strong and be sure in your troops! Are you sure of your forces? [Your level must be at least 10, and your army completely filled.] : The Test allows every man worthy to learn about himself. You grow closer to your own mind, in the Truth Arena. You long to... learn yourself; so that you will become better, purer, and stronger.: I agree to take the Test.: The Truth Arena opens only for a worthy person. Not just anyone can enter Arena... You must be sufficiently strong and be sure in your troops! Are you sure of your forces? [Your level must be at least 10, and your army completely filled.]Dreghen is exaggerating slightly, your army doesn't have to be completely filled. I think you need 5 stacks, and probably above a certain percentage of your maximum troop number. For instance, we are missing a few Snakes, but can still enter the Arena. : Look at me, gnome! Confidence is my middle name! Welcome to one of my favourite fights in the game. Our doppelganger's army is the exact troop composition as your own, but with larger numbers of each (about 25% more than your own). He also comes with stats representative of the class, though not identical to your own. In this case, our Double has a bit more Attack than we do, but far less Intellect.  Let's show him why more Intellect is a smart decision as a Mage. On the starting turn, we kill off nearly half of his Royal Snakes and most of his Alchemists.  He retaliates with a Fireball... it's painful, but at less than 25% of my own spell damage, I know I will win in this contest of will. Especially since he also doesn't get to cast mutliple spells a turn like I do.  His large Griffin stack moves in, while one of his Shaman stacks drops a well-placed Totem of Death. Annoyingly, it prevents my Cannoneers from doing anything but destroying the Totem.  One thing your Double can't replicate is the Chest of Rage. It's another advantage for us, although smaller than our advantage in spells.  It's not often that our stacks are outmatched, but his Griffins do just that, delivering a critical hit in retaliation.   The next turn, we can use our second level of Higher Magic to finish off his Cannoneers/Alchemist stacks and weaken his Griffins.  My Royal Snakes take a bite out of his Griffins, further bringing them down to about one-third of their original numbers. However, the Double knows a spell I really wish I had - Blind. This Distortion spell is basically identical to the Sleep debuff. The affected troop misses all turns until the duration runs out or until it suffers damage.  His Griffins split up, each going for one of my rear stacks. The Alchemists take a beating, but my Shamans can handle these Griffins easily.  As his numbers get whittled down, the Double breaks out a new spell - Phantom. Another spell that I don't have and really want, this one creates a copy of a friendly stack, with the proportion replicated depending on the spell level and Intellect. We are lucky here - in my test run he created a Phantom stack of Griffins on the first turn, meaning I had about 35 more Griffins to deal with.  The Ice Ball will help take on the new Phantom and the original Shamans.  My snakes finally shake off their blindness, and take out the smaller stack that tried to sneak down one side of the battlefield.  My Cannoneers spend most of the battle dealing with endless Totems. Not only did he have two Shaman stacks, the newly created Phantoms can cast their own Totems as well.  It may look like my Shamans killed this stack off, but it died of natural causes - Phantom units shuffle off the mortal coil automatically at the end of their third turn.  One final Flaming Arrow fries the last stack of enemy Shamans.  These casualties are actually pretty light. It shows the power of spells, good tactical decisions, and exploiting the AI. We faced an army stronger than our own in every single way, led by a Hero with good stats, and we still destroyed them with most of our stacks taking only minor losses. This battle is tougher as a Warrior - your advantage in troop numbers is nullified since the Double will always have more than you. You need to be clever with your spell buffs, and use your Rage abilities to their maximum potential.  Urgh... as much as I love the Ice Ball... I don't want it to cost 40 Rage. I only have 47 at max, and it's hard to build up that much currently. For now, I will bypass this upgrade, even though the Chargers skill is basically useless. I just don't want to make the Ice Ball unusable.  On the bright side, the fight with our Double gave great experience, and we breeze into Level 17. Our Leadership gets another big boost. : You have passed the tests. Now, you know your value, and now you will take this gold and these stones. They will help you become who you are meant to be. [You receive: 5000 Gold, 2 Might Runes, 2 Mind Runes, 2 Magic Runes]Awesome, that is a fantastic reward - almost like earning a level worth of Runes. : It is not all... you know who you are. But do you know who you can become? Do you want to know your true potential?: How?: You will see your future. One possible future... What heights can you reach? Who you can become? Everyone sees something. Even I don't know what awaits you there.You know what, I think we should hold off on this. Part of our army has already been mauled, we need time to recover, and we just got a bunch more Leadership capacity. : It's an interesting offer. But I am not yet ready for this knowledge. We just got a ton of Runes between the level and the reward, but we are falling just short of some key skills I have been saving up for. Instead, I spend a minor amount improving Mana regeneration.  Returning to the lower world, we continue heading south-east. Another large metal door guards the portal to Taron Mines. We know this is where we need to go to find the Dwarven capital. However, we have a bunch of unfinished business here in Lower Hadar.  Next time, we turn away from progress, and continue exploring the local mines. We need to find the remaining missing badges, fix that broken elevator, and I'm sure there will be more for us to do beyond that. ---------------------------------- Bonus Material Marking the Map Lower Hadar  Upper Hadar  Talkin' 'bout Troops Cannoneer 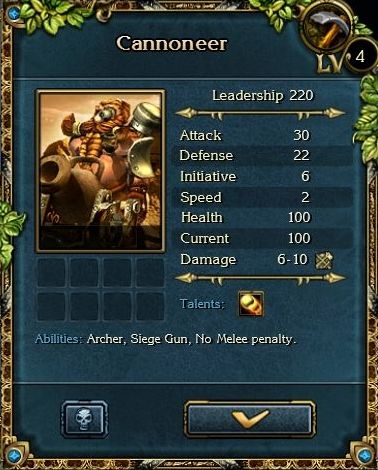 Resistances: 10% Fire Critical Hit %: 10 Defense Bonus: 3 Talents  Salvo: Loads and discharges three cannonballs at once, inflicting 18-30 points of damage to the target. Reload: 2. Salvo: Loads and discharges three cannonballs at once, inflicting 18-30 points of damage to the target. Reload: 2.Abilities Archer Siege Gun: Inflicts 200% of damage to obstacles, barriers, and gremlin towers. No Melee penalty Gully's opinion: When I first played the game, I loved the Cannoneer. Over time, though, my opinion has lowered. The main drawback is simply that the Cannoneer does not bring much base damage to the table in comparison to many other ranged units, due to their price. 8 damage (on average) is quite small. For comparison, the 4-5 Bowmen you can hire for the same price will bring about 16 damage to the table. Even Evil Beholders get about 12 damage apiece, for 40 less Leadership. Of course, the Salvo talent is a huge mitigation to that. Triple damage every three turns means nearly double damage output overall, and more damage immediately is great. They do have a sturdy amount of Defense, but only 100 Health is again a problem for something that costs that much. The Siege Gun ability is largely useless in normal fights, but great for Keeper fights. In summary, the Cannoneer is like most Dwarf units - almost but not quite great. If you do go for an all-dwarf army, they are quite a bit better, since the Morale bonuses play very well with their high base stats. One other minor benefit - their cannonballs aren't affected by the Bone ability that Skeletons/Skeleton Archers/Bone Dragons have. Fighting them: Despite what I've said, Cannoneers are actually dangerous enemies to face, since they front-load their damage so strongly. They have high initiative too, so it's often hard to hurt them before they fire. Spells do good work on their low Health. They fall apart in melee - despite the lack of melee penalty, their low base damage is not that threatening, and they can't Salvo you while in melee combat. Items Identified Miner's badge  Description: A copper badge engraved with dwarven runes. Type: Quest Info: This badge is the sign of a dwarven miner. With the help of such badges, dwarves can identify whose body they've found in a mine or in a monster.
|
|
#
?
Oct 18, 2017 23:53
|
|
|
A mirror match is a pretty big challenge in this game. I imagine you can't just leave most of your troops behind to make it easy on yourself?
|
|
#
?
Oct 19, 2017 06:41
|
|
|
These dwarfs have some excellent beards, drat.
|
|
#
?
Oct 19, 2017 07:07
|
|
|
Gully Foyle posted:
|
|
#
?
Oct 19, 2017 08:13
|
|
|
The Trap spell is another great way to block those bottlenecks in the underground maps. It both weakens units and takes away action points, leaving the unit ripe for your army to finish it off. (And then you can use your high Initiative next turn to set up *another* Trap for the *next* enemy unit that rushes into the freed space. Rinse and repeat.) The Stone Wall works, too. In fact, that's my favourite Zerock ability, and the only one that never stops being useful to me by the end of the game. And I totally agree that it's hard fighting the Double fight as Warrior. That's one fight I usually leave for the endgame. Then I fill my army with either slow or low-level units (bears, griffins, those Hyenas work well), Magic Shackle the most dangerous special abilities, and abuse *that one* Rage ability that comes with that one Spirit that's still a spoiler. I tried to do the fight once at this point of the game, and, nope.
|
|
#
?
Oct 19, 2017 09:13
|
|
|
Glazius posted:A mirror match is a pretty big challenge in this game. I imagine you can't just leave most of your troops behind to make it easy on yourself? Nope. That's why Dreghen mentions that your army must be 'completely filled'. That last bit is a bit of a lie, since you can do it while missing a few troops (I think I was short a couple of Snakes and Cannoneers from full stacks). But you need your stacks above some percentage, though I don't know the exact amount. Picayune posted:These dwarfs have some excellent beards, drat. Hell yeah. As a non-good beard grower, I get jealous sometimes. Poil posted:Looks like the griffin is about to get its head bitten off. Haha, actually the opposite. The Griffin is going in for the soft fleshy insides (in reality, it was taken during the Beholder death animation). meristem posted:The Trap spell is another great way to block those bottlenecks in the underground maps. It both weakens units and takes away action points, leaving the unit ripe for your army to finish it off. (And then you can use your high Initiative next turn to set up *another* Trap for the *next* enemy unit that rushes into the freed space. Rinse and repeat.) Trap is great for these spots, agreed. And Zerock's Stone Wall is his ability that retains usefulness all the way through, along with Sleem's Armor ability. I was actually surprised how easy the Double fight was. I tried it out during my test run just to see (expecting to lose), and the difference that good spell damage makes is crazy. A lot of my assumptions about this game come from my first playthrough as a Warrior, where this fight is indeed very difficult. The 4th Rage Spirit would definitely make a huge difference though. Gully Foyle fucked around with this message at 11:36 on Oct 19, 2017 |
|
#
?
Oct 19, 2017 11:33
|
|
|
I�m assuming the other easy way to do the Mirror Match is make an army where each unit counters another unit and then have a bunch ignored bonus initiative?
|
|
#
?
Oct 19, 2017 15:55
|
|


|
Lord_Magmar posted:I�m assuming the other easy way to do the Mirror Match is make an army where each unit counters another unit and then have a bunch ignored bonus initiative? You can definitely try to use units that you can use more effectively than the AI. Royal Snakes, especially in combination with slow or Totems, can be very effective, and the enemy Royal Snakes you can either try to strike first or use slow/blind effects to prevent them from being useful. You can try to do something like have both Thorns and Fire Dragonflies - then send your Dragonflies after his Thorns, while your army can hit his fragile Dragonflies once they rush for your army. Your main advantage in the fight is your brain, obviously - we've seen how the AI tends to just rush up as fast as possible with his units. So if you use a combination of fast and slow units, his army will get tend to get separated and you can focus on parts of his army with all of yours. Besides all that, you can also get bonuses through equipment or Morale bonuses, which the enemy won't get access to. The difference in your unit stats can help cover the gap in numbers.
|
|
#
?
Oct 19, 2017 16:54
|
|
|

|
| # ? Jun 12, 2024 13:17 |
|
|
Update 39 - Damsel in Distress Although we've found the exit to the next region, we should probably explore the rest of this area and finish some quests.  Heading away west from the exit, here is me completely missing this copper badge. Whoops! I'll get it later, though.  Speaking of passing by, we are going to ignore this dwarf calling out for help - for now.  Rich veins of Magic Crystals are growing everywhere. Both of these stacks give the max of 3 Crystals. We've probably picked up 25+ Crystals in the last few updates, a nice boon for us. I'm still holding on for now, but we will be spending a bunch soon enough.  I don't miss this badge, but the guarding army comes swooping in immediately.  Another animal heavy army here, the dwarves must love shipping animals into these caves. Like, I know bears like caves for hibernating, but this is way underground.  The Alchemists do some great damage when you can get 3+ stacks in the damage zone.  It's easy to forget how good Shamans are in close combat. Never be afraid to use them for their physical prowess.  After examining the remains, we find a second badge.  The tunnel opens up, giving way to a small dwarven village. This must be the Pick Village that the lift operator directed us to last time. We head for the storehouse.  : I was looking for a storehouse. I came on an errand from Babur. A Lever Gear has broken, and the elevator doesn't work. : I was looking for a storehouse. I came on an errand from Babur. A Lever Gear has broken, and the elevator doesn't work. : Ah, Babur! That's sixth Lever Gear this year! No doubt, he was cracking nuts, putting them in the lifting mechanism. Ok, take it, but tell our nut lever, that this is the last lever gear I'm gonna give him! If he breaks this one too, he'll be raising and lowering the elevator by hand.: Thank you, Master Derold. : Ah, Babur! That's sixth Lever Gear this year! No doubt, he was cracking nuts, putting them in the lifting mechanism. Ok, take it, but tell our nut lever, that this is the last lever gear I'm gonna give him! If he breaks this one too, he'll be raising and lowering the elevator by hand.: Thank you, Master Derold. The storehouse also contains cages full of captured bears for sale. Derold will also sell us these Steel Boots, which give +2 Defense. I pick them up - even if I won't use them, they are an upgradeable item, so I can extract some experience from them.  On the way back around to the broken lift, I see the badge I missed earlier and grab it. We are now at 7 of 9 miner's badges.   : So have you found the Lever Gear? Ok, I see, yes it's just what we need! Great! [The dwarf takes the Lever Gear and begins to fiddle around in the elevator mechanism.] Well, now... just a second... That's it! It's ready! The elevator is at your disposal. Here, take this money as we arranged! (Reward: 4600 Gold, 325 Experience): Good luck, Babur! : So have you found the Lever Gear? Ok, I see, yes it's just what we need! Great! [The dwarf takes the Lever Gear and begins to fiddle around in the elevator mechanism.] Well, now... just a second... That's it! It's ready! The elevator is at your disposal. Here, take this money as we arranged! (Reward: 4600 Gold, 325 Experience): Good luck, Babur! With the elevator fixed, we head back up into the sunshine. We emerge near a small mountain lake with a strange contraption floating in it.  : What did you say? : What did you say? : Ah, greenhorn! One can see that you've not sailed, you know not the smell of the salty sea wind. You can't understand the language of an old sea dog.: I think my official Pirate Brotherhood membership says otherwise, Master Dwarf.: Probably, you mean - old salt?: By a thousand streaky herrings! You want to teach an old sailor how to swear? Yes 0 yes, human, you got it right; you are speaking to captain Ribas himself, old sea cat, who has sailed all the seas and oceans of Endoria.: and my name is Bill Gilbert. By the way, its not right to say "cat" - it's "dog", a sea dog!: Stubborn human! You are the first one who will quibble with me words, instead of asking about my submarine. If you were going by - I'd say keep going. Why should ye bother me, a thousand Cerberuses!: Tell me about your ship.: Funny thing, isn't it? It's a new invention from our engineers; we call it "Leakproof Streamlined Boat for Demersal Moving by Propeller Traction"!: LSBDMPT? Gotta say, that acronym needs some more brainstorming.: You're right, human. This boat moves under the water. Invisible to enemies, invulnerable in storms. Although it does need deep water.: Blow me down! As my friend the dwarven captain says!: Yes! We dwarves by our inventions have conquered water, land, and air... And now we have reached the very depths of the ocean. Scientific and technological advance! Mark my words! Soon everybody will forget your magic, and in every house there will be devices which make the life of common dwarves easier.: I want to know where you can take me in your ship.: You? A human? What next, I wonder. You'll wonder if I'll take an elf or a demon on a tour of the coast? I don't really know how you could even get to Kordar, and walk around here, so easily. In case you haven't heard, Kordar is at war with Darion. What do I know? Maybe you are a spy and want to discover the secrets of my ship. Forget it! You'll not come aboard. Once before the war, I would go to Darion's port, visit the Islands of Freedom, once or twice even had to secretly transport troops to the Elves.: Sorry, I have to go... Good bye, old sea coon... : Ah, greenhorn! One can see that you've not sailed, you know not the smell of the salty sea wind. You can't understand the language of an old sea dog.: I think my official Pirate Brotherhood membership says otherwise, Master Dwarf.: Probably, you mean - old salt?: By a thousand streaky herrings! You want to teach an old sailor how to swear? Yes 0 yes, human, you got it right; you are speaking to captain Ribas himself, old sea cat, who has sailed all the seas and oceans of Endoria.: and my name is Bill Gilbert. By the way, its not right to say "cat" - it's "dog", a sea dog!: Stubborn human! You are the first one who will quibble with me words, instead of asking about my submarine. If you were going by - I'd say keep going. Why should ye bother me, a thousand Cerberuses!: Tell me about your ship.: Funny thing, isn't it? It's a new invention from our engineers; we call it "Leakproof Streamlined Boat for Demersal Moving by Propeller Traction"!: LSBDMPT? Gotta say, that acronym needs some more brainstorming.: You're right, human. This boat moves under the water. Invisible to enemies, invulnerable in storms. Although it does need deep water.: Blow me down! As my friend the dwarven captain says!: Yes! We dwarves by our inventions have conquered water, land, and air... And now we have reached the very depths of the ocean. Scientific and technological advance! Mark my words! Soon everybody will forget your magic, and in every house there will be devices which make the life of common dwarves easier.: I want to know where you can take me in your ship.: You? A human? What next, I wonder. You'll wonder if I'll take an elf or a demon on a tour of the coast? I don't really know how you could even get to Kordar, and walk around here, so easily. In case you haven't heard, Kordar is at war with Darion. What do I know? Maybe you are a spy and want to discover the secrets of my ship. Forget it! You'll not come aboard. Once before the war, I would go to Darion's port, visit the Islands of Freedom, once or twice even had to secretly transport troops to the Elves.: Sorry, I have to go... Good bye, old sea coon...Well, that's no good. We will have to remember to come back here once we have settled things and brought peace to our kingdoms.  An ice-covered stream lies opposite the dwarven submarine (sorry, dwarven LSBDMPT). Wait, is that a dialogue prompt?  : A speaking brook? Wow! How can I help you? Can I make a fire and throw several hot stones in you? : A speaking brook? Wow! How can I help you? Can I make a fire and throw several hot stones in you? : Nooo. Of couuurse nooo... I neeed waaater... Wonderful waaater from the elves' springs. It's in Ellinia, there fiiiind Diana... the river fairy. Ask for waaater... I'll be waiting...: Well, I didn't agree to warm you up. But ok, once I get to Ellinia I'll ask your fairy. : Nooo. Of couuurse nooo... I neeed waaater... Wonderful waaater from the elves' springs. It's in Ellinia, there fiiiind Diana... the river fairy. Ask for waaater... I'll be waiting...: Well, I didn't agree to warm you up. But ok, once I get to Ellinia I'll ask your fairy.That's one quest that will be put way on the back-burner - we can't even get to Ellinia yet.  The trip up here isn't entirely unprofitable, as a chest sitting next to the brook yields a nice haul.  Back underground, we find this darkened passage. We fought a cyclops army right around here in the previous update, but ignored this tunnel.  A nice trio of pick-ups await us there.  The Altar gives us Mana rather than Intellect, but it's still great to have.  The other end of the tunnel has a 'Beware of Beholders' sign. Wait, what Beholders? The tunnel didn't have any...  Whoah, there they are. Not only both kinds of Beholders, but a Beholder Hero.  Scratch that, not a Beholder Hero, but a Beholder King!  However, this army is less strong that the rating indicates. See, Beholders are really expensive Leadership-wise, which is what the ratings are based on. Yet their Health is pretty bad, meaning they are extremely easy to kill with spells. We destroy 4 of the 5 stacks immediately, reducing his army to a mere fraction of it's starting strength.  Heo is not without his own tricks, and he uses a Level 2 Teleport to send his Spiders into combat.  The Spiders slash out at the Cannoneers, plunging their sharpened forelegs into their flesh. Several Cannoneers fall to the blow.  Of course, the Spiders don't last long while right next to my whole army, and we soon clean the other troops up. We even get another nice amount of gold from this chest.  An easy victory, despite the 'Slightly Stronger' rating and presence of an enemy Hero.  With the Beholder King destroyed, we can make our way across a chasm to a Dwarven castle.  Castle Horwest has a decent repository of Dwarven units, but the equipment store is pretty empty. The Belt there just gives +1 Defense, so meh.  : What, are you surprised? : What, are you surprised? : Humans are rare guests in our undergrounds. And recently, they generally only come down as captives. Oh, sorry. I forgot to introduce myself. My name is Tadum Reg, the head of an ancient dwarven family. And who are you?: I am Bill Gilbert, Royal Treasure Searcher for His Majesty, King Mark.: Fancy that! You are an important little birdie, aren't you? And what do Royal Searchers do? They look for lost items?: Well... something like that. Why are you so interested? Have you lost something?: Oh, you are right. I'm at a loss. And not just a loss... Wait, why would I take you into my confidence? I've never seen you before! Who knows, who you are? Ah, but my beloved daughter, my Gerda!: King Mark himself trusts me with his personal secrets! And you are afraid of telling me an errand concerning your daughter?! Well, suit yourself. It's up to you...: Ok, ok, you've convinced me! You know, I'm worried about here. My daughter, my darling Gerda does housework. Maybe that isn't customary among you humans, but we believe that every dwarven woman should learn from childhood to be useful to her husband. Chop firewood, repair the armor, sharpen the pole axe, patch the roof - you understand: be useful in the household! She went to the forest for firewood and disappeared. Two weeks have passed! Please be so king as to find this idler, grab her by the hair and bring her home!: Hmm, pull her by the hair, you say? Not bad, not bad. And how strong is your love for your daughter? I'm talking about reward, in case you didn't catch my drift...: Reward? I've heard a lot about the selfish nature of humans, and now I see that it is true. But I love my daughter, don't worry, I'll pay you if you bring her back here safe and sound. (Reward: 4000 Gold, 275 Experience): Excellent! : Humans are rare guests in our undergrounds. And recently, they generally only come down as captives. Oh, sorry. I forgot to introduce myself. My name is Tadum Reg, the head of an ancient dwarven family. And who are you?: I am Bill Gilbert, Royal Treasure Searcher for His Majesty, King Mark.: Fancy that! You are an important little birdie, aren't you? And what do Royal Searchers do? They look for lost items?: Well... something like that. Why are you so interested? Have you lost something?: Oh, you are right. I'm at a loss. And not just a loss... Wait, why would I take you into my confidence? I've never seen you before! Who knows, who you are? Ah, but my beloved daughter, my Gerda!: King Mark himself trusts me with his personal secrets! And you are afraid of telling me an errand concerning your daughter?! Well, suit yourself. It's up to you...: Ok, ok, you've convinced me! You know, I'm worried about here. My daughter, my darling Gerda does housework. Maybe that isn't customary among you humans, but we believe that every dwarven woman should learn from childhood to be useful to her husband. Chop firewood, repair the armor, sharpen the pole axe, patch the roof - you understand: be useful in the household! She went to the forest for firewood and disappeared. Two weeks have passed! Please be so king as to find this idler, grab her by the hair and bring her home!: Hmm, pull her by the hair, you say? Not bad, not bad. And how strong is your love for your daughter? I'm talking about reward, in case you didn't catch my drift...: Reward? I've heard a lot about the selfish nature of humans, and now I see that it is true. But I love my daughter, don't worry, I'll pay you if you bring her back here safe and sound. (Reward: 4000 Gold, 275 Experience): Excellent! He points us to a private elevator nestled in next to the castle.  This one takes us to a pine forest. A cyclops can be seen wandering in the background.   An old dwarven statue lies in the middle of the battlefield.  Lord of Snowstorms, eh? Sounds dangerous... lucky it's just a statue, right?  Wait, that's not my Ice Snake! The Ice Statue is a new kind of interactable battle object. This one is quite dangerous, able to cast Ice Snake and Geyser spells.  Two griffins perish under the frost. As a statue of a dwarven god, the Ice Statue won't target any Dwarven unit, friend or foe. Since we are in dwarven lands, this usually works out in favor of the enemy army.  The injured Griffins get a blast of healing light from Gizmo. The ability of Gizmo to heal is mildly useful, especially for Level 5 units. Too bad it can't resurrect units - that would have been amazing.  Hidden in a corner of the small forest, we can find a precious Might Rune.  In the opposite corner, a dark cave leads back below ground. A nearby chest contains a great prize of 2 Magic Runes.  Cyclops Cave, eh? No guesses as to what we will fight here.  Yep, a couple of them are walking over this frozen lake.  The battle lines are forced to accommodate the jagged edges of the lake. People have asked if enemy units ever start away from the back of the field. Well, here we see that even when they do start on the backline, that backline may be pushed quite far towards the middle by the battlefield.  The consequence of this is that my Royal Snakes are close enough to strike this stack of beholders immediately.  The last stack of surviving Beholders get some measure of revenge, zapping one Snake down.  We have our own zaps to deliver, though, and Gizmo takes out the Beholder.   The second Cyclops force is basically identical and is fought on an identical field.  The Ice Ball comes out to destroy the last Cyclops.   I wonder if this Cyclops is dead or simply in cryogenic stasis, awaiting the arrival of a warm spell to be freed from the ice.  A dwarven woman, presumably Tadum's daughter, is found on a ledge at the back of the cave, warming her hands over a fire.  : What are you yelling? Get out of there and come home! Your dad is waiting for you. : What are you yelling? Get out of there and come home! Your dad is waiting for you. : You... you... have come to free me?: Well, I'm killing cyclops, to bring you home as your father asked. This is what I have come for.: These Cyclops held me captive for several weeks, make me clean their cave. And there was no way to run away... Thank you. Come I will reward you!: Thank you, now hurry up to your father! : You... you... have come to free me?: Well, I'm killing cyclops, to bring you home as your father asked. This is what I have come for.: These Cyclops held me captive for several weeks, make me clean their cave. And there was no way to run away... Thank you. Come I will reward you!: Thank you, now hurry up to your father! Gerda hurries up.. by very, very slowly walking towards the exit. Whatever, she will catch up eventually. And by eventually, I mean as soon as we get back to Horwest Castle, Gerda is there with her father. : You idler! You'll do anything to get out of a spot of work! What is it going to be this time? You're going to tell me lies about a monster kidnapping you? Dragon? Or a Giant? Which one was it this time? Roaming around somewhere, meanwhile our stairs are coming down. One day your dad will fall down and break his neck, and then you'll be sorry. Go repair the stairs right now! Don't stare at me, I'm not a hammer! And thank you, kind human! Take this, as I promised.. (Reward: 4000 Gold, 275 Experience): Thank you, Tadum. See you.: Hmm... Greetings to you, my life's savior, How can I thank you?: You shouldn't Gerda, you shouldn't...: Thank you once more for rescuing Gerda! She will be punished; nobody deserves such a lazy daughter. I will tether her and make her work hard, to make here a good bride.: In my opinion, you are too strict with her. She's only a little girl...: You know... I see you already have a wife... Well when you will have your own children, then you'll understand me!: Ok, ok. Settle it yourself.Gerda As that last conversation hints, Gerda is the next potential wife. After the rescue, if we approach the castle with no wife in tow: : Look, human. I've thought about it...: What else has happened? Did you lose your daughter again?: In a way, I would be glad to lose her... Listen what I've thought up. You are single. And my daughter at the age when it's time to marry! Do you understand what I'm talking about?: You want me to marry your daughter?: Why not? Just look at her! Where else you can find such a hard working girl? She sleeps and eats little, works very hard...: Hmm... This is interesting. Go on, dwarf.: I knew that you'll agree! Just understand me right, I want happiness for my daughter, and such a wife would be a perfect match for you. What do you think of my offer?: Ok, you've persuaded me, dwarf! Now, let me speak to her myself.: Father said that you want to marry me. Is that true?: Yes, I want to marry you.: I don't know... What will my friends say? Doris has married a human, and you know what? He left her. He said that her beard was too bushy!: Beard?: OF course. After 50, the beard begins to grow in. Isn't in the same with your people?: And how old are you?: I'm under-age, I'm 30! But don't worry, I can still marry. We're allowed to marry earlier. Even my mother married at 20!: Oh, so then I shouldn't worry!: What does that mean? Everybody will think that I married you, just because none of the dwarves wanted to marry me. A-a-a-a! Dwarves are brave and strong! They can drink barrels of a beer at a time! A-a-a-a!: Why are you howling again?! Don't be afraid, I can drink beer too, and I have enough self-control not to allow myself to hurt you.: Ok, I agree! You can marry me!: (Kiss the girl...) As a dowry, Tadum opens up his stores for us. We can buy a battle hammer from him, a fantastic weapon if you are using a Dwarf army. His troop selection is also enhanced - in addition to the boosted stacks seen here, he adds a few Giants and Polar Bears.  Speaking of all-dwarf armies, Gerda is a key element to that, giving +1 Morale to any Dwarf unit. Even if you only have a couple of Dwarf stacks, she may be worth it, since Morale is a great boost. The Dwarf units all have decent Attack/Defense, which means the proportional benefits given by Morale works very well. Her equipment slots are meant to boost the defensive and Leadership capabilities of the army, with Armor, Boots, Regalia, and a Regalia/Shield slot. You can add a lot of Leadership with the Regalia slots, or a lot of Defense by adding a Shield on top of the Armor/Boots. Children : What can Gerda do for her husband? I can do a lot of things?: I'd like to talk about us.: You are my beloved husband. I'm your faithful wife. What are you talking about?: Well, I want to speak to you about children. Don't you think it's time for us to have a baby?: Children? A-a-a-a! Why don't you love Gerda? Do you want Gerda to have a big and fat belly and become unattractive? Dwarf-girls are allowed to have children only when their beards begins to grow! If you're in such a hurry, my beard will begin to grow earlier, right after my first baby's birth. And it's bad for my health! Plus, pregnant women become very moody, and their legs are often swollen.If we decide to go ahead and have a child: : I don't know about dwarves, but as for us humans, every loving family has children. And they aren't afraid of beards.: A-a-a-a! My husband, I don't wa... Actually, maybe I'll have a really silky beard and together we will braid it in pigtails! Alright, I agree!: That's wonderful, darling! (Kiss your wife...)If we decide not to: : Belly? Beard? Moods? I don't need that kind of happiness! You're right, it's best to wait.Divorce : I've decided that it's time for us to say goodbye to each other!: A-a-a-a! I knew that you don't love me because I haven't gotten my beard yet! Don't leave me, my husband! I'll do anything you say, I can even learn alchemy and the art of fighting with pole axes, if that's what you want, I can carry water, chop firewood, darn your wounds and heal your socks... I mean, heal your wounds and darn your socks!If we go ahead with divorce: : Sorry, but I am determined to leave you. It's time for us to part.: Well, ok. But I'll tell everyone what it means to marry a human! I would hope to save other dwarven girls from such sufferings. And you should know that I'm taking all my property and one fifth of our gold!: Come on; go back to your father.However, Gerda never shows up at her father's castle again, and he will still have his expanded inventory for sale and act as if nothing has happened. If we decide to stay together: : Sorry, I'm a little unhinged today. Of course I'll never leave you! In reality we are going to keep Feanora as our wife. I'm not going to be using an all-dwarf army in the game - even though it can actually be very effective, I think it would be a bit dull to read. Next time, one last delve into the furthest reaches of Lower Hadar, and a very special encounter. ---------------------------------- Bonus Material Marking the Map   Items Identified Battle Hammer  Description: The heavy hammer, made by the dwarves. Effects: +3 to Attack, +3 to the Attack of Dwarves Type: Weapon Race: Dwarves Cost: 10000 Info: Dwarves successfully use such heavy hammers both for combat and smithing. Steel Boots  Description: Solid boots, strengthened by steel plates. Effects: +2 to Defense Type: Boots Race: Dwarves Cost: 6000 Upgraded To: Spiked Boots Info: A common type of footwear among experienced warriors who appreciate solid dwarven craftsmanship. Lever Gear  Description: The new gear wheel, still shining from grease. Type: Quest Info: The lever gear wheel is necessary for the normal working of lifting gears.
|
|
#
?
Oct 21, 2017 17:35
|
|